Layout of the Interline Payable Audit window

Menu Bar / Toolbar
File Menu
Print Reports
 Selecting the Print Reports button will bring up the report selection window, common to many TruckMate applications. Here, you will select a report file from those available in your system and a Crystal Report will be generated.
For more information on Report functionality in TruckMate, see the Crystal Reports Reference.
Exit
 Selecting this option will close the Interline Payables Audit program.
Multi-Company Menu
For more information on the Multi-Company options available from the Menu Bar, see the Multi-Company documentation.
Navigate Menu
The Navigate Menu contains the standard TruckMate Navigational Bar, used for browsing the records in your Database.
Tools Menu
TruckMate Monitor
 Click the down arrow next to this button to access the various functions of the new TruckMate Monitor.
Remember Position / Size
Selecting this option will maintain the program window position and size upon close. When the program is re-opened, it will appear the same.
Synergize Indexing
![]() This option is the second step in Image Indexing available for users of TMW-Synergize™ Imaging software. The behavior of the application depends on the selected mode.
This option is the second step in Image Indexing available for users of TMW-Synergize™ Imaging software. The behavior of the application depends on the selected mode.
If the selected mode is 'View Single Document', when selecting this button, the user will have to select a specific Synergize 'Workflow' (as defined in the Codes Maintenance program > Imaging Tab > Microdea > Workflow Tab). Once the 'Workflow' has been determined, the Image Indexing window will appear with one image in the Synergise image viewer window.
For an explanation of how the Image Indexer behaves while in the 'View Single Document' mode, see this User Case Example.
-
Upon selection of a 'Workflow ID' from the Select Workflow window, TruckMate automatically requests the first available imaged document in the Workflow queue.
-
TruckMate automatically causes the document to display in the Synergize viewer window, and returns a 'Document ID' to TruckMate:
-
A document may not be 'available' if it has already been requested by another user, as Synergize will lock documents once they have been retrieved from the Workflow queue. In this case, TruckMate will move to the next available document.
-
If there are no more documents available in the Workflow queue, a non-error notification will be shown to the user, indicating that processing has been completed.
-
-
TruckMate will attempt to look up the 'Document ID' from step 1 in Customer Service:
-
If none is found, a new, empty bill will be inserted automatically and left in edit-mode. The 'Document ID' from step 1 will be added as a Trace number.
-
If one is found, it will be displayed in the Customer Service window and left in edit-mode.
-
-
The user will then Post the Freight Bill (to obtain a TruckMate bill number), and the Indexer will complete the following:
-
TruckMate automatically sends this bill number, the customer ID, and any other trace numbers on the bill to Synergize, which causes the document to be indexed with these values.
-
Depending on the Workflow settings in Synergize, this will cause the bill to be removed from the Workflow queue.
-
-
Finally, TruckMate automatically requests the next available imaged document in the Workflow queue, and returns to step 2.
If the selected mode is 'View List of Documents', when selecting this button, a grid will popup with a list of available documents. The grid will display columns containing information about each listed document. Filters are available to help the user locate the desired documents easily and quickly. This feature is only available if 'Display Columns' checkbox is selected from Codes Maintenance > Imaging > Imaging Vendor Configuration > TMW-Synergize™ Imaging > Workflow Tab. The user can select the document to be indexed individually via manual selection.
|
In both described Indexing modes, when a user opens an image for indexing, a lock for this image will be enforced. As a result, other users cannot open this image for indexing purpose. The lock will be released once the user posts TruckMate information to Synergize, skips the image or exits indexing mode. To monitor image locks and release locks that cannot be auto-released (in case unexpected shutdown or users terminate TruckMate abnormally), users can open the Codes Maintenance program > Imaging > Microdea > Workflow Tab > Locks Tab. Erroneous locks can be removed from the list. If a document is locked by a user, that user can still open the document without requesting removing locks but other users would have to have locks removed. This functionality is only available for Users with TMW - Synergize software installed and correctly configured, and that have checked the 'Workflow Enabled' flag on the Workflow Tab in Codes Maintenance (see above). |
Remember Filters
This option if selected, will have the system memorise some of the selected filters in the last session of the program. When the user runs the application, some of the filters selected in the previous session will be automatically selected for the current session. The memorised filters are: 'Interline Range', 'Interline Type', All 5 'Status' Checkboxes (for IP details), 'Bill Date Range' and 'Charges Range'.
Color Interliner Details by Status
Selecting this option will have the system display interline records with different statuses in different colors based on the status. Furthermore, the text of the checkboxes to filter the interline records based on status, will appear in the designated color for each status. This option makes it easier and quicker for the user to spot interline records of a specific status. Deselecting this option will disable coloring of interline records based on status.
IP Import Processing
Selecting this option will open the IP Inquiry Import window, which allows you to import EDI data and match it to Interliner Payable records.
Window Menu
Interline Payable Register
 Selecting this option will open an instance of the Interline Payable Register program.
Interline Payable Accrual Register
Selecting this option will open an instance of the Interline Payable Accrual Register program.
Help Menu
TruckMate Help
 Selecting this button will open the Interline Payable Audit topic in the TruckMate Online Help file (the page you are currently viewing).
Service Portal
 Selecting this button will open an instance of your default Internet browsing software, with the https://www.tmwcare.com login page displayed.
About
 Selecting this button will open the standard TruckMate About window, which contains important information about the application you are currently using, including its version number (important for support calls).
Toolbar
Synergize Indexing
![]() This option is only available for users of TMW-Synergize™ Imaging software. This option is used in two steps. The first step is selecting the mode. use the drop don list to select one of the available options. The second step would be to perform the indexing by selecting the button (
This option is only available for users of TMW-Synergize™ Imaging software. This option is used in two steps. The first step is selecting the mode. use the drop don list to select one of the available options. The second step would be to perform the indexing by selecting the button (![]() ).
).
The options available in the first step are:
-
Update Synergize Document
This option updates the Synergize database with changes in TruckMate. When you make changes in TruckMate to image information, select this option to reflect the change made in TruckMate in Synergize database.
-
View Single Document
This option activates the 'View Single Document' mode in Image Indexing. When in this mode and the user selects the indexing button (
 ), the User will have to select a specific Synergize 'Workflow' (as defined in the Codes Maintenance program > Imaging Tab > Microdea > Workflow Tab). Once the 'Workflow' has been determined, the Image Indexing window will appear with one image in the Synergise image viewer window.
For an explanation of how the Image Indexer behaves while in the 'View Single Document' mode, see the User Case Example in the Tools Menu section above.
-
View List of Documents
This option puts the image viewing process in a different mode. In this mode, users can select a specific document from among a list of documents. When the user selects the indexing button (
) while in this mode, a grid will popup with a list of available documents. The grid will display columns containing information about each listed document. Filters are available to help the user located the desired documents easily and quickly. This feature is only available if 'Display Columns' checkbox is selected from Codes Maintenance > Imaging > Imaging Vendor Configuration > TMW-Synergize™ Imaging > Workflow Tab. The user can select the document to be indexed individually via manual selection.
After selecting the mode, the second step can be performed. You can select the indexing button (![]() ) to perform the indexing according to the selected mode in the first step. The indexing step can also be performed from an option in the Tools menu.
) to perform the indexing according to the selected mode in the first step. The indexing step can also be performed from an option in the Tools menu.
Interline Vendor (Carrier) Information
In the Interliner Information Grid at the top of the screen, you can select the interline for whom you wish to view interline transactions. To sort the items in the grid, click on the column header of the column by which you wish to sort. A blue arrow will appear that indicates that this column is the sort column, and the data will display in the order of the data in this column. Interlines are configured as Vendors in the Customer & Vendor Profiles program > Vendor > Types Tab, by setting the 'Vendor Type' to 'Interliner'.
Filtering Options
Interliner Range
The Interliner Range enables you to filter Interliners based on customized search criteria. Click on the button to the right of the date fields for a selection form. Clearing the Interliner Range check-box will disable the Interliner-range filter.
Interliner Type
The 'Interliner Type' drop-down menu allows you to Filter on specific Vendor records for use in the IP Audit program. Depending on your system’s Security Settings (configured in the Security Setup program > Security > Vendor Types Tab, you may or may not be able to access some of the options in this menu. The options available are: 'All' (All Vendor Types,) 'Agent (Carrier)', 'Interliner', and 'LineHaul Carrier'.
Filter By Trip
This function allows you to key in a dispatch trip number and when you click on the Search button, the program will display those pro-bills associated with that trip in the interline pro-bill information grid (see below), and the associated carrier is matched in the interline carrier information grid.
This function only works if you have pro-bills which have been associated with a Dispatch Trip. That is, you must have used the carrier assignment functions in Dispatch or this will fail.
Filter
You can reduce the number of Interline carriers displayed in the grid by applying a filter. The Filter field works in conjunction with the sort column, indicated by a blue arrow. When you enter characters in the Filter field, only records in the sort column that match the characters will be displayed.
Interliner Information Grid
Interline, Name, Address, Alternate Address, etc.
The information in these fields are populated from various sections of the Customer & Vendor Profiles program for the selected Interliner Vendor.
Context Menu
Select All / Unselect All
This option selects / unselects all of the carriers displayed in the grid.
Notes
You can view or add notes about an interline carrier by selecting this option. These notes correspond to the Notes tab in the Vendor’s profile stored in the Customer & Vendor Profiles program. Consequently, any notes you add here will also be displayed in that program.
The Notes window now has 3 user configurable Tabs. You can configure the Tab labels (and/or set the Notes to 'Journal-style' so that they are automatically Date/Time stamped upon entry) by editing their associated configuration options in the Application Configurator program > NOTES section (VENDOR Tab 1 - 3, and VENDOR Journal-style 1 - 3.)
Reporting > Interline Payable Report
Selecting this item will open the Report Selection form. The Crystal Report template supplied with the TruckMate system is called 'IIPM.RPT'. You will have the option to choose the status of interline transactions that you wish to report, and a Start and End date for transactions. The report will preview to the screen. Click the printer icon at the top of the screen to send the report to the printer that is configured as the default printer for your workstation.
See the Crystal Reports Reference for more information on report functions.
IP Import Processing
Selecting this option will open the IP Inquiry Import window, which allows you to import EDI data and match it to Interliner Payable records.
Advance Checks
This option allows the user to view advanced checks.
Booking # Processing
This option invokes the Booking # Processing Window.
Attach / Open Related Files
Selecting this option will open the Attach / Open Related Files window, which allows the addition of images or documents to this record.
Interline Probill Details
The Interline Details Grid displays all of the pro-bills in the system for the interline carrier selected in the top part of the screen. Most of this information is carried over from the Customer Service program > IP Tab. The intent of this part of the program is to reconcile those bills which were entered in the Customer Service program or Dispatch program against any billing which was received from the carrier. Amounts which were quoted by the vendor to your customer service representatives or dispatchers can then be adjusted and the probills then marked as approved / audited so they can be interfaced into A/P (by way of the IP Audit Register program) for payment.
The user can set a filter to retrieve IP records based on the record’s interface status (described next). The user can select any combination of interface statuses by selecting the appropriate checkboxes. The color of the text of each checkbox, represent’s the color of the corresponding IP record when displayed in the details grid. You can set the color off (display all records in black) using a 'Tools' menu option: 'Color Interliner Details by Status'. Deselecting this option will cancel the coloring of interliner detail records based on their interface statuses.
-
N = New/Unapproved (red)
Check this box to display records that are set to 'N' interface status (New/Unapproved). To view records that are set to 'N' you must also provide a trip number in the 'Filter By Trip' filed described before. However, if a user is to bypass this restriction, the 'IPIIPM - Allow selection of New/Unapproved Status Without Trip Number Specified' option must be selected for that user in Security Setup > Security > Business Events > Allow Changes. -
S = Source Approved (purple)
Check this box to display records that are set to 'S' interface status (Source Approved). -
A = Audited Accrual (green)
Check this box to view transactions of interface status 'A' (Audited Accrual). -
I = Interfaced to AP (blue)
Check this box to view transactions that have the 'I' interface status (Interfaced to AP). -
U = Unaudited Accrual (black)
Check this box to display records that are set to 'U' interface status (Source Unaudited).
| For a detailed description of all interface statuses, see Interline Payable Interface Status Codes. |
All / None
These two buttons allow the user to select all status filters or none of them with one click of the mouse.
Bill Date Range
When working with a large database (and particularly when browsing 'Interfaced' IP records) the Interline Payable Audit program may respond slowly. If long refresh times are occurring, ensure that the users select the 'Bill Date Range' flag and configure a range of dates that will limit the number of records returned.
Filter
You can reduce the number of vendor records that are displayed by entering partial match data in the Filter field. The Filter field works in conjunction with the 'sort' column, indicated by a blue arrow. When you enter characters in the Filter field, only records in the 'sort' column that match the characters will be displayed.
Locate
The Locate field works in conjunction with the Filter field. That is, you must enter data in the Filter field before you can use the Locate field. To find a specific record, enter characters in the Locate field. As you enter characters, the selection indicator (the black arrow on the left grid margin) will move to the first invoice that matches the data entered in the Locate field. Use the 'C' button to clear any information entered into the 'Locate' field.
Grid Details
The Grid displays details of the probill records that have been displayed for the selected Vendor (as determined by the applied Filtering criteria.) Most of these fields are read-only, merely showing data as it was entered for the Freight Bill on the Customer Service program > IP Tab. However, the following fields require further describing:
Status
Status codes are as follows:
-
N = New/Unapproved
-
S = Source Approved
-
A = Audited Accrual
-
I = Interfaced to AP
-
U = Unaudited Accrual
Notes
If the 'Show Adjustment Notes' option is set to 'True' in the Application Configurator program > IPIIPM.EXE section, you can enter IP Adjustment Notes for the selected record by double-clicking this field. You will know if the config option is set to 'True' if this field contains either 'True/False'. If the field contains the text 'NA,' then the configuration option is set to 'False,' and no Notes can be entered against the probill record.
Rate Sheet Name
This field displays the name of the Rate Sheet that has been attached to the Freight Bill record in the Customer Service program. The User can double-click this field to open the Rate Sheet details in the Rates Maintenance program > Rate Sheet Tab. If there is no Rate Sheet Name value, the double-click functionality will not work.
Consolidated ID
After IP records have been consolidated together on the IP Consolidation window, they will have a unique Consolidated ID added to their detail records in this field.
Original FB Number
This will list the original freight bill number of any consolidated freight bills with IP charges on them.
Require AR Payment
If the record is 'Unaudited', 'Unposted', or 'Source Unaudited', the user can toggle this column to True or False by double-clicking on the field. (Cannot change if the IP status is Audited/Source Audited/Interfaced.)
| The user cannot approve the IP record if this is set to True. |
F/B Paid Amount
This column shows how much of the AR invoice has already been paid.
F/B Unpaid Balance
This column shows how much of the AR invoice remains unpaid.
F/B Currency
This column shows the type of currency used in the freight bill.
Recalculated Sub Total / Recalculated Extras / Recalculated Total
These three fields are read-only fields. These figures can differ from the accrued amounts if a change is made to the trip in 'Dispatch' or to a freight bill in 'Customer Service', after the IP record was accrued (run through IP Accrual Register).
If the recalculated amounts are different than the accrued amounts, and the IP record interface status is 'U' or 'A', and there is a business need to pay the recalculated figures instead of the accrued figures, use CTRL + J to open the 'Adjust Interliner Payable' widow and audit the record.
| If the record’s interface status is 'A', you have to change it to 'U' before you can make any adjustments. Use CTRL + U to change the status of the IP record. |
Recalculated After Interfaced
This read-only, 'True' / 'False' flag, indicates whether the IP record was recalculated after it was interfaced of not. If this flag is 'True', this means that the recalculated figures were changed after the IP record was interfaced. Since you can no longer adjust via audit, you may wish to use the 'Reverse & Recreate' sub-option found under 'Status Change' context menu option to make changes.
| We suggest you use a Crystal Report or KPI to periodically list which IP records have the flag set AND the recalculated charges differ from the adjusted charges (either already paid or about to be paid. |
Context Menu
Status Change
This group of options provides a way to approve and change the status of interline transaction records. Most of the options in this group have additional sub-options, mainly most of them have three additional sub options, 'Current Record', 'Selected Records' and 'All Records', you can use one of these options to decide to which records you want to apply the status change. Some options have different sub-options that will be described where applicable. Following are the options in this group:
Approve New (N -→ S)
This option is to approve a new record and change the status from 'N' to 'S'. The normal acceptable procedure from an accounting stand point is to have all I/P records' approval dates and the FB approval date fall in the same accounting (GL) period. However, there is an application configuration option which can be set in Application Configurator > Billing > CSERV.EXE - 'Allow A/R and I/P GL to different GL periods' to allow approving transactions even if there is a GL period mismatch of the approval dates of the related records.
Reverse Approval (S -→ N)
This option is to reverse the approval for a record, whish sets the status back from 'S' to 'N'.
Audit Accrued (U -→ A)
This option allows the user to set the record as audited, which changes the status from 'U' to 'A'.
Reverse Audit (A -→ U)
This option allows the user to reverse the previously done audit process, and sets the status back from 'A' to 'U'.
Audit and Adjust Accrued (U -→ A)
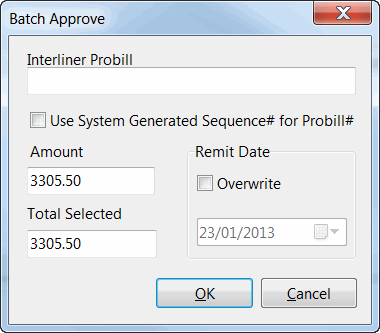
This option allows the user to adjust the amounts of the IP record and then audit it by setting the status from 'U' to 'A'. The sub-options available under this option are 'Current Record' which will audit only the current record, 'Selected Different ProBills' which allows the user to approve all selected freight bills with different Probills. and the last option is 'Selected with one ProBill or Sequence Number' Clicking this option will bring up the Batch Approve window which allows the user to approve a batch of freight bills under one probill.
| Field | Definition |
|---|---|
Interliner Probill |
Enter the Probill number that you wish to use when approving multiple Freight Bills. |
Amount |
This field is pre-populated with the total amount of all selected Freight Bills. It cannot be edited. If adjustments to the amount are required, the interliner payable records must be individually adjusted prior to approval. |
Total Selected |
This field is pre-populated with the total amount of all selected Freight Bills and cannot be modified. |
Remit Date |
The 'Remit Date' section allows one option: if you check the 'Overwrite' box, you can select the date of approval. If there has already been an approval using the same Probill, the old approval’s date will be updated with this one. |
Quick Audit (U -→ A)
This option allows for a quick audit with a restricted adjustment to the amount, and sets the status from 'U' to 'A'. Under this option you will find additional sub-options:
Quick Audit Style
Selecting this sub-option opens the Adjust Interliner Payable window. This window allows you to adjust the amount of the interline payable.

| Field | Definition |
|---|---|
Freight Bill |
Displays the selected Freight Bill. |
Interliner Probill |
Displays the selected Interliner Probill |
Invoice Amount |
Displays the selected Invoice’s Invoice Amount. |
Adjusted Amount |
You may enter a new amount to be Adjusted into the currently selected Invoice. Click the 'OK' button to add the amount. |
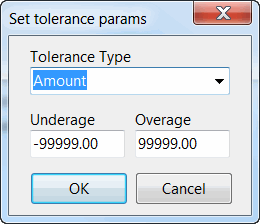
Quick Audit Tolerance
This option allows you to restrict the adjustment that can be made using the 'Quick Audit' option. You can define a tolerance, which will be used by the system to restrict the adjustment. Selecting this option opens the Set Tolerance Parameters window.
| Field | Definition |
|---|---|
Tolerance Type |
Use the pull down menu to select a vale for the Tolerance Type. You can chose to represent the tolerance to be a fixed 'Amount' or a 'Percentage'. |
Underage |
Enter the Underage value for the selected Tolerance Type. The system will prevent any decrease of the amount by less than this value. |
Overage |
Enter the Overage value for the selected Tolerance Type. The system will prevent any increase of the amount by more than this value. |
EDI Import / Batch Audit (U -→ A)
This option allows the use of EDI (External Data Interface) to import interline records from vendors and audit them at the same time, and set the interface status from 'U' to 'A'.
Write-Off / Batch Audit to $0 (U -→ A)
This option enables IP records write-offs, including records in credit / rebill scenarios. Selecting this option opens the Write-Off - IP Records Selection by FB window.
You can set a filter, or any combination of filters by selecting the appropriate checkboxes to retrieve IP records based on the following ranged filters. Clearing these checkboxes will cancel that particular filter of IP records.
| Field | Definition |
|---|---|
Interliner Range |
The Interliner Range enables you to filter IP records based on customized search criteria. Click on the button to the right of the date fields for a selection form. Clearing the Interliner Range check-box disables the Interliner Range filter. |
Charges Range |
The Charges Range enables you to filter IP records based on the Writeoff Amount. Clearing the Charges Range check-box disables the range filter. |
Bill Date Range |
The Bill Date Range enables you to filter IP records based on the IP record Bill Date. Click on the button to the right of the date fields for a calendar selection form. Clearing the Bill Date Range check-box disables the range filter. |
Grid Details |
The grid displays details of the IP records that have been returned (as determined by the filtering criteria.) Most of these fields are read-only, merely showing data as it was entered for the Freight Bill on the Customer Service program > IP Tab. However, the following columns are worth noting: |
Interliner, Name, Address, etc. |
The information in these fields are populated from various sections of the Customer & Vendor Profiles program for the selected Interliner Vendor. |
Excl. Last Rebill |
If set to 'Yes', this flag enables you to exclude the last rebill record from being written-off. Using "Excl.Last Rebill", you can write-off the original IP and credit record(s) and keep the rebill (before auditing). |
IP Count |
The IP Count column indicates whether or not an IP record has a Credit / Rebill. If the IP Count column indicates a number greater than 1, that IP record has an available Rebill. |
Writeoff Amt |
This column contains the Writeoff Amount of each IP record. It cannot be edited, but can be filtered by using the Charges Range. |
Reverse and Recreate (I -→ S)
This option allows the user to recreate interline records.
View / Edit
This option provides a list of sub-options for data viewing. The user can select one of the sub-options listed below:
View Interliner Details
Use this option to display the original transaction as entered in the Customer Service program. If the interline record was entered in the Quick Bill Entry program, the details will still display. The form that is displayed is the same as the Customer Service program > IP Tab. This is a read only display.
View Load Details
Opens the Load Details dialog box where you can view but not change, the Load Details as entered in the Customer Service program > Details Tab.
View FB (CSERV) for <Bill #>
Opens the Customer Service program and goes directly to the freight bill in question.
View Rate Sheet
Selecting this option will open the Rate Sheet attached to the Freight Bill record in the Rates Maintenance program > Rate Sheet Tab, the same as if the User double-clicks the 'Rate' field in the Probill Details Grid.
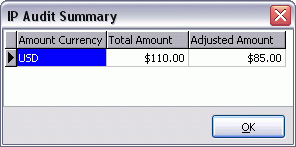
View Detail Totals
This button opens the IP Audit Summary window, which offers sub-total information on the outstanding bills owed to the currently selected carrier.
View History
Selecting this option opens the Interliner Detail History window. Which displays the status change history of the selected interline record as will as the transactions involved.

The upper part of the window is a grid that shows only one row, which displays details about the selected interline record. The lower part consists of two tabs, the 'Transactions' tab and the 'Status History' tab. The 'Transactions' tab consists of two grids, the upper ('Transactions') displays the details of the interline transactions in a multi row grid. The lower ('G/L') part displays the G/L entries associated with the selected transaction. To display the history of another interline record, you can select the desired interline record from the original IP tab (no need to close the history window) and use the 'View History' option once again. The history of the second record will replace the previously selected record in the same window.
The 'Status History' grid will have one row for each of the following transactions if they took place for the selected IP record:
-
When the IP is newly created (either manually or via copy or credit/rebill).
-
When the IP is approved.
-
When the IP is unapproved.
-
When the IP accrual is posted (run through IPAccrualReg).
-
When the associated FB is approved.
-
When the associated FB is unapproved.
-
When the associated FB is interfaced (run through billbr).
-
When the IP is audited (with or without adjustment).
-
When the IP is unaudited.
-
When the IP audit is posted (run through ipiipr).
-
When the IP is un-consolidated (status set back to U).
-
When a "Reverse and Recreate" is done on the IP record (from ipiipm).
| Field | Definition |
|---|---|
Edit User Fields |
Selecting this option allows you to enter data for this record into one of the three User Defined fields for the IP Audit program. |
IP Adjustment Notes |
Select this option to view Adjustment Notes for the selected probill record. If the 'Show Adjustment Notes' option is set to 'True' in the Application Configurator program > IPIIPM.EXE section, you can enter IP Adjustment Notes for the selected record. You will know if the config option is set to 'True' if the 'Notes' field in the Details Grid contains either 'True/False'. If the field contains the text 'NA,' then the configuration option is set to 'False,' and no Notes can be entered against the probill record. |
Adjust Remit Date for Selected |
Clicking this option will bring up a calender menu, where you can select the appropriate Remit Date. The Remit Date is the date that will be updated in the 'AP_SUM' and 'AP_BILL' tables as the 'TX_DATE' value (transaction date). |
Advance Check |
This option allows the user to review and assign advanced checks, the following sub-options are available:
These options allow the user to review and assign advance checks by freight bill or trip. |
Consolidation
This option allows the user to consolidate IP records. The following sub-options are available:
Setup Consolidation Types
Selecting this option will open the Codes Maintenance program > Consolidation Types > Interliner Pay tab, where you can define the Table/Column combinations that IP records must have in common in order to be consolidated together when using the 'Consolidate Similar IPs' option.
Consolidate Similar IPs / Adjust by Consolidated ID
Selecting this option will open the Interliner Payables Consolidation window. From there, you can consolidate similar IPs ('Similar' means the IPs fulfill the Table/Column combination similarity as defined in 'Setup Consolidation Type' option)
Adjust Consolidated IPs
You can use this option to adjust IPs that were previously consolidated.
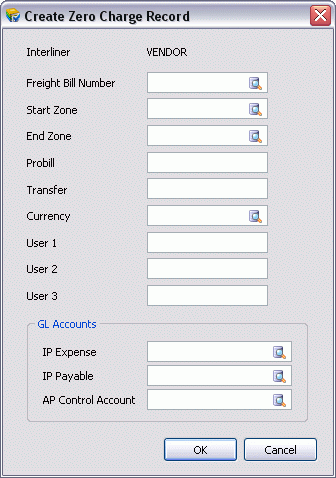
Create Zero Charge Record
Selecting this option opens the Create Zero Charge Record window, which allows the user to create an ORDER_INTERLINER record against a particular Freight Bill that has already gone through the billing process. This feature is useful in the case that an invoice from an Interliner arrives after a Freight Bill has already been sent to billing. This option can be used with both normal freight bills as well as consolidated ones.
| The use of this option is dependent on value of the Application Configurator program > IPIIPM.EXE > 'Create Zero Charge' option. |
| Field | Definition |
|---|---|
Interliner |
This field is automatically populated based on the item you right-clicked previously. |
Freight Bill Number |
Enter a Freight Bill Number here or click the search button to select one from a generated list of Freight Bills. |
Start Zone / End Zone |
This information is generated automatically when you select a Freight Bill. |
Probill |
Enter a ProBill name. |
Transfer |
Enter a Transfer number. |
Currency |
A Currency code, based on the selected Freight Bill, is automatically populated in this field after you select a Freight Bill. |
User 1 / User 2 / User 3 |
You may specify Users for the record here. |
GL Accounts |
|
IP Expense |
Pre-populated with the GL account number for your Interline Payables Expense data. |
IP Payables |
Pre-populated with the GL account number for your Interline Payables Payable data. |
AP Control Account |
Pre-populated with the GL account number for your Accounts Payable Control Account data. |
Trip/Manifest
This options allows the user to filter records in details grid based on Trip/Manifest, the following sub-options are available:
Filter by Trip/Manifest
Select this option to filter the records displayed in the Details grid by their Trip/Manifest number.
Clear Trip/Manifest Filter
Select this option to clear an applied Trip/Manifest filter.
Adjust Trip/Manifest
Using the Adjust Trip Manifest option, you can adjust the amount of the interline payable that was entered using the Carrier option from the Trip grid in the Dispatch program.
Multi Row Selection
This item includes the multi row selection options.
Select One
Use this option to select one of the detail records in the Grid. You can hold the <Ctrl> key and use this option to select multiple records.
Select All
Clicking 'Select All' highlights all currently available Freight Bills.
Clear Selected
This option clears all selected records.
Attach/Open Related Files (For Order / For Order Interliner)
These two options use the same interface (Attach/Open Related Files window), to append images or documents to a particular Freight Bill detail record. One is used to attach / open documents / images to Order records, and the other is used to attach / open documents / images to Order Interliner records.