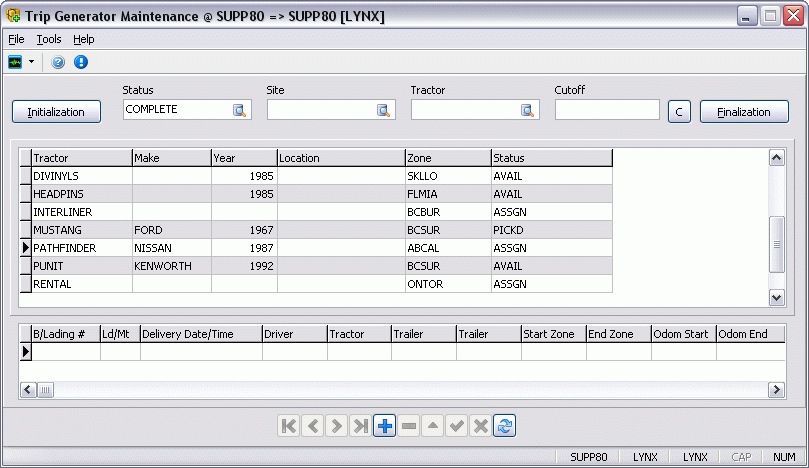
Trip Generator Maintenance

The Trip Generator Maintenance program is used to create trip information (Fuel Tax, Driver Pay) when the Dispatch program is not used. This program has been coined the "after-the-fact Dispatch program" for it allows you to record Trip information an the end of a Trip, using the documentation the Driver provides from his Trip Sheet. This comes in handy if you have a Driver doing repetitive Trips for a period of time, for you can simply use Trip Generator Maintenance to record his Trip information, without having to repeatedly enter Dispatch details.
Once the User enters the filters at the top of the window (which gather information from the Customer Service program), and then recalls the Power Units that were on the trips, Driver Pay records and Fuel Tax trips will be created that will generate miles based on the settings in the Application Configurator program’s TRIPGEN.EXE section.
| Before you can use the Trip Generator Maintenance program fully, you must configure a few additional options in other TruckMate programs. Go to How Do I? and follow the steps under the "How do I Setup Trip Generator Maintenance?" topic. |
To access Trip Generator Maintenance:
| From this location | Go to |
|---|---|
TruckMate Menu and TruckMate Task List |
Fuel Management > Trip Generator Maintenance |
Windows Start Menu |
TruckMate 20xx > Trip Generator Maintenance |
Windows Explorer |
C:\Program Files (x86) > TruckMate 20xx > Tripgen.exe |
How Do I?
How do I Set Up Trip Generator Maintenance?
These steps are required for the Trip Generator Maintenance program’s 'Finalization' functionality to work correctly, and require the use of a few additional programs.
-
Open the Driver Pay Contracts program (PAYCON.EXE).
-
On the Contracts Tab, click the Pay Sub-Tab. You will see several fields with data in them. Click the '+' button to enter new information. Many of these fields can be set to whatever you like, but the 'Pay Code' field will be used by the TRIPGEN.EXE program, and later in these setup steps, so make this value something pertinent (perhaps WARMUP) and remember it. Also, make sure you set the 'Category' to the 'Other' radio option.
Set the other options as your Company requires. When complete, save the record by clicking the 'checkmark' button below the fields you have modified.
-
Repeat Step #2 for all contracts available in the Driver Pay Contracts program, using the same 'Pay Code' value. You can access new contracts by clicking the 'right-arrow' button below the 'Contract Details' information on the Contracts Tab.
Note: Depending on the Driver Contracts in your system and the Drivers attached to those Contracts, you can enter different rates of pay in the 'Rate' field for each Contract. To see which Drivers are attached to a Contract, you must use the Driver Profiles program.
-
Open the Application Configurator program (CONFIGEXPLORER.EXE).
-
Click the '+' button next to the 'Configuration Options' menu item to open the tree listing of TruckMate applications. Click the 'TRIPGEN.EXE' option.
-
Four configuration options will appear in the right-side window, only three of which are of concern. You must configure these values as your company requires. For information on what these settings refer to, click here. Make sure you enter the value you entered in the 'Pay Code field' in Step #2 in the 'Warm-Up Pay Code' field. Once you have configured these as you wish, close the Application Configurator program.
How do I Use the Trip Generator Maintenance program?
While the TRIPGEN.EXE program is relatively easy to use, certain fields must be completed in the Customer Service program prior to its use.
-
Make sure you complete the above step, "How do I Setup Trip Generator Maintenance?". When you have obtained the notes from your Driver’s Trip Sheet, you must first enter them in the Customer Service program.
-
Open the Customer Service program (CSERV.EXE).
-
Click the Driver Pay Tab. Click the '+' button to begin entering a new detail line. Double click the 'Driver ID' field and select the Driver code of the Driver who did the work. Click the 'Pay Code' field (or use your <TAB> key) and manually enter the Pay Code you have setup in the above step. Click the 'checkmark' button below (or use your <TAB> key) and the data from the Pay Contract should be automatically populated into the detail line.
-
Review the details of the Driver Pay entry and then Post the Freight Bill you have been creating using the 'Post' Button to the right.
-
Open the Trip Generator Maintenance program (TRIPGEN.EXE).
-
Click the 'Initialize' Button.
Menu Bar / Toolbar
Multi-Company
For more information on the Multi-Company options available from the Menu Bar, see the Multi-Company documentation.
Tools Menu
TruckMate Monitor
![]() Click the down arrow next to this button to access the various functions of the new TruckMate Monitor.
Click the down arrow next to this button to access the various functions of the new TruckMate Monitor.
Remember Position / Size
Selecting this option will maintain the program window position and size upon close. When the program is re-opened, it will appear the same.
Help Menu
TruckMate Help
![]() Selecting this button will open the Trip Generator Maintenance topic in the TruckMate Online Help file (the page you are currently viewing).
Selecting this button will open the Trip Generator Maintenance topic in the TruckMate Online Help file (the page you are currently viewing).
About
![]() Selecting this button will open the standard TruckMate About window, which contains important information about the application you are currently using, including its version number (important for support calls).
Selecting this button will open the standard TruckMate About window, which contains important information about the application you are currently using, including its version number (important for support calls).
Service Portal
![]() Selecting this button will open an instance of your default Internet browsing software, with the https://www.tmwcare.com login page displayed.
Selecting this button will open an instance of your default Internet browsing software, with the https://www.tmwcare.com login page displayed.
Program Buttons
Initialization
![]() The Initialization button will gather all the needed data from TruckMate and display it in the two Trip Generator Maintenance Grids below.
The Initialization button will gather all the needed data from TruckMate and display it in the two Trip Generator Maintenance Grids below.
Finalization
![]() The Finalization button will create the Fuel Tax Trips and Driver Pay entries based on the selection criteria you have outlined in the Filtering Options and data entered into the Customer Service program.
The Finalization button will create the Fuel Tax Trips and Driver Pay entries based on the selection criteria you have outlined in the Filtering Options and data entered into the Customer Service program.
| When you click the Finalization Button, you may see some error message windows. These relate to a few other setup steps that are required to run the Trip Generator Maintenance program. If you need help with these steps, click here. |
Clear
![]() The Clear button will remove any values entered into the 'Tractor' and 'Cutoff' Filtering fields.
The Clear button will remove any values entered into the 'Tractor' and 'Cutoff' Filtering fields.
Filtering Options
These options can be used singly or in conjunction to limit the number of Tractors/Power Units that appear in the Tractor Grid.
Status
Click the search button here to select a 'Status' filter. A selection window will appear, displaying all of the currently setup Status Codes on your system- configured in the Codes Maintenance program. Once you have chosen a Status Code, the records in the Tractor Grid will be filtered accordingly.
Site
Click the search button here to select a 'Site' filter. A selection window will appear, displaying all of the currently set up Site Codes on your system, configured in the Codes Maintenance program > Site Tab. Once you have chosen a Status Code, the records in the Tractor Grid will be filtered accordingly.
Tractor
Click the search button here to select a 'Tractor' filter (or 'Power Unit' filter). A selection window will appear, displaying all of the currently setup Power Units in your system- configured in the Power Unit Profiles program. Once you have chosen a Status Code, the records in the Tractor Grid will be filtered accordingly.
Cutoff
Double-click within the 'Cutoff' field to select a Cutoff Date. This value will be used to limit the Trips that are created. All Power Units that have 'Pickup' and 'Delivery' dates specified on the Dispatch Tab of the Customer Service program will be included in the Trip creation process if their dates fall before the value entered here.
Power Unit/Tractor Grid
This upper Grid of the Trip Generator Maintenance program contains all the Power Units currently setup in your system. These records are created and maintained in the Power Unit Profiles program. If there are no values in the Filtering fields above the Grid, all of your Power Units will be displayed. If there are values in the Filters, your Power Unit records will be filtered accordingly.
Details Grid
The bottom Grid of the Trip Generator Maintenance program is used to enter the details of the Trip from the Driver’s Trip Sheet. Click the '+' button to begin entering details. Notice that depending on where the cursor is positioned in the Power Unit Grid above, the value for the 'Tractor' field in this Grid will automatically populate.