D83 Data Import

The RMB (Rocky Mountain Tariff Bureau Inc.) Division Sheet D-83 is an accepted industry standard used in determining the division of revenue between multiple carriers moving a single load. The D83 Tariff Import program allows you to import the D-83 rate structure into your TruckMate Database and then allow you to set up Split Rate Sheets to apply to your Interline Vendors.
To access D83 Tariff Import:
| From this location | Go to |
|---|---|
TruckMate Menu and TruckMate Task List |
|
Windows Start Menu |
TruckMate 20xx > D83 Tariff Import |
Windows Explorer |
C:\Program Files (x86) > TruckMate 20xx > D83Import.exe |
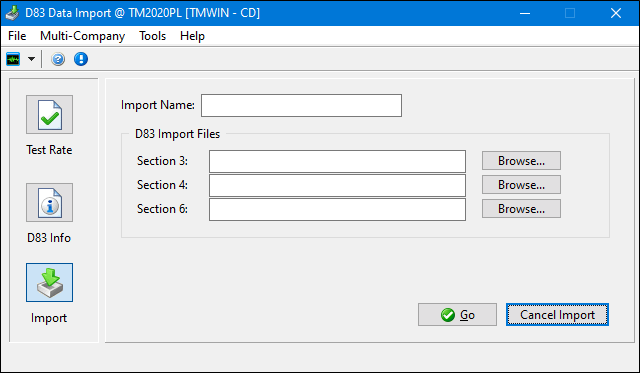
Layout of the D83 Data Import window
The D83 Data Import program is divided into three sections, which you can access by clicking their associated button on the left side of the program screen. They are 'Test Rate', 'D83 Info', and 'Import'.
Normally, a User would first use the 'Import' section to enter the D83 Data into their system, set up the 'D83 Info' section, and use the 'Test Rate' section to see if their Data is functioning correctly.
Menu and toolbar options
There are no unique menu and toolbar options and functionality specific to the D83 Data Import window.
For information about common menu and toolbar options (i.e. File menu, Refresh, Multi-Company, etc.), see General menu and toolbar options in TruckMate basics.
Test Rate
The options within the Test Rate section are only available once an Import has been successfully completed. See the 'Import' section below for more information on how to complete an Import of D83 Data. Once you have imported, you can use the 'Test Rate' section to see if your D83 Data is working correctly. Click on the 'Test Rate' button and enter the following data into the program fields:
Click the 'Rate' button, and the Carrier Split should appear as in the example. Your results may be different if the D83 Data you Imported is newer or older then Rates imported in this example.
The 'Clear Fields' button will erase all data you have entered in the fields of this section.
D83 Info
Click the D83 Info button and on in the D83 Info section, enter the Default Minimum Divisions like so:
The 'Effective Date' field will default to the date you are importing on, and the 'Expiry Date' field will default to exactly one year later. You may change these dates if you wish.
Your company’s Minimum Divisions may be different than the ones displayed here. As suggested on the actual program screen, see your Rocky Mount Tariff Bureau documentation for other recommended default Minimum Division values.
Procedures
Steps for Import Procedure
-
Put your D83 CD in the CD-Rom drive in your computer.
-
Open the 'D83IMPORT.EXE' program.
-
Click on the 'Import' button and enter the text 'D83' in the 'Import Name' field, and select the File directories for the various 'Section' import files.
The 'SECTION3.TXT' and 'SECTION4.TXT' files are in a different directory than the 'SECTION6.TXT' text file. For the files, go to the 'Data Format > ASCII' folder of their separate directories. Do not select 'EBCDIC' or anything under the 'Tape Format' directory.
-
Click on the 'Go' button and wait for the import to complete successfully. This will take a very long time (depending on the speed of your database server this may take from 5-8 hours). When the process is complete, you will be prompted to confirm it’s completion. Click the 'OK' button to continue.
-
Once complete, you may use the 'Test Rate' section to see if your Data has been correctly Imported.
-
Now that the data has been imported, you must use the Rates Maintenance program (specifically the Rate Sheets Tab) to setup a Rate Sheet that will use the D83 tariffs. Click here form more information.
How do I Setup D83 Rating?
-
Open the D83 Tariff Import program (D83IMPORT.EXE), click: Start Programs TruckMate Rating D83 Data Import
-
Follow the instructions outlined in the D83 Tariff Import documentation to complete the Import of the D83 Rates.
-
Proceed to the next question (below).
How do I Use the D83 Functions within Rates Maintenance?
-
Open the D83 Tariff Import program (D83IMPORT.EXE).
-
Follow the instructions outlined in the D83 Tariff Import documentation to complete the Import of the D83 Rates. After the Rates are imported, you must set up a new Rate for D83.
-
Open the Rates Maintenance program (RATES.EXE).
-
On the Rate Sheets Tab, setup your Rate Sheet using the 'Split' Type and specifying the Tariff Tab > 'Rate Tariff' field as 'D83'.
-
Once the Rate Sheet is created, you can then apply it to your Vendors. Do so by using the '<F7>' key of your keyboard or by clicking the 'V' button in the Attachments Section of the Rate Sheets Tab. It is a good idea to apply it to at least one Vendor for testing.
-
Go to the Vendor Info Tab and filter on the Vendor ID you attached to your new D83 Rate Sheet and make sure the Rate Sheet is under the Confirmations Tab.
-
The D83 Tab will be blank; it normally does NOT need any additional configuration. Now, to test your new D83 Rates.
-
Open the Customer Service program (CSERV.EXE), click: Start Programs TruckMate Billing Customer Service
-
Create a new Freight Bill and then add the Vendor that is attached to the D83 Rate Sheet in to the I/P Tab.
-
Click the 'Rate' button and a rate should auto-generate.
*Troubleshooting:
Be sure you have added Load Details to the Freight Bill with charges before you click on the 'Rate' button.
Also keep in mind that this Rate Tariff is ZIP Code based, so every Zone you use in the test must have a valid ZIP Code attached to it in order for splitting to work. The stored procedure looks at the ZONE.POSTAL_CODE field- if it isn’t populated or has invalid data, the calculation will not work and your D83 rate will not apply.
Note: This ZONE.POSTAL_CODE field is NOT automatically populated by our system, it MUST be filled in MANUALLY. Also, the stored procedure looks at the Postal Code/Zip on the TLORDER record.
How do I Setup and Use Reverse D83?
"Reverse D83" is the practice of using D83 tariff calculations to calculate how much another Carrier would owe you if you were taking a partial move of shipment for them. For example: CLIENT_A has hired ABBA Trucking to move a load from the Shipper to their terminal. They will be billing their customer $1000 and will be expecting you to move the Freight 40% of the move. The Reverse D83 calculation would create a receivable item of 40% of their charge to the customer.
-
Setup D83 Rating normally, as described above.
-
A Freight Bill is then created in the Customer Service program with 'Shipper' and 'Consignee' information as provided by the other Vendor.
-
The movement that the other Vendor will be completing is then entered into the Customer Service program > IP Tab with the appropriate 'Movement Type' and appropriate 'Start Zone' / 'End Zone' of what they will be doing. The 'Charges' field must be set to 'Receivable'.
-
This will then change the 'Bill-To' Client on the order to the Interliner. In order for this step to be accomplished, however, the Vendor must be set up with a CLIENT Code in it’s profile. You can add a Client Code to a Vendor using the Customer & Vendor Profiles program > Vendor > Header > 'Customer Code' field. This Client Code must also be assigned and approved to the D83 Rate Sheet that had been setup previously (in the Rates Maintenance program > Rate Sheets Tab).
-
The amount that the other Carrier is billing their customer is put into the Customer Service program > Details Tab > 'Gross Manual' field, and the detail line should be marked as 'Manually Rated'.
-
The splitting is calculated based on the 'Movement Type' on IP Tab, and the same 'Start Zone' / 'End Zone' lookup as regular D83. What you will see happen is the percentage of the move calculated and charges based off of this put into the Details Tab. This in turn will populate the Billing Tab and create a Receivable for you from the Vendor involved.