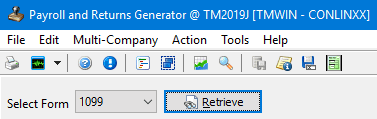
Retrieving payroll data and generating reports

The following forms are available in the Payroll and Returns Generator program:
-
American Payroll Reports: 940 / 941, 1095-C, 1099 & W2
-
Canadian Payroll Reports: T4, T4A or RL-1

American Payroll Reports
| TruckMate will generate payroll reports for W2, 1099 and 1095-C formats but it does not store historical versions of the reports data and does not support submitting amended versions for these formats. |
Generating W2’s
-
Choose W2 from the 'Select Form' drop-down list. The Employee and Company grids adjust to display W2 headings.
W2 Record Codes and Order of Generation
CODE REQUIRED SUPPORTED BY TMW RA - Submitter Record
Yes
Yes
RE - Employer Record
Yes
Yes
RW - Employee Wage Record
Yes
Yes
RO - Employee Wage Record Optional
Optional
Yes
RS - State Wage Record
Optional
For: KY, WI, MO
RT - Total Record
Yes
Yes
RU - Total Record
Optional
Yes
RV - State Total
Optional
Yes
RF - Final Record
Yes
Yes
-
All records are 512 characters long
-
RO is required if any of the fields for an EE in RO record is not 0 or blank. Do not create it if all fields are zero or blanks.
-
TruckMate currently supports RS records only for Kentucky (KY), Wisconsin (WI), and Missouri (MO). RS records should follow RW or optional RO record. If multiple State Wage records for an EE, include all of the RS records for the EE immediately following the related RW or RO records. Do not generate RS if only blanks would be entered after the record identifier.
-
RT must be generated for each RE.
-
RU is required if RO is prepared. Do not generate RU if only zeros would be entered in all positions.
-
RF must be last record in the file. Nothing after RF record is allowed in the file.
-
-
Click the Retrieve button. The Search Preferences window appears.
-
W2’s require choosing a Company ID to report on and a Date Range for the Payroll records you need to generate. The Select Date Range field (calendar control) is the same as used in other TruckMate programs. Click the calendar icons to select start and end dates from the calendar presented, or you can right-click on the date box and select a specific day, week or month.
-
Click OK. Your W2 data is saved to the database and displayed on the grid in the main window.
You can now print a report or submit this information electronically (create a magnetic media file).
|
Generating 1099s
| Please ensure you have run your Driver Pay, Driver Deductions, and Check Registers for the processing year before running 1099 Wizard! |
-
Select 1099 from the Select Form drop-down list and click Retrieve.
The first page of the 1099 Wizard is displayed and it provides step-by-step instructions for setting up your 1099 Forms. See Using the 1099 Wizard for details.
For more information concerning how 1099s are calculated in TruckMate, see Additional Taxation Information.
Warning: TruckMate does not support Multi-Company 1099 forms unless the company is setup to use a Multi-Schema database.
-
Once you have finished navigating through the Wizard screens, click OK to save your data and return to the Main window. You can now print a report or submit this information electronically (create a magnetic media file).
Notes:
-
When preparing 1099 data for magnetic media filing, ensure you save as '.csv' file type or it will not function correctly in the Payroll and Returns Generator program.
-
TruckMate does not store historical versions of the 1099 report data and does not support submitting amended versions for this format.
-
Generating 940s and 941s
-
Select 940/941 from the 'Select Form' drop-down list.
-
Click Retrieve. The Employer’s Federal Unemployment Return form appears.
In the first window, you must verify your Company Code (in the 'Select a Company' section) and whether you want to complete the 'Form 940' (Annually) or 'Form 941' (Quarterly). Company Codes are configured via the Company Profiles program.
Generating 940s
To complete the Form 940 (Annually), follow these steps:
-
In the first window (Step 1 of 4), choose a 'Year' value by using the 'Select Year' drop-down menu, and use the 'Yes' or 'No' radio buttons to answer the questions in the 'A', 'B' and 'C' sections.
If your answer to the question in section 'A' is 'No', you can skip the other two sections.
-
Click Next. Step 2 is for the computation of taxable wages. After clicking the Calculate button, the system builds a list of employees that received earnings in the requested pay period (the 'Year' from Step 1) and then calculates all the totals. (Depending on the size of your database, this may take a few seconds).
-
Click Next when the calculations are complete (100% of the progress bar). The 'Tax Due or Refund' window displays. This section (Step 3 of 4) allows you to obtain the taxable payroll information and populate this data into the correct lines on the 940 form.
-
Select the Get Taxable Payroll button. The system looks at all the employee records in the database, and populates the screen with the correct data from your database.
The importance of having well maintained data in the Payroll Setup program is crucial here. If no values were entered, we would not get any taxable payroll.
-
Direct your attention to the amount displayed in the box beside Line 8 ('Total FUTA tax deposited for the year'). There is no way for TruckMate to know if a company actually made those payments. Therefore, the system will retrieve the FUTA amount found in the CHECK_MSTR TruckMate table.
-
If the amount matches the amount actually paid, no further action is required. If the amounts do not match, the user has the option to overwrite the original amount in box 8 with the amount that was paid and select their <Enter> key. The value is recalculated using the newly entered amount.
-
-
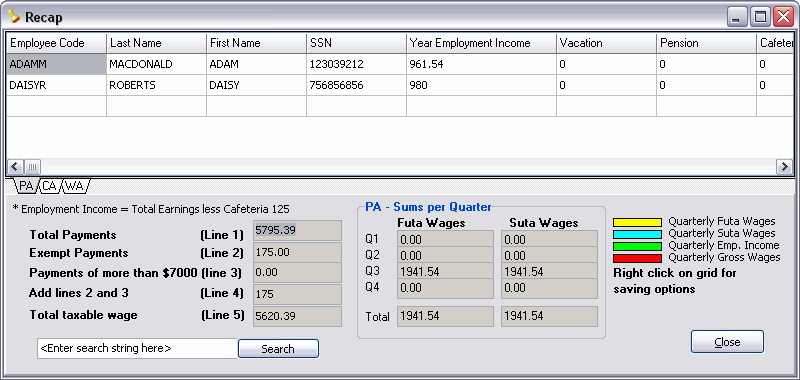
Optional - Click the Get Recap button to pull the quarterly information for your employee records.
The Recap Summary window displays employee information broken down into separate 'State' tabs. You can view employee data for different States by selecting a tab from just beneath the data grid.
The information on this grid is color-coded. Refer to the legend at the bottom right side of the window for details regarding the records you are viewing.
Right-clicking the data grid on any State tab produces a Context Menu that allows several options for saving the displayed data.
-
Click Close when you have saved your quarterly information.
-
Click Next. The final page of the Wizard displays (Step 4 of 4), and shows your 'Balance Due'.
-
Select the Save button to save the 940 information.
Note: TruckMate does NOT provide a 'Standard Report' for 940 forms but 'Custom Reports' can be made available upon request.
-
If you have previously added a Custom 940 Report to your TruckMate Reports list, click the Report button to access and run it.
-
Once done, click Close to complete this process.
-
When you reach the final step and receive a message saying you have successfully completed your form, click Save to save your data to the database, and then Close to return to the main window.
You can now print a report or submit this information electronically (create a magnetic media file)
Generating 941s
To complete the Form 941 (Quarterly), follow these steps:
-
In the first window (Step 1), choose a 'Year' value in the 'Select Year' drop-down menu.
-
In the 'Select Period' section, select the 'Period' you wish to gather records for by selecting its corresponding radio option.
If you do not have to file returns in the future, enable the associated flag, and enter the 'Date' that the final wages were paid.
-
Select 'Next'. You will notice that the second screen in the Wizard looks very similar to the 941 form with 17 lines showing detailed information pulled from the employee record.
To obtain the information from the TruckMate database, click the 'Calculate' button at the bottom of the screen. Depending on the size of your database, the system will take a few seconds to generate all of the information.
-
Optional: After selecting the 'Calculate' button, you can use the 'See Recap' button to view the Employee records gathered for the period you selected in step 1.
On the window that appears, you have several means of saving the employee data that is displayed in the grid. Refer to the Employee(s) Year-to-Date Information grid for an explanation of the options available for saving the data.
-
Browse through all five sections of the form and ensure that the data generated is correct. You may adjust values as necessary throughout the form. Once all the fields contain values, select the 'Next' button.
-
Optional: If you select the 'You were a semi-weekly schedule depositor for any part of this quarter' option in part 2 of the 941 form, you must fill out the Schedule B - Employer’s Record of Federal Tax Liability form:
-
Place a checkmark in the 'Semiweekly scheduled depositors' checkbox to enable the 'Calculate' button located on the right-hand side of the window, then select the 'Calculate' button to generate your semi-weekly figures.
-
Select 'Next'.
-
-
The final screen of the 941 Wizard will appear, displaying your 'Balance Owing', as well as allows you to report and save the data you have compiled.
-
Select the 'Save' button to save your 941 information. If you have already saved a return into your database, you will receive a warning message. Select the 'OK' button in this case.
-
The next step is to pull up the 941 report. Select the 'Report' button.
The Report Selection window will appear, with the reports contained in the default TruckMate installation folder displayed.
-
Select the 'US_941.rpt' from the Reports grid and select the 'OK' button.
This report will generate the detailed information from the tax return, and allow you to print out the form using your printer, on the actual 941 form. When you view the report on your screen, you will notice that there are no lines or additional information on this page, because this page is meant to be printed on the actual 941 form.
In this instance, place the blank 941 form into your printer, and select the 'Print' button at the top of the screen.
-
Optional: If you completed step 5 (above) to gather semi-weekly deposit information, you can now select the 'Print Schedule B' button. The Report Selection window will appear where you should select the 'US_941_SchedB.rpt' file.
The Schedule B report will then be generated, and you can use the 'Print' button on the Report Preview window to print the Schedule B report.
-
-
Back on the final screen of the 941 Wizard, select the 'Close' button to complete the 941 tax form process.
-
When you reach the final step and receive a message saying you have successfully completed your form, click Save to save your data to the database, and then Close to return to the main window.
You can now print a report or submit this information electronically (create a magnetic media file).
Canadian Payroll Reports
Generating T4s
-
Choose T4 from the 'Select Form' drop-down list. The Employee and Company grids adjust to display T4 headings.
-
Click Retrieve. The Search Preferences window appears.

Once you have specified the search criteria, click on the 'OK' button to retrieve the data and return to the main screen.
Notes:
-
Use the Select a date range section to specify which records you would like to see in the main program grid. Simply click the pull down menu button to select a date from a calendar menu.
-
The Search Preferences window offers additional options where you can select the employee Payroll information you want to retrieve. These options include 'Maximum amount Employment Insurance earnings, 'EI Maximum Contribution', a specific 'EI Rate', the 'Maximum amount of pensionable earnings', 'Canadian Pension Plan Maximum Contribution' and a specific 'CPP Rate'.
-
-
Select a Date Range for your data using the options on the right. You can click on the calendar icons to select the 'Start Date' and 'End Date' from the calendar presented, or you can right-click on the date box and select a specific day, week or month.
-
Click OK. Your T4 data is saved to the database and displayed on the grid in the main window.
You can now print a report or submit this information electronically (create a magnetic media file).
Generating Returns (RL-1s) for Quebec
Revenue Quebec provides a web site for submitting your RL-1 slip files. As of January 1, 2011, anyone filing more than 50 copies of a given type of RL slip is required to use this service. If the file you wish to submit is larger than 10MB or if you have a low-speed Internet connection (56 Kbit/s or less), it is recommended that you compress the file. If you notice errors in the file after submitting it, contact the Division de l’acquisition des données électroniques at [email protected], or by telephone at 1 866 814-8392. For any other questions about filing your RL slips, call the Direction principale des services à la clientèle des entreprises at 418 659-4692 or 1 800 567-4692. Always keep a copy of the acknowledgement of receipt for your files.
Submitting Original RL-1 forms to Revenue Quebec
-
Choose RL-1 from the 'Select Form' drop-down list. The Employee and Company grids adjust to display RL-1 headings.
-
Click Retrieve. The Search Preferences window appears.
Note: The Search Preferences window offers additional options where you can make changes. For RL-1’s these options include 'Maximum amount QPIP earnings, 'QPIP Maximum Contribution', and 'Rate'. These fields are pre-populated, but you can change the 'Maximum amount QPIP earnings' and 'Rate' if necessary.
-
Select a Date Range for your data using the calendar options on the right.
-
Click OK. A confirmation dialog appears. Click Yes to continue. Your RL-1 data is saved to the database, and displayed in the grid in the main window.
-
Click File > Create File or the Create magnetic media file icon (
 ) on the toolbar. The Magnetic Media for RL-1 forms window opens.
 -
Select Original in the Transmission Type drop-down list.
-
Enter information into the other available fields and select appropriate drop-down choices. For more about this window, see the Magnetic Media window.
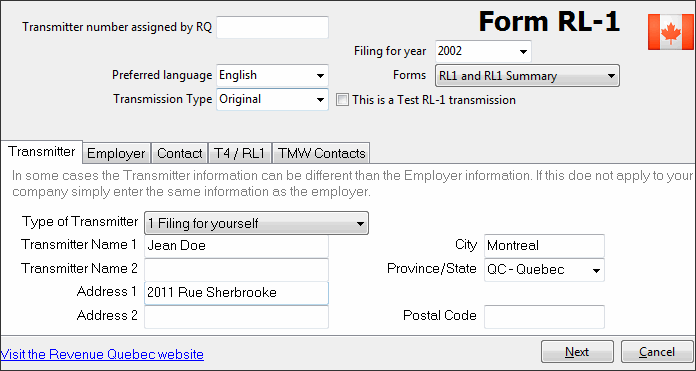
Field Definition Transmitter number assigned by RQ
This number is assigned to each client by Revenue Quebec and always starts with NP and contains six digits.
Transmission Type
Select Original for original data (R records) being filed. Click in the 'This is a Test RL-1 transmission' checkbox to create a test file and submit it to Revenue Quebec.
For Amending or Cancelling, select Amended or Cancelled (A or D).
Note: Submitting a Transmission or Submission Type of Amended is only supported for T4, T4A, RL1 and 1099 forms.
Transmitter tab
Type of Transmitter
Specify if you are filing on behalf of employees in this field. (i.e., 1. Filing for yourself, 2. Filing on behalf of other filers, 3. Filing for yourself and on behalf of other filers).
T4/RL1 tab
Certification #
This field is populated automatically with TruckMate’s certification number RQ-10-01-212 and was provided by Revenue Quebec. TruckMate must be certified for RL-1 slips each year and this field is always populated with the current year’s number.
Employer Identification #
Enter your employer identification number assigned to you by Revenue Quebec.
Quebec Enterprise # NEQ
This field is optional.
Source of RL Slips
The appropriate option for TruckMate users is option C.
File #
Enter your file number provided by Revenue Quebec.
RL1 Sequence Numbers From/To
Are the numbers assigned to you by Revenue Quebec? You can request more if you need to. You must have at least as many sequential numbers as Employees (RL-1 slips).
TMW Contacts
-
Click Next. The information you entered is now saved and a message appears asking you to confirm that you want to transmit Original data.
-
Click Yes to proceed. Another confirmation box appears asking if you want to save a copy to your hard disk.
-
Click Yes to save a copy. An important information window appears. Pay careful attention to the file naming conventions specified in this window. The format is AAPPPPPPSSS.xml where:
-
AA = the last two digits of the taxation year you are filing for.
-
PPPPPP = the six digits of your transmitter number assigned to you by Revenue Quebec less the NP.
-
SSS = the chronological sequence number of your file.
-
-
Click OK. Ensure the file name appears as it should.
-
Click Save. A Warning message appears. Pay attention to the maximum file size (150 MB) allowed and make a note of who to contact if it exceeds this size.
-
Click OK and your file is saved to your desktop. A pop-up window appears prompting you to upload your file to the Revenue Quebec Web site.
Warning: If you choose not to save your file, the information is deleted from the records table.
-
If you would like to proceed and upload your file to Revenue Quebec, click the link to their web site and follow the instructions there.
Note: Once you have completed the upload, mark down your Acknowledgement Reference Number provided to you by Revenue Quebec.
-
Return to the Submit RL-1 file window and enter your Acknowledgement Reference Number into the field provided.
-
Click Submit. A confirmation message appears.
-
Click OK. The upload process is now complete.
-
Optional: if you choose not to upload your file, click the Do Not Submit button in the Submit RL-1 file window. Your file is still created but the filename is now changed. A Warning message appears explaining that the file now has an "unsubmitted" prefix and it cannot be submitted to Revenue Quebec.
Submitting Amended RL-1’s to Revenue Quebec
If you have generated an RL-1 form and then realize you need to amend it, you can make the correction in the Employee Profile program and then return to the Payroll and Returns Generator to retrieve your Original data again. Follow the steps below to amend your file:
| You can amend an Original or Amended record. You cannot amend a Cancelled record since Cancelled records are deleted from Revenue Quebec systems immediately. |
-
Flag the record(s) you want to Amend.
Note: Once you select Amend (or Cancel), the next record in the grid becomes active.
-
Click the Create magnetic media file icon (
) in the toolbar. The Magnetic Media for RL-1 forms window opens. -
Select Amended from the 'Transmission Type' drop-down list.
Note: If you do not select 'Amended' as the Transmission Type, you will re-create Original records for ALL records appearing in the grid. (Even those labeled as Amended or Cancelled).
-
Enter any additional information as required.
-
Click Next. A confirmation message appears asking you to confirm that you are "Amending a record".
-
Click Yes to amend your file. A message appears asking if you want to save the file to your hard disk.
-
Click Yes to save. An Information message appears with important file naming conventions. Ensure you have provided the correct sequence number. The format is AAPPPPPPSSS.xml where:
-
AA = the last two digits of the taxation year you are filing for.
-
PPPPPP = the six digits of your transmitter number assigned to you by Revenue Quebec less the NP.
-
SSS = the chronological sequence number of your file.
Note: If the Original file’s sequence number is 001, then its amended file is 002. If an amended file is 002, then amending it once again would make it 003.
-
-
Click OK. The Save window opens so you can save your file with the correct format and sequence.
-
Click Save and your file will be saved to your desktop. The Submit RL-1 file window appears.
Warning: Ensure you read the important disclaimer information in this window before proceeding.
-
If you would like to proceed with uploading your amended file to Revenue Quebec, click the link to their web site and follow the instructions there.
Note: Once you have completed the upload, mark down your Acknowledgement Reference Number provided by Revenue Quebec.
-
Once you have your Acknowledgement Reference Number, return to the Submit RL-1 file window and enter it into the field provided.
-
Click Submit. A confirmation message appears.
-
Click OK. The upload process is now complete.
-
Optional: If you choose not to upload your file, click the Do Not Submit button in the Submit RL-1 file window. Your file is created but the filename is now changed. A Warning message appears explaining that the file now has an "unsubmitted" prefix and it cannot be submitted to Revenue Quebec.
Submitting Cancelled RL-1’s to Revenue Quebec (original or amended)
If you would like to cancel an RL-1 record, follow the steps below.
| You can cancel an Original or Amended record only. You cannot cancel an already cancelled RL-1 record since cancelled records are deleted from Revenue Quebec’s system immediately. |
-
From the Payroll and Returns Generator, retrieve your original data.
-
Flag the record(s) you want to cancel.
Note: Once you select Cancel (or Amend), the next record in the grid becomes active.
-
Click the Create magnetic media file icon (
) on the toolbar. The Magnetic Media for RL-1 forms window opens. -
Select Cancelled from the 'Transmission Type' drop-down list.
Note: If you do not select 'Cancelled' as the Transmission Type, you will re-create Original records for ALL records appearing in the grid.
-
Click Next. A confirmation message appears asking you to confirm that you are "Cancelling a record".
-
Click Yes to cancel your file. A message appears asking if you want to save the file to your hard disk.
-
Click Yes to Save. An Information message appears with important file naming conventions. Ensure you have provided the correct sequence number.
Note: If the Original file’s sequence number is 001, then its cancelled file is 002. If an amended file is recorded as 002, and you cancel it, then it is now recorded as 003.
-
Click OK. The Save window opens so you can save your file with the correct format and sequence.
-
Click Save and your file will be saved to your desktop. The Submit RL-1 file window appears.
-
Upload your cancelled file to Revenue Quebec by clicking the link to their web site and following the instructions there.
Note: Once you have completed the upload, mark down your Acknowledgement Reference Number provided by Revenue Quebec.
-
Return to the Submit RL-1 file window and enter it into the field provided.
-
Click Submit. A confirmation message appears.
-
Click OK. The upload process is complete.