Fuel Card Data Import
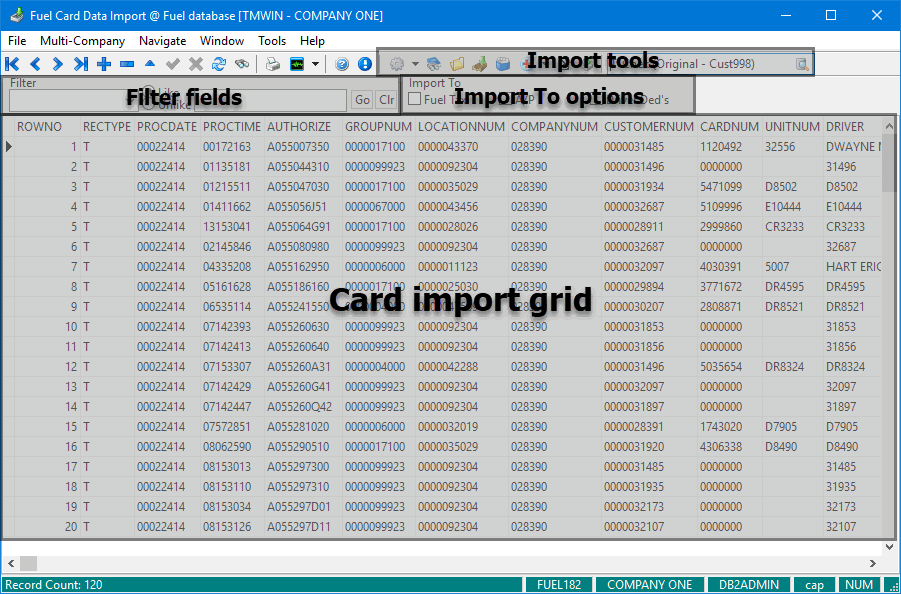
Fuel Card Data Import imports transaction information from electronic files provided by your fuel vendors into TruckMate.
These vendors usually have a card system where your drivers can purchase fuel, oil, and miscellaneous purchases and in some cases take cash advances using such cards. Some oil companies will then send you an electronic copy of your fuel purchase invoice.
Card Data Import allows you to process fuel vendor data in the following ways:
-
If your vendor provides fuel purchase transactions, you can import your fuel purchase data into TruckMate to match to your dispatch data. You can then calculate your fuel taxes based on the correlated information.
-
You can process the transactions recorded by your vendor into an A/P invoice, which is then processed in the same way as your other A/P invoices.
-
You can process the transactions recorded by your vendor directly into deductions against the drivers who purchased the fuel.
Fuel Card Data Import requires a license file for each fuel vendor you will use. Without this license, you can load files and check them for errors, but you cannot import file data. For more information about required licenses, see License Key Entry.
To access Fuel Card Data Import:
| From this location | Go to |
|---|---|
TruckMate Menu and TruckMate Task List |
|
Windows Start Menu |
|
Windows Explorer |
C:\Program Files (x86) > TruckMate 20xx > CardImport.exe |
Setting up Fuel Card Data Import
General Fuel Card Data Import setup
Setting up import types
You can decide which fuel vendor import types are available to users.
Click the ![]() Setup/Options drop-down and select Import Types. The Import Types Setup window opens.
Setup/Options drop-down and select Import Types. The Import Types Setup window opens.
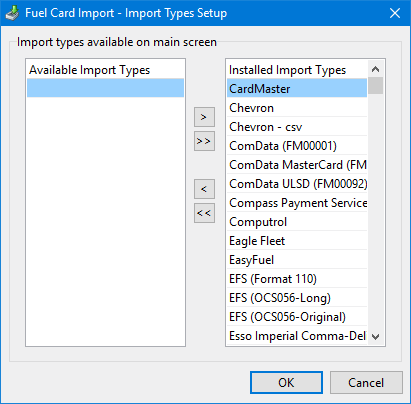
Use the buttons to add or remove import types as needed.
Configuring predefined import definitions
You can see how an individual import type is defined and make changes if you want.
| Changing predefined import definitions can cause data to import incorrectly or not at all. For this reason, Trimble strongly recommends that you do not change the information in the Import Type Definition window without assistance from Trimble Support. |
-
Enter or select the import type in the field at the top right of the toolbar.
-
Click the
 Setup/Options drop-down and select Import Types. The Import Type Definition window opens.
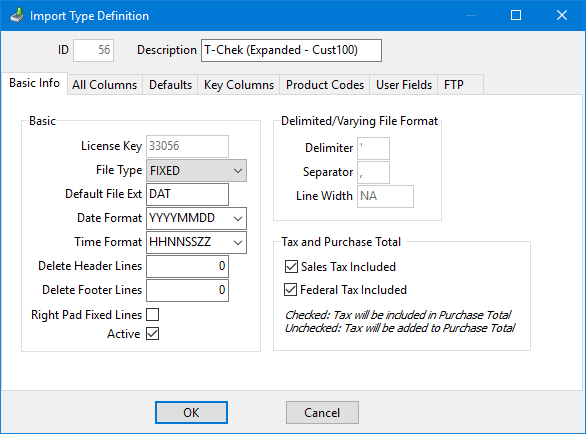
Setting up Application Configurator for use with Fuel Card Data Import
Configure Fuel Card Data Import using the options found under Configuration Options > CARDIMPORT.EXE.
Fee type for e-check transactions |
Fee type for e-check transactions that are created in the vendor’s portal |
Fuel Update Via |
When set to True, the system uses fuel stops for Fuel Tax routing. |
Use CASH and DASH CASH together for the Cash Advance in T-Chek (Expanded - Cust100) |
When set to True (default), the system adds CASH and DASH CASH values together when cash advance data is imported. This setting applies only to the T-Chek (Expanded - Cust100) import type. |
Use EFS Branch in Lookups |
When set to True, the system concatenates the EFS branch ID onto the card ID. |
Currently-supported fuel vendors
This table lists supported fuel vendors along with the licenses required to import vendor data. If your fuel vendor is not included, contact Trimble Support.
Where needed, vendor-specific instructions are included in Importing transaction data.
You enter license numbers in License Key Entry.
| Vendor | License |
|---|---|
CardMaster |
33073 |
Chevron |
33043 33074 (CSV) |
Comdata |
33000 (FM00001) 33051 (ULSD (FM00092)) 33064 (MasterCard (FM00081)) |
Compass Payment Services |
33077 |
Computrol |
33001 |
Eagle Fleet |
33078 |
EasyFuel |
33062 |
EFS |
33010 (OCS-056) 33058 (OCS056-Long) 33071 (Format 110) |
Esso Imperial Comma-Delimited |
33063 |
Expediter |
33068 |
FCL |
33031 |
FleetOne |
33039 |
FTS Fuel System |
33057 |
FuelMan - Apollo |
33048 |
GasBoy |
33009 33037 (Transactions) 33052 (2000) 33054 (RawTrans) 33072 (CSV) |
Husky |
33029 (Invoice Detail) 33076 (Pro) |
Irving |
33022 (Fixed Text - Original) 33055 (Delimited) |
Metro |
33032 |
MultiService |
33024 |
OPW Global |
33069 |
P-Fleet |
33066 |
Penske |
33034 33036 (Lease) |
Petro-Vend |
33045 |
PetroCanada |
33016 |
Phoenix |
33013 (Text) 33047 (Excel) 33050 (CSV) |
Pilot Fuel Tax |
33014 |
Quick Fuel |
33053 |
SC Fuels |
33067 |
Shell |
33025 33075 (Delimited) |
Suncor Energy |
33061 |
SuperFleet |
33060 |
T-Chek |
33003 (ESSO - DBF) 33008 (Original - Cust998) 33046 (ESSO - Text) 33056 (Expanded - Cust100) 33065 (FLTDAT08) |
TCH |
33005 33070 (Money Code Usage) |
Trace SHELL |
33002 |
TransPlatinum |
33007 |
Trendar |
33027 |
UFA |
33041 (Original) 33042 |
Ultramar |
33020 (Text) 33049 (Excel) |
WINC6 Fuel Report |
33059 |
Wright Express |
33018 |
Importing transaction data
To import transaction data, follow these steps.
-
Load a transaction data file into Fuel Card Data Import.
-
Check the data for errors and correct any that occur.
-
Determine which data you want to import.
-
Import the data into your database.
Loading a transaction data file
-
If you know the import type, enter it in the field at the top right of the toolbar. You can also click
 Pick List to select an import type.
If you do not know the import type, go to Step 2.
-
Click
 Load Data File.
If you entered an import type in Step 1 and the data file format matches, the Card Import grid populates with transaction data.
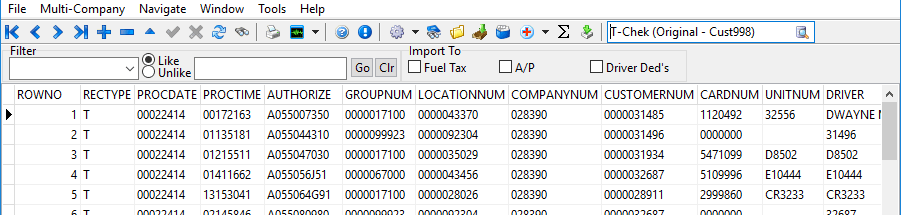
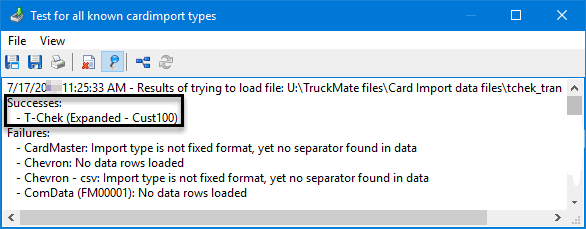
If you did not enter an import type in Step 1, a message appears asking if you want to test a data file to see if it matches a known type or format. Follow these steps.
-
Click Yes.
-
On the window that opens, go to and open the import file.
The system checks the data file against all recognized file formats. When the check is complete, a window opens that contains the results. If there is a recognized file format that is a match, it appears in the Successes section. Repeat Step 1 with that file format.
-
Checking for and correcting errors in the transaction data file
After you have loaded the data file, check it for errors. If there are any, you must correct them before you import the data.
-
In the Import To group, select one or more options.
-
Click the
 Error Check drop-down and select Error Check.
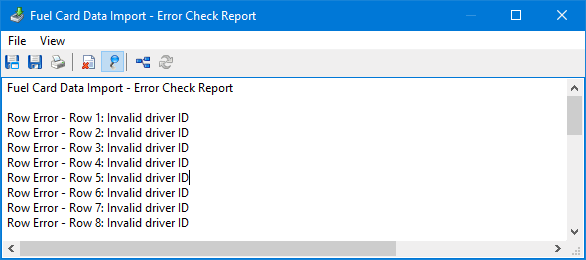
After the system completes the error check, the Error Check Report window opens. It lists all errors found in the data.
|
The following report messages are warnings and will not prevent you from importing the data record:
|
You have several options if you want to use this report as a guide when correcting the errors.
-
By default,
 Stay on Top is selected, so you can keep the window open alongside any other open TruckMate applications.
 -
You can save the report as a text file by clicking
 Save to File and choosing a file name and location.
 -
You can print the report by clicking
 Print.
Correct errors using either of the following methods.
Editing values in the Card Import grid
-
Go to the row containing the error. If necessary, use the Filter fields to locate the row.
-
Click in the appropriate column. In some columns, double-clicking in the column opens a Select window.
-
Enter or select a valid value.
-
Repeat Steps 1-3 for each row containing an error.
-
When finished, rerun the error check.
-
Repeat these steps until no errors remain.
Setting mappings between data values and TruckMate IDs
When you load a file, the system identifies all values in the file that do not have equivalents in your TruckMate database. You can create mappings for these values that will be applied to the records when you rerun the error check.
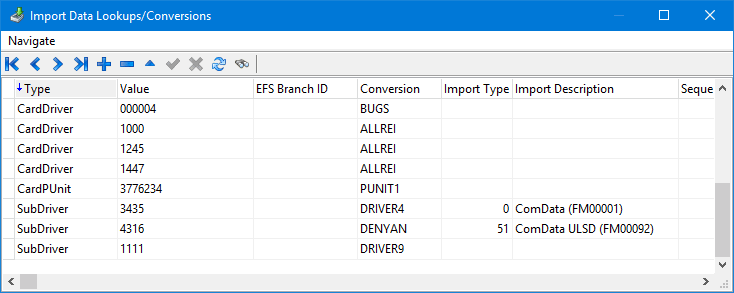
Click ![]() Set Mappings. The Import Data Lookups/Conversions window opens.
Set Mappings. The Import Data Lookups/Conversions window opens.
To add a new mapping:
-
Click
 Insert.
A new row appears in the grid. -
Enter values in the following required columns.
Column Definition Type
Relation ID. There are two types:
-
Cardxxx (where xxx=resource type)
Use this type when you want to create a mapping based on a card’s main ID value.For example, if a card ID is 123 and you want to create a mapping for a driver whose ID is SMITH, you would enter CardDriver as the type, 123 as the value, and SMITH as the conversion.
-
Subxxx (where xxx=resource type)
Use this type when you want to create a mapping based on the resource ID value attached to a card.For example, multiple cards may be attached to a driver whose non-TruckMate ID is JONES. If you want to create a mapping to the TruckMate ID SMITH, you would enter SubDriver as the type, JONES as the value, and SMITH as the conversion.
With this option, you only have to set the mapping once. It will work for all future imports.
If there is more than one match, the system chooses an ID from the card data record in this order:
-
Cardxxx = main ID
-
Cardxxx = alternate ID
-
Subxxx = resource ID
-
None of the above = resource ID
Value
Invalid value for which you want to create a mapping
Conversion
Valid database value
-
-
Click
 Post.
Post.
To edit an existing conversion, click in the appropriate column and make changes as needed.
When finished, rerun the error check. Repeat the steps until no errors remain.
Completing the import process
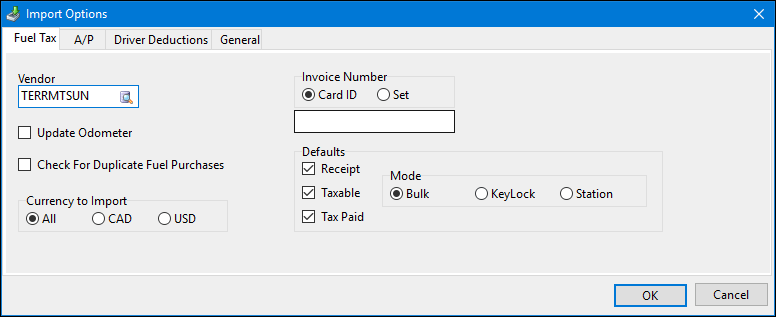
After you have loaded the data file and corrected all errors, click the ![]() Setup/Options drop-down and select Import Options. The Import Options window opens.
Setup/Options drop-down and select Import Options. The Import Options window opens.
If it is not already selected, select the tab corresponding to the database location where you want to import the data. On that tab, enter information in the appropriate fields.
When done, click OK. You can then import the data by clicking ![]() Import into TruckMate Tables.
Import into TruckMate Tables.
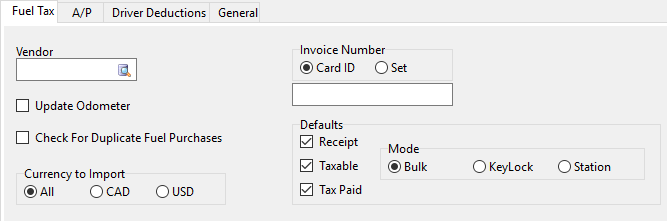
Fuel Tax tab
The import options available to you may differ depending on your vendor. This illustration displays options available for Comdata.
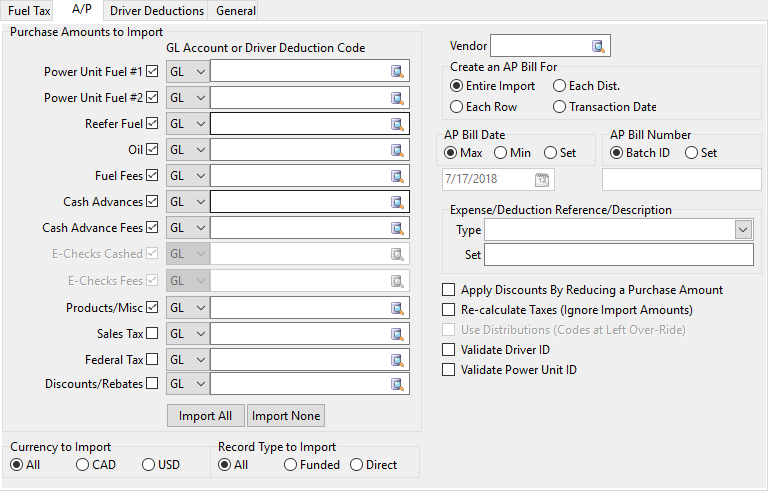
A/P tab
The import options available to you may differ depending on your vendor. This illustration displays options available for Comdata.

Splitting transaction data between two or more A/P bills
Occasionally you may have a single data file containing transactions that must go on separate A/P bills (e.g. one for company drivers and one for owner-operators).
-
After you have loaded the data file and corrected errors, use the Filter fields to display only those records that you want to apply to one of the bills.
-
Import the records.
-
Repeat Steps 1 and 2 for the records you want to apply to each new A/P bill.
For vendors (such as Comdata) that provide funded and direct bill transactions, follow the steps above for each type of transaction.