Driver Call-In - Dispatch information

Trip Summary
Trip Status
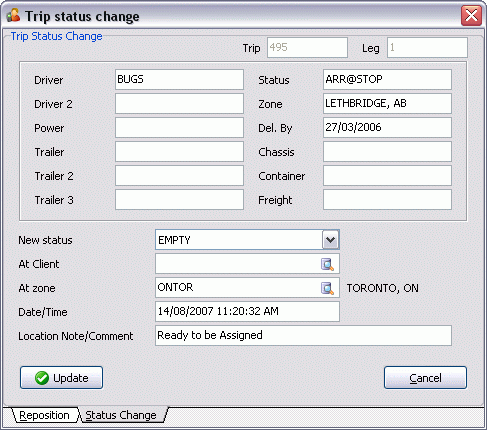
If the selected Driver is currently assigned to a Trip, the Trip will display in the Trips Assigned Grid. You can change the Trip status by clicking on this button, or by double clicking on the Trip Number in the Grid. The fields at the top of the Trip Status Change window will pre-populate depending on the equipment and details of the Trip. The fields on the bottom of the form are where you will update the Trip Status.
| Field | Definition |
|---|---|
New Status |
If you have configured the Previous Code value for the status code (in the Codes Maintenance program), or if you are using the default TruckMate status codes, the status code will default. You can select any status code from the drop down list box. |
At Client |
Applies when the Trip Status is changed to 'Spotted' or 'Arrive at Dock' behaviors to identify the location of the load. When the trailer is spotted or arrives at a Client location, click the search button and select the client. The 'At Zone' field will default to the Client’s zone location. |
At Zone |
The Zone Code that defaults here depends on the Code Behavior of the status code that is being assigned (as configured in the Codes Maintenance program). For example, if the status code has a Dispatch code behavior, the 'At Zone' will correspond to the Current Zone of the Active leg. If the status code has a Pick Up code behavior, the Leg From Zone of the next loaded leg will be used. If the status code has a Delivery code behavior, the Leg To Zone of the last leg on the Trip will be used. You can enter a different Zone Code in this field instead of the default. Enter the Zone Code, or click the search button for a search form. The Zone Code entered in the At Zone will become the Current Zone of the Trip. |
Date / Time |
Defaults to now. Double click for a calendar selection form. This is for information and reporting purposes only, and can be viewed using the Trip View menu option. |
Location Note / Comment |
You can record notes about this status change. This is for information purposes only, and can be viewed using the Trip View menu option. |
Update |
Select this button to update the Trip Status with the details you have selected in this window. |
Reposition
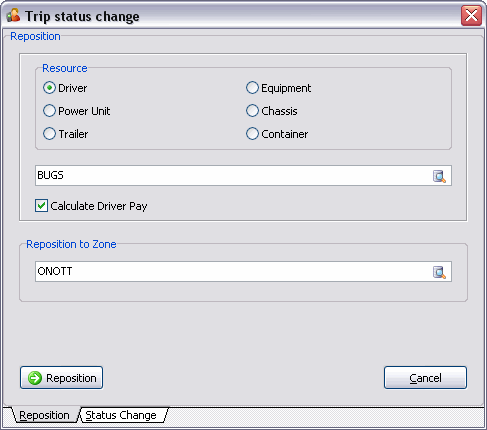
The Reposition function is used to move a Driver or piece of equipment from their Current Location to a new location. In order to do this, the selected Driver and / or equipment is assigned to a Trip with no freight bill. Generally, Driver and equipment repositions are taken care of automatically, through Trip activities.
For example, when you assign Drivers and equipment to a Trip that was created by double clicking on a freight bill, empty legs are created at the beginning of the Trip to show the movement of the Power Unit to the trailer, and the Power Unit and trailer to the start location of the first freight bill that is being picked up. However, if you wish to reposition a Driver or equipment without assigning them to a Trip with a freight bill, you can use the Reposition option, which opens the Trip status change and equipment repositioning window.
| Field | Definition |
|---|---|
Resource Resource Code |
By default, the Driver or piece of equipment that was selected when the Reposition function was invoked will default in the 'Resource Type' and 'Resource Code' fields. You can select a different Resource Type and Code if you wish. Enter the Zone Code of the zone to which you want to reposition the Driver or equipment. |
Reposition to Zone |
To quickly find the zone, enter the first few characters of the Zone Code or the short description in the 'Zone Code' field, then click the search button or select the <Enter> key to display a search form. When complete, click on the 'Reposition' button. |
Reposition |
When you select the Reposition button, you will be asked to confirm the reposition process. Select 'OK' when prompted, and the system will attempt the reposition. A Warning window may appear if the Resource you are attempting to reposition is currently assigned to another Trip. You may proceed with a reposition in such a case, but it is not recommended. If you are repositioning a Driver (for example), you may be prompted to automatically reposition any associated resources (Power Unit, Trailer, etc.) with the Driver. Select 'Yes' if you would like to have associated resources automatically repositioned, or 'No' if you would like to do this manually. |
Trips Assigned
The Trips Assigned Grid will display all Trips assigned to the Driver who is currently selected. Most of the details here will pre-populate based on the Freight Bill information of the Trip, but some of the fields in the Trips Assigned Grid can be used to enter leg and Trip information or invoke menu functions. Use your Context Menu to view more options. * *
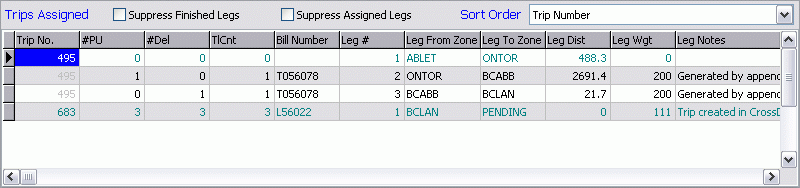
Suppress Finished Legs
Checking this Filter option will exclude all Trip Legs with a 'COMPLETE' Status from the Trips Assigned Grid.
Suppress Assigned Legs
Checking this Filter option will exclude all Trip Legs with an 'ASSGN' Status from the Trips Assigned Grid.
Sort Order
Use the pull down menu to select a Sort Order value, which will sort the records in the Trips Assigned grid accordingly.
Trip #
Double click on the Trip # field to invoke the Status Change form. See the Status Change section that follows for a description of changing Trip status.
# P/U / # Del / TlCnt
Double click on any of these fields to display the Drill Down form.
Bill Number
Double click in the Bill Number field to load the Customer Service program (if not already loaded) and display the first freight bill assigned to the leg. If the freight bill number is underline, it means that there are Notes associated with the freight bill.
Planned Departure Date
You can enter a Planned Departure Date for each leg. Double click in the Planned Departure Date field to invoke the entry form, then double click in the Planned Departure field for a calendar selection form. The default Planned Departure Date is '01/01/1980'.
Last FB Status
This field displays the last known Status of the Freight Bill attached to the Trip Leg.
LS_USER_1 - LS_USER_10
These 10 User Defined fields can be used to send miscellaneous information on Load Offers to Drivers. Users must setup a Macro in the Macro Setup program that uses the Forward Datatype '02- Text' with one of the ten available 'Trip User Field' Forward Actions.
Context Menu
Trip View
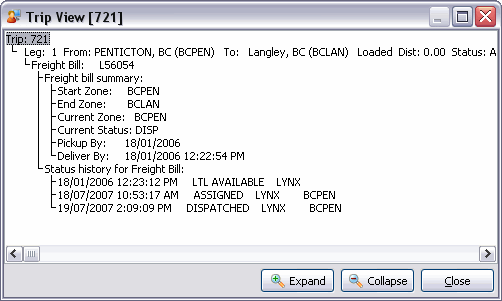
The Trip View window displays a form that provides exhaustive information about a Trip. The Trip View is organized in a hierarchy:
-
At the top of the hierarchy is the 'Trip number'.
-
Under the 'Trip Number' is each 'Trip Leg'.
-
Under the 'Trip Legs' is the 'Driver', Resources and Freight Bill(s) assigned to the leg.
-
Under each 'Driver' and Resource their location history (for the Trip) and their status history (for the Trip).
-
Under the Freight Bill is a Freight Bill summary and the Freight Bill status history (for the Trip).
Each level of the hierarchy can be collapsed or expanded by double clicking on the level above. The 'Expand' button at the bottom of the screen will expand all collapsed levels, while the 'Collapse' button at the bottom of the screen will collapse all expanded levels.
Freight Bill Notes
You can view or add notes to the freight bill assigned to the Trip leg from which this option was invoked.
Trip Notes
The Trip Notes function is used to add notes to the selected Trip.
View Freight Bill
This option will load the Customer Service program (if not already loaded) and display the first freight bill assigned to the Trip leg from which the option was invoked.
Drill Down
The Drill Down function is used for LTL Dispatch operations. See the Dispatch program > Trip Grid for a complete description.
Load Offer
Selecting this option brings up the 'Forward Message' dialog box where you can enter and send your message.
| When AAAD stops are being created, if one of the stops can not be geocoded properly, the latitude and longitude will come back as '0000000N/0000000E' or blank. If this happens, AAAD Load Offers have a field that lets the Driver know to send a 'Client GPS Update Macro'. This Client GPS Update Macro is sent by the Driver to update the Client’s lat/long when they have arrived at the stop. |
Driver Manifest
Selecting this option brings up the 'Forward Message' dialog box showing the Driver Manifest information for this particular Trip. Selecting this option will send a Driver’s manifest to the recipient.
Optimize Trip
The Optimize Trip function is used to configure Trip legs and freight bill picks and drops. See the Trip Optimizer window for a complete description.
Match Resource
By right-clicking within a Trip, you are given the option of matching a resource to that Trip. Depending on what you would like to assign, select either 'Trailer', 'Power Unit' or 'Misc Equipment'. Once an option is clicked, a new window will be displayed, asking you to select an available piece of equipment. When you have found the resource you wish to attach to the current Trip, select it and click the 'OK' button. The resource will then be assigned.
| If assigning resources to a Trip that are not currently in that Trip zone, the resources will be assigned the matching zone. This does not, however, create a Trip detailing how the resources became available in the current zone. |
Round Trip
The Round Trip options provide the ability to:
-
Set as Head Haul: defines the trip as the Head Haul for the Round Trip.
-
Set as Back Haul: defines the trip as the Back Haul for the Round Trip and requires entry of the Head Haul trip number on the Set Back Haul Round Trip window.
-
Set as Back Haul (Searching): defines the trip as the Back Haul of the Round Trip and provides a search window to select the Head Haul trip number on Select Trip Number window.
-
Set as Back Haul (Advanced): This will pop up a search box similar to the 'Set as Back Haul (Searching)' search box but it will allow you to search by Power Unit or Driver. The records will be displayed in reverse date order using the 'Actual Date' of the Trip (most current will be displayed at the top). The number of records that will be displayed will be limited to the number specified by the 'Back Haul Advanced' option in the Application Configurator program > TRIPENV.EXE section.
-
Driver Pay
Selecting this option will open a Driver Pay History information window that details 'Payments' and 'Deductions' for the selected Driver.
Print Manifest
Selecting this option brings up the Report Selection dialog box where you can select the recommended report of 'MANIFEST.RPT' or scroll to a report of your choosing.
Print Load Card
Selecting this option brings up the Report Selection dialog box where you can select the recommended report of 'LOADCARD.RPT' or scroll to a report of your choosing.
Expert Fuel Optimization
Selecting this option will display the Expert Fuel Optimization window, which allows the Driver Call In program to connect to the IDSC Fuel Expert Server and receive a list of fuel stops and route.
Attach / Open Related Files
Selecting this option will open the Attach / Open Related Files window.
Freight Bills Assigned Grid
If the user has set the Application Configurator program > DCALL.EXE > 'Show Freight Bills' option to 'True', an additional section (pane) will appear at the bottom of the Driver Call-In program window. This pane will show all Freight Bills that are on Trips assigned to the selected Driver. It will show the top section of CServ right here in Driver Call-in. This will, in effect, populate much of the information from the Customer Service program > Header section directly within the Driver Call-In program, for ease of viewing.
Driver Information
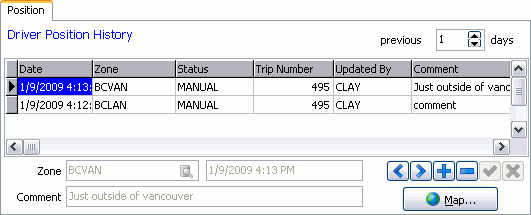
Position Tab
The Position Tab is used to display a history of the selected Driver’s geographical position. You may manually enter a position for a Driver. Position updates occur when status changes are assigned to Trips in the Dispatch program, in the Driver Call In program, and by messages sent through the Mobile Dispatch module. Driver positions are also updated by incoming mobile dispatch messages.
Previous <number> Days
Specify the number of days for which you want to see position history. Note, if you change the value in this field, you must re-find the Driver to refresh the display. Click the 'F' button beside the 'Driver ID' field to refresh the display.
Zone
Displays the short description for the Zone Code that is associated with the position record currently highlighted in the Grid. Zone codes and short descriptions are configured in the Codes Maintenance program.
Date and Time
Is displayed in the field to the right of the Zone Description field. If the position entry was created from a Trip status change, the date and time of the Trip status change will be displayed here. If the position entry was created from an incoming message in the mobile dispatch module, the date and time that the message was generated will be displayed here.
Comment
If a comment was recorded when the Trip status was changed, it will display here.
Map
The globe button will display a map that shows the Driver’s movements for the period specified in the Previous Days field. The mapping function works in conjunction with PCMiler’s mapping software. To use the map, the Mileage Server program must be running.
Position Grid
Date
Displays the date and time that the position entry was created.
Zone
Displays the Zone Code associated with the position entry.
Status
If the position entry was created from a Trip status change, the new status will display in this field.
Trip Number
If the position entry was created from a Trip status change, the Trip number will display in this field.
Updated By
If the position entry was created from a Trip status change, the user name of the person who made the status change will display here. User names are configured in the Security Setup program.
Comment
If a comment was recorded when the Trip status was changed, it will display here.
Position Latitude / Position Longitude
If the position entry was created from an incoming message processed through the mobile dispatch module, the latitude / longitude from which the message was sent will display in these two fields.
| There may be some slight differences between the GPS coordinates displayed by your Mobile Communications device and those displayed in these fields. This is because when TruckMate receives a GPS coordinate (00.00000, -000.000000) from a Communications device (i.e. a D2LINK device) the software translates this potions into 'Degrees', 'Minutes', 'Seconds', 'Direction' (0000000N, 0000000W). |
*Warning:* if the entry made here is the most recent position entry, the Driver’s current zone will be updated, but no Trip will be created to account for the movement.
Status Tab
The Status Tab gives a breakdown of the changes in the selected Driver’s Status history. You can use this Tab to quickly see the various Trips that brought a Driver to his / her current Zone Code.
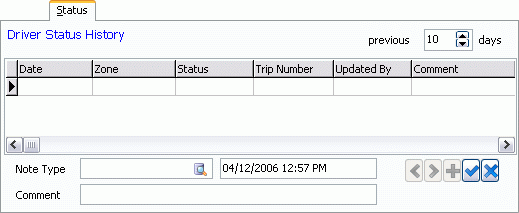
Note Type
Click the search button to select a Note Type value from those available on your system.
Date and Time
Is displayed in the field to the right of the 'Note Type' field. If the Driver status entry was created from a Trip status change, the date and time of the Trip status change will be displayed here.
Comment
If a comment was recorded when the Driver status was changed, it will display here.
Driver Status Grid
Date
Displays the date and time that the Status entry was created.
Zone
Displays the Zone Code associated with the Status entry.
Status
If the Status entry was created from a Trip status change, the new status will display in this field.
Trip Number
If the Status entry was created from a Trip status change, the Trip number will display in this field.
Updated By
If the position entry was created from a Trip status change, the User name of the person who made the status change will display here. User names are configured in the Security Setup program.
Comment
If a comment was recorded when the Driver Status was changed, it will display here.
Position Latitude / Position Longitude
If the position entry was created from an incoming message processed through the mobile dispatch module, the latitude / longitude from which the message was sent will display in these two fields.
Hours Tab
Driver on-duty hours can be recorded on the Hours Tab. Information entered here will update the summary on the Cycle Tab, as well as update the various Driver Cycle Duty Hour fields ('Can 7', 'Can 8', 'Can 14', 'US 7', etc.) on the Dispatch program > Drivers Tab. Entries will display based on the number of days specified in the Position Tab > 'Previous Days' field.
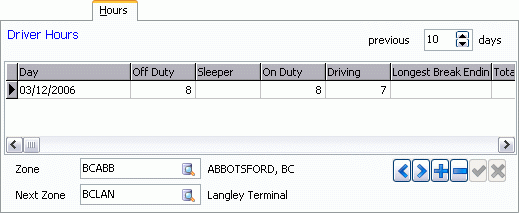
Zone
Displays the short description for the Zone Code that is associated with the hours record currently highlighted in the Grid. Zone codes and short descriptions are configured in the Codes Maintenance program.
Next Zone
Displays the short description for the Next Call Zone code that is associated with the hours record currently highlighted in the Grid. Zone codes and short descriptions are configured in the Codes Maintenance program.
Driver Hours Grid
| Information in this Grid is maintained within TruckMate’s DRVCALL database table. |
Day
Displays the date of entry of the hours record. When entering a record, the default is today’s date. Double click for a calendar selection form.
Off Duty
Displays the number of Off Duty Hours for the selected Driver. Click within the field and use your keyboard to update the Off Duty hours if required.
Sleeper
Displays the number of Sleeper Hours for the selected Driver when on two-Driver Trips. Click within the field and use your keyboard to update the Sleeper Hours if required.
On Duty Hours
Is used to record the number of hours the Driver worked on the date specified in the Day field.
Driving
Is used to record the number of Driver hours the Driver worked on the date specified in the Day field.
Total
Displays the Total Hours accrued by the selected Driver.
Zone
Is used to store the Zone Code from where the hour entry is made. You can enter any value in this field. If you enter an existing Zone Code, the short description will display in the Zone field at the bottom of the Tab. Zone codes and short descriptions are configured in the Codes Maintenance program.
Next Call Date
Is used to record the date when the Driver is supposed to call with his next hours report. Double click for a calendar selection form.
Next Call Zone
Is used to store the Zone Code from where the next hour entry is expected to be made. You can enter any value in this field. If you enter an existing Zone Code, the short description will display in the Next Zone field at the bottom of the Tab.
Entered Time
Will store the date and time that the hours entry was made.
Entered By
Will store the user name of the person who made the entry. User names are configured in the Security Setup program.
Cycle Tab
On the Cycle Tab in the Driver Call In program you’re able to view Driver Cycle Time Remaining.
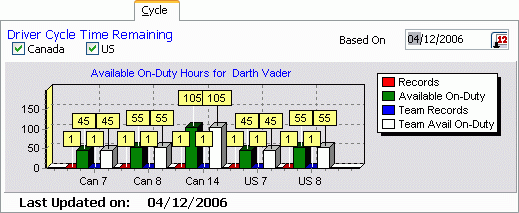
Canada / US
Select either of these options to view the Cycle time counts for Canada and/or US.
Based On
Select a date from the calendar menu to view the hours specific to the selected Driver for a certain date.
History Tab
The information entered on the Hours Tab is summarized on the Cycle Tab. It shows how many hours are available for each standard cycle, and the number of remaining hours for the selected Driver. Remaining hours are based on 60 hours for a seven day cycle, 70 hours for an eight day cycle, or 120 hours for a fourteen day cycle. These results are summarized on the History Tab.
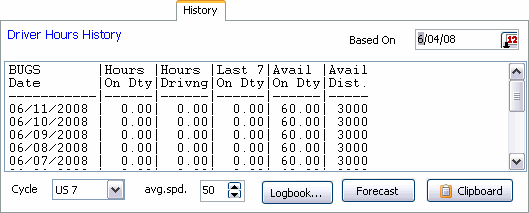
The History Tab shows the available hours for each of the remaining days in the Driver’s cycle. The cycle ('7' or '8' or '14') defaults to the value set in Driver profiles program for the displayed Driver, but you can over-ride and click the 'Refresh' button.
There is also a column showing available miles based on available driving hours at an estimated average 50 miles per hours; like the cycle, this can be over-ridden and the figures refreshed.
The 'Available Dist.' column is calculated by the following formula: (Max Hours on Duty for a rest cycle - Hours on Duty)('Default Avg. Speed' App Config for DCALL.EXE).
Based on
Select the calendar button to set your preferred date.
Driver Cycle
Select one of the radio buttons showing a Driver cycle of 7 hours, 8 hours, or 14 hours.
Average Speed
Use the up/down arrows to select your preferred average speed limit. Enter the speed in this Application Configurator > DCALL.EXE option entitled 'Default Average Speed', and the average speed limit will automatically be set to your preferred limit.
| Restart the Driver Call In program, or select the 'Refresh' button for your selections to take effect. |
Logbook
Selecting the 'Logbook' button will open the Logbook window, which displays the selected Drivers log information from the PeopleNet ELOG data.
Forecast
Clicking the 'Forecast' button will open a small display window which will outline some forecasted Hours amounts for the next calendar week, based on the Hour amounts recorded in the last week (displayed in this Grid). These projections are for informational purposes only, as they might (and probably will) change in reality.
Clipboard
Clicking this button will copy the history information on this Tab into the Windows Clipboard, which can then be 'pasted' into other programs.
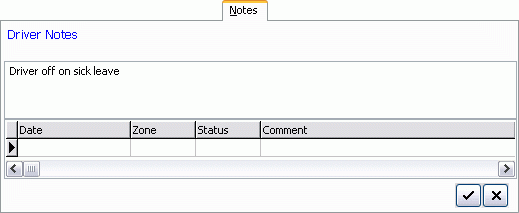
Notes Tab
You can enter free-form Driver notes on the Notes Tab. These are only visible on this Tab and are not used elsewhere in the system.
Last Trip Tab
The Last Trip Tab allows you to view details regarding the selected Driver’s last Trip. This Tab is for informational purposes only, as you cannot modify the details of a completed Trip or Freight Bill.
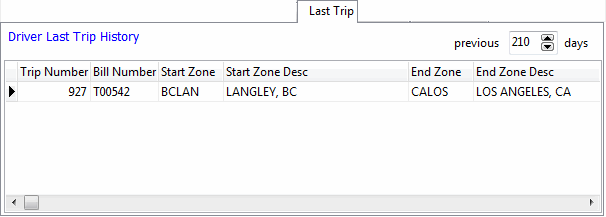
Previous (#) Days
Use the up and down arrows to select the number of days to be used in the history filter. The system will display trips that took place during the period specified by the selected number of days.
Trip Number
Displays the Trip Number of the selected Driver’s Last Trip.
Bill Number
Displays the Freight Bill number tied to the selected Driver’s Last Trip.
Start Zone / Start Zone Desc
Displays the Start Zone of the selected Driver’s Last Trip. The 'Start Zone Description' field displays the Zone Code description tied to the displayed 'Start Zone' Zone Code. Zone Codes are configured in the Codes Maintenance program.
End Zone / End Zone Desc
Displays the End Zone of the selected Driver’s Last Trip. The 'End Zone Description' field displays the Zone Code description tied to the displayed 'End Zone' Zone Code. Zone Codes are configured in the Codes Maintenance program.
Bill To Name
Displays the Customer Code of the Bill To Client associated with the 'Bill Number' of this detail line.
Delivery Driver / Delivery Driver 2
Displays the ID Code of the Driver (and second Driver, if applicable) associated with the Freight Bill on this detail line.
Delivery Tractor
Displays the Equipment ID Code of the Tractor used on this Freight Bill Trip.
Delivery Trailer / Delivery Trailer 2
Displays the Trailer Equipment ID Code of the Trailer(s) used on this Trip.
Actual Pickup/Delivery
Displays the actual times for pickup and delivery.
Context Menu
View Freight Bill
Opens an instance of the Customer Service program with the currently selected Freight Bill’s details displayed.
Trip View
Opens the Trip View window, which details the Location / Status history of the current Trip, as well as the Driver conducting it
-
Expand
Click the 'Expand' button to expand the Trip History tree.
-
Collapse
Click the 'Collapse' button to collapse the Trip History tree.
Mileage Tab
The Mileage Tab displays a graphical breakdown of the mileage totals accrued by the selected driver over a range of date periods, including the 'Last 7' days, 'Last 14' days, 'Last 30' days, 'Last 60' days, 'Last 90' days and a 'YTD' (Year to Date) graph.
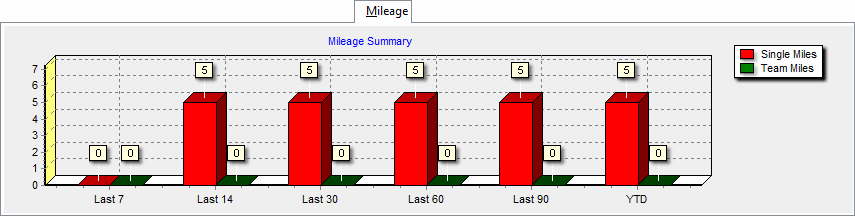
*NOTE:*The mileage values are determined by a SUM of those available for the driver in the LEGSUM table.
This Tab is for informational purposes only, as it cannot be modified. There are, however, Context Menu options available.
Context Menu
Refresh Mileage Settings
Selecting this option will refresh the Mileage data from the Mileage Server program (if it is running), and update the new mileage settings into the Mileage Summary window for the selected Driver. Choosing this option will enable the 'Interactive Mileage' and 'Maintain Flat Pay' options if they are disabled.
Interactive Mileage / Maintain Flat Pay
See the Mileage Server Manager program > Interactive Lookup for more information on these options.
Special Event Tab
The Special Event Tab displays a grid containing Special Events information for the selected Driver.

Context Menu
Driver / Power Unit / Trailer 1 / Trailer 2
Selecting one of these options will filter the Special Events data to those events related to the Driver, Power Unit, Trailer 1 or Trailer 2, respectively.
View All
Selecting this option will display all Special Events for the Driver, Power Units and Trailers.
Send to History
Selecting this option will complete the selected Special Event, making it available for use again.