Configuring third party mileage engine services
Once the windows service is configured, there is some additional setup information required and some configuration options within TruckMate unique to specific mileage engines.
If your company is using a combination of different mileage calculation engines, you will have to configure all that apply in order for these services to be available within the Mileage Profiles.
Setting Pad Values for PC*Miler, ProMiles, MileMaker
Pad values are used to alter or round off the values returned from the mileage engine services.
To enter or edit the default ETA configuration values used by the mileage engines:
-
Open the TruckMate > Utilities > Mileage Server Manager program.
-
Go to the Tools > Configure > Pad Values tab to enter or edit the values.
-
Click OK to save your changes.
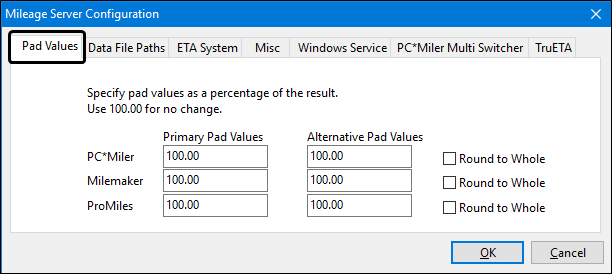
All pad values default to 100% so the values returned from the mileage programs are not altered. You can use the Primary and Alternative Pad Values to apply a factor to the mileage supplied by the mileage software. To increase the mileage distance reported by the mileage software, enter a percentage that is greater than 100%. To decrease the mileage distance reported by the mileage software, enter a percentage that is less than 100%. For example, to increase the mileage distance reported by the mileage software by 10%, enter '110' in the pad value field.
Pad Values
Are set by default to 100%, which means that the values returned from the mileage programs will not be altered. You can use the Primary and Alternative Pad Values to apply a factor to the mileage supplied by the mileage software. Pad Values can be attached to Mileage Profiles in the Driver Profiles program and the Customer & Vendor Profiles program. To increase the mileage distance reported by the mileage software, enter a percentage that is greater than 100%. To decrease the mileage distance reported by the mileage software, enter a percentage that is less than 100%. For example, to increase the mileage distance reported by the mileage software by 10%, enter '110' in the pad value field.
Round to Whole
Select this checkbox to have the mileage values returned by the associated mileage software rounded up to the nearest whole number.
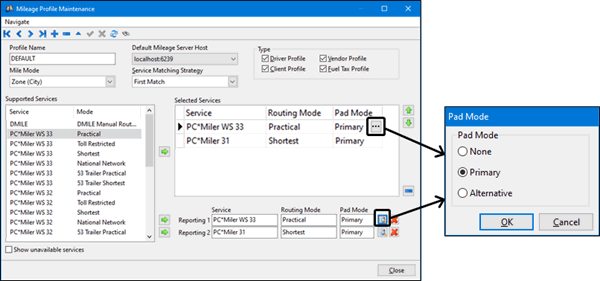
Assigning the Pad Mode to a Mileage Profile Pad Values or rounding behavior are attached to Mileage Profiles in the Driver Profiles program and the Customer & Vendor Profiles program with an option to use the Primary value or the Alternative value. You can use this just to control the Mileage Profile rounding behavior by leaving the padding at 100% and setting the Round to Whole checkbox in the Mileage Server Manager > Tools menu > Configure > Pad Values tab.
Interfacing Mileage Server with ProMiles XF
The Data File Paths tab contains configuration information specific to particular third party mileage engines.
To set the data file path values for ProMiles XF mileage engine:
-
Open the TruckMate > Utilities > Mileage Server Manager program.
-
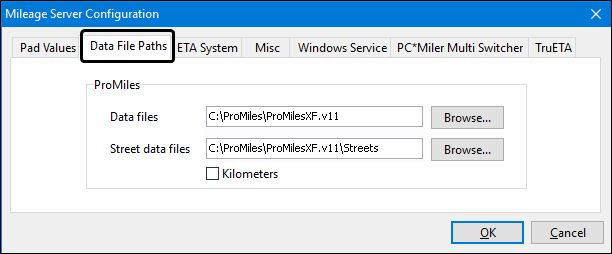
Go to the Tools > Configure > Data File Paths tab.
-
Enter or edit the configuration values for ProMiles.
Data Files
If you are using ProMiles as your mileage software, you must enter the path to the ProMiles Datafile in this field. Click the Browse button to locate the Datafile on your system.
Street Data Files
If you are using ProMiles Street-Level software, you must enter the path to the Street-Level Datafile in this field. Click the Browse button to locate the Datafile on your system.
Kilometers
Selecting this checkbox option enables reporting of all ProMiles mileage in kilometers (KM) instead of miles (default).
-
Click OK to save your changes and return to the Mileage Server Manger main window
-
Select the ProMiles Version checkbox and use the drop-down list to select the version.
Entering credentials for PeopleNet connection
To set the PeopleNet connection values:
-
Open the TruckMate > Utilities > Mileage Server Manager program.
-
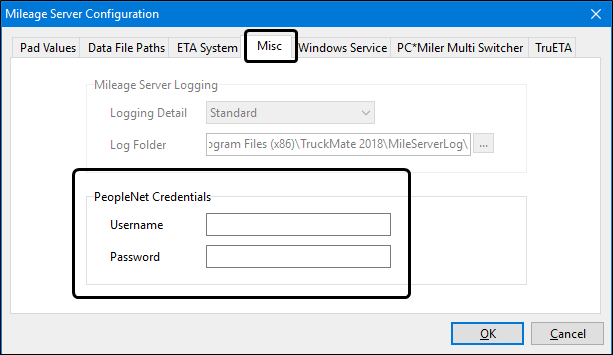
Go to the Tools > Configure > Misc tab.
-
Enter the connection information supplied by PeopleNet.
-
Click OK to save your changes.
Configuring PC*Miler Multi Switcher
PC*Miler Multi Switcher allows you to configure the Mileage Server program to access a running PC*Miler Multi-Version Switch (MVS) implementation. An MVS install will run any number of different PC*Miler service versions on a single machine, and will allow access to them simultaneously using different ports on the mileage server machine.
Refer to documentation and instructions provided by ALK technologies to install and implement the PC*Miler MVS software. Once implementation/setup is complete, and the appropriate licenses have been installed, the user can configure the TruckMate Mileage Server to access the multiple versions of PC*Miler running simultaneously.
Note: Two licenses are required to use MVS with TruckMate, one on the ALK side, the other on the TruckMate side (license # 7030).
To set up the PC*Miler Multi Switcher (MVS) within TruckMate:
-
Verify the PC*Miler MVS has been installed. (e.g. check for the MVS folder.)
-
Open the TruckMate > Utilities > Mileage Server Manager program.
-
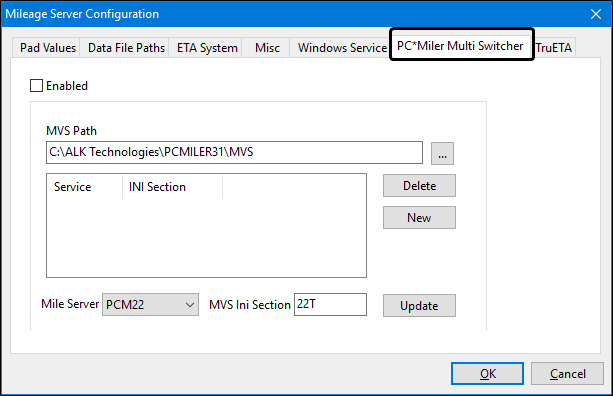
Go to the Tools > Configure > PC*Miler Multi Switcher tab.
-
Set the MVS Path. Use the
 ellipsis button to set the PC*Miler multi version switcher directory MVS Path. This isthe directory location of the PC*Miler MVS.INI file.
 -
The grid below the MVS path will list which versions of the PC*Miler Service are to be run and which section of the PC*Miler MVS .INI file contains their port settings. The .INI file itself is configured by the user with the help of ALK Technologies documentation and support.
-
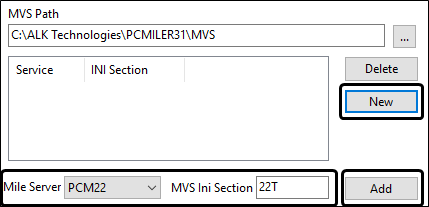
To indicate which versions will be added to the MVS switcher list:
-
Click the New button.
-
Use the pick-list to select the Miler Server version and manually type in the 'MVS Ini Section' value as determined by inspecting the PC*Miler MVS .INI file.
-
Click the Add button.
-
The Service entry will appear as a record in the list and the Add button label will change to Update.
-
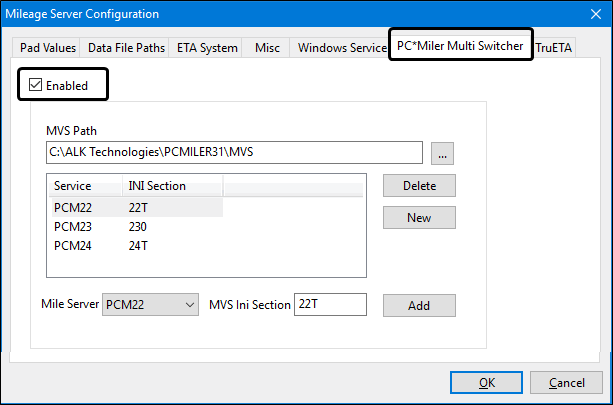
Repeat steps 6 to 8 to add additional PC*Miler versions.
-
Use the Delete button if you need to remove a service.
-
Set the Enabled checkbox.
-
This will enable the use of PC*Miler MVS as setup in the PC*Miler .INI file (provided and setup by ALK Technologies). Once this flag is checked, the PC*Miler version select drop-down on the main Mileage Server window will be replaced with the text 'PC*Miler Multi Switcher'.
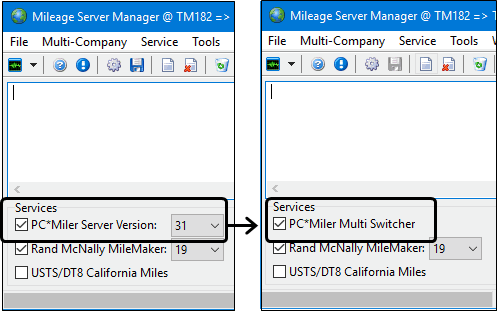
The list of PC*Miler versions will now be displayed in any TruckMate program which references the Mileage Engine.
Configuring PC*Miler toll calculations
Before beginning these setup instructions, ensure that the Tolls add-on module is installed with PC*Miler, and that the toll information mode is enabled (please refer to PC*Miler documentation for clarification).
-
Accessorial Charge setup:
-
Open the Profiles > Codes Maintenance program.
-
Go to the Accessorial Charges tab.
-
Create a new accessorial charge for the currency you are using and ensure that:
-
The Charge Behavior = Ranged Percentage.
-
The Auto-Assign by Default flag is selected.
-
The Range Field = Tolls.
-
Inside the Ranged Percentage details grid, ensure that the 'Percentage Of' field is set to Tolls.
-
-
The rest of the setup and configuration of the accessorial charge can be done as per requirements of the business.
-
-
Driver Pay Contracts (if required):
-
Open the Accounting & Finance > Driver Payables > Driver Pay Contracts program (PAYCON.EXE).
-
Configure a new tolls contract rule under the Tolls tab and assign it to the driver pay contracts you wish to be reimbursed for toll charges.
-
-
Application Configurator options:
-
Open the Utilities > Application Configurator program.
-
Under the DISPATCH.EXE module, make sure that the 'Multi Driver Tolls' configuration variable is set to the option that best represents how you would like the driver pay charges to be broken out once a trip that has tolls associated with it has been completed in the Dispatch application.
-
Proposed usage for PC*Miler toll calculations:
A trip on a route that will incur toll charges is created inside the Dispatch application. Once the trip is completed, the system will automatically create accessorial charges for the freight bills that were assigned to the legs associated with toll charges. This will only happen if the tolls accessorial charge is created, configured as auto-assign, and associated with the bill-to client. This process can be repeated using City Dispatch application.
When the trip is completed, the system will automatically create driver pay records for the driver that was assigned to the legs with toll charges. This is to reimburse the driver for the costs of the toll charges. This will only happen if the driver pay tolls contract rule is created and assigned to the Driver’s driver pay contract.
Setting up PC*Miler Streets for street level mileage calculations
If using PC*Miler Streets as your mileage calculation software, users can opt to validate their mileage from zone to zone at street level, meaning that the mileage calculations will be precise down to the actual address associated with a specific zone code.
| Once the following steps are completed, TruckMate will route your trips based on the street level information entered. In order to see the same distance values in the PC*Miler application itself (i.e. when you are checking the distance values for accuracy) you must open the routing Options menu and ensure that the Use Hwy Only flag is cleared. |
-
Ensure that the Mileage Server program is correctly setup and interfaced with your third-party mileage software.
-
Open the Application Configurator program > MILESERV.EXE section and set the Street Level config option to True.
-
Open the PCMSERVE.ini file (located in the C:\Windows\ directory) and update the UseStreets value to True (i.e., UseStreets=true).
-
Open the Codes Maintenance program > Zone tab. For every zone code that you wish to validate at a street level, you must enter the exact address information into the Address 1, City, and State fields on the Zone tab. You can enter the Postal Code value if you know it, but PC*Miler may update this based on the validated location.
-
Once the address information has been correctly entered for the Zone, ensure that your correct mileage software application is chosen in the Mileage System section in the bottom-left corner of the Zone tab.
If your mileage software is not available for selection here, the Mileage Server program is not running or is not correctly setup
-
Click the Validate button.
| If PC*Miler returns a range of addresses (i.e. 100150 Broadway St.), ensure that you select the Validate button a second time to verify your entered address is correctly validated. |
-
Repeat steps 4 and 6 for all of the zone codes you wish to validate to the street level (i.e. terminal zones or zones that are associated with a specific customer).
-
Mileage calculations throughout TruckMate will now be accurate to the street addresses of the zone codes you have updated.
Configuring PC*Miler Web Services
TruckMate first offered an Mileage Server integration with PC*MILER Web Services in TM 18.2. This cloud based integration allows you to access PC*MILER mileage throughout TruckMate without requiring an "on-premise" PC*MILER installation in your environment.
-
Go to the Application Configuration program and enter the MILESERV.EXE > PC*MILER Web Services API Key.
-
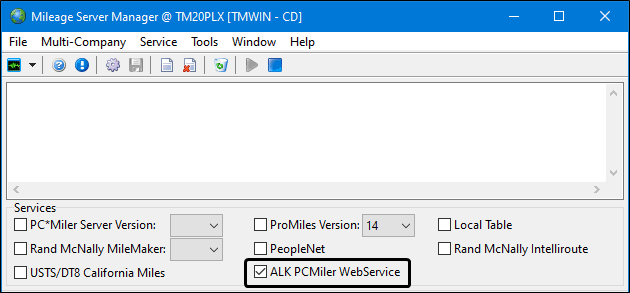
Go to the TruckMate > Utilities > Mileage Server Manager program (Mileserv.exe) and select the ALK PCMiler Webservice checkbox to use the integrated PC*Miler web service which includes mileage lookups and a host of other features.
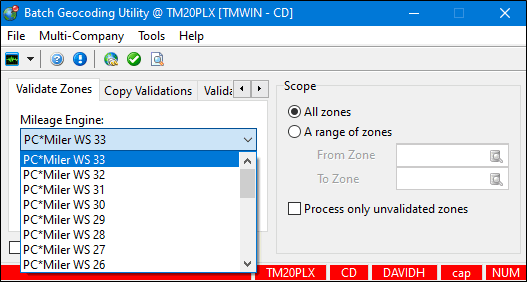
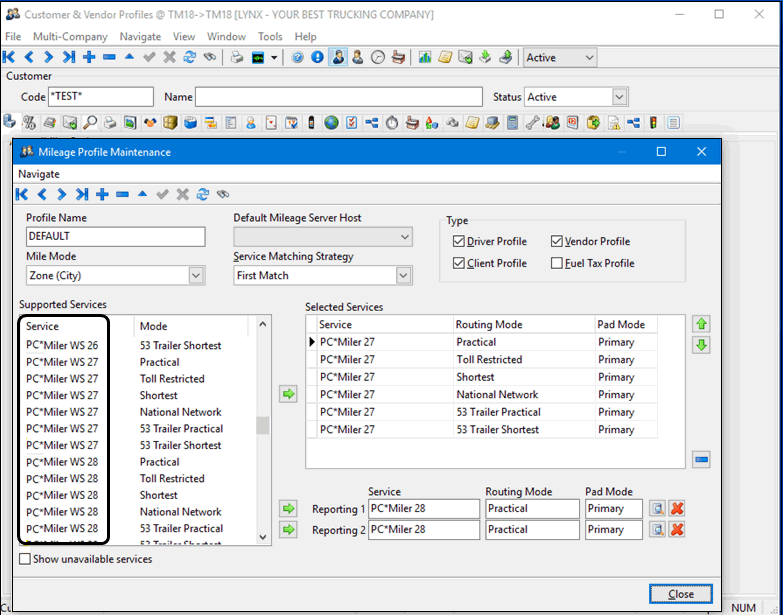
When the box is checked, all PC*Miler WS services will be displayed in the list of Supported Services section on the TruckMate > Profiles > Customer & Vendor Profiles > Tools menu > Mileage Profile window.
Installing and configuring Trimble TruETA
Refer to the stand-alone document available on the Trimble Transportation Learning Center > TruckMate.