Accounts Payable Module

AP_PAY_DETAILS.RPT
This report is used in conjunction with the A/P Inquiry program (APNI.EXE) and will display vendor payment details for a given date range.
APAGING.RPT
This report is used in conjunction with the A/P Inquiry program (APNI.EXE) and provides an Aging report for a single vendor or all vendors. You will be prompted to select the following details:
-
An 'Aging Date': all records that have been aged as of the date selected here will be included in the report.
-
A 'Detail level': choose from either 'Transaction' level, 'Invoice' level, 'Vendor' level or 'Currency' level. The report will include different details depending on your choice here.
-
To 'Print Paid' Invoices: if you would like to include 'Paid' invoices, select 'True'. If you would only like to display 'Unpaid' invoices, select 'False'.
-
A 'Vendor ID': you can select a specific 'Vendor ID' to filter for aging records, or simply select the '*' to include all Vendors.
APPO.RPT
This report will allow you to print out individual Purchase Orders from the A/P Purchase Order Entry program (APPO.EXE). You will be prompted for the following information:
-
A 'PO Number': enter the number of an existing Purchase Order in the text field and click the '>' button to add it to the 'Selected Values' section. You can add any number of Purchase Orders to the 'Selected Values' section- each PO will be printed on a separate page. Select the 'OK' button and a preview of the purchase order will appear on your screen ready for printing, if you so desire.
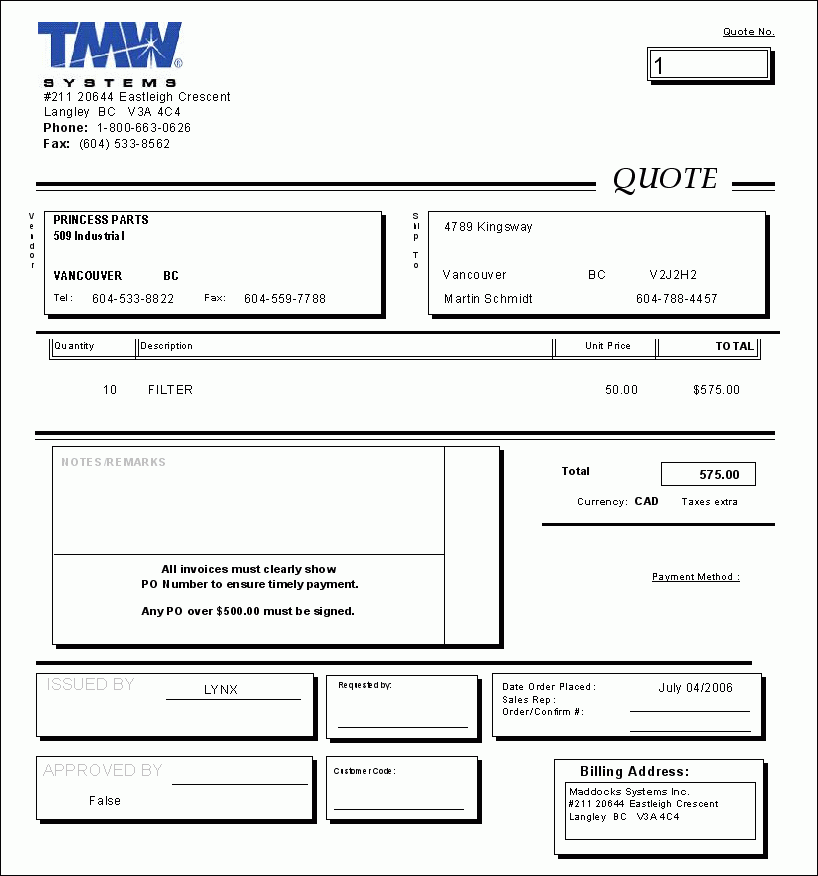
APQUOTE.RPT
This report will allow you to print out individual Quotes from within several programs in the Accounts Payable Module of TruckMate. You will be prompted for the following information:
-
A 'Quote Number': simply enter the Quote number you wish to print and click the '>' button to add them to the list of Quotes to be printed. You can add any number of Quote Numbers to the 'Selected Values' section- each Quote will be printed on a separate page. Select the 'OK' button and a preview of the purchase order will appear on your screen ready for printing, if you so desire.
BANKREC.RPT
This report is used in conjunction with the Bank Reconciliation program (CHKREC.EXE), and will show your bank reconciliation report, per reconciliation for each GL Account in your system of 'Bank' type.

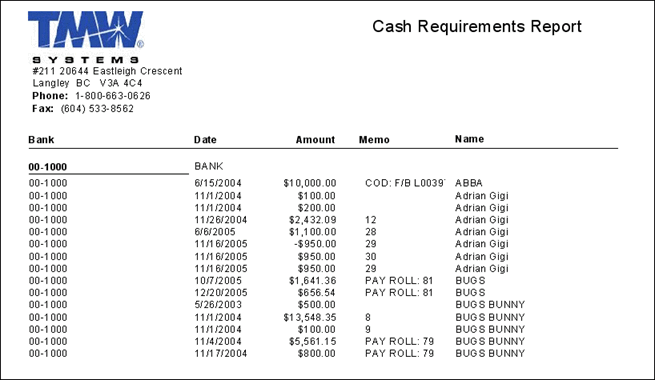
CASHREQ.RPT
This report is used in conjunction with the Pay Bills window of the A/P Inquiry program (APNI.EXE). Once on the Pay Bills window, select the 'Print Cash Requirements' option from the right-click Context Menu. This report will display information regarding the dollar amounts required to pay the outstanding checks in your system.
Note: You can also print this report from the Check Printing program (APNCP.EXE) from a right-click menu option, 'Print Cash Requirements'.
CHECKSTUB.RPT
This report can be run from the context menu (Right Mouse Click) of Employee Profiles > Pay Info > YTD > Pay History grid, there is an option 'Print Check Stub', select it to print the 'Check Stub' report. This report displays payroll check information, earnings / deductions, codes and associated payroll amounts.

CHEQUE.RPT
This report should be run from the Check Printing program (APNCP.EXE). When the report is run, it will generate the Payroll Checks for all outstanding Payroll amounts.
CHEQUE2.RPT
This report will run automatically following the CHEQUE.RPT described above. When you close the CHEQUE.RPT preview screen, another Report Selection form will be displayed, with the default report CHEQUE2.RPT. The purpose of the second report is to print any overflow payment details that could not be printed on the check stub. When the CHEQUE2.RPT report preview displays, you will be able to see if any checks fall into this category.
If so, you can change the paper in your printer before printing the overflow details.
CHECK_REGISTER.RPT
This report is run from the Crystal Report Launcher program, and prints a listing of checks by 'Bank Account' for a specific Date Range.
ER_AVAIL.RPT
This report is used in conjunction with the Equipment Rentals program (EQRENTALS.EXE), and will provide details as to all the available Rental Equipment configured in your system.
When this report is run, you will be prompted to choose from the following options:
-
A 'Billing Status': choose from 'Open' or 'Closed' status to filter the Rental records.
-
To select 'ALL' Rentals or just those where the 'City' field has been left 'BLANK'.
-
A 'Sort Option': choose from either 'Agreement', 'Unit' or 'Year/Type' to sort the returned records.
-
An Equipment 'Type': choose from either 'All', 'Power' (Power Units), 'Trailer', 'Container' and 'Special' (Miscellaneous) to filter the records returned to the report the Rental Equipment’s 'Type' value.
ER_BILLINGS.RPT
This report is used in conjunction with the Equipment Rentals program (EQRENTALS.EXE), and will provide an outline of the Billing information for your Equipment Rentals for any given month. When the report is run, you will be asked to select which 'Month' you would like to filter the report on, and then to type in a 'Year' into the provided field. The report will then gather the Rental Billing information for that month.
ER_INSUR.RPT
This report is used in conjunction with the Equipment Rentals program (EQRENTALS.EXE), and will provide an outline of the Insurance information for your Equipment Rentals for any given month. When the report is run, you will be asked to select which 'Month' you would like to filter the report on, and then to type in a 'Year' into the provided field. The report will then gather the Rental Insurance details for that month.
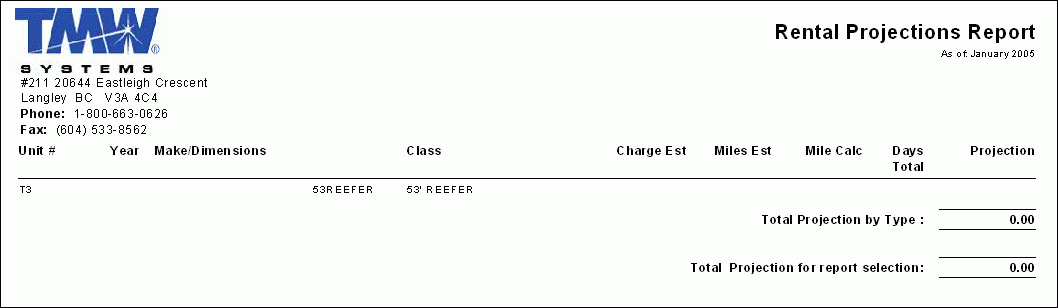
ER_PROJ.RPT
This report is used in conjunction with the Equipment Rentals program (EQRENTALS.EXE), and will provide an outline of the Projected Rental costs for your Equipment Rentals for any given month. When the report is run, you will be asked to select which 'Month' you would like to filter the report on, and then to type in a 'Year' into the provided field. The report will then gather the Rental Projection details for that month.
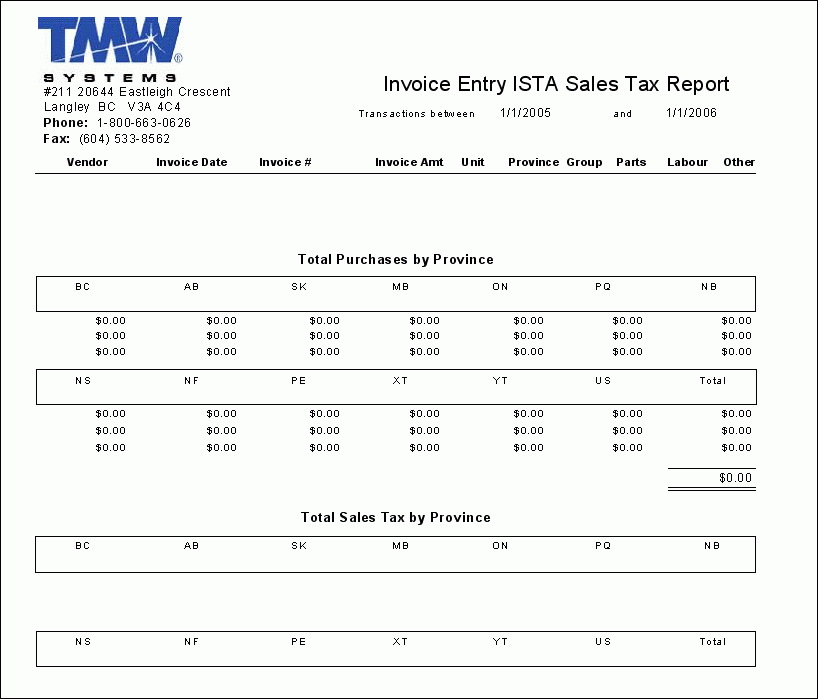
ISTADTL.RPT
When this report is run, you will be prompted to select a Date Range for the ISTA report. The ISTA report summarizes entries made on the ISTA Tab of the A/P Invoice Entry program and the ISTA Tab of the Instant Checks program. Entries are summarized according to the splits entered on the 'ISTA Group' form.
NJ.RPT
In the A/P Inquiry program (APNI.EXE), on the Pay Bills window, select Invoices to pay, and then use your Context Menu to select 'Print Payment Edit List' which will then give you the report dialog box where you select the 'NJ.RPT'. The 'NJ.RPT' will give you a list of all of the Invoices you have selected for payment.
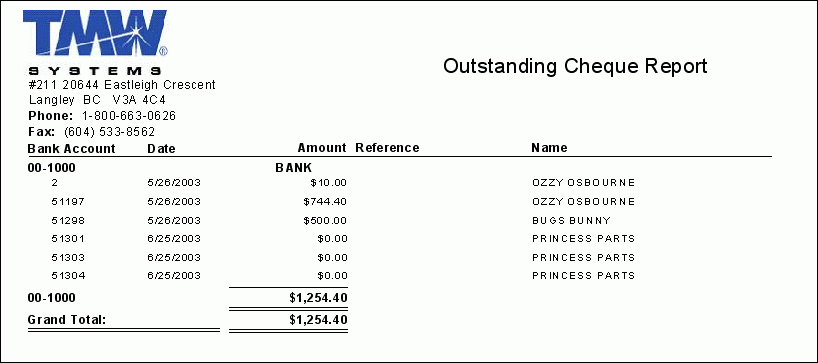
OSCHEQUE.RPT
In the A/P Inquiry program (APNI.EXE), select this report by clicking the 'Print' button and selecting it from your selection of reports. When run, the OSCHEQUE.RPT report will generate a list of all outstanding checks based on the inputted Date, backwards.
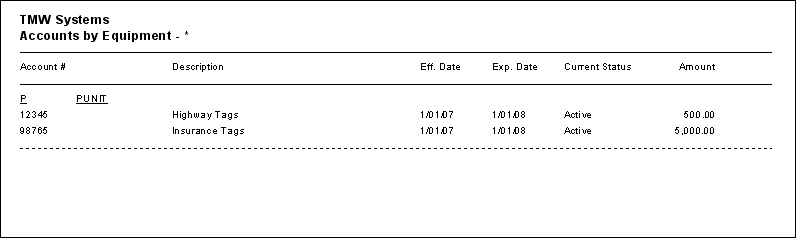
PPD_ACCTS_BY_EQUIP.RPT
In the Pre-Paid Accounts program (PPDACCOUNTS.EXE), you can run this report by opening the 'File' menu and choosing the 'Print' option, which will allow you to select this report from a list of available reports for the Pre-Paid Accounts module. When run, the PPD_ACCTS_BY_EQUIP.RPT will generate a listing of equipment and the Pre-Paid accounts (tags) associated with each. The report allows you to filter out certain Pre-Paid Accounts based on the following two selection fields:
-
Account Type*: this value will filter on certain Pre-Paid account types, depending on the Account Type you enter in the field provided. Account Types are configured on the Account Type Setup window of the Pre-Paid Accounts program, accessed from the program Tools Menu.
-
Current Status*: this value will filter on Pre-Paid account transactions based on their 'Status' value. Select one of the available options from the drop-down menu: '*' (All values - no filter), 'Active', 'Adjusting', 'Entry', 'Hold', or 'Inactive'.
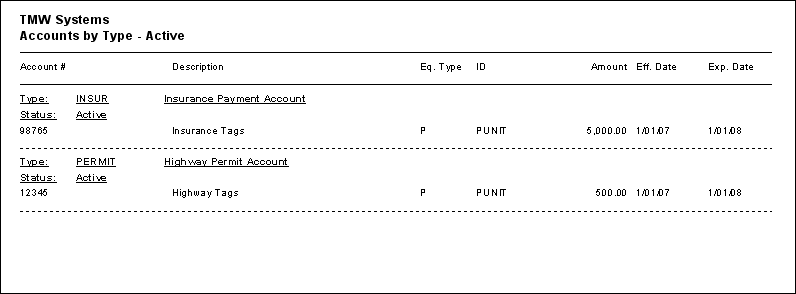
PPD_ACCTS_BY_TYPE.RPT
In the Pre-Paid Accounts program (PPDACCOUNTS.EXE), you can run this report by opening the 'File' menu and choosing the 'Print' option, which will allow you to select this report from a list of available reports for the Pre-Paid Accounts module. When run, the PPD_ACCTS_BY_TYPE.RPT will generate a listing of current Pre-Paid accounts (tags) grouped by states covered and detailing the equipment the tag is assigned to, organized by their 'Account Type' variable (as assigned in the 'Acct Type' field on the main Pre-Paid Accounts program window). Account Types are setup in the Pre-Paid Account program’s 'Tools' menu. The report allows you to filter out certain Pre-Paid Accounts based on the following two selection fields:
-
Account Type: this value will filter on certain Pre-Paid account types, depending on the Account Type you enter in the field provided. Account Types are configured on the Account Type Setup window of the Pre-Paid Accounts program, accessed from the program Tools Menu.
-
Current Status: this value will filter on Pre-Paid account transactions based on their 'Status' value. Select one of the available options from the drop-down menu: '*' (All values - no filter), 'Active', 'Adjusting', 'Entry', 'Hold', or 'Inactive'.
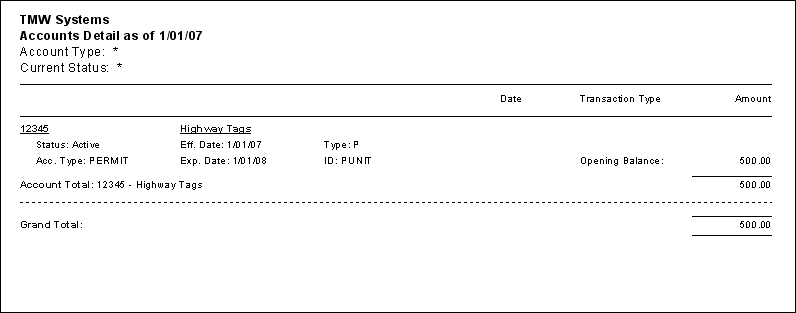
PPD_DETAIL.RPT
In the Pre-Paid Accounts program (PPDACCOUNTS.EXE), you can run this report by opening the 'File' menu and choosing the 'Print' option, which will allow you to select this report from a list of available reports for the Pre-Paid Accounts module. When run, the PPD_DETAIL.RPT will generate a list of the Pre-Paid Account transactions existing in your Database, based on several variables, which you must enter before the report will generate:
-
'As Of' Date: this value will be used to designate which Pre-Paid accounts are available for the report. Only Pre-Paid accounts that exist from this date, FORWARD, will be displayed.
-
Account Type: this value will filter on certain Pre-Paid account types, depending on the Account Type you enter in the field provided. Account Types are configured on the Account Type Setup window of the Pre-Paid Accounts program, accessed from the program Tools Menu.
-
Current Status: this value will filter on Pre-Paid account transactions based on their 'Status' value. Select one of the available options from the drop-down menu: '*' (All values - no filter), 'Active', 'Adjusting', 'Entry', 'Hold', or 'Inactive'.
-
Summary / Detail: if you do not want to list all the details for every account, set this field to 'True', which will produce a Summary Report, instead of a Detailed report. The Summary report only shows the 'Account #', 'Description', 'Eq.', and 'ID' values, as well as the account’s 'Opening Balance', 'Transactions' and 'Current Balance'. Setting this field to 'False' (default) will display the Detailed report (including journal entry details for all equipment attached to the account).
-
Zero Balances: if you want to display Pre-Paid accounts with zero balances, set this option to 'True'. Otherwise, setting this option to 'False' (default) will filter out any such accounts.
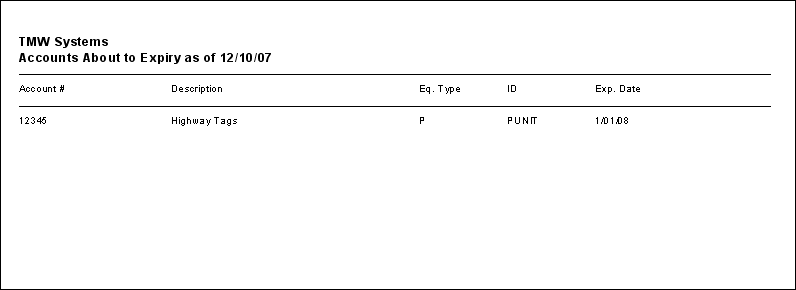
PPD_EXPIRY.RPT
In the Pre-Paid Accounts program (PPDACCOUNTS.EXE), you can run this report by opening the 'File' menu and choosing the 'Print' option, which will allow you to select this report from a list of available reports for the Pre-Paid Accounts module. When run, the PPD_EXPIRY.RPT will produce a list of Pre-Paid accounts (tags) that are about to expire, letting the User know which tags might need to be re-purchased. The amount of Pre-Paid accounts that will be shown by this report is dependant on two values you must provide before the report is generated:
-
'As Of' Date: this value will be used to designate which Pre-Paid accounts are available for the report. Only Pre-Paid accounts that exist (and are entering into expiry) from this date, FORWARD, will be displayed.
-
Days to Expiry:* enter an integer value in this field to represent the days left until expiry. For example, if the User enters '2007-01-01' (January 1st, 2007) into the 'As Of' Date field (above), and then enters '30' in this field (default), only those reports that will expire during the month of January will be displayed.
-
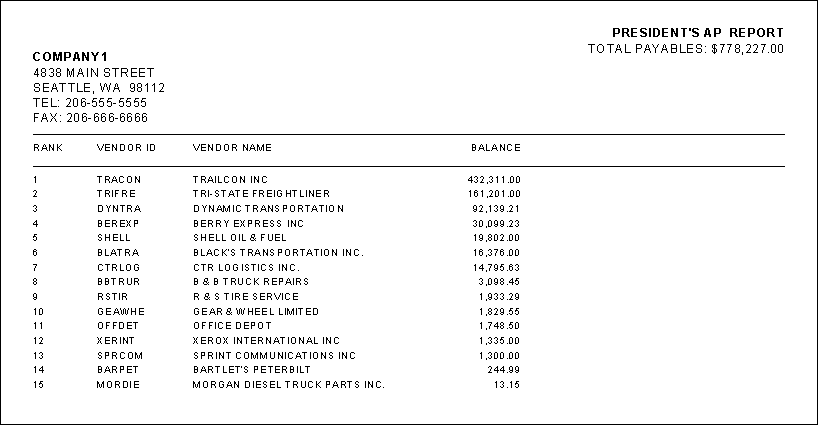
PRESIDENTS AP.RPT
This report produces a list of vendors with outstanding balances and transaction activity for the previous 4 weeks. This report should be run from the Crystal Report Launcher program (CRRUN.EXE).
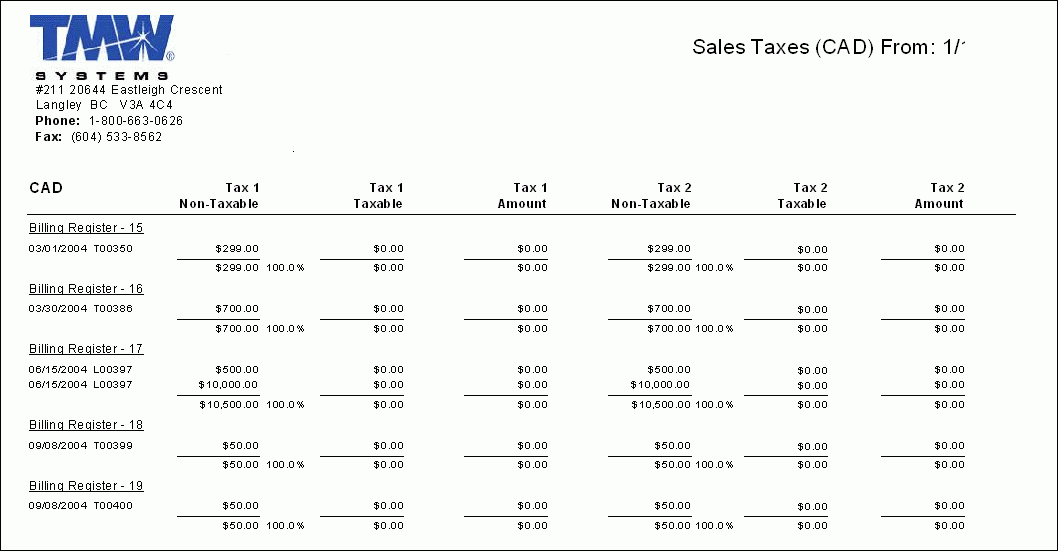
SALESTAXES.RPT
This report is used in conjunction with the Accounts Payable Module, and will detail the various Tax amounts accrued through all of your Accounting Registers in the TruckMate suite.
When the report is run, you must provide a 'Starting' and 'Ending' Date to constitute the Date Range that will be used to gather sales tax data, and whether you would like to see a 'Summary' or 'Detailed' report, the latter having more specific information about each Register’s totals.