LTL & Service Level Maintenance

The LTL & Service Level Maintenance program can be used to define both Service Levels and the Service Level Matrix. The Service Levels Tab is where you define the number of days allowable for delivery of a freight bill, however, these delivery days will not be used when using the Service Level Matrix. The Service Level codes display on the Details Tab in the Customer Service program and in the top right corner of the Quick Bill Entry program.
Along with the Service Levels Tab the SLM program contains two Tabs that support the Service Level Matrix, which includes the Terminal Delivery Times Tab and Advance/Beyond Times Tab. The Service Level Matrix is one of the methods used in TruckMate for calculating an estimated delivery date and this concept applies mainly to users who offer service commitments to their customers when quoting freight services between points in their service area. In simple terms, the service level matrix is the set of factors used to calculate the time commitment required for you to move a customer’s load from point A to point B. In practice, moving a load from point A to point B requires consideration and setup in the Matrix:
-
Use of an Advance, Beyond, or Interliner Carriers with their own Service Level standards to points/terminals/junctions common within your company’s Zone Tree. These times are setup via the Advance/Beyond Times Tab.
-
Defining the Service regions around a Terminal / point / junction. These are Terminal to Terminal times (for LineHaul delivery) and can be setup on the Terminal Delivery Times Tab.
-
Holidays, weekends, or even weekdays when no service may be available. Days off are setup in the Customer & Vendor Profiles program > Service Calendar Tab & Hours of Operation Tab.
| The Range Mappings Tab can be used in place of defining service regions around terminals to provide terminal times for a range of zones inherited from a 'Base Zone'. Finally, the Load Plan Options Tab is the available to plan outbound CrossDock shipments to break bulk or destination terminals. |
Total Service Days for a particular Client are configured using the following calculation:
Service Days = [Advance Leg Time] + [LineHaul Time] + [Beyond Leg Time]
To access LTL & Service Level Maintenance:
| From this location | Go to |
|---|---|
TruckMate Menu and TruckMate Task List |
|
Windows Start Menu |
TruckMate 20xx > LTL & Service Level Maintenance |
Windows Explorer |
C:\Program Files (x86) > TruckMate 20xx > Svclevel.exe |
How Do I?
How do I Set Up the Service Levels?
The Service Levels tab is used to manage service levels, with or without using the Service Level Matrix. It is important to note that once the Matrix is used (activated) the Service Days, Time and Hours fields are no longer available as they are not required.
-
Open the LTL & Service Level Maintenance program (SVCLEVEL.EXE).
-
On the Service Levels Tab define your service levels. Select the '+' button on the TruckMate Navigation bar and enter the following information:
-
Service Level Code: enter the service level code to a maximum of 10 characters.
-
Service Level Description: enter a description to describe the service level.
-
Hot Rush: select this checkbox when the service level is a Rush and should be flagged as such. This indicator displays an icon under the column labeled "Warnings" in the freight bill grid of the CrossDock program.
-
-
Define Service commitments when not using the Service Level Matrix:
-
Service Days: enter the maximum allowable number of days between the pickup and delivery of the freight bill. The number of days specified here will be used to calculate the Deliver By date on freight bills displayed in the Customer Service program.
-
Service Time: the time value entered in this field will be used as the time component of the 'Delivery By' date in the Customer Service program. To use the Service Time, you must also check the Use Time box.
-
Use Time: check this box to value to use the Service Time field as the time component of the 'Deliver By' date in the Customer Service program. Use Time must be selected to calculate the service If you do not check this box, the Service Time will be ignored.
-
OR
Service Hours: enter the maximum allowable number of hours between the pickup and delivery of the freight bill. The number of hours specified here will be used to calculate the Deliver By date on freight bills displayed in the Customer Service programs. You should only enter a value in this field if this service level is calculated by number of hours, rather than number of days ensure the Service Days is 0. Do not check the Use Time box above if you specify a Service Hours value.
-
Select the 'checkmark' button to save.
How do I Setup the Service Level Matrix?
The Service Level matrix is one of the methods used in TruckMate for calculating an estimated delivery date. This concept applies mainly to users who offer service commitments to their customers when quoting freight services between points in their service area. In simple terms, the service level matrix is the set of factors used to calculate the time commitment required for you to move a customer’s load from point A to point B. This includes terminal to terminal and Advance/Beyond times to and from the terminals.
*Warning:* When using the Service Level Matrix and the Load Plan Options ensure the times required to accommodate the Load Plan Option are included in the service commitment. These times are not included automatically.
-
Open the LTL & Service Level Maintenance program (SVCLEVEL.EXE).
-
On the Service Levels Tab define your service levels if this has not already been done. For detailed procedures, click here.
-
On the Terminal Delivery Times Tab select the Service Level to define from the drop down list.
-
In the grid area select Add zone to matrix from the right-click menu.
-
In the 'Add Zone to Matrix' window select the 'To' zone.
-
Select 'OK'.
-
In the 'Add a Second Zone to Matrix' window select the 'From' zone.
-
Select 'OK'. In the Terminal Delivery Times grid the zones will display twice, once in the vertical 'Origin' column and again in the Horizontal 'Destination' column.
-
Select the 'Copy times for reverse routes' checkbox. This automatically duplicates the value entered to the reverse route and speeds up the entry process, however these can be changed when required.
-
Enter the delivery time in number of days. For example, enter '3' for 3 days. _ _
-
Repeat steps 4 - 10 until all terminal service commitments are defined.
-
On the Advance Beyond Times Tab define the following:
-
Service Level: select the service level to define from the drop down list.
-
Direction: select the Advance or Beyond direction from the drop down list.
-
-
The following information displays for the Service Level and Direction selected:
-
Zones with delivery commitments tree: the list of Terminal Zones setup in the system.
-
Zones not serviced tree: the list of zones not serviced.
-
Entire zone tree: a complete list of zones.
-
-
In the Zone with delivery commitments tree, you can double-click the zone to define its default Interliners and/or Service Level specific Interliners (and their respective Advance / Beyond Times).
Note: You can simply drag and drop entire Parent Zones (or individual Zone Codes) from the 'Zones Not Serviced' list onto a Terminal Zone in the 'Zones with Delivery Commitments' section, enabling you to set up your matrix fairly quickly. Similarly, you can simply drag and drop serviced zones into the 'Garbage Can' icon to delete their defined service times.
-
In the Interliner Zone Setup window define the following:
-
Define the Advance (to term) information:
-
Interliner: in the Select Interliner window select the interliner from the list , select OK.
-
Junction Zone: in the Select Junction Zone window select the zone from the list, select OK.
-
Days: enter the time between the junction zone and zone, in number of days.
-
-
Define the Beyond (to term) information:
-
Interliner: in the Select Interliner window select the interliner from the list , select OK.
-
Junction Zone: in the Select Junction Zone window select the zone from the list, select OK.
-
Days: enter the time between the zone and junction zone in number of days.
-
-
Select the 'Checkmark' button to save.
-
To further define the Advance/Beyond times by service level select the 'By Service Level >>' button, otherwise skip to step 17.
-
In the expanded Interliner Zone Setup window select insert record and define the following:
-
Advance times tab: Simply double-click the applicable field in the row to access the list selection window.
-
Service Level: in the Select service level window select the service level, select OK.
-
Interliner: in the Select Interliner window select the interliner from the list , select OK.
-
Junction Zone: in the Select Junction Zone window select the zone from the list, select OK.
-
Days: enter the time between the junction zone and zone, in number of days.
-
-
Select 'Checkmark' button to save.
-
The "Add same interliner to beyond leg?" message displays. Select Yes, the Beyond information will be added.
OR
Select No, select the Beyond tab to define the values:
-
Service Level: in the Select service level window select the service level, select OK.
-
Interliner: in the Select Interliner window select the interliner from the list , select OK.
-
Junction Zone: in the Select Junction Zone window select the zone from the list, select OK.
-
Days: enter the time between the junction zone and zone, in number of days.
-
Repeat steps 12-17 until all Advance/Beyond Times are defined.
-
Select Close.
-
Note: The Holidays and Non-service Days defined in the Customer & Vendor Profiles program are included in the SLM Deliver by date calculations depending on how the following Application Configurator program options are defined:
-
No Delv on Holidays
-
No Transit Holidays
The Service Level Dates option for the Customer Service program in the Application Configurator program also has some bearing on the Pick Up By and Delivery By dates and times in the Customer Service program.
How do I Start Using the Service Level Matrix?
Once you have defined the required service level commitment times you can activate the Service Level Matrix following this procedure. Once the Service Level Matrix is activated the Deliver By dates for the freight bill in the Customer Service program are assigned based on these values.
-
Open the LTL & Service Level Maintenance program (SVCLEVEL.EXE).
-
Select the 'Use zone-based service levels (use matrix)' checkbox at the top left corner of the program window.
-
Close the LTL & Service Level Maintenance program. The Service Level Matrix is active and will be available the next time the Customer Service Program is opened.
-
A second feature is available that supports the automatic recalculation of the service commitments when the freight bill is saved. To Activate this option open the Application Configurator program (Start image:> Programs image:> TruckMate image:> Utilitiesimage:> Application Configurator)
-
Expand the 'Configuration Options' tree and select CSERV.EXE (Customer Service Program).
-
In the 'Options Panel' select the 'Get delv time onsave' option.
-
Select 'Edit Option'.
-
In the 'Edit Config Value' window, change to the value to 'True', and select 'OK'.
-
Back in the options panel, select the CSERV.EXE > 'Service Level Dates' option.
-
Select 'Edit Option'
-
Set the option to 'True'.
-
Close the Application Configurator. You have now completed the configuration.
Note: The Service Level Matrix delivery date calculations are not currently supported in custom Bill-Entry programs or TM4Web.
The Service Level Dates option for the Customer Service program CSERV.EXE in the Application Configurator program has some bearing on the Pick Up By and Delivery By dates and times in the Customer Service program.
How do I Detect Service Failures?
The Service Level Matrix collects some statistics about bills which could be used for assessing service failures. In particular, it watches in Dispatch for when the bill is DOCKED at a terminal (in order to rate your interliners) and when the bill is delivered (in order to rate yourself against the SLM delivery commitment).
When the SLM_ACTUAL_DELIVERY_ADVANCE date is later than the SLM_EXPECTED_DELIVERY_BEYOND is a good comparison to determine service failures. The SLM_EXPECTED_DELIVERY_BEYOND is usually the same as PICK_UP_BY_END, unless somebody manually overrides the latter.
You can hold your interliners accountable by comparing SLM_EXPECTED_DELIVERY_ADVANCE to SLM_ACTUAL_DELIVERY_ADVANCE.
TLORDER table: The TLORDER table, where your freight bills are stored, contains the following fields that can be used for assessment of service failures:
-
SLM_JUNCTION_ADVANCE
-
SLM_JUNCTION_BEYOND
-
SLM_CARRIER_ADVANCE
-
SLM_CARRIER_BEYOND
-
SLM_EXPECTED_DELIVERY_ADVANCE DATE
-
SLM_EXPECTED_PICKUP_BEYOND DATE
-
SLM_EXPECTED_DELIVERY_BEYOND DATE
-
SLM_ACTUAL_DELIVERY_ADVANCE TIMESTAMP
-
SLM_PERFRATING: Bills which SLM did not calculate the delivery date will have a value of 'Non-SLM' and can be excluded from reporting.
-
SLM_OVERRIDE DEFAULT 'False'
-
SLM_LAST_UPDATED TIMESTAMP
How do I Set Up the Range Mappings?
The Zone Range Mappings Tab can be used instead of the Terminal Delivery logic to provide terminal times for a range of zones inherited from a "Base Zone".
For example, you can place a group of zones, ranging from ON to ONZZZ (this range would support alphabetically anything that starts with ON) and make them the same as the ONTOR zone in terms of delivery commitments. Then, in the Terminal Delivery tab you would only need to define the ONTOR (Base Zone) Times and all zones in the range would inherit those values.
-
Open the LTL & Service Level Maintenance program (SVCLEVEL.EXE).
-
On the Range Mappings Tab select the '+' button to insert a new record.
-
Define the following range information:
-
Lowest Zone in Range: enter the value of the lowest zone in the range, where the range begins.
-
Highest Zone in Range: enter the value of the highest zone in the range, where the range ends.
-
Base Zone: on the Select Service Base Zone window, select the base zone. This zones service commitments will be applicable to all zones defined in the range.
-
Priority: enter the range priority. This priority is used when a zone is in more than one range, the range with the higher priority will be used.
-
-
Select Post Edit
 to save.
 -
Repeat steps 2 - 4 until all ranges have been defined.
How do I Set Up the Load Plans?
The Load Plan Options tab is used to plan outbound crossdock shipments to break bulk and destination terminals. This information is then available in the Crossdock program, including the available options and default door. Also, when the crossdock is managed using a hand-held device the dock worker will receive instructions on the loading plan options via the device
| The terminal option stops defined here will not be automatically considered in the Service Level Matrix, therefore they should be accounted for in the delivery days defined in the Matrix. |
-
Open the LTL & Service Level Maintenance program (SVCLEVEL.EXE).
-
On the Load Plans Options Tab define the following:
-
Origin Terminal: in the Select Terminal Code window, select the Origin terminal from the list.
-
Destination Terminal: in the Select Terminal Code window, select the Destination terminal from the list.
-
Door: enter the preferred loading Door.
-
Option 1: select the terminal that is the first choice for consolidation of shipments.
-
Option 2: select the terminal that is the second choice for consolidation of shipments, used when option 1 cannot load the shipment
-
Option 3: select the terminal that is the first choice for consolidation of shipments, used when options 1 and 2 cannot load the shipment.
-
Comments: enter load plan comments.
-
Days of the week: select the days of the week the Load Plan applies to.
-
-
Select the 'Checkmark' button to save.
-
To add more Load Plans select the '+' button and repeat steps 2-3.
Menu and toolbar options
There are no unique menu and toolbar options and functionality specific to the LTL & Service Level Maintenance window.
For information about common menu and toolbar options (i.e. File menu, Refresh, Multi-Company, etc.), see General menu and toolbar options.
General Information
The two options listed below are available throughout the LTL & Service Level Maintenance program window, regardless of the Tab you have selected:
Use zone-based service levels (use matrix)
Select this checkbox when you have done all of the setup and are ready to use the matrix to calculate the deliver by date in the Customer Service program.
Note: This also toggles the setting in the Application Configuration program > SVCLEVEL.EXE > Zone-Based SVCLevels. Disabling this option also hides the Service Level Maintenance tab in Customer Service.
Print button
Select the Print button to access the Report Selection window and generate a report.
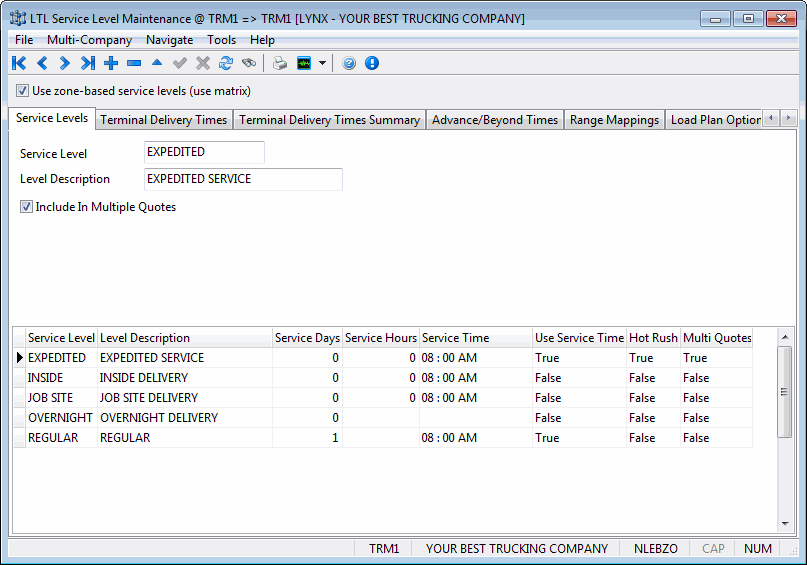
Service Levels Tab
Service Levels indicate the number of days that is allowable for delivery of a Freight Bill. The Service Levels Tab can be used to manage service levels, with or without using the Service Level Matrix. Service Levels are assigned by default to freight bills according to the Site Setup under which the freight bill was entered. The Service Level code displays on the Customer Service program > Details Tab, and in the top right corner of the Quick Bill Entry program.
Service Level
Enter a Service Level code that best describes the service Level. This can be up 10 characters in length.
Level Description
Enter a description for this Service Level. This is used for information and reporting purposes only.
Include In Multiple Quotes
If checked this service level will be included among optional service levels within multi service level quotes provided to customers.
Hot Rush
Indicates a rush delivery is required. This indicator displays an icon under the column labeled 'Warnings' in the freight bill grid of the CrossDock program.
Note: The following values are not required when you will be using the service level matrix. Once you activate the matrix by selecting the Use zone-based service levels (use matrix) these fields will not be available.
Service Days
Enter the maximum allowable number of days between the pickup and delivery of the freight bill. The number of days specified here will be used to calculate the Deliver By date on freight bills displayed in the Customer Service program.
Service Time
The time value entered in this field will be used as the time component of the Delivery By date in the Customer Service program. To use the Service Time, you must also check the Use Time box.
Use Time
When this box is checked, the value entered in the Service Time field will be used as the time component of the Deliver By date in the Customer Service program. Use Time must be selected to calculate the service If you do not check this box, the Service Time will be ignored. Do not check this box if you are specifying Service Hours, rather than Service Days.
Note: Service levels can be calculated by number of days or number of hours but not both. When using hours ensure 0 is entered in the number of days field.
Service Hours
Enter the maximum allowable number of hours between the pickup and delivery of the freight bill. The number of hours specified here will be used to calculate the Deliver By date on freight bills displayed in the Customer Service program. You should only enter a value in this field if this service level is calculated by number of hours, rather than number of days. Do not check the Use Time box above if you specify a Service Hours value.
It is important to note that once the Matrix is used the Service Days, Time and Hours fields are no longer available as they are not required.
Terminal Delivery Times Tab
The Terminal Delivery Times Tab is used to manage the delivery times between Terminals (LineHaul) to support the matrix calculations. For each terminal in your system You can define multiple sheets per service level with a different set of times, in number of days. If your Company deals strictly with LineHaul deliveries, you can simply configure the Terminal to Terminal times, and then use the Zone Range Mappings Tab to tie all other Zones in the Zone Tree to these times.
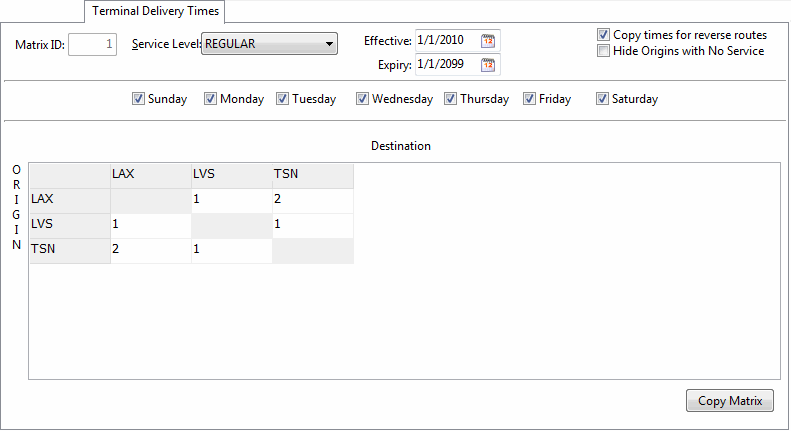
Matrix ID
This an auto generated sequence to give the current matrix of the service level a unique identifier.
Service Level
Select the service level you need to define the service level times for from the drop down list box.
Effective Date
Enter the date you want this service level to be in effect (a date you don’t want this service level to be used before)
Expiry Date
Enter the date you want this service level to expire at (a date you don’t want this service level to be used after)
Copy times for reverse routes
Check this box prior to adding zones if you want to automatically define the return route times the same as the original route.
Hide Origins with No Service
Select this flag to hide any Origin Zone Codes that have been flagged as 'No Service' from the grid.
Sunday, Monday, …………., Saturday (days of the week checkboxes)
Check any day you want this sheet to be active in, you can choose multiple days.
Copy Matrix
This button allows you to copy the current matrix to a new matrix. clicking this button will create a new matrix with the same content as the current one but with different ID. This is useful when want to create a new matrix with slight variations.
Terminal Delivery Times Grid
The grid displays the currently defined routes and times. A right mouse click in the grid area provides 4 options, as follows:
Add Zone to Matrix
Right click in the grid and select Add zone to matrix.
Remove Zone from Matrix
Right click the grid to select Remove zone from matrix.
No Service
Choosing this option will set the selected grid to 'No Service', meaning that it will not accept Deliveries for the selected Service Level code. If the User has selected the 'Hide Origins with No Service' flag (above), Origin Zones with No Service will not be visible on this grid.
Cells with no service are identified by an 'X' through them in the program grid (see above). Any trip that is routed from the Origin terminal to the Destination terminal will return a 'No Service' message.
Zone Exceptions
Select this option to add an Exception to the selected Zone. This will add an entry into the SVCLEVEL_MATRIX_EXCEPTION TruckMate Table. These exceptions are based on a Zone Range, and depending on where the User right-clicks the grid, there will be different outcomes:
-
Row label: No service is provided for pickups for specific zones within the zone’s service area.
-
Column label: No service is provided for deliveries for specific zones with the zone’s service area.
-
Grid cell: Exceptions (no service or extended lane days) exist for trips that originate from the cell’s row zone and are delivered to the cell’s column zone. (No service is identified by specifying -1 lane days for the exception)
Note: Cells in the Service Level Matrix that have an exception associated with them are marked with an asterisk (*) to identify that there are exceptions.
If you are an LTL or Interliner operation, you will have to add additional Times for the Zones in your Company’s Zone Tree on the Advance / Beyond Times Tab. These 'Advance' and 'Beyond' Times will be added to the Terminal Delivery Times Tab information when calculating the total Service Days for a delivery.
Terminal Delivery Times Summary Tab
The Terminal Delivery Times Summary Tab is to summarize start and end zone pairings based on filter criteria.
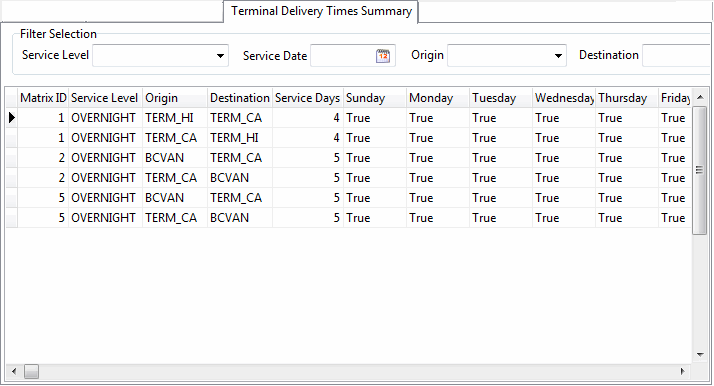
To display a summarized view of the start and end zone pairings time schedule enter the desired criteria in the 'Filter Selection' section above the detail grid.
Advance / Beyond Times Tab
The Advance / Beyond Times Tab is used to manage the advance (to terminal) and beyond (from terminal) time as well as the default Interliner and the junction zone. You can simply drag and drop entire parent zones onto a terminal enabling you to set up your matrix fairly quickly.
Note: The Service Level Matrix makes one assumption: every zone is either a terminal or it is serviced directly by a single terminal. For example, there is a Terminal 'ONTOR' which services all zones in 'ONT'. Any zone that is not attached to a terminal is considered not serviced.
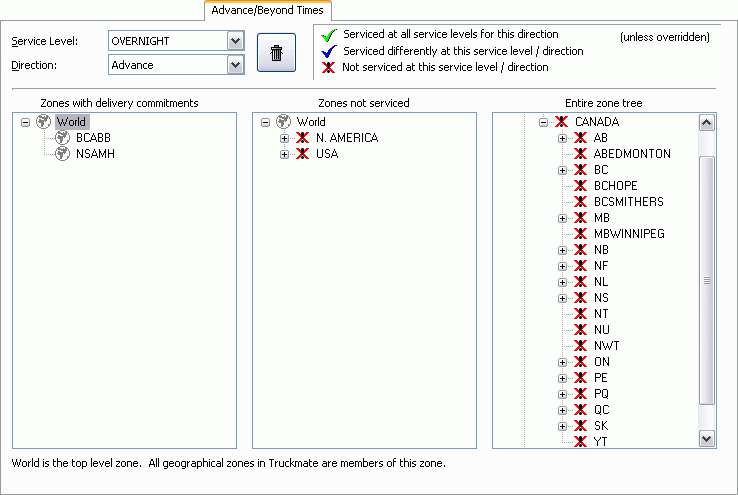
Service Level
Defaults to Global (All) Service Levels, to filter select a Service Level from the drop down list box.
Direction
Select the direction from the drop down list box.
Trash Can
Used to delete a defined service. Simply drag a zone to the trash can to delete.
Service Indicator Legend
Displays a description of the service level indicators.
Zone Tree Menus
Double-clicking a Zone ID in any of these tree menus will bring up the Interliner Zone Setup window, which is used to setup Interliner Vendors for use with the specific Zone Code.
Zones with delivery commitments tree
Displays the list of zones with delivery commitments based on the Service Level selected in the drop down list box.
Zones not serviced tree
Displays the list of zones not serviced.
Entire zone tree
Displays the complete list of zones.
Zone Range Mappings Tab
The Zone Range Mappings Tab can be used instead of the Terminal Delivery logic to provide terminal times for a range of zones inherited from a 'Base Zone'. The Zone Range Mappings Tab can be used in place of the Advance / Beyond Times Tab if you only require Terminal to Terminal delivery times (i.e. with strictly LineHaul operations).

For example: you can place a group of zones, ranging from ON to ONZZZ (this range would support alphabetically anything that starts with ON) and make them the same as the ONTOR zone in terms of delivery commitments. Then, in the Terminal Delivery Tab you would only need to define the ONTOR (Base Zone) Times and all zones in the range would inherit those values.
Zone Range Mappings grid
This grid is used to define the range of zones and the base zone for which they will inherit their delivery times
Lowest Zone in Range
Enter the zone code that will begin the range. Above example = ON, range begins with all zones beginning with ON.
Highest Zone in Range
Enter the zone code that will end the range. Above example = ONZZZ.
Base Zone
Enter the zone code that all the zones in the range will be based on. This is the Zone defined in the Terminal Delivery Times Tab.
Priority:
Enter the Range Mapping priority. For example: enter 1 for first priority. This priority is used when a zone is in more than one range, the range with the higher priority will be used.
Note: Zone Range Mapping is enabled by default. To disable it, the 'Check Zone Range Maps' application configuration option in Application Configurator > Profile > SVCLEVEL.EXE must be set to 'False'.
Load Plan Options Tab
The Load Plan Options Tab is used to plan outbound Crossdock shipments to break bulk and destination terminals. The Load Plan data will become, essentially, the Terminal Plan for a created Trip. This information is then available in the Crossdock program, including the available options and default door. Also, when the Crossdock is managed using a hand-held device the dock worker will receive instructions on the loading plan options via the device.
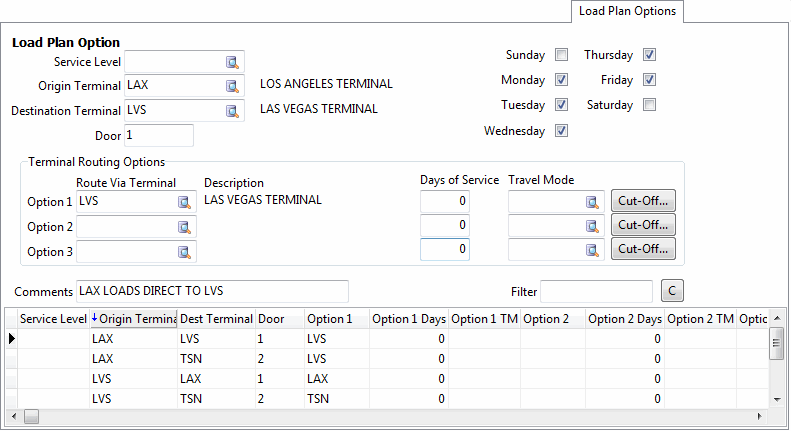
Service Level
The Service Level field is used to tie the Load Plans created on this Tab to a specific Service Level in the TruckMate system. Freight Bills which use the selected Service Level will have their Days of Service impacted by the available Load Plans.
Origin Terminal / Destination Terminal
Define the Origin and Destination Terminals for the displayed Load Plan.
Door
Enter the preferred loading Door.
Option 1 / Option 2 / Option 3
In a freight forwarding scenario, these three fields represent possible "via" Zones for the movement of Freight from the 'Origin Terminal' to the 'Destination Terminal'. In the above screenshot, 'LVS' is the only option chosen, meaning that all shipments that use the displayed Load Plan (i.e. going from LAX > TSN) must pass through the 'LVS' terminal.
The user can specify three potential freight forwarding points, and the system will use them in order when building the LTL Terminal Plan for the movement (i.e. 'Option 2' will be used when 'Option 1' is not available, and so on). The 'Option' points will be built into the Terminal Plan as 'I' (Intermediary) movements.
Days of Service
Enter the Service Days required for the Intermediary movement represented by the 3 available 'Option' zones. The Days of Service for each of the 'Option' values will be added onto the Days of Service for the movement from the 'Origin Terminal' to the 'Destination Terminal'.
Travel Mode
Enter the Travel Mode that will be used for the displayed Load Plan. Travel Mode codes are created on the Codes Maintenance program > Travel Modes Tab.
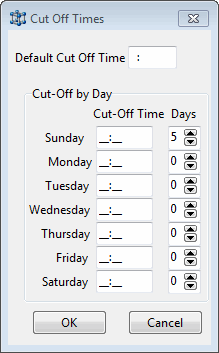
Cut Off…
Enter the cut off times for the days of the week, a cut off time is the time that cannot be exceeded in order to make the shipment using the selected 'Travel Mode'. For example if the travel mode selected is 'Air' and the take off time for an airliner on a specific day is 12 noon, and time needed to handle a shipment in terms of paper work, air shipping regulations,customs and all other related procedures is 4 hours, then the cut off time for that day should be set at 8:00 in the morning, if the shipment is not ready by that time it cant be shipped using the selected 'Travel Mode' on that particular day. A default cutoff time can be specified - and/or each day set independently (If no cutoff is configured for a specific day, then the default will be used). The cut off times can be set using the Cut Off Times window, invoked by clicking the 'Cut Off' button.
Comments
Enter any comments you wish to attach to the selected Load Plan.
Filter
Depending on the column that is being sorted on, you can type a value in this field to filter the Trip Plan grid. Use the 'C' button to clear the applied filter, if necessary.
Days of the week
Select the days of the week the Load Plan can be used on.
Trip Plan Options Tab
The Trip Plan Options Tab is used to setup pre-booking information for Trips in a variety of TruckMate applications. The information entered on the Trip Plan Options Tab is used to create legs when a 'Booking Number' is assigned to a Trip.
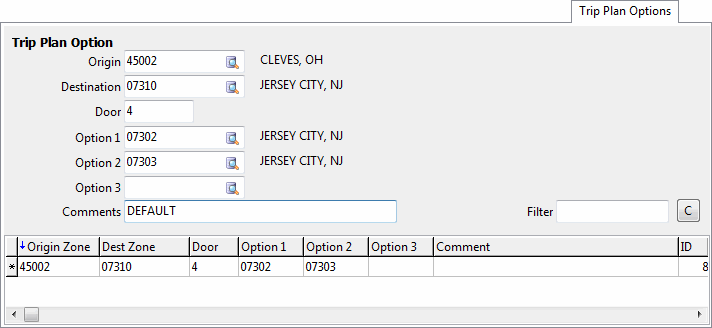
Origin
Enter the Origin Zone.
Destination
Enter the Destination Zone.
Door
If the Destination is a terminal and a specific Door is required, enter it here.
Option 1 / Option 2 / Option 3
For trips, these three fields represent possible "via" Zones for the movement plan of the trip from the 'Origin Terminal' to the 'Destination Terminal'. In the above screenshot, '07302' and '07303' are chosen, meaning that trips that Trip Plan (i.e. going from 45002 > 07310) must pass through the either the '07302' or '07303' zone codes.
The user can specify three potential trip plan points, and the system will use them in order when building the trip for the movement (i.e. 'Option 2' will be used when 'Option 1' is not available, and so on). The 'Option' trip legs will be built into the trips automatically.
Comments
Enter any comments regarding the Trip Plan options you are creating.
Filter
Depending on the column that is being sorted on, you can type a value in this field to filter the Trip Plan grid. Use the 'C' button to clear the applied filter, if necessary.