R&M Work Orders

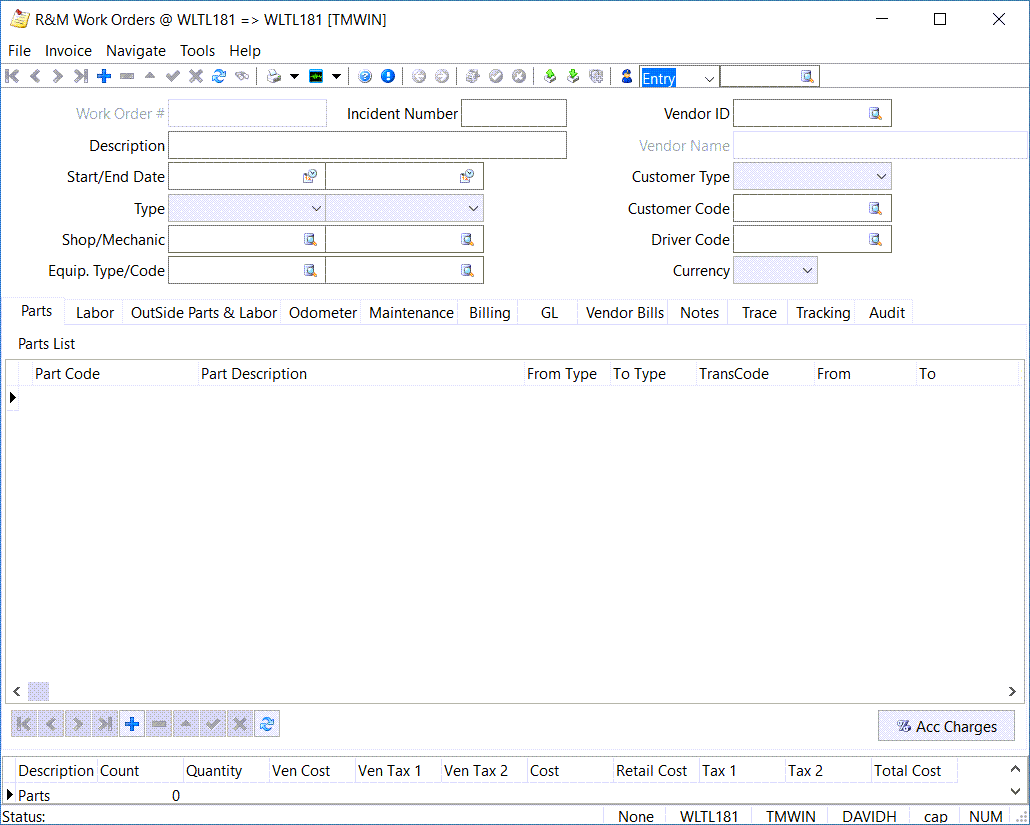
The R&M Work Orders program is used to create records of maintenance and repairs performed on equipment. They are used for scheduled maintenance and repair work, updating odometer readings, billing for outside work, and most other day-to-day shop administration functions.
There are two kinds of Work Orders (although both kinds can be combined on one work order): scheduled maintenance, and repairs. With repair work orders, you must manually enter details on the parts and labour tabs, and you are not required to enter odometer/hourmeter readings (although you can if you want to).
Scheduled maintenance Work Orders, however, require an odometer/hourmeter reading before you select and apply the scheduled maintenance jobs (although you may override the requirement). Scheduled maintenance jobs will automatically enter parts and labour details for you, based on your job codes.
To access the R&M Work Orders program:
| From this location | Go to |
|---|---|
TruckMate Menu and TruckMate Task List |
Repair & Maintenance > R&M Work Orders |
Windows Start Menu |
TruckMate 20xx > R&M Work Orders |
Windows Explorer |
C:\Program Files (x86) > TruckMate 20xx > RMWO.exe |
Menu and toolbar options
This topic describes menu and toolbar options and functionality that are specific to the R&M Work Orders window.
For information about common menu and toolbar options (i.e. File menu, Refresh, Multi-Company, etc.), see General menu and toolbar options.
Invoice Menu
Post Invoice
![]() Selecting this option will Post the currently displayed Work Order, making it available to the R&M Work Orders Register program.
Selecting this option will Post the currently displayed Work Order, making it available to the R&M Work Orders Register program.
Set to Complete
![]() Selecting this option will give the currently displayed Work Order the status of 'Complete'.
Selecting this option will give the currently displayed Work Order the status of 'Complete'.
You can only select this option when both the 'Parts' and 'Labour' have been 'Posted' (via a Context Menu option from the Parts tab and Labour tab).
Set to Entry
![]() Selecting this option will give the currently displayed Work Order the status of 'Entry'.
Selecting this option will give the currently displayed Work Order the status of 'Entry'.
Navigate Menu
Set Search Filter
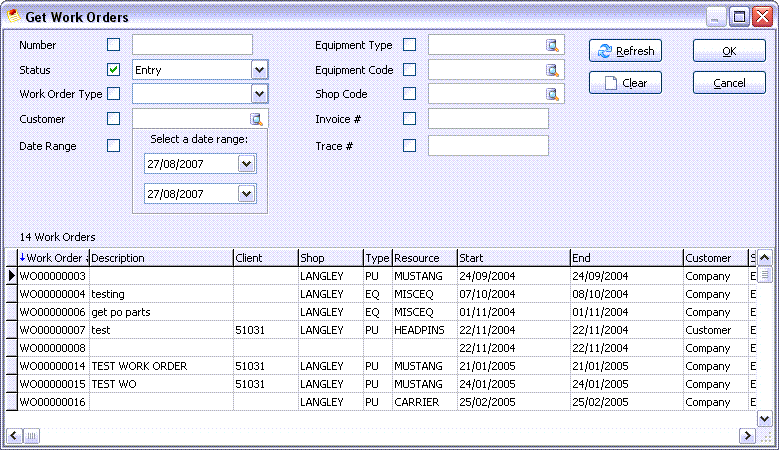
![]() To filter the records that are displayed in the main screen, use the Search function, which opens the Get Work Orders window. You can specify a number of criteria for filtering. By default, when the program is first opened, the search criteria are set to display all records that do not have the status of 'Complete'.
To filter the records that are displayed in the main screen, use the Search function, which opens the Get Work Orders window. You can specify a number of criteria for filtering. By default, when the program is first opened, the search criteria are set to display all records that do not have the status of 'Complete'.
| Field | Definition |
|---|---|
Number |
To select a specific work order, check the Number box and enter the specific work order number in the field to the right. |
Status |
To select work orders according to their status, check the Status box and select a status from the drop down list. If you want to view all work orders except those of a certain status, select the status and check the Not Equal To checkbox. |
Work Order Type |
To select work orders of a specific type (ie, In House or Out Side Work), check the box and select the value from the drop down list. |
Customer |
To select work orders for a specific customer, check the box and enter the Customer (or Interliner) code in the field. Double click for a selection form. Use the search button for more choices. |
Date Range |
You can select work orders according to a range of Start Dates. Check the box, then click on the calendar icon for a selection form. |
Equipment Type |
To select work orders for a specific type of equipment, check the box and enter the equipment type code in this field (or double click for a selection form). If you want to select work orders for a specific piece of equipment, you must select that equipment’s type in this field first. Use the search button for more choices. |
Equipment Code |
After selecting the equipment type, you can enter an equipment code. Double-click on the Code field to display and select an equipment code within the type selected. Equipment codes are configured in the Power Unit Profiles program, the Trailer Profiles program, and the Misc Equipment Profiles program. Use the search button for more choices. |
Shop Code |
To select work orders performed at a specific shop, check the box and enter the shop code in this field. Double click for a selection form. Shop codes are configured in the R&M Configuration program. Use the search button for more choices. |
Invoice # |
To select work orders performed on a specific invoice number, check the box and enter the invoice number in this field. |
Trace # |
To select work orders performed on a specific trace number, check the box and enter the trace number in this field. |
Refresh |
Selecting this button will renew all data in this program. |
Clear |
Selecting this button will clear all Filter options on this Search window. |
Filter Previous
![]() Selecting this button will browse to the previous record gathered by the Search Filter (described above).
Selecting this button will browse to the previous record gathered by the Search Filter (described above).
This option is also available on the Toolbar, for ease of browsing.
Filter Next
![]() Selecting this button will browse to the next record gathered by the Search Filter (described above).
Selecting this button will browse to the next record gathered by the Search Filter (described above).
This option is also available on the Toolbar, for ease of browsing.
Tools Menu
Copy Work Order
![]() Selecting this option will open the Copy Work Order window, which will allow you to Copy a complete Work Order in a variety of ways.
Selecting this option will open the Copy Work Order window, which will allow you to Copy a complete Work Order in a variety of ways.
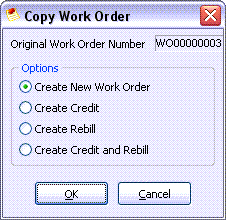
The Original Work Order’s 'number' will be displayed in the field at the top of this window.
Options are:
-
Create New Work Order
Will copy the exact details of the current Work Order into a new Work Order, useful for reorders of the same Parts.
-
Create Credit
Will create a Credit Work Order based on the current Work Order’s details.
-
Create Rebill
Will create a Rebill Work Order based on the current Work Order’s details.
-
Create Credit and Rebill
Will create Credit and Rebill Work Orders based on the current Work Order’s details.
Copy Parts and Labour
![]() Selecting this option will allow you to Copy 'Parts' and 'Labour' information from another Work Order into the currently displayed Work Order. When this option is invoked, you must confirm your decision by clicking 'Yes', and then enter the Work Order Number of the Work Order you would like to Copy the information from.
Selecting this option will allow you to Copy 'Parts' and 'Labour' information from another Work Order into the currently displayed Work Order. When this option is invoked, you must confirm your decision by clicking 'Yes', and then enter the Work Order Number of the Work Order you would like to Copy the information from.
Toolbar
Status Filter
Use the pull-down arrow to select 'Entry', 'Complete', 'Posted', or 'Cancel'. Once selected, the records will be sorted based on your selection. Use the scroll buttons to locate the desired record.
Shop Filter
Use the search button to select a Shop. Once selected, the records will be sorted based on the Shop you have selected. Use the scroll buttons to locate the desired record.
Header Information

Work Order #
This a unique number assigned to each work order. In the R&M Configuration program > Misc tab, you can specify whether the Work Order number should be generated by the system, or whether you have to enter your own work order number.
Incident Number
The user can double-click in this field to select an Incident Number initially created in the Safety & Compliance program to record an accident or other similar incident. When an 'Incident Number' is attached to a work order, it will be tied to the Safety & Compliance record that is the focus of that incident.
Note: Alternatively, the user can select the 'Add New Work Order' button on the Safety & Compliance program > Work Orders tab to automatically open the R&M Work Order program and have this field automatically populate.
Description
Enter a free format description of the work order. This is for reporting and reference purposes only.
Start / End Date
Will default to today’s date. Double click to display a calendar selection form. You can leave the End Date blank until the work order is complete.
Type
There are two available 'Type' fields. In the first one, select the Work Order Type from the drop down box. Available options are:
-
In House:* Meaning work performed by your shop.
-
Out-Side Work:* Meaning work performed on your equipment by another shop. You can record work orders for outside work in order to update your maintenance and inventory records for work performed outside your own shop.
-
Quote:* Meaning a quote you are preparing to send to another shop for work that is yet to be done. This means creating a Work Order that can not be updated until it is changed to either an 'In-House' or 'Out-side Work' Work Order.
The second 'Type' field allows you to specify, by using the pull-down menu, whether this is a 'Work Order', 'Credit', or 'Rebill':
-
Work Order:* Used to create an original Work Order.
-
Credit:* This option will create a 'Credit' for an original Work Order and will reverse all GL entries the original one added.
-
Rebill:* This will create a 'Rebill' based on the original Work Order and will allow you to make modifications in order to re-bill out to the customer.
Shop Code / Mechanic
Enter the shop at which the work is being performed. Double click or click the search button for a list of valid shop codes. In the next field, click the search button for a list of available Mechanics at the currently selected Shop.
Equipment Type
Double-click to display and select equipment types. The options are 'CO' (Container), EQ' (Miscellaneous Equipment), 'OS' (Outside Equipment), 'PU' (Power Unit), or 'TR' (Trailer). Use the search button for more choices.
Equipment Code
Double-click on the Equipment Code field to display and select an equipment code within the type selected. Equipment codes are configured in the Power Unit Profiles program, the Trailer Profiles program, and the Misc Equipment Profiles program. Use the search button for more choices. The default behavior of the system is to show only active resources (equipment) for selection. However, if you would like inactive resources to show up as well, you can set the application configuration option in Application Configurator program > Repairs and Maintenance > RMWO.EXE - Allow Inactive Resources to 'True'.
Vendor ID / Vendor Name
Click the search button to select a Vendor ID for this Work Order. Once selected, the Vendor’s name will appear to the right of the Vendor ID.
Status
When the work order is first created, it is assigned a status of 'Entry'. When the work order is finished, change the Status to 'Complete'. All Parts and Labour items must be posted before the work order can be flagged as completed. Once the status is changed to 'Complete' the work order entry will no longer display in the Work Order program (but you can use the History Reports function to view information about completed work orders) and the entry can now be posted through the R&M Work Order Register program. Also, once marked as 'Complete' the user cannot make changes to this work order entry.
A fourth status, 'Cancel', will be set on inventory records that are deleted by the user. When the user selects the 'X' button (delete) on the TruckMate Navigation Bar, he/she will be prompted to set the selected record to 'Cancel' status. No records are every actually deleted from the R&M system.
Customer Type
Select the Customer Type from the drop down box. The Customer Type is used to determine the mark up rate, as configured in the R&M Configuration program > Misc tab.
Customer Code
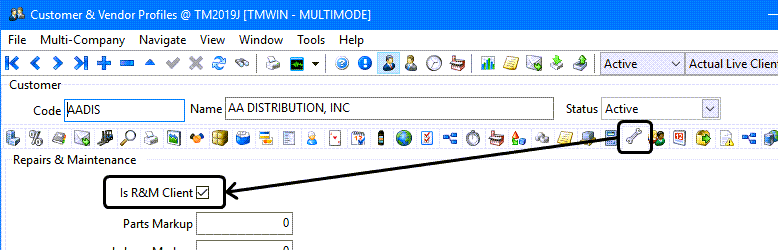
If your maintenance facilities and staff perform repair work for outside companies or customers, you can specify the 'Customer Code' in this field. Double-click this field or click on the ellipsis button to select from one of the available choices.
All Customers who have the Is R&M Client checkbox selected on their Profiles > Customer & Vendor Profiles > Customer > Repairs & Maintenance tab will be available for selection.
Driver Code
Double-click to view Driver Code options. Driver Code and Driver ID are often used interchangeably. To add a new Driver Code view the Driver Profiles Program. Use the search button for more choices.
Currency
Select the currency of the work order. The base currency, as configured in the Codes Maintenance program, will default. This field is currently only used for information and reporting purposes.
Parts tab
You manually add records on the Parts tab only for non-scheduled maintenance jobs. For scheduled maintenance jobs (created in the R&M Maintenance program), the parts and labour entries will be made automatically when the job is added to the work order.
Unlabeled Column
Will display a 'P' when this record has been posted.
Part Code
Enter a part code. Double click for a selection form. Part Codes are configured in the R&M Configuration program.
Part Description
Automatically populates with a 'Part Description' based on the 'Part Code' selected.
From Type
Displays the 'From' information from the Transaction Code.
To Type
Displays the 'To' information from the Transaction Code.
TransCode
Double click to display and select a transaction code. Transaction codes are configured in the R&M Configuration program.
From
Enter the shop location where the part originated. Double click for a selection form. If you tab through the fields as you make your entry, the From code will default to the shop code entered in the R&M Work Orders program header (top of screen).
To
Enter the equipment code on which the part will be installed. Double click for a selection form. If you tab through the fields as you make your entry, the To code will default to the Equipment Code entered in the header.
Serial Number
Enter the serial number of the part that is being installed (if applicable). Double click to display and select serial numbers for that part code and From location combination.
Quantity
Enter the quantity of items of that part code that will be used.
Rate / Cost / Tax 1 / Tax 2 / Total Cost
When you move (usually by hitting the <tab> key) out of the 'Quantity' field, the 'Rate', 'Cost', 'Tax 1', 'Tax 2', and 'Total Cost' fields will be calculated and filled in.
The Taxes will be calculated based on the configuration in the Tax Calculation Configuration program and the R&M Configuration > Miscellaneous tab. Taxes are calculated on ('Cost' X markup); the 'Total Cost' will reflect the Cost plus markup plus taxes.
Note: The Tax flags in the R&M Configuration program’s Parts tab and Labor tab (as well as the 'Tax 1 Exempt' and 'Tax 2 Exempt' flags) apply to this calculation. They also apply to tax calculations in the Stock Adjustments program and the Stock Receipts program.
Mark Up
The Mark Up value will automatically calculate based on the entered 'Rate' and the default Parts Markup Category that is assigned to the Customer set in the 'Customer Code' field of the Work Order Header section.
Markup Matrix Categories are created in the R&M Configuration program > Markup Matrix tab, and are assigned to Client Codes (based on Parts and/or Labor) in the Customer & Vendor Profiles program > Repairs & Maintenance tab.
T Place / T Depth
Are filled in automatically by the 'Tire Move' grid. This grid can be selected from the right mouse menu. The Tire Move grid is used for all tire operations, such as rotations, replacements, etc.
Remarks
You can enter free form remarks about this part item in this field. This is for reference and reporting purposes only.
Job Code
Enter the job code or double-click in the column for job codes entered on your system.
Suggested Retail
Enter the suggested retail price for this item.
Transaction Date
Pre-populated based on your start/end date entered in the header when you add a new detail line.
Component
Double-click to select an appropriate 'Component' code for this piece of equipment.
UOM
Double-click to select a Unit of Measurement, if required for the current detail line.
ID
Automatically populates with the 'ID' number for the selected Part.
Cause
Double-click this field to select an appropriate 'Cause' code for this R&M Work Order. The 'Cause' codes are setup in the R&M Configuration program, and relate to the reason that this particular part is scheduled for repair.
Effect
Double-click this field to select an appropriate 'Effect' code for this R&M Work Order. The 'Effect' codes are setup in the R&M Configuration program, and relate to the actual damage accrued to a piece of Equipment after a 'Cause' has been evaluated.
Remedy Description
Double-click this field to select an appropriate 'Remedy' code for this R&M Work Order. The 'Remedy' codes are setup in the R&M Configuration program, and relate to the course of repair actions that should be undertaken after valid 'Cause' and 'Effect' entries have been made.
Acc Charges
![]() Clicking the Acc Charges button will open the Accessorial Charges dialog box where you can search for Accessorial Charges entered in your system.
Clicking the Acc Charges button will open the Accessorial Charges dialog box where you can search for Accessorial Charges entered in your system.
Context Menu
Post
Will add the detail line to equipment and remove it from available stock. A 'P' will appear on the far left of the row to indicate that the item has been posted. The Status on the Work Order header cannot be changed to 'Complete' until all line items are posted. When a line item has been posted, you can no longer make changes to it. After posting, an entry is created in the GL tab for the R&M Work Order program based on the GL Account setup in the R&M Configuration program > GL tab.
Post All
Will post all entries appearing in the grid.
Reverse Post
Will reverse the status of a posted detail line to un-posted. You will be able to make changes to the line item after reversing the post.
Reverse Post All
Will reverse the status of all posted detail lines to un-posted. You will be able to make changes to the items after reversing the posts.
Add Notes
Brings up a Parts and Labour Notes dialog box where you can enter relevant notes, as needed.
Set to Retail
Will set the retail price for this part. The retail price you enter in the R&M Configuration program > Part Codes tab, will be the retail price used.
Warranty Parts
If the item has a serial number, the Warranty Parts menu option will be available. The fields on the Warranty form correspond to those on the Warranty tab of the R&M Maintenance program. See that documentation for further information on maintaining warranty records. Use the Get Warranty button to use the last warranty from this Part Code / Vendor Code combination.
Core Returns
The fields on the Core Returns form correspond to those on the Core Returns tab of the R&M Maintenance program. See that documentation for further information on maintaining Core Return records.
Tires
Selecting the Tires menu option displays the Tire Move window. Using this form, you can record tire installation and rotation, tread depth, and tire position on each unit. When you click the Fill table button, all tires at the From location will be displayed. Double click to remove rows that display tires that are not involved in this transaction. The Tire Placement form at the left can be used to drag and drop the new position of the tire into the New Place field in the grid.

In the Tire Move grid, users can select multiple items by clicking on them.
Note: When working within the Tire Move Grid, you can use the <Shift><Alt><D> keyboard combination to quickly delete tires that have been added to the Grid.
Field |
Definition |
Transaction Code |
Double-click to select a transaction code. Transaction codes are configured in the R&M Configuration program. The code selected here (in combination with the From Location) will determine the tires that display in the grid when the Fill Grid button is clicked. For example, if you select the transaction code 'ROTTRPU' (Rotate Tires on Power Unit), all the tires currently installed on the power unit specified in the From location will display in the grid. If you choose the transaction code 'INSTTRSHTR' (Install Tire from Shop to Trailer) all the tires available in the shop specified in the From location will display in the grid. |
From Location |
Double-click to select the current location of the tires affected by this transaction. The available codes will vary depending on the Transaction Code you selected. For example, if you select the transaction code 'ROTTRPU' (Rotate Tires on Power Unit), power unit codes will be available in the selection form. If you select the transaction code 'INSTTRSHTR' (Install Tire from Shop to Trailer), shop codes will be available in the selection form. |
To Location |
Double-click to select the destination of the tires affected by this transaction. The available codes will vary depending on the Transaction Code you selected. For example, if you select the transaction code 'RCAPTRTRVE' (Recap Tires from Trailer to Vendor), vendor codes will be available in the selection form. If you select the transaction code 'INSTTRSHTR' (Install Tire from Shop to Trailer), trailer codes will be available in the selection form. |
Fill table |
Will fill the grid with all tires currently assigned to the From location. |
Part Code / Serial Number |
Are read-only fields. |
Old Place |
If the tire is currently assigned to a piece of equipment, the position of the tire will be displayed in this field. The position corresponds to the Tire Placement definition shown on the right side of the screen. The Tire Placement definition form is configured in the R&M Configuration program |
New Place |
You can record the tire’s new position by entering the placement code in this field. Alternatively, you can drag and drop the tire position from the Tire Placement form on the right side of the screen. The Tire Placement definition form is configured in the R&M Configuration program. |
Old Depth |
If a tread depth had been previously recorded for this tire, it will display in this field. |
New Depth |
Record the current tread depth in this field. |
Copy to Work Order |
Will create an entry on the Parts tab that describes the tire movements created in this form. |
Abort |
Will cancel the Tire Move operation. |
Part Notes
Displays any Notes associated with the selected Part.
Create New Part Code
Is used to create a new Part Code in the same manner as a new part code is created in the R&M Configuration program.
Part Packages
Is used to recall a Part Package and add the included parts to the work order. Click on the desired Part package Name on the left side of the form, then click Add Parts to create the detail lines on the Parts (or Labour) tab. Part Packages are configured in the R&M Configuration program.
Vendor Part Codes
You can update the code the vendor uses to refer to this part using the Vendor Part Codes menu option. See the R&M Configuration program for more information.
Get a Stock Receipt
Selecting this option will open a new window, where you can select a 'Stock Receipt Number' for the current Part.
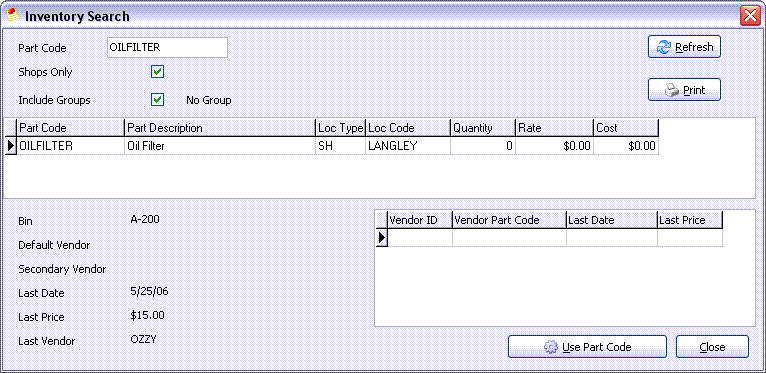
Check Inventory
Displays an Inventory Search window where you can search for inventory based on a number of criteria.
Field |
Definition |
Part Code |
If the line item you were working on already had a part code, it will default into the Part Code field. Otherwise, double-click to display and select a part code. Select search button for more choices. |
Shops Only |
If you only want to see inventory available in your shops (as opposed to that installed on equipment), check off the Shops Only box. |
Include Groups |
If you want to see inventory that is in the same group as the part code you selected, and is therefore interchangeable, check off the Include Groups box. The Group name will display to the right. Groups are defined in the R&M Configuration program. |
Refresh |
Will refresh the grid display after you change the parameters. |
Will display the Report Selection form. The Crystal Report template supplied with the TruckMate system is called 'RMINVSN.RPT'. The report will preview to the screen. Click the printer icon at the top of the screen to send the report to the printer that is configured as the default printer for your workstation. See the Crystal Reports Reference for more information on report functions. |
|
Part Code / Part Description / Loc Type / Quantity / Rate / Cost |
The fields within the main Inventory Search grid display data based on the information entered into the 'Part' tab of the R&M Configuration program and are read-only. |
Bin / Default Vendor / Secondary Vendor / Last Date / Last Price / Last Vendor |
These read-only fields will populate if the information exists within R&M Configuration program for the selected part. |
Vendor ID / Vendor Part Code / Last Date / Last Price |
These read-only fields will populate if the information exists within R&M Configuration program for the selected part. |
Use Part Code |
Will paste the selected part from the inventory search grid into the line item for the stock receipt. |
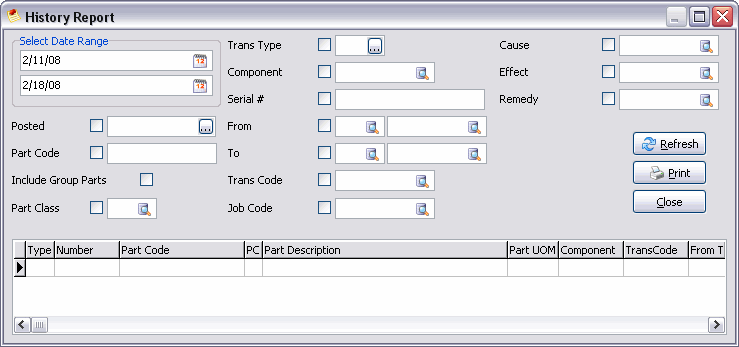
History Reports
Displays the History Report window, where you select R&M transactions based on the specified criteria. The items shown in the grid are the items that will be included on the report, so you can preview the included data before you preview the layout and print.
Field |
Definition |
Date |
Refers to the date of the transaction. A single piece of inventory may be displayed several times in the history report; once when it was received in the Stock Receipts program, again when it was installed on a piece of equipment on a work order, and so on. |
Posted |
Check the Posted box if you want to include (or exclude) only posted items (Stock Receipts, Stock Adjustments or R&M Work Order items). Double click in the field to the right to toggle the value. Select the search button for more choices. |
Part Code |
To report on a specific part code, check the Part Code box and enter the part code in the field to the right (or double-click to display and select valid codes). Part codes are defined in the R&M Configuration program. Select the search button for more choices. |
Include Group Parts |
If you wish to include parts in the same part group, check this box. Part groups are defined in the R&M Configuration program. |
Part Class |
Check the box if you want to select a specific part class, then double-click in the box to the right to display a selection list. Part classes are defined in the R&M Configuration program. Select the search button for more choices. |
Transaction Type |
Check the box if you want to select a specific transaction type, then double-click in the box to the right to toggle through valid selections. 'IA' indicates a transaction generated in the Stock Adjustments program (this program). 'ST' indicates a transaction generated in the Stock Receipts program. 'WO' indicates a transaction generated in the Work Orders program. 'OW' indicates an outside work transaction. Select the search button for more choices. |
Component |
Check the box if you want to select a specific component, then double-click in the box to the right to display a selection list. Components are defined in the R&M Configuration program. Select the search button for more choices. |
Serial # |
Check the box if you want to select a specific serial number, then enter the serial number in the box to the right. |
From |
Check the box if you want to select a specific origin for the transaction, then double-click in the box to the right to display a selection list. Select the search button for more choices. |
To |
Check the box if you want to select a specific destination for the transaction, then double-click in the box to the right to display a selection list. Select the search button for more choices. |
Trans Code |
Check the box if you want to select a specific transaction code, then double-click in the box to the right to display a selection list. Transaction codes are defined in the R&M Configuration program. Select the search button for more choices. |
Refresh |
When you have entered the desired criteria, click this button to refresh the grid display. |
Will display the Report Selection form. The Crystal Report template supplied with the TruckMate system is called 'RMHIST.RPT'. The report will preview to the screen. Click the printer icon at the top of the screen to send the report to the printer that is configured as the default printer for your workstation. See the Crystal Reports Reference for more information on report functions. |
Copy and Insert
The Copy and Insert function is useful for entering multiple identical items of stock with serial numbers. For example, say you are entering records for twenty batteries. Enter the first battery, post the entry, then select Copy and Insert off the right-mouse menu. Another entry will be created using all the same details except the serial number. Enter the serial number, post the new entry, then select Copy and Insert again. Continue until all the items have been entered.
Driver Call In
Reports from drivers about required maintenance can be entered using this option. This is the same as entering Driver Call In records in the R&M Maintenance program.
Attach/Open Related Files
Selecting this option will open the Attach / Open Related Files window, which allows you to add images or documents to the selected record.
Labor tab
You manually add records on the Labor tab only for non-scheduled maintenance jobs. For scheduled maintenance jobs, the parts and labour entries will be made automatically when the job is added to the work order.

Labor Code
Labor codes are a type of part code. Double-click to display and select a valid code. Part codes are configured in the R&M Configuration program.
TransCode
Transaction codes must be of the part class 'LB'. Double-click to display and select.
Mechanic
Double-click to display and select a mechanic code. Mechanic codes are configured in the R&M Configuration program.
To
Enter the equipment code on which the labor will be performed. Double click for a selection form. If you tab through the fields as you make your entry, the To code will default to the Equipment Code entered in the R&M Work Orders header (top of screen).
Time
Enter the amount of time that this labor entry represents. This is the actual, not the estimated, time.
Rate / Cost / Tax 1 / Tax 2 / Total Cost
When you <tab> out of the Time field, the Rate, Cost, Tax 1, Tax 2, and Total Cost will be calculated and filled in. The Rate is determined according to the setup in the R&M Configuration program. The taxes will be calculated based on the configuration in the Automatic Tax Calculation Configuration program. Taxes are calculated based on the Cost multiplied by the markup (as configured in the R&M Configuration program). The Total Cost will reflect the Cost plus markup plus taxes.
Note: The tax flags in the R&M Configuration program do not apply to this calculation; they only apply to tax calculations in the Stock Adjustments program and the Stock Receipts program.
Mark Up
The Mark Up value will automatically calculate based on the entered 'Rate' and the default Labor Markup Category that is assigned to the Customer set in the 'Customer Code' field of the Work Order Header section.
Markup Matrix Categories are created in the R&M Configuration program > Markup Matrix tab, and are assigned to Client Codes (based on Parts and/or Labor) in the Customer & Vendor Profiles program > Repairs & Maintenance tab.
Est
This field is used to store the estimated time. When this line is created by selecting a maintenance job, the estimated time will be filled in according to the setup of the job.
Remarks
You can enter free form remarks about this labor item in this field. This is for reference and reporting purposes only.
Component / Serial Number
Optionally, you can enter a Component code and serial number for the purpose of cross referencing a parts entry. Component codes are configured in the R&M Configuration program.
Job Code
Enter the job code or double-click in the column for job codes entered on your system.
Suggested Retail
Enter the suggested retail price for this item.
Start Time / End Time / Actual Hours
These fields are used to add specific Time values concerning the labor accomplished. Any new record lines automatically created by the RM Mechanic program will set time field to '1' and rate amount to '0'.
Acc Charges
![]() Clicking the Acc Charges button will open the Accessorial Charges dialog box where you can search for Accessorial Charges entered in your system.
Clicking the Acc Charges button will open the Accessorial Charges dialog box where you can search for Accessorial Charges entered in your system.
Context Menu
Post
Will finalize the detail line. A 'P' will appear on the far left of the row to indicate that the item has been posted. The Status on the Work Order header cannot be changed to 'Complete' until all line items are posted. When a line item has been posted, you can no longer make changes to it. After posting, an entry is created in the GL tab for the R&M Work Order program based on the GL Account setup in the R&M Configuration > GL tab.
Reverse Post
Will reverse the status of a posted detail line to un-posted. You will be able to make changes to the line item after reversing the post.
History Reports
See above for more information.
Reports
Selecting the 'Reports' option from the Context Menu will open a new window, similar to the one found in the R&M Maintenance program.
Insert and Copy
Will create a new detail line that is identical to the currently selected detail line.
Driver Call In
Reports from drivers about required maintenance can be entered using this option. This is the same as entering Driver Call In records in the R&M Maintenance program. See that documentation for further information.
Acc Charges
Selecting this option will open the Accessorial Charges dialog box where you can search for Accessorial Charges entered in your system.
Outside Parts and Labor tab
The Outside Parts and Labor tab contains details to the parts you use that come from outside sources.

Unlabeled Column
Will display a 'P' when this record has been posted.
Part Code
Enter a part code. Double click for a selection form. Part Codes are configured in the R&M Configuration program.
TransCode
Double click to display and select a transaction code. Transaction codes are configured in the R&M Configuration program.
From Type
Will take information from the transaction code.
To Type
Will take information from the transaction code.
From
Enter the shop location where the part originated. Double click for a selection form. If you tab through the fields as you make your entry, the From code will default to the shop code entered in the R&M Work Orders program header (top of screen).
To
Enter the equipment code on which the part will be installed. Double click for a selection form. If you tab through the fields as you make your entry, the To code will default to the Equipment Code entered in the header.
Serial Number
Enter the serial number of the part that is being installed (if applicable). Double click to display and select serial numbers for that part code and From location combination.
Quantity
Enter the quantity of items of that part code that will be used.
Outside Cost / Outside Tax 1 / Outside Tax 2
When you move (usually by hitting the <tab> key) out of the 'Quantity' field, the 'Rate', 'Cost', 'Tax 1', 'Tax 2', and 'Total Cost' fields will be calculated and filled in.
The taxes will be calculated based on the configuration in the Tax Calculation Configuration program and the R&M Configuration > Miscellaneous tab. Taxes are calculated on (Cost X markup); the 'Total Cost' will reflect the Cost plus markup plus taxes.
Note: The Tax flags in the R&M Configuration program > Parts tab and Labor tab now apply to this calculation (as do the 'Tax 1 Exemp' and 'Tax 2 Exempt' fields, when using Vendor Tax and Company Tax). They also apply to tax calculations in the Stock Adjustments program and the Stock Receipts program.
Mark Up
The Mark Up value will automatically calculate based on the entered 'Rate' and the default Part and/or Labor Markup Category that is assigned to the Customer set in the 'Customer Code' field of the R&M Work Order Header section. If the record is for Parts, then the program will use a Parts Markup matrix; otherwise, it will use a Labor Markup Matrix.
Markup Matrix Categories are created in the R&M Configuration program > Markup Matrix tab, and are assigned to Client Codes (based on Parts and/or Labor) in the Customer & Vendor Profiles program > Repairs & Maintenance tab.
Retail Cost
Enter the retail cost of this item.
Rate / Cost / Tax 1 / Tax 2 / Total Cost
When you move (usually by hitting the tab key) out of the Quantity field, the Rate, Cost, Tax 1, Tax 2, and Total Cost will be calculated and filled in. The taxes will be calculated based on the configuration in the Tax Calculation Configuration program and the R&M Configuration - Miscellaneous tab. Taxes are calculated on (Cost X markup); the Total Cost will reflect the Cost plus markup plus taxes. Note, the tax flags in the R&M Configuration program now apply to this calculation. They also apply to tax calculations in the Stock Adjustments program and the Stock Receipts program.
T Place / T Depth
Are filled in automatically by the Tire Move grid. This grid can be selected from the right mouse menu. The Tire Move grid is used for all tire operations, such as rotations, replacements, etc.
Remarks
You can enter free form remarks about this part item in this field. This is for reference and reporting purposes only.
Job Code
Enter the job code or double-click in the column for job codes entered on your system.
Suggested Retail
Enter the suggested retail price for this item.
Acc Charges
![]() Clicking the Acc Charges button will open the Accessorial Charges dialog box where you can search for Accessorial Charges entered in your system.
Clicking the Acc Charges button will open the Accessorial Charges dialog box where you can search for Accessorial Charges entered in your system.
Context Menu
Post
Will add the detail line to equipment and remove it from available stock. A 'P' will appear on the far left of the row to indicate that the item has been posted. The Status on the Work Order header cannot be changed to 'Complete' until all line items are posted. When a line item has been posted, you can no longer make changes to it. After posting, an entry is created in the GL tab for the R&M Work Order program based on the GL Account setup in the R&M Configuration > GL tab.
Reverse Post
Will reverse the status of a posted detail line to un-posted. You will be able to make changes to the line item after reversing the post.
Post All
Will post all entries appearing in the grid.
Add Notes
Brings up a Parts and Labour Notes dialog box where you can enter relevant notes, as needed.
Set to Retail
Will set the retail price for this part. The retail price you enter in the R&M Configuration program > Part Codes tab, will be the retail price used.
Warranty Parts
If the item has a serial number, the Warranty Parts menu option will be available. The fields on the Warranty form correspond to those on the Warranty tab of the R&M Maintenance program. Use the Get Warranty button to use the last warranty from this part code/vendor code combination.
Core Returns
The fields on the Core Returns form correspond to those on the Core Returns tab of the R&M Maintenance program. See that documentation for further information on maintaining Core Return records.
Tires
See Parts tab for more information.
Add Part Code
Is used to create a new part code in the same manner as a new part code is created in the R&M Configuration program. View the R&M Configuration > Part Code topic for more information.
Part Packages
Is used to recall a Part Package and add the included parts to the work order. Click on the desired Part package Name on the left side of the form, then click Add Parts to create the detail lines on the Parts (or Labour) tab. Part Packages are configured in the R&M Configuration program.
Vendor Part Codes
You can update the code the vendor uses to refer to this part using the Vendor Part Codes menu option. See the R&M Configuration program for more information.
Get a Stock Receipt
Selecting this option will open a new window, where you can select a 'Stock Receipt Number' for the current Part.
Check Inventory
See Parts tab for more information.
History Reports
See Parts tab for more information.
Reports
Selecting the 'Reports' option from the Context Menu will open a new window, similar to the one found in the R&M Maintenance program.
Copy and Insert
The Copy and Insert function is useful for entering multiple identical items of stock with serial numbers. For example, say you are entering records for twenty batteries. Enter the first battery, post the entry, then select Copy and Insert off the right-mouse menu. Another entry will be created using all the same details except the serial number. Enter the serial number, post the new entry, then select Copy and Insert again. Continue until all the items have been entered.
Driver Call In
Reports from drivers about required maintenance can be entered using this option. This is the same as entering Driver Call In records in the R&M Maintenance program.
Acc Charges
Selecting this option will open the Accessorial Charges dialog box where you can search for Accessorial Charges entered in your system.
Odometer tab
The Odometer tab is used to record mileage / hourmeter readings for the unit specified in the R&M Work Orders program header (top of screen). When you recall maintenance jobs on the Maintenance tab, the system will check to see if the odometer readings have been updated. Previous odometer readings will be displayed in the grid.
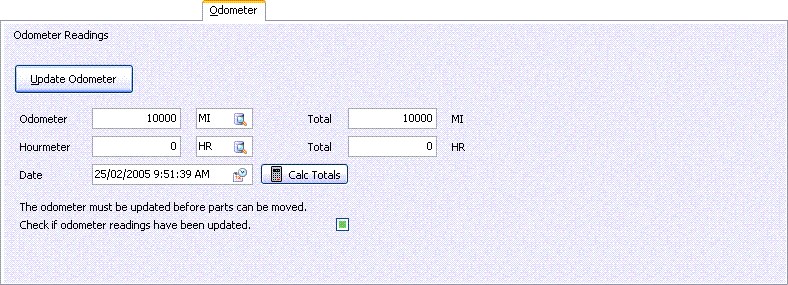
Update Odometer
Will display the form used for recording odometer / hourmeter readings. See the documentation for the Odometer Reading tab of the R&M Maintenance program for information about entering odometer / hourmeter readings.
Calc Totals
Clicking the 'Calc Totals' button will calculate the total Odometer values based on the starting Odometer readings and those that you have added to the Odometer using this module.
Check if odometer readings have been updated
If you do not want to add a new odometer reading before recalling maintenance jobs on the Maintenance tab, check this box. After you enter odometer readings, this box will be checked automatically.
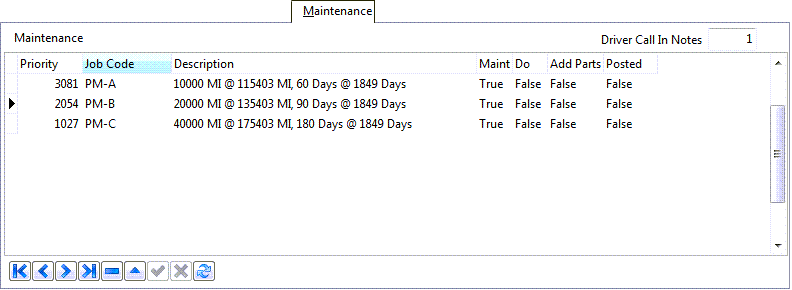
Maintenance tab
The Maintenance tab is used to recall maintenance jobs assigned to the equipment specified in the R&M Work Orders program header (top of screen), and to create Part and Labour entries that correspond to the selected maintenance job. After entering odometer/hourmeter readings on the Odometer tab (or checking the 'Check if odometer readings have been updated' box on the Odometer tab), use the right-mouse to display menu options on the Maintenance tab.
Note: On entry to this tab the system performs an auto query to fetch all pending maintenance jobs for the selected equipment.
Drivers Call In Notes
This is a counter for driver call in notes, it shows the number of call in notes made by the driver.
Priority
Enter the priority code for this job.
Job Code
Enter the job code or double-click in the column for job codes entered on your system.
Description
This field is automatically calculated and populated based on the number of days left before a schedule maintenance job should be performed.
Maint
Enter a maintenance name for this job.
Do
Enter items that form part of this job.
Add Parts
If parts are required, enter the part information here.
Context Menu
Get Maintenance Jobs
Will select and paste all outstanding maintenance jobs for the unit specified in the header, regardless of their priority. Therefore, after you get the jobs, delete all jobs except those that you wish to perform immediately. Maintenance jobs are assigned to equipment in the R&M Maintenance program, or using the Add Maintenance Jobs menu option described below.
Add Maintenance Jobs
Will display a selection form that lists all defined job codes (as configured in the R&M Configuration program). You can add another maintenance job to the work order for this unit, even if it hasn’t been assigned to this unit in the R&M Maintenance program.
Check Driver Call In Notes
Will display all outstanding Driver Call In entries. Driver Call In entries are entered in a variety of places in TruckMate: in the R&M Maintenance program, in the R&M Work Order program > Parts or Labor tab, or on the Driver Call In tab of a variety of Profiles Module applications (Power Unit Profiles, Trailer Profiles, etc.). When a Driver Call In entry has been addressed, click the 'Mark As Done' button to change the status of the Call In entry to complete, so that it will no longer display in this form. Once this button is selected, the Driver Call In entry status will be updated in the Profiles Module programs with the Date/Time of completion.
Mark Job as Do
Will set the value of the 'Do' column on the job to 'True'. You can use this function to set up work orders before activating them.
Add Labour and Parts
Will create detail lines on the Parts and Labour tabs for the maintenance job that is currently selected (you must use the Get Maintenance Jobs and / or Add Maintenance Jobs menu functions first). Note that parts and labour rates will not automatically be filled in. In the case of labour, this is because the labour rates are only estimated in the job code - you must fill in the actual time. On the Parts tab, put the record in edit mode, and tab through the quantity field - this will fill in the Rate and perform the extended calculations.
Post Maintenance Jobs
Will add the job to the unit’s maintenance record (which can be viewed on the R&M tab of the unit’s Profile program, and on the R&M Maintenance program > Maintenance tab). Be sure to use the 'Mark Job as Do' function before posting the job; otherwise the job will be deleted. After you post the maintenance jobs, you will not be able to enter any more maintenance jobs.
Reverse Posted Job
Undoes previous posting for this job.
Reports
Selecting the 'Reports' option from the Context Menu will open a new window, similar to the one found in the R&M Maintenance program.
Billing tab
The Billing tab controls all of the charges that will be updated into your General Ledger for your Work Orders.
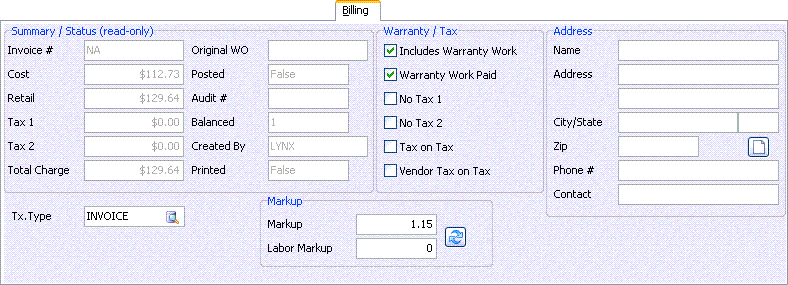
Invoice #
Populates once this record has been posted (after selecting the 'Post Invoice' button).
Cost
Automatically populated from the Parts tab.
Retail
Automatically populated from the Parts tab.
Tax 1
Automatically populated from the Parts tab.
Tax 2
Automatically populated from the Parts tab.
Total Charges
Automatically populated from the Parts tab.
No Tax 1 / 2
Place a checkmark in the box provided if no tax is to be calculated on this item.
Post Invoice
Select this button to post this invoice. Once posted, the invoice number above will populate.
Print Invoice
Selecting this button brings up the Report Selection dialog box where you can select the report type of your choice. In this instance, select 'RMWO.RPT', which is an R&M Work Order invoice.
Set Complete
When you enter a new work order item, the Status is set to 'Entry' by default. When the Status is set to Complete ('Set Complete' button) the inventory adjustment will no longer display in the R&M Work Order program.
Note: Set the filter below to 'Complete' to view completed work order records. Complete means these records are ready to be updated through the R&M Work Order Register, and then the records become 'Posted'. Also, once marked as 'complete' the user cannot make changes to the entry but the entry can now be posted through the R&M Work Order Register program.
Tx. Type
Click the search button to display a new window, where you can select the appropriate Transaction Type from a generated list of available Transaction Types.
-
Includes Warranty Work*
Check this option if the current Work Order includes maintenance under warranty.
Warranty Work Paid
Check this option if the pay rates for this Work Order fall under warranty.
Markup
Displays the default markup value specified in the R&M Configuration program. If you alter it after adding parts or labour items, click on the Refresh button to re-calculate the parts and labour entries.
Labour Markup
Displays the default markup value specified in the R&M Configuration program. If you alter it after adding parts or labour items, click on the Refresh button to re-calculate the parts and labour entries.
Posted
This information will be pre-populated from the appropriate fields with a TRUE or FALSE entry.
Audit Number
This information will be pre-populated from the appropriate fields.
Balanced
This area will show an integer value that corresponds to a specific 'Balance Status' indicator that will show you , prior to going any further in your accounting process, that your entry is either in or out of balance. The Integer values correspond as follows:
-
1* - No journal entries.
-
2* - Sum Debits / Credits don’t match.
-
3* - Problem with AR Control.
-
4* - Problem with Driver Control.
-
5* - Total Outside Parts/Labour cost do not match Total Vendor Bills cost.
-
6* - Problem with AP Control.
-
7* - Vendor Bills by Vendor ID do not match Outside Parts/Labour by Vendor ID.
Created by
The current User’s name will automatically populate next to the 'Created By' label. This is a read-only field.
Name/Address/City/Province/Postal Code/Phone Number/Contact
Pre-populated from the Customer Code/Driver Code information.
Copy Work Order
You can copy the parts and labour details from another work order using the Copy Work Order button.
Note: This function does not copy the serial numbers, costs, taxes or totals, only the part code, the transaction code, the From location code, and the To location code.
Copy Parts and Labour
Will bring up a dialog box asking if you wish to copy parts and labour from another work order to this work order.
R&M Reports
Selecting the 'R&M Reports' option from the Context Menu will open a new window, similar to the one found in the R&M Maintenance program.
GL (General Ledger) tab
The GL tab allows you to verify the transaction entries that will be made to the General Ledger once the Work Order has been run through the register. Each entry is made here once you 'Post' your Parts and Labour entries (on the Parts and/or Labor tabs. You also have the ability to add new entries here where applicable as well as modify existing entries as long as you have sufficient security rights.

Account Code
This field will display the 'Account Code' used in each transaction. If you are modifying or adding a record, you can double click to display and select an account code. Account codes are defined in the GL Chart of Accounts program.
Description
Should automatically populate with the Account Code descriptor.
Account Type
This field will indicate the 'Type' of account for the selected Account Code. The possible values are 'I' (Inventory), 'E' (Expense), 'M' (Manual), 'S' (Sales), 'C' (Cost) and 'P' (Payable).
Debit Amount
The values found in this column are the Debit amounts taken from the entries 'Posted' on the selected Work Order. If you are modifying or creating a new record, you can simply enter the amount to be Debited.
Credit Amount
The values found in this column are the Credit amounts taken from the entries 'Posted' on the selected Work Order. If you are modifying or creating a new record, you can simply enter the amount to be Credited.
Debits / Credits
These 2 fields (which are read-only) are total amounts of each based on the transactions listed in the grid above. It should be noted that these totals must match each other before the Work Order is set to 'Complete' and run through the Work Order Register program.
No Journal Entries
If this flag is checked, then NO Journal/GL entries are created when posting Parts/Labour records. When the 'No Journal Entries' flag is checked, it will automatically overrule the Transaction Codes CostInv field (which may be set to create Journal / GL records). The user can uncheck the 'No Journal Entries' flag and Journal/GL entries will be created as specified according to the Transaction Code’s setting.
The flag’s default setting can be controlled via the Application Configurator > Repairs & Maintenance > RMCONFIG.EXE > 'Default No GL' option.
Vendor Bills tab
The Vendor Bills tab directly relates to the entries made on the Outside Parts & Labour tab of this program. To create a Vendor Bill record in the Accounts Payable module, you must right click in the grid and select the 'Create Vendor Bills' option. This will bring over the relevant information and perform the necessary calculations for all entries made in the Outside Parts & Labour tab.

Vendor ID
This will display with the Vendor ID listed under the 'From' column on the Outside Parts & Labour tab. If you are manually entering information, you double-click in the column to bring up Vendor IDs entered into your system.
PO Number
If you have created a Purchase Order for these transactions, enter the PO# here. You now have the option (via the right click context menu) to add Parts & Labour from a Purchase Order by selecting the 'Get PO Parts' menu option.
Bill Number
Enter the relevant Bill Number here. This MUST be the 'Vendors Invoice #' so when it flows through to Accounts Payable, they can match it to the correct invoice. If an Invoice number is not entered, the Work Order number will be used instead.
Amount
This will be a total value of all entries made on the Outside Parts & Labour tab.
Date Due
The date that displays here is calculated using the current date plus the number of days configured in the 'Pmt. Days' field of the Vendor Profiles program under the A/P tab for the selected Vendor ID.
Discount Date
The date that displays here is calculated using the current date plus the number of days configured in the 'Disc. Days' field of the Vendor Profiles program under the A/P tab for the selected Vendor ID.
Discount %
The percentage amount that displays here is taken from the 'Discount %' field of the Vendor Profiles program under the A/P tab for the selected Vendor ID.
Hold
This field will display a default value of 'False'. However, if you want to put a 'Hold' on this entry so its held for payment in the AP Inquiry program, change this value to 'True'. Double-click in the column to toggle between these values.
Terms
The value that displays here is taken from the 'Pmt. Terms' field of the Vendor Profiles program under the A/P tab for the selected Vendor ID.
Context Menu
Create Vendor Bills
Selecting this option will create an Invoice for this Vendor based on the entries made in the Outside Parts & Labour tab, which can be viewed in the AP Inquiry program, under the selected Vendor.
Get PO Parts
Selecting this option will bring in the data from the Purchase Order into the Vendor Bills tab. This option is only available once you have entered a Purchase Order number into the 'PO Number' field in the Vendor Bills tab Grid.
Vendor Information
Selecting this option will display the Vendor Information window, which displays a variety of information for the selected Vendor. This information is pulled from the Vendor Profiles program, and can be modified there.
Notes tab
Use the space on the Notes tab to record any notes about the work order. These are general notes that will appear on the Work Order Report. You can also enter Notes that are specific to Part or Labour detail lines on the detail lines themselves.

Trace tab
The Trace tab allows you to enter Trace Types and Trace Numbers that you can attach to your Work Orders.

Trace Information
In R&M Configuration program > Trace tab, enter the names of your trace types here. If problems occur, refresh your data. Once entered, you can attach a trace type to a work order and a trace number. In R&M Work Order, use the '+' sign to enter a new record, then double-click in the Trace Type column and view your entries from the R&M Configuration program and select one. Enter a trace number and press 'Save'.
Remedy Information
In the R&M Configuration program, use the '' sign to add a new cause, effect, and remedy code to the grids. These new codes will be accessible when in the R&M Work Order program, Parts tab. Ensure your parts list entry has been posted, proceed to the R&M Work Order Billing tab and post the invoice, select the 'Set Complete' button. Change your filter below to the 'Complete' filter. Proceed to the R&M Work Order Trace tab and use the '' sign to add a new record. Double-click in the cause, effect, and remedy columns to view your entered cause, effect, and remedy codes, and make your selections. Back in the R&M Work Order Parts tab, tab through the columns until you reach the 'Remedy Description' column, use your context menu and select 'Set Remedy'.
Tracking tab
The information found in the Tracking tab grid is for informational purposes only and is pre-populated based on other entries made within the R&M Work Orders program, and accompanying Power Unit Profiles program, the Trailer Profiles program, and the Misc Equipment Profiles program. The Tracking tab is broken down further by three tabs at the bottom of the Tracking grid. By clicking on the 'Power Units', 'Trailers' or 'Miscellaneous Equipment' tabs, you will see the specific Repair and Maintenance data for each type of equipment. All fields within the three sub-tabs are read-only fields.