Financial Statements

Financial Statements was created to simplify the periodic reporting of General Ledger activity. This program offers users the ability to mix and match multiple account ranges into meaningful totals without having to program complicated Crystal reports. The totals from your account lists are generated into a temporary table which can then be reported on with the Crystal report templates provided.
| The most important thing to keep in mind when using Financial Statements is that most of the planning should be done before even using the GFS.EXE application. You must have a clear plan of what you would like your Financial Statement to look like (ie: which GL Accounts should be included, etc.) and where you would like them positioned in relation to your other accounts. This is the most important step, and should be carefully planned out beforehand. |
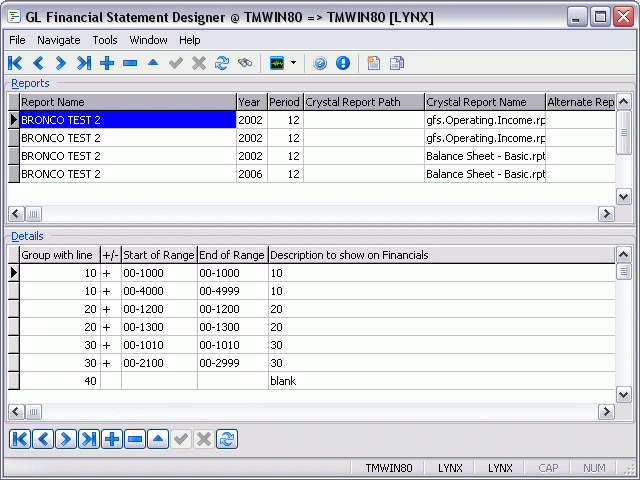
The GFS program screen is divided into two sections, the Reports Grid and the Details Grid, where most of your activity in the program will take place. The program screen also shows buttons below the grids which offer supplementary functions.
The Reports Grid is used to manage the list of the reports you have created, are modifying, or are actively using to generate your financial data. The line items which make up each report are managed in the Details Grid.
To access Financial Statements:
| From this location | Go to |
|---|---|
TruckMate Menu and TruckMate Task List |
Accounting & Finance > General Ledger > Financial Statements |
Windows Start Menu |
TruckMate 20xx > Financial Statements |
Windows Explorer |
C:\Program Files (x86) > TruckMate 20xx > Gfs.exe |
How Do I?
How do I Create Financial Statements?
-
Open the Financial Statements program (GFS.EXE).
-
Use the '+' button on the top navigational bar to add a new report. In the Report Name column, enter the name of the report (as specified in the list of available TruckMate reports). Recommended reports would be: 'GFS.BALANCE.SHEET.12.MONTHS.RPT', 'GFS.INCOME.COMBINED.RPT', and 'GFS.OPERATING.INCOME.RPT'.
-
Enter the year of the report. Double-click in the Year column to bring up available choices.
-
Enter the Period Number of the report. Double-click in the Period column to bring up the available choices.
-
Select the Crystal Report template. Double-click in the Crystal Report Name column to bring up available choices. Scroll through to select the desired report.
-
Create your financial statement structure by placing the appropriate GL Accounts and descriptors in the lower grid. Once you have the correct data in place, you could add blank spaces, lines, and User Defined formatting. See the Details Grid section of the main GFS page for more information.
-
Select 'Generate Selected Financial Statement' to create the report.
-
View the report and check for accuracy.
How do I Create / Modify headings on my Financial Statement?
-
Open the Financial Statements program (GFS.EXE).
-
Complete steps 1-5 in the above topic.
-
To create a Heading for your Financial Statement, you need enter only two things on one of the detail lines of the Details Grid. the 'Line' value is the only required value, but the text you enter in the 'Description' field will be the actual text that appears as the Heading on your Financial Statement. Depending on how you have planned your Financial Statement, enter values into these two fields.
Optional: you can use the 'User Formatting' field to set the description to 'bold' or 'italicized' if you wish. See the User Formatting Codes section of the GFS overview page for more information on specific User Formatting Codes.
How do I Report on a GL Account on my Financial Statement?
-
Open the Financial Statements program (GFS.EXE).
-
Complete steps 1 - 5 of the first topic on this page.
-
To report on a single GL Account you need to enter values in the 'Line', '+/-', 'Start', 'End' and 'Description' fields:
-
The 'Line' field may be whatever increment (from the previous line) you wish to use, and is required.
-
Select '' or '-' to tell Crystal what kind of expense account this is- the '' sign denotes and Expense or Asset Account, the '-' sign denotes a Credit Account.
-
In the 'Start' and 'End' fields, enter the same GL Account.
-
You may add descriptive text to the 'Description' field if you wish, as well as any other User Formatting codes in the 'User Formatting' field.
-
How do I Report on a Contiguous GL Account range on my Financial Statement?
-
Open the Financial Statements program (GFS.EXE).
-
Complete steps 1 - 5 of the first topic on this page.
-
To report on a Contiguous range of GL Accounts you need to enter values in the 'Line', '+/-', 'Start', 'End' and 'Description' fields:
-
The 'Line' field may be whatever increment (from the previous line) you wish to use, and is required.
-
Select '' or '-' to tell Crystal what kind of expense account this is- the '' sign denotes and Expense or Asset Account, the '-' sign denotes a Credit Account.
-
In the 'Start' field enter the GL Account that will be the beginning of the range.
-
In the 'End' field, enter the GL Account that will be the ending of the range.
-
You may add descriptive text to the 'Description' field if you wish, as well as any other User Formatting codes in the 'User Formatting' field.
-
How do I Report on a Non-Contiguous GL Account range on my Financial Statement?
This feature can be used to exclude certain GL Accounts from a report of a range of contiguous GL Accounts.
-
Open the Financial Statements program (GFS.EXE).
-
Complete steps 1 - 5 of the first topic on this page.
-
To report on a Non-Contiguous range of GL Accounts you need to enter values in the 'Line', '+/-', 'Start', 'End' and 'Description' fields:
-
The 'Line' field may be whatever increment (from the previous line) you wish to use, and is required. For this type of report you must include at least two detail lines with the same value in the 'Line' field (the first for the range, the second detail line for the Account that is being excluded).
-
Select '' or '-' to tell Crystal what kind of expense account this is- the '' sign denotes an Expense or Asset Account, the '-' sign denotes a Credit Account. Do this for both detail lines.
-
In the 'Start' and 'End' fields of the first detail line setup a GL Account Range like you would in a Contiguous GL Account range.
-
In the 'Start' and 'End' fields of the second detail line enter the same GL Account. This GL Account will be excluded from the range.
-
Repeat the previous step for as many GL Accounts as you wish to exclude.
-
You may add descriptive text to the 'Description' field of the first detail line if you wish, as well as any other User Formatting codes in the 'User Formatting' field. The second detail line only requires the 'Line' and 'Start / End' fields.
-
How do I Create a 'Total' Line on my Financial Statement?
-
Open the Financial Statements program (GFS.EXE).
-
Complete steps 1 - 5 of the first topic on this page.
-
Add the GL Accounts you wish to display on the Financial Statement by creating detail lines in the lower grid (in the below example, the user has added four lines: '1000', '2000', '2500' and '3000'). Enter the descriptions you would like to have displayed on the report in the 'Description to show' field.

-
To create a 'Totalled' line, add a new line and in the 'Start of Range' field, enter the word 'TOTAL' (as in the above example), then, enter the line you would like to add into the totalled value in the 'End of Range' field.
-
Repeat the last step for every line that you would like to have included in the totalled value (in the above example there is a small typo: the user has added the line '4000' instead of '2500').
Note: When creating a totalled line, only add a line description to the first detail line (as in the above example).
-
Select 'Generate Selected Financial Statement' to create the report and check it for accuracy.
How do I Include 'Wildcard' global filters in my Statements?
For more information on Wildcard Global Filters, see the GFS Overview.
How do I Print a Profit and Loss Statement on a Per-Employee basis?
-
Open the GL Chart of Accounts program (GLM.EXE), click: Start > Programs > TruckMate > Accounting & Finance > General Ledger > GL Chart of Accounts
-
Create an account named EM-PLOY-EE (this helps keep this from being used by another user by mistake), and enter the description as 'Employee Counts Per Month'. Enter 'Non Financial Accounts' as the 'Type' with notes saying: Each month, post an entry for the number of employees per month (as per the Revenue Canada Remittance form). Also, post a 'reversing' entry for the next month to reverse this out, assuring that the next month’s posting would therefore stand alone as the count. The offset to this account is 'Clearing'.
-
Once the journal entries are posted using the GL Journal Entries Register, you should be seeing the year to date numbers on the right side representing your Employee head count
-
Open the Financial Statements program (GFS.EXE).
-
Use the add function ('+') and enter in line '400000'. Enter the start range as 'EM-PLOY-EE', and end of range as 'EM-PLOY-EE'. Put the keyword 'EMP' in the 'D/C column'. This column is often referred to as 'USER FORMAT'.
-
Make sure you use the pre-formatted 'STATEMENT OF EARNINGS - PER MILE report (STATEMENT OF EARNINGS-PER MILE.RPT)'.
Menu Bar / Toolbar
Multi-Company Menu
For more information on the Multi-Company options available from the Menu Bar, see the Multi-Company documentation.
Cross-Company Viewing
Like other programs with this option, the Cross-Company Viewing option’s setting (check or unchecked) is "remembered" to registry when you close, so it is set the same the next time you open Financial Statements.
Fix GL Accts in Details
This option allows you to manually change the company segment in the GL accounts in the from/to range columns in the details grid.
Navigate Menu
The Navigate Menu contains the standard TruckMate Navigation Bar, used to browse your Database records, as well as the following options:
Find
![]() Click this button to search for a specific GL Report record using a variety of criteria.
Click this button to search for a specific GL Report record using a variety of criteria.
Tools Menu
TruckMate Monitor
![]() Click the down arrow next to this button to access the various functions of the new TruckMate Monitor.
Click the down arrow next to this button to access the various functions of the new TruckMate Monitor.
Remember Position / Size
Select this option to retain window size and position upon exit. When the program is re-opened, it will maintain its previous appearance.
Generate Financial Statement
![]() Selecting this option causes the program to process the line items specified in the Details Grid into a temporary table. After all the report line items are generated, GFS will open the Crystal report file(s) associated with your report design on screen for you to review.
Selecting this option causes the program to process the line items specified in the Details Grid into a temporary table. After all the report line items are generated, GFS will open the Crystal report file(s) associated with your report design on screen for you to review.
When you are done reviewing the generated report, you may Print the previewed report in the Crystal Report preview screen, or close the window to return to the main GFS screen.
Copy Report
![]() Selecting this option allows you to copy an existing report’s details into a new record. This is a useful function if you want to test some changes to an existing report and do not want to alter or create mistakes on the original. The record in the Report Grid and the corresponding details in the Details Grid are all copied to the new report.
Selecting this option allows you to copy an existing report’s details into a new record. This is a useful function if you want to test some changes to an existing report and do not want to alter or create mistakes on the original. The record in the Report Grid and the corresponding details in the Details Grid are all copied to the new report.
Window Menu
GL Journal Entries
![]() Selecting this option will open an instance of the GL Journal Entries program.
Selecting this option will open an instance of the GL Journal Entries program.
GL Journal Entries Register
![]() Selecting this option will open an instance of the GL Journal Entries Register program.
Selecting this option will open an instance of the GL Journal Entries Register program.
GL Chart of Accounts
![]() Selecting this option will open an instance of the GL Chart of Accounts program.
Selecting this option will open an instance of the GL Chart of Accounts program.
Reports Grid
Reports are added, deleted, and accessed for editing in the Reports Grid by clicking on the TruckMate Navigation Bar below the Grid.
Report Name
This field displays the Reports name, or is used to enter a Report Name when inserting new Report records. The Report Name can be up to 80 characters in length, and can include spaces. GFS will allow you to use the same name more than once, but it is better to use unique names to prevent confusion when previewing and printing reports.
Year / Period
The 'Year' and 'Period' values are used when Crystal Reports are compared against one another. If the Crystal Report you plan to use is configured to compare current Fiscal Year and/or Period data with previous data records, enter a 'Fiscal Year' and 'Period' value in these two fields. The data which is summarized by the Report Generator button will then include the calculated activity for that year.
Crystal Report Name
GFS summarizes the line items you specify into a temporary table, and then opens the Crystal Report(s) specified here to display your summarized data. If the Crystal Reports files are in the TruckMate 2011 folder, you may simply key in the filename here. If they are stored on a shared network resource, you may specify a UNC path here as well. You may also double-click on the report name field to open a standard Windows open file window so that you may search for your file.
Alternate Report / 3rd Report / 4th Report / 5th Report
If you wish to run additional Crystal Reports using the same parameters configured in the Details Grid (and the 'Year' and 'Period' fields) enter the name of a Crystal Report template here. Double click for a selection form. Only files with the extension of '.RPT' can be selected.
Round Type
This field allows you to select the level of rounding. Below is a description of the available values.
-
'0': Which rounds the financial values to the dollar.
-
'1': Which rounds the financial values to the tenth of dollars.
-
'2': Which rounds financial values in the GL report to the penny (most recommended)
Selecting any value other than 2 might affect the subtotals so they don’t align with the details anymore.
Details Grid
The Details Grid has two functions: primarily, it is used to group General Ledger Accounts (activity) together into line items. Secondarily, it allows the user some simplified formatting options for each line. Every detail line in the Details Grid will correspond to a line on the generated Financial Statement, unless you are creating a 'Totalled' line- see the example below. See the How do I? page for the GFS program for more information on how to accomplish specific tasks with the Details Grid.
| GL account selection includes all GL accounts (cross-company), and reported amounts will be converted to the logged-in company’s base currency (as defined in the Company Profiles program) when being consolidated. Converted amounts will be rounded when necessary. |
Group with Line
This field is the basis for much of the logic in GFS. Financial Statements are reported on a line by line basis- the report results will appear much like a ledger where the rows are numbered and calculated sequentially from top to bottom.
Each 'Group Line' can represent a label (or title), a single GL Account summary total, a continuous GL Account range summary total, a discontinuous GL Account range summary total, a group line total, or even a constant value (e.g. '12,500').
| GFS allows the User to assign more than one calculation to the same line number, making complex calculations possible. |
In the above example the GL Accounts are grouped onto lines from '1000' to '5000'. The lines were numbered on one thousand increments to allow for inserting other lines into the sequence later, without having to renumber the existing entries (line '2500' is an example of this). You can also use increments of '100' on your Statements without issue.
By the same token, the program will not check that all your line numbers are there, it simply processes the existing lines in sequence (the gap between line '3000' and '5000' is an example of this).
All the GL Transaction Activity in GL Accounts '00-1000' to '00-1011' for the current year will be summarized into line '1000' on the report. The logic is the same for line '2000', and so on. Line '2500' will only report on the Transaction Activity of one GL Account, because it’s 'Start' and 'End' range values are the same GL Account.
| The GST Receivable account does not fall sequentially immediately after the last asset account. This common feature in many charts of accounts is handled gracefully by GFS by allowing ranges of accounts to be assigned to line numbers regardless of where they fall in the chart sequence. |
Line '5000' is calculated as the sum total of lines '1000', '2000', '3000', and '4000' by using the reserved word TOTAL in the 'Start of Range' and providing the Source Line value ('1000', '2000', etc.) in the 'End of Range' field.
You can also use the 'Line Filter' column to define additional wildcard definitions for each line range.
For a more Advanced Example of a Financial Statement, see below.
+/-
This column is used to reverse the value of an account (or group of accounts). On a Financial Statement you may not wish to display your Liability accounts as negative numbers (i.e. enclosed by brackets). By entering a negative symbol in this field ('-'), the subtotals and totals will be multiplied by '-1' in order to convert them to positive numbers.
Start of Range
Enter the first General Ledger Account number that will be assigned to the line number entered in the 'Group with line field'. The 'Start of Range' and 'End of Range' fields refer to consecutive General Ledger Account numbers.
| You do not have to enter a valid account number in this field. For example, if you wanted to start the range with the account number '00-1000', you could enter that value in this field even if that account number does not exist in your chart of accounts. |
End of Range
Enter the last General Ledger Account number that will be assigned to the line number entered in the 'Group with line' field. The 'Start of Range' and 'End of Range' fields refer to consecutive General Ledger Account numbers.
| You do not have to enter a valid account number in this field. For example, if you wanted to end the range with the account number '00-1999', you could enter that value in this field even if that account number does not exist in your chart of accounts. |
Description to show on Financials
This field is the label for the line that will appear in the generated Crystal Report that represents one detail line from the Details Grid. If you have multiple 'Group with line' fields that use the same line number, the description from the first line using the designated group with line value will be used.
Underline Format
You can select an 'Underline Format' for the numbers generated by the 'Group with line' configuration. On the Crystal Report, the subtotal and total amounts will be underlined according to the format selected here. Click to display the drop down list box arrow, then select the format from the drop down list. You can select 'No underline', 'Single underline' or 'Double underline'. Make sure that all entries for the same 'Group With Line' number use the same format.
$
If you wish to precede the subtotals and totals generated by the 'Group with line' configuration with a '$' symbol, enter that symbol here. Alternatively, click to display the drop down list box arrow, then select the symbol from the down list. Make sure that all entries for the same 'Group With Line' number use the same format.
User Formatting
This field is used for special codes that change how GFS handles the GL Account data for reporting. See the below section on User Formatting Codes for more information.
Blank Lines Before
If you wish to generate blank lines before this line prints, enter the number of blank lines here. The maximum number of blank lines is '2'. Alternatively, you can select '1' or '2' from the drop down list box. Make sure that all entries for the same Group With Line number use the same format.
Above Line Format
You can print a line of '-' symbols before this line prints. Select the symbol from the drop down list box. Make sure that all entries for the same Group With Line number use the same format.
Print Blank Lines After
if you wish to generate blank lines after this line prints, enter the number of blank lines here. The maximum number of blank lines is two. Alternatively, you can select '1' or '2' from the drop down list box. Make sure that all entries for the same Group With Line number use the same format.
Line Filter
This field gives the user the ability to define additional wildcard definition for each range (defined by their shared 'Group with line' value).
Advanced Program Functions
Global Filters (Wildcard Values)
You can also configure a Global Filter that will apply to all GL Account ranges. This is useful in situations where you have setup multiple company divisions by applying a division prefix to the same chart of accounts used across all the divisions.
To do this, create a detail line with the value of '0' in the 'Group with line' column. In the 'Description to show on Financials' field, enter the Wildcard value: '%'.
For example, if your account segments are configured as two digits then four digits (ie, '00-1000'), you could enter the wildcard '01-%' in the 'Description to show on Financials' field. This would exclude all accounts from the report except those that begin with '01', regardless of the Account ranges entered in the 'Start of Range' and 'End of Range' fields.
As another example, if your account segments are configured as two digits, then four digits, then three digits (for example, '00-1000-000'), you could enter the wildcard '%-100', which would exclude all accounts except those which have the value of '100' in the last segment of the Account number.
In order to include accounts that are nonsequential, you can use commas to separate up to five wildcards.
| The Wildcard value works in conjunction with the Start of Range and End of Range fields. That is, for an account to be included, it must both satisfy the wildcard filter, and fall into the range specified in the Start of Range and End of Range fields |
User Formatting Codes
Entering these values into the 'User Formatting' field of the Details Grid will cause certain special functions to occur when the Crystal Reports are being prepared by the GFS program.
These Codes are divided below into two sections: 'Formatting Codes' (those which affect how text appears on the Financial Statement) and 'Formula Codes' (those used by Crystal to calculate data). Read on for descriptions of each of these unique User Formatting Codes:
Formatting Codes
HDR
Suppresses all amount values for the line. This is useful for lines where only a description or title is needed.
Formula Codes
% (Total)
Place this symbol on the line that represents the total by which other amounts should be divided. The report will look for the first line that has the '%' symbol. This line therefore represents the 'Total' (e.g. TOTAL REVENUE). This number will then divide all subsequent numbers. The Statement of Earnings reports also uses this symbol.
INC (Current Income)
Used for calculating Current Income (income minus expenses) to be reported on the Balance Sheet reports. This entry must be repeated for each line that will be used to calculate the Current Income.
R/E (Retained Earnings)
If you are building a report that compares current year financial activity versus a prior year’s financial activity, you must use the 'R/E' code to indicate what lines will be used to calculate Retained Earnings in prior years.
Advanced Financial Statement Example
This section will provide details on how to create more advanced GFS reports, focusing on a Balance Sheet report, and will detail many of the features discussed in this Advanced Program Functions section. Observing the techniques in this section should give you an idea of how to format a professional looking Financial Statement.
| This example uses the 'Consolidated Balance Sheet' report gfs.Balance.Sheet.12.months.rpt. |
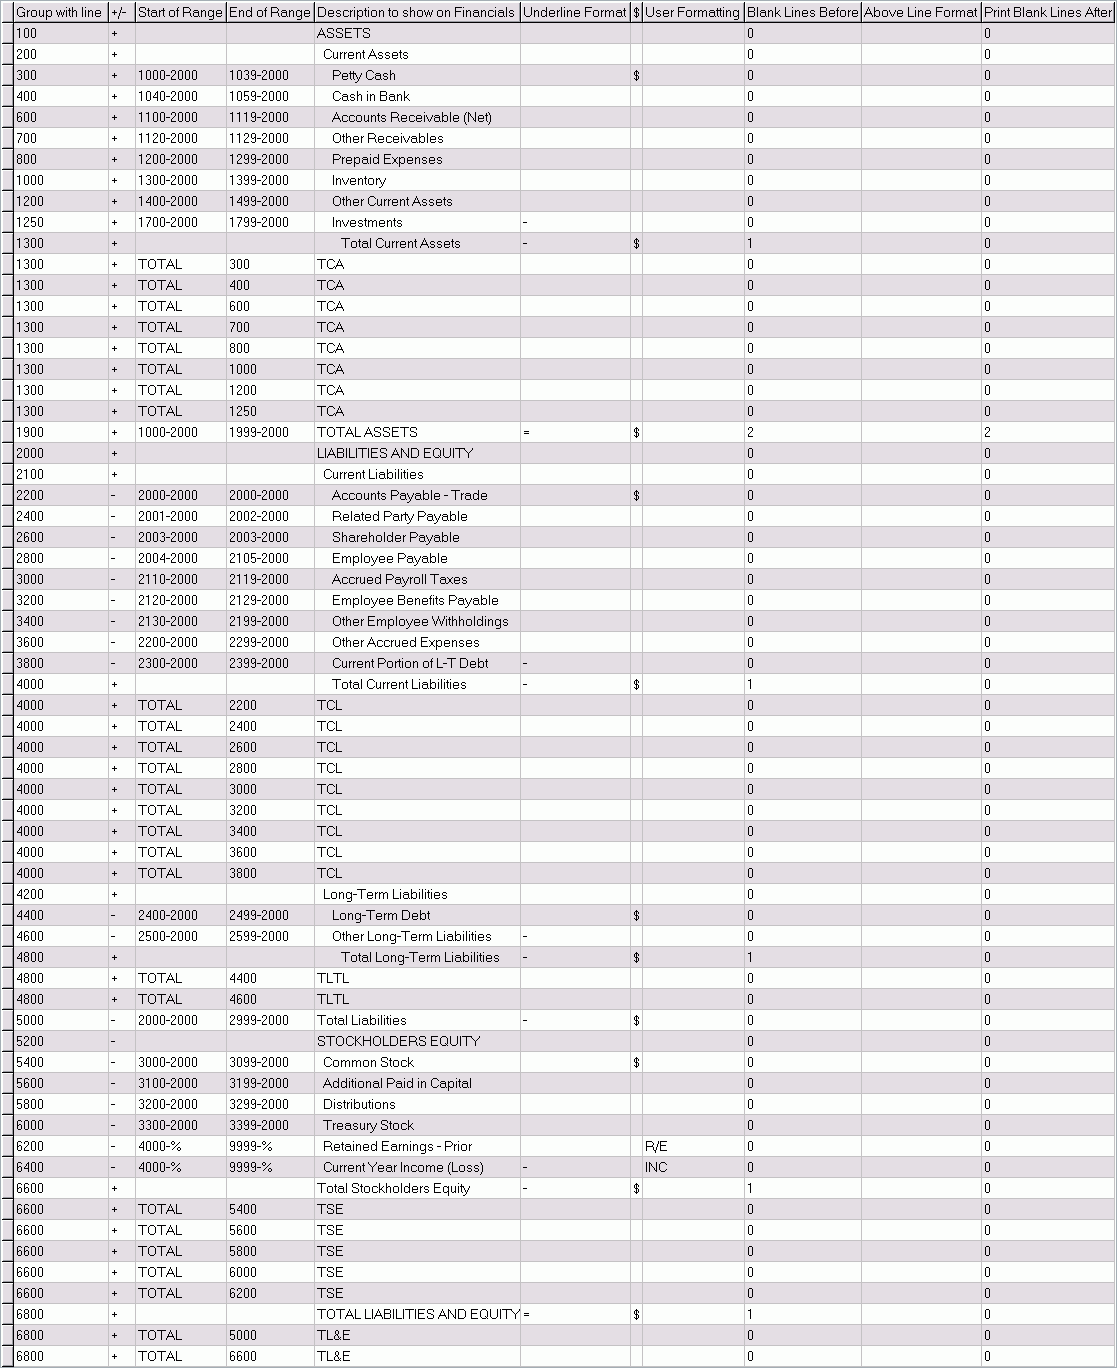
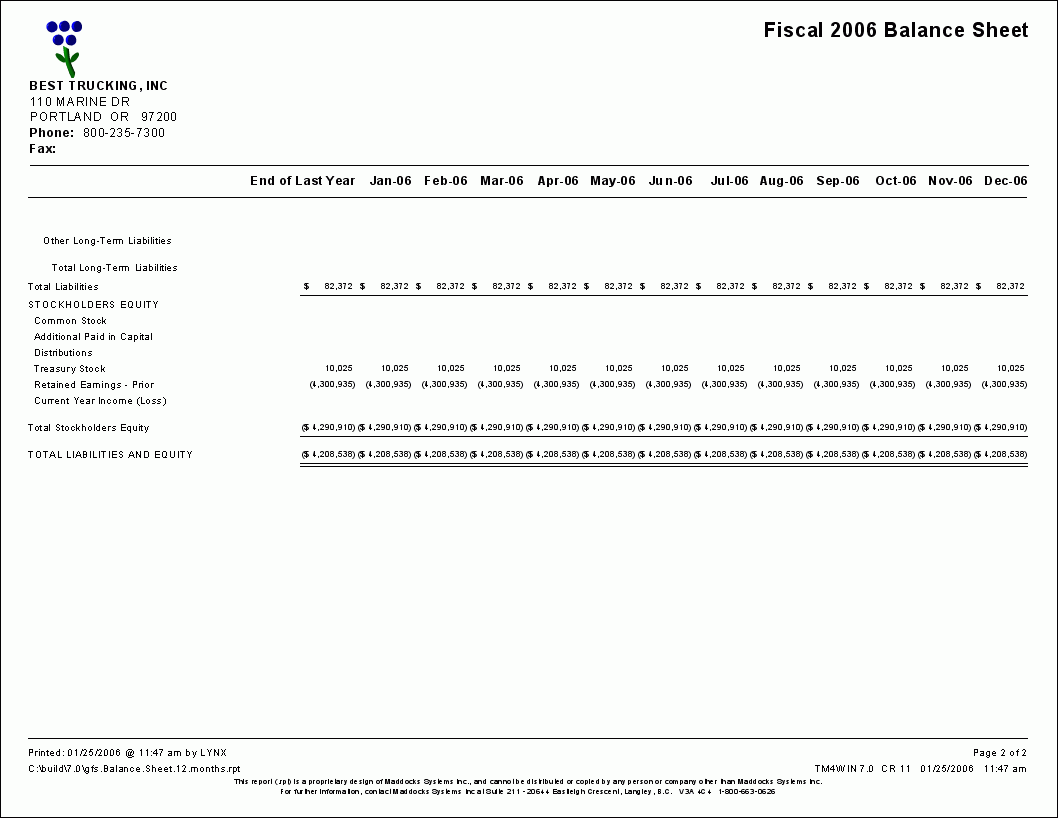
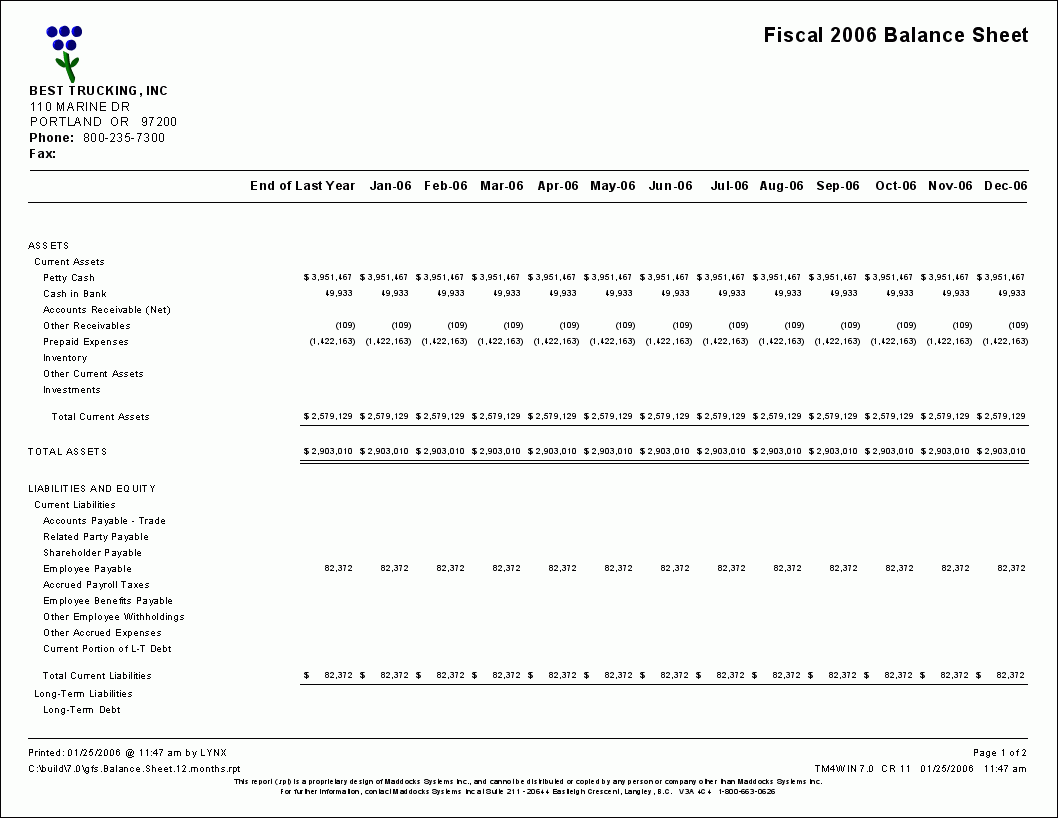
Images of this generated Financial Statement appear below.
Heading Indentation
If you look at the 'Description to show on Financials' field in first three detail lines of the report ('100', '200' and '300'), you will see how the User entered spaces using the <spacebar> key on the keyboard in order to ease data entry and make it easier for those who must read the report later.
| Notice that headings do not require values in the '/-*' field. If you leave this field blank, a '' sign will be entered automatically; it makes no difference whether headings have a '' or '-' in the '*/-' field. |
Underlining
Like Symbols, 'Underlines' are best used sparingly. In this example the User has only included 'Underlines' in the 'Underline Format' field before and after detail lines that delineate 'TOTAL' lines, and only uses the 'double underline' (=) twice, for line '1900' and '6800', both lines that give grand totals of all that come before them.
Symbol Usage
Notice that this User chose to use the '$' sign in the '$' field only when absolutely necessary for the report. They did not include a '$' sign on every detail line that contained monetary values because that would make the Financial Statement overly full of useless symbols. By using this symbol only on the first of a list of GL Accounts and for your 'TOTAL' amounts will make your Statements much more concise and professional.
Spacing
Just as with Underlining and Symbol usage, spacing must be used sparingly to maintain a concise and professional report. In this example extra spaces are added (in the 'Blank Lines Before' and 'Print Blank Lines After' fields- but not always both) only after 'TOTAL' lines ('1300', '1900', '4000', '4800', '6600' and '6800') where a space between sections of the Financial Statement is required.
User Formatting
This balance sheet doesn’t include a large number of User Formatting codes, but there is one example available. On lines '6200' and '6400' the User Formatting codes 'R/E' and 'INC' are used, respectively. See above for a description of these two codes.
Financial Statements Problem Resolution
The Problem Resolution section is designed to provide Administrators with the steps to take to resolve common problems encountered in this Module.
| These steps should only be performed by Technical personnel with Administrator privileges. |
GFS cannot find my Reports
This issue is most likely due to a centralized setup of TruckMate on a Terminal / Citrix Server, using centralized reports.
The Financial Statement (GFS) program does not allow users to specify a directory, so you cannot centralize these reports using the technique mentioned above for other TruckMate reports. You can work around this, though, by copying the program executable (GFS.EXE) into the shared folder as well, and changing your start menu shortcuts to point to this file. By default, GFS looks for reports in the same directory from which the executable was launched.
By using a single location to store TruckMate programs and reports, TruckMate administrators can reduce the effort and costs involved in upgrading, securing, and administrating TruckMate, as well as simplifying report distribution. As the number of users at your site grows, the potential cost saving will increase; but even those with a small number of clients can see improvements by centralizing- and therefore simplifying and standardizing- your setup.
Error - Financial reports not displaying certain months
In the case of Companies whose Fiscal Year setup does not exactly match their GL Period setup, some Crystal Financial reports may be missing data.
Use the 'Calendar Offset' field on the GL Chart of Accounts > Periods Tab > Fiscal Year Information section to determine when your Fiscal Years should start, as opposed to your standard GL Periods.
I can’t see the Company selection drop-down menu
-
Open the Application Configurator program (CONFIGEXPLORER.EXE), click: Start > Programs > TruckMate > Utilities > Application Configurator
-
Click the '+' sign next to the text 'Configuration Options' and then select the 'REPORTS' option from the program list that appears.
-
On the right side of the Application Configurator you should see a single option, entitled 'AllowCompanySelect'. Double click this option and set the value to 'True' by double clicking the text 'False' in the text field. Click 'OK'.
Note: If you do not have this option listed in your Application Configurator program, you must install Patch # 20778. For assistance with installing this patch Contact TMW Support.
-
Open (or close and re-open) the GFS.EXE program. You should now see the 'Company Select' drop-down box just about the Details Grid.