Working in the freight bill header
Freight bill number (FB#)
The FB# field contains NA (if the bill has not been posted) or the number of the bill (if it has been posted).
When you click Post, the system assigns the next bill number available for the currently-selected site.
Hovering your mouse pointer over the field displays the Detail Line and Site IDs.
If your system allows it, you can enter a value in this field. If a freight bill already exists with the value you enter, an alert displays.
In some cases, a freight bill number will have a suffix attached. The type of suffix indicates the type of freight bill.
| Suffix type | Definition |
|---|---|
Claim number |
Displays if the freight bill is associated with a claim. Click the claim number to view details in Claims. |
Extra-stop bills |
Freight bills with extra stops display a suffix of AA, AB, AC, etc. The system adds each suffix sequentially in the order that each extra-stop bill is created. |
Intermodal bills |
A number for a freight bill that you create from the Intermodal tab will have a suffix depending on the intermodal movement type.
|
Invoice types
Text displayed under the FB# field indicates the source of the freight bill.
If the text appears in bold red format, the freight bill was cancelled.
| Text | Definition |
|---|---|
Original |
The freight bill was created in Customer Service or Quick Bill Entry. |
Original (w/ C) |
The freight bill is original (as defined above) and has credit recorded against it. |
Original (w/ C/R) |
The freight bill is original (as defined), has credit recorded against it, and has a new bill (rebill) in the database. |
Inter Company |
The freight bill was created in a multi-company environment and contains resources from another company (for example, an inter-company carrier assignment). |
Split |
The freight bill was created as a result of splitting another freight bill. |
*Credit* |
The freight bill was generated as a result of a credit created in A/R Inquiry. |
*Rebill* |
The freight bill was generated as a result of a rebill created in A/R Inquiry. |
*Return* |
The freight bill was created as a result of a copy process in which the copy type selected was Return. |
Inter Comp Credit |
The freight bill is inter-company and has credit recorded against it. |
Inter Comp Rebill |
The freight bill is inter-company and was created as a result of credit being recorded against it (rebill). |
Locked Status |
The freight bill is locked. |
Viewing a freight bill’s history
If the invoice status is Original, Credit, Rebill, Inter Comp Credit, or Inter Comp Rebill, clicking the text displays the Accounts Receivable History window. You can also access this window by going to Tools > More FB Info.
If multiple credits and/or rebills exist for the current freight bill, they are listed in this window. All of the information is read-only.
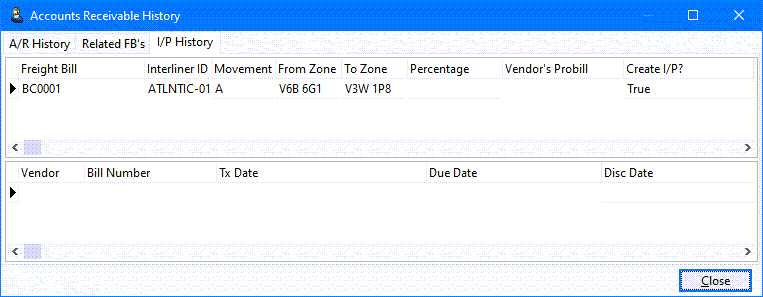
Viewing Accounts Receivable history
The A/R History tab automatically populates with the current freight bill’s data from the Accounts Receivable module.

To view data for a specific line item in A/R Inquiry, right-click on it and select View in A/R Inquiry from the menu that appears.
Viewing related freight bills
The Related FB’s tab displays all of the freight bills that are related to the currently-displayed freight bill. You can filter these bills using the criteria in the Filter area. You can all click All or None to select or deselect all of the criteria.
If you select Same Bill-To, only the bills with the same Bill To as the currently-displayed freight bill appear in the grid.
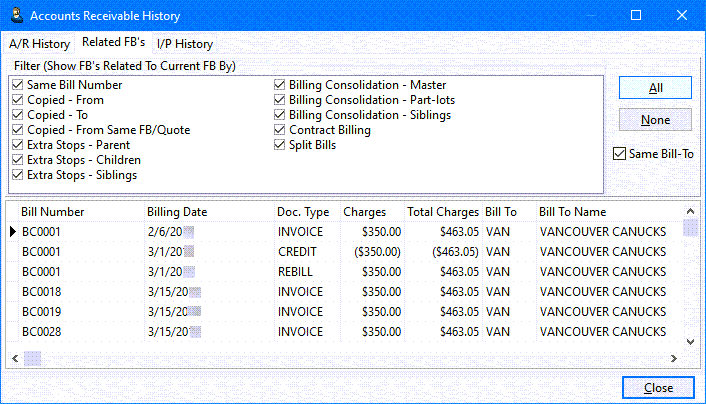
If you are working in a Multi-Company environment and Cross-Company Viewing is not selected, only freight bills from the current company appear in the grid.
If you are working in a Multi-Company environment and Cross-Company Viewing is selected:
-
The grid will include a Company ID (integer) column.
-
The grid may show freight bills from other companies depending on your filter choices.
-
An additional filter criterion, Inter-Company Transfer, is available. If selected, and the current freight bill is part of an inter-company transfer, the freight bill from the other company appears in the grid.
Bill To
If your system allows, you can choose the company that will be billed for the freight transaction. Note the following:
-
If you want to bill an external company, select Other and complete the Other Contact fields on the Contacts tab. Without this information, the system prevents you from saving the freight bill.
-
If you change the Bill To, the Rating Terms option may also change.
-
If your system allows it:
-
You may be able to select a Bill To that does not have a valid customer code.
-
You may be able to override the Bill To value on the Billing tab.
-
Rating Terms
If your system allows, you can choose the rating term for the freight bill. Depending on the rating term selected, you can use one Rate Sheet ID in multiple ways for the same client.
If you change the Bill To, the rating term may change as well. For example, changing the Bill To from Caller to Consignee changes the Rating Terms value from N/A or PPD to COL.
| Rating term | Definition |
|---|---|
Not Applicable (N/A) |
The freight bill is rated normally. The system uses the rate sheet attached to the client. If there is no rate sheet attached to the client, the system uses the default base rates (or any rates that are entered manually). |
Collect (COL) |
The freight bill is flagged for collect-style rating. The system uses the available Collect rate sheet. |
Pre-Paid (PPD) |
The freight bill is flagged for prepaid-style rating. The system uses the available Pre-Paid rate sheet. |
Third Party (TP) |
If the Bill To indicates a party other than the shipper, the consignee, or the shipper’s and/or consignee’s default Bill To party, the freight bill is flagged for third party-style rating. The pricing program defined for the third-party payer takes precedence over all other pricing programs. |
Ad-Hoc (AH) |
If your system allows it, you can choose a customer other than the currently-selected Bill To party for rating purposes. |
Currency
In the field below the Rating Terms section, select the currency to be used for the freight bill. The values available in this field are defined in Codes Maintenance.
Entering contact information for the freight bill
There are three types of contact information associated with a freight bill that you enter in the header:
-
Caller: The customer placing the order
-
Shipper: The location where the freight will be picked up
-
Consignee: The location where the freight will be delivered
Many of the fields in the Caller, Shipper, and Consignee sections of the freight bill header function similarly.
Use TAB and SHIFT+TAB to navigate between the fields in a section.
By default, the text in these fields is black. Depending on your system setup, the text in these fields may change color if there is special information associated with the selected customer.
-
Blue: You can hover your cursor over the customer code to see notes about the customer.
-
Green: An informational window appears when you add the customer code to a new freight bill.
If your cursor is in any of the fields in a section, you can clear all fields in the section by pressing CTRL+O. Specific restrictions apply to the Shipper and Consignee sections.
Selecting an existing customer
If a profile exists in the database, you can select the customer in several ways.
-
Type the complete customer code in the field provided. Press ENTER.
-
Type part of the customer code in the field provided, and then press F12 to view a list of customers with codes that match the data entered. Select a customer from the list.
-
Type part of the address in one or more of the Address fields, and then press F12 to view a list of customers that match the data entered. Select a customer from the list.
-
Click
 Find.
On the window that appears, search for and select a customer.
Find.
On the window that appears, search for and select a customer. -
If you are working in a distribution center site and you are selecting a consignee, press F11 to choose from a list of applicable customers.
You can only select those customers who have been configured appropriately in Customer and Vendor Profiles. For example, if a customer’s profile indicates that they are only a shipper, you cannot select that customer in the Caller or Consignee sections.
The system completes the remaining contact fields automatically with the values that are in the customer profile.
To view additional customer information, click ![]() Additional Information. The Client Information/Specifications window opens.
Additional Information. The Client Information/Specifications window opens.
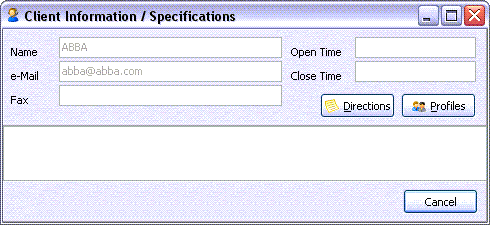
Information on this window comes from Customer & Vendor Profiles and is read-only. To add directions to the customer’s location, click Directions and enter the directions on the window that opens.
Depending on your system setup, you may not be able to edit contact or address information for an existing customer.
Adding a new customer
If you are adding a new customer to the database:
-
Enter the address information. To view a list of country codes, click
 Pick List and select a country in the window that appears.
 -
Click
 Profile.
 -
A window appears. Depending on your setup, do one of the following:
-
Enter a customer code in the field provided and click OK.
Note: Customer codes must contain only letters and/or numbers. -
Review the system-generated customer code. Click Yes to accept the code. If your system allows, you can reject this code and enter one of your own.
-
-
Another window appears in which you can provide additional information about the customer.
-
In the Phone field, enter the phone number. Use the drop-down to indicate the type of number.
-
In the Contact field, enter a contact name. Use the drop-down to indicate the type of contact.
If you select Notify, a window opens in which you can select a person or list of people as notification contact(s). You manage notification contacts in Customer and Vendor Profiles.
To choose from a list of customer contacts, click
 Contacts.
You manage customer contacts in Contacts and Phone.
Depending on your system setup, section fields are populated automatically when you select a contact from the list.
Contacts.
You manage customer contacts in Contacts and Phone.
Depending on your system setup, section fields are populated automatically when you select a contact from the list.
Sending an e-mail confirmation
Selecting Tools > Freight Bill Confirmation will open an address book. After you select a contact, the e-mail window will open, allowing you to send a confirmation message via e-mail (or fax) to your customer.
Specific features and restrictions
Certain features and restrictions apply to specific sections.
Caller
For information on the Mileage fields, see Viewing and calculating freight bill mileage.
If you right-click and select View Bill To Information or View Caller Information, the appropriate party’s information appears in the section. TruckMate remembers your selection each time you open Customer Service.
The following restrictions may apply based on your system setup.
-
If the customer in the Caller section is also the Bill To party, you must enter a customer code for the caller.
-
You may be required to enter a valid customer code before you can post the freight bill.
-
Your system may supply a default customer that appears each time you create a freight bill.
Shipper
You cannot clear fields using CTRL+O if the Pickup At party (as defined in the Contacts tab) is different from the shipper company.
Consignee
You cannot clear fields using CTRL+O if the Care of Delivery party (as defined in the Contacts tab) is different from the consignee company.
Setting dates, times, and zones

You set pickup and delivery dates and times, and the start and end zones, in the fields at the bottom of the Shipper and Consignee sections respectively. Typically these fields are automatically populated when you create a new freight bill and select a shipper and consignee.
Setting pickup and delivery dates and times
Each section contains two date/time fields that represent the span of time during which pickup or delivery should take place. You can:
-
Enter the date and/or time manually, following the prescribed date/time format
-
Enter the date and/or time manually without following any format. For example, if you enter
12272020 11:00, the system changes your entry to the correct date/time format. -
Double-click in the field. A calendar displays in which you can select the date and time.
Note: If you double-click in the field after the freight bill has been posted, the Freight Bill Appointments window opens, where you can change the dates if you want. -
Right-click in the field and do one of the following:
-
Select Get from Service Level. This retrieves a date and time based on the service level set up for the shipper or consignee.
-
Select a date/time option. For example, selecting Today Less > 1 Day sets the date to the previous day and removes the time value. Selecting Now Less > 1 Day sets the date to the previous day while keeping the current time value.
-
If you change the pickup date, the delivery date does not change automatically.
Specific features and restrictions
Depending on your system setup, these restrictions may be in place when creating a new freight bill:
-
The pickup and/or delivery time may default to a time that falls within the company’s hours of operation.
-
You cannot post a freight bill without entering a valid pickup and delivery date.
Depending on your system setup, these restrictions may be in place when editing an existing freight bill:
-
You may be required to provide a reason before you can change a pickup and/or delivery date.
-
You may be able to modify dates for a freight bill that has been run through Billing Register or Billing Consolidation. Double-click in any date field to open the Freight Bill Appointments window. On this window, you can specify a new pickup and/or delivery date. You can also indicate whether an appointment is required or has been made (see below).
Marking pickup and delivery appointments
In Customer and Vendor Profiles, you can indicate whether an appointment is required to pick up and/or deliver freight. If that option is selected in the profile, the Appt Req checkbox is selected automatically. You can also select it manually.
Once the appointment has been made, select Made.
Spotting trailers
A trailer can be left (spotted) at a location to make loading or unloading easier. In Customer and Vendor Profiles, you can indicate whether a trailer should be spotted for loading or unloading. If that option is selected in the profile, the Spot checkbox is selected automatically. When the trip’s status changes to "Arrive at Shipper" or "Arrive at Consignee", the system alerts the dispatcher that the customer needs a spotted trailer.
If a trailer is spotted for unloading, TruckMate automatically creates a trip to handle the spotted trailer. The trip’s status code is also set automatically.
Specifying start and end zones
The Start Zone and End Zone fields indicate the freight’s origin and destination zones respectively. These fields' values default to the zone codes specified in Customer and Vendor Profiles. Also, a default delivery zone can be selected as part of site setup.
You can also enter the zone code manually in several ways.
-
Type the zone code in the field.
-
Type part of the zone code in the field and click
Pick List. Select a zone from the list that appears. -
After entering the customer’s city, state/province, and ZIP/postal code, click in the customer’s ID field and press ALT+Z.
-
If a zone exists in the database that matches the customer’s city, state/province, and ZIP/postal code values, the system inserts its code into the field.
-
If a zone does not exist, and your setup allows it, the system creates a new zone code and inserts it into the field.
-
Depending on your system setup:
-
You can enter a zone code and allow the system to complete the city, state/province, and ZIP/postal code fields based on the value.
-
You cannot post a freight bill that does not contain a valid zone code.