Container Depot Configuration

The Container Depot Configuration program allows a user to enter a code for each container, as well as the accompanying contact information, set up a Depot Rate, enable any Accessorial Charges, and enter Carrier details.
After entering information in the Intermodal Setup program, Container Depot Configuration program, and Container Inventory Control program, use the Container Depot Billing program to print reports and create bills. Created bills will then appear in the Customer Service program.
To access Container Depot Configuration:
| From this location | Go to |
|---|---|
TruckMate Menu and TruckMate Task List |
|
Windows Start Menu |
TruckMate 20xx > Container Depot Configuration |
Windows Explorer |
C:\Program Files (x86) > TruckMate 20xx > CDConfig.exe |
Menu Bar / Toolbar
File Menu
Print Reports
![]() Selecting the Print Reports button will bring up the report selection window, common to many TruckMate applications. Here, you will select a report file from those available in your system and a Crystal Report will be generated.
Selecting the Print Reports button will bring up the report selection window, common to many TruckMate applications. Here, you will select a report file from those available in your system and a Crystal Report will be generated.
For more information on Report functionality in TruckMate, see the Crystal Reports Reference.
Exit
![]() Selecting this option will close the Container Depot Configuration program.
Selecting this option will close the Container Depot Configuration program.
Multi-Company
For more information on the Multi-Company options available from the Menu Bar, see the Multi-Company documentation.
Tools Menu
TruckMate Monitor
![]() Click the down arrow next to this button to access the various functions of the new TruckMate Monitor.
Click the down arrow next to this button to access the various functions of the new TruckMate Monitor.
Remember Position / Size
Select this option to retain window size and position upon exit. When the program is re-opened, it will maintain its previous appearance.
Help Menu
TruckMate Help
![]() Selecting this button will open the Container Depot Configuration topic in the TruckMate Online Help file (the page you are currently viewing).
Selecting this button will open the Container Depot Configuration topic in the TruckMate Online Help file (the page you are currently viewing).
Service Portal
![]() Selecting this button will open an instance of your default Internet browsing software, with the https://www.tmwcare.com login page displayed.
Selecting this button will open an instance of your default Internet browsing software, with the https://www.tmwcare.com login page displayed.
About
![]() Selecting this button will open the standard TruckMate About window, which contains important information about the application you are currently using, including its version number (important for support calls).
Selecting this button will open the standard TruckMate About window, which contains important information about the application you are currently using, including its version number (important for support calls).
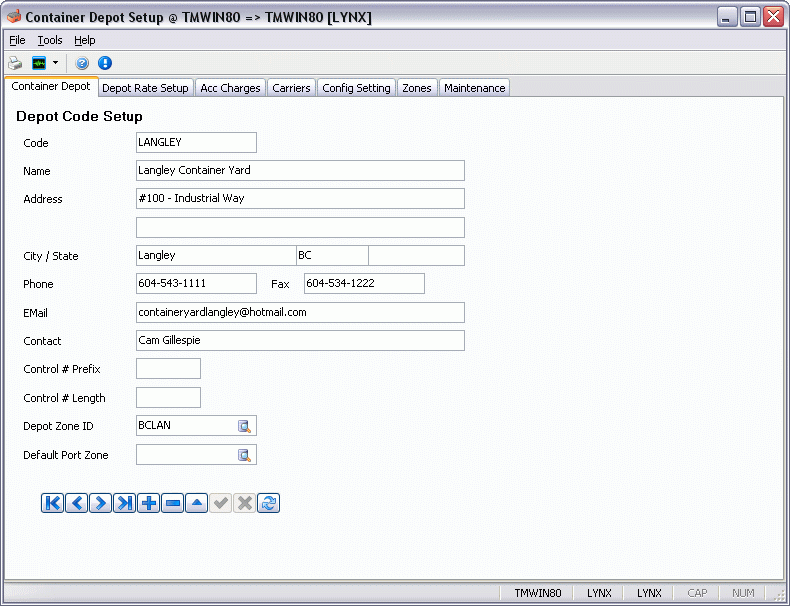
Container Depot Tab
In the Container Depot Tab, you will set up your Container Depot, including all of it’s relevant Zone data.
Code
Enter a code for this container depot of up to 10 characters in length.
Name
Enter a descriptive name for this container depot.
Address
Enter the address of the container depot.
City
Enter the City where this container depot is.
State
Enter the State/Province where this container depot is.
Postal/Zip
Enter the Postal/Zip for this container depot.
Phone
Enter the phone number for this container depot.
Fax
Enter the fax number for this container depot.
Enter the email for this container depot.
Contact
Enter a contact name for this container depot.
Control # Prefix
Enter a control number prefix for this container depot. The size of the control number prefix combined with the control length value cannot exceed '10'.
Control # Length
Enter the length of the control number for this container depot. The size of the control number prefix combined with the control length value cannot exceed '10'.
Depot Zone ID
Click the search button to select a zone ID for this depot.
Default Port Zone
Click the search button to select a default port zone for this depot.
Depot Rate Setup Tab
The Depot Rate Setup Tab is used to configure the Rate Sheets for your Depot.

This Tab works in conjunction with the Container Inventory Control program.
Filter on Client
Place a checkmark in the box provided and enter the Client name in the filter area, or select the search button to bring up a search dialog box where you can search by Bill To code or Client Name.
Filter on Depot
Place a checkmark in the box provided and enter the Depot name in the filter area, or select the search button to bring up a search dialog box where you can search by Depot code or Name.
Rates
Client ID
Use the search button to bring up the 'Select Client ID dialog box where you can search by Client ID or Name. To enable the Client ID, go to Customer Profiles program, Intermodal Tab and select your desired client type.
Depot
Use the search button to bring up a search dialog box where you can search by Depot code or Name.
Effective Dates
Select the pull-down arrow to display a calendar where you can scroll to your desired date. Choose both a start and end date to create an Effective date range.
Storage Charges
Container Storage Charges Tab
Rate Per Day / Flat
Select the radio button that describes how to charge the selected client for container storage. You can chose 'Flat', in which case a flat rate will be charged to the customer for container storage. Or you can select 'Day' in which case the rate defined for container storage will be applied on daily basis.
Monthly
Enter a monthly dollar rate, if required.
Send Charges To
The 'Send Charges To' drop-down menu allows two choices:
-
FB: selecting 'FB' means to send the container storage charges to the original Freight Bill (via the Container Depot Billing program).
-
ST: selecting 'ST' means to send the container storage charges to a newly created Freight Bill.
| This field is only available when the 'Billing Cycle' value is set to the 'Container' option. |
COFC Rates Loaded / Empty
Enter the amount charged for storing on a Container on (rail) flat car, which is a form of piggyback movement of freight.
TOFC Rates Loaded / Empty
Enter the amount charged for storing on a Trailer on (rail) flat car (TOFC), which is a form of piggyback movement of freight.
Grace Days
Enter the number of days where there will be no charge for storage, if applicable.
Trailer Storage Charges Tab/Misc. Equipment Storage Charges Tab
The Trailer Storage Charges Tab and the Misc. Equipment Storage Charges Tab are where the trailer storage charges and the Miscellaneous Equipment storage charges are defined respectively. The fields available in both tabs are the same and are mostly similar to the fields available in the 'Container Storage Charges Tab' described previously.
The only difference between each of these tabs and the 'Container Storage Charges Tab' is the Rate fields. For the 'Trailer Storage Charges Tab' and the 'Misc. Equipment Storage Charges Tab' only one 'Rate' field exists and one 'Grace Days' field exists.
Rate
Enter the rate (either Per Day or Flat, according to the radio button selected in the 'Rate Per' filed) for storing the Trailer/Misc. Equipment.
Billing Cycle
Weekly / Monthly
Choosing either of these options will set up the Billing Cycle as periodic, where storage days are per container on an on-going basis.
| 'Weekly' and 'Monthly' types create a detail line on the Freight Bill for container storage charges. |
Container
When the 'Container' option is selected the information set up on the Rates By Storage Days Tab (see below) will be used to determine the storage charges. If set to 'Container', storage charges will only be billed after storage has ceased and the Container has been out-gated.
| 'Container' Storage charges are created as an Accessorial Charge on the Freight Bill . |
Accessorial Charges (Auto-Assign COFC / Auto-Assign TOFC / Rate)
There are two checkboxes and a text field for every option in this section. When the first checkbox is checked, the 'rate' in the text field will auto-assign itself to all COFC shipping through the selected depot. When the second checkbox is checked, the 'rate' will automatically assign itself to TOFC shipping in this depot. You may check one or the other, or both.
Inspection
Enter the charge amount in the field provided.
Steam Clean
Enter the charge amount in the field provided.
Tarp
Enter the charge amount in the field provided.
Lift Charge
Enter the charge amount in the field provided.
Rate By Size Code (COFC Only) Tab
Use the '+' button to enter a new record in the grid. Double-click in the 'Size Code' column to bring up a size code dialog box where you can search by Size Code or Size Code Description. To enter a new Size Code, go to the Intermodal Setup program > Size Tab. Enter a rate for this size code in the Rate column. Click the 'checkmark' button when finished.
Container Inventory - Depot Rate Setup Grid
The grid information will pre-populate with record entries in the Depot Rate section.
Rate By Storage Days Tab
The Rate By Storage Days Tab allows the user to configure storage charges based on a ranged number of days in storage.
From / To
These values indicate the range of days in storage for the particular charge.
Type
This field will indicate if the charge is to be applied to either containers of 'COFC' or 'TOFC' type. Some users may not been both, but ranged charges should be set up for at least one type.
Base (Flat)
This field sets a flat amount to apply when charges are generated by the system. If no 'Base' charge is needed, the value should remain at '0' or blank. If a Container has a 'Billing Cycle' value of 'Container' but doesn’t fall into the Date Range as specified by the 'From / To' fields, they will be charged the 'Base' amount.
Empty / Loaded
These fields indicate the daily or flat storage amount to apply when charges are generated.
Charge Code
This field designates the Accessorial Charge Code to assign the storage charges to when the charges are added to either the original Freight Bill or '-S' Storage Bill. This code must already exist in the Codes Maintenance program > Accessorial Charges Tab.
Acc Charges Tab
The Accessorial Charges Tab is where you will designate the Accessorial Charges for other InterModal programs.
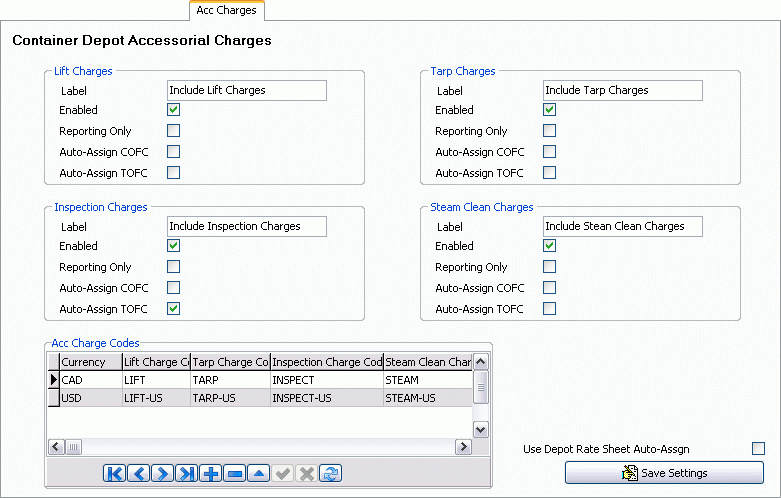
Lift Charges
Label
You are able to modify the text description of Intermodal Accessorial Charges. Simply replace this text with whatever label you wish to use.
Enabled
Place a checkmark in the box provided to enable lift charges.
Reporting Only
Place a checkmark in the box provided to enable the 'Reporting Only' option. This will allow an extra detail line to be added to the invoice.
Auto-Assign COFC
Automatically assigns 'Lift Charges' to COFC shipping in this depot.
Auto-Assign TOFC
Automatically assigns 'Lift Charges' to TOFC shipping in this depot.
Tarp Charges
Label
You are able to modify the text description of Intermodal Accessorial Charges. Simply replace this text with whatever label you wish to use.
Enabled
Place a checkmark in the box provided to enable tarp charges.
Reporting Only
Place a checkmark in the box provided to enable the 'Reporting Only' option. This will allow an extra detail line to be added to the invoice.
Auto-Assign COFC
Automatically assigns 'Tarp Charges' to COFC shipping in this depot.
Auto-Assign TOFC
Automatically assigns 'Tarp Charges' to TOFC shipping in this depot.
Inspection Charges
Label
You are able to modify the text description of Intermodal Accessorial Charges. Simply replace this text with whatever label you wish to use.
Enabled
Place a checkmark in the box provided to enable inspection charges.
Reporting Only
Place a checkmark in the box provided to enable the 'Reporting Only' option. This will allow an extra detail line to be added to the invoice.
Auto-Assign COFC
Automatically assigns 'Inspection Charges' to COFC shipping in this depot.
Auto-Assign TOFC
Automatically assigns 'Inspection Charges' to COFC shipping in this depot.
Steam Clean Charges
Label
You are able to modify the text description of Intermodal Accessorial Charges. Simply replace this text with whatever label you wish to use.
Enabled
Place a checkmark in the box provided to enable steam cleaning charges.
Reporting Only
Place a checkmark in the box provided to enable the 'Reporting Only' option. This will allow an extra detail line to be added to the invoice.
Auto-Assign COFC
Automatically assigns 'Steam Clean Charges' to COFC shipping in this depot.
Auto-Assign TOFC
Automatically assigns 'Steam Clean Charges' to TOFC shipping in this depot.
Acc Charge Codes
This Grid allows you to define Accessorial Charges for multiple currencies. Click the '+' button on the TruckMate Navigational Bar to add a new record, then double click the 'Currency' field to select which Currency you would like to define Accessorial Charges for.
In the remaining fields, specify which type of charge you would like to use for the selected currency by double-clicking in the fields. The available values for these fields are maintained in the Codes Maintenance program.
Use Depot Rate Sheet Auto-Assgn
Select this checkbox to enable the automatic assigning of a Depot Rate Sheet.
Save Settings
Saves the entries made to the Accessorial Charge tab in this program.
Carriers Tab
In the Carriers Tab you will designate the available Carriers for your Depot. Use the '+' button to enter a new carrier.
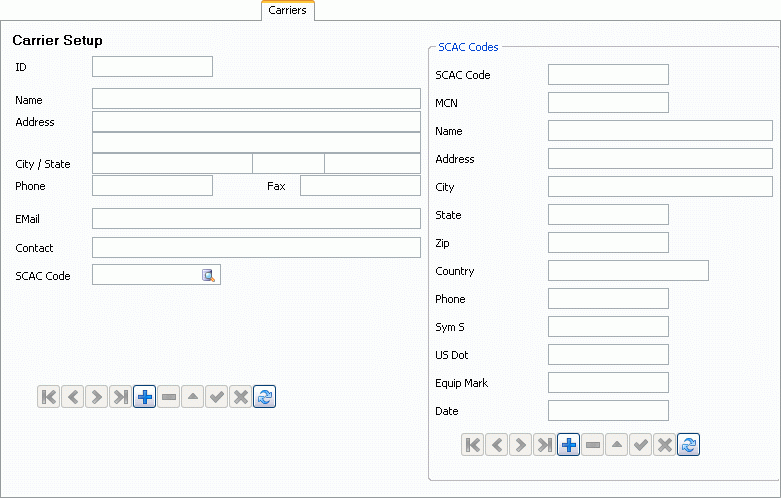
ID
Enter a 10 character descriptor for this carrier.
Name
Enter a descriptive name for this carrier.
Address
Enter the address of the carrier.
City
Enter the City where this carrier is.
State / Province
Enter the State/Province where this carrier is.
Postal / Zip
Enter the Postal / Zip for this carrier following the State / Province field.
Phone
Enter the phone number for this carrier.
Fax
Enter the fax number for this carrier.
Enter the email for this carrier.
Contact
Enter a contact name for this carrier.
SCAC-Codes
Use the '+' button to enter a new SCAC-Code entry.
SCAC Code
Enter a SCAC-Code (Standard Carrier Alpha Code), a common identifier within the EDI industry.
MCN
Enter an MCN number for this carrier.
Name
Enter a descriptive name for this carrier.
Address
Enter the address of the carrier.
City
Enter the City where this carrier is.
State
Enter the State/Province where this carrier is.
Postal/Zip
Enter the Postal/Zip for this carrier.
Country
Enter the Country for this carrier.
Phone
Enter the phone number for this carrier.
Sym S
Enter your one-digit 'Sym S' value for this carrier.
US Dot
Enter your US Department of Transportation number for this carrier.
Equip Mark
Enter the Equipment Mark for this carrier.
Date
Populates with the current date. You can manually change the date if you wish.
Config Setting Tab
The options in the Config Setting Tab relate to other Intermodal programs:
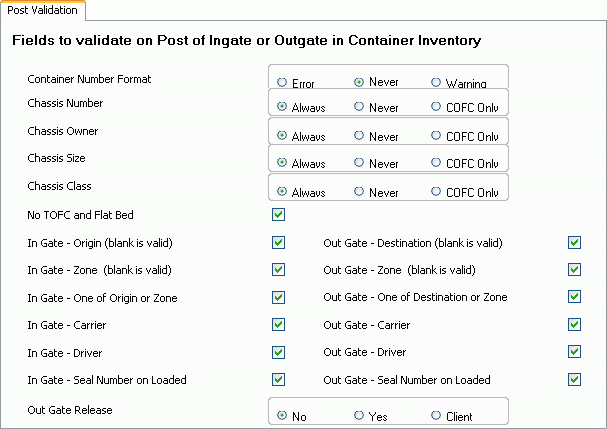
Post Validation Tab
The Post Validation Tab contains many options that outline the Validation rules that TruckMate will use when posting InGate or OutGate records. Use the radio buttons on this page to set up your reports as you would like them to appear. When you are finished, click the 'Save Settings' button to save your InGate and OutGate settings.
Misc Tab
The options on the Miscellaneous Tab relate directly to the functionality of the Container Inventory Control program. Changing values here will alter the way you create your InGates and OutGates.
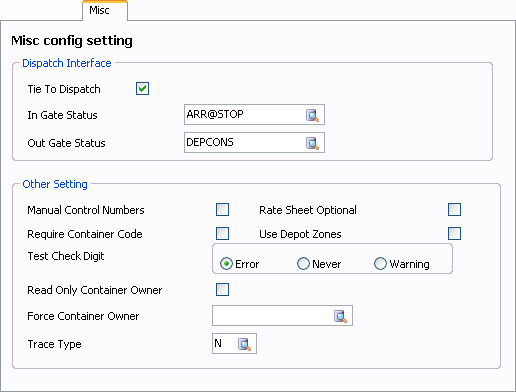
Dispatch Interface
Tie To Dispatch
If you would like the Container Inventory Control program’s InGate and OutGate functionality to be incorporated into the DIspatch program, place a check in this checkbox.
InGate Status
Use the search button to select a default InGate status.
OutGate Status
Use the search button to select a default OutGate status.
Other Setting
Manual Control Numbers
Placing a check in this checkbox will allow you to manually enter Control Numbers when using the Container Inventory Control program.
Rate Sheet Optional
Placing a check in this checkbox will make the use of Rate Sheets within the Container Inventory Control program optional.
Require Container Code
Placing a check in this checkbox will require the use of Container Codes when using the Container Inventory Control program.
Use Depot Zones
Placing a check in this checkbox will require the use of Depot Zones when using the Container Inventory Control program.
Test Check Digit
By placing an check in the checkbox of either 'Error', 'Never', or 'Warning', you will alter the behaviour of the 'Quick Container Entry' function of the Container Inventory Control program. Based on you choices here, when you enter a check digit for a Container in the Container Inventory Control program you will either see an error message, nothing at all, or a warning.
Read Only Container Owner
Sets the 'Container Owner' value within the Container Inventory Control program to a read only (uneditable) value.
Force Container Owner
Use the search button to select a default Container Owner for all InGate creations within the Container Inventory Control program. During the 'Quick Container Entry' process of the Container Inventory Control program, the value chosen here will be automatically made default, and, if used in conjunction with the 'Read Only Container Owner' value above, can be made to be unchangeable.
Trace Type
Set this field’s value to the Trace Type you wish to be used when an entry is made to the TRACE table for the container when a Freight Bill is created via the Container Depot Billing program. The field defaults to 'N', but you may change it to any valid Trace Type value (as setup on the Codes Maintenance program > Trace Number Types Tab).
Zones Tab
In the Zones Tab you will set up your Depot Zones, and the amount and type of containers that they may house.
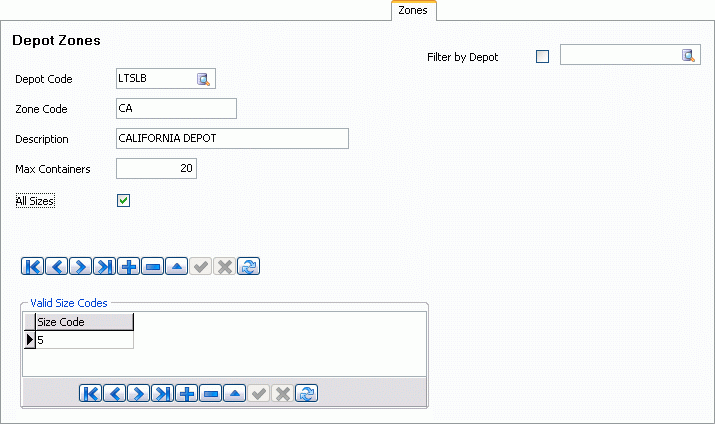
Filter by Depot
If you wish to search for a specific depot, check this checkbox, and then use the search button to select the depot you wish to filter by. Once selected, it’s data will appear in the fields below.
Depot Code
Click the search button to select a Depot Code from a list of available codes.
Zone Code
Manually enter a Zone Code.
Description
Enter a description of the Depot, if required.
Max Containers
Enter the maximum amount of containers that can possibly reside at this depot.
All Sizes
Place a check here to allow all available sized containers at this depot.
Valid Size Codes
Once the above options have been set, clicking the '+' button within this grid will allow you to specify the valid size codes for the containers that will be using this depot. Double click within the 'Size Code' field to bring up a selection menu with all your available size codes. Click the checkmark to save.
Maintenance Tab
The purpose of the Maintenance Tab is to create 'Maintenance Codes' for use in the Container Inventory Control program. Once created here, these codes are accessible by clicking the 'Maint' button and bringing up the 'Container Maintenance Jobs' within the Container Inventory Control program.
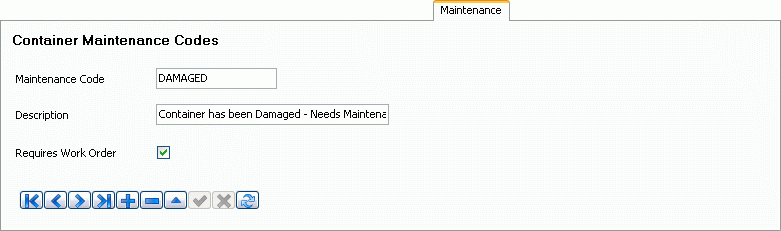
Maintenance Code
Enter the label for your new Maintenance Code.
Description
Enter a description for your new Maintenance Code.
Requires Work Order
Place a check in this checkbox if your Maintenance Code requires a work order.