Claims

The Claims program is really an extension of the OSD (Over, Short and Damaged) program. Once you locate the Freight Bill # in OSD and fill in the over/short/damage information, return to the claim program to actually enter your claim information.
The Claims program generally pulls information from the 'Caller' of the Freight Bill. However, TruckMate now offers you the choice for where you wish the information to be pulled from. Using your Application Configurator program, under the 'CLAIMS.EXE' option, select 'Default Claimant' and you will be offered the following choices: C=Caller, O=Shipper, D=Consignee, B=Bill-to, N=None.
|
You have two sections to complete: the Freight Bill Information and the Claim particulars. Once you attach the Freight Bill number, most of this information will pre-populate as per the Freight Bill information entered in the Customer Service program.
To access Claims:
| From this location | Go to |
|---|---|
TruckMate Menu and TruckMate Task List |
Billing > Claims & OSD |
Windows Start Menu |
TruckMate 20xx > Claims & OSD |
Windows Explorer |
C:\Program Files (x86) > TruckMate 20xx > Claim.exe |
How Do I?
How do I Make a Claim?
-
Optional Step: Begin working in the Over/Short/Damaged program (OSD.EXE), and enter the Freight Bill corresponding to the problem claim information. Complete all relevant fields in the OSD program and then save and begin working in the Claims program.
-
Open the Claims program (CLAIM.EXE), click: Start > Programs > TruckMate > Billing > Claims & OSD > Claims.
-
Select the '+' sign to enter a new claim and begin by attaching a Freight Bill to this claim. Enter all relevant information.
That’s it. Now, you can track all claims against this Freight Bill, and add others. You can view the history of this claim file, any audit information, view whether the claim has been settled and if any monies were recovered, view billing, and OSD info, upload pictures of the claim, and modify the extra user fields to reflect your company’s situation.
How do I Reverse a Claim?
-
Open the Claims program (CLAIM.EXE), click: Start > Programs > TruckMate > Billing > Claims & OSD > Claims.
-
Go to the header portion and locate the 'Status' field. Select the search which will bring up a window asking if you wish to re-open this claim. Select 'Okay'.
How do I Create a Credit to a Freight Bill for a Claim?
-
Open the Claims program (CLAIM.EXE), click: Start > Programs > TruckMate > Billing > Claims & OSD > Claims.
-
Go to the 'Billing' tab. This answer is assuming that you’ve already set up this claim with the pertinent information such as who you’re going to bill back any funds to, and that you’ve entered the amount of funds in the space provided.
-
Then, you’d just place a checkmark in the space next to the credit client areas and/or select, if appropriate, the person/company you’re going to be billing back funds to.
-
Read through the question on Posting Claim information.
How do I know if a Claim has been Deleted, Closed or Posted?
-
Open the Claims program (CLAIM.EXE), click: Start > Programs > TruckMate > Billing > Claims & OSD > Claims.
-
Go to the status filter located on the right-hand side of the program and select the desired filter: Open, Closed (Posted), Deleted, or All. Information relevant to that filter will appear in any of the grids using any tab.
How do I Search for a Claim?
-
Open the Claims program (CLAIM.EXE), click: Start > Programs > TruckMate > Billing > Claims & OSD > Claims.
-
Decide if you wish to search by claim number or Freight Bill. Go to the 'Find By' area in the claims program (far right-hand side, directly below the status filter area), and select either 'Claim' or 'FB'.
Search by Claim Number:
Select the 'Find' button and a 'Find an open claim' window will open offering different search options: Claim #, Claimant, Claimant’s Ref. #, and Type. Select the appropriate radio button and continue. In this example, we’ll search by Claim Number. Select 'Claim #'. The grid will show any claims currently in the system. Simply highlight the claim #, Claimant, Claimant’s Ref. #, and/or Type and press 'Okay'. You will immediately be re-directed to that claim.
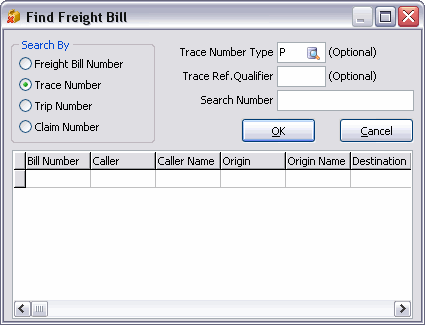
Search by Freight Bill:
Select the 'Find' button and a 'Find claim' window will open. Enter the Freight Bill number and press 'Okay'. If the Freight Bill you enter, does not have a matching claim, you will receive a message stating that. If the Freight Bill you enter does have a matching claim, you will be re-directed to that claim’s information.
How do I Create or Edit Claim 'Types'?
-
Open the Claims program (CLAIM.EXE), click: Start > Programs > TruckMate > Billing > Claims & OSD > Claims.
-
Go the header portion of the Claims program and locate the 'Type' field.
-
Click the search button to the right of the 'Type' field and view the 'Select Claimant' window. Here you can see what 'types' are available on your system. If you see the 'Type' you’re after, select it and press 'OK' to exit the window, otherwise select 'Cancel'.
-
To enter a new 'Type', select the box just to the right of the search box. This will show you the claim types entered on your system. To enter a new 'Type', select the '+' sign, enter a name for your new type, select the 'checkmark' button to save, and close out of the window. Now, you can select the search just to the right of the 'Type' field, and your new 'Type' should be available for you to select.
How do I View Detailed information on a Claim?
It depends on exactly what you’re defining as 'detail' information. The load details as entered in the Customer Service program-Detail tab will appear in the OSD program Load Details section (bottom grid). To verify this:
-
Open the Customer Service program (CSERV.EXE), click Start > Programs > TruckMate > Billing > Customer Service.
Locate the desired Freight Bill. Go to the 'Details' tab.
-
Open the Over/Short/Damaged program (OSD.EXE), click Start > Programs > TruckMate > Claims > OSD.
Use the 'Find' button to locate the desired Freight Bill. Review the load details in the bottom grid.
If you’re seeking more varied detail information on the claim, you can also obtain that in either the OSD program and/or the Claims program. To do this you would:
-
Open the Over/Short/Damaged program (OSD.EXE), Start > Programs > TruckMate 20xx > Billing > Claims & OSD > OSD.
Scroll through the claims until you find your desired one. Review or add information to the claim.
-
Open the Claims program (CLAIM.EXE), click: Start > Programs > TruckMate 20xx > Billing > Claims & OSD > Claims.
Locate the desired Freight Bill and/or claim number and the exact same information entered in the OSD program, will appear here. Use the tabs to review more details of the claim.
How do I Print an itemized list of all Financial Changes to a Claim?
-
Open the Claims program (CLAIM.EXE), click: Start > Programs > TruckMate > Billing > Claims & OSD > Claims.
-
Select the 'Print' button and your screen will open to a Report Selection window where you have a choice of 7 different reports:
-
Claims Summary: one line for every claim
-
Detail Summary: all information for the current claim
-
Contact Log/History Summary: all information for the current claim
-
Status/Audit Summary: all information for the current claim
-
Summary Report: of all OSD Freight Bills
-
Detail Report: listing the details for this particular Freight Bill
-
Proof of Delivery (POD) Report: showing proof of delivery of this Freight Bill
Select the report entitled: 'CLAIM_STATUS.RPT'. This report will offer detailed information regarding the financial changes for all claims. Scroll through until the claim number you are seeking information about appears on the screen. Press the 'Print' button to print a copy of this report for your records.
This report is also accessible from the OSD program.
-
How do I post Claim Information to my Accounting System?
-
Open the Claims program (CLAIM.EXE), click: Start > Programs > TruckMate 20xx > Billing > Claims & OSD > Claims.
Locate the desired Freight Bill and/or claim number by using either the search method or by scrolling through the records until you find your desired claim.
-
Enter any changes to the claim information in either the header or on any of the tabs. Press the '' when all information is entered.
Note: You can only post on 'Open' claims. Once they are closed or deleted, no further changes can be made.
-
Go to the 'Billing' tab and select the 'Setup' button to view the Claim Billing Setup window where you specify which date you wish to post your claim information. Your date choices are: current, claim, settled, FB billed, FB created.
-
Then, for each of the following: Claimant, Insurer, Carrier, Salvager, and Other, select your AR Transaction Type.
Note: Go to the A/R Transaction Type program to set up new AR Transaction Types.
-
If this claim is pertaining to a driver, you can even set up a Driver Deduction.
-
Select 'Okay' and return to the main menu.
-
Before posting any items, you need to specify which items you want posted. You’re probably still on the 'Billing' tab, if not select it and place a checkmark in the boxes beside the items you wish to post to your accounting system. For example, if on this claim you wish to deduct an amount from a driver, place a checkmark '' beside the item saying 'Drvr Deduct'. If you wish to bill the insurer for a specific amount for the damaged goods, select 'Bill Insurer' by placing a checkmark '' beside the item saying 'Bill Insurer'. Now you’re ready to post these items.
-
Some people prefer to preview their posting items before the actual posting, as they is no way you can undue an incorrect post. To preview your posting information, select the 'Preview' button.
-
Select 'Post' and your selected entries will be posted to the AR Adjustment program. Run the AR Adjustment Register to post your entries to your General Ledger accounts. See the question 'How do I post my A/R adjustments to GL accounts?' for more information. After posting, you’ll notice the word 'Done' in the place where the checkmarks used to be. This is telling you that these items have been posted.
How do I Add a Claim Picture?
If you enter a '.jpg' or a '.png' file, you can view these photos in your browser. Any other file extension will not allow you to use the 'Open' button to view the file. Also, you can add more than one picture. Simply follow the steps below until all your photos are loaded into the program. Further, in the next general release, you will be able to 'attach' any type of file, not just picture files (although only certain 'picture' files will 'pre-view' in the 'thumbnail' box). Double-clicking any attached file will launch the associated exe - just like in Windows Explorer, so samples of potential attachments could be as follows: a fax from an unhappy consignee, an excel spreadsheet list of items/values in box, or an e-mail from a client expressing thanks for speedy claim resolution.
-
Open the Claims program (CLAIM.EXE), click: Start > Programs > TruckMate > Billing > Claims & OSD > Claims.
Select the '+' sign to enter a new Claim and begin by attaching a Freight Bill to this claim. Enter all relevant information.
-
Open the 'Tools' menu and select 'Attach Files'.
-
Use the Attach / Open Related Files window to add pictures to the claim.
How do I run Claim Reports?
-
Open the Claims program (CLAIM.EXE), click: Start > Programs > TruckMate > Billing > Claims & OSD > Claims.
-
Select the 'Print' button and your screen will open to a Report Selection window where you have a choice of 7 different reports:
-
Claims Summary: one line for every claim
-
Detail Summary: all information for the current claim
-
Contact Log/History Summary: all information for the current claim
-
Status/Audit Summary: all information for the current claim
-
Summary Report: of all OSD Freight Bills
-
Detail Report: listing the details for this particular Freight Bill
-
Proof of Delivery (POD) Report: showing proof of delivery of this Freight Bill
These reports are also accessible from the OSD program.
-
-
Select one of the above choices and a report will automatically be generated. If you have configured a report preview, click the printer icon at the top of the screen to send the report to the printer that is configured as the default printer for your workstation. See the Basics documentation for more information on report functions.
How do I View OSD Claim Notes entered in either the Customer Service program or OSD?
You can view any notes entered in the Customer Service program, OSD, and/or the Claims program, in any of these programs. For example, if I entered notes relevant to a particular claim attached to a particular freight bill in the Claims program, I could access these notes in either the Customer Service program, or the OSD program.
In this example, I’ll enter notes into the Customer Service program.
-
Open the Customer Service program (CSERV.EXE), click: Start > Programs > TruckMate > Billing > Customer Service.
-
Go to the 'Summary' and/or 'Billing' tab and select the 'Notes' button.
-
Select a tab relevant to the notes you are entering from the choices of: Billing, Container, Driver, OSD, Other, and Write-Off.
-
Enter any notes and click the 'check' button to save them.
To view these notes in the Claims program:
-
Open the Claims program (CLAIMS.EXE), click: Start > Programs > TruckMate 20xx > Billing > Claims & OSD > Claims.
-
Review the notes entered in any of the 'Billing', 'Container', 'Driver', 'OSD', 'Other', and 'Write-Off' Tabs.
Menu Bar / Toolbar
File Menu
 Opens to a Report Selection dialog box where you have a choice of 7 different reports.
-
Claims Summary: one line for every claim
-
Detail Summary: all information for the current claim
-
Contact Log/History Summary: all information for the current claim
-
Status/Audit Summary: all information for the current claim
-
Summary Report: of all OSD Freight Bills
-
Detail Report: listing the details for this particular Freight Bill
-
Proof of Delivery (POD) Report: showing proof of delivery of this Freight Bill
Select one of the above choices and a report will automatically be generated. If you have configured a report preview, click the printer icon at the top of the screen to send the report to the printer that is configured as the default printer for your workstation.
Upon calling a report, TruckMate looks for two parameters, CLAIM_ID (for claim reports) and DETAIL_LINE_ID (for OSD reports), if either is found, TruckMate will set the found parameter for you, you don’t need to set it yourself in the report dialog.
|
If used, the parameter name must match exactly and the value must be numeric. For more information on Crystal Reports, see the Crystal Reports Reference. |
Exit
 Selecting this option will close the Claims program.
Multi-Company Menu
For more information on the Multi-Company options available from the Menu Bar, see the Multi-Company documentation.
Navigate Menu
The Navigate Menu contains the standard TruckMate Navigation Bar, used to browse through your Database records, and the following options:
Find
 Click this button to open a search window where you can search for a specific Claim by a variety of criteria.
Claim Menu
Notes
![]() Selecting the notes button will cause a window to open displaying the OSD Notes for the Freight Bill number you are seeking. Here, you can view all relevant notes for this particular Freight Bill. Select different Tabs such as: 'Billing', 'Container', 'Driver', 'OSD', 'Other', and 'Write-Off', to view any relevant information.
Selecting the notes button will cause a window to open displaying the OSD Notes for the Freight Bill number you are seeking. Here, you can view all relevant notes for this particular Freight Bill. Select different Tabs such as: 'Billing', 'Container', 'Driver', 'OSD', 'Other', and 'Write-Off', to view any relevant information.
Find by FB
![]() Selecting this option will open the Find Claim window, where you can search for a specific Claim using a variety of criteria.
Selecting this option will open the Find Claim window, where you can search for a specific Claim using a variety of criteria.
Close Claim
![]() Selecting this option will close the currently displayed Claim (setting its 'Status' value to 'CLOSED').
Selecting this option will close the currently displayed Claim (setting its 'Status' value to 'CLOSED').
Delete Claim
![]() Selecting this option will delete the currently displayed Claim.
Selecting this option will delete the currently displayed Claim.
Re-Open Claim
![]() If a Claim has a 'Status' value of 'CLOSED', you can select this option to set its Status to 'Open', allowing you to edit its details.
If a Claim has a 'Status' value of 'CLOSED', you can select this option to set its Status to 'Open', allowing you to edit its details.
Change Status
![]() Selecting this option will open a window that will allow the User choose a new Status Code for the displayed Claim. The available Status Codes are configured using the Setup Menu > Status Codes option.
Selecting this option will open a window that will allow the User choose a new Status Code for the displayed Claim. The available Status Codes are configured using the Setup Menu > Status Codes option.
Audit Billings
![]() After a Freight Bill is posted, the Audit button opens the audit information in the General Ledger Summary program for the current Freight BiIl.
After a Freight Bill is posted, the Audit button opens the audit information in the General Ledger Summary program for the current Freight BiIl.
Preview Billings
![]() The Preview option displays a preview of what the GL Summary posting will look like for the current Freight Bill.
The Preview option displays a preview of what the GL Summary posting will look like for the current Freight Bill.
Post Billings
 The Post option posts the current Freight Bill to the GL, changing it’s status to 'Posted' in other TruckMate programs.
Attach Files to Claim
![]() Selecting this option will open the Attach/Open Related Files window, allowing you to add an image or document to the Claim record.
Selecting this option will open the Attach/Open Related Files window, allowing you to add an image or document to the Claim record.
Attach Files to FB
![]() Selecting this option will open the Attach/Open Related Files window, allowing you to add an image or document to the Freight Bill record attached to this Claim.
Selecting this option will open the Attach/Open Related Files window, allowing you to add an image or document to the Freight Bill record attached to this Claim.
![]() Selecting this option will allow you to send claim details to claim billing parties via the TruckMate E-Mail System. Selectable contacts come from the Billing Tab. By default, all contacts listed in the Billing Tab (that have a fax or e-mail address specified in their profile) are available in the e-mail form.
Selecting this option will allow you to send claim details to claim billing parties via the TruckMate E-Mail System. Selectable contacts come from the Billing Tab. By default, all contacts listed in the Billing Tab (that have a fax or e-mail address specified in their profile) are available in the e-mail form.
However, there is an Application Configurator program > CLAIM.EXE > 'Contacts Displayed inside the E-Mail/Fax Contact List' option that allows you to filter by type (allow any combination of Clients, Vendors, and Drivers). Like e-mailing in other areas of TruckMate, you may setup a template. If you do, you may use place-holder fields in your template from 3 tables:
-
TLORDER: these are for the freight bill associated with the claim.
-
CLAIM: these are the basic fields for the claim (including the 10 User Fields displayed in the User Fields Tab).
-
CLAIMBILL: these are the fields shown in the Billing Tab (including the 3 user fields).
| You may have multiple rows in the Billing Tab, but only one can be used at a time in the e-mail template- so if you use a CLAIMBILL field in your template, it is critical that you first select the right row in the Billing Tab grid before you invoke the 'Send E-Mail' feature. |
Claimant Menu
Claimant Info (Main)
Selecting this option will bring up a window with the all available Profile information for the selected Claimant.
Claimant Info (Billing)
Selecting this option will bring up a window with the all available Profile information for the selected Billing Claimant.
Summary Aging
![]() Select this button to view the Summary Aging details for the selected Client (displayed in the 'Claimant' field).
Select this button to view the Summary Aging details for the selected Client (displayed in the 'Claimant' field).
Client Sales
![]() Select this button to open a small window detailing some general sales data for the selected Client (as of the current date).
Select this button to open a small window detailing some general sales data for the selected Client (as of the current date).
Claim History
![]() Select this button to open a small window detailing some general claims data for the selected Client (as of the current date).
Select this button to open a small window detailing some general claims data for the selected Client (as of the current date).
Toggle Pmt Hold
![]() When the user has selected a Vendor as the 'Claimant Type' on a claim detail line, they may use the 'Toggle Pmt Hold' option to flag the 'Payment Hold' option (on the Customer & Vendor Profiles program > Vendor > Accounts Payable Tab) for that Vendor, moving them into payment hold status. After selecting this option, you will not be able to create new checks for the selected Vendor. This is useful if a vendor acknowledges liability of a claim but refuses to pay- you can withhold your payments to them until the claim recovery amount is paid. Vendors with this flag enabled will also be excluded from the AP Inquiry program > Pay Bills window.
When the user has selected a Vendor as the 'Claimant Type' on a claim detail line, they may use the 'Toggle Pmt Hold' option to flag the 'Payment Hold' option (on the Customer & Vendor Profiles program > Vendor > Accounts Payable Tab) for that Vendor, moving them into payment hold status. After selecting this option, you will not be able to create new checks for the selected Vendor. This is useful if a vendor acknowledges liability of a claim but refuses to pay- you can withhold your payments to them until the claim recovery amount is paid. Vendors with this flag enabled will also be excluded from the AP Inquiry program > Pay Bills window.
| If there are unposted checks in the system for this Vendor when you check this option, the program will issue a warning. |
Tools Menu
TruckMate Monitor
 Click the down arrow next to this button to access the various functions of the new TruckMate Monitor.
Remember Position / Size
Select this option to retain window size and position upon exit. When the program is re-opened, it will maintain its previous appearance.
Window Menu
View FB in Customer Service
![]() Selecting this option will open the Customer Service program with the Freight Bill details of the Freight Bill chosen in the 'FB #' field of the main Claims program window.
Selecting this option will open the Customer Service program with the Freight Bill details of the Freight Bill chosen in the 'FB #' field of the main Claims program window.
View Claimant’s Profile
![]() Selecting this option will open the Customer Profiles program with the information of the Client selected in the 'Claimant' field of the main Claims program window displayed.
Selecting this option will open the Customer Profiles program with the information of the Client selected in the 'Claimant' field of the main Claims program window displayed.
View Shipper in Client Profiles
![]() Selecting this option will open the Customer Profiles program with the information of the Client selected in the 'Shipper' field of the main Claims program window displayed.
Selecting this option will open the Customer Profiles program with the information of the Client selected in the 'Shipper' field of the main Claims program window displayed.
View Consignee in Client Profiles
![]() Selecting this option will open the Customer Profiles program with the information of the Client selected in the 'Consignee' field of the main Claims program window displayed.
Selecting this option will open the Customer Profiles program with the information of the Client selected in the 'Consignee' field of the main Claims program window displayed.
Setup Menu
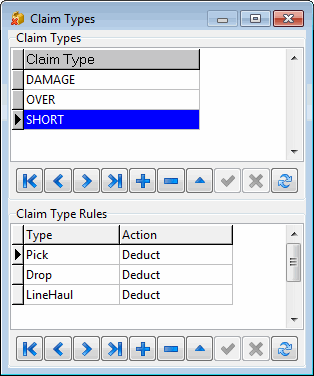
Claim Types
![]() Selecting this option will open the Claim Types window, where you can specify the various Claim Types that will be available for use within the Claims program.
Selecting this option will open the Claim Types window, where you can specify the various Claim Types that will be available for use within the Claims program.
| Field | Definition |
|---|---|
Claim Types |
Select the '+' button in the middle of the Claim Types window to enter a new Claim Type. The three Claim Types available by default are 'DAMAGE', 'OVER' and 'SHORT'. You can add as many additional Claim Types as you require. The Types created here will be available for selection in the 'Type' field of the 'Claim' section on the main program window, as well as when working with OS&D records on the Customer Service program > OS&D/POD Tab. |
Claim Type Rules |
The Claim Type Rules section allows you to configure 'Actions' for each of the Claim Types that you have setup in the system. These rules can be used to automatically modify the detail lines of a freight bill (on the Customer Service program > Details Tab) when a specific claim type is logged against a freight bill on the Customer Service program > OS&D/POD Tab.
When used in conjunction with specific Claim Types, these rules will automatically impact the freight bill details when an OS&D record with matching Claim Type is created. For example:
|
Status Codes
![]() Selecting this option will open the Status Codes window, where you can specify the various Status Codes that will be available to attach to claims in the Claims program.
Selecting this option will open the Status Codes window, where you can specify the various Status Codes that will be available to attach to claims in the Claims program.
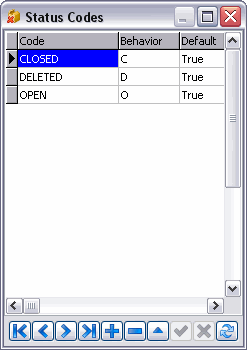
Previously, there were only 3 hard-coded claim status codes: 'OPEN', 'CLOSED' and 'DELETED'. You may now create as many as you like (they must be unique and at most ten characters).
You must give each Status Code that you create a 'Behavior' value of 'O' (Open), 'C' (Closed) or 'D' (Deleted). You may not delete Status Codes that are already in use on a claim.
When editing the Status Codes in the Setup grid, you may double-click the 'Default' field to toggle between 'True' / 'False' and double-click the 'Behavior' field to toggle between the three types (O, C, and D).
You must set exactly one Status Code to default for each of the three behavior types. You may restrict users from editing this list (and list of claim types) via the Security Setup program > Security > Allow Changes Tab.
Help Menu
TruckMate Help
 Selecting this button will open the Claims topic in the TruckMate Online Help file (the page you are currently viewing).
Service Portal
 Selecting this button will open an instance of your default Internet browsing software, with the https://www.tmwcare.com login page displayed.
About
 Selecting this button will open the standard TruckMate About window, which contains important information about the application you are currently using, including its version number (important for support calls).
Toolbar
Notes
![]() Selecting the notes button will cause a window to open displaying the OSD Notes for the Freight Bill number you are seeking. Here, you can view all relevant notes for this particular Freight Bill. Select different Tabs such as: 'Billing', 'Container', 'Driver', 'OSD', 'Other', and 'Write-Off', to view any relevant information.
Selecting the notes button will cause a window to open displaying the OSD Notes for the Freight Bill number you are seeking. Here, you can view all relevant notes for this particular Freight Bill. Select different Tabs such as: 'Billing', 'Container', 'Driver', 'OSD', 'Other', and 'Write-Off', to view any relevant information.
Attach/Open Related Files
![]() Selecting this option will open the Attach/Open Related Files window, which replaces the 'Files Tab' from older versions of TruckMate.
Selecting this option will open the Attach/Open Related Files window, which replaces the 'Files Tab' from older versions of TruckMate.
Summary Aging
![]() Select this button to view the Summary Aging details for the selected Client (displayed in the 'Claimant' field).
Select this button to view the Summary Aging details for the selected Client (displayed in the 'Claimant' field).
Client Sales
![]() Select this button to open a small window detailing some general sales data for the selected Client (as of the current date).
Select this button to open a small window detailing some general sales data for the selected Client (as of the current date).
Claim History
![]() Select this button to open a small window detailing some general claims data for the selected Client (as of the current date).
Select this button to open a small window detailing some general claims data for the selected Client (as of the current date).
![]() Selecting this option will allow you to send claim details to claim billing parties via the TruckMate E-Mail System. Selectable contacts come from the Billing Tab. By default, all contacts listed in the Billing Tab (that have a fax or e-mail address specified in their profile) are available in the e-mail form.
Selecting this option will allow you to send claim details to claim billing parties via the TruckMate E-Mail System. Selectable contacts come from the Billing Tab. By default, all contacts listed in the Billing Tab (that have a fax or e-mail address specified in their profile) are available in the e-mail form.
However, there is an Application Configurator program > CLAIM.EXE > 'Contacts Displayed inside the E-Mail/Fax Contact List' option that allows you to filter by type (allow any combination of Clients, Vendors, and Drivers). Like e-mailing in other areas of TruckMate, you may setup a template. If you do, you may use place-holder fields in your template from 3 tables:
-
TLORDER: these are for the freight bill associated with the claim.
-
CLAIM: these are the basic fields for the claim (including the 10 User Fields displayed in the User Fields Tab).
-
CLAIMBILL: these are the fields shown in the Billing Tab (including the 3 user fields).
| You may have multiple rows in the Billing Tab, but only one can be used at a time in the e-mail template- so if you use a CLAIMBILL field in your template, it is critical that you first select the right row in the Billing Tab grid before you invoke the 'Send E-Mail' feature. |
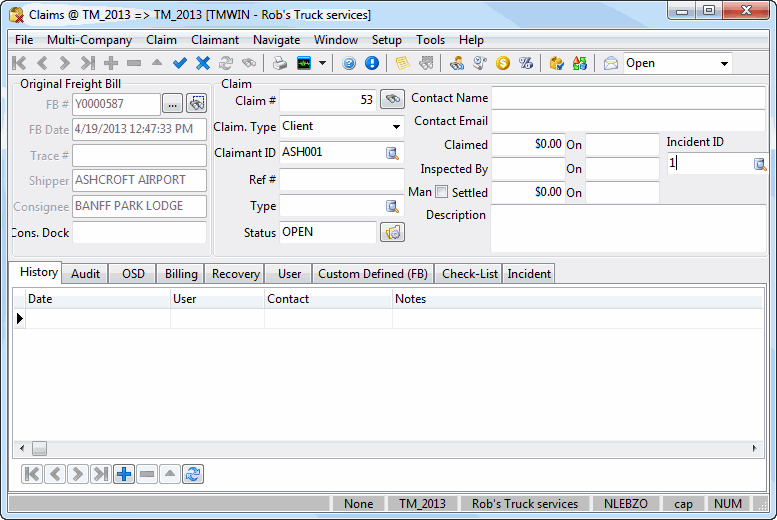
Freight Bill & Claim
Original FB Section
Freight Bill
This entire area will pre-populate once the Freight Bill # is attached. Use the search button to open a search form to find a Freight Bill.
FB Date
The date/time when the Freight Bill was created in the Customer Service program or Quick Bill Entry program.
Trace#
A trace number with a bill of lading trace type or if there is no bill of lading, the trace number with the lowest value (e.g. AAA011 will be displayed over BBB010 regarding of trace type).
Shipper
The name of the shipper on the Freight Bill from the body of the Freight Bill.
Consignee
The name of the consignee on the Freight Bill from the body of the Freight Bill.
Claim info
Claim #
Selecting the plus sign at the bottom right hand side of this program will start a new claim. A new claim number will be automatically generated.
Claimant
By default, the billing party on the Freight Bill is selected and displayed. Select the search button to view possible Claimant names. For further address information, click on the database button and full client information will appear along with a button labeled 'Directions'.
Ref #
Enter your claimant’s (customer’s) reference number here, if applicable.
Type
Double-click to view possible damage types, or use your context menu on this field only to 'Edit Claim Types'. Selecting the 'Edit Claim Types' will allow the Claim Type dialog box to open where you can add or modify a claim type.
Status
When the claim is created, the status is set to 'OPENED' by default. Select the search button to modify this claim’s status. The status of the claim can be one of the following statuses: OPEN, CLOSED, and DELETED.
Contact Name
Enter a contact person’s name for follow up purposes.
Claimed
Enter the dollar amount claimed.
On
Enter the claim date and time. Double-click and it will default to the current date and time.
Inspected by
Enter the inspector’s name.
On
Enter the date and time of the inspection. Double-click and it will default to the current date and time.
Settled
Enter the dollar amount required to settle this claim. This is the amount agreed to between all parties.
On
Enter the date and time this claim was settled. Double-click and it will default to the current date and time.
Description
Enter a description in the space provided.
Incident ID
This is an optional field that allows you to link a Claim to a Safety and Compliance incident. Sometimes the claim is about a shortage or damage of transported goods that is a result of an incident reported in the Safety and Compliance program. In such cased it will be useful to link the claim with the incident that caused the submitted claim. To link the current claim to an incident use the search button to select an incident.
History and Audit Tabs
The History Tab allows you to enter historical information on this claim, such as the reason and/or cause of a damaged product. By selecting the '+' button on the TruckMate Navigation bar below the Grid, the Contact Log window will appear, allowing the User to details regarding the Claim.

Enter useful details such as the person’s name you were speaking with, and any relevant information. Information entered here will be stored in the History Tab of this Claim (designated by its 'Claim #'). Enter the Date and time, contacted person, and notes regarding the communication can be entered, tracked and reported on.
The Audit Tab tracks financial transactions for the claim from its creation through to its disposition. The Audit Grid is automatically populated with this Claim’s information. It could be the date the claim was entered, and any settlements or discrepancies along the way.
OSD Tab
The OS&D/POD Tab allows you to enter details regarding shipments that arrived incomplete, delayed or damaged. If entered on a freight bill, all POD fields will be copied to onto Credit/Rebills.
| This tab can be set to read-only for certain users in certain scenarios by changing the three available Security Setup program > Security > Allow Changes Tab options related to the OS&D/POD Tab. |
OSD Tab
The OSD Tab is where the user can create new over, short or damaged claims against a freight bill.
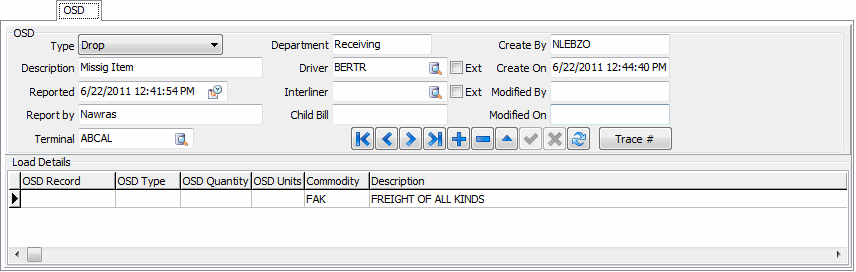
Users can enter multiple OSD records for a single freight bill. Use the '+' button on the navigation bar to enter a new OSD record, and provide details using the available header and grid fields.
Type
The 'Type' field has three possible values ('Pick', 'Linehaul' and/or 'Drop') and basically corresponds to when the OS&D issue was noticed. If there is a shortage or damages when the goods are being loaded, the user would enter 'Pick' in this field. If the driver notices damages during shipment, the user would enter 'Linehaul', and if anything is noticed at the delivery dock, the user would enter 'Drop'.
Description
Enter a relevant description of the occurrence in this field.
Reported
Enter the date the OSD was recorded. You can select the calendar icon to choose the date from a calendar menu.
Reported by
Enter the name of the person who reported this OSD item.
Terminal
Enter the terminal abbreviation here. Double-click to view terminal zones available in the system.
Department
Enter the Department name here.
Driver / Ext
Enter the Driver’s name here. Double-click to view Driver names already in the system.
Interliner / Ext
Enter the Interline name here or select the search button for more choices or to search for the correct name. To view a full profile of the selected Interliner, Right-Mouse click and select 'View in Interliner Profile'.
Child Bill
This is the number of a child bill if the original bill is split. Enter the child bill number in this field if this OS & D record is on a split bill.
Created by / Created On / Modified By / Modified On
These fields will automatically populated with audit information when a new OSD record is entered or when an existing record is modified.
Trace #
Clicking this button will open a pop up window OSD Trace Number where trace numbers can be associated with OSD records. A trace number could be any reference to any entity.

| Field | Definition |
|---|---|
Trace Number |
Enter the desired trace number in this field. |
Quantity |
Enter the quantity related to this trace number. |
Remark |
A free text field to enter remarks about each trace number if wanted. |
| If the user defines 'User-Defined' fields in Codes Maintenance program using the OSD table, and selects the 'CLSIMS.EXE' application to access them, a scroll box will appear besides the header fields displaying the user defined fields. |
Load Details Grid
OSD Type
Double-click the OSD Type field to open the OSD Detail Entry window, which allows you to choose the 'OSD Type' (Over, Short or Damage), the Quantity and Type (unit). Once this window has been accessed and these three fields have been provided, all other fields on the Load Details Grid will be pre-populated with the freight bill information from the Customer Service program > Details Tab.

| If you have configured Claim Types with Claim Type Rules, entering an OS&D record may automatically update the freight bill detail lines on the Details Tab. See the Claims program > Setup Menu > Claim Types window for more information. |
POD Tab
The POD Tab is where the user can create new proof of delivery records for a freight bill.
Type
The 'Type' field has three possible values ('Pick', 'Linehaul' and/or 'Drop') and basically corresponds to when the POD issue was noticed. If there is a shortage or damages when the goods are being loaded, the user would enter 'Pick' in this field. If the driver notices damages during shipment, the user would enter 'Linehaul', and if anything is noticed at the delivery dock, the user would enter 'Drop'.
Description
Enter a description of the POD issue.
Signed by
Enter the name of the person signing off for 'Signed Clean' above.
Signed On
Enter the date the shipment was signed off. Double-click to view calendar.
Trace No.
If there is a trace number associated with the POD issue, enter it in this field.
Driver Counted
Select this checkbox if the driver has made a notation on the bill of lading or delivery receipt that he counted the freight as the shipment was unloaded from the trailer.
Receiver Signed
Select this checkbox if consignee’s/receiver’s signature accompanies notation that shipping particulars and count agree with the bill of lading.
Signed Clean
Select this checkbox if this shipment was signed 'SLC' or if there is a notation that shipment was unloaded according to bill of lading with no noted shortages, overages or damages.
Copy Received
Select this checkbox if a copy of the bill of lading for this shipment was received.
Driver / Ext
Enter the Driver’s name here. Double-click to view Driver names already in the system.
Interliner / Ext
Enter the Interline name here or select the search button for more choices or to search for the correct name. To view a full profile of the selected Interliner, Right-Mouse click and select 'View in Interliner Profile'.
Child Bill
This is the number of a child bill if the original bill is split. Enter the child bill number in this field if this POD record is on a split bill.
Created by / Created On / Modified By / Modified On
These fields will automatically populated with audit information when a new POD record is entered or when an existing record is modified.
Billing Tab
The Billing Tab is the most important section of the Claims program, as it is where the user will add charges to the Claim and determine who will be charged. Once your charges and claimants have been determined, the user can preview and post the claims via the right-click Context Menu, which will move the Claim records forward in the TruckMate system (to either the A/P or A/R modules, and then onward into the General Ledger).

Almost all of the auditing information found in the Billing Grid is fully customizable. This is where the majority of the claim information will be determined and directed into other areas of TruckMate.
Settled
For new records, the 'Settled' field will default to 'False'. Before the detail line can be 'Previewed' or 'Posted' to one of the TruckMate Accounting modules, the user must double-click this field to set it to 'True'.
Claimant Type
The 'Claimant Type' field can be used to select one (of four) possible Freight Bill parties that will have the claim record applied to. Depending on the 'Claimant Type' chosen, the user will have access to specific values in the 'Payment Type' field, as follows:
-
Client: user has access to 'Credit' and 'Pay' Payment Types (see below).
-
Vendor: user has access to 'AP Invoice', 'AR Misc Cash Receipt' and 'Pay' Payment Types (see below).
-
Driver: user has access to 'Deduct' and 'Pay' Payment Types (see below).
-
Other: user has access to the 'Pay' Payment Type (see below).
| If the claim has more than one detail line, the user can specific unique 'Claimant Types' for each line, simplifying the claim entry process. |
Payment Type
The 'Payment Type' field is used to designate which accounting module will receive a specific claim detail line once it has been settled and posted. Only certain Payment Type values are available for use, depending on which 'Claimant Type' is selected for the claim detail line. Just as you can have multiple 'Claimant Type' records in a single claim, you can also have multiple 'Payment Types'. The Payment Types behave as follows:
-
AP Invoice: when creating a claim against a Vendor 'Claimant Type', this option will create a record in the TruckMate Accounts Payable module against that Vendor (including the 'Amount' and 'GL / Bank Account' specified).
Once settled and posted, users will then see these records in the AP Invoice Entry program, where they can be subsequently adjusted and then sent to the AP Invoice Register program for updating into the GLTRANS Table.
-
AR Misc Cash Receipts: when creating a claim against a Vendor 'Claimant Type', this option will create a record in the TruckMate Accounts Receivable module against that Vendor (including the 'Amount' and 'GL / Bank Account' specified).
-
Credit: when creating a claim against a Client 'Claimant Type', this option will create a record in the TruckMate against that Client (including the 'Amount' and 'GL / Bank Account' specified).
-
Deduct: when creating a claim against a Driver 'Claimant Type', this option will create a deduction record in the Driver Payable Audit program against that Driver (including the 'Amount' and 'GL / Bank Account' specified). This record can then be posted using the Driver Deduction Register program.
-
Pay: when creating a claim against a Driver, Client or Vendor 'Claimant Type', this option is available. The behavior of claim detail lines specified as 'Pay' will be different depending on the 'Claimant Type' chosen:
GL Account
Enter the GL Account that will be used for the Claim amount.
Bank Account
Enter the Bank account that will be used for the Claim amount.
Amount
The 'Amount' field is used to enter the dollar amount that will be applied as the selected 'Payment Type' against the selected 'Claimant ID' for the selected detail line of the claim.
| You may enter negative amounts against a Vendor 'Claimant Type' when using the 'AP Invoice' 'Payment Type' option. After the AP Register program is run, this negative amount will show up in the AP Inquiry program > Pay Bills window, which can then be deducted from a check to the Vendor. |
Tx Type / Deduction Code
Depending on the 'Claimant Type' and 'Payment Type' combination, the available values for this field will differ. When working with 'Client' or 'Vendor' claimants, this field will be a drop-down menu with a limited number of options. When using a 'Driver' claimant, this field will become an edit pick field. Double-clicking this field with a 'Driver' claimant will grab all the Deduction Codes entered against the Driver Contract (in the Driver Pay Contracts program) that the chosen Driver ID is assigned to (in the Driver Profiles program).
Check Number
The Claims program will update the check number in the Claim module’s Billing grid for checks to vendors and for AP Invoices (when check run through check register - based on a config).
User Field 1 - User Field 3
These three user fields can be used to input any other miscellaneous information related to a billing party (client, vendor, driver, or other) on the claim.
Context Menu
Claimant Info (Billing)
Clicking this button will bring up a window with the all available Profile information for the selected 'Claimant ID' on the detail line.
Audit Billings
After a Freight Bill is posted, the Audit button opens the audit information in the GL Journal Entries program for the current Freight Bill.
Preview Billings
The Preview button displays a preview of what the GL Summary posting will look like for the current Freight Bill.
Post Billings
The Post button posts the current Freight Bill to the GL, changing it’s status to 'Posted' in other TruckMate programs.
Toggle Payment Hold
![]() When the user has selected a Vendor as the 'Claimant Type' on a claim detail line, they may use the 'Toggle Pmt Hold' option to flag the 'Payment Hold' option (on the Customer & Vendor Profiles program > Vendor > Accounts Payable Tab) for that Vendor, moving them into payment hold status. After selecting this option, you will not be able to create new checks for the selected Vendor. This is useful if a vendor acknowledges liability of a claim but refuses to pay- you can withhold your payments to them until the claim recovery amount is paid. Vendors with this flag enabled will also be excluded from the AP Inquiry program > Pay Bills window.
When the user has selected a Vendor as the 'Claimant Type' on a claim detail line, they may use the 'Toggle Pmt Hold' option to flag the 'Payment Hold' option (on the Customer & Vendor Profiles program > Vendor > Accounts Payable Tab) for that Vendor, moving them into payment hold status. After selecting this option, you will not be able to create new checks for the selected Vendor. This is useful if a vendor acknowledges liability of a claim but refuses to pay- you can withhold your payments to them until the claim recovery amount is paid. Vendors with this flag enabled will also be excluded from the AP Inquiry program > Pay Bills window.
| If there are unposted checks in the system for this Vendor when you check this option, the program will issue a warning. |
Recovery Tab
The Recovery Tab displays the recovery of a claim and how it is allocated by the following: Driver, Insurer, Carrier, Salvager, and/or Other. Whatever cannot be recovered is the difference between the amount settled and the amount claimed. This difference is the Denied portion of the claim and is reflected in the 'Denied' section. The Denied portion is reflected in the 'Net FB Chg’s' section.
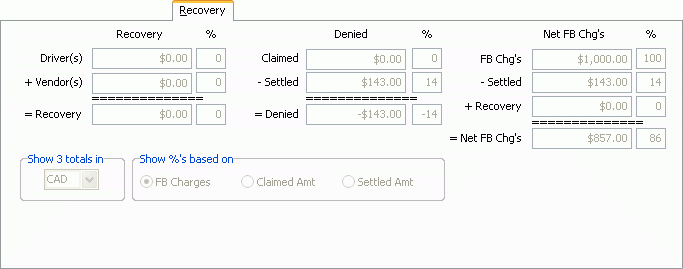
The Recovery column also allows you to track how much money you are able to recover, and how that breakdown works in regards to the different departments responsible. You can enter any amounts you were able to recover from say, the driver involved, the insurance company, the carrier, salvager, or other. From there, it’s easy to calculate what percentage of the claim that would be equal to.
The Denied area allows you to track the amount of money claimed, what the claim was actually settled at, and the amount of money denied for this claim.
The Net FB Charges area allows you to match the Freight Bill charges, if any, to this claim. Plus, enter the settled amount, and any recovery amount received, to reach a Net Freight Bill Charge, if applicable.
Show 3 totals in
Use the pull down menu to show the totals in Canadian or US funds.
Show %'s based on
Use the radio options to show the percentages based on the Freight Bill Charges, Claimed Amount, and/or Settled Amount.
User Tab
The User Tab displays the values that have been entered in the available User Defined fields in the Claims program.
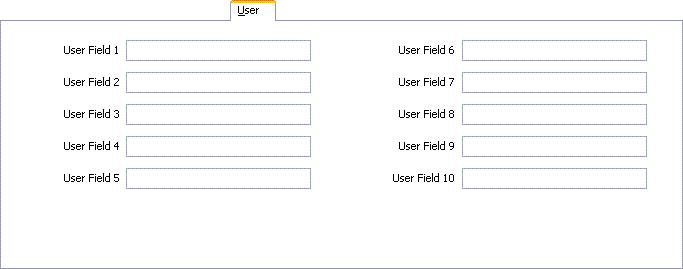
| Use the Application Configurator options for CLAIM.EXE to configure your ten free format fields. |
User Field 1 - User Field 10
In the Customer Service program and Quick Bill Entry program, you can invoke a form with ten free format fields by using the <CTRL><U> hot key combination. The labels for each of these fields can be configured here. Enter the new labels in the Value field. Enter in claim information in these user definable fields for information or reporting purposes.
Custom Defined (FB) Tab
The Custom Defined (FB) Tab lists any Custom Defined Fields that have been added to the Claims program in Codes Maintenance > Custom Defined Fields Setup.
Check-List Tab
The Check List Tab lists any number of 'Check List' items that are required before a Freight Bill can go through the Approval process and onto the Dispatching process. These Check List items are based on the 'Bill To' Customer Code, and are added/modified to your system’s Customer Codes in the Customer & Vendor Profiles program > Freight Bill Checklist Tab. The Check List items themselves are added to your Database using the Codes Maintenance program > Check List Tab.
If the 'Bill To' Customer Code you have chosen has 'Check List' items in it’s Customer Profile, several fields on this Tab will populate with data when they are added to a new Freight Bill. Double clicking on a detail line will set the 'Completed' field to 'True' and will populate the 'Completed By' and 'Completed Date' fields automatically. The User has the option of entering any comments in the 'Comments' field regarding the documents that have or have not been received.
Setup (creation of master list) will be done via the existing Codes Maintenance program > Check-List Tab. Like Freight Bill check-list items, you will be able to set the conditions for how / when a check-list item is to be added to a claim: never (manual add only), always, or when certain conditions apply. The "when" condition will be when the claim amount is above or below (you choose) a certain dollar amount (that you specify).
| You will be able to restrict access to this new Claims Tab (or any claims tab) by user or user group via the Security Setup program > Security > Tabs Setting section. |
Incident Tab
This tab is a read-only tab that displays the details of the incident linked to the selected claim. The link can be made using the optional field Incident ID (described above). Sometimes the claim is about a shortage or damage of transported goods that is a result of an incident reported in the Safety and Compliance program. In such cases it will be useful to link the claim with the incident that caused the submitted claim.
Other Functions
Status Filter
Choosing any of the options in the Status Filter will sort the available Freight Bills by that status (ex: checking 'Closed' will display all Freight Bills with 'Closed' status).
Find by
You have two choices. You can select to find claim information by claim or Freight Bill information. Your selection here will cause the find dialog box to show the relevant options. For example, if you select 'Claim' and then select 'Find', the option that appear in the Find an open claim dialog box will be: Claim #, Claimant, Claimant’s Ref #, and Type.