Bank Reconciliation

The Bank Reconciliation program is used to compare your bank statements with your deposits and checks, and to flag checks and deposits as 'cleared' when they appear on your bank statements. Also, you can record adjustments to your bank accounts from service charges and interest payments.
As you clear deposits and checks, the totals displayed at the bottom of the screen will be updated. When the Difference is equal to zero, click the 'Done' button to complete the reconciliation. The Done button will display the Report Selection form. The Crystal Report template supplied with the TruckMate system is called 'BANKREC.RPT'. After selecting the desired report (using the Report Selection form) the report will preview to the screen. Click the printer icon at the top of the screen to send the report to the printer that is configured as the default printer for your workstation. See the Basics documentation for more information on report functions. After the report is run, the system will create journal entries in the GL Journal Entries program for the interest and service charge amounts, and will change the Cleared status of included deposits and payments from 'INPROG' to True.
The Bank Reconciliation program screen is divided into the following areas - bank and statement information, general ledger adjustments, transactions to clear, and summary information.
To access Bank Reconciliation:
| From this location | Go to |
|---|---|
TruckMate Menu and TruckMate Task List |
Accounting & Finance > Accounts Payable > Bank Reconciliation |
Windows Start Menu |
TruckMate 20xx > Bank Reconciliation |
Windows Explorer |
C:\Program Files (x86) > TruckMate 20xx > ChkRec.exe |
How Do I?
How do I Reconcile my Bank Account?
The Bank Reconciliation program is used to compare your bank statements with your deposits and checks, and to flag checks and deposits as "cleared" when they appear on your bank statements. Also, you can record adjustments to your bank accounts from service charges and interest payments.
-
Open the Bank Reconciliation program (CHKREC.EXE).
-
Use the top right-hand navigation bar to scroll through your banking accounts and find the banking account you wish to reconcile.
-
The 'Last Date' and 'Opening Balance' fields should be pre-populated from last month’s reconciled bank statement.
-
'New Date' and 'Ending Balance' information will be taken from the bank statement you are attempting to reconcile.
-
Select 'Payee Type' for all or just the ones you wish to obtain information regarding.
-
Total all bank service charges, interest earned, with appropriate date(s), and the GL Account you wish this information posted to—enter this information in the fields entitled 'General Ledger Adjustments'.
GL Adjustments should contain items not already entered through the Checks or Deposit system. The Deposits Tab will not appear until checks have been run through the GL Journal Entries Register program.
-
Upon completion of this reconciliation, a Journal Entry will be created.
-
You should have on hand a recent bank statement showing recent payments and deposits your company has cleared at the bank over the last month. Compare these statements against this program to verify information. Clear any checks and/or deposits that have gone through your bank, and you will then be aware of any outstanding checks or deposits. Your 'difference amount'--showing at the bottom of the screen should be zero upon completion of this process.
Menu Bar / Toolbar
File Menu
Print Reports
 Selecting the Print Reports button will bring up the report selection window, common to many TruckMate applications. Here, you will select a report file from those available in your system and a Crystal Report will be generated.
The Crystal Report template supplied with the TruckMate system is called 'OSCHEQUE.RPT'. After selecting the desired report (using the Report Selection form) the report will preview to the screen. Click the 'Printer' icon at the top of the screen to send the report to the printer that is configured as the default printer for your workstation.
For more information on Report functionality in TruckMate, see the Crystal Reports Reference.
Exit
 Selecting this option will close the Bank Reconciliation program.
Multi-Company
For more information on the Multi-Company options available from the Menu Bar, see the Multi-Company documentation.
Navigate Menu
The Navigate Menu contains the normal TruckMate Navigation Bar, used to browse through your Database records, and the following options:
Find
 Click this button to open a search form that you can use to find a specific GL 'Bank' Account in your system.
Tools Menu
TruckMate Monitor
 Click the down arrow next to this button to access the various functions of the new TruckMate Monitor.
Remember Position / Size
Selecting this option will maintain the program window position and size upon close. When the program is re-opened, it will appear the same.
Clear By Range
![]() Clicking this button brings up the Clear Payments by Range window that assists in filtering your checks.
Clicking this button brings up the Clear Payments by Range window that assists in filtering your checks.
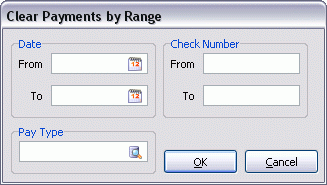
| Field | Definition |
|---|---|
Date |
Click on the 'Calendar' button in both the 'From' and 'To' fields to select a date range. Clicking the 'OK' button will strikeout all checks in the 'Payments' grid within the date range. |
Check Number |
Enter check numbers into both the 'From' and 'To' fields to set a range. Clicking the 'OK' button will strikeout all checks in the 'Payments' grid within the integer range. |
Pay Type |
Use the search button menu to filter checks based on the Pay Type: D=Driver, E=Employee, V=Vendor. Clicking the 'OK' button will strikeout all checks in the 'Payments' grid with the selected pay type. |
Void Check button
 When you click this button, you will strikeout the current check in the 'Payments' Grid, Voiding it. To update the voided check, you must do so in the Check Register program.
View Direct Deposit Details
This menu option allows the user to drill down the transactions to their details, if selected, it invokes the 'Direct Deposits Drill-Down form'. In order for this menu option to be visible a configuration option 'Allow Details on Direct Deposit' must be set to 'False' under 'CHKREC.EXE' in the Application Configurator program, and for a specific user to be able to access this menu option a security setup option 'Allow View of Direct Deposits' must be set to 'True' for that user in Security Setup program > Security > Allow Changes.
Bank Cross Reference (Import)
 The Bank Cross Ref (Import) feature allows you to select a import file to compare with the bank and statement information currently displayed in the program window.
Complete Bank Reconciliation
 When finished with the details of the current bank account’s data, click this button to begin the Reconciliation process. You must have both of the 'Last Date' and 'New Date' fields of the 'Bank Statement Information' section populated for this process to succeed. You will be prompted to click 'Yes' before the process begins. Once complete, all check records for the selected bank account will be removed from the 'Payments' tab grid.
Window Menu
Check Register
 Selecting this option will open an instance of the Check Register program.
GL Journal Entries
![]() Selecting this option will open an instance of the GL Journal Entries program.
Selecting this option will open an instance of the GL Journal Entries program.
GL Journal Entries Register
Selecting this option will open an instance of the GL Journal Entries Register program.
Help Menu
TruckMate Help
 Selecting this button will open the Bank Reconciliation topic in the TruckMate Online Help file (the page you are currently viewing).
Service Portal
 Selecting this button will open an instance of your default Internet browsing software, with the https://www.tmwcare.com login page displayed.
About
 Selecting this button will open the standard TruckMate About window, which contains important information about the application you are currently using, including its version number (important for support calls).
Header Information
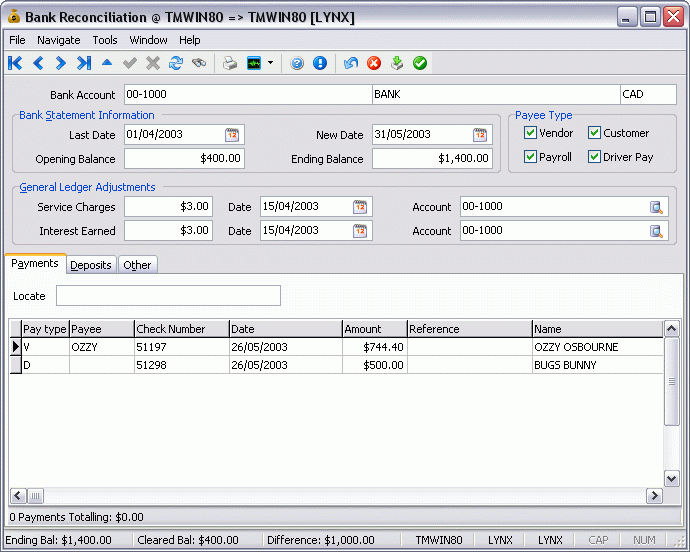
Bank & Statement Information
Bank Account
Choose the Bank Account that you want to reconcile by using the arrows on the Navigator Bar. Only General Ledger accounts of the type 'Bank' will be available for selection.
Last Date
When you have completed the bank reconciliation for this account and clicked the Done button at the bottom of the screen, the Last Date field will be updated to the same date as the New Date.
Opening Balance
When you have completed the bank reconciliation for this account and clicked the Done button at the bottom of the screen, the Opening Balance field will be updated to the same amount as the Ending Balance.
New Date
Enter the date of your bank statement. Double click for a calendar selection form.
Ending Balance
Enter the balance shown on your bank statement.
Payee Type
The Payee Type section allows you to filter which checks you would like to see displayed in the Payments tab check grid. Click the checkbox option for either 'Vendor', 'Customer', 'Payroll', or 'Driver Pay' to filter the grid based on what is checked.
General Ledger Adjustments
The Service Charges and Interest Earned section forms the basis for journal entries that are created when the 'Done' button is clicked. These journal entries can be viewed using the GL Journal Entries program. They must be updated using the GL Journal Entries Register program before they will be included in your account summaries.
Service Charges
Enter the total amount of service charges from your bank statement.
Date
Enter the date of the bank statement. Double click for a calendar selection form.
Account
Select the GL account that will be debited for the service charge amount. The Bank account specified in the header will be credited for the service charge amount.
Interest Earned
Enter the total amount of interest from the bank statement.
Date
Enter the date of the bank statement. Double click for a calendar selection form.
Account
Select the GL account that will be credited for the interest earned amount. The Bank account specified in the header will be debited for the interest earned amount.
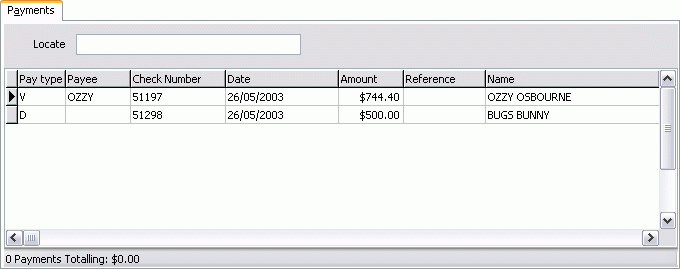
Payments Tab
The Payments Tab displays a list of checks. If the corresponding check appears on your bank statement, double click on the item in the grid. The text will turn from black to grey, and the Cleared status will change to 'INPROG'. You can change an item’s Cleared status back to False by double clicking on it again.
Context Menu
Clear by Range
To clear a batch of checks, select this item from the context menu in the Payments grid, a new window will appear (see above for details). Choose two Dates by clicking on the calendar buttons and selecting the appropriate Date Range, or create a range by using two Check Numbers in the 'From' and 'To' fields, or use both.
| The program logic for the Check Number 'From' and 'To' fields is based on an Integer comparison. For example, if you entered a '3' in the From range of checks to be cleared, all checks greater and including '3' (e.g. 3, 4, 5) would be cleared (up until the value stated in the 'To' field). Each of the checks included in this range will turn from black to grey, and the 'Cleared' status will change to INPRG (not INPROG). |
Void Check
Will create reversing entries for this check that will be updated to the GL Journal Entries program the next time the A/P Check Register program is run, and will return invoices to an un-paid state. Also, the check will have the status of 'VOID', as displayed in the A/P Inquiry program. To enable this option, go to the Security Setup program, Security tab, Business Events tab.
View Direct Deposit Details
This option (available also in the tools menu) allows the user to drill down the transactions to their details, if selected, it invokes the 'Direct Deposits Drill-Down form'. In order for this menu option to be visible a configuration option 'Allow Details on Direct Deposit' must be set to 'False' under 'CHKREC.EXE' in the Application Configurator program, and for a specific user to be able to access this menu option a security setup option 'Allow View of Direct Deposits' must be set to 'True' for that user in Security Setup program > Security > Allow Changes.
Bank Cross Ref (Import)
The Bank Cross Ref (Import) feature () allows you to select a import file to compare with the bank and statement information currently displayed in the program window.
When you select this feature, you are prompted to select an import file. If this file is neither in OFX format nor in the TruckMate former standard format (having a row starting with "Date", followed by rows with a date in mm/dd/yy format in bytes 4-11, a bank transaction ID in bytes 53-72 and a check number in bytes 81-100), then you will get an error. Otherwise, you will get a summary message stating how many bank transactions were read from the file and how many of them were auto-matched to TruckMate bank rec items.
| Note that the process can only auto-match a bank transaction to a TruckMate transaction if there is a one-to-one relationship; for example, if your bank statement lists a daily deposit figure, and this is made up of several TruckMate cash receipt figures, then you must manually match or reconcile these cash receipts. It also only matches against items displayed in the app’s main form; so you may want to consider checking all the Payee Types before running this tool. |
A screen will appear (Bank Statement Import) that lists all the transactions read from the file:
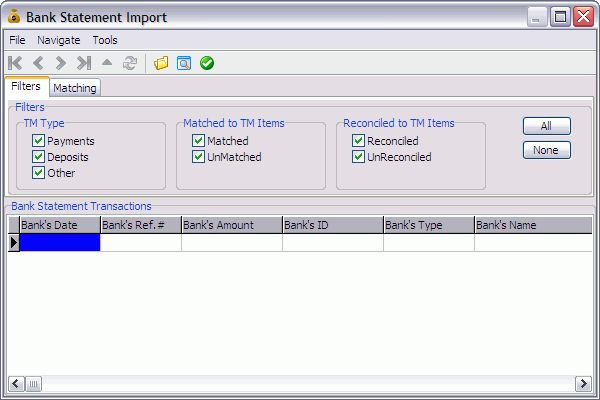
It includes various fields read from the file (Date, Ref.#, Amount, ID, Type, Name, and Memo), as well as three columns indicating the auto-matched status: TM Trans.Type (in which P=payment, D=deposit, and O=other/misc), Matched count (one or zero, depending if a match was found), and Reconciled count (of the matched items, the number that are already reconciled).
You may filter this list by TM types and whether or not the transaction is matched or reconciled.
You may also change the rules or level for auto-matching. By default, payments are auto-matched if both check number and dollar amount match. You can relax this requirement to match on check number only, regardless of dollar amount. Or, you may make the rule more restrictive and only auto-match if check number, dollar amount, and date all match. There are similar auto-match level/rule options for deposits and other/misc. If you change the rules, you must reload the file (accessible from top menu or toolbar button) as the auto-matching is only done when a file is loaded.
To view more transactions at once, you may choose the Full Screen option (accessible from top menu or toolbar button); this toggles whether the top section (filters/matching ) is shown or hidden.
You may double-click any transaction listed in the grid to bring up a form (Bank Statement Transaction) showing details for that single bank transaction.
Besides displaying more details (more info about the TM item), the Bank Statement Transaction screen allows you to: a) change the TM transaction type (if you do, you will unmatch all items for the bank transaction), b) manually match individual items (e.g. if the bank transaction actually matches multiple TM items) or c) unmatch individual items. Changing the TM Type can be done via the drop-down (you must then click the + button beside it to commit the change). Matching and unmatching is done via the bottom navigation bar’s + (or grid double-click) and the - button, respectively. On an add (+ or double-click), you are presented with a pick list of TM transactions from the main screen (using the filters you applied there), that have not yet been matched (they may or may not be reconciled already). As you add items, a total of your matched items displays at the bottom. Also, a difference figure between the bank transaction’s dollar amount and this total is displayed. This way, for example, when you are manually matching several TM cash receipts against a single bank deposit figure, it helps prevent you from missing one (or matching one too many).
Once all the bank transactions have been matched (or as many as you want to match using this tool), in the Bank Statement Import screen, choose the "Apply" menu item or toolbar button. This will reconcile all the items that are matched but not yet reconciled. Close the form and you will see the items reconciled (grey and crossed out) in the three grids in the app’s main form.
Deposits Tab
The Deposits Tab displays summaries from the A/R Cash Receipts Register and the COD Payable Register programs. Only registers that have been updated using the GL Journal Entries Register program will be displayed. Manual journal entries made to the selected back account in the GL Journal Entries program will also be displayed (after they have been updated using the GL Journal Entries Register program). Manual journal entries that credit the bank account will display as negative amounts. If the corresponding deposit appears on your bank statement, double click on the item in the grid. The text will turn from black to grey, and the Cleared status will change to 'INPROG'. You can change an item’s Cleared status back to False by double clicking on it again.

Other Transactions Tab
Entries posted through the General Ledger Journal Entry program, and then posted using the GL Journal Register program, will appear in the Other Transactions Tab.

Example:
A bank reconciliation adjustment was needed and so I made two entries (debit/credit) using the GL Journal Entry program. Then, I posted these entries using the GL Journal Entry Register program and when I went into the Bank Reconciliation, I saw this entry in the 'Other' tab. See the sample image above.
Summary Information
As you clear the items on the Payments, Deposits, and Other tabs, the summary totals change at the bottom of the page. Ultimately, the goal is to clear all of your payments, deposits, and adjusting entries so that the cleared balance (which is made up of these totals) matches the ending balance on your statement.
When you have reconciled your recorded activities against the bank’s statement of your activities and made adjustments if necessary, click on the Done button to complete the reconciliation.