Purchase Orders

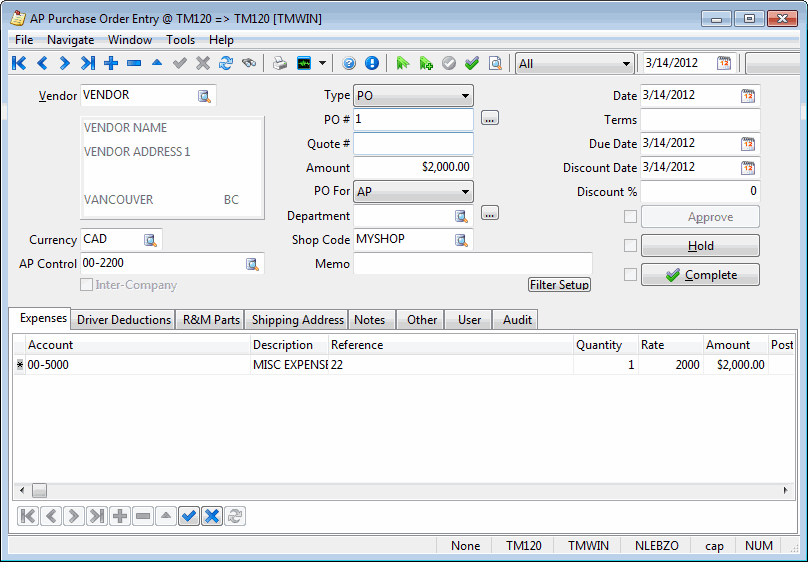
Finally, control over your Purchase Orders, and the accompanying approval process. A/P Purchase Order Entry allows you to enter and track all POs and Quotes submitted to and returned from your vendors. When your purchase order is approved, it transfers directly into A/P Invoice Entry.
The program screen is divided into the following areas: Purchase Order Entry Header, Transaction Details Grid and Special Functions / buttons.
-
The Purchase Order Entry Header occupies the top 1/2 of the screen. This is where the vendor is specified, your purchase order number, a quote number, etc.
-
The Transaction Details are where additional information about the purchase order are entered. These details are essentially the same as the details for A/P invoices. The data keyed in here will also be copied over to the A/P invoice if the PO is approved and completed.
-
The Menu Bar / Toolbar buttons are at the top part of the program screen. You can filter for PO’s in various stages of processing, check to see if the GL expense distribution balances, or even copy the PO into memorized transactions if it is going to be a recurring purchase.
To access Purchase Orders:
| From this location | Go to |
|---|---|
TruckMate Menu and TruckMate Task List |
Accounting & Finance > Accounts Payable > Purchase Orders Also, in TruckMate 2022.x and earlier: Repair & Maintenance > Purchase Orders |
Windows Start Menu |
TruckMate 20xx > Purchase Orders |
Windows Explorer |
C:\Program Files (x86) > TruckMate 20xx > ApPo.exe |
How Do I?
How do I View all POs and Quotes Entered?
-
Open the Purchase Order Entry program (APPO.EXE).
-
Go to the 'Filter' button near the left-hand bottom of the screen and use the pull-down menu to modify the filter choice in order to find the PO/Quote you seek. The choices are: All, Complete, Approved but not complete, Not Approved, and Not Complete. Selecting a filter will allow you to view only the Pos or Quotes relevant to your search.
-
After ensuring your PO or Quote has been approved, you may want to enter an invoice as your next step.
How do I Create a Purchase Order or Quote?
-
Open the Purchase Order Entry program (APPO.EXE).
-
Select the '+' button to add a new record.
-
Tab through the fields, entering information as you go. When you come to the 'Type' field, use the pull-down menu to select either 'PO' or 'R&M'. If you are making an R&M PO, see below.
-
Your PO number can be automatically generated or you can manually add a PO number of your choice. An error message will appear after you attempt to save the information if the PO number you chose is already in use.
-
Once you’ve completed the header part of this program, select the appropriate tabs relevant to your purchase, and enter the information necessary in the fields provided. This is optional- you can move forward in your PO process without completing any of these fields.
-
If you have approving power, select 'Approve' and move forward with your PO process.
-
TruckMate assigns 'Complete' status automatically when the invoice is updated through the Accounts Payable Invoice Register program.
-
If this is a purchase order you will have to re-enter often, select the
 Memorize Transaction button on the navigation bar in the center of the screen. Then, the next time you need to enter this purchase order, select Recall Memorized Transaction button to save time.
 -
Print a copy of the PO for your records.
-
Select the 'GL' button to view how the transaction will appear as a journal entry. If needed, print a copy of this for your records as well.
-
Your next step is to wait for Approval. You can always view all your PO’s and Quotes while awaiting approval to see where they are in the approval process. Once you obtain approval for this PO, open the AP Invoice Entry program, locate this PO number, and create an invoice from this PO.
How does A/P Purchase Order Entry interface with the A/P Invoice Entry program?
In this example you will see how to use Purchase Orders to create Invoices in the A/P Invoice Entry program.
-
Open the Purchase Order Entry program (APPO.EXE).
-
Setup a Purchase Order using the above previous How Do I? topic. Check the GL Tab to ensure that the 'Debits' and 'Credits' balance- an amount is required in both of these fields.
-
Approve the Purchase Order by clicking the
 Approve button on the toolbar, or by using the <CTRL><A> hot key combination.
 -
Open the AP Invoice Entry program (APNE.EXE), click: Start > Programs > TruckMate > Accounting & Finance > Accounts Payable > AP Invoice Entry
-
Click the
 Create Invoice from Purchase Order button, or add a new Invoice and enter a Vendor ID, then double-click the 'PO number' field to see available Purchase Orders (only Approved PO’s will appear, not PO’s that have a Complete status). Select the Purchase Order you wish to use.
 -
Save the Invoice by clicking the 'checkmark' button in the TruckMate Navigation bar.
-
Open the AP Invoice Register program (APNR.EXE), click: Start > Programs > TruckMate > Accounting & Finance > Accounts Payable > AP Invoice Register
-
Process the Invoice through the Register. For help with Posting Invoices to the Register, click here.
-
Now, back in the AP Purchase Order Entry program (APPO.EXE), the PO will have a Complete status, meaning it has been properly processed and cannot be added to an Invoice again.
How Do I Use a Purchase Orders in the R&M Work Orders program?
-
If your Purchase Orders contain Repairs & Maintenance information, you will have to interface them with the R&M Module.
-
Follow the steps in the above topic "How Do I Enter a Purchase Order or Quote?". Make sure that for the 'Type' field, you select 'R&M'.
-
Make sure you enter the R&M information for the PO on the R&M Parts Tab.
-
Open the R&M Work Orders program (RMWO.EXE), click: Start > Programs > TruckMate > Repair & Maintenance > R&M Work Orders
-
Click the '+' button at the bottom edge of the R&M Work Orders program to create a new Work Order. Fill in the required details in the Header Section.
-
Click the Vendor Bills Tab. Click the '+' button on the lower part of this Tab to add a new Detail Line.
-
Double-click in the 'Vendor' field to open a selection form where you will see a list of your Vendors. Select the Vendor that you created the PO for.
-
Double-click in the 'PO Number' field to open a second selection form, where you will see a list of 'Approved' PO’s for the Vendor you have chosen. Select the PO with the R&M information and it’s details will populate into the Work Order.
-
'Complete' the Work Order through the Billing Tab when you are finished, and then update it through the R&M Work Orders Register program to complete the process.
Menu Bar / Toolbar
File Menu
Print Reports
 Selecting the Print Reports button will bring up the report selection window, common to many TruckMate applications. Here, you will select a report file from those available in your system and a Crystal Report will be generated.
For more information on Report functionality in TruckMate, see the Crystal Reports Reference.
Exit
 Selecting this option will close the A/P Purchase Order program.
Multi-Company Menu
For more information on the Multi-Company options available from the Menu Bar, see the Multi-Company documentation.
Navigate Menu
The Navigate Menu contains the normal TruckMate Navigation Bar, used to browse through your Database record
Find
 Click this button to open a search form that you can use to find a PO in the system. You have the ability to search for PO Numbers by Date. Select the 'Date' option on the right side of the screen and then enter a date ('yyyy-mm-dd' format) and click the type the <Enter> key on your keyboard. All Purchase Orders with that Date will appear in the search window.
Tools Menu
TruckMate Monitor
 Click the down arrow next to this button to access the various functions of the new TruckMate Monitor.
Remember Position / Size
Selecting this option will maintain the program window position and size upon close. When the program is re-opened, it will appear the same.
Memorize Transaction / Recall Memorized Transaction
These two buttons- located to the right of the record navigation bar- allow you to save a copy of the current PO as a memorized transaction. This is useful if you have recurring purchases with the same vendor, such as office supplies.
-
Memorize Transaction
 Clicking on this button opens the Memorize Purchase Order window, where you can apply different options to the memorized transaction.
-
Save Transaction Tab
The Save Transaction Tab allows you to give the memorized transaction a label to differentiate it from other memorized purchase orders. The Remind / Don’t Remind options let you specify if the purchase orders program should remind you that this memorized transaction is due to be used again. You can of course simply ignore the reminder when it appears. If you do, the program will not remind you again until recall the transaction and the Next Date value is reset.
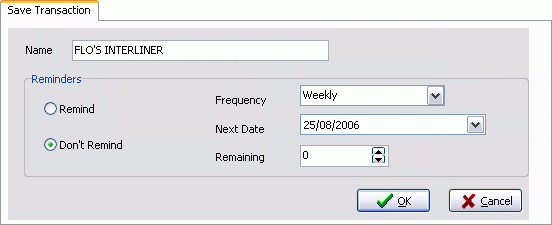
Field Definition Name
This field displays the Vendor Name for which you are creating Memorized Transactions.
Remind / Don’t Remind
Select one of the available radio options to toggle reminder functionality on / off.
Frequency
The 'Frequency' field lets you select the interval between reminders using a drop-down menu.
Next Date
The 'Next Date field', as already mentioned, is set based on the current use, plus the interval. It is reset based on the same calculation the next time you recall the transaction.
Remaining
The 'Remaining' field keeps track of how many times you have left to recall the memorized transaction. After the remaining runs out, you will no longer be allowed to recall this transaction.
-
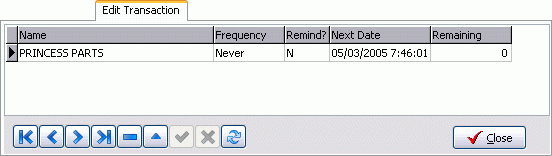
Edit Transaction Tab
The Edit Transaction Tab allows you to delete or fix memorized transactions. You can change the any of the settings listed in the grid: reminder frequency, if reminders are required, etc.
-
-
Recall Transaction
Click the Recall Transaction button to open a selection window containing all of the Memorized Transactions previously created on this database. Double-click one of these entries to view its details.
Toggle PO Approval
Click the 'Approve PO' button after the PO has gone through the approval process, and been approved for purchase. You can also un-approve the PO by clicking on this button if the PO is marked 'Approved'.
View GL Report
 Selecting this button will open a Report Preview window that will show whether or not the resulting GL entries will be in balance or not.
Window Menu
Customer & Vendor Profiles
![]() Selecting this option will open an instance of the Customer & Vendor Profiles program.
Selecting this option will open an instance of the Customer & Vendor Profiles program.
AP Invoice Entry
![]() Selecting this option will open an instance of the AP Invoice Entry program.
Selecting this option will open an instance of the AP Invoice Entry program.
Help Menu
TruckMate Help
 Selecting this button will open the A/P Purchase Order topic in the TruckMate Online Help file (the page you are currently viewing).
Service Portal
 Selecting this button will open an instance of your default Internet browsing software, with the https://www.tmwcare.com login page displayed.
About
 Selecting this button will open the standard TruckMate About window, which contains important information about the application you are currently using, including its version number (important for support calls).
Toolbar
Filter
Filters POs/Quotes by 'Not Approved', 'Not Complete', 'Approved but Not Complete', 'Complete', and 'All'.
Default Date
This controls what date will be used in new PO’s that are entered. By default the value is 'today'. If you are entering back-dated, or future vendor PO’s, set the date to the previous or future date.
Purchase Order Entry Header
Vendor
Enter a vendor code, or select a vendor from the search form by clicking the search button. Vendor codes are configured in the Customer & Vendor Profiles program. The Vendor name and address details will appear in the fields below.
Currency
The default currency of the invoice is the currency assigned to the vendor in the Customer & Vendor Profiles program but you could change to another currency by clicking on the search button. If you did not assign a currency to the vendor’s profile, enter the currency code or click the search button for a search form. Currencies are configured in the Codes Maintenance program.
| Unlike AP Bill Entry and Instant Checks, regardless of whether or not you have set up intercompany (I/C) accounts for each currency in company profiles, the GL displayed in Purchase Orders will still only show a single I/C row per company (in that company’s base currency). The reason is that purchase orders are not posted to the GL (and hence will not have to be reconciled). |
Account Payable Control
Select the appropriate General Ledger Account for the item to be purchased and/or that you are receiving a PO or Quote on. The Account Description of the GL Account you select here will populate into the 'Expenses' Tab Grid, so that you can easily tell which GL Account you are working with.
Type
Select either PO (Purchase Order) or Quote.
Purchase Order / Quote Number
Enter the appropriate number from your files, or click on the search button to the right of the field to auto-fill this value with the next available number from the system counter. This number can be up to 20 characters in length.
Amount
Enter the dollar amount of the Purchase Order/Quote.
PO For
Use this drop-down menu to specify if the Purchase Order is intended for the A/P or R&M module.
Department
Enter a Department name, if applicable.
Shop Code
Choose the Shop Code of the Shop conducting the repairs by using the search button.
Memo
Enter any relevant free format notes about the PO or Quote in the Memo field.
Date
Enter the date the Purchase Order/Quote was obtained, unless this populates automatically.
Terms
Enter any agreed upon terms, unless this populates automatically from the Vendor Profile program.
Due Date
Enter the due date for the monetary transaction, unless this populates automatically from the Vendor Profile program.
Discount Date
Enter any appropriate discounts offered, unless this populates automatically from the Vendor Profile program.
Discount %
Enter the discount percentage, unless this populates automatically from the Vendor Profile program.
Approve
Selecting this button will approve the displayed Purchase Order. To be able to approve a PO, the User must have the appropriate security rights in the Security Setup program. When a PO has been approved, the checkbox next to the Approve button will be flagged.
Hold
Set this button if the Purchase Order has been placed on hold. When the 'Hold' button is checked, the PO will still be processed through to Accounts Payable, and the invoice will be updated through the A/P Invoice Register program, but in the A/P Inquiry program the invoice will be flagged as an 'On Hold' invoice. The column called 'Hold' (True or False) would in this instance show as 'True'. When a Purchase Order is set to 'Hold', the check mark next to the 'Hold' button will be flagged.
Complete
Set this button once the PO/Quotes process has been completed. After the 'Complete' button is selected, the checkbox next to the button will be flagged. Simply uncheck this flag in order to reverse a 'Completed' PO, setting it back to 'Not Complete' Status, which allows editing.
Filter Setup
This button is found in many TruckMate applications. Selecting this button opens the SQL Filter window. For details on SQL Filters Click Here.
Transaction Details
Expenses Tab
The Expenses Tab details the expense distribution for the purchase order charges. Enter the Account number, any reference information, the quantity of items required, the rate/per item purchased, the dollar amount, and posting amount. In the Vendor Profiles program, you could input default G/L accounts so that any time you enter an invoice or a PO regarding a particular vendor, it will automatically distribute or post to the G/L account specified. This will automatically distribute expenses, if the Vendor Profile has been set up to do so.
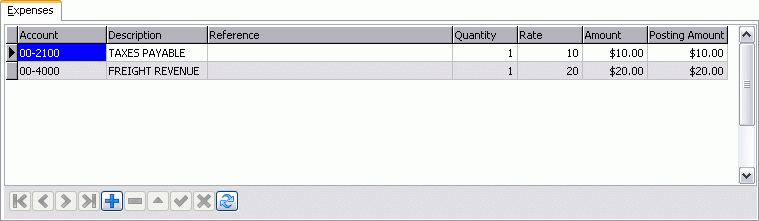
Select the '+' button to add a new record to the Expenses grid.
Account
Enter the relevant Account Number. Double click for a selection form populated with all the GL Accounts currently setup on your system. The charges specified in the 'Amount' field of this grid will be added to the GL Account you select here.
Description
Automatically populates with the Description of the GL Account chosen in the 'Account' field to the left.
Reference
Enter a description of the item that is being charged to this GL Account.
Quantity
Enter the number of expenses of this type that will be charged.
Rate
Enter the individual purchase price of the item.
Amount
This field will automatically populate based on the 'Quantity' field multiplied by the 'Rate' value.
Posting Amount
Behaves exactly as the 'Amount' field, but displays the actual amount that will be posted to the GL Account selected in the 'Account' field. This value will display when the User clicks the 'checkmark' save button. This value cannot be edited.
Description
When you select a GL Account in the 'Account' field, the 'Description' field will populate with the name of the GL Account (as configured in the GL Chart of Accounts program) for the account you have selected. This will help maintain consistency in your Accounting records, as it will be harder to confuse which GL Account the PO belongs to.
Note: The user cannot edit the 'Reference' or 'Resource' columns in the Expenses Tab grid for Inter-Company rows ('Due To' and 'Due From'). The Inter-Company rows are auto-calculated. For example, if you change the check’s amount, the Inter-Company amounts will update. The application changes the amounts by first deleting the Inter-Company rows and then re-adding them with the new amounts. Any data in the 'Reference' or 'Resource' columns will be lost.
Driver Deductions Tab
If the PO is to be expensed against a driver using Driver Pay System deductions, then enter the Driver ID, deduction code, account number, any relevant reference information, the quantity of the item being ordered/quoted, rate, and amount on the Driver Deductions Tab.
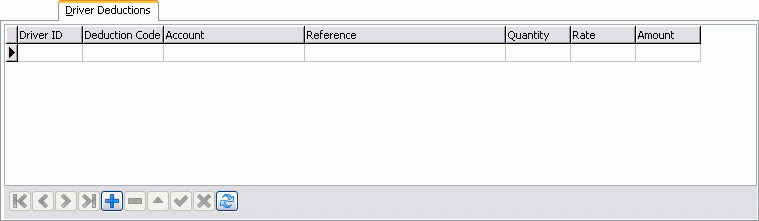
Driver ID
Double-click to view a 'Pick Driver ID' search box, or enter the Driver ID.
Deduction Code
Double-click to view a 'Pick Driver Deduction Code' search box, or enter the Driver Deduction Code.
Account
Enter the GL Account Number that is used to track your Driver Deduction totals. Double-click for a selection form.
Reference
Enter a description of the deduction that is being charged to this GL Account.
Quantity
Enter the number of deductions accrued.
Rate
Enter the individual Driver Deduction amount.
Amount
This field will automatically populate based on the 'Quantity' field multiplied by the 'Rate' value.
R&M Parts Tab
If the PO represents parts that are to be expensed against a Shop in the R&M system, enter the 'Part Code', 'TO Code', 'Trans Code', quantity being ordered, rate per item, dollar amount, and any relevant reference information on the R&M Parts Tab.
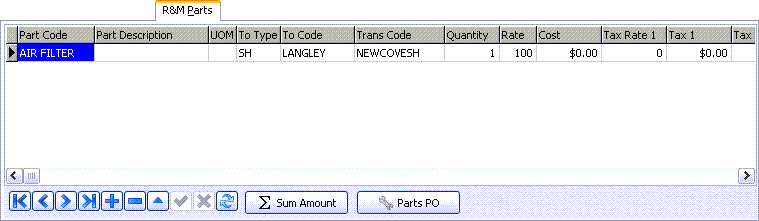
Part Code
Double-click in the column to bring up the 'Select Part Code' window, or enter the Part Code.
Part Description
Automatically populates with the description of the part selected in the 'Part Code' selection field.
UOM
Enter the Unit of Measurement for the specific part.
To Type
Depending on the 'Part Code' value, the 'To Type' field pull down menu will display available destination options for the part. For example: SH=Shop; PU=Power Unit; TR=Trailer; EQ=Misc. Equipment; OS=Outside.
To Code
Double-click in the column to bring up the 'Select Shop Code' window, or manually enter the destination Shop Code.
Trans Code
Double-click in the column to bring up the 'Select Transaction Code' window, or manually enter the Transaction Code.
Quantity
Enter the number of parts.
Rate
Enter the purchase rate for each individual part.
Cost
This field will automatically populate based on the 'Quantity' field multiplied by the 'Rate' value.
Tax Rate1
Enter a Tax Rate value (integer) that will represent the first tax added to the 'Cost' field.
Tax 1
This field will populate with a value once the 'Cost' field and 'Tax Rate 1' fields have data in them. The 'Tax Rate 1' integer value is multiplied against the 'Cost' value to determine the monetary amount of the first tax.
| If the R&M Part Code selected has had the 'Tax 1 Exempt' flag checked in the R&M Configuration program > Part Codes Tab, this value will default to '0'. |
Tax Rate 2
If needed, enter a second Tax Rate value (integer) that will also be added to the 'Cost' field.
| If the R&M Part Code selected has had the 'Tax 2 Exempt' flag checked in the R&M Configuration program > Part Codes Tab, this value will default to '0'. |
Tax 2
This field will populate with a value once the 'Cost' field and 'Tax Rate 2' fields have data in them. The 'Tax Rate 2' integer value is multiplied against the 'Cost' value to determine the monetary amount of the first tax.
Total Amount
Automatically populated as you add values to the other fields in this section. If there are values in the 'Tax 1' and 'Tax 2' fields, they will be added to the 'Total Amount' field as well.
Received
This field automatically populates with data based on data in the Stock Receipts program. The values in the 'Received' field will change depending on the amount of stock received against the amount of stock ordered.
Reference
Enter any descriptive information for these R&M Parts.
Sum Amount Button
Clicking the 'Sum Amount' button will add all charges and taxes from all the parts listed, and populate the total amount in the 'Amount' field of the main Purchase Order program window.
Parts PO Button
Clicking the 'Parts PO' button will generate a Purchase Order for any parts your company may need. The system will query the R&M Configuration program, and will balance your 'Max Stock' values against your 'Min stock' value. The program will then generate an order that will bring your inventory back to it’s maximum capacity.
| The re-ordering process will take into account the 'Tax 1 Exempt' and 'Tax 2 Exempt' flags in the R&M Configuration program > Part Codes Tab for any parts that have these values flagged. |
Context Menu
Create Part Code
Clicking on this item on the context menu opens up the Add New Part window where you can enter information about a new part code. This window allows functionality similar to that found in the R&M Configuration program.
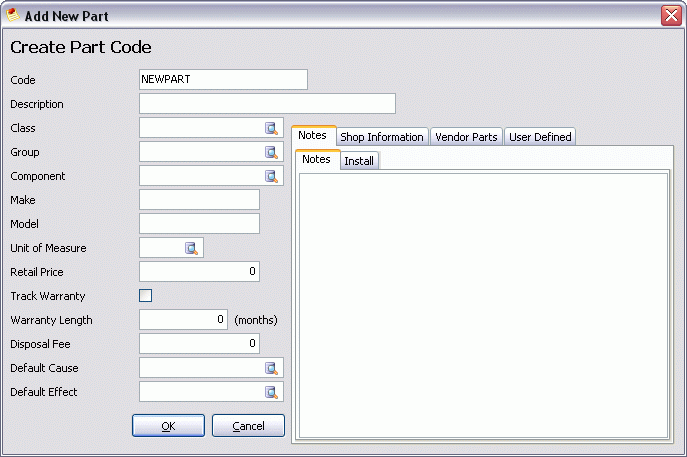
Code
Enter the text string that will become the new product’s 'Code' value.
Description
Enter the part description. This description will populate whenever a TruckMate program grid contains a 'Description' field.
Tax 1 / Tax 2 Exempt
These two flags designate the tax exemptions available for a specific part in your inventory. Both the 'Tax 1' and 'Tax 2' amounts are defined in the Tax Calculation Configuration program. By selecting one (or both) of these fields, you can exempt the selected part from taxation.
| These fields can be defaulted for all newly created Part Codes by using the 'Tax 1 / Tax 2 Exempt Parts' options in the Application Configurator program > RMCONFIG.EXE section. |
Class
Use the search button to select the Class to which your new part will belong.
Group
Use the search button to select the Group to which your new part will belong.
Component
Specify what component your newly created part will work with.
Unit of Measure
Use the search button to select your new part’s unit of measurement.
Make / Model
Enter the make and/or model information for your new part.
Retail Price
Enter the retail price for your new code.
Track Warranty
Enable this checkbox to allow warranty tracking.
Warranty Length
Specify the length of the warranty, in months, for use by the 'Track Warranty' button above.
Disposal Fee
Enter a disposal fee (if applicable) for your newly created part.
Notes Sub-Tab
The notes tab allows you to enter notes in two areas. The first is a general notes area, the second a notes area for install issues or instructions.
Shop Information Sub-Tab
The 'Shop Information' tab lets you specify who carries your products, and what the access permission are for each.
Shop Code
Click the '+' button and then double click the 'Shop Code' field to select a shop from a generated list.
Bin #
Enter the product’s Bin Number location.
Min Stock
Enter the minimum amount of stock at this shop.
Default Bin
Automatically set to 'True' upon entering a Bin #. If the Bin # you entered is not the default, you may change this value by typing in 'False'.
Max Stock
Enter the maximum stock amount at this shop.
Auto Calc Min
Set to 'True' upon creation of a shop. Set this value to 'False' if you would not like the program to automatically adjust the 'Minimum' amount when stock is depleted.
Auto Reorder
If set to 'True', will automatically reorder parts based on availability.
Auto Vendor Bump
If set to 'True', will change the Default Vendor value depending on which Vendor has the cheapest merchandise. This function takes data from the R&M Configuration 'Part Codes' section.
Default Vendor
Double click to select a Default vendor.
Secondary Vendor
Double click to select a Secondary vendor.
Alternate Vendor
Double click to select an Alternate vendor.
Vendor Parts Sub-Tab
The Vendor Parts tab lets you specify parts that are Vendor specific.
Vendor Code
Once the '+' button has been clicked, you may manually enter a Vendor Name here, or double click to select a Vendor from your Vendor list.
Vendor Part Code
Enter the Vendor Part code.
User Defined Sub-Tab
This tab allows several options for user created fields within the Purchase Order module.
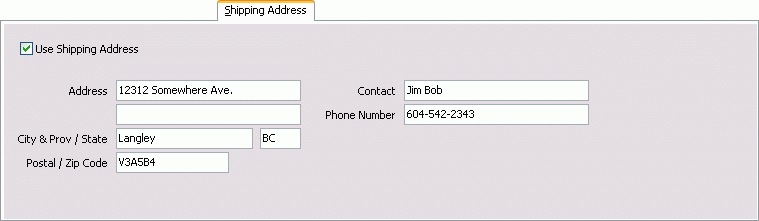
Shipping Address Tab
Use the Shipping Address Tab to enter an alternate shipping address if the items on the PO are to be sent to an address other than the one your company provides by default. This information is now available for any reports generated which require this information.
Other Tab
The Other Tab offers a few additional options.
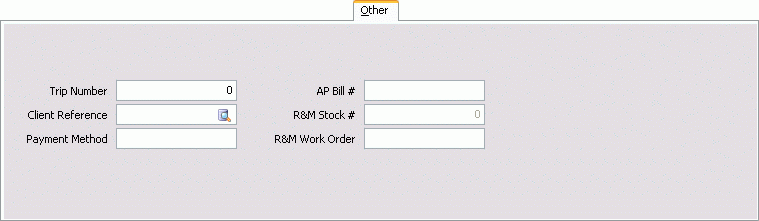
Trip Number
Displays the trip number, from the Dispatch program, on which the freight bill was carried.
Client Reference
Enter your client name here or select the search button to search for your client by name or ID.
Payment Method
Enter the accepted payment method.
AP Bill #
Enter the Accounts Payable Bill Number.
R&M Stock #
Enter the Repairs & Maintenance Stock number.
R&M Work Order
Enter the Repairs & Maintenance Work Order number.
Audit Tab
The Audit Tab is a read only section that details the user information for whomever has last modified the file.
Created By
Pre-populated with the User’s name and date of creation.
Last Modified By
Pre-populated with the name of the user who last modified the Purchase Order, and date of modification.
Approved By
This is the date the PO was approved, and date of approval.