AR Inquiry

The AR Inquiry program is used to inquire into Customer account information and to print reports such as aging lists, billing summaries and Statements of account. This program can also assign Statement numbers to Invoices, record collection information, place Customer accounts on credit hold, and make Invoice adjustments.
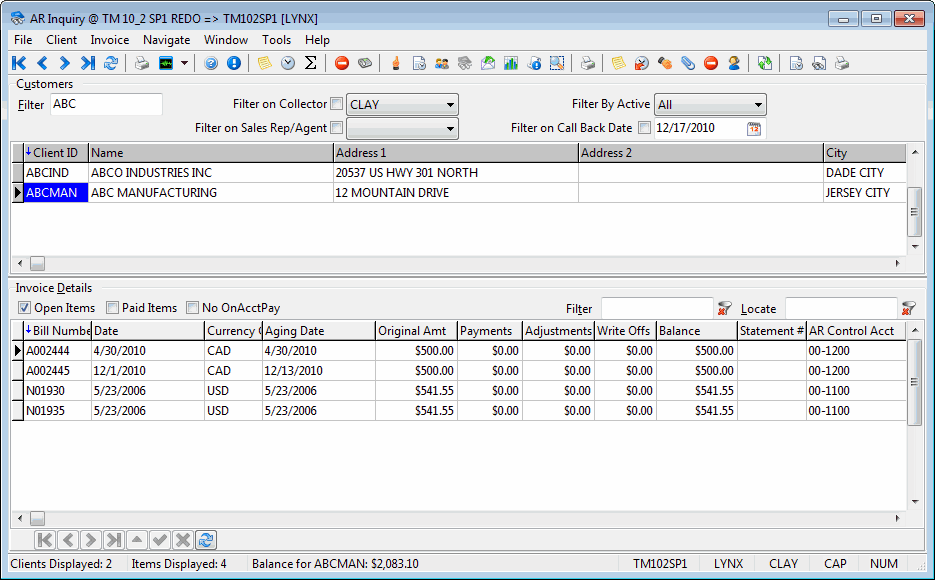
The top part of the screen displays a Grid of Customer summary information that has been entered in the Customer & Vendor Profiles program. The Grid at the bottom of the screen displays Invoices for the Customer selected in the Grid at the top. Both Grids have right mouse menus.
The AR Inquiry program is broken into three main sections: the Menu Bar / Toolbar section at the top of the window, the Customers Grid and the Invoices Grid.
To access AR Inquiry:
| From this location | Go to |
|---|---|
TruckMate Menu and TruckMate Task List |
Accounting & Finance > Accounts Receivable > AR Inquiry |
Windows Start Menu |
TruckMate 20xx > AR Inquiry |
Windows Explorer |
C:\Program Files (x86) > TruckMate 20xx > ArRa.exe |
Document Imaging
Third-Party Document Imaging solutions may be used with the AR Inquiry program as long as they are setup correctly for your specific Imaging Vendor in the Codes Maintenance program > Imaging Tab. Once you have enabled document imaging access on a particular field within one of the AR Inquiry program Grids, you can right-click to access the imaging options (as they have been named in the Codes Maintenance program).
AR Inquiry has access to Invoice Imaging, which can also be used with the 'Auto-Indexing' Image Functionality available from the Toolbar.
Auto-Indexing Document Images
Users with Microdea’s Synergize Document Imaging system can select this option to enter into Auto-Index Imaging. The Workflow configured for the AR Inquiry program (ARRA.EXE) will be used, depending on the settings configured in the Codes Maintenance program > Imaging Tab > Microdea > Workflow Tab.
While using Auto-Indexing mode, the Document Images in the Workflow an be navigated through using the keyboard.
How Do I?
How do I create a Credit or Rebill Freight Bill?
You can create Credit or Rebill Freight Bills using AR Inquiry or the Customer Service program. For information on how to accomplish this using Customer Service, click here. The following outlines the process for the AR Inquiry program.
-
Open the AR Inquiry program (ARRA.EXE).
-
In the Grid, find the Freight Bill you wish to create a Credit or Rebill Freight Bill for. Right click the Freight Bill you want to use and select the 'Transaction History' menu option. The Transaction History window will display.
-
Right click on one of the Client Invoice options in the Transaction History window grid and select the 'Credit Memo / Rebill' menu option.
-
Set the options you would like to use and click the 'OK' button to create the Credit or Rebill Freight Bill. This Freight Bill can now be viewed in the Customer Service program.
How do I change the currency in a 'Billed' Freight Bill?
The A/R Adjustments program is used to make credit or debit adjustments against Freight Bills. You would use this function when changing the dollar amounts only. The left side of the screen is the working area, where adjustments are entered. The right side of the screen displays information about the selected Freight Bill.
Adjustments to invoices can also be made using the Credit and Rebill function in the AR Inquiry program. This is where you would change the details of a Freight Bill, including the dollar amount. This function can cause the original Freight Bill to be credited using a credit invoice or a credit Freight Bill, and you can also, as another option, generate a new Freight Bill, called a Rebill, that can be modified to reflect the adjustment. For example, a bill to a customer, modifying Freight Bill details, sale information, weight details, volume amounts, and/or rate changes, etc.,
-
Open the AR Inquiry program (ARRA.EXE).
The top part of the screen displays a grid of customer summary information that has been entered in the Customer & Vendor Profiles program. The grid at the bottom of the screen displays invoices for the customer selected in the grid at the top. Both grids have right mouse menus.
-
Use the filter to locate the client you are seeking information about. For example, if I’m looking for client information about TMW, I would simply enter a 'T' into the filter and all TMW information would appear in the top grid area.
-
Highlight the Client ID, and the Freight Bills particular to that client will display in the lower grid.
-
Select the Freight Bill you wish to modify. Use your Context Menu (right-click) and select 'Transaction History'. A Transaction History window will appear.
-
Find the invoice in the Client Invoice History grid and highlight that invoice. Then, use your Context Menu (right-click) and select 'Credit Memo and Rebill'.
-
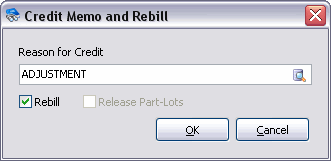
Another dialog box opens called Credit Memos and Rebills, use the drop-down menu to select 'Reason for Credit' and this would display your adjustment option as set up in the AR Transaction Type program.
-
Select the checkbox if you wish to create a Rebill.
-
Select 'Okay' and you will then be asked if you wish to edit the Credit Memo immediately. Select 'Yes'.
-
Customer Service will then open with all the particulars of the newly created Credit Memo appearing on your screen. You’ll notice the word 'Credit' in the top left-hand corner of the Freight Bill in Customer Service.
-
Edit the Rebill, if necessary, by modifying the currency used. Use your scroll-bar to locate the Rebill in Customer Service.
-
Update the newly created Freight Bills using the Billing Register program.
-
To verify your changes have been made, open the AR Inquiry program and select 'Transaction History' and the effects of the Credit and Rebill should be apparent.
How do I figure out how much a Customer owes me?
The AR Inquiry program is used to inquire into customer account information and to print reports such as aging lists, billing summaries and statements of account. An aging report will create a report showing all owed monies for all customers.
-
Open the AR Inquiry program (ARRA.EXE).
The top part of the screen displays a grid of customer summary information that has been entered in the Customer & Vendor Profiles program. The grid at the bottom of the screen displays invoices for the customer selected in the grid at the top. Both grids have right mouse menus.
-
Use the filter to locate the client you are seeking information about. For example, if I’m looking for client information about TMW, I would simply enter a 'T' into the filter and all TMW information would appear in the top grid area.
-
Highlight the Client ID, and then use your right mouse menu and select 'Summary Aging' and a summary of the aging report for this particular customer will appear on your screen.
-
Alternatively, there’s a new feature available for customers using statements. Highlight your Client ID again, and then use your Context Menu (right-click) and select 'Statement Balance' and a statement balance report for this particular customer will appear on your screen.
How do I list all the Customers owing me money?
The AR Inquiry program is used to inquire into customer account information and to print reports such as aging lists, billing summaries and statements of account. An aging report will create a report showing all owed monies for all customers.
-
Open the AR Inquiry program (ARRA.EXE).
The top part of the screen displays a grid of customer summary information that has been entered in the Customer & Vendor Profiles program. The grid at the bottom of the screen displays invoices for the customer selected in the grid at the top. Both grids have right mouse menus.
-
Use the filter to locate the client you are seeking information about. For example, if I’m looking for a client information about TMW, I would simply enter a 'T' into the filter and all TMW information would appear in the top grid area.
-
Highlight the Client ID, and then use your right mouse menu and select 'Reporting', then 'Aging Reports'. When the report selection dialog box comes up, select the 'ARAGING.RPT' and hit 'Okay'.
-
The 'Enter Parameter Values' dialog box will come up offering you choices in how this report prints.
-
You can select 'AgeDate' which will print a report showing balances owing for 0-30 days, 31-60 days, etc., You must select a discrete value using the pull-down menu. This discrete value becomes the cut-off date for the report.
-
You can select 'ShowPaid', with the discrete value set at 'False'. If you select 'True' the report will show paid and unpaid items. If you select 'False', it will only show open invoices.
-
Or, you can select 'ShowDetails' allows you to select the level of detail you require. Enter the level of detail with 1.0 being Currency (only shows currency totals), 2.0 being Client (will list totals by client), 3.0 being Bill (will still show Currency, and Client information but it will show Bill Details for the clients as well), and 4.0 being Transactions (shows all transactions—i.e., the highest level of detail). In this example, we’re going to use the 2.0 Client choice. Select 2.0 from the Discrete value pull-down menu. You’ll have a report showing all the customers in your system, that owe you money.
-
If, after viewing the aging report you see that what your customers owe you, is within your 'acceptable' standards then you don’t have to act on the situation. But, if after reviewing the aging reports you see that too much money is owing from this customer, you do have the option of putting them on Credit Hold.
How do I inquire about collecting money from a Customer Account?
The AR Inquiry program is used to inquire into customer account information and to print reports such as aging lists, billing summaries and statements of account. This program can also assign statement numbers to invoices, record collection information, place customer accounts on credit hold, and make invoice adjustments.
-
Open the AR Inquiry program (ARRA.EXE).
The top part of the screen displays a grid of customer summary information that has been entered in the Customer & Vendor Profiles program. The grid at the bottom of the screen displays invoices for the customer selected in the grid at the top. Both grids have right mouse menus.
-
Use the filter to locate the client you are seeking information about. For example, if I’m looking for a client information about TMW, I would simply enter a 'T' into the filter and all TMW information would appear in the top grid area.
-
Before you phone the customer and inquire about monies owing, you’ll want to do your homework and figure out how much this particular customer owes you, and for how long this money has been owed.
-
Highlight the Client ID, and then use your right mouse menu and select 'Reporting', then 'Aging Reports'. When the report selection dialog box comes up, select the 'ARAGING.RPT' and hit 'Okay'.
-
The 'Enter Parameter Values' dialog box will come up offering you choices in how this report prints.
-
You can select 'AgeDate' which will print a report showing balances owing for 0-30 days, 31-60 days, etc., You must select a discrete value using the pull-down menu. This discrete value becomes the cut-off date for the report.
-
You can select 'ShowPaid', with the discrete value set at 'False'. If you select 'True' the report will show paid and unpaid items. If you select 'False', it will only show open invoices.
-
Or, you can select 'ShowDetails' allows you to select the level of detail you require. Enter the level of detail with 1.0 being Currency (only shows currency totals), 2.0 being Client (will list totals by client), 3.0 being Bill (will still show Currency, and Client information but it will show Bill Details for the clients as well), and 4.0 being Transactions (shows all transactions—i.e., the highest level of detail). In this example, we’re going to use the 2.0 Client choice. Select 2.0 from the Discrete value pull-down menu. You’ll have a report showing all the customers in your system, that owe you money.
-
If, after viewing the aging report you see that what your customers owe you, is within your 'acceptable' standards then you don’t have to act on the situation. But, if after reviewing the aging reports you see that too much money is owing from this customer, you do have the option of putting them on Credit Hold.
How do I place one of my Customers on Credit Hold?
The AR Inquiry program is used to inquire into customer account information and to print reports such as aging lists, billing summaries and statements of account. An aging report will create a report showing all owed monies for all customers.
-
Open the AR Inquiry program (ARRA.EXE).
The top part of the screen displays a grid of customer summary information that has been entered in the Customer & Vendor Profiles program. The grid at the bottom of the screen displays invoices for the customer selected in the grid at the top. Both grids have right mouse menus.
-
Use the filter to locate the client you are seeking information about. For example, if I’m looking for client information about TMW, I would simply enter a 'T' into the filter and all TMW information would appear in the top grid area.
-
Highlight the Client ID, and then use your right mouse menu and select 'Toggle Credit Hold'. Hit your 'Refresh' button.
-
At this point you might want to go into the Client’s profile and see what the credit limit is set at. There are two ways you can open the Customer and Vendor Profiles program from here. The easiest way is to use your context menu and select 'View Client Profile' but failing that you can always view it from the main TruckMate menu.
To open the Customer & Vendor Profiles program (PROFILES.EXE), click: Start > Programs > TruckMate 20xx > Profiles > Customer & Vendor Profiles.
-
Once in the Customer and Vendor Profiles, make sure you are on the Customer Tab, then go to the 'Credit Info Tab', and see what the credit limit is set at. You will also notice that the toggle switch has put a checkmark in the 'Credit Hold' field.
How do I make a Credit or Debit entry against a Freight Bill?
The AR Adjustments program is used to make credit or debit adjustments against Freight Bills. You would use this function when changing the details about the Freight Bill, including the dollar amount. For example, a bill to a customer, modifying Freight Bill details, sale information, weight details, volume amounts, and/or rate changes, etc., Adjustments to invoices can also be made using the Credit and Rebill function in the AR Inquiry program. This function can cause the original Freight Bill to be credited using a credit invoice or a credit Freight Bill, and you can also, as another option, generate a new Freight Bill, called a Rebill, that can be modified to reflect the adjustment. The left side of the screen is the working area, where adjustments are entered. The right side of the screen displays information about the selected Freight Bill.
-
Open the AR Inquiry program (ARRA.EXE), click Start Programs TruckMate Accounts Receivable AR Inquiry. The top part of the screen displays a grid of customer summary information that has been entered in the Customer & Vendor Profiles program. The grid at the bottom of the screen displays invoices for the customer selected in the grid at the top. Both grids have right mouse menus.
-
Use the filter to locate the client you are seeking information about. For example, if I’m looking for client information about TMW, I would simply enter a 'T' into the filter and all TMW information would appear in the top grid area.
-
Highlight the Client ID, and the Freight Bills particular to that client will display in the lower grid.
-
Select the Freight Bill you wish to modify. Use your context menu and view 'Transaction History' a dialog box will appear.
-
Find the invoice in the Client Invoice History grid and highlight that invoice. Then, use your context menu and select 'Credit Memo and Rebill'.
-
Another dialog box opens called Credit Memos and Rebills, use the drop-down menu to select 'Reason for Credit' and this would display your adjustment option as set up in the AR Transaction Type program.
-
Select the checkbox if you wish to create a Rebill.
-
Select 'Okay' and you will then be asked if you wish to edit the Credit Memo immediately. Select 'Yes'.
-
Customer Service will then open with all the particulars of the newly created Credit Memo appearing on your screen. You’ll notice the word 'Credit' in the top left-hand corner of the Freight Bill in Customer Service.
-
Edit the Rebill, if necessary. Use your scroll-bar to locate the Rebill in Customer Service.
-
Update the newly created Freight Bills using the Billing Register program.
-
To verify your changes have been made, open the AR Inquiry program and select 'Transaction History' and the effects of the Credit and Rebill should be apparent.
How do I void an A/R Invoice?
The AR Inquiry program is used to inquire into customer account information and to print reports such as aging lists, billing summaries and statements of account. Adjustments to invoices can also be made using the Void and Rebill function in the AR Inquiry program. This program can also assign statement numbers to invoices, record collection information, place customer accounts on credit hold, and make invoice adjustments.
-
Open the AR Inquiry program (ARRA.EXE).
The top part of the screen displays a grid of customer summary information that has been entered in the Customer & Vendor Profiles program. The grid at the bottom of the screen displays invoices for the customer selected in the grid at the top. Both grids have right mouse menus. Use the filter to locate the client you are seeking information about. For example, if I’m looking for client information about TMW, I would simply enter a 'T' into the filter and all TMW information would appear in the top grid area.
-
Once the top grid fills with the correct client name, the bottom grid will fill with invoices relevant to this client. Select the invoice you wish to void, and use your Context Menu (right-click) to select 'Transaction History'.
-
A Transaction History window will open. In the top grid, called Client Invoice History, select the correct transaction type, and use your context menu to select 'Credit Memo and Rebill'.
Where do I find Imaging in AR Inquiry?
Usually, you can use your right mouse functionality to gain access to viewing your images but this isn’t the case with the AR Inquiry program.
-
Open the AR Inquiry program (ARRA.EXE).
-
Go to the bottom grid, titled 'Invoice Details' and select your Freight Bill.
-
Use your Context Menu (right-click), and select 'Transaction History'. A Transaction History window will appear.
-
Use your Context Menu (right-click) again and select 'View Trace Numbers', and a Trace Number window will open.
-
Right-click in the grid and select the option 'View Images', and select whatever option is available to view images associated with that trace number. For more information on Imaging, see the Document Imaging Overview.
How do I Create a Customer Statement?
In this task, you’ll use the Customer Profile program and AR Inquiry program.
-
Open the Customer & Vendor Profiles program (PROFILES.EXE), click: Start > Programs > TruckMate 20xx > Profiles > Customer & Vendor Profiles.
-
Go to the Customer Profile - Billing Tab. Locate the 'Statement Frequency' area and select a radio button to indicate how often summary statements should be generated for this Customer.
-
In the AR Inquiry program, you can generate statements for Customers based on the Statement Frequency assigned here. Open the AR Inquiry program (ARRA.EXE).
The top part of the screen displays a grid of Customer summary information that has been entered in the Customer & Vendor Profiles program. The grid at the bottom of the screen displays invoices for the Customer selected in the grid at the top. Both grids have right mouse menus.
-
Use the filter to locate the client you are seeking information about. For example, if I’m looking for a client information about TMW, I would simply enter a 'T' into the filter and all TMW information would appear in the top grid area.
-
Highlight the Client ID, and then use your right mouse menu and select 'Assign Statements'. By selecting this option you can assign statement numbers and statement dates to outstanding invoices. Statement numbers and dates will only be assigned to those outstanding invoices that have not been put on Statement Hold. (Statement Hold is applied using the Toggle Statement Hold menu option in the Invoice grid). The Assign Statements option will update the Statement Number and Statement Date fields in the Invoice grid.
-
Familiarize yourself with the Starting and Ending Customer definitions as found below, as well as how the Statement Frequency and Statement Date options function in the Customer and Vendor Profiles program.
-
Starting Customer: the Customer who was selected when the menu option was invoked will default as the Starting and Ending Customer. To assign statements to a range of Customer accounts, enter the code of the first Customer in the range in this field.
-
Ending Customer: the Customer who was selected when the menu option was invoked will default as the Starting and Ending Customer. To assign statements to a range of Customer accounts, enter the code of the last Customer in the range in this field.
-
Statement Frequency: in the Customer & Vendor Profiles program, on the Billing tab, you can assign a Statement Frequency to a Customer. To generate statements only for Customers with a specific Statement Frequency, select the frequency from the radio buttons.
-
Statement Date: enter the date that should be assigned to the statement. Click on the down arrow for a calendar selection form.
Note: To view a Summary Statement Report, highlight the invoice details found in the bottom grid of the AR Inquiry program (you can only view one invoice at a time), and use your context menu to select 'Reporting' and then 'Summary Statement'. (Note: you must have used the 'Assign Statement' function first, before being able to view 'Summary Statement' as an option in the AR Inquiry program). When you select the Summary Statement report, you will be prompted to enter the statement date, which is the date that you wish to generate statements on. This corresponds to the date assigned to invoices using the Assign Statements option. Click on the down arrow for a calendar selection form or leave the pre-selected choice at today’s date. Select the Crystal Report template supplied with the TruckMate system called 'BILLSTMT.RPT'. Before generating summary statements, you must use the 'Assign Statements' menu option to assign a statement date and a statement number to outstanding invoices.
-
How do I Manually Assign Statements?
-
Open the AR Inquiry program (ARRA.EXE).
-
Filter the program view using the various Filter options in the program header. Your Client Grid will then populate with data.
-
Select the 'Client Menu' and choose the 'Assign Statements' option.
-
The Statement Number Assignments window will open.
-
Complete the desired Statement criteria and select the 'OK' button.
-
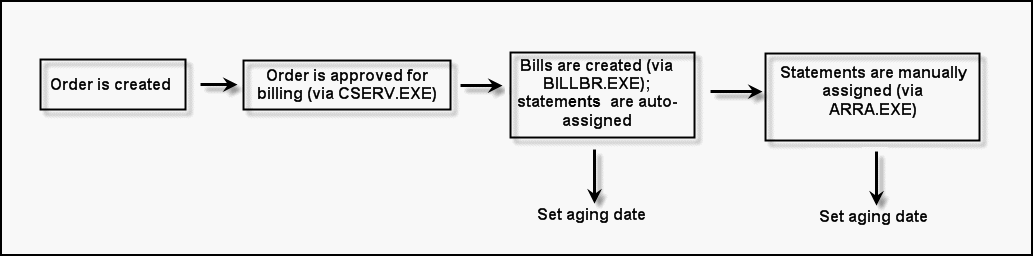
Aging by Statement Date: At the time when bills are assigned to statements, TruckMate will set the Receivable’s 'Aging Date' value to the Statement Date (if the Application Configurator program > ARRA.EXE > 'Set Aging Date to Stmt Date' option is set to 'True').
How do I Automatically Assign Statements?
The Aging Date will also be set for bills that are automatically assigned to Statements when they are created by the Billing Register program. To create bills and assign them to statements, follow these steps:
-
Open the Customer & Vendor Profiles program (PROFILE.EXE), click: Start > Programs > TruckMate 20xx > Profiles > Customer & Vendor Profiles
-
Select the Client Tab (
 ).
). -
Choose the Client you wish to configure Automatic Statements for, then select the Billing Tab. Ensure that the 'Auto-Assign Statements' flag is checked. This will set the 'Auto-assign Statement' flag in the Customer Service program against new bill(s) billed to that Client.
-
In the Customer Service program > Billing Tab, approve the bill for billing.
-
Run the Billing Register program. At this time, TruckMate will set the receivable’s 'Aging Date' to the variable determined by the Application Configurator program > BILLBR.EXE > 'Set Aging Date' option. For Aging by Statement Date, simply set this config option to 'STATEMENT'.
Menu Bar / Toolbar
The options available in the topmost Menu bar are available in other places in the AR Inquiry program, such as the Toolbar directly below the Menu bar, and from within the program’s Context Menus.
File Menu
Print Reports
 Selecting the Print Reports button will bring up the report selection window, common to many TruckMate applications. Here, you will select a report file from those available in your system and a Crystal Report will be generated.
For more information on Report functionality in TruckMate, see the Crystal Reports Reference.
Exit
 Closes the AR Inquiry program.
Multi-Company Menu
For more information on the Multi-Company options available from the Menu Bar, see the Multi-Company documentation and the Cross-Company Viewing documentation.
Navigate Menu
The Navigate Menu contains the standard TruckMate Navigation Bar that is used to browse the records in your Database, as well as the following options.
Refresh
![]() Select this option (or use the '<CTRL><F5>' hot key combination) to refresh all sections/grids of the AR Inquiry program.
Select this option (or use the '<CTRL><F5>' hot key combination) to refresh all sections/grids of the AR Inquiry program.
Client Menu
Customer Collection Information
![]() Opens the Customer Collection Notes window. See the Menu / Toolbar Options Details section below for more information.
Opens the Customer Collection Notes window. See the Menu / Toolbar Options Details section below for more information.
| The ability to add notes to the Customer Collection Information section can be disabled using a security option on the Business Events Tab of the Security Setup program. |
Summary Aging
![]() Opens the Summary Aging window, displaying a form that summarizes the selected Customer’s account by five Aging categories. The categories are 'Current' (Invoices less than 30 days), 'Over 30' (Invoices from 30 to 59 days), 'Over 60' (Invoices from 60 to 89 days), 'Over 90' (Invoices from 90 to 119 days), and 'Over 120' (Invoices 120 days or more). You can use the <CTRL><G> hotkey combination to access this option as well.
Opens the Summary Aging window, displaying a form that summarizes the selected Customer’s account by five Aging categories. The categories are 'Current' (Invoices less than 30 days), 'Over 30' (Invoices from 30 to 59 days), 'Over 60' (Invoices from 60 to 89 days), 'Over 90' (Invoices from 90 to 119 days), and 'Over 120' (Invoices 120 days or more). You can use the <CTRL><G> hotkey combination to access this option as well.
Statement Balance
![]() Opens the Statement Balances window. See the Menu / Toolbar Options Details section below for more information.
Opens the Statement Balances window. See the Menu / Toolbar Options Details section below for more information.
Toggle Credit Hold
![]() Clicking this option will change the Credit Hold Status field of the selected Customer from 'True' (Credit Hold) to 'False' (non-Credit Hold), or vice-a-versa. A small dialog box will display asking the User for confirmation. You can also use the <CTRL><H> hotkey combination to do this.
Clicking this option will change the Credit Hold Status field of the selected Customer from 'True' (Credit Hold) to 'False' (non-Credit Hold), or vice-a-versa. A small dialog box will display asking the User for confirmation. You can also use the <CTRL><H> hotkey combination to do this.
Change Call Back Date
![]() Opens the Change Call Back Date window. Double click the Calendar icon to select a new Date from a Calendar menu. This date will then be populated into the Customer Grid’s 'COL_CALL_BACK' field for the selected Customer detail line.
Opens the Change Call Back Date window. Double click the Calendar icon to select a new Date from a Calendar menu. This date will then be populated into the Customer Grid’s 'COL_CALL_BACK' field for the selected Customer detail line.
Assign Statements
![]() Opens the Statement Number Assignments window. See the Menu / Toolbar Options Details section below for more information.
Opens the Statement Number Assignments window. See the Menu / Toolbar Options Details section below for more information.
View Payment History
![]() Selecting this option opens the Payment History window. See the Menu / Toolbar Options Details section below for more information.
Selecting this option opens the Payment History window. See the Menu / Toolbar Options Details section below for more information.
View Client Profile
![]() Opens an instance of the Customer and Vendor Profiles program with the currently selected Customer’s details displayed to the screen. For more information, see the Customer & Vendor Profiles program > Customer Tab.
Opens an instance of the Customer and Vendor Profiles program with the currently selected Customer’s details displayed to the screen. For more information, see the Customer & Vendor Profiles program > Customer Tab.
View A/P Information
![]() Selecting this menu option opens the AP Inquiry program (if not already loaded) and displays this Customer’s vendor record. Only Customers who are linked to a vendor record via the Client ID field on the Customer & Vendor Profiles program > Vendor Tab will have a vendor record associated with a Customer record.
Selecting this menu option opens the AP Inquiry program (if not already loaded) and displays this Customer’s vendor record. Only Customers who are linked to a vendor record via the Client ID field on the Customer & Vendor Profiles program > Vendor Tab will have a vendor record associated with a Customer record.
View Post Dated Cash Receipts
![]() Selecting this option opens the Post Dated Checks window for the selected Customer. The Post Dated Checks Grid displays details relevant to any Post Dated Checks received from the Customer and is for informational purposes only.
Selecting this option opens the Post Dated Checks window for the selected Customer. The Post Dated Checks Grid displays details relevant to any Post Dated Checks received from the Customer and is for informational purposes only.
View Sales
![]() This option displays a small window containing Sales information as of the current Date.
This option displays a small window containing Sales information as of the current Date.
| Calculation is based on calendar year, not fiscal year. |
View Instant Checks
![]() This option displays a window with any Instant Check details for the selected Customer.
This option displays a window with any Instant Check details for the selected Customer.
View Pending Transactions
![]() Selecting this option will open the View Pending Transactions window, which displays all transactions for the selected client that are due, along with their date.
Selecting this option will open the View Pending Transactions window, which displays all transactions for the selected client that are due, along with their date.
Recalculate Current Client Balance
![]() Selecting this option will recalculate the selected Client’s current balance to reflect any changes that have been applied throughout the accounting system. The 'Balance' field in the AR Inquiry program’s Footer area will update with the new balance value.
Selecting this option will recalculate the selected Client’s current balance to reflect any changes that have been applied throughout the accounting system. The 'Balance' field in the AR Inquiry program’s Footer area will update with the new balance value.
Recalculate Unposted Balance
Selecting this option will recalculate all the bills that are not yet posted for the selected client. A popup will come up displaying the value. The value is not stored anywhere, its calculated when needed.
Reporting
![]() There are several options for the creation of automatic Crystal Reports. All Reporting options will display the Report Selection form prior to displaying the selection criteria form (as applicable). After selecting the desired report (using the Report Selection form) and specifying the selection criteria (as applicable), the report will preview to the screen. Click the printer icon at the top of the screen to send the report to the printer that is configured as the default printer for your workstation.
There are several options for the creation of automatic Crystal Reports. All Reporting options will display the Report Selection form prior to displaying the selection criteria form (as applicable). After selecting the desired report (using the Report Selection form) and specifying the selection criteria (as applicable), the report will preview to the screen. Click the printer icon at the top of the screen to send the report to the printer that is configured as the default printer for your workstation.
See the Crystal Reports Reference for more information on Report Functions.
All Clients
Choose a Report Type for your Client group. Available options are: 'Aging Reports', 'Summary Statement', 'Statement of Account', 'Collections', 'Sales' and 'Other'. See the Report Types section below for more information on specific Report Types.
The option you choose will open a Report window with the appropriate Report Type ready use. For more information on Report fuctions, see the Crystal Reports Reference .
<Current Client>
Choose a Report Type for the selected Client in the Customer Gridl. Available options are: 'Aging Reports', 'Summary Statement' and 'Statement of Account'. See the Report Types section below for more information on specific Report Types.
The option you choose will open a Report window with the appropriate Report Type ready use. For more information on Report fuctions, see the Crystal Reports Reference.
Invoice Menu
Invoice Collection Notes
![]() Opens the Invoice Collection Notes window. See the Menu / Toolbar Options Details section below for more information.
Opens the Invoice Collection Notes window. See the Menu / Toolbar Options Details section below for more information.
Change Invoice Aging Date
![]() Selecting this option opens the Change Aging Date window. Double click the Calendar icon to select a new Date from a Calendar menu. This date will then be populated into the Invoice Grid’s 'Aging Date' field for the selected Invoice detail line.
Selecting this option opens the Change Aging Date window. Double click the Calendar icon to select a new Date from a Calendar menu. This date will then be populated into the Invoice Grid’s 'Aging Date' field for the selected Invoice detail line.
Note: By default, the Aging Date of an Invoice is the same as the Invoice date. Once this feature is enabled, to change the aging date, select this menu option and enter a new aging date. Click the down arrow for a calendar selection form.
Change Expected Date
![]() Selecting this option opens the Change Expected to be Paid Date window. Double click the Calendar icon to select a new Date from a Calendar menu. This date will then be populated into the Invoice Grid’s 'Expected to be Paid' field for the selected Invoice detail line.
Selecting this option opens the Change Expected to be Paid Date window. Double click the Calendar icon to select a new Date from a Calendar menu. This date will then be populated into the Invoice Grid’s 'Expected to be Paid' field for the selected Invoice detail line.
Change Transaction Reference
![]() Selecting this option opens a small window where you can enter a new 'Reference' field value for the selected Invoice Grid detail line. Enter the text you wish to use as the Reference, and click the 'OK' button.
Selecting this option opens a small window where you can enter a new 'Reference' field value for the selected Invoice Grid detail line. Enter the text you wish to use as the Reference, and click the 'OK' button.
Toggle Statement Hold
![]() Clicking this option will change the Statement Hold Status field of the selected Invoice from 'True' (Statement Hold) to 'False' (non-Statement Hold), or vice-a-versa.
Clicking this option will change the Statement Hold Status field of the selected Invoice from 'True' (Statement Hold) to 'False' (non-Statement Hold), or vice-a-versa.
View Freight Bill
![]() Opens an instance of the Customer Service program with the currently selected Freight Bill’s details displayed to the screen. For more information, see the Customer Service program.
Opens an instance of the Customer Service program with the currently selected Freight Bill’s details displayed to the screen. For more information, see the Customer Service program.
Credit Memo and Rebill
![]() Selecting this option opens the Credit Memo and Rebill window, which allows the User to create a new Freight Bill in the Customer Service program that reverses the selected Freight Bill in the AR Inquiry program. When you create a credit memo (and optionally, a Rebill) via this method, the original Freight Bill in the Customer Service program is left intact, and a duplicate Freight Bill with the same bill number but negative charges is created.
Selecting this option opens the Credit Memo and Rebill window, which allows the User to create a new Freight Bill in the Customer Service program that reverses the selected Freight Bill in the AR Inquiry program. When you create a credit memo (and optionally, a Rebill) via this method, the original Freight Bill in the Customer Service program is left intact, and a duplicate Freight Bill with the same bill number but negative charges is created.
-
Reason for Credit
Select the Database Search button in this field to choose a 'Reason for Credit' code for the Credit or Rebill Freight Bill. The available Reason codes for this field are configured in the A/R Transaction Types program.
The Reason for Credit code you select for the new Freight Bill will populate in the 'Transaction Type' field on the Customer Service program > Billing Tab.
-
Rebill
If you select the 'Rebill' option, a second duplicate Freight Bill with the same charges as the original will be created that you can edit and then process through the Billing Register program to update the change to the A/R system.
This Freight Bill will have a new Bill Number, but will be identified as a 'Rebill' in the top-left corner of the Customer Service program. Make adjusting changes to the new, duplicate bill as required, and then process it through the Billing Register program.
-
Release Part-Lots
If you select this flag when processing a Credit / Rebill, the original part-lot bills (Freight Bills that were used to create the Consolidated Master Freight Bill) will be "released". In other words, they will become "free," unposted Freight Bills that can be updated in the Customer Service program and then either run separately through the Billing Register program or re-consolidated onto a new Master Freight Bill.
You cannot choose both this option and the 'Rebill' option, because you would effectively be billing the client twice.
Note: This flag is only enabled if the Freight Bill you are creating a Credit / Rebill against is a Consolidated Master Freight Bill.
This new Freight Bill will offset the original after being updated via the Billing Register program. In the top left corner of the Customer Service program, the bill will be identified as a 'Credit' rather than an 'Original'. If you select the Rebill option, a second duplicate bill with the same charges as the original will be created that you can edit and then process through the Billing Register program to update the change to the A/R system. This bill will be identified as a 'Rebill' in the top-left corner of the Customer Service program. Make adjusting changes to the new, duplicate bill as required.
Note: Driver Pay, COD and Interline Payable charges are not included on 'Rebill' bills.
Transaction History
![]() Opens the Transaction History window. See the Menu / Toolbar Options Details section below for more information.
Opens the Transaction History window. See the Menu / Toolbar Options Details section below for more information.
Find Freight Bill
![]() Selecting this button when a Freight Bill number (or the first few characters of a Freight Bill number) are entered into the 'Filter' text field above the Invoices Grid will position your cursor on the closest matching Freight Bill.
Selecting this button when a Freight Bill number (or the first few characters of a Freight Bill number) are entered into the 'Filter' text field above the Invoices Grid will position your cursor on the closest matching Freight Bill.
Add to Statement / Remove from Statement
These two options allow you to edit statement numbers. The options are only enabled if:
-
Valid Freight Bill status codes are assigned to the 'Stmt Add Status' and 'Stmt Del Status' configuration options in the Application Configurator program > ARRA.EXE section, and
-
The current User has been granted security to for the 'AR - Allow Edit of Statement Numbers' option in the Security Setup program > Business Events > Allow Changes Tab.
The options can either apply to a single invoice or multiple invoices. You can select multiple invoices via either <CTRL>+click, <ALT>+click or <CTRL><A>(select all). Use a single click to clear selection. Selected invoices are highlighted (grey). If no invoices are selected, then the options apply to only a single invoice (the current one- indicated by black arrow in grid’s left margin).
On running either option, various error-checks will be performed on the selected invoice(s). Some are errors ("Update aborted - you must change your selection") and some are just warnings (you may choose to continue with updating).
After the invoice list error-checks, for the 'Add to Statement' option, you will be prompted to enter an existing 'Statement Number' for the given Client (from top grid) and 'Currency' (of selected invoices). A pick list is available. If you type it manually, you may get an error "Invalid data" if statement you entered does not exist or is for a different client or currency. In that case, try the pick list.
After all the error-checks (and selecting statement number for an add), the updates (to AR_SUM and inserts to ODRSTAT) are performed via a stored procedure (either ARSTMT_ADD or ARSTMT_DEL). If more than one invoice has been selected for updating, then a progress bar will be displayed during updating. Besides the statement number (AR_SUM.STMT_NUM), the date (AR_SUM.STMT_DATE) and print status (AR_SUM.STMT_PRINTED) are also updated.
As well, provided the invoice is not an "on account" payment, a entry will be logged to the ODRSTAT table with the status code specified by ARRA.EXE config 'Stmt Add Status' or 'Stmt Del Status'. The ODRSTAT logging will occur for all Freight Bills that match the given bill-to code / bill number combination (i.e. including credits and rebills).
Reporting
There are two Crystal Reporting options for use with the Invoice Grid, 'Invoice' reports and 'Summary' reports. The option you choose will open a Report window with the appropriate Report Type ready use. For more information on Report Functions, see the Crystal Reports Reference.
Invoice
The Crystal Report templates supplied with the TruckMate system are called 'DLVRECPT.RPT' (delivery receipt format with no charges printed on Invoice), 'INVOICE.RPT' (landscape style) and INVOICE1.RPT (portrait style). You can reprint the selected Invoice using this function.
Summary Statement
The Crystal Report template supplied with the TruckMate system is called 'BILLSTMT.RPT'. It will print the Statement associated with the selected Invoice.
This is the same as using the Summary Statement option in the Customer Grid. The option will only be available if a Statement number has been assigned to the Invoice using the Assign Statement option in the Customer Grid.
Tools Menu
TruckMate Monitor
 Click the down arrow next to this button to access the various functions of the new TruckMate Monitor.
Remember Position / Size
Selecting this option will maintain the program window position and size upon close. When the program is re-opened, it will appear the same.
Check Search
You can use this option to search for posted AP checks, in order to view their details. You have the option of searching by 'Dollar Amount', 'Date' and/or 'Client'.
Window Menu
AR Adjustments
![]() Selecting this option will open an instance of the AR Adjustments program.
Selecting this option will open an instance of the AR Adjustments program.
AR Cash Receipts
![]() Selecting this option will open an instance of the AR Cash Receipts program.
Selecting this option will open an instance of the AR Cash Receipts program.
Help Menu
TruckMate Help
![]() Selecting this button will open the AR Inquiry topic in the TruckMate Online Help file (the page you are currently viewing).
Selecting this button will open the AR Inquiry topic in the TruckMate Online Help file (the page you are currently viewing).
Service Portal
![]() Selecting this button will open an instance of your default Internet browsing software, with the https://www.tmwcare.com login page displayed.
Selecting this button will open an instance of your default Internet browsing software, with the https://www.tmwcare.com login page displayed.
About
![]() Selecting this button will open the standard TruckMate About window, which contains important information about the application you are currently using, including its version number (important for support calls).
Selecting this button will open the standard TruckMate About window, which contains important information about the application you are currently using, including its version number (important for support calls).
Customer Information Grid
The Customer Information Grid is used to quickly gather details about the Customer Codes in your TruckMate system, and allows a variety of Filtering options.
Filter
The Filter field works in conjunction with the sort column. The sort column is indicated by a blue arrow in the column header. If you enter characters in the Filter field, only those records with matching characters in the sort column field will be displayed. Be sure to press the <Enter> key after entering data in the Filter field.
To view Invoices for a Customer account, click on the desired Customer in the Customer Information Grid. You can sort the list by any column by clicking on the column header.
A blue arrow indicates which column is currently the sort column.
Filter on Collector
To view customers who have been assigned a specific User ID for collections, check the box and select the User ID from the drop down list box. Collectors are assigned to accounts in the Customer & Vendor Profiles program > Misc Tab. The User ID entered into this filter will be remembered to the registry, so that the next time AR Inquiry is opened, the records will be automatically filtered.
| This filter can be enabled/disabled via the Security Setup program > Security > Filters Tab. When disabled, this filter be checked and will automatically populate to the logged in user’s 'User ID' (i.e. so a collector user can only see which customers they have done business with). |
Filter on Sales Rep/Agent
To view customers who have been assigned a specific Sales Representative or Agent, check the box and select the User ID from the drop down list box. Sales Rep/Agents are assigned to accounts in the Customer & Vendor Profiles program > Misc Tab. The User ID entered into this filter will be remembered to the registry, so that the next time AR Inquiry is opened, the records will be automatically filtered.
| This filter can be enabled/disabled via the Security Setup program > Security > Filters Tab. When disabled, this filter be checked and will automatically populate to the logged in user’s 'User ID' (i.e. so an agent user can only see which customers they have done business with). |
Filter By Active
This allows you to filter customers in the Customer Information Grid by the 'Terminated' status of customers in the Customer & Vendor Profiles program:
-
'All': 'Terminated' flag will be ignored (all customers displayed).
-
'Active': customers who do not have the 'Terminated' flag in Customer & Vendor Profiles checked will be displayed.
-
'Terminated Only': only those customers who have had the 'Terminated' flag checked will be displayed.
This choice is "remembered" to registry when they close AR Inquiry and reset to the remembered choice the next time they run AR Inquiry on that machine.
| This filter can be enabled/disabled via the Security Setup program > Security > Filters Tab. When disabled and the user launches AR Inquiry, the filter will be disabled and set to 'Active Only'; in other words, the user will not be able to access inactive/terminated clients. |
Filter on Call Back Date
To view Customers according to their assigned call back date, check the box and enter the 'Call Back Date'. All Clients with 'Call Back Dates' after the date you choose will not be displayed. Double click for a calendar selection form. The default is today’s date.
Customer Grid
This grid displays information about the customer. The information are pulled from the customer record in Customer and Vendor Profiles. The grid display all the information needed to communicate with the customer and proceed with billing activities.
| The grid shows billing information including 'Billing Email' double clicking the 'Billing Email' opens the 'Compose e-mail Message' window. If there is no e-mail defined in the 'Billing Email' field for the selected customer, the system will bring the address book up first with filtering capability to allow the user to select an e-mail address. The user can then compose the desired e-mail message and select the 'Send' button to send the e-mail to the customer. |
Invoice Details Grid
Invoices for the Customer selected in the Customer Grid at the top of the screen are displayed in the Invoice Details Grid. There are only a few functions you can perform directly in the Invoice Details Grid: you can add remarks in the Reference field of any Invoice, and adjust the 'Expected to be Paid' field used in the Cash Management module. Click on any column heading to sort the Invoices displayed in the Grid by that column. The sort column is indicated by a blue arrow
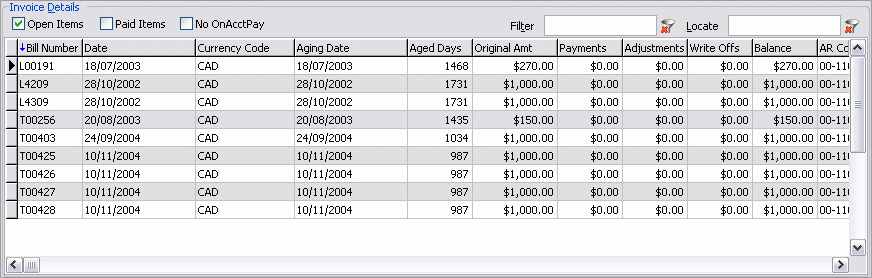
| The Aged Days column displays differently depending on whether the Invoice is paid or open. If the Invoice is open (un-paid), the Aged Days field displays the number of days between the Aging Date and the current date. If the Invoice is Paid, the field display the number of days that elapsed between the Aging Date and the payment date. |
Open Items
Check this box to display Invoices that have not yet been paid in full.
Paid Items
Check this box to display Invoices that have been paid in full.
No OnAcct Pay
If checked, will hide On Account Payments.
Filter
The Filter field works in conjunction with the sort column, and the sort column is indicated by a blue arrow in the column header. If you enter characters in the Filter field, only those records with matching characters in the sort column field will be displayed. Be sure to press the <Enter> key after entering data in the Filter field.
Locate
To find a specific Invoice issued to the selected Customer, enter the Invoice number in this field. Press the <Enter> key after entering the data to position the Grid at the first matching record. An arrow will appear to the left of the Grid to indicate the selection.
Invoice Grid
Aging Date
The Aging Date can be changed by the user throughout most of the life of a receivable, but it will be set by TruckMate at two particular points in the life of a receivable. See this diagram for an overview of how TruckMate sets the Aging Date.
The Aging Date will default for freight bills based on the Application Configurator program > BILLBR.EXE > 'Set Aging Date' option. The Aging Date of rebill freight bills will be based off of the 'Rebill Aging Date' option for BILLBR.EXE.
For more information on how to configure automatic and manual assigning of the Aging Date to Statements, see "How do I Create a Customer Statement?"
Reference
Select this field and enter any free format Notes you have regarding the Invoice.
Expected to be Paid
For those Customers who have purchased the Cash Management TruckMate module, this field will display the system calculated date corresponding to when you should receive payment from your Customer.
This Date is worked out by the algorithms supplied with the Cash Management Module, and pulls data from the Customers payment history, as well as the 'Suggested Days to Pay' field.
Suggested Days to Pay
For those Customers who have purchased the Cash Management Module from TMW Systems, this field will display the system calculated number of days that the Customer should take to pay his or her Invoice.
This integer is worked out by the procedures added by the Cash Management Module from the Customer’s days-to-pay averages from the Billing Register program, across a number of days (determined by an Application Configurator program option).
Note: You can select to calculate the value of this field either as a normal average or as a weighted average with revenue. To use the weighted average you should set the application configuration option in Application Configurator > Accounts Receivable > ARRA.EXE - Days to Pay Average Type to 'Weighted'. The default value for this application configuration option is 'Normal'.
Menu / Toolbar Option Details
Assign Statements Window
Numbered Statements are used by companies who bill their Customers for multiple Freight Bills delivered during a set period - usually weekly, biweekly, or monthly billing cycles.
The system has a Statement number counter that is incremented each time Statements are processed. This number is assigned to all the Bills which match the selection options described below in order to group them onto one Statement per Customer included. These Statements are then sent to your Customers, who now can pay the Statement outright, or portions of it.
Selecting this option opens the Statement Number Assignments window, where you process current billings into Statements.
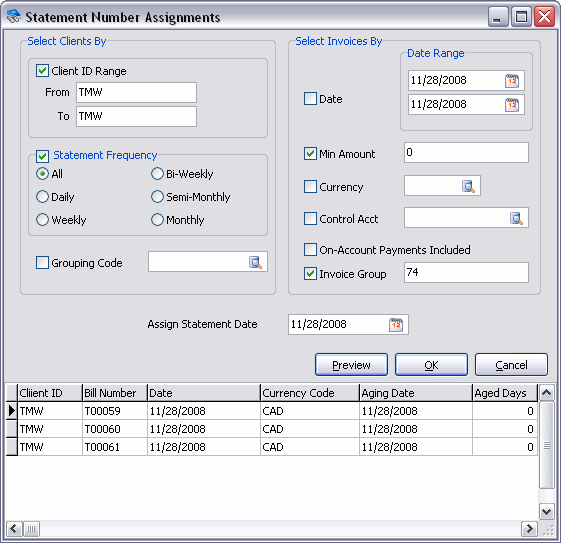
The form allows you to control which Customers are included in the Statements process by providing a range of Customer codes, or by only selecting those which have been assigned a Statement frequency in their profile, or by using a user-defined 'Grouping Code', or some combination of the three.
Only those Freight Bills which have been posted to A/R, and thus appear in AR Inquiry, are eligible for inclusion on a Statement. Of those, you can select bills to include on Statements by filtering by a billing date range, or you can select only those above a minimum billing amount, or were billed in a certain currency, or match to a specific general ledger control account, or some by combination of these options.
Finally, you must specify a Statement date to assign to all the bills included. This is roughly analogous to a billing date, since it is likely your collections people will be tracking payments made on a per Statement basis.
The Statement numbers and Statement date both appear in the Invoice Details Grid.
Grouping Code
A 'Grouping Code' can be assigned to a Freight Bill on the Customer Service program > Billing Tab. Freight Bills with matching Grouping Codes can be assigned to statements in specific ways, usually determined by a custom procedure.
On-Acct Payments Included
Use this checkbox to assign the selected statement as an 'On-Acct Payment' or not.
Invoice Group
If no 'Grouping Code' value is specified, the system will use the value entered in this field to determine if multiple Freight Bills should be grouped onto Statements together. To use this function, the user must setup a Custom Defined field for the TLORDER Table named 'INVOICE_GROUPING' (via the Codes Maintenance program > Custom Defs Tab), and then must manually assign a value into this field on the Customer Service program > Custom Defined Fields Tab for every Freight Bill they would like to appear together.
Preview
Select this button to preview which Invoices will be selected by the filtering criteria you have specified on the Assign Statements window, and will also show you the total value of the selected invoices.
Customer Collection Information Window
Selecting this option opens the Collection Information window where you can enter 'Collection Information' and 'Credit Notations' by selecting their respective Tabs at the bottom of the window. These notes can also be accessed in the Customer & Vendor Profiles program.
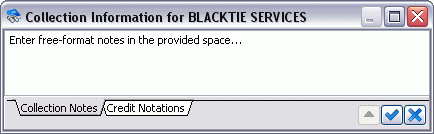
Enter Free Format Notes on either the 'Collection Notes' or 'Credit Notations' Tabs by simply clicking within the text field and using your keyboard.
Users can set the option in the Application Configurator program > Accounts Receiveable > ARRA.EXE > Note Entry Style to either Normal (notes are saved like they are typed) or Journal Style (notes are date/time stamped, and blank lines separate the notes).
Payment History Window
The Payment History window includes a list of the checks remitted by this Customer, including whether each check has been cleared through the Bank Reconciliation program. You can drill down (by double clicking) on a specific payment to view the Invoices that were paid by that check.
Context Menu
Drill Down
Selecting this option is the same as double-clicking on a check record- the check’s various payment details will be displayed.
View GL Distribution
Selecting this option will open the GL Distribution information for this particular check, showing which GL Accounts have been debited/credited.
Void/Reverse Cash Receipt (NSF)
The void cash receipt option can be used if a cash receipt needs to be reversed after it has been posted via the AR Cash Receipts Register program (if the register has not been run, it is better to simply find the cash receipt in the AR Cash Receipts Entry program and delete it). You may wish to use this feature when you find that a client’s check is NSF, or you find it was entered in error.
The option will make a reversing cash receipt that is identical to the original except:
-
All amounts are negated (i.e. debits and credits reversed).
-
The check number will have "VOID-" pre-pended to it (if the original check number was longer than 10 characters, then the right-most 10 characters will be appended to VOID-).
-
The detail description (in AR_TRANSACTIONS) is 'Reversing Cash Receipts' (instead of simply 'Cash Receipts').
Both FB type cash receipts (AR_CASH) and misc. cash receipts (AR_MISC) may be voided/reversed. Both the voided and voiding cash receipts are flagged as void (TX_VOID=True) so that neither can be voided again (the column is displayed in the Payments History grid in AR Inquiry).
Another column, AR_CASH.TX_VOID_ID (or AR_MISC.TX_VOID_ID) has been added. Although it is hidden (not displayed in the Payments History grid), it links the 2 related cash receipts together (each has the other’s AR_CASH_ID/AR_MISC_ID). This may be useful for Crystal reports and for Support to diagnose issues.
Just like AP, the new reversing cash receipt is not auto-posted; you must run the Cash Receipts register program to complete/commit the voiding/reversal. Just like credit notes in Customer Service and void checks in Instant Checks, it is NOT recommended that you find the reversing cash receipt in the AR Cash Receipts Entry program and make changes to it, especially anything that affects any dollar amounts, GL, or invoices paid. You may however delete it (if you haven’t run the register yet and realized voiding it was a mistake). Deleting the reversing entry in AR Cash Receipts Entry will remove the void flag / link from the original cash receipt (i.e. turn it back to "normal").
Once a FB type reversing cash receipt is posted via the AR Cash Receipts Register program, then all the AR invoices that were paid (or partially paid) will have the payment amount "backed out" and show up as unpaid- as though the original cash receipt had never been applied.
You have access to document Imaging functionality from the Payment History window, which is based upon the AR_CASH Table. For more information on document Imaging, see the Document Imaging Overview.
|
Statement Balance Window
Selecting this option opens the Statement Balances window, which lists all Statements issued to this Customer and summary totals against each Statement number. See the Assign Statements section below for more information on Statements.

Transaction History Window
The Transaction History window shows a breakdown of transaction information for all of the Clients in your system.
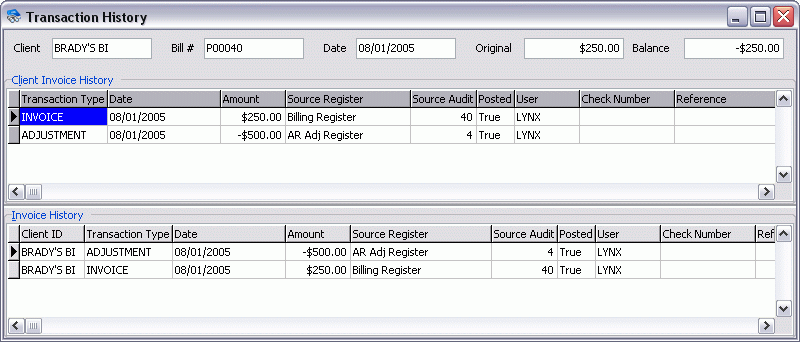
The Client Invoice History Grid at the top shows the transactions from the selected Freight Bill that apply to the selected Customer. This will display Invoices, CODs, COD payments, Invoice payments and adjustments. You can reprint an Invoice using the right mouse 'Reprint' menu option. The Invoice History Grid at the bottom shows all the transactions associated with the Freight Bill, even if they do not apply to the selected Customer. You can reprint an Invoice using the right mouse 'Reprint' menu option.
Context Menu
The options in this section apply to the Context Menus for both the 'Client Invoice History' and 'Invoice History' sections of the Transaction History window.
Reprint
Will display the Report Selection form prior to displaying the selection criteria form (as applicable). After selecting the desired report (using the Report Selection form) and specifying the selection criteria (as applicable), the report will preview to the screen. Click the printer icon at the top of the screen to send the report to the printer that is configured as the default printer for your workstation.
See the Crystal Reports Reference for more information on Report Functions.
Credit Memo and Rebill
Creates a new Freight Bill in the Customer Service program that reverses the selected Freight Bill. Optionally, you can also create a new Freight Bill (a 'rebill'). When you create a credit memo and (optionally) a rebill via this method, the original Freight Bill in the Customer Service program is left intact, and a duplicate Freight Bill with the same bill number but negative charges is created.
This new bill will offset the original after being updated via the Billing Register program. In the top left corner of the Customer Service program, the bill will be identified as a 'Credit' rather than an 'Original'. If you select the Rebill option, a second duplicate bill with the same charges as the original will be created that you can edit and then process through the Billing Register program to update the change to the A/R system. This bill will be identified as a 'Rebill' in the top-left corner of the Customer Service program. The Reason for Credit field displays the description entered in the A/R Transaction Types program. This description will be pasted into the Transaction Type field on the Customer Service program > Billing Tab. Make adjusting changes to the new, duplicate bill as required.
| Driver Pay, COD and Interline Payable charges are not included on 'Rebill' bills. |
View Trace Numbers
Will bring up a 'Trace Numbers' dialog box. Enter the 'Trace Number' or 'Trace Type' in the columns.
Attach / Open Related Files for AR_CASH
Selecting this option will open the Attach / Open Related Files window for the selected 'CHK_NUMBER' record in the AR_CASH Table, which allows you to attach document images or other related files to the specific 'CHK_NUMBER' record in the database.
Attach / Open Related Files for Transaction
Selecting this option will open the Attach / Open Related Files window for the selected 'AR_ID' record in the AR_SUM Table, which allows you to attach document images or other related files to the specific 'AR_ID' record in the database.
Crystal Report Type Details
Aging Reports
The Crystal Report template supplied with the TruckMate system is called 'ARAGING.RPT'. When you select Aging Reports, you will be have the option to select an aging date for the report, to specify whether you want to display paid Invoices, and to specify the level of detail you want to view. You can summarize the aging report by Currency, by Customer, by Freight Bill or by individual transactions. For more information on report functions in TruckMate see the Crystal Reports Reference.
Summary Statement
The Crystal Report template supplied with the TruckMate system is called 'BILLSTMT.RPT'. Before generating summary Statements, you must use the Assign Statements menu option to assign a Statement date and a Statement number to outstanding Invoices. When you select the Summary Statement report, you will be prompted to enter the Statement date for which you wish to generate Statements. This corresponds to the date assigned to Invoices using the Assign Statements option. Click on the down arrow for a calendar selection form. For more information on report functions in TruckMate see the Crystal Reports Reference.
Statement of Account
The Crystal Report template supplied with the TruckMate system is called 'STMTACT.RPT'. It generates a listing of all outstanding Invoices on the Customer’s account. The report will be previewed on the screen. For more information on report functions in TruckMate see the Crystal Reports Reference.
Collections
This option is available for your own custom collections Crystal Report template. For more information on report functions in TruckMate see the Crystal Reports Reference.
Sales
This option is available for your own custom sales Crystal Report template. For more information on report functions in TruckMate see the Crystal Reports Reference.
Other
The Crystal Report template supplied with the TruckMate system is called 'CLIENTLIST.RPT'. It generates a listing of all Customers configured in the Customer & Vendor Profiles program. The report will be previewed on the screen. For more information on report functions in TruckMate see the Crystal Reports Reference.