eManifest Defaults and Settings window

Defaults A Tab
The Defaults A Tab contains several configurable options for various sections of the eManifest program.
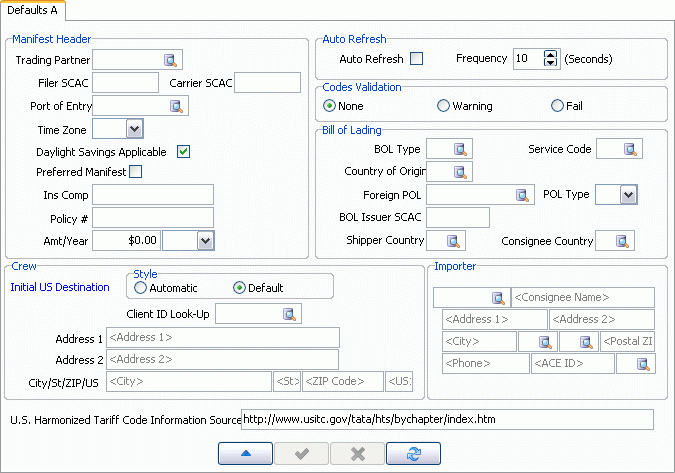
Manifest Header
If you would like to setup defaults that will apply to the Header section of the eManifest program, enter details in this section.
Trading Partner
Use the database search button to select a Trading Partner. The default options you setup on this Tab will be applied when the Trading Partner you select here is used for a Manifest.
Filer SCAC
Enter the SCAC of the company that is going to be generating the Manifest.
Carrier SCAC
Enter the SCAC of the Carrier that is going to cross the border with your shipment.
Point of Entry
Use the database search button to select a default Port of Entry for the Manifest.
Time Zone
Use the drop-down menu to select a default Time Zone.
Daylight Savings Applicable
If flagged here, the 'Daylight Savings' flag in the Header section will be checked by default when this Trading Partner is added to a Manifest.
Preferred Manifest
If flagged here, the 'Preferred Manifest' flag in the Header section will be checked by default when this Trading Partner is added to a Manifest.
Insurance Company / Policy # / Amt / Year
Enter the default Insurance Company and Policy information for the displayed Trading Partner. When this Trading Partner is attached to a Manifest, these values will automatically populate into the Hazardous Materials Tab.
Auto Refresh
The Auto Refresh section controls the global refresh behavior for the eManifest program.
Auto Refresh / Frequency
If you would like the eManifest program grids to refresh while the program is being used, select this flag, then enter an integer value (in seconds) into the 'Frequency' field to determine the interval between automatic refreshes. The Auto-Refresh behaviour is only applicable when the Manifests Tab or Message Details Tab is visible.
When working with the eManifest program on a local machine, the following shortcuts are available:
-
<Ctrl><R>: toggles refresh on/off.
Double-click the 'Auto Refresh' label (bottom right corner of Summary Tab and Messages Details Tab) toggles refresh on/off.
-
<Ctrl><U>: when auto refresh on, increases the number of seconds interval between each refresh.
-
<Ctrl><D>: when auto refresh on, decreases the number of seconds interval between each refresh.
Codes Validation
These options allow you to verify if the system codes used in the Manifest are accurate during the Validation check:
None
No Codes validation.
Warning
When exceptions are found, eManifest will return a warning and continue with validation.
Fail
When exceptions are found, eManifest will return an error and validation will fail.
Defaults B Tab
The Defaults B Tab contains several configurable options for various sections of the eManifest program.
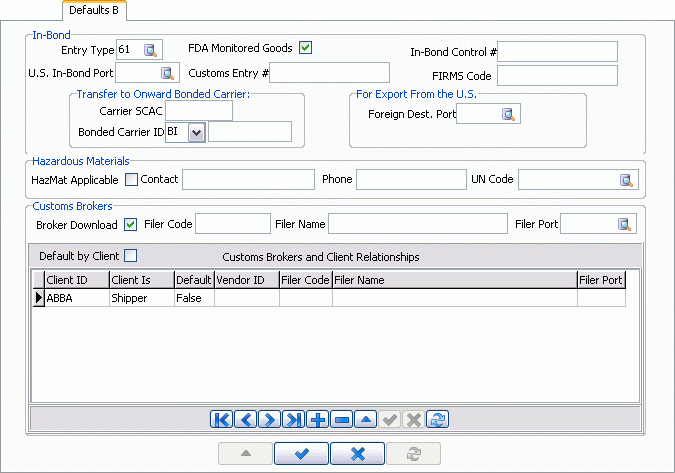
In-Bond
The settings in this section control the default configuration for the Bill of Lading > In-Bond Tab. Any values entered here will become the default values and will be automatically entered into the Bill of Lading > In-Bond Tab when new Manifests are being created.
Hazardous Materials
The settings in this section control the default configuration for the Hazardous Materials Tab. Any values entered here will become the default values and will be automatically entered into the Hazardous Materials Tab when new Manifests are being created.
Customs Brokers
The settings in this section control the default configuration for the Bill of Lading > Importer / Broker Tab. Any values entered here will become the default values and will be automatically entered into the Bill of Lading > Importer / Broker Tab when new Manifests are being created.
The top area of the Customs Brokers section sets up a global default for the eManifest program. If you would instead like to setup default Customs Brokers for individual Clients, use the Customs Brokers and Client Relationships Grid.
Broker Download
Select this flag to have the 'Broker Download' flag on the Bill of Lading > Importer / Broker Tab automatically select when entering a Manifest record. When selected, this flag requests information downloads from the Canadian Border Protection (CBP) agency to be sent to the Customs Broker.
Filer Code / Filer Name / Filer Port
Enter the Customs Broker information for the selected Client. Some of these fields may automatically populate based on the chosen 'Vendor ID'. These defaults will apply to the 'Customs Broker' section of the Bill of Lading > Importer / Broker Tab.
Customs Brokers and Client Relationships Grid
This Grid allows you to configure specific Custom Broker relationships with your various TruckMate EDI Clients.
Default by Client
If you wish to use setup default Customs Brokers for your individual TruckMate Clients, ensure that this flag is checked, and then enter details for each field below.
Client ID
Double click this field to select a TruckMate Client ID to create Customs Broker defaults for.
Client Is
Double click this field to access a drop-down menu where you can set the Client Type. Available options are 'Shipper', 'Consignee', 'Bill-To' and 'Customer'. When the Client selected in the 'Client ID' field is included on a Freight Bill as the 'Client Is' value selected here, the Customs Broker defaults will apply.
Default
If the 'Client Is' value chosen for the selected Client is that Client’s default value, set this field to 'True' by double clicking the field.
Vendor ID
Choose the Vendor ID / Customs Broker for the selected Client.
Filer Code / Filer Name / Filer Port
Enter the Customs Broker information for the selected Client. Some of these fields may automatically populate based on the chosen 'Vendor ID'.
Notifications Tab
The Notifications Tab allows you to configure how Inbound and Outbound update messages are stored in the Dispatch program > Trip Grid.
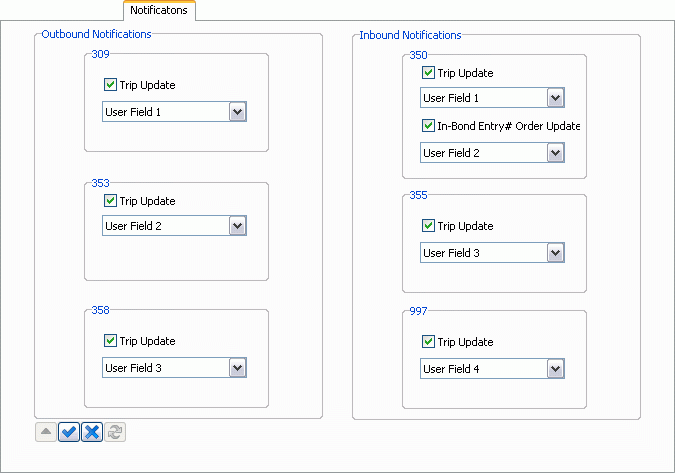
Outbound Notifications
For each of the Outbound Notification messages, you can configure the Dispatch program > Trip Grid 'User fields' to contain data regarding the Outbound EDI transmissions to the Canadian Border Protection Agency.
Simply select the 'Trip Update' flag for the EDI transmission you wish to track (309, 353 and/or 358), and then use the drop-down menu to select the 'User Field' in the Dispatch program > Trip Grid that will contain the Outbound message notification data.
This will let your Dispatchers know what data has been sent to the CBP.
Inbound Notifications
For each of the Inbound Notification messages, you can configure the Dispatch program > Trip Grid 'User fields' to contain data regarding the Inbound EDI transmissions from the Canadian Border Protection Agency.
Simply select the 'Trip Update' flag for the EDI transmission you wish to track (350, 355 and/or 997), and then use the drop-down menu to select the 'User Field' in the Dispatch program > Trip Grid that will contain the Inbound message notification data.
This will let your Dispatchers know if the Manifest has been accepted by the CBP.
Cross Reference Tab
The Cross Reference Tab allows you to match TruckMate system codes for Commodities, Units of Measurement and Weight with the codes used by the ACE system.
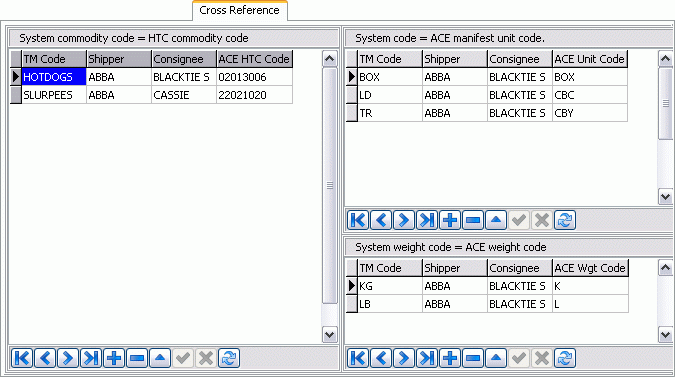
The three sections of the Cross Reference Tab allow you to link TruckMate Codes with ACE Harmonized Transit Commodity (HTC) Codes, ACE Manifest Codes and ACE Weight Codes. When a Freight Bill is added to a Manifest, the eManifest program will search the Freight Bill details (as entered in the Customer Service program > Details Tab) and match any Commodity Codes found there with HTC and/or ACE Manifest Codes based on the rules specified in the following three sections.
Manifest (HTC / ACE) Codes are equated with TruckMate Codes using the following logic:
-
The 'Shipper' and 'Consignee', and 'Commodity' (or 'Pieces Unit') all match.
-
The 'Shipper', and 'Commodity' (or 'Pieces Unit') match.
-
The 'Consignee', and 'Commodity' (or 'Pieces Unit') match.
-
'Commodity' or 'Pieces Unit' match, 'Shipper' and 'Consignee' are blank in the cross reference record.
TruckMate Commodity = ACE HTC
This section allows you to link a TruckMate Commodity Code, as defined in the Codes Maintenance program, with an ACE Harmonized Transit Commodity Code.
TM Code
Double click this field to select a TruckMate Commodity Code. Commodity Codes are defined in the Codes Maintenance program > Commodity Tab.
Shipper / Consignee
Based on the matching logic outlined above, the 'Shipper' and 'Consignee' fields are used to setup Commodity relationships between TruckMate and HTC / ACE that are 'Shipper' and 'Consignee' specific.
For example: a client uses Commodity Code 'FAK' for all orders in the Customer Service program. For most freight for the Carrier, the Manifest Unit Code is 'PCS', but for one specific Shipper ('SHIPPERA'), the Manifest Unit Code is 'BLK' (Bulk). This Carrier would set up two Cross Reference records:
-
TM Code = FAK, Shipper = (Blank), Consignee = (Blank), ACE Unit Code = PCS
-
TM Code = FAK, Shipper = SHIPPERA, Consignee = (Blank), ACE Unit Code = BLK
Thus when normal 'FAK' Freight is entered, the eManifest program will transfer that to the Manifests as 'PCS', but when the specific Carrier 'SHIPPERA' is attached to a Freight Bill as 'Shipper', the Manifest code 'BLK' is used.
ACE HTC Code
When you double-click this field, your web browser will automatically open to the United States International Trade Commission’s website (http://www.usitc.gov/tata/hts/bychapter/index.htm), with the Tariff Information Center page displayed.
Browse the various .PDFs found on this site to locate the specific Commodity you are linking from TruckMate, and then record the HTC Code and enter it in this field. The HTC Code consists of the 'Heading/SubHeading' value and the 'Stat Suffix' value (without any periods), which are found next to the commodity you are shipping in the various .PDFs available at the USITC website.
TruckMate Commodity Unit = ACE Manifest Unit
This section allows you to link a TruckMate Commodity Unit Code, as defined in the Codes Maintenance program, with an ACE Manifest Unit Code.
TM Code
Double click this field to select a TruckMate Commodity Unit Code. Unit Codes are defined in the Codes Maintenance program > Units Tab.
Shipper / Consignee
See the above description in the 'TruckMate Commodity = ACE HTC' section.
ACE Unit Code
Double click this field to select an ACE Unit Code to match against the 'TM Code'. The ACE Unit Codes are hard-coded into the TruckMate system and cannot be modified.
TruckMate Weight Unit = ACE Weight Unit
This section allows you to link a TruckMate Weight Unit Code, as defined in the Codes Maintenance program, with an ACE Weight Code.
TM Code
Double click this field to select a TruckMate Commodity Unit Code. Unit Codes are defined in the Codes Maintenance program > Units Tab.
Shipper / Consignee
See the above description in the 'TruckMate Commodity = ACE HTC' section.
ACE Wgt Code
Double click this field to select an ACE Weight Code to match against the 'TM Code'. The ACE Unit Codes are hard-coded into the TruckMate system and cannot be modified.
Passengers Tab
The Passengers Tab is used to create records for any Passengers that may be crossing the border with an ACE qualified Driver and Power Unit.
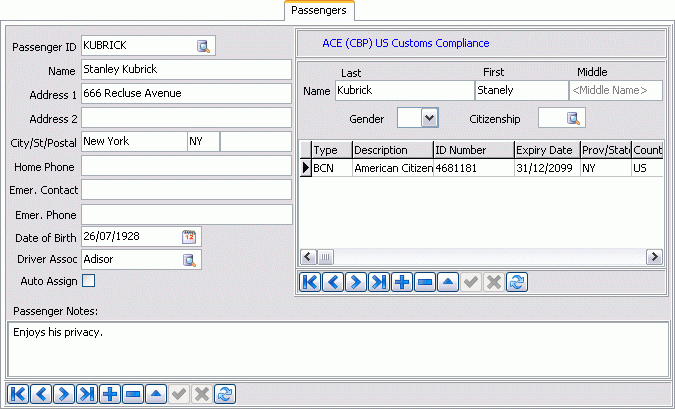
Passenger ID
When creating a new Passenger ID, simply enter the Passenger ID Code you wish to use, and then fill in the address information below. If you would like view and/or edit the details of an existing Passenger ID code, select the Database search button to browse the Passenger records available in your system.
Name / Address Information
Enter all the relevant details for the displayed Passenger ID. Not all fields are required, but the more information included, the better.
Driver Assoc
Use the Database search button to choose a TruckMate Driver that will be associated with the displayed Passenger ID. If you associate a Passenger ID with a specific Driver ID (as configured in the Driver Profiles program), you will only be able to assign the selected Passenger to a Manifest where the associated Driver has been added. Driver and Passengers are added to Manifests on the Crew Tab.
Auto Assign
If the Auto Assign flag is enabled, whenever you add a Passenger’s Associated Driver to a Manifest as the 'EJ' (Principal Person) crew member on the Crew Tab, a window will open asking if you would like to add the displayed Passenger.
Passenger Notes
Enter any free format notes regarding the displayed Passenger.
ACE (CBP) US Customs Compliance
This section is used to setup the Passenger’s ACE (CBP) US Customs Compliance information.
Last Name / First Name / Middle Name
Enter the relevant details for the selected Passenger ID in the spaces provided.
Gender
Use the pull down menu to select either 'M' (Male) or 'F' (Female).
Citizenship
Click the search button to select a Citizenship code from those available on your system.
Customs Detail Grid
Type
Double click this field to select as Customs Type ID from those available on your system.
Description
This field should automatically populate based on the 'Type selected above. If not, enter a brief description of the Type value in this field.
ID Number
Enter the selected Passenger’s Customs ID number in the space provided.
Expiry Date
Double click this field to select a date from a Calendar menu.
Province / State
Double click this field to select a Province / State Zone code.
Country
Double click this field to select a Country code for this Passenger.
SCAC
Enter this Passenger’s Standard Carrier Alpha Code (SCAC), defined by the National Motor Freight Traffic Association, which is sometimes required when crossing into the US.
On Person
The 'On Person' field specifies if the Passenger has on his person the specific document described on this Grid detail line. In some cases certain documents are required to be physically available to make a successful border crossing (birth certificate, passport, etc.). Double click this field to set the value to 'True' or 'False'.