Rules for Selected Contract Details

Rules tab
After rules have been created on the tabs in the lower part of the screen, they must be assigned to contracts. First, make sure that the correct contract header is displayed in the top left section of the screen. Make sure that the Rules tab is at the front in the top right section of the screen. Then, using the left mouse button, click and drag the desired rule from the bottom section of the screen to the Rules tab. When you release the left mouse button, the rule will be added to the Rules tab, and thus to the contract. Normally these rules will apply to pickup / delivery drivers. If other drivers are involved (other than pickup / delivery), the rules will not apply to those drivers. However, if you need to apply the rules to non pickup /delivery drivers, you can set the application configuration option in Application Configurator Program > Driver Pay > PAYCON.EXE - Calculate Freight Bill based Driver Pay on Drivers Other than Pickup/Delivery Drivers to 'True'; the default value for this option is 'False'.

Rule ID
This is the system-generated identifier for each rule created in the bottom part of the screen. If you are viewing multiple rules and would like to sort them according to Rule ID, use your mouse to select the title of this field, this will sort the data on the grid first based on Rule ID (ascending) and then on Group.
Rule Seq
A numeric value that indicates the order in which the rules should be tested is assigned sequentially when the rule is assigned to the contract. This field works in conjunction with the Group field. To change the sequence, double-click in the Rule Seq field and enter a new numeric value. When the Dispatch, Customer Service, Quick Bill Entry or Local Dispatch programs calculates Driver pay, for each Group, the system will test each rule in the order of the Rule Sequence until a rule yields a payment.
|
The first rule of the same type of rule (Trip/leg based or Freight Bill based) in the Group that generates pay is used. Then the system proceeds to the next Group, testing each rule in the order of the Rule Sequence, and creates a pay record based on the first rule of the same type of rule within that group that generates pay. Therefore, it is possible to have more than one pay record generated for the same rule Group. Rules that auto-generate driver pay based on legs must do so for each leg since there may be different drivers associated with each leg. It is important that the rules within a group be sequenced so that the more particular or specialized criteria are tested first before the more generic rules. Groups cannot be re-sequenced. |
Rule Type
The rule type, corresponding to the four tabs in the bottom part of the screen, is indicated in this field.
Pick / Drop
Is used to control when the payment rule should be applied. Double click to toggle the value. This field only applies when the payment rule is based on the Freight Bill (Percentage and Unit rules), not on trip activity. If the value is set to 'Pick', pay will only be calculated if the Driver is assigned as the Pick Up Driver (which can be viewed in the Customer Service program). If the value is set to 'Drop', pay will only be calculated if the Driver is assigned as the Delivery Driver.
Group
The group field is used to create a hierarchy where you can pay a driver by more than one rule on the same trip or freight bill. When driver pay is calculated, the system checks each rule in each group, in the order of the Group Sequence and then by the Rule Sequence for the rules within each group.
|
The first rule of the same type of rule (Trip/leg based or Freight Bill based) in the Group that generates pay is used. Then the system proceeds to the next Group, testing each rule in the order of the Rule Sequence, and creates a pay record based on the first rule of the same type of rule within that group that generates pay. Therefore, it is possible to have more than one pay record generated for the same rule Group. Rules that auto-generate driver pay based on legs must do so for each leg since there may be different drivers associated with each leg. It is important that the rules within a group be sequenced so that the more particular or specialized criteria are tested first before the more generic rules. Groups cannot be re-sequenced. |
Double click in the Group field to assign a group to each rule. If you are viewing multiple rules and would like to sort based on group, use your mouse to select the title of this field, this will sort the data on the grid first based on group and then based on Rule ID.
Use DMILE Flat Pay
On the Mileage tab in the Customer Service program, you can specify a flat pay amount for a Zone combination. If you check the 'Use DMILE Flat Pay' flag, another rule will be added to the grid. This rule will generate pay entries based on the flat pay amounts configured on the Mileage tab.
This rule does not apply to the 'Leg From' and the 'Leg To' Zones on the trip in the Dispatch program. It applies when a Freight Bill with a 'Start' and 'End' Zone combination that matches the DMILE entry is assigned to a trip in the Dispatch program.
Use JOB Pay
This option works similarly to the 'Use DMILE Flat Pay' option above. When this flag is checked, it will add a record to the JobQuote program grid, creating new pay behavior and using the rules set in the Job Quote program > Driver Pay Rules.
Pay tab
Extra Pay Codes are configured separately for each contract on the Pay tab, but can be copied from one contract to another as desired. They are not automatically assessed. That is, you must manually add Extra Pay entries for Drivers. This can be done in the Dispatch program (on the Driver Pay form invoked from the right-mouse menu in the Trip or Driver grids), in the Customer Service program (on the Driver Pay tab), or in the Driver Pay Audit program (on the Pay tab).
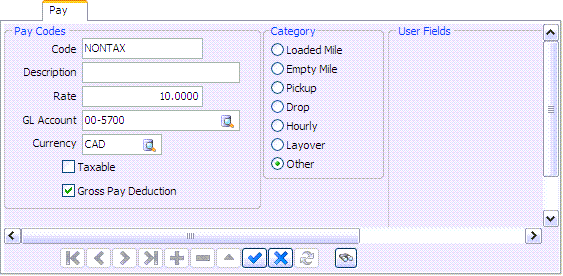
Code
Enter the extra pay Code in this field. When you assign extra pay to Drivers (in the Customer Service program, Dispatch program or Driver Pay Audit program ) you generally select based on the Code entered here (although sometimes you can select by the Code Description).
Description
Enter a Code description. The Code description is printed on the Driver’s statements (generated by the Driver Statements program).
Rate
Enter the amount that will be paid to the Driver when this extra pay Code is added to their pay. This amount could be positive or negative. Why negative? Because this will allow you to make a deduction from the driver pay when there is a need for that in certain cases.
GL Account
The Account selected here will be debited for the amount of the extra pay when the Driver Pay Register program is run. Click the search button for an Account selection form. GL Accounts are configured in the GL Chart of Accounts program.
Currency
Select the currency of the Extra Pay from the drop down list box. Currencies are configured in the Codes Maintenance program, on the Units tab. If the currency selected here differs from the Base currency (configured on the Units tab in the Codes Maintenance program), when the payment is posted using the Driver Pay Register program a posting will be made to Account for the currency exchange.
Taxable
This field is used to set the status of the payment with regards to payroll taxes, and for those Drivers identified as a Pay Type of Driver or Vendor, you can distinguish which earnings and deductions will be reported on a 1099 form. For payroll taxes, this function is only applicable to Drivers who are paid through the Payroll module (as configured in the Driver Profile program, in the Pay Type field).
If the Taxable value is set to 'True', that means that the payment or deduction is subject to payroll taxes, and the payment will be added to, or the deduction deducted from, the employee’s pay (in the Payroll Time Sheets program) when the Driver Pay Statement program is run.
If the Taxable value is set to 'False', that means the payment is not subject to payroll taxes. When calculating totals used on a 1099 form, setting the Taxable option to 'True' will result in earnings and deductions being included in the total calculations. Setting the Taxable option to 'False' will result in no earnings or deductions being added to the total calculations.
For payroll taxes, the setup of your Application Configurator program > PRSETUP.EXE determines how the next few steps flow depending on whether Payroll and Driver Pay Transfer are set to 'True' or 'False'. When the Driver Pay Statement program is run and the Application Configurator (PRSETUP.EXE) is set to 'True', a check will be generated for this Driver in the Accounts Payable module, and the payment will not become part of the employee’s payroll amount. The check can then be viewed/printed from the Check Printing or Instant Checks programs. If the Application Configurator (PRSETUP.EXE) is set to 'False', then the non-taxable amount will flow through to a non-taxable paycode previously set up in the payroll setup/employee payroll programs. This amount will be added to or deducted from the employee’s net pay.
When a user changes the 'Taxable' flag for pay or ded codes and clicks on Save, he/she will be prompted to provide 'Year Range' that indicates for what taxation year the change should be applied.
|
The label of the 'Taxable' field will change depending on if the 'Currency' is set to 'USD' and the following variable:
|
Gross Pay Deduction
If this Pay Contract includes a Gross Pay Deduction, select this flag. Drivers that are set to receive deductions from their Gross Pay (in the Driver Profiles program) will have a deduction calculated when this Pay Contract is used.
If the 'Currency' is set to 'USD', the following comes into effect:
-
'Gross Pay Deduction' and 'Taxable' checked = Deduction before tax (1099/W2)
-
'Gross Pay Deduction' and 'Taxable' unchecked = After Tax Deduction (1099/W2)
Category
The radio button selected here determines the columns in which the Extra Pay amount will be displayed. In the Driver Pay Audit program (and on the Driver Pay tab in the Customer Service program, and in the Driver Pay form in the Dispatch program) pay quantity and rate are displayed according to their category. For example, if you select the Other radio button, when you add an Extra Pay entry in the Driver Pay Audit program the value in the Other Quantity field will default to 1, and the value in the Other Amount field will default to the amount entered in the Rate field.
Pay Code User Field 1 - Pay Code User Field 10
These 10 fields are User-Defined, and can contain whatever information your Company wishes to track against the Pay Code. The field labels for these 10 fields are configured using the 'Pay Code User 1 - 10' options in the Application Configurator program > PAYCON.EXE section.
Find
This option allows users to easily search through Driver Pay Codes.
Deductions tab
Deduction Codes are configured separately for each contract, but can be copied from one contract to another. Deductions can be manually added to Driver Accounts in the Driver Pay Audit program, on the Driver Pay tab in the Customer Service program, or on the Driver Pay form in the Dispatch program (invoked from the context menu in the Trip or Driver grid). Deductions can also be applied semi-automatically, using the Memorize function in the Driver Pay Audit program.
You will notice that there are one or more deduction Codes already created on the Deductions tab, with Deduction Codes in the format of 'OWE-XXX' (where 'XXX' is one of your currency Codes). These Codes are created automatically each time you create a new contract. They are used when the Driver’s statement has a balance owing - that is, the amount of the deductions exceeds the amount of the payments. When this occurs, a deduction is created for the Driver using one of these Codes. The deduction will be created in the currency of the statement, and will be included in the next period’s statement.
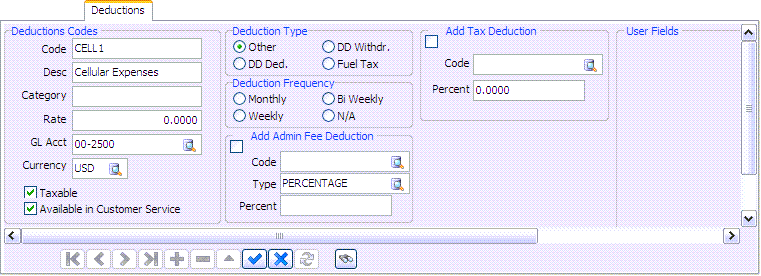
Code
Enter the deduction Code in this field. When you assign deductions to Drivers (in the Customer Service program, Dispatch program or Driver Pay Audit program) you generally select based on the Code entered here (although sometimes you can select by the Code Description).
Description
Enter a Code description. The Code description is printed on the Driver’s statements.
Category
Is not currently used.
Rate
Enter the amount that will be deducted from the Driver’s pay when this deduction Code is used.
GL Account
The Account selected here will be debited for the amount of the extra pay when the Driver Deduction Register program is run. Click the search button for an Account selection form. GL Accounts are configured in the GL Chart of Accounts program.
Currency
Select the currency of the deduction from the drop down list box. Currencies are configured in the Codes Maintenance program, on the Units tab. If the currency selected here differs from the Base currency (configured on the Units tab in the Codes Maintenance program), when the deduction is posted using the Driver Deduction Register program a posting will be made to Account for the currency exchange.
Taxable
This field is used to set the status of the payment with regards to payroll taxes, and for those Drivers identified as a Pay Type of Driver or Vendor, you can distinguish which earnings and deductions will be reported on a 1099 form. For payroll taxes, this function is only applicable to Drivers who are paid through the Payroll module (as configured in the Driver Profile program, in the Pay Type field). If the Taxable value is set to 'True', that means that the payment or deduction is subject to payroll taxes, and the payment will be added to, or the deduction deducted from, the employee’s pay (in the Payroll Time Sheets program) when the Driver Pay Statement program is run. If the Taxable value is set to 'False', that means the payment is not subject to payroll taxes. When calculating totals used on a 1099 form, setting the Taxable option to 'True' will result in earnings and deductions being included in the total calculations. Setting the Taxable option to 'False' will result in no earnings or deductions being added to the total calculations.
For payroll taxes, the setup of your Application Configurator option for PRSETUP.EXE determines how the next few steps flow depending on whether Payroll and Driver Pay Transfer are set to 'True' or 'False'. When the Driver Pay Statement program is run and the Application Configurator (PRSETUP.EXE) is set to 'True', a check will be generated for this Driver in the Accounts Payable module, and the payment will not become part of the employee’s payroll amount. The check can then be viewed/printed from the Check Printing or Instant Checks programs. If the Application Configurator (PRSETUP.EXE) is set to 'False', then the non-taxable amount will flow through to a non-taxable paycode previously set up in the payroll setup/employee payroll programs. This amount will be added to or deducted from the employee’s net pay.
|
The label of the 'Taxable' field will change depending on if the 'Currency' is set to 'USD' and the following variable:
|
Available in Customer Service
This flag enables/disables the use of the displayed Driver Deduction code from within the Customer Service program > Driver Pay tab. If this flag is un-checked for a Deduction code, a user will not be able to enter Deductions using that particular code.
Add Tax Deduction
Select this checkbox to add a Tax Deduction, using the two fields below.
-
Tax Code
Is used to attach an additional deduction Code to the deduction Code that is currently selected. Whenever the original Code is used (in the Customer Service program, Dispatch program or Driver Pay Audit program), a second deduction will be created using the deduction Code stored in this field. As the Tax Code deduction is applied as a percentage of the original deduction Code, the Rate entered for the Tax Code deduction Code will be divided by 100 to determine the value of the Rate field on the Deduction tab in the Driver pay form. The Quantity field on the Deduction tab in the Driver Pay form will default to the Amount of the original deduction. -
Percentage
If you wish to enter a percentage as the Tax deduction (instead of using the above 'Tax Code' field) simply enter a percentage value here.
Deduction Type
The radio option selected here will determine the Deduction Type of the currently selected Deduction. Available options are: 'Other', 'DD Deduction', 'DD Withdrawal' or 'Fuel Tax'. The 'DD' prefix stands for 'Damage Deposit'. Choose the appropriate label by clicking it’s radio option. These values will be used when Deductions are logged against the selected Driver in other programs.
| Selecting the 'Fuel Tax' type will create Driver Deductions based on a Miles-per-Gallon average calculated from previous Fuel Tax Trip entries. |
Deduction Frequency
The radio option selected here will determine the frequency that the selected Deduction will occur. Choose from either 'Monthly', 'Weekly', 'Bi Weekly' or 'N/A'.
Add Admin Fee Deduction
Select this checkbox to add an Administration Fee Deduction, using the three fields below.
-
Tax Code
Is used to attach an additional deduction Code to the deduction Code that is currently selected. Whenever the original Code is used (in the Customer Service program, Dispatch program or Driver Pay Audit program), a second deduction will be created using the deduction Code stored in this field. As the Tax Code deduction is applied as a percentage of the original deduction Code, the Rate entered for the Tax Code deduction Code will be divided by 100 to determine the value of the Rate field on the Deduction tab in the Driver pay form. The Quantity field on the Deduction tab in the Driver Pay form will default to the Amount of the original deduction.
-
Type
The Type field is used to configure how the Tax Code you have selected will behave when it is applied as an additional Deduction. Double-click this field to select one of the available Type codes:
-
Percentage: this code will look to the 'Percentage' field below and use the value found there as the additional deduction (applied as percentage of the original deduction).
-
Flat: this code will add a flat rate as an additional deduction (as defined by the 'Rate' field of the deduction code you are appending).
-
Top-Up: this code will add an amount to the original charge up to a certain 'Top-Up' value, as configured by the 'Top-Up To' field that replaces the 'Percentage' field when this 'Type' is selected. For example, if the deduction charge (after tax) totals $75.00 but there is an admin fee (attached to the deduction) with a 'Top Up' value of $100.00 then the program will automatically create an admin deduction record for $25.00 which is equal to the difference between the 'Top Up' value ($100.00) minus Deduction records Value ($75.00).
-
Custom: the 'Custom' type allows you to use a custom coded process to calculate the Administration Fee Deduction. The procedure that gets called when 'Custom' type is used is 'CUSTOM_DRDED_ADMIN_FEE'.
-
Fixed: when this Type is selected, the Admin Fee will be created with the same quantity as the Deduction code it is based on, but with the specified rate (and with amount = 'Quantity' * 'Rate'). This will work for all applications that generate Admin Fee deductions, including the Fuel Card Data Import program (where, for example, you may wish to charge a Driver an extra half cent per liter on fuel purchases). Note that if the original deduction has 'Quantity' = '1', then the 'Fixed' and 'Flat' Types will generate the exact same Admin Fee.
-
-
Percent
If you wish to enter a percentage as the Admin Fee deduction (instead of using the above 'Tax Code' field) simply enter a percentage value here.
Deduction Code User Field 1 - Pay Code User Field 10
These 10 fields are User-Defined, and can contain whatever information your Company wishes to track against the Pay Code. The field labels for these 10 fields are configured using the 'Pay Code User 1 - 10' options in the Application Configurator program > PAYCON.EXE section.
Find
 This option allows users to easily search through Driver Deduction Codes.
R&M tab
The R&M Deduction Codes specify which deduction Codes are charged to a particular Driver depending on how your work orders are set up in the R&M Work Order program. Ideally, you want work orders set up in the R&M Work Order program to be automatically deducted from your Drivers information when the R&M Work Order Register program is executed. Set up these deduction Codes under the Deduction tab. The R&M tab is especially handy when calculating the taxes in British Columbia where we are charged a '7%' GST and a '7%' PST tax on most items.
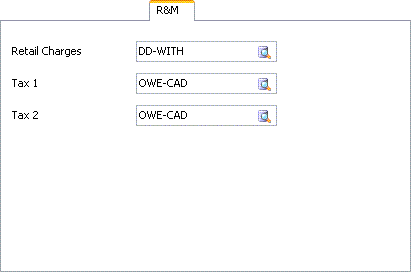
Retail charges
Enter the retail charges as well as the Driver Deduction Code you want these charges shown under on the Driver Pay Statement. An example Code might be 'shop'.
Tax 1
Enter the Tax Type. Enter the Driver Deduction Code you want these charges shown under on the Driver Pay Statement. This will depend on your R&M Configuration program configuration. An example for this entry might be 'GST'. If you want the GST for Drivers to show here as a separate identified line, then using a GST deduction Code set up for a Driver would be appropriate. If not, using the 'shop' Code may also be appropriate.
Tax 2
Enter the Tax Type. Enter the Driver Deduction Code you want these charges shown under on the Driver Pay Statement. This will depend on your R&M Configuration program configuration. An example for this entry might be 'PST'. If you want the PST for Drivers to show here as a separate identified line, then using a PST deduction Code set up for a Driver would be appropriate. If not, using the 'shop' Code may also be appropriate.
Payable tab
The Payable tab is essentially an optional override of the Driver Pay Account. Simply select the add sign ('+'), double-click in the column to enter the correct currency to be used, and then double-click in the Control Account column to bring up the Driver Pay Control Account dialog box. Select a control Account from the choices.
Currency
Double-click to view currency choices.
Control Account
Double-click to bring up the 'Select Driver Pay Control Account' dialog box where you can search by control Account and description.
Entering more than one Driver Pay Account
For advanced users only: ensure you’ve created a second Driver Pay Account in the GL Chart of Accounts program. Then, you can use the desired second Account in the A/P Invoice Entry program > Driver Deductions Tab (use the '' button on the navigational bar to enter a new record, then double-click on the Account, and ensure it displays the desired Account). As well, use the desired second Account in the Customer Service program > Driver Pay tab and follow the same steps as above. Use the '' button to add a new record, double-click on the Account, ensure it displays the desired Account.
| You can enter more than one Driver Pay Account. |
GL by Site tab
The GL by Site tab provides an optional over-ride of Expense Account information by Site ID.
Site ID
This displays the ID Code of the Site being used.
Service Level
Displays the Service Level associated with the selected Site ID.
Expense Acct
Displays the GL Account associated with the selected Site ID.
Stat tab
The Stat tab provides details for Driver contract rates on Statutory Holidays.
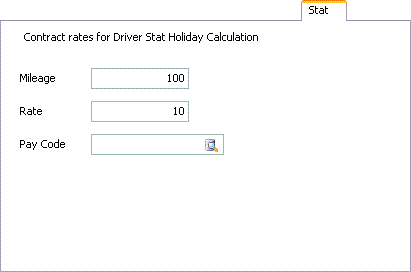
Mileage
Enter a numerical value for the Mileage based Holiday pay.
Rate
Enter a numerical value for Rate based Holiday pay.
Pay Code
Click the search button to select which Pay Code will be displayed when a Contract is fulfilled on a Holiday.