Customer Profiles header, tabs A-C

Customer Header
Customer Code
Can be up to 10 characters in length. This Code is used for selecting Customers throughout the Billing module and the Accounts Receivable module (although frequently you can select by the Customer name also). You can make the system automatically create numeric Codes of a specified length using the Application Configurator program.
Note: Under certain circumstances, the Customer Code can be auto-generated for your users. See the Address Tab > Auto-generating a Customer Code based on address information section for more information.
Customer Name
Enter the full name of the customer. This field must be filled out if auto-generated Custom Codes are being used (see note above).
Status
Note: This field is only visible if the TruckMate CRM license is installed. If the CRM license is not installed this field disappears and the 'Terminated' checkbox (described next) appears instead.
This field displays the current status of the selected customer. Available options are:
-
Active: This status means that the customer is a current customer and is ready to conduct business if there is a need.
-
Don’t Call: This means that the customer is a current active customer but prefers not to be contacted by marketing people for any business promotions.
-
Lead: This is a potential prospect customer. The process of collecting information about this customer is just beginning in hope to turn this customer into a prospect and then active customer.
-
Lost: This means that the selected customer used to be either and active customer or a prospect customer but was lost to one of our competitors.
-
Prospect: This status indicates that this is not a current active customer yet, but is a potential customer that we need to promote our business to.
-
Terminated: This means that this customer has been permanently terminated and is no longer our customer.
Terminated
Select this option if the currently selected Customer has been Terminated.
Note: This option is visible if the system does NOT have the CRM license installed.
Configure Web Services
Clicking the 'Configure Web Services' button opens the Configure Web Services window where you can setup this Customer’s Web Services protocols. The 'Save' button at the bottom of the window saves all changes, while the 'Close' button closes the window. The Web Services Setup window is broken into three sections: 'Inbound 204', 'Outbound 214' and 'Veltion':
Inbound 204
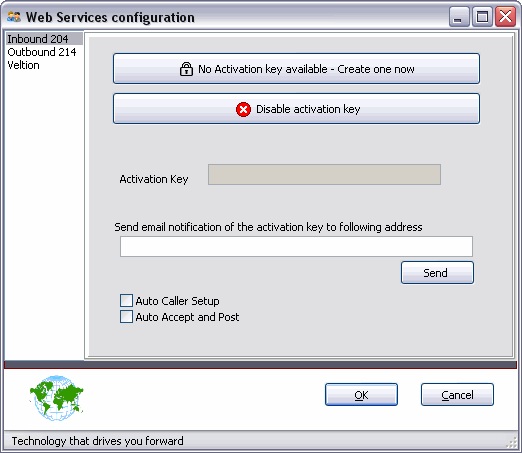
No Activation Key Available
Click this button to generate a SOAP 204 Activation Key into the 'Activation Key' field below.
Disable Activation Key
If there is an email address in the 'Email Notification' field below, clicking the 'Disable Activation Key' button will remove the Activation Key from the field and create an email notifying the Client of it’s disabling.
Activation Key
This field is uneditable, and will generate an Activation Key when the 'No Activation Key Available - Create one now' button is used.
Email Notification / Send
Enter an email address you would like to have notifies upon creation / deletion of the SOAP 204 Activation Key. In the case of additions, you must click the 'Send' button. When deleting an Activation Key, an email is generated automatically and loaded into your email software, ready to send.
Auto Caller Setup
Check this option to allow Automated Caller Setup.
Auto Accept and Post
Check this option to enable 'Automatic Accepting and Posting' in your system.
Note: Checking this option will also enable the 'Auto Caller Setup' option.
Outbound 214
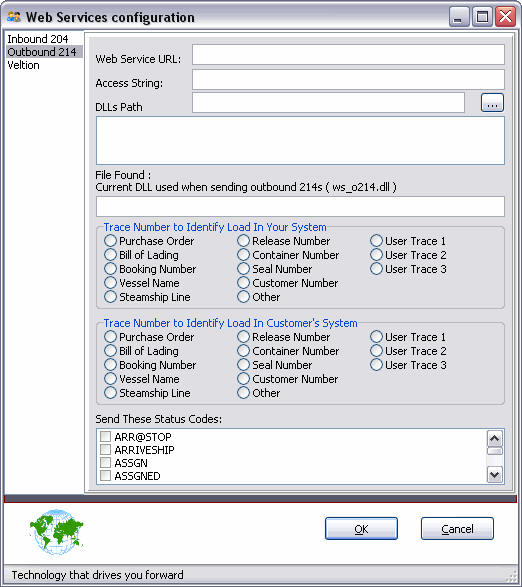
Web Service URL
Enter the URL string that the Customer will use to connect to TruckMate’s Web Services.
Access String
Enter your Web Services Access String.
DLLs Path
Click the search button to browse your system for the Web Services '.DLL' file.
File Found
This text field will display the current '.DLL' selected to be used when sending Outbound 214s to Web Services.
Trace Number to Identify Load in Your System
Select the method you would like to use in Identifying Freight Loads on your local system.
Trace Number to Identify Load in Customer’s System
Select the method you would like to use in Identifying Freight Loads on your Customer’s system.
Send These Status Codes
Choose the Status Codes you would like to have sent with your Outbound 214s.
Configure Stop Profiles
For information on configuring stop profiles, see Stop Profiles.
Accessibility Options Tab
The Accessibility Options Tab allows you to outline any specific LTL Delivery Options pertaining to this Customer’s Delivery Site.
Suite / Floor / Dock Number
Enter the numerical values pertaining to these fields in the space provided.
Stairs / Elevator / Dock / Site Survey / Vehicle Restriction
This group of checkboxes describe the Delivery Site’s physical layout. Each of these checkboxes is a tri-state checkbox. Which means each of them can be set to one of three different values:
-
Checked*: This means the value of the field is 'True'.
-
Unchecked - solid white color*: This means the value of the field is 'False'.
-
Unchecked - grey or blue color*: This means that the value of this field is not set 'Null'.
Click with your mouse repeatedly to toggle between the three values.
Default Terminal
Double-click this field to choose a Default Terminal for this Delivery Site.
Terminal Zone
Manually type in the Terminal Zone for this Delivery Site.
Map Book Guide
Enter Map Book Guide data for the client.
Accessorial Charges Tab
You can specify any Accessorial Charges for this Customer using the Accessorial Charges Tab.
Origin / Destination
Enter a numerical Origin / Destination Code in this field.
Acc Ch Code
Double click this field to select the Accessorial Charge Code you would like to assign to the Customer.
ACE (CBP) US Customs Compliance Tab
The Customs Tab allows you to set the parameters of your ACE (CBP) US Customs Compliance data. Enter the appropriate ID codes in their respective fields.
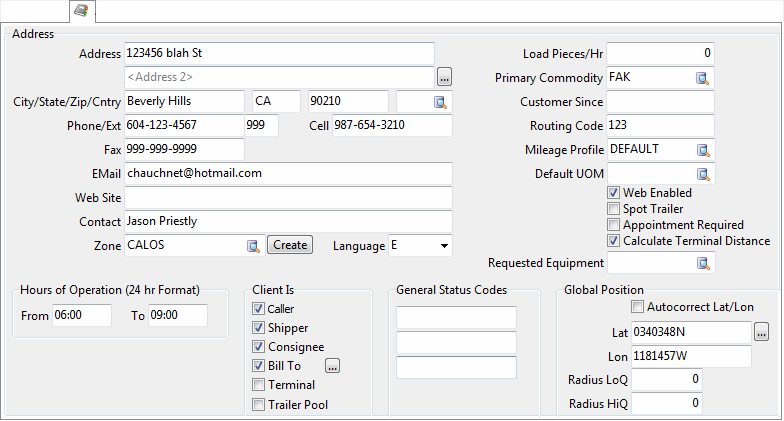
Address tab
The Address Tab contains address information for the selected Customer, as well as some other miscellaneous details, such as the Customer’s primary commodity information.
Unit
This field allows you to enter a Unit number for the Client ID, if the Client’s address is an apartment or suite in a larger building.
Note: This field is only available when the Application Configurator program > PROFILE.EXE > 'Show Unit Field' option is set to 'True'.
Address
Enter the company’s address. Note that there are two address fields; the second field can be used, for example, in those cases where a company’s mailing address differs from the street address. You should decide on a standard for using the address fields: if you enter the street address in the first field and the mailing address in the second, be sure to follow this method for all Customers. This will make invoice formatting easier.
Selecting the ellipsis button next to the second 'Address' field will open the Street Level window.
City/State/Zip
These three fields are used for the Customer’s city, state and postal/zip code, respectively.
Auto-generating a Customer Code based on address information
Your system administrator can setup some options that will allow Customer Codes to be automatically generated based on the information supplied in the 'Address', 'City' and 'State' fields. After manually entering a customer’s name and address information, the user can simply select the 'Save' (checkmark) button on the TruckMate navigation bar. If the Application Configurator program > PROFILE.EXE > 'Auto Gen Client Key' option is set to either 'True' or 'Client Info', a Customer Code will be automatically generated. See the previous link for more information on the format of the generated Customer Code.
If the user’s security settings allow (see the SECSETUP.EXE > Business Events > Misc > Profiles > 'Allow Enter Client ID in Client Info Mode' option), they can then overwrite the auto-generated Customer Code (if required).
Note: Client Codes can only consist of letters and numbers (i.e. no special characters).
Country
Select the two character Country code that the customer operates within. The codes available in this drop-down menu are those flagged as 'Active' on the Codes Maintenance program > Country Tab.
Phone / Ext / Fax / Cell
Enter the Customer’s Phone number (an Extension value is optional), Fax number and/or Cellular phone number in these fields.
If there is an email contact address for the company, enter it here.
Web Site
If this Client has a corporate Web Site, you may enter it here for future reference.
Contact
Enter the name of the primary contact person at this company. Additional contacts can be entered on the Billing Info Tab and on the Contacts Tab.
Zone
Enter the Customer’s zone, or click the search button for a selection form. Enter the starting characters of the zone’s Code or short description, then click the search button for a search form. If you have PC*Miler’s Zip / Postal Code software installed (and the Mileage Server program is running), you can have the system automatically enter the zone Code based on the City / State or Postal / Zip Code entered for this Customer.
To do this, do not enter any characters in the zone field; instead, click on the Create button. When you create a Freight Bill in the Customer Service program, the zone Code selected here will default as the Start Zone or End Zone (depending on whether the Customer is the bill’s Shipper or Consignee). When you create a Freight Bill in the Quick Bill Entry program, the zone Code selected here will default as the Start Zone or End Zone (depending on whether the Customer is the bill’s Shipper or Consignee).
Language
Select a language Code from the drop down list box: 'E' (English) or 'F' (French). This is for informational purposes only, and not used elsewhere in the system.
Hours of Operation
Enter the Customer’s Hours of Operation in these fields and the information will be displayed whenever this Customer Code is used in the Customer Service program. Enter the opening time in the 'From' field and the closing time in the 'To' field (in 24 hour format).
Note: Once this value is set, the user can select the 'Tools Menu > Create Daily Hours of Operation' option to automatically populate the 'From' and 'To' values into the Hours of Operation Tab for each day of the week.
Load / Unload Pieces / Hour
The loading and unloading speed in pieces per hour. This is for informational purposes only.
Primary Commodity
If you specify a Commodity Code for this Customer, whenever this Customer is selected as a Freight Bill’s Shipper (in the Quick Bill Entry program or the Customer Service program), this Commodity will become the default for any entries made in the Details section of those programs. Commodity Codes are defined in the Codes Maintenance program.
Customer Since
For informational purposes, you can record the date that this company became a Customer.
Routing Code
Displays this customers default Routing Code. Double click this field to set the Routing Code for the selected Customer.
Mileage Profile
The Mileage Profile selected here will determine the method by which Freight Bill distances are calculated in the Customer Service program. Select a pre-configured Mileage Profile by clicking the search button inside the text field. Click the Mileage Profiles button to access the Mileage Profile Maintenance window.
Default Unit of Measure
If you specify a default unit of measure for this Customer, whenever this Customer is selected as a Freight Bill’s Shipper (in the Quick Bill Entry program or the Customer Service program), this unit of measure will become the default for any entries made in the Details section of those programs. The value entered here will override the default unit of measure for the primary Commodity specified in the Codes Maintenance program.
Web Enabled
This checkbox, if selected, serves two functions:
-
Makes the selected client available for new Access Group creation. Only Clients that are 'Web Enabled' will be available for selection in the Web Administration program, where they can be granted access to the TM4Web software.
-
Displays the selected client within the TM4Web web address book (along with other configurations, such as Enabled, Is Shipper etc.).
Spot Trailer
If this flag is checked, whenever this Client is used in the Customer Service program, the 'Spot Trailer' checkboxes (one for Shipper, another for Consignee) will default to checked. Then, when performing a status change in dispatch and the Shipper or Consignee requires a trailer spot, then give the dispatcher a warning about the trailer spot required.
Appointment Required
Check this option if this Customer requires an appointment to be made prior to contact.
Calculate Terminal Distance
This checkbox if selected (checked) will have TruckMate calculate the distance based on the terminal or the start/end zones.
Requested Equipment
Click the search button to specify any Equipment requested by this Customer.
Context Menu
All of the menu options available via right-click from the Address Tab are explained on the Customer & Vendor Profiles program > Tools Menu.
Client Is
These six checkboxes correspond to fields in the Customer Service program and the Quick Bill Entry program. By specifying the type of Customer in the profile, you can reduce the number of Codes that are displayed in the selection forms for the associated fields.
-
Caller corresponds to the Caller section in the Customer Service program. A Client record with this checkbox enabled will be selectable as a Caller when the User is entering new Freight Bills.
-
Shipper corresponds to the Shipper section in the Customer Service and Quick Bill Entry programs. A Client record with this checkbox enabled will be selectable as a Shipper when the User is entering new Freight Bills.
-
Consignee corresponds to the Consignee section in the Customer Service and Quick Bill Entry programs. A Client record with this checkbox enabled will be selectable as a Consignee when the User is entering new Freight Bills.
-
Bill To corresponds to the 'Bill To' field in the Quick Bill Entry program. In the Customer Service program, there is a 'Bill To' radio button that indicates which Client ('Caller', 'Shipper', 'Consignee', 'Intermodal' or 'Other') is the chargeable Customer for the Freight Bill. This checkbox, when selected, automatically selects this radio option. Alternatively, you can impose credit control by disallowing Customers to be selected as 'Bill To' Customers on Freight Bill by leaving this checkbox blank.
Note: This field is only available for users with Allow Changes of 'AR-Allow Edit of Client-Is-Bill-To' Security Setup is checked (True).
-
Bill Type (…)* Selecting the ellipsis button next to the 'Bill To' option will open a small window where you can configure the 'Billing Type' of the selected Client. You have three options: 'FREIGHT', 'DETENTION' or 'DEMURRAGE'. The option you select here must match with the option chosen in the Customer Service program > Billing Tab > 'Invoice Type' to be used as a commodity on a Freight Bill.
-
-
Terminal specifies the selected Client as a Terminal.
-
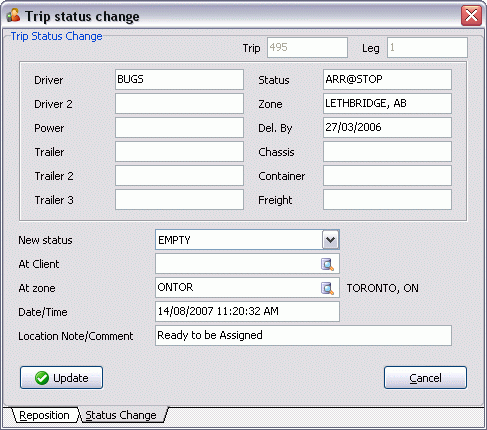
Trailer Pool specifies the selected Client as a Trailer Pool. If checked, the selected client will appear as one of the values for the 'At Client' field in the Trip Status Change and Equipment Reposition window, which is used for repositioning resources in the Dispatch program, for detailed information on repositioning resources, see the How do I reposition equipment or drivers? topic.
General Status Codes
Are used for the export of billing information to third-party accounting products, such as TruckMate Legacy and AccPac. In the billing export programs, you can specify a General Status Code.
Only billing information from Customers with the corresponding General Status Code will be exported.
Note: The General Status Codes are not related to TruckMate' status Codes.
Global Position
Latitude / Longitude
These values are used by the Mobile Dispatch system to generate directions to the Freight Bill’s shipper or consignee. See the Communication Macro Setup program for information about using these values. When entering values in this field, they must be in the format of hours, minutes, seconds, and/or position, such as '0510215N'.
Selecting the ellipsis button to the right of the 'Lat' field will open the Street Level window.
AutoCorrect Lat / Lon
By default, this box is disabled. This is to prevent good location data from being accidentally 'updated' by the 'AutoCorrect GPS' option in the Communication Manger program. If the User encounters problems with certain locations, he/she can turn this option on for those locations only.
Radius LoQ / HiQ
Defines a radius, centered at the specified position, so that the system can consider that a Vistar enabled trailer is 'at' the Customer location.
There are actually two radii, depending of the quality of the GPS signal. HiQ indicates a High Quality 3-D GPS signal, and LoQ indicates a Low Quality 2-D signal. These fields accept a number, which would indicate the number of seconds of latitude to include within the radius. For example, entering Lat 0490133N, Lon 1222244W, HiQ 3 LoQ 4 would be appropriate for 3D when the Latitude is between 0490130N and 0490136N, and the Longitude is between 1222241W and 1222247W- considered at the Customer location.
For 2D, the numbers would be 0490129N, 0490137N, 1222240W and 1222248W.
Street Level Window
The Street Level Selection window allows you to correctly geocode your Customer’s address for use with supported third party mileage software products. In order to use this feature, you must have a Street Level License (License # 7010), as provided by TMW Systems.
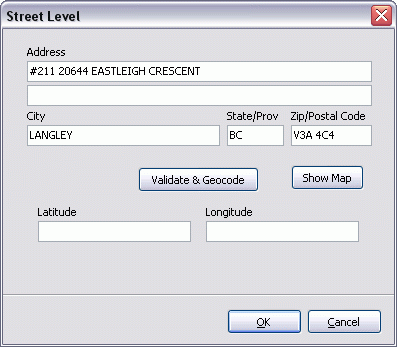
Address
Enter the full Address information in the two spaces provided, just as you would on the main Customer Profiles program form.
City, State, Zip
Enter the City, State and Zip information in the spaces provided.
Validate & Geocode
Click the Validate & Geocode button to check the Address information entered against the Mileage Server program’s information. If found, the 'Latitude' and 'Longitude' fields below will populate with information returned form the Mileage Server.
Profile address validation is a method of geocoding a profile’s street address- placing it at a latitude/longitude coordinate. It uses whatever validation service the Mileage Server program has enabled. In most cases this will be PC*Miler Streets. We also support ProMiles XF for address validation.
When validating an address the system will use the complete street address. Two addresses on the same street will have two different geocodes.
For example:
7000 North Resort Drive, Tucson, AZ, 85750 = 0321936N, 1105110W
7001 North Resort Drive, Tucson, AZ, 85750 = 0321937N, 1105108W
If a profile is missing its address then its validation will fail. Zone codes are not used as a fall-back as they are too broad an area and would throw things off that depend on street-level accuracy.
Show Map
Select the Show Map button to display the current 'Address' using either GoogleMaps or YahooMaps services. GoogleMaps is the default service provider.
In order to use this feature, you must have a Street Level License (License # 7010), as provided by TMW Systems.
Note: To change your system default from GoogleMaps to YahooMaps (or any other mapping service, such as MSN Earth, etc.) you must apply a patch to your database, provided by TMW Systems Inc. Contact Support for more information.
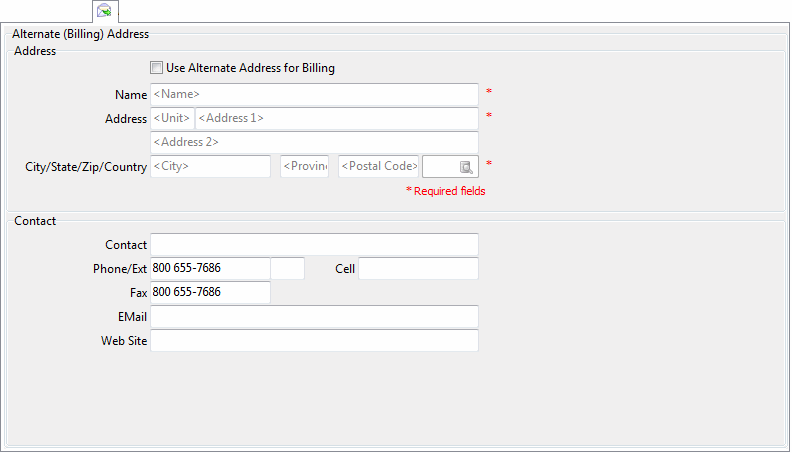
Alternate (Billing) Address Tab
The Alternate (Billing) Address Tab is to enter the alternate or additional address details that can be used for billing or other communications.
Address
Use Alternate Address for Billing
This checkbox is used to determine if the alternate address details used in this tab are to be used for billing purposes by the billing department, if checked, the following alternate address details will be used for billing purposes.
Name
The alternate name for billing (if the 'Use Alternate Address for Billing' checkbox is checked) or other communications.
Address
The alternate address for billing (if the 'Use Alternate Address for Billing' checkbox is checked) or other communications.
City/State/Zip/Country
This is to complete the alternate address with city, state, zip code and country.
Contact
Contact
Is used to store the name of the Customer’s alternate contact person for billing (if the 'Use Alternate Address for Billing' checkbox is checked) or other communications.
Phone/Ext
This is the Customer alternate telephone number for billing (if the 'Use Alternate Address for Billing' checkbox is checked) or other communications.
Cell
This is the cell phone for the alternate contact person.
Fax
If the Customer has another fax number (that differs from the main fax number) you can enter it in here which can be used for billing (if the 'Use Alternate Address for Billing' checkbox is checked) and other communications.
This is the alternate e-mail address.
Note: If you wish to use these two fields (Fax and EMail) with Imaging functionality, there are two configuration options that will set the Imaging XML to take the fax number and/or email address values from these fields (CLIENT.BILL_FAX and CLIENT.BILL_EMAIL,) rather than from the Client’s default fax number or email fields (CLIENT.FAX_PHONE and CLIENT.EMAIL_ADDRESS). For more information, see the Application Configurator program > RENDPRINTDRIVER.DLL section._
Web Site
Enter an alternate web site for the client.
Audit Tab
Created / By
These fields (display the date and time that the record was created, and the login name of the User who created the record. These are display-only fields, and cannot be changed.
Modified / By
These fields (display the date and time that the record was modified, and the login name of the User who modified the record. These are display-only fields, and cannot be changed.
Billing Tab
The Billing Tab controls currency and billing information for the selected Customer.
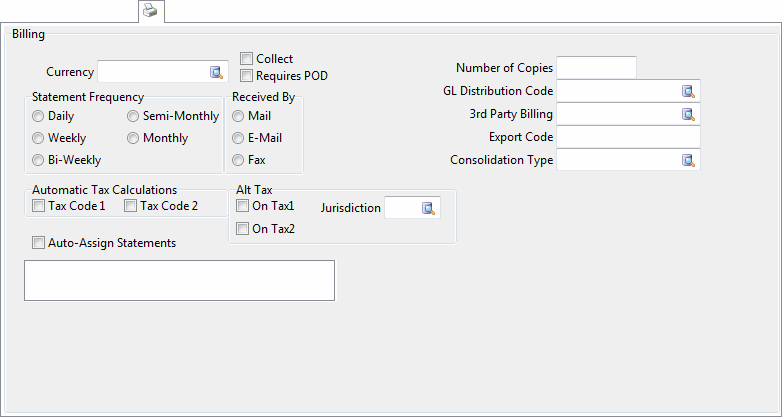
Currency
Select the Customer’s currency from the search form (click the search button to display). The short description of the currency unit (configured in the Codes Maintenance program) is displayed here. Foreign exchange postings are calculated when the currency specified in a Customer’s profile differs from the base currency unit specified in the Codes Maintenance program.
Collect
Indicates that the charges for all bills for this Customer should be collected at the time the freight is picked up or delivered (depending on whether the Customer is a shipper or a consignee). On the Customer Service program > Billing Tab (and in the Totals section of the Quick Bill Entry program), there is a corresponding Cash Collect checkbox that will automatically be checked if the Bill To Customer for the bill has the Cash Collect box checked in their profile.
Requires POD
If the Customer requires a Proof of Delivery to be submitted with the billing, check this box. This flag is for informational purposes only.
Statement Frequency
Check a radio button to indicate how often summary statements should be generated for this Customer. In the AR Inquiry program, you can generate statements for Customers based on the Statement Frequency assigned here. As well, you can set your Application Configurator program > ARRA.EXE for more Statement frequency options.
Received By
Check a radio button to indicate the method by which the Customer wants to receive invoices and / or statements. This field is for informational purposes only and not used elsewhere in the system.
Automatic Tax Calculations
Check 'Tax Code 1' and/or 'Tax Code 2' depending on which taxes (if any) you want to be calculated on charges for this Customer. See the Tax Calculation Configuration program for further details about tax setup.
Alt Tax
The Alternate Taxation section is used if the client code requires taxation based on it’s home jurisdiction (i.e. in the case that a client operates nationwide but must be taxed based on the location of its corporate headquarters).
If the client require alternate taxation based on a different jurisdiction when used as the bill-to party of a freight bill, check either 'On Tax 1' and/or 'On Tax 2', then provide the 'Jurisdiction' zone code that represents the "home" location.
Note: There is a flag on the Customer Service program > Billing Tab that allows the user to toggle alternate taxation on/off during billing.
Auto-Assign Statements
Check this option if you would like to Auto-Assign Statements to the current Customer. If this option is left unchecked, two fields ('Auto-Assign Stmt' and 'Stmt Date') will not be available on the Customer Service program > Billing Tab.
When checked, you will be required to select an option from the above 'Statement Frequency' choices. When using Customer Service, you have the option to overwrite the 'Auto-Assign' option as well.
Note: There are also two Application Configurator options for 'PROFILE.EXE' that will automatically set the 'Auto-Assign Statements' value (to 'True') and 'Statement Frequency' value for you, whenever a new Customer record is created.
Every <Date> of the Month
This field controls when the Automatically Assigned Statements will be generated. Use the pull down arrow to select a value.
Number of Copies
The 'Numbers of Copies' value is used for filtering. A User may enter an 'alpha' or 'numeric' value in this field. The User can also look at the Client Profile and refer to the 'Number of Copies' required so they can set up the number of copies in Crystal.
For example: A User might enter in '1' to group particular clients, then '2', or use 'A' or 'B' and so on, and use this value in the Invoice Printing program (BILL.EXE) to print invoices for these groups.
Note: The number of copies actually printed is set in Crystal print setup window that displays whenever you choose to produce a report in any TruckMate program.
GL Distribution Code
Select the Code, created in the GL Distribution Setup program, that represents the General Ledger Distribution you want to be applied to Freight Bills for this Customer (when they are selected as the 'Bill-To' party).
General Ledger distribution is performed automatically by the Customer Service program and the Quick Bill Entry program based on the setup of this Code. You can view the GL Distribution of a Freight Bill by looking at the GL Tab in the Customer Service program (for bills generated both in the Customer Service program and in the Quick Bill Entry program). If you do not select a Code here, the default Code specified in the GL Distribution Setup program will be used.
Note: The Application Configurator program > BILDIST.EXE > 'Calculate GL Based On' option has some bearing on how this field operates.
3rd Party Billing
If Freight Bills charged to the selected Customer are always billed to another Customer, enter the third party’s Customer Code or click the search button for a search form. This will cause Freight Bills entered in the Customer Service program or the Quick Bill Entry program to be charged to the Customer specified in this field. For example, in the Customer Service program, if the Bill To radio button is set to 'Caller', and the Caller’s profile has a value in the 3rd Party Billing field, the Freight Bill will be charged to the 3rd party. You can view the Customer to whom the Freight Bill is being charged on the Billing tab in the Customer Service program.
Export Code
If you are exporting billing information to another software package (such as TruckMate Legacy), enter the Customer Code from that package that corresponds with this Customer. If you leave this field blank, the 'Customer Code' from the Customer & Vendor Profiles program will be used.
Consolidation Type
This field controls which Consolidation Type the selected Client will use in Billing Consoildation and IP Consolidation. By default, this field will be set to DEFAULT (and any newly added client gets assigned to DEFAULT). But, once you have created a new Consolidation Type on the Codes Maintenance program > Consolidation Types Tab, you may assign it to one or more bill-to clients. Once a consolidation type has been assigned to at least one client, it may not be deleted in Codes Maintenance (unless you first un-assign it from all clients).
Budget Information Tab
The Budget Information Tab is used to enter the selected Customer’s fiscal year as well as budget periods and amounts.
Fiscal Year
Use the scroll bars to scroll to the desired year.
Budget Information
Use the '+' sign below to enter a new detail line in the grid.
Period
Enter the period number.
Amount
Enter the budgeted amount.
Note: To modify Fiscal Year start and end dates, go to the GL Chart of Accounts > Periods Tab.
Change Requests Tab (Auditing / Vetting)
This tab is a tracking tool for changes requested on customer profiles. It shows statuses and details of requested changes as well as the history of all changes for the selected client’s profile. It’s also used as a vetting tool, a user with vetting rights will be able to use this tab to review requested changes and either approve or decline a change request.
Warning: The Client Auditing and Vetting features in TruckMate are part of the CRM (Customer Relationship Management) features and thus require the CRM license (Key 39000). For details on other Trimble TruckMate Products and Licenses please contact TruckMate support. To avoid error messages related to unavailability of license every time the application is started, use the Application Configurator program > PROFILE.EXE to set the config option 'Audit/Vet Client Changes' to 'N = Neither'.
Notes Sub-Tab
This sub-Tab allows the user to enter notes about the change request. The sub-tab has one field. the 'Change Request Notes' field can be entered and edited as long as the change request is NOT 'Approved', 'Rejected' or 'Cancelled'. The length of this field is virtually unlimited (actual limit is 131,072 characters). This field is useful when an unsophisticated user wants to pass his / her change request in a simple easy-written note without having to worry about following a strictly structured data entry format offered by the application. This is especially helpful when the change involves charges and rates with their accompanying financial data.
Change Request Notes
This is a free-text format field, any clarification on the requested change can be entered in this field, it can be used for reference and documentation purposes.
Status Sub-Tab
The Status Sub-Tab is where the actual approval or rejection of a change request is recorded by a user with vetting Privileges that can be set through the Security Setup Program > Security > Misc > Customer Profile.
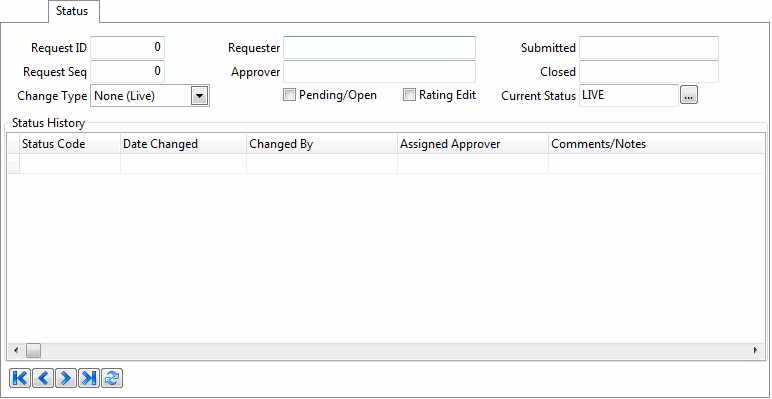
All fields on this tab are read-only and are populated from actual change requests except the following fields:
Rating Edit
This field can be used by an unsophisticated user (sales rep) who does not know how to fill out the rating tabs for the changes he / she wants. Instead, he /she can check this checkbox and enter the required change in simple format in the Notes Sub-Tab. Based on the 'Rating Edit' field the reviewer can determine whether this change is complicated and involves rating tab changes (field checked) or its just a simple change that involves static data like contact information (field unchecked) in which case the approval process will be quicker and easier.
*Current Status *
This field can be used by the reviewer to approve or reject a change request submitted by another user. The reviewer can simply change the status of the change request to 'Approved' or 'Rejected'.
Status History
This grid provides historical information on status changes to change requests. All fields are read-only fields. The 'Comments / Notes' field displays the first part of long comments entered in the Notes sub-tab (if notes are longer than 255 characters, the text shown in the grid will end with …). To display the full notes with carriage returns (i.e. so they appear just like how they were entered), either right-mouse-click or double-click the grid cell.
Note: The company can use Custom Dawgs to send e-mail notifications to selected employees based on status changes of change requests. This is not part of a standard TruckMate application, a Customized Dawg needs to be created. To help create the customized dawg a column was added to 'CLIENT_CR' table ('APPROVED_EMAIL') Which can be used in managing e-mail notifications.
Tracer Sub-Tab
The Tracer Sub-Tab allows the user to trace the changes of client profiles by providing a multiple filtering criterion mechanism.

Trace (Filter) By
SQL Filter
By checking this checkbox and selecting the 'Setup' button you can define your own SQL query which allows you to define the desired criteria in the where clause of the SQL statement.
Note: If you check the 'SQL Filter' checkbox all other checkboxes for different criterion will be disabled, you can only choose 'SQL Filter' alone or any other combination of filters.
Client ID
Check the checkbox and select the client ID you wish to trace the changes for.
Change Type
Check the checkbox and select the change type you wish to trace.
Sequence
Check the checkbox and select the sequence number you wish to trace.
Requester
Check the checkbox and select the requester of the changes you wish to trace.
Approver
Check the checkbox and select the approver you wish to trace changes for.
Open
Check the checkbox and select if you are tracing open changes or closed changes.
Current Status
Check the checkbox and select the status you wish to trace.
Submitted
Check the checkbox and select the period during which the changes you wish to trace were submitted.
Closed
Check the checkbox and select the period during which the changes you wish to trace were closed.
Run Trace
Select this button if you are satisfied with your filtering selection to run the trace with the selected options.
Clear
If you wish to clear all selected filters select this button.
Trace Results
This grid provides read-only information about each change request in addition to the changes to the actual client profile data that has been changed through the specific change request. If you right-mouse-click or double-click any row in the grid you will be taken right to that change request (so you can view the status change history on the sibling tab and/or view CLIENT fields grouped logically on the main tabs)
Limit Search Results to First ( ) Records
This field allows the user to limit the trace results to a specific number of records, useful when the trace is expected to fetch a large number of records.
Include Live (Seq = 0) Client Records
If this checkbox is checked the results will also include the initial creation transaction of the client record as being a change request with a sequence number of (0).
Note: For better comparison and understanding of the change you can highlight any 2 rows from the results grid (using ctrl or shift key combined with mouse) and right-mouse-click to "Show Differences". This will bring up a form with a read-only list of all the columns whose values differ on the 2 records. This is most especially useful for comparing a "Before Edit" value and its corresponding "After Edit" value. If the changed column is longer than 254 characters (a Note column), then the "Show Differences" grid will display "(MEMO)". The 'Before Edit' might show the full value but if the 'After Edit' value is longer than 254 characters it will show 'Memo'.
Context Menu
Go to Change Request
Selecting a row on the grid and then selecting this option will switch control to the client affected by the change request. If you select any tab afterwards it will be related to the customer affected.
Show Differences
This option invokes a grid the Differences Between Two Change Requests grid. For this option to work, exactly two rows must be highlighted (selected). If two records are not selected when using this option, an error message will pop up.
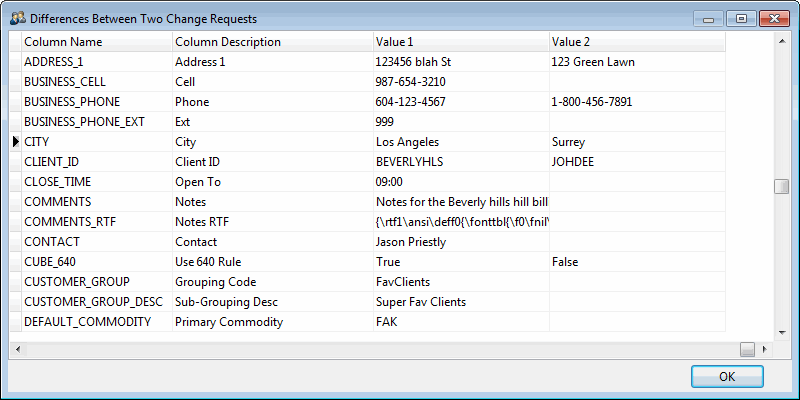
This grid enables users to compare two change requests. Each column from the first change request is compared to the corresponding column of the second change request. Each row on this grid represent a column comparison between the two selected change requests.
Note: If the two rows selected for comparison are for the same client, any new inserts or deletes of records to the 6 detail tables will appear in additional rows to the grid. Again, this is only if the change requests selected are for the same client. * *
Table Name/Table Description/Row ID/Column Name/Column Description
Those columns are all to identify and describe the column to be compared between the two change requests. Each row on the grid describes one column to be compared.
Value 1 / Value 2
Value 1 represents the value of the column being compared from the firs selected change request. Value 2 is the value of the same column being compared from the second selected change request.
Note: If the length of the value in 'Value 2' is longer the 254 characters (a note column for example), then the word 'Memo' will show instead of the actual value. To view both the old value and the new value in a new form select the 'Show Memo Values' option from the context menu (Right Mouse Click). This context menu option is only available if the 'Value 2' content is longer than 254 characters ('Memo' is shown).
Clear Multi Row Selection
This options clears the multi record selection selected for comparing two change requests.
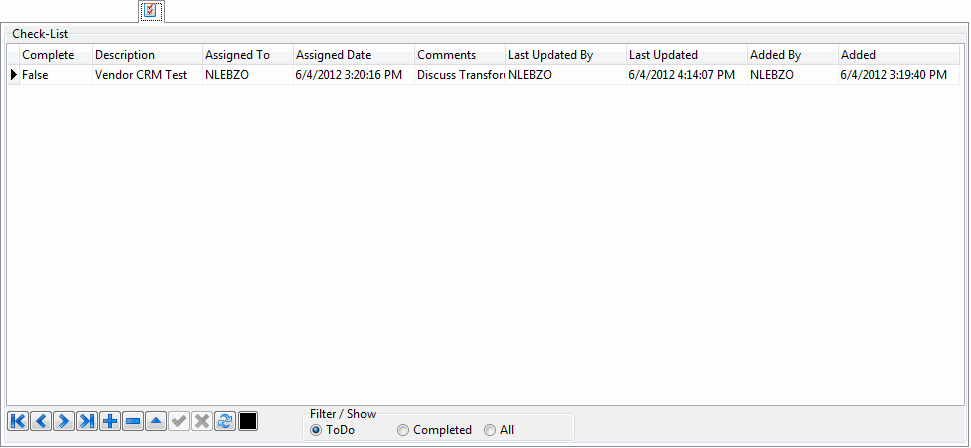
Check-List Tab
This tab allows the user to define checklist items and assign them to users. This feature is part of TruckMte CRM, and require the TruckMate CRM License to work. The Check-List Tab is a grid to define and view Check-List items. Check list items can be defined to perform any needed tasks regarding a specific customer.
When the checklist window opens, all fields will be blank. If you try to enter any value in the grid, or double click in any field or select the 'Add' (plus sign) at the bottom of the screen will open a selection list of available check list items, select a suitable item, and then conclude the rest of the fields on the grid as described next. If you cant find a suitable checklist item to select, then select the 'Add a Checklist Item in Codes Maintenance' button at the bottom of the screen ![]() . This will open the 'Checklist Items' tab in codes maintenance and will allow you to add new items or edit existing items.
. This will open the 'Checklist Items' tab in codes maintenance and will allow you to add new items or edit existing items.
Complete
This field is to flag the check-list item as 'To Do' or 'Complete'. Double-Clicking the field will toggle between the two values. Logically, this field must only be set once by the user, when the item is completed. However, the system doesn’t prevent the user from toggling between the available values.
Description
This field is a read-only field, to modify the description of a checklist item you must do it from Codes Maintenance program > Checklist Items. Alternatively, you can select the 'Add a Checklist Item in Codes Maintenance' button described later.
Assigned To
Select a user to assign this check-list item to. The selected user will be responsible for performing this item.
Assigned Date
This the date of the assignment. Double-clicking the field will bring up a calendar to select the date from. If no date is selected, this field will default to the system date.
Comments
Include any comments that are needed to make the item more easier to understand, or to draw the attention of whoever is going to see this item in the future to a certain issue that should be handled, or handled differently, or maybe just add a comment for your own reference.
Last Updated By, Last Updated, Added By and Added
These are audit fields populated by the system, to record who created or modified the item and the time stamp of it.
image:CV-Customer/image13.pngAdd a Checklist Item in Codes Maintenance
This button (with no title), located at the bottom of the screen to the right of the navigation bar, allows the user to add checklist items in Codes Maintenance program. For a checklist item to appear for selection it must be created first in Codes Maintenance program > Checklist Items. If you can’t find a check list item that is suitable to be added, you can just select this button, the 'Checklist Items' tab in codes maintenance program will be launched.
Note: To minimize the need to add checklist items from codes maintenance program it’s recommended that you create at least one generic check list item and flag it as 'Repeated' in Codes Maintenance. This way you can assign this item over and over without having to go to Codes maintenance program for every assignment.
Filter/Show
This radio button group is to filter the displayed Check-List items in the grid. You can display only 'To Do' (not completed) items, 'Completed' items or 'All' items. Select the desired radio button.
Commodities Tab (Commodity Matching)
This tab allows users to define which Commodities are available for a Client ID when that Client is added to a Freight Bill in a way that matches the defined FB Client Matching logic setup in FB Client Matching Sub-Tab (described later in this section). So, when certain Callers/Shippers/Consignees are selected in the Customer Service program in such a way that matches the FB Client Matching logic, the system will only use the Commodities specified on this Tab for the 'Use Commodities Of' Client ID (as defined on the FB Client Matching Sub-Tab).
Note: For information on setting up default Commodity Groups for a specific client, see the Customer & Vendor Profiles program > Tools Menu > 'Commodities…' option documentation.
Commodity Codes Sub-Tab
The Commodity Codes Sub-tab is to define the list of default commodities frequently used by a customer.
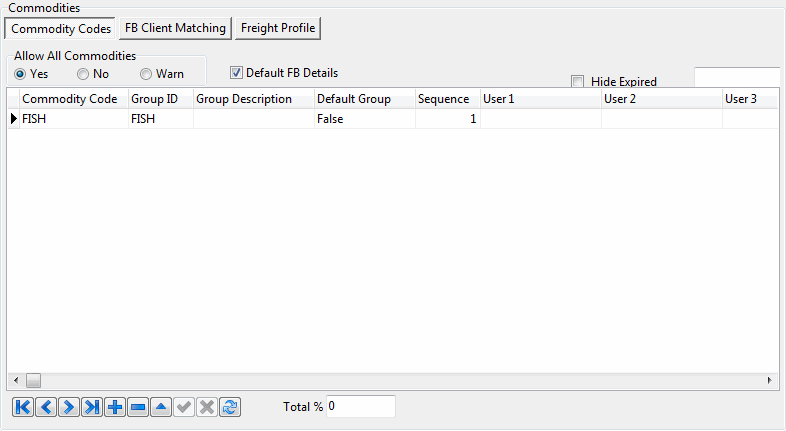
Allow Access to All Commodities
This radio button group governs the options available for users in the Customer Service Program to assign commodities to a freight bill requested by this customer. It has 3 options 'Yes' which allows the user to add commodities regardless of what is defined for the customer in his profile, 'No' which limits the users ability to add commodities to whatever defined in the customer profile and 'Warn' which issues a warning if an undefined commodity is added for this customer but still allows the selected commodity to be added.
Default FB Details
This checkbox (if checked) will auto-add the commodities that belong to the default group to any new freight bill for this customer.
Hide Expired
If you select this checkbox, all expired commodities will be hidden. The expiry is determined by the Expiry Date for the selected commodity. By default, TruckMate will compare the Expiry Date with the current date (which will display in the field beside the checkbox). You can change the current date to any date of your choice. TruckMate will use the date you enter to determine the expiry of the commodity, and thus, hide it or display it in the grid accordingly.
Commodity Code
Double clicking this field will open the commodity selection window where you can select the commodity you want to add to the list of default commodities for the customer.
Group ID & Group Description
You may want to define groups and organise the commodities into different groups, this comes in handy in customer service program when adding details to a freight bill. Double click the 'Group ID' field to select a group for your commodity or create a new group. If left blank a group is created with the current commodity info.
Note: Groups created by default cannot be assigned to other commodities, if you want to have more than one commodity belong to the same group you must define a new group and assign a unique sequence number for each commodity within the same group.
Default Group
Double clicking this field will toggle between 'False' (the default value) and 'True' which indicates that commodities in this group will be used by default for new freight bills; provided that the 'Default FB Details' checkbox is checked.
Sequence
This sequence is for commodities with in the same group, you can sequence the commodities with in a group in the desired order, this will be reflected in the freight bill if the group is chosen to be added by default. If left blank the sequence will be set according to order of entry.
USER 1 - USER 3
These fields are for informational purposes only; they are not used elsewhere in the TruckMate system.
High Value Per
This is the high estimate of the financial value of the commodity valued per unit of measure (as defined in 'High Value Per Units' field). These two linked fields ('High Value Per' and 'High Value Per Units') are informational only and don’t affect any calculations.
High Value Per Units
This is the unit of measure used in financial valuation of the commodity as per the 'High Value Per' field described earlier. For example using both fields ('High Value Per' and 'High Value Per Units') you can define a dollar-value per KG, per Meter or per Gallon…..etc. Double click this field to invoke the 'Select Unit' window and choose the desired unit.
Freight Percent
This is an optional info-only field allowing you to indicate how much of the client’s business (by pieces, weight, or dollars - your choice) involves the given commodity. A total is displayed at the bottom of the screen.
Note: For this feature to be logically helpful, you should enter amounts that add up to 100%.
Created & Created By
These two fields are auditing fields and are populated by the system.
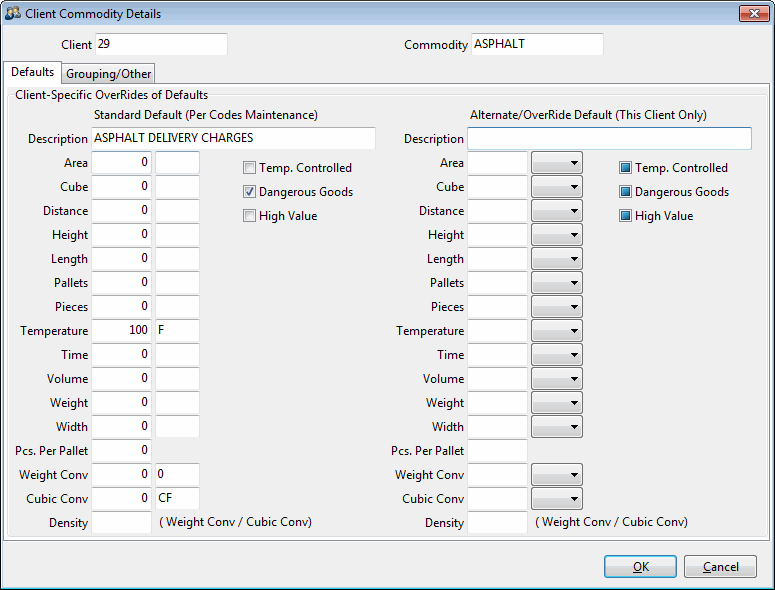
Std. Commodity Description & Alt. Commodity Description
The Std Commodity Description read-only field is the original description of the commodity as described in the Codes Maintenance program. Where as the Alt. Commodity Description field is an entry field which allows the user to override the original description with the entered value when dealing with this client. This is helpful when the client uses a different name for the commodity and wishes to use that name in trading transactions.
Commodity Measurement Fields
Most of the measurements available for commodities are included in this grid, they are divided in to two categories, the standard fields (the title starts with 'Std') that are populated from the definition of the commodity in the 'Codes Maintenance' program which are read-only, and a second category of corresponding set of alternate fields (the title starts with 'Alt') that are used to override the standard values with user-entered values. Two additional read-only calculated fields are also available in the grid, 'Std.Density' (Std.Weight Conversion Factor / Std.Cubic Conversion Factor) and 'Alt.Density' (Alt.Weight Conversion Factor / Alt.Cubic Conversion Factor).
Note: Because the grid now has so many columns, you may optionally view it via the Client Commodity Details modal form. The form organizes the Std (codes) measurements and the Alt (editable) measurements for easy comparison. The form can be accessed via right-click or by double-clicking a grid column that does not already have a double-click action.
Effective Date / Expiry Date
These two dates determine the date range within which the commodity is considered to be effective. You can update these fields to reflect a client-level commodity effectiveness. When you choose the commodity in Customer Service program, TruckMate will check the Pick Up Date against the dates entered in these two fields. If the Pickup Date is out of this range, an error will be issued.
Status
This field is the status of the selected commodity for the selected client. Active, Expired and Obsolete are the possible values for this field.
FB Client Matching Sub-Tab
The FB Client Matching Sub-Tab is used to determine which FBs the commodities list applies to, in other words this tab is used to decide in which FBs the commodities list will be used.
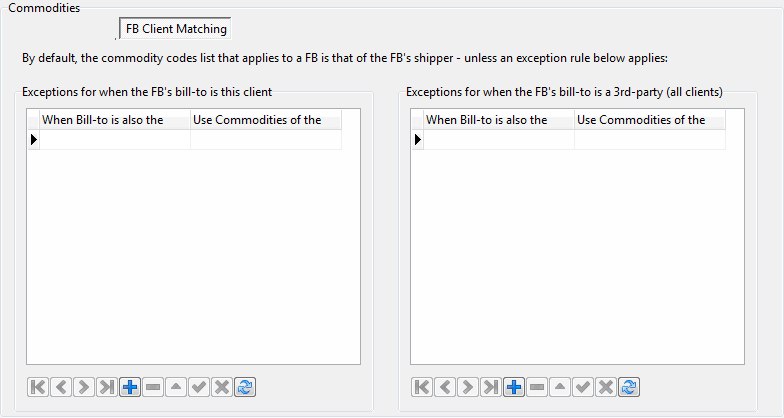
This tab provides two types of exceptions, exceptions for when the FB’s Bill-to is this client and exceptions when the bill-to is a 3ed party. The default behavior is to use the commodities' list of the FB’s shipper (almost applies to 95% of the cases), so leaving both exception grids blank will lead the system to use the commodities list of the FB’s shipper. By using an exception you can control which list of commodities to be used based on different scenarios.
Freight Profile Sub-Tab
The Freight Profile Sub-Tab is used to enter basic information on the general handling of the commodities in a freight.
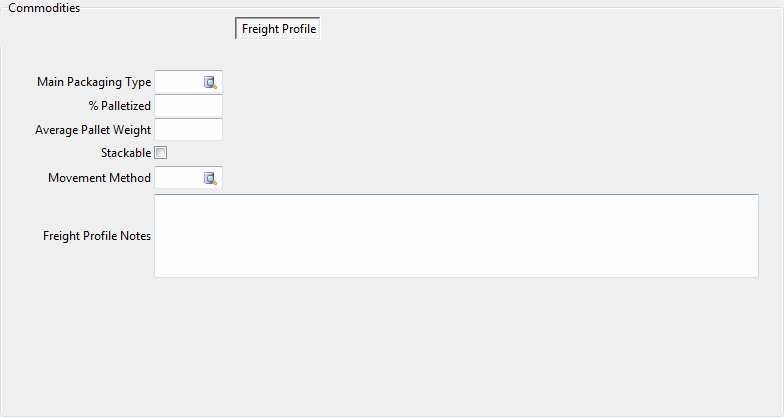
Main Packaging Type
Select the main packaging type from the list.
% Palletized
Enter an estimated percentage of the commodity that requires pallets to be handled.
Average Pallet weight
Enter the average weight of the required pallets.
Stackable
If the commodity is stackable check this flag.
Movement method
Select the best movement method for the commodity to be moved around from the list of available methods.
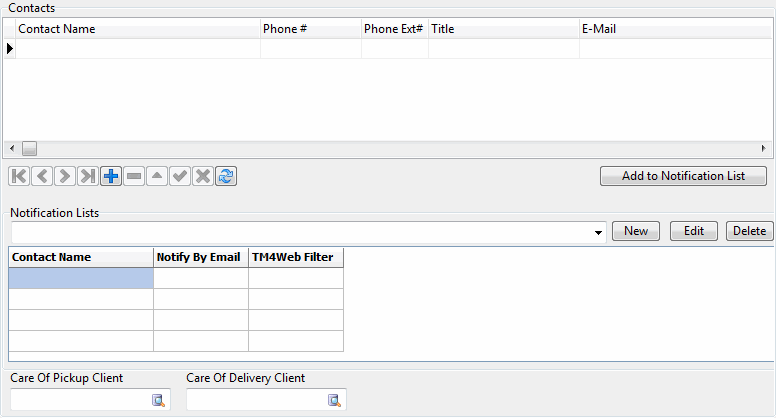
Contacts Tab
You may enter as many contacts as you like for each Customer on the Contacts Tab. The contact entered on the main Customer Profile screen is automatically added here. Contacts can also be entered in the Contacts and Phone program.
Other Contacts
The Contact entered into the 'Contact' field in the 'General Information' header will automatically appear in this section, but you may add as many additional contacts you require for this Client. Not all of the following fields are mandatory, but it is recommended that you fill them out completely, for future reference.
Contact Name
Enter the Contact’s full name.
Phone #
Enter the Contact’s phone number.
Phone Ext #
Enter the Contact’s phone extension number.
Title
If required, enter the Contact’s title.
Enter the Contact’s E-mail address. This address will be used by any automatic notification functions in TruckMate.
Contact Type
Double click this field to select a 'Contact Type' for this Contact. This filed can be used to quickly determine where this Contact is located in your Company’s structure.
TM4Web User Name
If this Contact requires visibility in the TM4Web suite, enter his/her TM4Web User Name here.
Fax #
If required, enter the Contact’s Fax number.
Mobile #
If required, enter the Contact’s Mobile phone number.
Preferred Communcation
Double-click this field to select the type of communication preferred by this contact ('E-mail', 'Fax', 'Letter' or 'Phone). Ensure that the associated 'Number' or 'Address' column is correctly filled out.
Add to Notification List
Selecting this button will add the highlighted Contact to the currently displayed Notification List below.
Comments
This is a 240 characters field, which allows the user to enter comments about a specific contact. These comments could be any thing that can help make better communications with this contact, preferred calling times could be an example.
User1,…., User10
Those are 10 user defined fields that can be used by TruckMate users for any future purpose. The column headers can be modified to reflect users' needs using the Grid Customizer.
Notification Lists
A notification list is essentially a group (subset) of the contacts at that client, where each contact can have specific flags indicating the types of notifications he/she wishes to receive or access. You can have multiple notification lists per client, e.g. "Billing Group", "Key Accounts Group", "Executive Team", etc. You can also specify a notification list for each of the Caller, Shipper, or Consignee when creating a Freight Bill.
Each order can have either a Notification List or a single Contact attached, thereby notifying a specific Contact, or a whole group of Contacts (specified in a Notification List, appearing on the Freight Bill as 'Notify Type: List').
If you attach TM4Web User IDs to the contacts in a Client’s notification list and you have TM4Web properly configured, then users will be able to access a "My Shipments" screen in TM4Web. This screen will show the user a list of all Freight Bills attached to notification lists of which they are a member.
You can also configure The Dawg program to send Delivery Notification e-mails to the notification list, rather than to individual or fixed recipients.
Notification List
Use the drop-down menu to select one of the Notification Lists currently setup for this Client.
New / Edit / Delete
Select the 'New' button to open a small form where you can create a new Notification List by specifying it’s name. The 'Edit' button functions the same way, allowing you to update an already created Notification List.
The 'Delete' button removes the selected Notification List from this Client.
Contact Name
This field contains the Contact’s name, as specified by the 'Contact Name' field above. Can only be altered using the field above.
Notify By Email
When this field is set to 'True', and this Notification List is selected on a Freight Bill, this Contact will receive Email notification of the order.
TM4Web Filter
When this field is set to 'True', this Contact will be able to see orders assigned to this Notification List in TM4Web.
Care of Pickup Client
Enter a 'Client ID' or select the search button to view all Clients entered on your system. The Client selected in this field will become the default 'Care of Pickup' Client for the selected Client.
Care of Delivery Client
Enter a 'Client ID' or select the search button to view all Clients entered on your system. The Client selected in this field will become the default 'Care of Delivery' Client for the selected Client.
Credit Info Tab
The Credit Info Tab is used to enter general credit notes about the Customer.
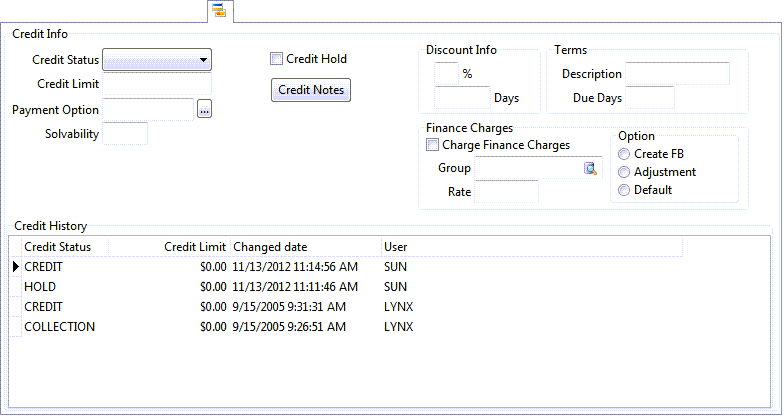
Credit Status
Use the pull down menu to select a Credit Status for the selected Customer. Available options are: 'COLLECTION', 'CREDIT', 'DECLINED', 'HOLD' and 'NOCREDIT'. The options available in this field are maintained in the Codes Maintenance program > Credit Status Tab.
Depending on the Credit Status code you select, you will have access to specific options in the 'Payment Option' field, below.
Credit Limit
Is used to store the amount of credit that this Customer is allowed to have. When the 'Bill-Tp' Customer’s account balance exceeds their credit limit (as specified by this field), Users will be warned when they enter bills for this Customer in the Customer Service program and the Quick Bill Entry program.
Note: The ability to edit this field can be enabled / disabled per user (or user group) on the Security Setup program > Security > Business Events > Allow Changes Tab.
Payment Option
When you choose a Credit Status for the selected Client (using the 'Credit Status' field above) this field will default to the 'Default' option. This means that the selected Client will have access to all Payment Options as configured for the selected Credit Status Code in the Codes Maintenance program > Credit Status Tab.
Selecting the ellipsis button will open the Customize Payment Options window, which allows you to add custom Payment Options to the selected Client’s current Credit Status code. This field will then read 'Custom'. Any Custom Payment Options that you create will not be carried back over into the Codes Maintenance program > Credit Status Tab; Custom Payment Options apply to only the selected Client and the selected Credit Status within the Customer Profiles program.
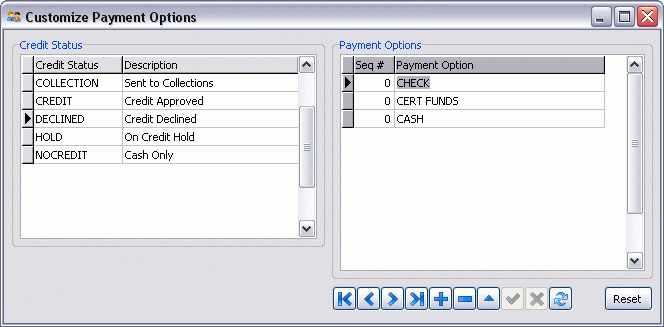
Credit Status
This section displays the available Credit Status codes as maintained by the Codes Maintenance program > Credit Status Tab. These fields are read only both on this window and in Codes Maintenance.
Payment Options
You can use the TruckMate Navigation Bat at the bottom of the window to apply Custom Payment Codes to the Credit Status Code selected in the 'Credit Status' section of this window.
These Custom Payment Options are only available for the currently selected Client in the Customer Profiles program, and will not be copied into the Payment Options section of the Codes Maintenance program > Credit Status Tab for this Credit Status.
When you have entered one or more Custom Payment Options, close this window to return to the Customer Profiles program > Credit Info Tab. You will notice that the 'Payment Options' field has changed from 'Default' to 'Custom' to reflect that the User has created Custom options for this Client.
Reset
Selecting the Reset button will remove any Custom Payment Options the User has added to the Payment Options Grid.
Solvability
Not currently used.
Credit Hold
To prevent Users from entering new Freight Bills for Customers who are over their credit limit (or for any other reason), check the Credit Hold box. When the User attempts to post a new record in the Customer Service program or the Quick Bill Entry program, they will be informed that the Bill To is on credit hold, and the addition of the record will be aborted.
Discount Info
This group of fields is used to store early payment discount information for this Customer. This is for informational purposes only, and is not used elsewhere in the system.
%
If the Customer gets a percentage discount for early payment, enter it in the '%' field.
Days
Enter the number of days to which the discount applies in the 'Days' field.
Terms
This group of fields is used for customers with special terms applied to their accounts. This is for informational purposes only, and is not used elsewhere in the system.
Description
Enter a description of the special terms.
Payment Terms
Use the drop-down menu to select the 'Payment Terms' option from the four available options. These options will determine the 'Due Date' for Payments in the A/P Invoice Entry program.
-
Transaction Date
The value in the Due Days field will be added to the invoice date. -
Entry Date
The value in the Due Days field will be added to the current date. -
Date Next Month
The value in the Due Days field determines the actual day of the month following the invoice date month. For example, if the invoice date is April 15, and the Due Days value is 25, the due date is May 25. -
Day of Month
The value in the Due Days field determines the actual day of the month following the invoice date day. For example, if the invoice date is April 15, and the Due Days value is 25, the due date is April 25. If the invoice date is April 15, and the Due Days value is 5, the due date is May 5. -
Day of 2nd Month
The value in the Due Days field determines the actual day of the month following the invoice date day for the second month. For example, if the invoice date is April 15, and the Due Days value is 25, the due date is June 25. If the invoice date is April 15, and the Due Days value is 5, the due date is June 5.
Due Days
Enter the number of days before invoices become due in the 'Due Days' field.
Finance Charges
This group of fields is used when there is a need to charge the customer for overdue amounts. In other words, if you want to charge the customer for financing his charges for the overdue period.
Charge Finance Charges
Select this checkbox if you will be charging interest on overdue accounts. This will allow your A/R Finance Charges program to calculate overdue interest on this Customer’s account.
Group
Select the search button to view all finance groups already set up. Leave this field blank if you know this client doesn’t have a finance group associated with it. To set up a new finance group, go to the Customer & Vendor Profiles program, Credit Info tab, and enter in a name in the Group field. For example, if all new Customers were offered interest free accounts for a period of 60 days, then you would create a new finance group called 'NoInterest'. (Only 10 characters are allowed in this descriptive field).
Rate
Enter the interest rate to be charged on overdue amounts for this Customer. This rate will override any rate added to the A/R Finance Charges program.
Option
When interest rates are charged on overdue accounts, you have the option of creating a new Freight Bill, make an A/R adjustment, or leave it to the default, and then sending it to the Customer.
Select one of the available radio buttons.
Credit History Grid
This Grid will populate with data as you change the fields above it. The 'Changed Date' and 'User' fields will automatically populate with the current Date and the Username of the User who is modifying the Customer record.
Credit Status
This field displays the Credit Status as it was after the change.
Credit Limit
This field displays the new Credit Limit as it was after the change.
Changed Date
This field displays the date when the change took place
User
This field displays the user name of the user who made the change.
Custom Defined Fields Tab
The Custom Defined Tab displays any Custom Defined fields that may be setup in your system for this Customer. Custom Definitions are setup in the Codes Maintenance program.
Customs Broker Tab
The Customs Broker Tab is used to define the available Customs Broker Vendors for a selected Client. The Customs Brokers available for a freight bill will be based off of the setup for the Client being used as the Shipper/Consignee of the freight bill as well as the direction of the customs movement (inbound or outbound).
In / Out / Vendor
These fields will default will update with the default Inbound and Outbound vendors (when configured below).
Inbound
The Inbound section allows the user to configure the available Vendors (and one 'Default Inbound' Vendor) for the selected Client code. When working with an Inbound customs movement (on the Customer Service program > Customs Tab), the Vendors available in the 'Customs Broker' edit-pick will be those Vendor codes added into this grid.
Broker
To add a new Vendor as a Customs Broker, select the '+' button. Only Vendors of type 'C' (Customs Broker) will be available for selection.
Default Inbound
One Vendor can be chosen as the default for Inbound movements. The 'Default Inbound' vendor will be automatically added to an Inbound customs movement when the user adds a new record on the Customer Service program > Customs Tab with the selected Client as Consignee).
Outbound
The Outbound section allows the user to configure the available Vendors (and one 'Default Outbound' Vendor) for the selected Client code. When working with an Outbound customs movement (on the Customer Service program > Customs Tab), the Vendors available in the 'Customs Broker' edit-pick will be those Vendor codes added into this grid.
Broker
To add a new Vendor as a Customs Broker, select the '+' button. Only Vendors of type 'C' (Customs Broker) will be available for selection.
Default Outbound
One Vendor can be chosen as the default for Outbound movements. The 'Default Outbound' vendor will be automatically added to an Outbound customs movement when the user adds a new record on the Customer Service program > Customs Tab with the selected Client as Shipper).