Mobile Communications Macro Setup menu bar and toolbar

File Menu
New Macro
Select one of the New Macro options from the Macro drop down menu to create a new Macro. The Define New Macro window will appear, where you must select a number from either the forward Macros list or the return Macros list.
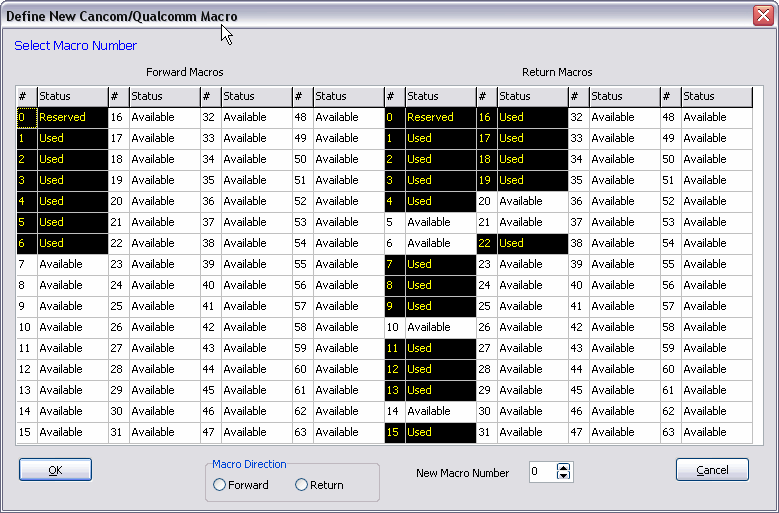
There are 63 Forward and 63 Return Macros available for definition. The status of Available means that the Macro number is not currently used. When a Macro number is in use, its status is 'Used'. To select a Macro number, either click on the # or Status field in the grid, or use the Macro Direction and New Macro Number fields at the bottom of the form.
When you click on the 'OK' button, you will then see the Modify Macro window, which is described below.
Add / Edit DTF Macros
Selecting this option will open the Decision Tree Form Builder window. This option is only available when working when 'PeopleNet' is one of the available Networks.
Define HighwayMaster Datatypes
The Define HighwayMaster Datatype Setup window is used to create HighwayMaster Return Macro fields (referred to as 'Status Codes' and 'Prompts' by HighwayMaster). The datatypes configured here are the only Field Types available for HighwayMaster Return Macros.
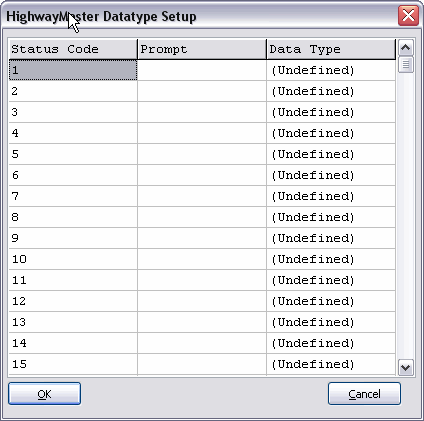
There are 99 Status Codes available for configuration. The Prompt is the text that appears on the remote device. The Data Type refers to the format of the data that must be entered. It will determine the available Return Actions for the Macro fields.
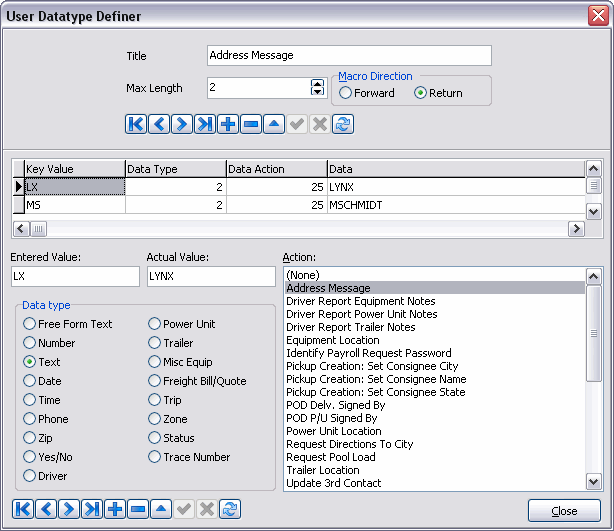
Define User Datatypes
User Datatypes are user-configured Codes that correspond to pre-configured TruckMate Macro fields used for data updates. In the example of the User Datatype Definer window shown below, the letter 'O' has been configured to perform the same function as the letter 'Y' for a Load Acceptance Return Macro. The User Datatypes configured here can be used when you create Macros; they are available as a User Type Field Type for both Forward and Return Cancom and AMSC Macros, and for Forward HighwayMaster Macros. For a description of the available Actions for datatypes, see the Forward and Return Macro Field Type sections of this documentation.
Exit
![]() Selecting this option will close the Communications Macro Setup program.
Selecting this option will close the Communications Macro Setup program.
Multi-Company Menu
For more information on the Multi-Company options available from the Menu Bar, see the Multi-Company documentation.
Export Menu
Export To
After you create Macros, or if you make changes to exported Macros, you must send the Macros to the remote devices. You must also re-export Macros if you add new remote devices to your fleet. Select 'Export to QTracs/400' to export Macros to the QTracs network (or selected 'QTracs' to export to the iWeb Portal). To export Macros to HighwayMaster devices, select 'Export to HighwayMaster'. To export Macro to AMSC devices, select 'Export to AMSC', etc.
After choosing your option, a confirmation window will appear before the procedure completes.
Export QHOS Macros
Selecting this option opens the Export QHOS Macros window.
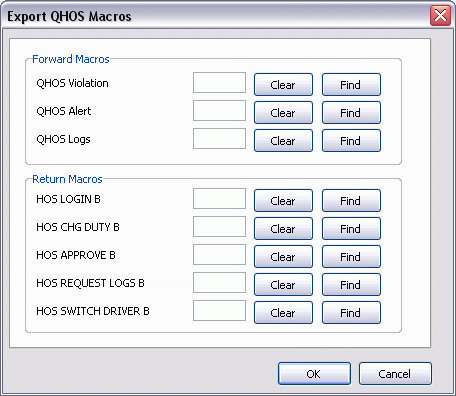
For each of the Macros listed here ('QHOS Violation', 'QHOS Alert', 'QHOS Logs', 'HOS LOGIN B', 'HOS CHG DUTY B', 'HOS APPROVE B', 'HOS REQUEST LOGS B', 'HOS SWITCH DRIVER B'), select the 'Find' button and define which Macro slot you wish to use. *Make reference of the numbers chosen here*.
The customer will need to contact Omnitracs to specify which Macro Numbers the QHOS Macros are in. This will allow the QHOS server to process the QHOS Macros. Click 'OK' and the QHOS Macros will be exported directly to the Qtracs database and then sent to the trucks.
After Macros have been marked as exported from the Macro Setup program, a record will be inserted into the IWEB_PORTAL_ACTION Table. The 'Action_Type' variable will be set to 'M' (for Macro,) and the 'Resource_Id' variable will be the Macro’s ID #. This will allow the TMW Windows Service Host program to see that there is a new Macro to be exported and then send the new Macro Definition to the Web Portal.
Check Web Portal Macro Status
Selecting this option will open the iWeb Portal Macro Import/Export Status window, which will allow you to view the states of the various Macros you have sent/received. The window details the 'Macro Name', 'Direction', 'Status' and any 'Error Messages' that have been returned.
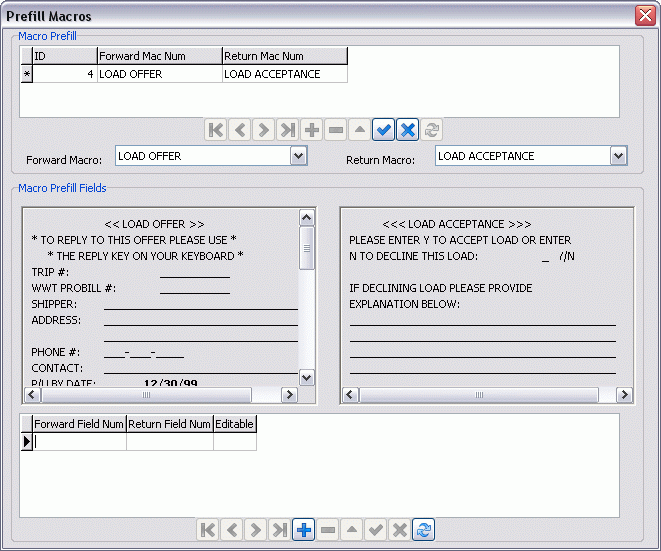
Prefill Macro
Selecting this option opens the Prefill Macro window, which allows you to automatically populate the Return Macro fields with information from the Forward Macro (only available for Omnitracs devices). Then the user can view those macros side by side and click on the fields that need to be linked. The macros prefill macro fields will be exported to Qtracs.
-
Macro Prefill
This section allows you to create a new Prefill Macro. Select the '+' button to begin creation. A new Prefill Macro will be added and given a sequential ID value. -
Forward Macro / Return Macro
Use the 'Forward Macro' and 'Return Macro' to configure which Macros will be used for the Prefill Macro. The information from the forward macro will automatically be populated in the fields for the return macro. -
Macro Prefill Fields
The two Macros you have selected will display in the two provided boxes here. Select the '+' button, then choose a filed from the Forward Macro and a field from the Return Macro. All of the fields you choose to match will be displayed in the grid below.
Select the 'Save' (checkmark) button when done. The Macro Setup program will then automatically connect to the Qtracs database in order to link the provided Macro fields together.
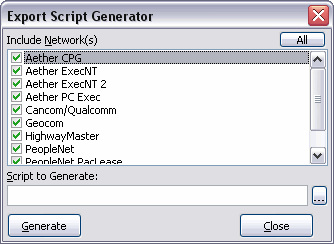
Generate Export Script
Selecting this option opens the Export Script Generator window, which allows you to export macro structures that can be saved into another Database or as backups.
-
Include Networks
Place a checkmark in the box provided if you wish to include these networks in your export script generation procedure. -
Script to Generate
Enter the name of the script to be generated in the text field provided or click the ellipsis button to choose a filename and file location on your local system. -
Generate
Click on the 'Generate' button to proceed.
Import Menu
If you have been using the Cancom / QTracs system, you may already have configured Macros. The Communications Macro Setup program allows you to import these Macros and edit them within the TruckMate system. Select one of the following five options:
-
Import Already-Defined Macros from QTracs
-
Import from QTracs / 400
-
Import from Omnitracs Web Portal
-
Import ExecNT Forms (Instance 1)
-
Import ExecNT Forms (Instance 2)
Import PeopleNet Definitions
Selecting this option opens the PeopleNet Forms window.
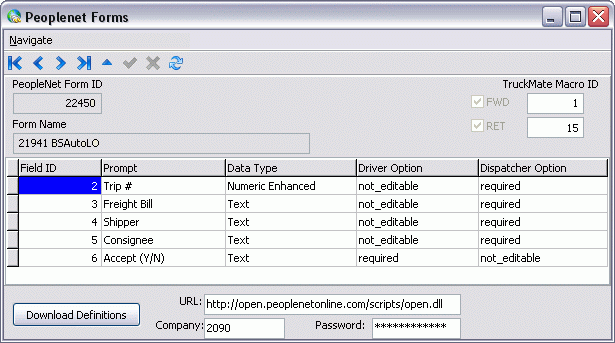
This window is used to associate PeopleNet forms with TruckMate Macros. You can associate PeopleNet forms with either forward or return type macros, or you can create (as in the image above) a bidirectional form by associating the forms with both a forward and return macro.
Use the Navigation Bar buttons to scroll between records in the Forms Grid (once you have downloaded the definitions).
The two TruckMate Macro ID fields specify which TruckMate Macro will be associated with the PeopleNet forms. Once you have downloaded the definitions (see below) enter the macro number you wish to associate with the forms in the text field provided. The 'FWD' and 'RET' checkboxes will default to selected depending on if the selected Peoptton and define which Macro slot you wish to use. Make reference of the numbers chosen here.
The customer will need to contact Omnitracs to specify which Macro Numbers the QHOS Macros are in. This will allow the QHOS server to process the QHOS Macros. Click 'OK' and the QHOS Macros will be exported directly to the Qtracs database and then sent to the trucks.
To create a two-way (bidirectional form), you would just create a 'Forward' and 'Return' Macro that look the same, (i.e. that have the same fields), but assign them different actions. You then upload one of the scripts to the PeopleNet Fleet Manager, but assign both Macros to use the resulting form.
Load Import Script
Selecting this option opens the Load Import Script window.
Migrate Menu
The Migrate menu offers choices for a 'From' migration point, and 'To' migration point. Use the pull-down menu to identify the correct parameters for your import process (based on the Software involved), and proceed.
Tools Menu
TruckMate Monitor
![]() Click the down arrow next to this button to access the various functions of the new TruckMate Monitor.
Click the down arrow next to this button to access the various functions of the new TruckMate Monitor.
Remember Position / Size
Checking this option will maintain window position and size on application exit. When the program is opened again, it will appear as before.
Help Menu
TruckMate Help
![]() Selecting this button will open the Communications Macro Setup topic in the TruckMate Online Help file (the page you are currently viewing).
Selecting this button will open the Communications Macro Setup topic in the TruckMate Online Help file (the page you are currently viewing).
Service Portal
![]() Selecting this button will open an instance of your default Internet browsing software, with the https://www.tmwcare.com login page displayed.
Selecting this button will open an instance of your default Internet browsing software, with the https://www.tmwcare.com login page displayed.
About
![]() Selecting this button will open the standard TruckMate About window, which contains important information about the application you are currently using, including its version number (important for support calls).
Selecting this button will open the standard TruckMate About window, which contains important information about the application you are currently using, including its version number (important for support calls).