eManifest Bill of Lading tab

Bill of Lading Grid
The Bill of Lading Grid displays any Freight Bills that are attached to the current Shipment / Manifest. Changes to the Freight Bill detail records are accomplished on the Bill of Lading Sub-Tabs, described below. You also have access to two Context Menu options from this Grid, which allow you to quickly remove Freight Bills from any Shipments that need amendment.
Context Menu
Skip All Bills
Selecting this option will set the 'Skip Bill' field to 'True' on all Freight Bills in the Bill of Lading Grid, removing them from the currently displayed Manifest. This is useful when you are amending a Shipment with multiple Freight Bills on it, but do not wish to make any modifications to a specific Freight Bill (because it was correctly submitted the first time).
Clear Skip on All Bills
Selecting this option will change the 'Skip Bill' field from 'True' back to 'False', including the Freight Bill(s) in the Manifest.
Item Summary Tab
The Item Summary Tab shows the details of the Freight Bill attached to the selected Manifest record and allows some configuration.
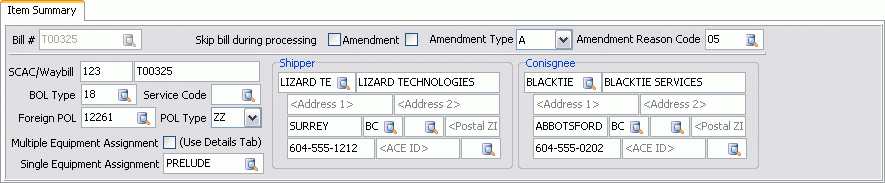
| Many of these fields can be set to automatically populate based on the default settings in the 'Bill of Lading' section on the Defaults A Tab. |
Bill #
This field displays the Freight Bill number of the Freight Bill currently selected in the Bill of Lading Grid.
Skip Bill During Processing
Selecting this flag will remove the selected Freight Bill Manifest that is sent electronically. If you have multiple Freight Bills in a Manifest that has been sent, and not all of them require amending, use this flag to avoid submitting the same Freight Bill multiple times.
Amendment / Amendment Type / Amendment Reason Code
If the Freight Bill selected in the Bill of Lading Grid requires amending/modification, select the 'Amendment' flag, then use the 'Amendment Type' drop down menu to choose the a value from the following:
-
A - Add a Freight Bill
-
D - Delete a previously submitted Freight Bill.
-
M - Modify a previously submitted Freight Bill.
Once you have chosen an 'Amendment Type', you must then select an 'Amendment Reason Code' by selecting the Database search button and choosing the reason for amendment from the list of available options in your system.
SCAC / Waybill
These fields displays the SCAC number used to file the Freight Bill, as well as the Waybill number of the Freight Bill currently selected in the Bill of Lading Grid.
| The 'Waybill' field will default to a blank field (rather than have it auto-populate with the Freight Bill Number. This is to ensure that a Dispatcher does not send the eManifest without updating the Waybill number manually. If a User attempts to send the eManifest with a blank 'Waybill' field, the eManifest program will return an error and won’t send until they add the waybill number. |
BOL Type
Use the Database search button to select a Bill of Lading Type from those available on your system. The User can select from the following Types:
-
Type 00: Regular Bill.
-
Type 13: Sec 321 Release.
-
Type 14: Intangibles.
-
Type 18: Goods Astray. This type entails several specific requirements. See the 'Goods Astray' section of the In-Bond Tab for more details.
-
Type 24: Single Entry Per C4 Line Release.
-
Type 25: Individual Entry for Multiple C4 Line Releases.
-
Type 33: Preferred FAST Shipment.
-
Type 34: Preferred Pre-Arrival Processing System (PAPS) Shipment.
Service Code
Use the Database search button to select the ACE Service Code required for the selected Freight Bill on this Manifest.
Foreign POL / POL Type
Use the Database search button to select the Foreign POL and the drop down menu to select the POL Type.
Multiple Equipment Assignment
This flag allows you to identify the Shipment as having Multiple Equipment assigned to it. If selected, the applicable Equipment unit must be manually selected for each Detail record of the Shipment on the Details Tab. This field is useful in a "Two Trailer, One Shipment" scenario.
Single Equipment Assignment
If the shipment is to only have a single piece of Equipment associated with it, use the Database search button to select a Trailer code from your system.
In-Bond Tab
The In-Bond Tab shows the details of the Shipment’s In-Bond Customs information.
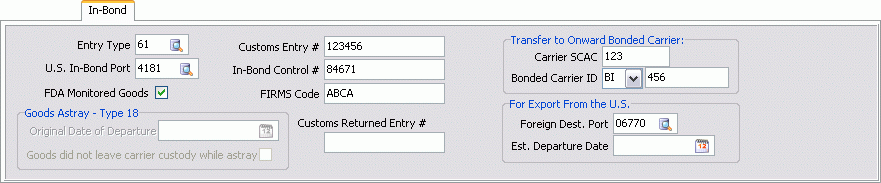
| Many of these fields can be set to automatically populate based on the 'Entry Type' selected by configuring defaults on the Defaults B Tab. |
Entry Type
Use the Database search button to select the Entry Type of the displayed Manifest. The Entry Type values correspond as follows:
-
Type 61: Immediate Transportation.
-
Type 62: Transportation Exportation. This Type is intended for export shipments (the 'Arrival Port' and the 'U.S. In-Bond Port' cannot be the same). Type 62 means the Freight is entering the U.S. and is intended for departure from the U.S. at another Port.
-
Type 63: Immediate Exportation. Type 63 is for Immediate Exportation from the Port the Freight is arriving into the U.S. at.
-
Type 65: Permit to Proceed (Permit to Transfer). This Type designates local Freight transfers.
U.S. In-Bond Port
Use the Database search button to select the U.S. Port of Entry where the shipment will clear U.S. Customs.
FDA Monitored Goods
If the displayed shipment contains Food and Drug Administration monitored goods, select this flag.
Customs Entry #
Enter the In-Bond Entry number that was supplied for the shipment by the Canadian Border Protection agency (CBP) upon entry into the U.S.
In-Bond Control #
Enter the 9-digit In-Bond Control # supplied by U.S. Customs. If a 9-digit value is not entered, the eManifest program will generate a warning message during the Validation process.
FIRMS Code
Enter the FIRMS location identifier code of the destination arrival/transfer facility.
Customs Returned Entry #
This field will display the Customs Returned Entry # provided by a 350 EDI from the Canadian Border Protection agency. This field is display only and cannot be modified.
Goods Astray - Type 18
If the Manifest is for a Goods Astray shipment (Type 18), the following special restrictions should be noted:
-
Must be an In-Bond Shipment under the Carrier’s own bond.
-
Must not have left the Carrier’s custody while astray from the U.S.
-
Freight must return to the U.S. with 45 days of departing the U.S. (or duties become payable).
-
Shipper and Consignee must both be of U.S. Origin
Original Date of Departure
Double click this field to select the date of original departure from the U.S. using a calendar menu. The Freight in the Shipment must return to the U.S. within 45 days of the date in this field.
Goods did not leave Carrier custody while astray
This is a required flag when issuing a Goods Astray shipment. If this flag is not checked, the Validation process for the Manifest will fail.
Note: These fields will only be available if the 'BOL Type' is set to '18' on the Item Summary Tab.
Transfer to Onward Bonded Carrier
Carrier SCAC
Enter the SCAC of the Onward Carrier the In-Bond shipment is expected to be transferred to.
Bonded Carrier ID
Use the drop-down menu to select the Bonded Carrier’s Internal Revenue Services (IRS) Identification code, then enter the Carrier ID in the provided field.
For Export From the U.S.
If the displayed shipment is set to leave the United States (export), the following fields are required:
Foreign Destination Port
Use the Database search button to select a Foreign In-Bond Port Code.
Estimated Departure Date
Select the calendar icon to chose an estimated departure date for the export from the U.S.
Importer / Broker Tab
The Importer / Broker Tab allows you to assign an Importer and/or Customs Broker to the current Manifest.
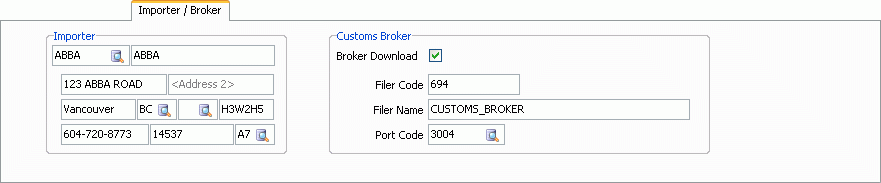
Importer
| These fields can be set to automatically populate based on the configuration settings for the 'Importer' section in the Defaults A Tab. |
Importer ID
Use the Database search button to select a Client ID that will be Importing the shipment detailed by the Manifest. The other detail fields in this section will automatically populate based on the Client’s setup in the Customer & Vendor Profiles program.
Customs Broker
| These fields can be set to automatically populate based on the configuration settings for the 'Customs Broker' section in the Defaults B Tab. |
Broker Download
Select this flag to requests downloads from the Canadian Border Protection (CBP) to be sent to the Customs Broker.
Filer Code / Filer Name / Port Code
Enter the Customs Broker’s Filer information and Port Code in the provided fields.
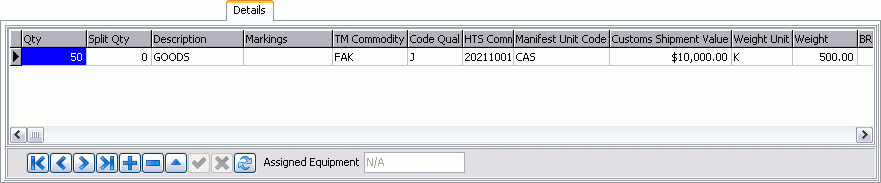
Details Tab
The Details Tab lists specific information about the kind of goods being shipped on the selected Freight Bill in the Bill of Lading Grid.
Reference Numbers Tab
The Reference Numbers Tab allows the User to attach a variety of specific Reference Numbers required when sending Shipments to Mexico.
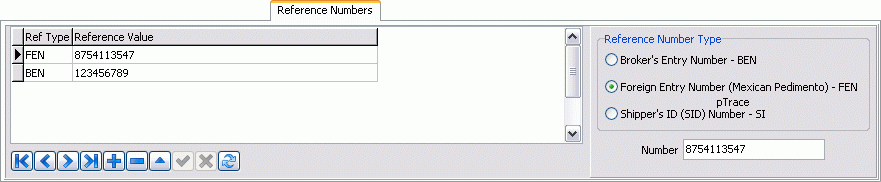
Use the '+' button at the bottom of the Reference Grid to create a new record detail line, then use the options in the 'Reference Number Type' section to add a Reference entry.
Reference Number Type
These fields are used to add records to the Reference Number Grid. Choose one of the following radio options:
-
Broker’s Entry Number - BEN:
-
Foreign Entry Number (Mexican Pdimento) - FEN:
-
Shipper’s ID (SID) Number - SI:
These values will appear in the 'Ref Type' column of the Reference Tab Grid.
Number
Once you have chosen the Reference Number Type, enter the Reference Number here. This value will be added to the 'Reference Value' column in the Reference Tab Grid.