Imaging setup and configuration
Points to consider
Before you can set up TruckMate to access and view your document images using a right-click shortcut menu option, you must have the third party document imaging software from your imaging vendor installed. Purchase this third-party software from your Trimble TruckMate Customer Service Representative, or supported third party imaging Vendor.
Within TruckMate, you must indicate a specific imaging vendor, configure the connection to that vendor and indicate which TruckMate executables can access the viewer using the Codes Maintenance program > Imaging tab.
Each of the third party imaging vendors integrated with TruckMate will require specific configuration settings. See Supported imaging vendors for a list of supported vendors and links to your specific imaging vendor for details.
| If using a third-party imaging vendor where a new integration with TruckMate was recently completed, you will need to install an updated (rebuilt) copy of every TruckMate executable that will be accessing the imaging features. |
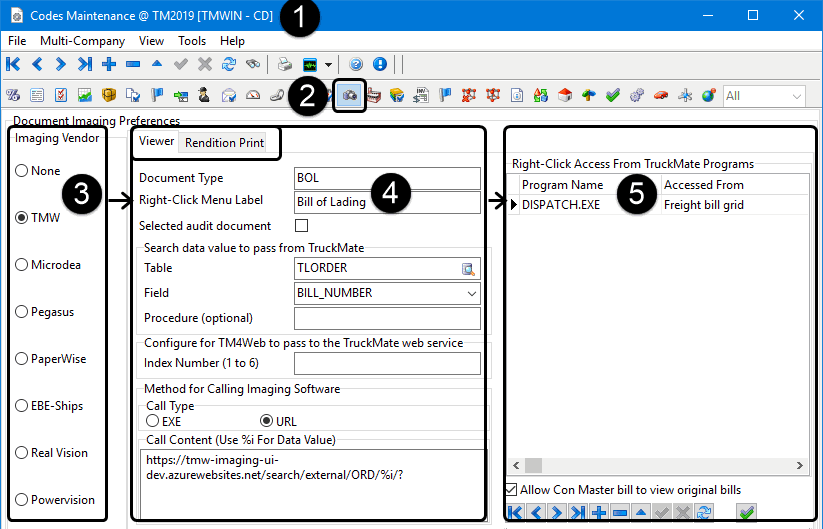
Configuration involves using the Codes Maintenance program > Imaging tab to indicate the following:
-
Which third-party imaging vendor you are using
-
The text label for the imaging document type that you will see in the right-click shortcut menu within the TruckMate applications
-
Which piece of data from TruckMate (table and column) is going to be passed to the viewer for searching
-
The TruckMate program from which the right-click option is to be available
-
The places/ parameters in the viewer that will accept a search value
Note: The parameters you can use as a search value is dependent on the imaging vendor. For example, one vendor might require that you specify three field values such as the server, repository and imaging fields. Another vendor (e.g., Pegasus) will require the base name and field name. Another vendor (e.g., PaperWise) uses the Environment ID and Search Field.
Selecting and configuring an imaging vendor
| You must have security permissions to view and edit the imaging tab in Codes Maintenance and the Imaging TruckMate license (13000) must be installed. |
-
Go to Profiles > Codes Maintenance.
-
Go to the Imaging tab.
-
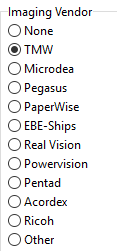
Select the third party imaging vendor from the list on the left.
-
Enter the required configuration information specific to this imaging vendor.
-
Depending on the imaging vendor selected, different imaging setup tabs will be available for configuration (i.e., Viewer, Workflow or Rendition Print tabs). See Vendor configuration for setup information specific to each vendor.
-
Use the navigation and grid editing tools for the TruckMate program access grid on the right to indicate which TruckMate applications will have access to this vendor’s imaging functionality. See Using the TruckMate program access grid section for details.
Using the TruckMate program access grid
The TruckMate program access grid displayed on the far right of the Codes Maintenance > Imaging tab is used to allow certain TruckMate applications access to the imaging functionality provided by your imaging vendor. Once your imaging software has been configured to work with TruckMate (via the Imaging Setup tabs for this specific vendor), you must indicate the programs you wish to have access to this functionality by adding them to this grid. TruckMate programs can access imaging based on the table that they use in their operations. So in this grid, you can only add those programs that access the table that the imaging software will be accessing. The grid will show the added program, and the area from where the imaging software can be accessed from within that program.
For a list of all TruckMate applications that allow document imaging (including which sections of the application can be used and which tables are accessed), see Integrating imaging with TruckMate programs, tables and access points.
| When using right-click shortcut menu > imaging access in any TruckMate application that allows multi-row grid selection, be aware that only the key value from the single right-clicked row is passed to the viewer (to search for matching documents). In other words, you will not get a list of all imaging documents matching any / all of the selected / highlighted grid rows. |
-
There are two ways to go about adding TruckMate applications to this grid:
-
Select the
 Insert button on the TruckMate navigation bar below the grid. This will create a new detail line in the TruckMate access grid, which you double-click to access a list of available programs to add one by one.
 -
Select the
 Auto-add all possible TruckMate programs for this TruckMate table button. This button is available for all imaging vendors, and will automatically add all the TruckMate programs that have use the table selected in the 'table' field of the Imaging Setup section.
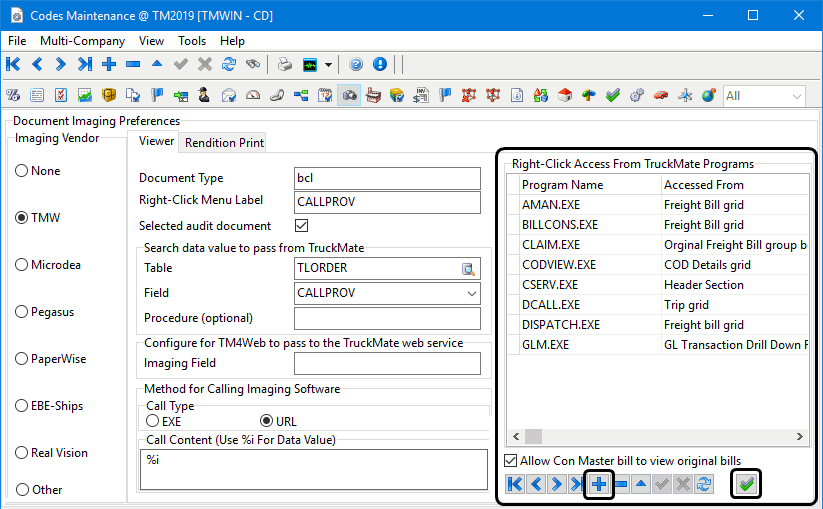
-
-
Set the Allow Con Master bill to view original bills checkbox found at the bottom of the TruckMate program access grid to determine whether you will be able to view the original bills.
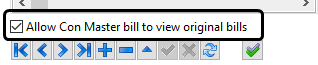
Setting this checkbox will either allow the user to view documents from original (part-lot) consolidated freight bills via the imaging vendor software. If this checkbox is not selected (default) the user will only have access to document images related to the specific freight bill they are working with (consolidated or not).
-
Refer to the topic specific to your imaging vendor for detailed descriptions for each vendor’s specific configuration requirements and setting options.
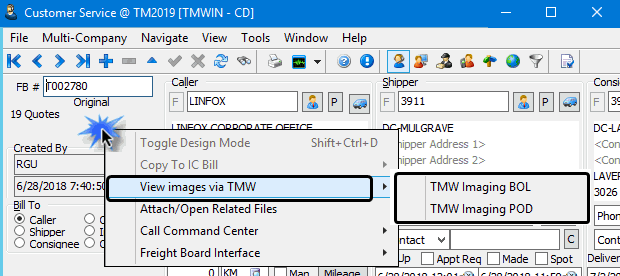
Once you have added programs to this grid, imaging will be available in them via the 'Imaging' right-click context menu option.
| If you choose a particular column during the setup of a right-click to an imaging viewer that is not available in the application (i.e. right-click from a grid but the chosen column is not displayed in the grid), then you will not get an error in Codes Maintenance, but you will when you attempt right-click imaging access from the specified application ("Unable to determine key data value to send to viewer"). The reason the column is available in Codes Maintenance (and you do not get an error if you choose it) is that the column may be available in a different TruckMate application with an imaging access link for the same table. |
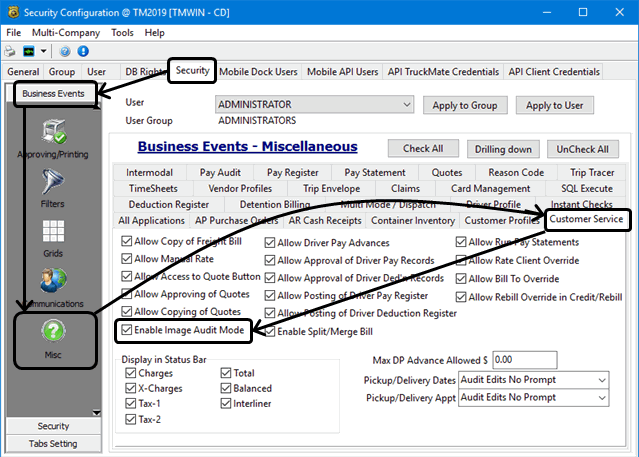
Setting the Image Audit Mode
The Image Audit Mode refers to a security setting option associated with the Customer Service program.
When the Auditing Mode is enabled, each time a new freight bill is located (either by the 'Find' function or by scrolling with the TruckMate Navigation Bar) in the Customer Service program, the program will automatically find and display the BOL type image associated with the Freight Bill. Thus, this option can speed up the process of verifying if BOL images have been attached to multiple Freight Bills.
When the Auditing Mode checkbox is cleared, the program will continue to behave normally, but will not automatically display the BOL image associated with a freight bill.
| Use the Security Configuration program > Security > Business Events > Misc tab > Enable Image Audit Mode checkbox to enable / disable this option for specific users. |
Vendor configuration
This section describes the fields available within the imaging setup tabs for each third party imaging vendor. They are listed in the same order as they appear on the Profiles > Codes Maintenance > Imaging tab.
Standard Imaging Viewer fields
Some of the fields required to configure the viewer for the imaging vendors are standard for all imaging vendors.Use the following table for a description of each of these common standard fields.
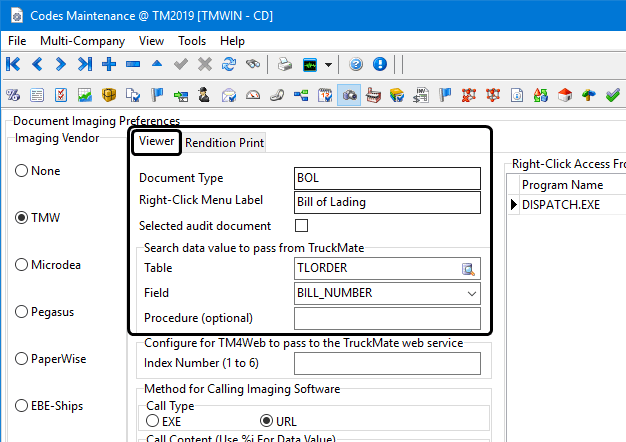
Required field: *
| Field | Definition |
|---|---|
Document Type * |
Documents on a mobile device are displayed as a list and are grouped by their 'Document Type', (e.g., Bill of Lading, Proof of Delivery, etc.) Note: the Document Type value passed to the imaging vendor is often case sensitive. |
Right-Click Menu Label * |
Enter explanatory text that will describe the right-click shortcut menu function set up as per the rest of the settings on this tab. When working in a TruckMate application, this will be the text that will represent this imaging function in the right-click shortcut menu of that program. |
Selected audit document * |
When this checkbox is selected, the displayed imaging document will be the image used when the Customer Service program is set to use the 'Image Audit Mode'. Only one Image record can have this flag set at one time. See Image Audit Mode for more information. |
Search data value to pass from TruckMate |
|
Table * |
Enter the table name that will link to your document image. imaging functionality will access this table when 'printing' an image. |
Field * |
Enter the correct TruckMate field name that will link to your document image. The values available in this field are determined by the 'table' value selected above. |
Procedure (optional) |
Enter a descriptive name for the document type here ("Bill of Lading" for example). |
TMW (Trimble Cloud) Imaging
Trimble Cloud Imaging is an improved cloud based version of the previous on-premise TMW Imaging solution. (The Trimble Cloud Imaging solution is described here but the descriptions and configuration are very similar for both if you are still using the previous TMW Imaging solution.)
-
Information related to the new Trimble Cloud Imaging solution is available from the Learning Center.
-
Contact your Trimble TruckMate Customer Service Representative for information on upgrading to the latest Cloud Imaging solution.
TMW (Trimble Cloud) Imaging requires some setup on the Viewer tab, and offers rendition printing.
Setting up a new document imaging integration using TMW Cloud Imaging
See Points to consider for an overview of the basic process and steps and return here for the configuration details unique to this imaging vendor.
Viewer tab
The Viewer tab contains the information required to establish communications between TruckMate programs and the TMW Cloud Imaging software.
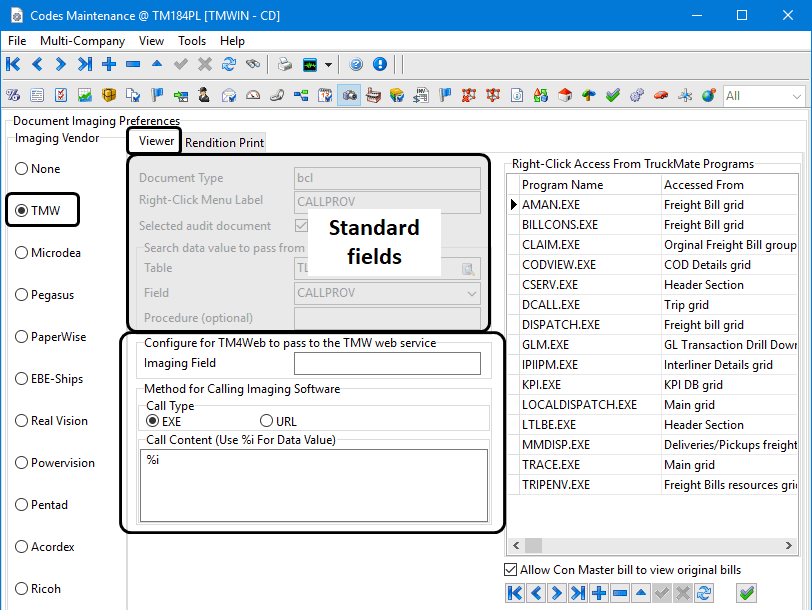
The first few fields on the Viewer tab are standard for all imaging vendors.
Required field: *
Imaging Field |
(Associated with the Crystal Report rendition print method.) This is the Index Type within Cloud Imaging that corresponds with the search value indicated in the search data setup.
|
Index Number |
(Associated with the Spool File rendition print method.) This is the Index Number within Cloud Imaging that corresponds with the search value indicated in the search data setup.
|
EXE / URL * |
TMW imaging offers two options for image viewing, using an EXE based viewer and a URL based viewer. The advantage of using an EXE based viewer over a URL based one is in the fact that every time a URL based viewer is called, a new browser window is opened. When an EXE based viewer is called, the image is opened in the same window. For frequent usage of the viewer during normal work process flow, the EXE based viewer provides an easier approach to image viewing. Select the radio button of the option that best satisfies your business needs. |
Call Content * |
Enter a fully qualified URL (include the 'http://' or 'https://' tag) in the space provided, with '%i' embedded (substituted at execution time with the value selected per the TruckMate table/field indicated). The imaging data will be transferred to this URL for use with the TMW software. For example, suppose you have set the URL to Pass/Append the Data To string to
TruckMate will launch a new web browser window (depending on system default) with
in the address bar. |
Rendition Print tab
The Rendition Print tab contains the information required to configure Rendition Printing via the imaging software.
You must configure all the fields for either the Crystal Report or Spool File rendition printing methods.
![]()
Select one of these methods. You cannot use both.
Most rendition printing features and options are common to all imaging vendors. For details, see Rendition printing.
Microdea Imaging (TMW Synergize™ by Microdea)
Before becoming Trimble Transportation Enterprise Solutions, TMW and Microdea, a leading provider of integrated document management and workflow solutions, became strategic partners. Introduced in 2010, the TMW-Synergize version of Microdea’s Synergize Software incorporates document imaging and workflow integration with several Trimble products, including TruckMate, resulting in a paperless office while ensuring that bills are paid, invoices go out, and cash is processed.
| A license key (Imaging - 13000) is required to integrate Synergize imaging software with TruckMate. See License Registration for more information. |
Imaging
A number of TruckMate programs allow for document imaging. When the functionality is configured, the user can access TMW-Synergize imaging by Microdea through the TruckMate programs by right-clicking and choosing the 'View images via Microdea' option from the context menu. For a full list of the TruckMate programs that support TMW-Synergize imaging, see Integrating imaging with TruckMate programs, tables and access points.
TMW-Synergize imaging functionality can also be accessed by users of the TM4Web product.
Workflow
TMW-Synergize incorporates workflow capabilities to several TruckMate applications. Utilizing the workflow functionality, documents (including freight bills, invoices, and cash receipts) are scanned into Synergize, and then either matched to existing TruckMate records or entered as new ones. They are then populated with indexing information from TruckMate to Synergize.
Once you have created your workflows on the Synergize side, the user can configure TruckMate program access to the workflows on the Codes Maintenance program > Imaging > Microdea > Workflow tab. Setting up specialized Workflow sequences- i.e. a unique 'Initial', 'Indexed' and 'Approved' Workflow queue sequence for each TruckMate application that uses workflows- will ensure a streamlined image indexing process from initial receipt to billing and that all imaged documents relating to one application are independent of other images relating to other applications.
The following applications support TMW-Synergize workflow functionality:
-
Customer Service
-
AP Invoice Entry
-
AR Cash Receipts Entry
-
Interline Payable Audit
-
Quick Bill Entry
-
Instant Checks
-
Cheque Printing
In these programs, the 'Index' button (![]() ) will be available from the 'Tools' menu when TMW-Synergize imaging is set up. After clicking this button, the user can select a specific Synergize Workflow, and the Image Indexing window will appear. Synergize does Index Validation without any interface or assistance from TruckMate, using a barcode to get the primary index and then connect to the TruckMate database to get secondary indexes.
) will be available from the 'Tools' menu when TMW-Synergize imaging is set up. After clicking this button, the user can select a specific Synergize Workflow, and the Image Indexing window will appear. Synergize does Index Validation without any interface or assistance from TruckMate, using a barcode to get the primary index and then connect to the TruckMate database to get secondary indexes.
TMW-Synergize by Microdea requires some setup on the Viewer tab, and includes the Workflow tab, which allows you to track your TMW-Synergize imaging requests.
Viewer tab
The Viewer tab contains the information required to establish communications between TruckMate programs and the Microdea server.
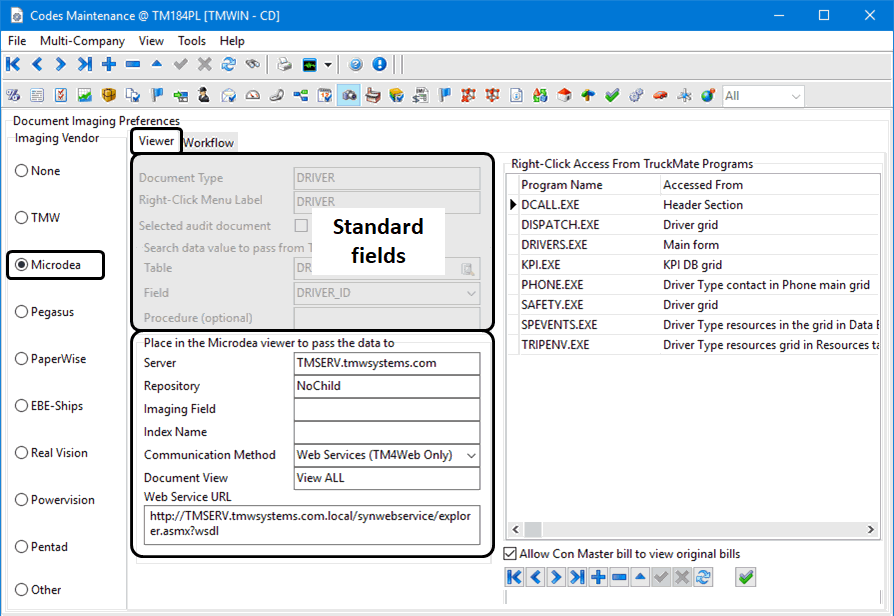
The first few fields on the Viewer tab are standard for all imaging vendors.
Required field: *
| Field | Definition |
|---|---|
Place in the Microdea viewer to pass the data to |
|
Server * |
Enter the server path. |
Repository * |
Enter the repository path to the location of the document images. This depends on your installation. For further clarification, ask your TMW Support Representative. |
Imaging Field |
Depends on your installation. Ask your TruckMate Support Representative for further information. |
Index Name |
Select the index name used for storing images. Providing an index name increases storage and retrieval speed. The larger the number of documents stored the more is the need for a proper index. |
Communication Method |
Choose one of the available methods for calling your Imaging Vendor’s Server API: 'COM', 'Web Services' or 'Web Services (TM4Web Only)'. |
Document View |
The Document View field is used to take advantage of the TMW-Synergize system’s 'MultiView' functionality. Once set up on the Synergize side, the User must simply enter the 'View Name' which they would like to use to filter the documents to be viewed. In order to use the MultiView functionality, you must select the 'Web Services' option in the 'Method for Calling Imaging' section. |
Web Services URL |
Web address of your Microdea imaging system as set up by Microdea or your TruckMate implementer. |
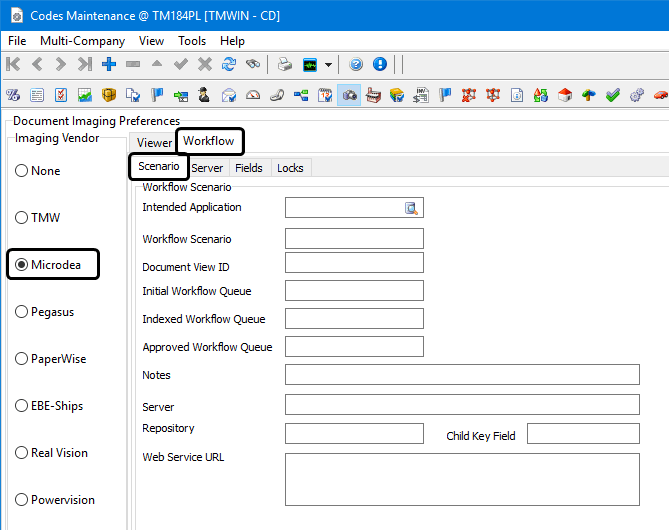
Workflow tab
The Workflow tab has been added to TMW-Synergize imaging by Microdea to allow you to set up a Document Imaging Workflow process, whereby document images can be accessed in sequence by a variety of supported TruckMate applications. Users may define a single scenario that can be used for multiple applications, a specific scenario for each application, or multiple scenarios for a single application where they want to use this feature.
You can access the TMW-Synergize workflows configured for supported applications by selecting the 'Image Indexing' option (![]() ) available on their respective program toolbars.
) available on their respective program toolbars.
Enter all the required information in the corresponding fields and save the record using the TruckMate Navigation Bar.
Scenario sub-tab
This section defines the 'Workflow Scenario' that will be selected for Auto-Indexing by the User when he/she is using one of the 'Intended TruckMate Applications' that support this functionality. Configure the following fields:
| Field | Definition |
|---|---|
Intended TruckMate Application |
Select the Database Search button and choose the TruckMate application that you would like the Imaging Workflow to apply to. The following applications are enabled for Workflow Auto-Indexing:
|
Workflow Scenario |
TMW Systems recommends configuring several 'Workflow Scenarios' for each application that you intend to use Image Workflows (and 'Auto-Indexing' functionality) with. Each TMW-Synergize 'Workflow Scenario' will ensure that all Imaged documents relating to one application are independent of other images relating to other applications. Enter a text name for your Workflow Scenario for the chosen application. |
Document View ID |
The Document View field is used to take advantage of the Synergize system’s 'MultiView' functionality. Once set up on the Synergize side, enter the 'View Name' to filter the documents to be viewed. |
Initial Workflow Queue |
By configuring various 'Initial', ' Indexed' and 'Approved' Workflow queues, you can streamline the document imaging process from initial receipt to the billing process. 'Initial' Workflow queues contain those Synergize images that have been received, but have not yet been opened or processed in TruckMate. Documents in the Initial Queue are the raw Bills of Lading, etc. that your company receives from its clients. |
Indexed Workflow Queue |
'Indexed' Workflow queues contain TMW-Synergize documents that have been opened and processed by TruckMate. When a document is processed by a TruckMate application (Customer Service, Quick Bill Entry, A/P Invoice Entry or A/R Cash Receipts Entry) information will be added to the document, and it will be placed into the 'Indexed' Workflow queue. |
Approved Workflow Queue |
'Approved' Workflow queues contain Synergize documents that have been 'Approved' via the Customer Service program. In Customer Service, when you approve a Freight Bill for Billing (by select the 'Approve' button on the Billing tab), it marks the document Image as 'Approved' so that it can be moved to a separate Queue. No additional information will be entered against the image. |
Notes |
Enter any descriptive Notes for the selected Workflow, such as when it should be used, and/or what Images it contains, here. |
Server |
Enter the TMW-Synergize Server’s HTTP-qualified internet address in this field. You can enter multiple server names / repositories in order to manage your various Synergize Workflow queues. Multiple Workflow queues can be beneficial when, for example, a company maintains two separate imaging repositories, one for Accounts Payable documents, and another for Accounts Receivable. |
Repository |
Enter the Document Image Repository name on the Server. You can enter multiple Server names / Repositories in order to manage your various TMW-Synergize Workflow queues. Multiple Workflow queues can be beneficial when, for example, for example, a company maintains two separate imaging repositories, one for Accounts Payable documents, and another for Accounts Receivable. |
Web Service URL |
If using Web Services to access the Microdea Server, enter the Web Service URL in this field. |
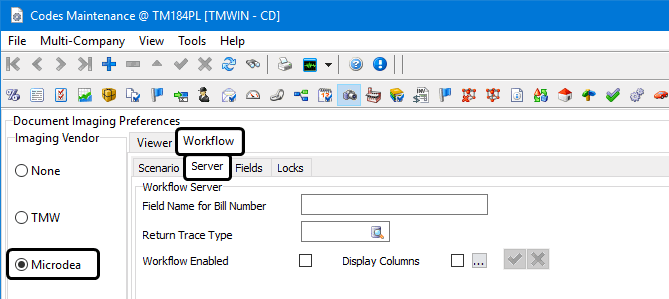
Server sub-tab
These are the details required to access the TMW-Synergize Server, in order for TruckMate to link to the required Document Image.
| Field | Definition |
|---|---|
Field Name for Bill Number |
Specify the Synergize field that will contain the Freight Bill’s Bill number. |
Return Trace Type |
This field allows you to link a Trace Type value from the TruckMate TRACE table that will be written to the Synergize system for Images in the Workflow. |
Workflow Enabled |
Select this flag to enable the Synergize Workflow functionality as you have configured it above. |
Display Columns |
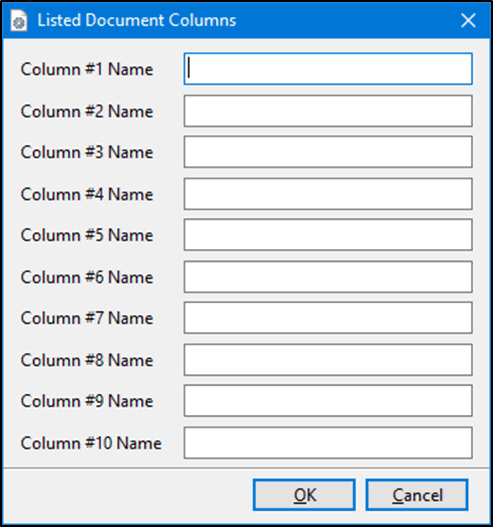
This checkbox is used as a flag on whether to display TMW - Synergize user defined columns or not. If this checkbox is selected, at the time when the Synergize indexing is done from one of the supported applications, and the 'List of Documents' mode is being used, the user defined columns will be displayed in the popup grid. If not selected, these columns will not appear. If you decide to define fields using the 'List of Synergize Fields' button, and you want them to appear in the popup form when the indexing is done form the application side, you must select the 'Display Columns' checkbox. |
List of Synergize Fields Button |
Selecting this button invokes a form with up to ten Synergize fields you can define by providing a name for each desired field. Each provided name must correspond to a specific column in the Synergize database, with an exact name match. Define as many columns as needed up to the provided limit of ten. Form any of the supported application, if the 'List Of Documents' mode is selected when performing a Synergize indexing, and the 'Display Columns' checkbox (described earlier) is selected, these columns will appear in the popup grid for indexing.
The idea behind this feature is to give the user additional information about available documents, when a specific document is to be selected for Synergize workflow indexing. |
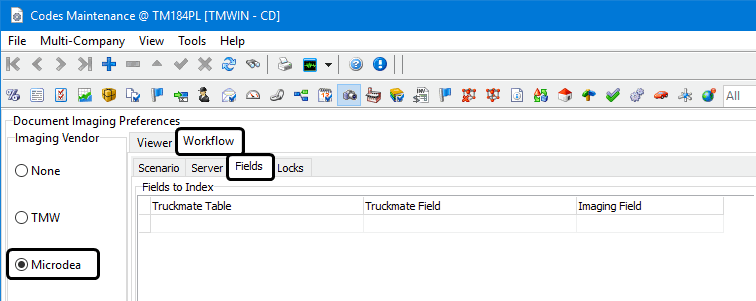
Fields sub-tab
The user must provide the 'TruckMate table', 'Field' and the Synergize 'Imaging Field' in order to use workflow. These indexing fields work in the same way as similar fields on the Synergize > Viewer tab, but are used separately when using workflow functions.
Locks sub-tab
In Image Indexing mode, when users open an image for indexing, a lock for this image will be enforced. As a result, other users cannot open this image for indexing purpose. The lock will be released once users post TruckMate information to Synergize, skip the image or exit indexing mode.
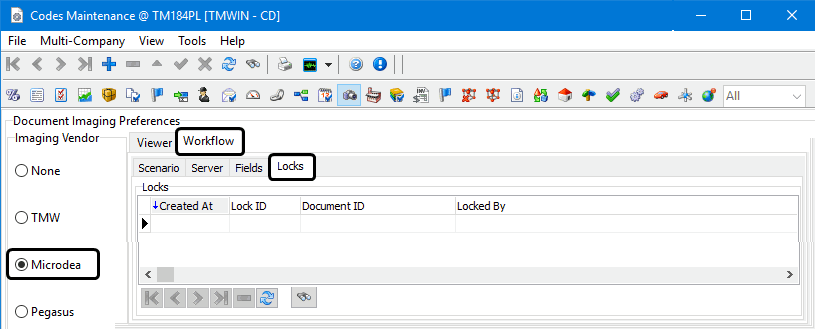
Users can use this Locks tab to monitor image locks and release/delete locks that cannot be auto-released (in case unexpected shutdown or users terminate TruckMate abnormally). Erroneous locks can be removed from the list.
If a document is locked by a user, that user can still open the document without requesting removing locks but other users would have to have locks removed.
Pegasus Imaging
Pegasus Imaging requires some setup on the Viewer tab, and offers rendition printing.
Setting up a new document imaging integration using Pegasus Imaging
See Points to consider for an overview of the basic process and steps and return here for the configuration details unique to this imaging vendor.
Viewer tab
The Viewer tab contains the information required to establish communications between TruckMate programs and the Pegasus Imaging software.
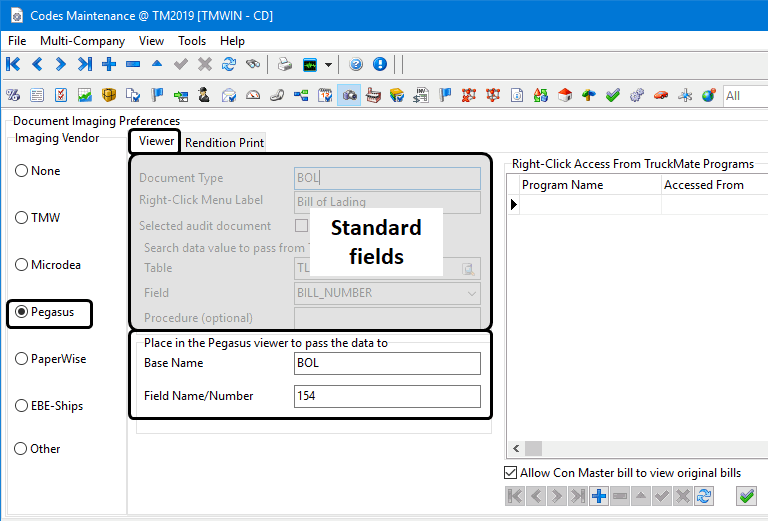
The first few fields on the Viewer tab are standard for all imaging vendors.
Required field: *
| Field | Definition |
|---|---|
Place in the Pegasus viewer to pass the data to |
|
Base Name * |
Enter the base name used within your Pegasus software to identify this type of document. Refer to Pegasus documentation. |
Field Name / Number * |
Enter the correct TruckMate field name or number that will link to your document image. |
Rendition Print tab
The Rendition Print tab contains the information required to configure Rendition Printing via the imaging software.
You must configure all the fields for either the Crystal Report or Spool File rendition printing methods.
![]()
Select one of these methods. You cannot use both.
Most rendition printing features and options are common to all imaging vendors. For details, see Rendition printing.
PaperWise (WebWise) Imaging
PaperWise (WebWise) Imaging requires some setup on the Viewer tab, and offers rendition printing. PaperWise imaging is supported by the document check-in functionality (configured on the Profiles > Codes Maintenance > Checklist Items tab).
Setting up a new document imaging integration using Pegasus Imaging
See Points to consider for an overview of the basic process and steps and return here for the configuration details unique to this imaging vendor.
Viewer tab
The Viewer tab contains the information required to establish communications between TruckMate programs and the PaperWise Imaging software.
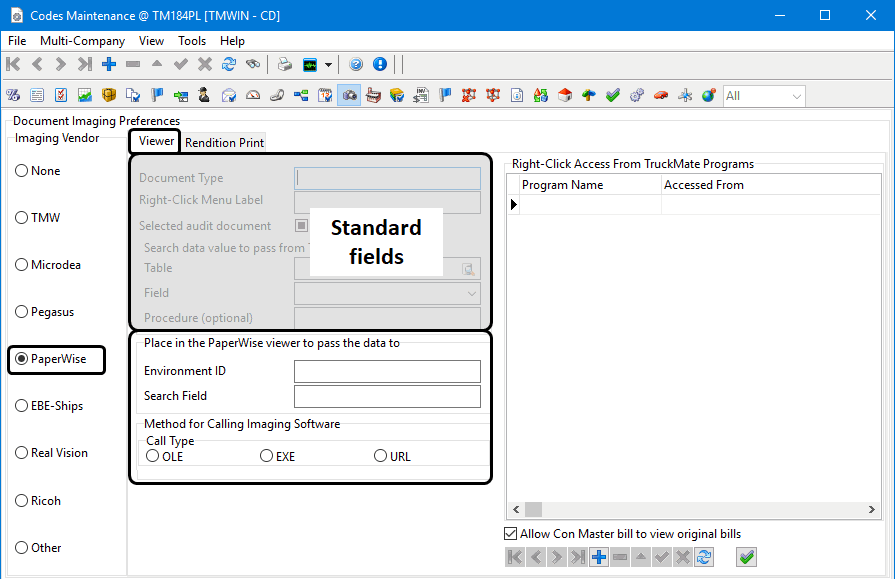
The first few fields on the Viewer tab are standard for all imaging vendors.
Required field: *
| Field | Definition |
|---|---|
Place in the PaperWise viewer to pass the data to |
|
Environment ID * |
Enter the ID code used within your PaperWise software to identify this type of document. Refer to PaperWise documentation. |
Search Field * |
Enter the correct TruckMate field name or number that will link to your document image. |
Method for Calling Imaging Software |
|
Call Type * |
Choose the way in which you would like to call the Paperwise software. The Available options are 'OLE', 'EXE', and 'URL'. The 'OLE' option has no further configuration required, but both 'EXE' and 'URL' require some additional data. The '.EXE' option corresponds to an external application that will handle the Imaging software requests, while the 'URL' option will use your system’s default Web Browsing software for Imaging purposes. |
Call Content * |
Specify the command-line command (EXE) or URL, with '%i' embedded (substituted at execution time with the value selected per the TruckMate table/field indicated). Different EXE’s could also be called (one for viewing, one for indexing, etc.). The user can determine which EXE or method they are calling by properly setting the label for the right-click menu option in the 'Right-Click Menu Label' field. For example: Suppose you have made an entry with: 'table' = 'TLORDER', 'Field' = 'BILL_NUMBER', 'Call Type' = '.EXE', and the 'Call Content' string = 'c:\progra~1\imaging\myviewer.exe %i'. When you have Freight Bill 'F123456' displayed in the Customer Service program and right-click it (and select the Imaging option), then TruckMate will attempt to execute/launch: 'c:\progra~1\imaging\myviewer.exe F123456' (just as though it had been launched from a shortcut or from a DOS Command window). In the same situation, if instead I had set Call Type' = 'URL' and set the 'Call Content' string = 'http://www.mywebsite.com/cgi-bin/img-docfind.pl?reftype=INV&refnum=%i', then TruckMate will launch a new web window (depending on system default) with 'http://www.mywebsite.com/cgi-bin/img-docfind.pl?reftype=INV&refnum=F123456' in the address bar. |
Rendition Print tab
The Rendition Print tab contains the information required to configure Rendition Printing via the imaging software.
You must configure all the fields for either the Crystal Report or Spool File rendition printing methods.
![]()
Select one of these methods. You cannot use both.
Most rendition printing features and options are common to all imaging vendors. For details, see Rendition printing.
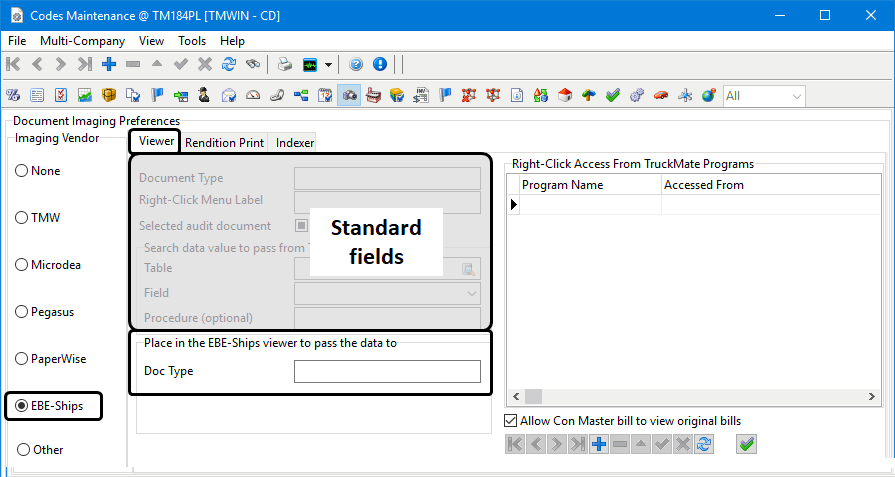
EBE-Ships Imaging
EBE-Ships Imaging requires some setup on the Viewer tab, and offers rendition printing. EBE-Ships Imaging is supported by the document check-in functionality (configured on the Checklist Items tab).
Setting up a new document imaging integration using Pegasus Imaging
See Points to consider for an overview of the basic process and steps and return here for the configuration details unique to this imaging vendor.
Viewer tab
The Viewer tab contains the information required to establish communications between TruckMate programs and the EBE-Ships Imaging software.
The first few fields on the Viewer tab are standard for all imaging vendors.
| Field | Definition |
|---|---|
Place in the EBE-Ships viewer to pass the data to |
|
Doc Type |
Enter the EBE-Ships 'Doc Type' value in the space provided. This is an optional field and thus a value is not required. Refer to EBE-Ships documentation. |
Rendition Print tab
The Rendition Print tab contains the information required to configure Rendition Printing via the imaging software.
You must configure all the fields for either the Crystal Report or Spool File rendition printing methods.
![]()
Select one of these methods. You cannot use both.
Most rendition printing features and options are common to all imaging vendors. For details, see Rendition printing.
Real Vision Imaging
Real Vision (RVI) Imaging requires some setup on the Viewer tab, and offers rendition printing.
Setting up a new document imaging integration using Real Vision Imaging
See Points to consider for an overview of the basic process and steps and return here for the configuration details unique to this imaging vendor.
Viewer tab
The Viewer tab contains the information required to establish communications between TruckMate programs and the Real Vision Imaging software.
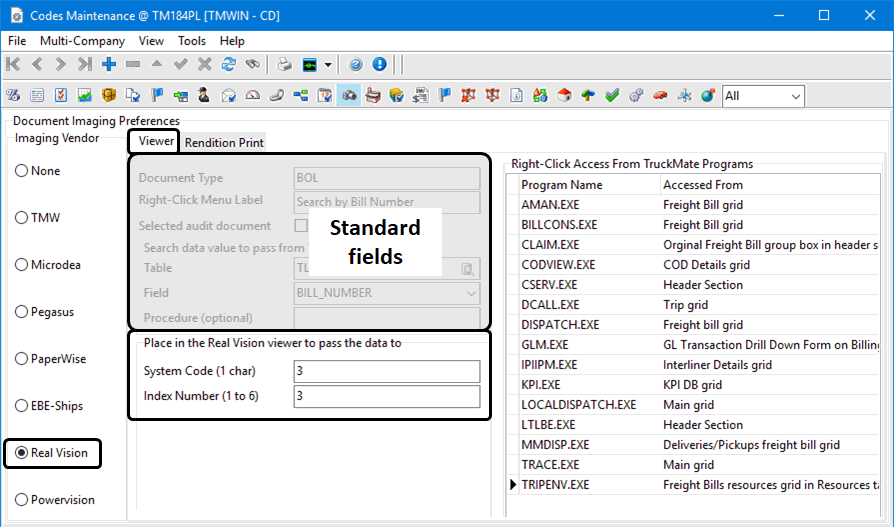
The first few fields on the Viewer tab are standard for all imaging vendors.
| Field | Definition |
|---|---|
Place in the Real Vision viewer to pass the data to |
|
System Code |
Enter your Real Vision System Code in the space provided. |
Index Number |
Enter your Index Number (an integer from 1 to 6) in the space provided. |
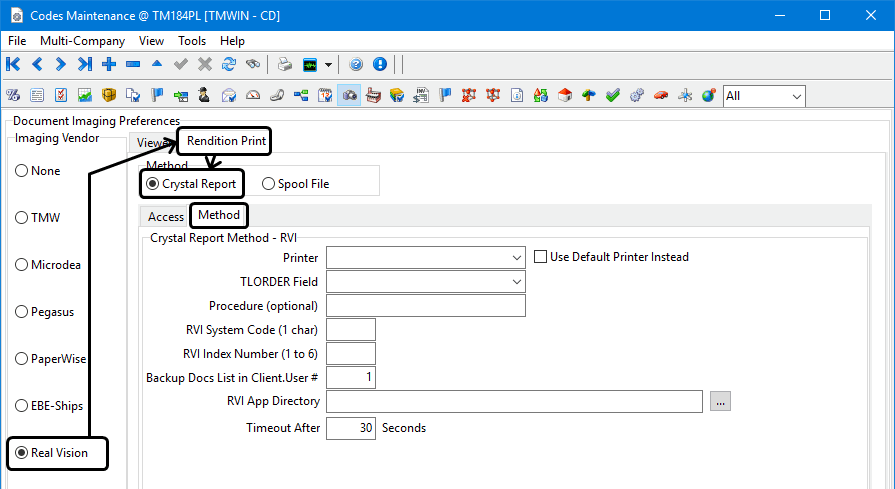
Rendition Print tab
The Rendition Print tab contains the information required to configure Rendition Printing via the imaging software.
You must configure all the fields for either the Crystal Report or Spool File rendition printing methods.
![]()
Select one of these methods. You cannot use both.
Most rendition printing features and options are common to all imaging vendors. For details, see Rendition printing.
Crystal Report (Printer Driver) Method
For the Crystal Report printer driver method for rendition printing, you need to specify the name of the imaging company’s custom printer driver, the and a timeout specification (telling TruckMate how long to wait in case the imaging company’s service is not running or not deleting the XML file properly).
Required field: *
| Field | Definition |
|---|---|
Printer * |
Specify the Custom Printer Driver included with your Third Party Imaging software. Use the pull-down menu to select from the available Printer Drivers. |
Use Default Printer Instead |
Selecting this checkbox means TruckMate will use the systems Default Printer instead of a Third Party Printer Driver. |
TLORDER Field |
Enter the correct TruckMate field name that will link to your document image. The values available in this field are determined by the 'table' value selected above. |
Procedure (optional) |
Enter a descriptive name for the document type here ("Bill of Lading" for example). |
RVI System Code |
Enter your Real Vision System Code in the space provided. |
RVI Index Number |
Enter your Index Number (an integer from 1 to 6) in the space provided. |
Backup Docs List in Client.User # |
Some Imaging Vendors want a 'backup documents string' indicating which types of documents (bills of lading, etc.) in their system they are to search for and print / send with the invoice, which supposedly varies by end-client. There is no dedicated field for this in the client table so you specify which of the ten Client User Defined Fields you have entered this string into. (The ten fields are edited in Profiles > Customer & Vendor Profiles > User Defined Fields tab) |
RVI App Directory |
Enter the location and name of the file directory containing the Real Vision Imaging software application. |
Timeout After |
This field tells TruckMate how long to wait (in seconds) in case the imaging software is not running or deleting the XML data file properly. Enter a numerical value in this field. |
Powervision Imaging
Powervision Imaging requires some setup on the Viewer tab, and offers rendition printing.
Setting up a new document imaging integration using Powervision Imaging
See Points to consider for an overview of the basic process and steps and return here for the configuration details unique to this imaging vendor.
Viewer tab
The Viewer tab contains the information required to establish communications between TruckMate programs and the Powervision Imaging software.
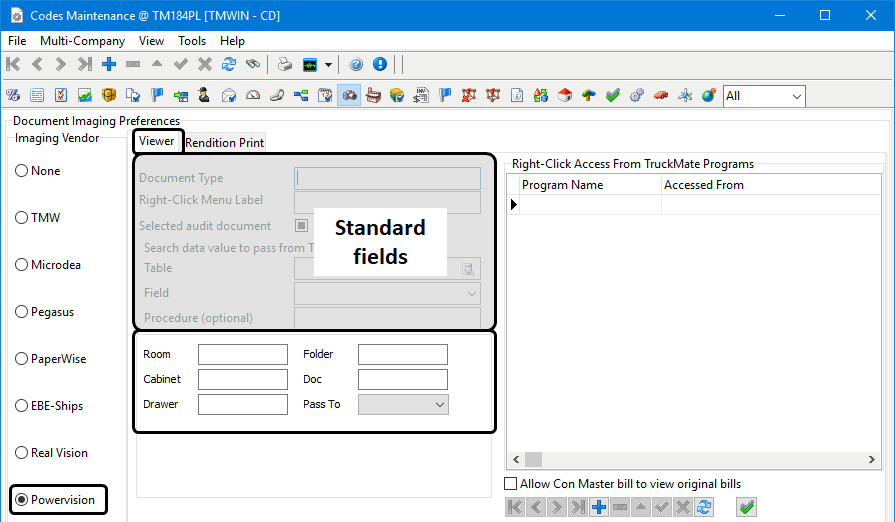
The first few fields on the Viewer tab are standard for all imaging vendors.
Enter the Powervision file location information in the remaining fields. Refer to Powervision documentation.
Rendition Print tab
The Rendition Print tab contains the information required to configure Rendition Printing via the imaging software.
You must configure all the fields for either the Crystal Report or Spool File rendition printing methods.
![]()
Select one of these methods. You cannot use both.
Most rendition printing features and options are common to all imaging vendors. For details, see Rendition printing.
Pentad Imaging
Pentad Imaging requires some setup on the Viewer tab.
Setting up a new document imaging integration using Pentad Imaging
See Points to consider for an overview of the basic process and steps and return here for the configuration details unique to this imaging vendor.
Viewer tab
The Viewer tab contains the information required to establish communications between TruckMate programs and the Pentad imaging software.
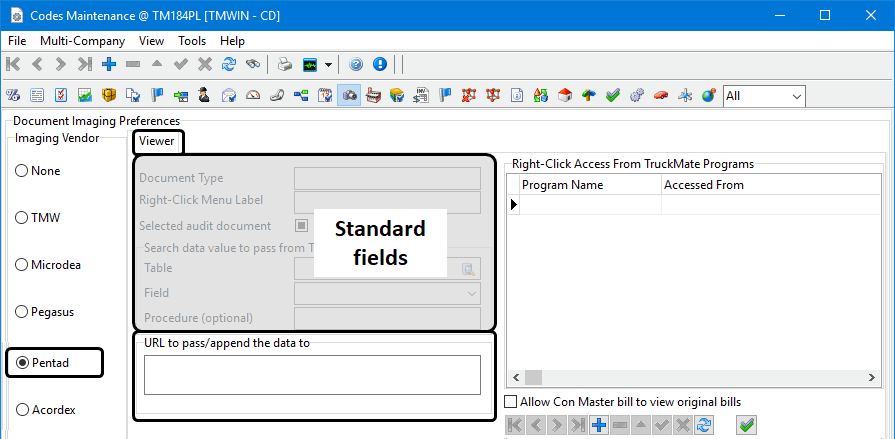
The first few fields on the Viewer tab are standard for all imaging vendors.
Required field: *
| Field | Definition |
|---|---|
URL to pass/append the data to * |
Enter a fully qualified URL (include the 'http://' tag) in the space provided, with '%i' embedded (substituted at execution time with the value selected per the TruckMate table/field indicated). The Pentad imaging data will be transferred to this URL for use with the Pentad software. For example, suppose you have set the 'URL to Pass/Append the Data To' string = 'http://www.mywebsite.com/cgi-bin/img-docfind.pl?reftype=INV&refnum=%i', then TruckMate will launch a new web browser window (depending on system default) with 'http://www.mywebsite.com/cgi-bin/img-docfind.pl?reftype=INV&refnum=F123456' in the address bar. Refer to Pentad documentation. |
Acordex Imaging
Acordex Imaging requires some setup on the Viewer tab, and offers rendition printing.
With Acordex Imaging, you can schedule a job that will query Acordex for a list of images scanned since the last time the job ran. The resulting image numbers will be used to update TruckMate’s tracking of Resource images. Acordex can also cross-reference Document Images.
Setting up a new document imaging integration using Acordex Imaging
See Points to consider for an overview of the basic process and steps and return here for the configuration details unique to this imaging vendor.
Viewer tab
The Viewer tab contains the information required to establish communications between TruckMate programs and the Acordex imaging software.
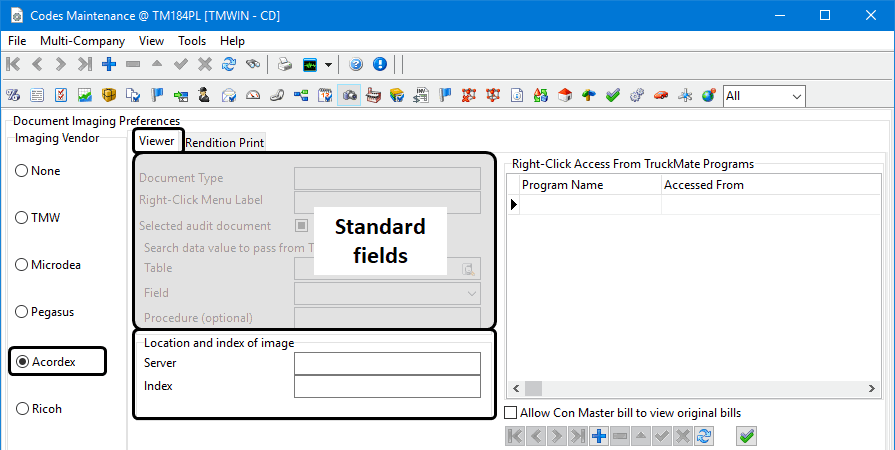
The first few fields on the Viewer tab are standard for all imaging vendors.
Required field: *
| Field | Definition |
|---|---|
Location and index of image |
|
Server * |
Enter the http:// address of the Acordex imaging server. The URL that is called when an Acordex image is displayed is of the format: http://['Server' field value]/viewimage.html#[Index name]Images/[Obfuscated bill number]-001 |
Index * |
Enter the Index Name for use with the Acordex imaging server. Refer to Acordex documentation |
Ricoh Imaging
Ricoh Imaging requires some setup on the Viewer tab, and offers rendition printing.
Setting up a new document imaging integration using Ricoh Imaging
See Points to consider for an overview of the basic process and steps and return here for the configuration details unique to this imaging vendor.
Viewer tab
The Viewer tab contains the information required to establish communications between TruckMate programs and the imaging software.
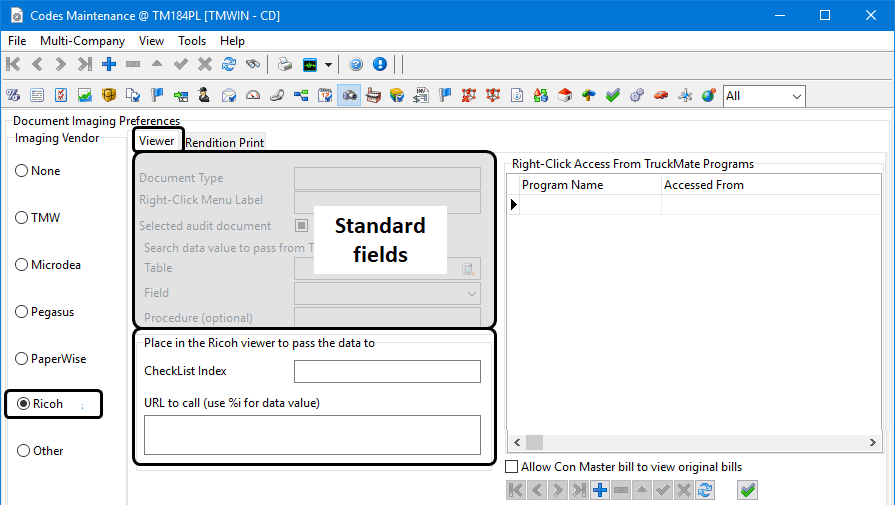
The first few fields on the Viewer tab are standard for all imaging vendors.
Required field: *
| Field | Definition |
|---|---|
Place in the Ricoh viewer to pass the data to |
|
Checklist Index * |
Enter the Index name for use with the Ricoh imaging server. Refer to Ricoh documentation. |
Call Content (User %i For Data Value) * |
Enter a fully qualified URL (include the 'http://' tag) in the space provided, with '%i' embedded (substituted at execution time with the value selected per the TruckMate table/field indicated). The Pentad imaging data will be transferred to this URL for use with the Pentad software. For example, suppose you have set the 'URL to Pass/Append the Data To' string = 'http://www.mywebsite.com/cgi-bin/img-docfind.pl?reftype=INV&refnum=%i', then TruckMate will launch a new web browser window (depending on system default) with 'http://www.mywebsite.com/cgi-bin/img-docfind.pl?reftype=INV&refnum=F123456' in the address bar. Refer to Ricoh documentation. |
Rendition Print tab
The Rendition Print tab contains the information required to configure Rendition Printing via the imaging software.
You must configure all the fields for either the Crystal Report or Spool File rendition printing methods.
![]()
Select one of these methods. You cannot use both.
Most rendition printing features and options are common to all imaging vendors. For details, see Rendition printing.
Other Imaging
The Other Imaging option allows you to use other third-party document imaging solutions but not all of your imaging vendor’s features may be supported.
Other Imaging requires some setup on the Viewer tab, and offers rendition printing.
If you are working with a third-party imaging software company that wishes to integrate with TruckMate in future releases, please contact your Trimble TruckMate support representative.
Setting up a new document imaging integration using Other Imaging
See Points to consider for an overview of the basic process and steps and return here for the configuration details unique to this imaging vendor.
Viewer tab
The Viewer tab contains the information required to establish communications between TruckMate programs and the imaging software.
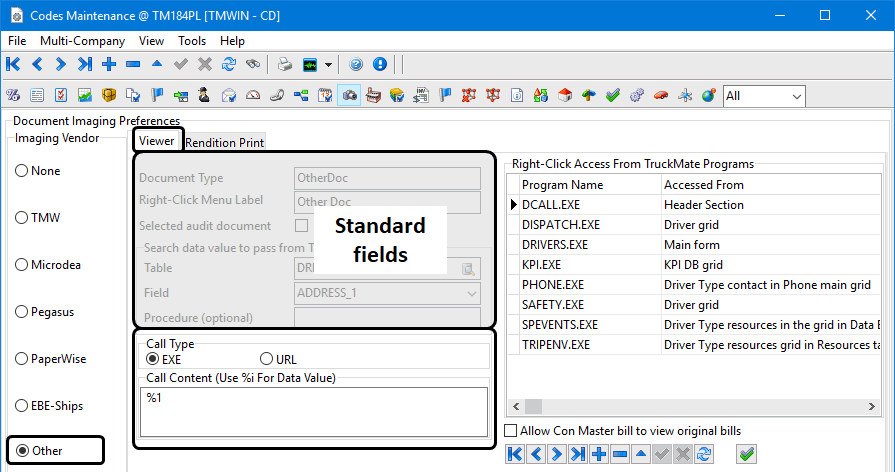
The first few fields on the Viewer tab are standard for all imaging vendors.
Required field: *
| Field | Definition |
|---|---|
Call Type |
|
EXE / URL * |
There are two options for image viewing, using an EXE based viewer or a URL based viewer. The advantage of using an EXE based viewer over a URL based one is in the fact that every time a URL based viewer is called, a new browser window is opened. When an EXE based viewer is called, the image is opened in the same window. For frequent usage of the viewer during normal work process flow, the EXE based viewer provides an easier approach to image viewing. Select the radio button of the option that best satisfies your business needs. |
Call Content * |
Enter a fully qualified URL (include the 'http://' or 'https://' tag) in the space provided, with '%i' embedded (substituted at execution time with the value selected per the TruckMate table/field indicated). The imaging data will be transferred to this URL for use with the TMW software. For example, suppose you have set the 'URL to Pass/Append the Data To'` string = 'http://www.mywebsite.com/cgi-bin/img-docfind.pl?reftype=INV&refnum=%i’. TruckMate will launch a new web browser window (depending on system default) with ‘http://www.mywebsite.com/cgi-bin/img-docfind.pl?reftype=INV&refnum=F123456’; in the address bar. |
Rendition Print tab
The Rendition Print tab contains the information required to configure Rendition Printing via the imaging software.
You must configure all the fields for either the Crystal Report or Spool File rendition printing methods.
![]()
Select one of these methods. You cannot use both.
Most rendition printing features and options are common to all imaging vendors. For details, see Rendition printing.