Trip Operation Planning (TOP)
The Trip Operation Planning (TOP) tool is available in Dispatch and Multi Mode Dispatch by selecting one or more trips, opening the context menu and selecting the Trip Operation Planning option.
To access TOP:
Dispatch |
|
Multi Mode Dispatch |
|
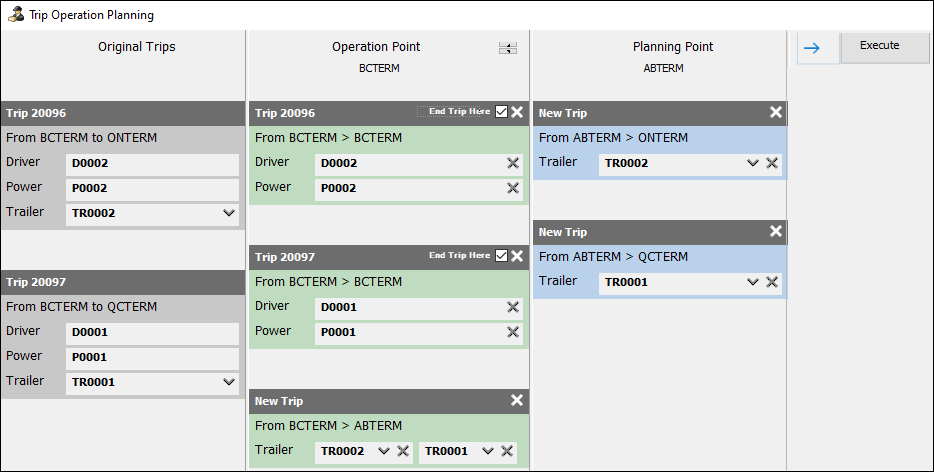
The TOP window can display an unlimited number of vertical columns. Each column can contain an unlimited number of trip panels. Column widths can be expanded using the mouse. Colors indicate whether the changes are going to be executed in the indicated zone or planned.
-
Grey - Original Trips
-
Green - Operation Point - Changes in the indicated zone that will occur when you click Execute
-
Blue - Planing Point - Planned changes
Use TOP to pre-plan large segments of trips for P&D and line haul routes. It provides greater control over merge and split loads and you can work with P&D and line haul routes linked together. The TOP tool replaces three previously separate tools that were doing similar functions:
-
Merge/Switch Resources (Dispatch + Multi Mode Dispatch)
-
Preplan Doubles (Dispatch)
-
Merge Trips (Yard Tab, Multi Mode Dispatch)
TOP is ideal for double-based moves for long combination vehicles with multiple trailers. You can also:
-
Plan multiple trips in a row for a single trailer, all connected via the Operational Plan ID.
-
Plan the entire lifecycle of a Freight Bill out from start-to-finish (ie. P&D and Linehaul Trips), all connected via the single Operational Plan ID. Especially useful for exclusive freight or intermodal moves broken up into intermodal trips rather than full loaded-empty movements.
-
Plan multiple trailer trips in a row with different bills and use TOP to create trips linked together with a shared Operational Plan ID.
Security Configuration for TOP
Go to Utilities > Security Configuration > Security tab > Business Events > Misc > Trip Operation Planning tab.

Allow use of Operation Point movements if Trip(s) are not present in the selected zone |
Allows the selected user / group to create an Operation Point movement for a zone when the trips are not actually positioned in that zone yet. This is intended to provide a quick cleanup method when it is not possible to move the trips normally or in an emergency. |
Allow moving bills between trailers |
Allows the selected user / group to drag and drop freight bills from one trailer to another. |
Go to Utilities > Security Configuration > Security tab > Business Events > Misc > Multi Mode / Dispatch tab.
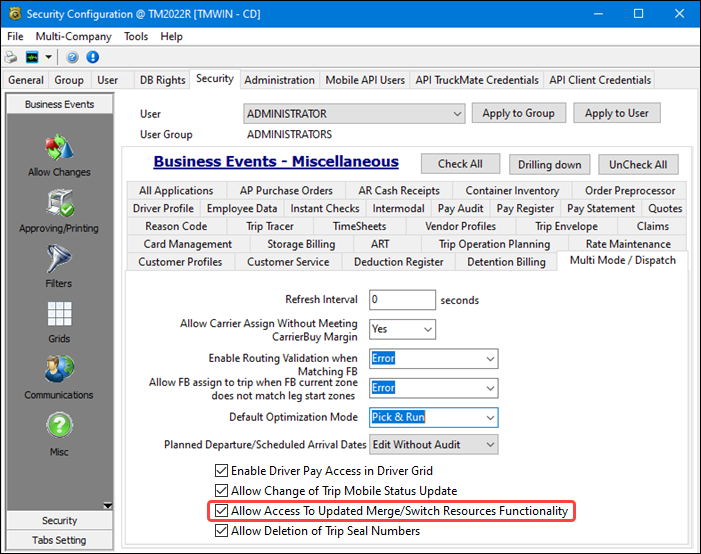
Allow Access to Updated Merge/Switch Resources Functionality |
Allows the selected user / group to use the TOP tool. |
TOP tool - workflow overview
The basic steps for using the TOP tool are:
-
Select one or more trips from a trips grid.
The TOP window opens and displays the trips you selected prior to opening the window in the far left Original trips column.
-
Select an option from the context menu on the Original Trips column.
Depending on the specific situation for this set of trips, a planning or operational column is created showing the proposed trip changes. From here you can:
-
Create new trips.
-
Drag resources onto a trip in the planning or operational columns.
-
Double-click the zone at the top of a column to change the point zone.
-
Use the up down arrow button to toggle the column from a Planning Point to an Operation Point.
-
Split and merge trips or click the arrow to create a new column.
-
Change the zone for a trip
-
Indicate if this is the end for a specific trip or if this is a straight point-to-point trip
-
Once everything is set up, click Execute to apply the Operation Point window changes and create the trips required by the Planning Points all linked together with a common Operational Plan ID number.
Using the TOP tool
Here is a more detailed description for how to use the TOP tool.
-
Open Dispatch or Multi Mode Dispatch and select one or more trips from a trips grid.
The TOP window will open with the Original Trips column containing any trips you had selected earlier. The last column on the far right will always display the arrow and Execute buttons.
The trips you selected that appear in the Original Trips column should be ready to go and not require any tweaking or revision. You can add additional trips but you cannot edit trips in this column.
-
If you selected the wrong trips or want to start over, close the TOP window before clicking Execute. Once you click Execute, the trips will be linked to an Operational Plan ID.
-
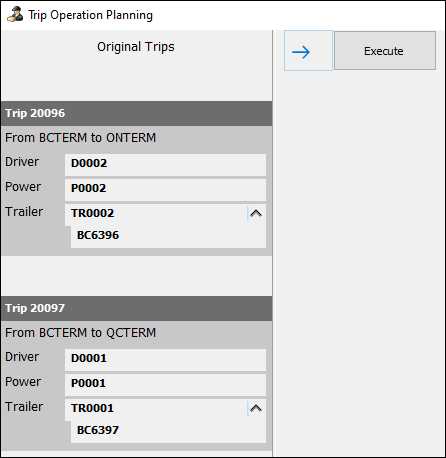
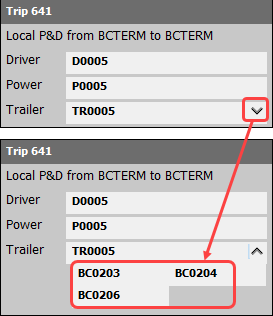
Drag and drop any additional trips from the trip grids to add them to the TOP Original Trips column. The trips in this column will always appear in grey since they are read-only and cannot be edited in this column. Each trip will show:
-
Trip number
-
Zone codes
-
Drivers
-
Power Units
-
Trailers
-
Chassis
-
Containers
-
Misc. Equipment
-
Carriers
-
Freight bills are typically displayed as a separate item below the trip.
-
If a Freight Bill is nested under a resource using linkage rules, it will display underneath that resources. Freight bills can only be nested below trailers, straight trucks and containers. Branch out the resource to see the nested freight bills.
-
-
When you have the desired set of original trips, use the
 arrow to start the next column or select an option from the context menu.
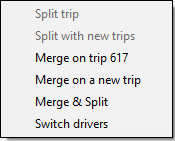
Before a new column is created, you are prompted to select a zone using the
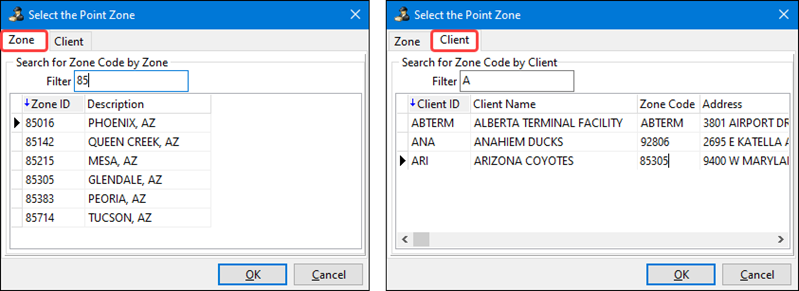
If the zone for this column is set to the current location for all of the trips, it can be an Operation Point column. Otherwise it will be a Planning Point column.
+ Only the FIRST new column may be set as an Operation Point - any subsequent columns will always be Planning Points. Only the changes in the Operation Point can happen immediately. All other column changes will occur in the future.
-
Double-click the zone value at the top of a column if you want to change the zone.
-
Use the double arrow button to switch from an Operation Point to a Planning Point column.
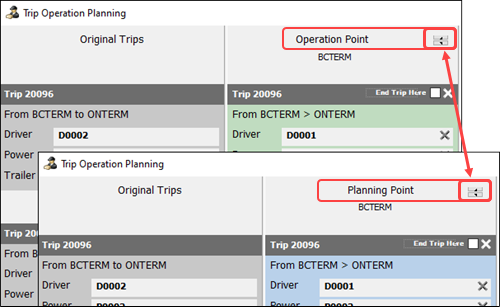
If the zone reflects the current trip locations, it will be possible to switch from a Planning Point to an Operation Point column. Switching from planning to operation is also affected by the Allow use of Operation Point movements if Trip(s) are not present in the selected zone security option.
The blue color for the Planning Point columns indicates these trip changes will not occur right away when you click Execute. These changes will occur in the future when the trips reach until the indicated zone. The trips are linked together by a common Operation Point ID value and each require that the previous trip is completed.
-
Create as many Planning Point columns as you need. You can create a multi column operation plan that takes each freight bill from pickup to its final destination delivery or you can use a series of separate operation plans.
You can select which zone the planned changes will occur for each column. Any changes(split, merge, switch, new trips, etc.) can be planned ahead of the current legs. All of the preceding trips will be adjusted to accommodate the planned changes in the future trips. This could mean TOP will create new legs on Original Trips, and create other new trips as needed.
Changing trip zone
To change the end zone for a trip, double-click the end zone in the trip panel. This opens the zone selection screen so you can select the new end zone.
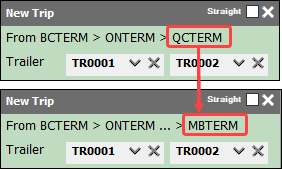
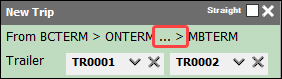
Ellipses appear if there are more stops on the trip than can be displayed without cutting off the end zone. Use the mouse to expand the column width and display all of the zone text.
Copying a trip
To copy a trip, select Copy Trip from the context menu.

An exact copy of the trip is created so you will need to adjust the resources and freight. This is especially useful when dealing with split trip workflows since it copies the trip destinations.
Adding resources to trips
Use drag-and-drop to assign resources from the Dispatch window to the operational and planned trips in the Trip Operation Planning operational and planned columns.
All the app configs that set the maximum number of resources that can be applied to trips will be obeyed. The system will not create the Operational Plan if it does not comply.
Creating New Trip
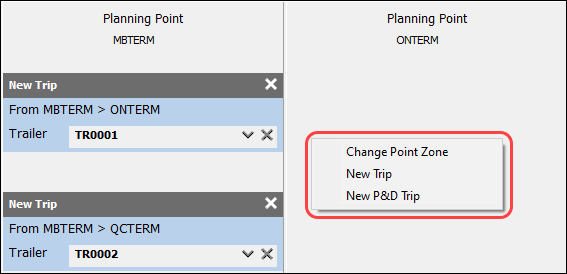
In addition to the trips that are automatically created via the merge and split options, you can create your own trips for that zone. Select New Trip or New P&D Trip from the context menu for the column to create a new trip using the column zone as the start zone.
Execute
Clicking the Execute button will:
-
Check to make sure the requested changes obey the app configs and are valid
-
Immediately make the changes described in the Operation Point.
-
Create the trips for the Planning Points.
-
Assign a common Operational Plan ID to all of these trips linking them together.
The Operational Plan ID field is available in all six of the Multi Mode Dispatch trips grids and the Trips grid in Dispatch to show how the trips are connected together.

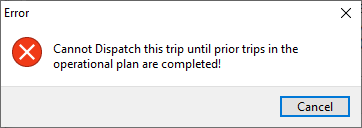
Once the Operational Plan ID has been assigned to a trip, you cannot use this trip in a different operation plan.
If you accidentally try to dispatch one of the future trips linked by the Operational Plan ID, a "Cannot Dispatch this trip until prior trips in the operational plan are completed." message is displayed."