Planning

How do I View Driver and Power Unit Trips for Planning?
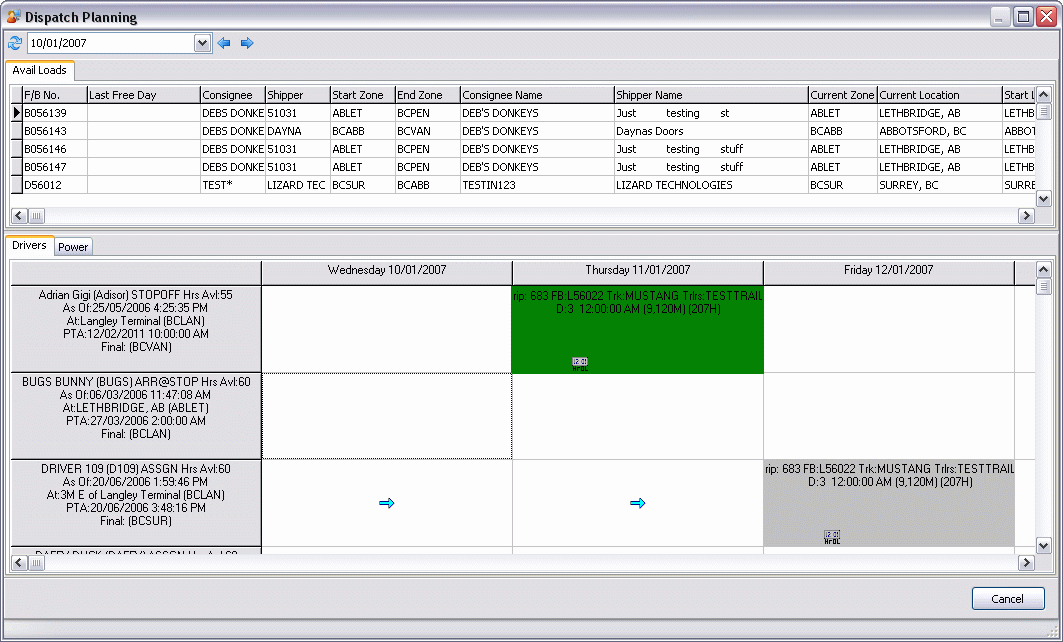
The Dispatch Planning window provides the Dispatcher with a chronological view of events for each Driver or Power unit in the form of a calendar. You can use this screen to quickly identify which Drivers or Power Units are available for use with newly created Freight Bills. The functionality of this window is similar to the normal Trip assignment process using the standard Dispatch program window, but allows you to view availability of Drivers and Power Units via a graphical interface. This is an incredibly useful tool in determining which of your Resources (Drivers or Power Units) are available at any given time.
Refresh
![]() Select this button to refresh the details of the Driver and Power Unit Tab Grids for any changes that have been recently made.
Select this button to refresh the details of the Driver and Power Unit Tab Grids for any changes that have been recently made.
Date
The 'Date' value is controlled via the calendar menu (accessed by selecting the drop-down menu button). Here you can choose a Date that will configure the below Driver and Power Unit Grids. These Grids will show the details for your Resources over a period of seven days, beginning with the Date selected for this option.
Previous Day / Next Day
The two arrow buttons will decrease/increase the 'Date' value by one, so that you can quickly browse through your Resources, to see which is available for Trip assignment.
The Dispatch Planning window is divided into two main areas: the Available Loads Tab and the Resource Location section (which is divided into the Driver Tab and Power Unit Tab).
-
In the Customer Service program, create a Freight Bill as normal.
-
Open the Dispatch program, and right click any Driver or Power Unit code on the Drivers Tab or Power Units Tab, respectively.
-
Select the 'Planning' option. The Dispatch Planning window will open (see screenshot and toolbar option details via the green link above).
-
If you search through the Avail Loads Tab, you will find the new Freight Bill you created in step # 1. Freight Bills are listed in alpha-numeric order. Once you have found the new Freight Bill, you can drag & drop it into one of the grid locations on either the Drivers Tab or Power Units Tab.
Basically, the Drivers Tab and Power Units Tab list all of the configured Resources (Drivers or Power Units) available in your system. The 'Row' values correspond to the Resources setup in your system, while the 'Column' values specify a day of the week (beginning with the 'Date' value chosen in the 'Date' drop-down field at the top of the window and projecting forward exactly one week).
-
When you drag & drop the Freight Bill from the Avail Loads Tab to either the Driver or Power Units Tab, the Dispatch program will automatically create a Trip for the Freight Bill, using the resource you 'selected' (via the drag & drop) for its determining value. If you have the 'Auto-Match' Application Configurator program > DISPATCH options set correctly, and you drop the value into a Driver Tab grid field, the Dispatch program will check if that Driver has a default Power Unit, and will ask the User if you would also like to match this Power Unit to the Trip. If you dropped the Freight Bill into a Power Unit Tab grid field, the program will ask if you want to match that Power Unit’s default Driver.
Just like the regular Dispatch Trip creation process, if there are any Resource conflicts, you will be warned by the program. Depending on your Application Configurator program settings, you may or may not be able to continue creating the Trip is a Resource conflict arises.
-
A grey detail box will be created in the location of the grid you dropped the Freight Bill into. In the grey box you will be able to view Trip details, such as the Trip Number, Freight Bill Number, attached Driver and/or Power Unit, the Trip Mileage and estimated hours, etc.
You will also see several 'arrow' icons that specify the estimated time of arrival. If you follow the arrow icons, you will see another grey box in the same row, which lists the details of the estimated Delivery (as specified on the original Freight Bill).
-
If you matched a Driver and Power Unit together on the same Trip, both the Driver and Power Unit Tabs will have the exact same information.
-
When you close the Dispatch Planning window, you will see the newly created Trip (with all it’s associated details) at the top of the Trip Grid in the normal Dispatch program window. You can then complete the Trip normally.
You may see, from time to time, a small icon that shows a time value ("12:01") with some characters beneath it appear in your Dispatch Planning grid (see above screenshot for example). These icons generally mean that the planned movement is of a time-sensitive nature. The characters included beneath the time-sensitive warning will give you more information about the planned movement. There are four possible iterations:
-
HrPU: Driver’s REMAINING_HOURS_US_7 is less than the number of hours required to drive to the pickup based on a straight-line distance between the driver’s last reported position and the load’s position (ie. no map is consulted) and a speed of 44 MPH.
-
HrDL: Same as HrPU, but this time it’s comparing REMAINING_HOURS_US_7 to the hours required to drive to the pickup location plus the hours required to drive to the delivery location. This one is more strange - driving to the pickup location is still straight-line but driving between the pickup location to the delivery location is based on the leg’s calculated mileage.
-
PU: LS_NUM_PU_REM is greater than zero, and LS_PICKUP_BY cannot be reached based on the same distance and speed calculations as above.
-
DL: LS_DELIVER_BY_END cannot be reached based on the same distance and speed calculations as above.
An image of a small satellite with the text 'PU' or 'DEL' next to it indicates Pickup Sent / Delivery Sent (whether or not the fields LTL_PU_SENT and LTL_DEL_SENT are <> 0).
How are ETAs calculated by the system?
The Dispatch program automatically calculates ETA (estimated time of arrival) values in a number of ways. There are several places within the Dispatch program window where ETA values are presented:
-
All Dispatch Resource Tab grids have several ETA fields available: 'ETA Date' (ETA_DATE), 'ETA Zone' (ETA_ZONE), 'Final Destination' (FINAL_DESTINATION) and 'PTA Date' (DELIVER_BY).
-
The Dispatch Trip grid has two main ETA fields that are used for calculation purposes: 'ETA For Leg' (LEGSUM.LS_EXPECTED_DATE) and 'ETA Date' (LEGSUM.LS_ETA_DATE).
These fields are populated using the following logic:
-
LEGSUM.LS_EXPECTED_DATE uses MAX(TLORDER.DELIVER_BY), meaning the "latest" 'Deliver By Start' value on the Freight Bills attached to a Trip.
-
An individual resource’s 'ETA Date' (ETA_DATE) is set to LEGSUM.LS_EXPECTED_DATE of the last Trip leg the resource is matched to.
-
An individual resource’s 'ETA Zone' (ETA_ZONE) is set to LEGSUM.LS_TO_ZONE of the last trip leg the resource is matched to.
-
An individual resource’s 'PTA Date' (DELIVER_BY) is now set to ETA_DATE + 2 Hours. This value can be overridden by double-clicking the 'Planned Time Available (PTA)' field on the Resource grid.
-
Resource 'Final Destination' (FINAL_DESTINATION).
|
How do I calculate ETAs?
The Dispatch Trip grid’s 'Calculate ETA' option provides the ability to calculate Estimated Arrival Times based on the Departure Date/Time defined. The calculations take into consideration the order of events. In other words, the distance to the second event is via the first event, the distance to the third event is via the first and second events, etc. The calculations round to the nearest 5 minutes and only flag as late if the driver will miss the end of the appointment by more than 10 minutes.
Your Mileage Server program must be up and running to calculate your ETA’s.
-
In the Trip grid, select the trip requiring ETA calculation.
-
On the Context Menu select ETA > Calculate ETA’s.
-
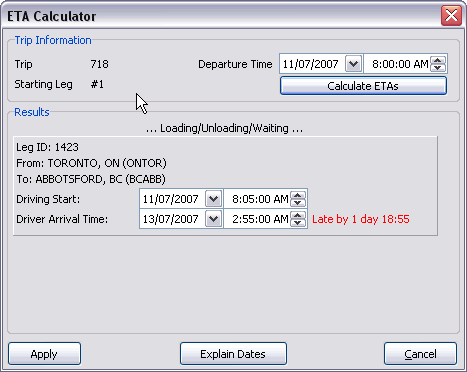
The ETA Calculator window displays. The 'Departure Time' will normally default to the 'Pickup By' (TLORDER.PICK_UP_BY) date/time value of the Freight Bill attached to the first leg of the trip. The Application Configurator program > DISPATCH.EXE > 'Calculate ETA by FB PickUpByEnd' option can be used to make the 'Departure Time' field default to the first fight bill’s 'Pickup By End' value (TLORDER.PICK_UP_BY_END). This date/time can also be modified by double-clicking to access the calendar and select a new date.
-
Select the Calculate ETAs button. If the Mileage Server program is running, the results will display, including Driver Start and Arrival Times.
-
Select the Explain Dates button to view the calculation details on the ETA Explanation window.
-
Select Apply. The new ETA information is applied to the trip or select Cancel to close without applying these changes.
| Leg ETA’s and Departure dates are NOT considered — only the Freight Bill 'Pickup By' (or 'Pickup By End') and 'Deliver By' date ranges are considered by this feature. |
How do I query for a power unit’s PACOS event history?
PACOS™ is an automated dispatch and arrival system for the PeopleNet mobile communication network that has been integrated with TruckMate. PACOS™ will allow Dispatch to receive status updates, based on triggered events, from the power unit in real time instead of waiting for the driver to call in his/her position.
The automatic detection of an Arriving, Arrived and Departed events (status updates) are generated by the power units on-board mobile device and is triggered by the preset Stop Profiles. Each stop profile is comprised of 3 possible radius settings, one for each event, and are measured from the geocode (latitude/longitude co-ordinate) set for each Customer location. Refer to the Customer and Vendor Profiles program for the stop profiles setup details. Refer to the Application Configurator program for the PACOS™ default Radius, Unit and Time values.
Refer to the Communications Manager program for the PeopleNet Status setup details.
-
In Dispatch select the Power Unit grid, select the Power Unit to view PACOS™ history on.
-
On the context menu select PACOS Event History.
This will then open the PACOS Event History window where you can query & view all PACOS™ events that occurred for the selected PeopleNet mobile device.
Note: This is strictly an events view and does not include messages.
-
In the Query section select the parameters:
-
" Date range: The default is set to the past 4 weeks. To change, click the arrow to display the calendar and select the new dates.
-
" Direction: The default is set to both Incoming & Outgoing checkboxes selected. Simply un-check either checkbox to modify to remove a direction from the view.
-
" Device ID: The default will be the Device ID you right clicked on to access this screen. To modify, click the search button to select a different PeopleNet Device ID.
-
-
Once you have the above parameters selected, click on the Refresh button to view the results in the grid.
How do I group my freight onto trips?
-
In the Dispatch Trip grid, select the trip to assign the Freight Bills, or select any trip then select New Trip in step 4 to create a new trip on assignment.
-
Hold down the CTRL key and use your left mouse button to select each freight bill that you wish to be grouped onto this trip.
-
After selecting all of the freight bills, double-click using the left mouse button on any ONE of the selected freight bills.
-
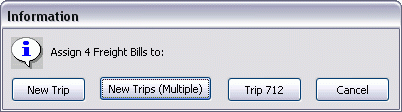
The Assign Freight Bill window displays, select the Assign to Trip OR New Trip button.
The Freight Bills are assigned to the trip.
| When multiple freight bills exist for a trip, only the first bill number displays in the Bill Number column of the trip grid. The Freight Bill list and details can be viewed by selecting the trip in the trip grid and selecting Freight Bill Details from the context menu. |
How do I reposition equipment or drivers?
Generally, driver and equipment repositions are taken care of automatically, through trip activities. For example, when you assign drivers and equipment to a trip that was created by double clicking on a freight bill, empty legs are created at the beginning of the trip to show the movement of the power unit to the trailer, and the power unit and trailer to the start location of the first freight bill that is being picked up.
The Reposition option is available to reposition a driver or equipment without assigning them to a trip with a freight bill. This option is available for resources including Drivers and Equipment and will create a "hidden" trip, one not available in the trips grid, that performs the reposition.
-
In Dispatch, select the applicable grid then select the resource to reposition.
-
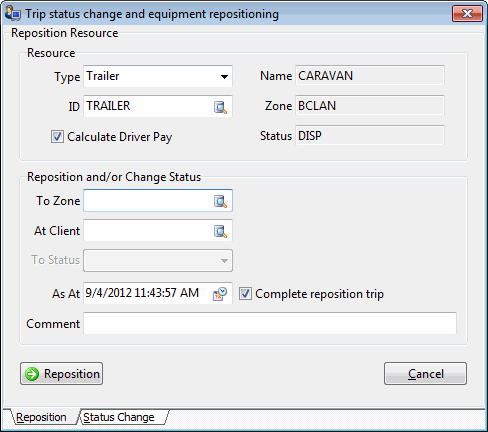
On the context menu select Reposition /Status. The Trip Status Change and Equipment Reposition window displays with the applicable resource selected.
Field Definition Resource Section
This section displays information about the selected resource. The user can select a different resource of the same type or can even change the resource type and select another resource of a different type.
Reposition and/or Change Status
This section is where the actual action can be performed. A resource can repositioned, have its status changed or both.
To Zone
Selecting a new value for this field will reposition the resource in to the new Zone.
At Client
You can select to assign the resource to a different client by selecting a different value for this field.
To Status
The user can change the status of the selected resource by using the drop down list and selecting the new status for the resource.
As At
This field allows the user to time-stamp the action taken by selecting a date and time using the calendar button.
Comment
A user can comment on the action taken using free format text.
Reposition
Selecting this button will confirm the performed action and conclude the process by saving the changes to the appropriate tables.
-
Enter the zone code in the "Reposition to Zone" field, or select the search button to search for the desired zone. Optionally, you can select a client from the 'At Client' field, which will populate the 'Reposition to Zone' field with the zone assigned to the selected client. If a client is selected, the 'Reposition to Zone' field becomes read-only and displays the Client’s assigned zone.
-
Select the Reposition button. Confirm reposition message displays, select OK.
-
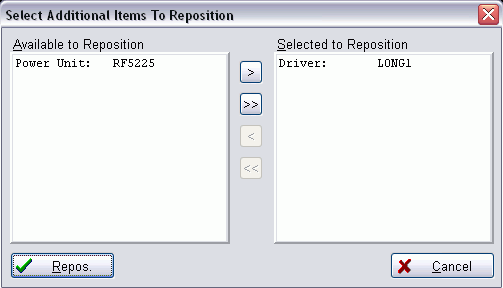
When other resources are currently matched with the reposition resource the Select Additional Items to Reposition window displays. For example, this might be the last driver and trailer dispatched with the power unit you are currently repositioning.
-
In the Available to Reposition panel select an additional resource to reposition.
-
Select the arrow button to move the resource to the Selected to Reposition panel.
-
Repeat for any additional resources requiring repositioning.
-
Select the Repos button.
-
-
"Automatically Reposition resources on a "trip ###?" message displays.
-
Select Yes. The resources are repositioned using the "hidden" trip. You can confirm the trip details, including the resource assignment in the Trip Envelope Processing program.
OR
-
Select "No". A new Trip is created and available in the trip grid. You can now locate the trip grid and manually dispatch it to completion in order to move the resources.
-
How do I pre-plan doubles?
The Pre-plan Doubles option provides the ability to handle the unique situation where 2 trailers have been spotted in one secured compound and need to travel to 2 different locations but can travel part of the way as a double.
For example:
Trip 1 has been spotted in a secured compound in zone "Exit 39". This trip contains Trailer A and is destined for zone NYSTH.
Trip 2 has also been spotted in the secured compound in zone "Exit 39". This trip contains Trailer B and is destined for NYST2.
Interstate 90 allows the trailers to travel part of the journey, as far as "Exit 60"as a double. The trip must then be split so Trailer B can be dispatched to NYST2 and Trailer A to NYSTH.
By selecting Trip 1 and Trip 2, defining the Merge Zone, in this example "Exit 39", and the split zone, in this example zone "Exit 60", the pre-plan doubles option will automatically create 3 trips. The Long Haul doubles trip and the 2 trips required to get Trailers A & B to their final destination.
-
In Dispatch program, trips grid, hold the <Ctrl> key and select the first trip to be included in the doubles pre-planning. Every leg of the trip should now be selected.
-
Release the control key and select the next trip to be included. The trip number of the 2nd trip should now be highlighted.
-
On the Context Menu select 'Pre-Plan Doubles'. The first Trip number displays in the context menu for information purposes.
-
The Pre-Plan Doubles window displays and includes the 2 panels to display the leg & zone information for each trip.

-
Define the Zones, as follows:
-
Merge Zone: enter the merge zone or click the search button to search and select from list. This is the start point for the doubles portion of the trip.
-
Split Zone: enter the split zone or click the search button to search and select from list. This determines the end of the doubles portion of the trip.
-
-
Select OK.
-
The Confirm window displays the impact of the change. For example, "This operation will create 3 new trips. OK to continue?"
-
Select Yes. The operation is completed and the trips created and available in the Trips grid for dispatching, or select No and the operation will be cancelled.
How do I display or add a Special Event?
The Special Events menu option displays an Events defined for the Driver, Carrier or Equipment. Also, the ability to add a Special Event is available here. Refer to the Special Events program for more detailed information.
If an event has been configured to Stop Use when it becomes overdue, the driver cannot be activated on a trip unless the user who is changing the trip status is configured as a Supervisor in the Security Maintenance program. The driver can still be assigned to trips, but those trips cannot be activated (Dispatched).
Special Events can be applied to Drivers, Carriers and Equipment.
-
In Dispatch, select the applicable grid and the specific Driver or Equipment to view/add special events.
-
On the context menu select Special Events. The Special Events window displays existing events.
OR
For a Carrier select the Special Events button on the Carrier Information window, Trip Information tab.
-
To add an event, select the '+' button.
-
Enter the following special event information:
-
Special Event: select a Special Event Code description from the drop down list.
-
Date: specify the date that the Special Event comes due. Double click for a calendar selection form.
-
Level 1 / Level 2: the Level 1 and Level 2 values configured in the Special Event code setup will default here, these can be modified.
-
Remarks: enter applicable event remarks. If you specified that Copy Description was "True" in the Special Event Code setup, this will appear in the Remarks field.
-
-
To Save, select the 'checkmark' button.
Additional Information:
-
Results: you can enter text in the Results field before you send the item to history. If you set the Req Results field to "True" in the Special Events program code setup, you must enter Results before you archive the event.
-
Send to History: you can archive the Special Event that is currently selected in the grid by clicking the Send to History button. If the Require Results field for the Special Events code is set to true, the Special Event cannot be sent to history until you have entered something in the Results field in the grid.
-
History and Repeat: will archive the Special Event that is currently selected in the grid, and create a new Special Event of the same type. You will be required to enter a date for the new event.