City Dispatch Check-In
|
As of TruckMate 2022.4, City Dispatch Check-In is no longer available. For details, see the 2022.4 New Features Guide. If your version of TruckMate is earlier than 2022.4, you can access City Dispatch Check-In using any of these methods:
|

The City Dispatch Check-In program allows a quick and easy way to update Pickup and Delivery Trip information that was initially created by the City Dispatch program. This application is helpful if Drivers are being dispatched onto Trips and determining Freight Bill information at the Pickup or Delivery site, as the Dispatcher can use the City Dispatch Check-In application to update the Freight Bill numbers (and other details) of the Trip when the Driver returns to the Terminal.
Menu Bar / Toolbar
Multi-Company
For more information on the Multi-Company options available from the Menu Bar, see the Multi-Company documentation.
Edit Menu
Next Record
![]() Choose this option (or click this Toolbar button) to change the currently selected Detail line to the next one in the program Grid.
Choose this option (or click this Toolbar button) to change the currently selected Detail line to the next one in the program Grid.
This option is also available on the Toolbar.
Save
![]() Choose this option (or click this Toolbar button) to save any modifications to the currently selected Freight Bill.
Choose this option (or click this Toolbar button) to save any modifications to the currently selected Freight Bill.
This option is also available on the Toolbar.
Print Menu
Selecting the Print Menu will bring up the Report Selection window, common to many TruckMate applications. Here you can select from the default reports provided for the City Dispatch Check-In program, or add your own custom reports.
For more information on report functionality within TruckMate, see the Crystal Reports Reference.
Process Menu
Process Pickups
![]() Choosing this option will display a small window requesting a Trip Number from the User. When the User enters a valid Trip Number (as created automatically by the Dispatch program when setting up Trips) the Freight Bills associated with the Pickup Trip will be displayed in the program Grid.
Choosing this option will display a small window requesting a Trip Number from the User. When the User enters a valid Trip Number (as created automatically by the Dispatch program when setting up Trips) the Freight Bills associated with the Pickup Trip will be displayed in the program Grid.
This option is also available on the Toolbar.
Process Deliveries
![]() Choosing this option will display a small window requesting a Trip Number from the User. When the User enters a valid Trip Number (as created automatically by the Dispatch program when setting up Trips) the Freight Bills associated with the Delivery Trip will be displayed in the program Grid.
Choosing this option will display a small window requesting a Trip Number from the User. When the User enters a valid Trip Number (as created automatically by the Dispatch program when setting up Trips) the Freight Bills associated with the Delivery Trip will be displayed in the program Grid.
This option is also available on the Toolbar.
View Menu
View Freight Bill
![]() Choosing this option (or clicking this Toolbar button) will open an instance of the Customer Service program with the currently selected Freight Bill displayed. Use this to make any advanced changes to the Freight Bill information.
Choosing this option (or clicking this Toolbar button) will open an instance of the Customer Service program with the currently selected Freight Bill displayed. Use this to make any advanced changes to the Freight Bill information.
This option is also available on the Toolbar.
Tools Menu
TruckMate Monitor
![]() Click the down arrow next to this button to access the various functions of the new TruckMate Monitor.
Click the down arrow next to this button to access the various functions of the new TruckMate Monitor.
Remember Position / Size
Selecting this option will maintain the program window position and size upon close. When the program is re-opened, it will appear the same.
Reload Configuration Options
This option is only available when you are working with a Multi-Company database. Selecting this option will re-apply the Application Configurator program options to the application you are currently working in.
| Only those config options that relate to application logic will be updated on the fly. Configuration options related to default selections (such as flags being checked/un-checked) will not update, as these configs are only checked when the application is loaded. |
Update Bill Number
Choosing this option allows you to change the Freight Bill number of the Freight Bill on the selected Detail Line.
Update Trace Number
Choosing this option allows you to change the Trace number of the Freight Bill on the selected Detail Line.
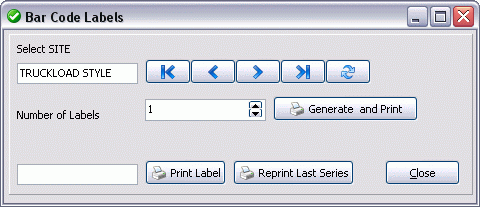
Print Bar Codes Labels
Selecting this option will open the Bar Code Labels window, which will allows you to generate a report full of bar code labels for Freight.
| Field | Definition |
|---|---|
Select Site |
If you wish to assign a Freight Bill number without entering the Freight Bill details at this time, select the site that applies to the Freight. Sites are configured in the Codes Maintenance program > Site Tab. |
Number of Labels |
Enter the number of labels that you wish to generate. Note that new Freight Bill numbers will be generated for the number of labels specified. |
Generate and Print |
Will display the Report Selection form. The Crystal Report template supplied with the TruckMate system is called 'PROLABELS.RPT'. In order to print bar Codes, you must have a printer capable of converting the values into bar Code format. After selecting the desired report template (using the Report Selection form) the report will preview to the screen. Click the printer icon at the top of the screen to send the report to the printer that is configured as the default printer for your workstation. See the Crystal Reports Reference for more information on report functions. The Generate and Print function will create the number of bar Code labels entered in the Number of Labels field. Keep in mind that these are new Freight Bills that do not currently exist in the system; the Freight Bill numbers will be generated sequentially according to the selected Site. The associated Freight Bill numbers will be "reserved", so that users entering Freight Bills in the Customer Service and Quick Bill Entry programs will not be able to use these assigned Freight Bill numbers. In order to fill in the Freight Bill details, use the Manual Add ('<Ctrl><M>') function in the Customer Service or Quick Bill Entry programs (which allow you to manually enter a Freight Bill number, rather than using the next sequential number assigned by the system). |
Print Label |
Is used to generate a bar Code label for an existing Freight Bill number. Enter the Freight Bill number in the field to the left. The Print Label button will display the Report Selection form. The Crystal Report template supplied with the TruckMate system is called 'PROLABELS.RPT'. After selecting the desired report template (using the Report Selection form) the report will preview to the screen. Click the printer icon at the top of the screen to send the report to the printer that is configured as the default printer for your workstation. See the Crystal Reports Reference for more information on report functions. |
Reprint Last Series |
This option regenerates the report using the Freight Bill series that was last generated (using the Generate and Print button), or the Freight Bill number that was last entered in the Print Label field. |
Validate Zip Codes
![]() Selecting this option will verify that the Zip Codes in your system match those included on the Freight Bills in the City Dispatch program. This option will look at the 'Shipper Zip' and the 'Consignee Zip' fields for each bill on the grid and test with the Mileage Server program.
Selecting this option will verify that the Zip Codes in your system match those included on the Freight Bills in the City Dispatch program. This option will look at the 'Shipper Zip' and the 'Consignee Zip' fields for each bill on the grid and test with the Mileage Server program.
If the 'Short Description' returned from the Mileage Server does not contain the 'City' and 'State' it will cause an error. The error check starts on the current record or the first record and will process until an error message or the bottom of the grid.
Help Menu
TruckMate Help
![]() Selecting this button will open the R&M Inventory Adjustmen Register topic in the TruckMate Online Help file (the page you are currently viewing).
Selecting this button will open the R&M Inventory Adjustmen Register topic in the TruckMate Online Help file (the page you are currently viewing).
Service Portal
![]() Selecting this button will open an instance of your default Internet browsing software, with the https://www.tmwcare.com login page displayed.
Selecting this button will open an instance of your default Internet browsing software, with the https://www.tmwcare.com login page displayed.
About
![]() Selecting this button will open the standard TruckMate About window, which contains important information about the application you are currently using, including its version number (important for support calls).
Selecting this button will open the standard TruckMate About window, which contains important information about the application you are currently using, including its version number (important for support calls).
Toolbar
Print Reports
![]() Selecting the down arrow next to this icon on the Toolbar will present you with three additonal options:
Selecting the down arrow next to this icon on the Toolbar will present you with three additonal options:
Print Crossdock Bills
Choose this option to open a window where you can select a Report method for your CrossDock Bills.
For more information on Report Functionality, see the Crystal Reports Reference.
Print Manifest
Choose this option to open a window where you can select a Report method for your Manifest Report.
For more information on Report Functionality, see the Crystal Reports Reference.
Print Bar Code Labels
Selecting this option will open the Bar Code Labels window.

The Bar Code Labels window allows you to print out Bar Codes to be used on your Freight.
Use the Navigation Bar buttons at the top to choose the name of the 'Site Code' you wish to use, then, select the 'Number of Labels' you would like to print, and select 'Generate and Print'.
A report selection window will appear, and default to the 'PROLABELS.RPT' Crystal Report.
For more information on this and other Crystal Reports, see the Crystal Reports Reference.
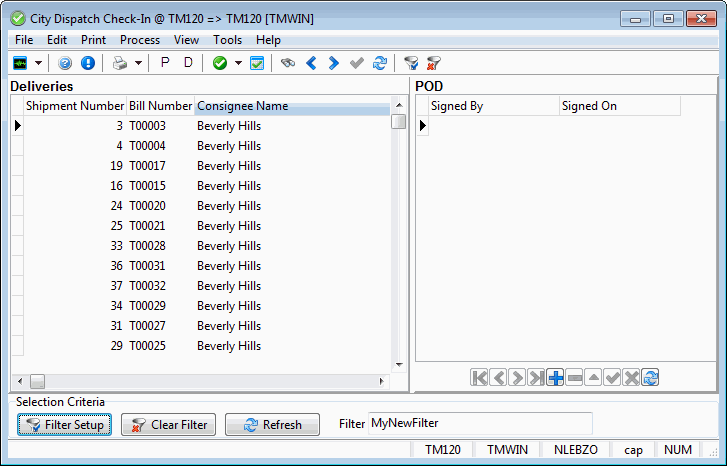
Grid Details
Pickups / Deliveries
The information within the City Dispatch Check-In Pickups Grid and Deliveries Grid are populated based on Freight Bill information from the Customer Service program. One feature to note, however, is that by double-clicking the 'Bill Number' field, you will open an instance of the Customer Service program, similar to the functionality of the 'View Freight Bill' option above. One difference between the pickups grid and the deliveries grid is that user fields on the freight bill in the pickups grid are editable.
Context Menu
Most of the Context Menu options are detailed in the Menu Bar / Toolbar section. Those that are unique to the right-click menu will be listed here:
Change Status
This option allows you to change the Trip Status. The options available here (and their order) depend on how many Status Codes you have setup in the Codes Maintenance program, and the values they have in the 'LTL Sort' field. In general a status change doesn’t change the location or the current zone of the trip, an exception takes place when the status change involves changing the current status to 'Ducked', in which case the value of the 'Current _Zone' column will be replaced by the value of the 'Pickup Terminal' column. If you want you can use the standard freight bill status change window instead; to do so you need to set the application configuration option in Application Configurator program > Dispatch > DEMAN.EXE - Use Default Status Change Popup to 'True'.
TruckMate will prompt a comment popup on status change. If there is a need to suppress this popup, use the cinfig option 'Suppress Comment on Status Change'. Setting this option to 'True' will suppress the comment that pops up evert time the status is changed.
| The 'Change Status' option will be grayed out (unavailable) if there are no Status Codes that are of 'LTL Sort' type and have the 'Behavior' category of 'Delivery' or 'Docked' in your system, or if the City Dispatch Check-In Grid is empty (no Trips). Status Codes are setup in the Codes Maintenance program. Note also that you will have to restart the City Dispatch Check-In program once you have added Status Codes in Codes Maintenance. |
POD
The Proof Of Delivery (POD) grid is only available within the Deliveries grid. This grid is used for recording the actual proof of delivery information.
Signed By
Enter the name of the person who signs the Proof Of Delivery or delivery note.
Signed On
Enter the date the Proof Of Delivery or delivery note was signed. The current system date will be the default date if non was selected.
Selection Criteria
This section allows the user to use the standard TruckMate SQL Filter Functionality.
Filter Setup
This button is used to invoke the SQL filter window where a custom filter can be created and saved.
Clear Filter
This button will clear the selected filter.
Refresh
This button re-query the database using the available filter.
Filter
This field displays the name of the selected filter.
| For the SQL Filter functionality to be used the user must be granted the proper rights in Security Setup > Business Events - Filters. |