Pallet Tracking

In the trucking industry, pallets are often leased from pallet leasing companies. Two common pallet leasing companies in Canada are CHEP and CPC. Manufacturers will often use leased pallets in their shipping operations rather than maintain their own supply. This way, the pallets are then the responsibility of a carrier delivering the freight, and, in most cases, must be returned in order to avoid charges for the pallets.
As most carriers drop off items at one location and proceed to a new location for the next load, pallets are often left at the consignee. When a full trailer load of pallets is available at any one specific location, the trucking company will dispatch a truck and trailer to pick them up.
For many truckling companies, tracking pallets can be difficult with so many pallet distribution locations to choose from. This program makes that task easier. The Pallet Tracking program is not only limited to tracking leased pallets but can also be used for any pallet tracking purposes.
To access Pallet Tracking:
| From this location | Go to |
|---|---|
TruckMate Menu and TruckMate Task List |
|
Windows Start Menu |
TruckMate 20xx > Pallet Tracking |
Windows Explorer |
C:\Program Files (x86) > TruckMate 20xx > Dpe.exe |
Configuration
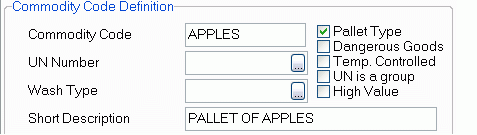
To setup the Pallet Tracking program properly, go to Codes Maintenance Commodity Tab, and create 'Pallet' entries by checking the pallet tracking box for a Commodity. See this image.
Procedures
How do I Track Pallets?
-
Before you can start tracking pallets, create a commodity code (Codes Maintenance) and check mark the box Pallet Type for each pallet code you create. To open the Codes Maintenance program (CODES.EXE), click: Start > Programs > TruckMate > Profiles> Codes Maintenance
-
Go to the Commodity Tab within the Codes Maintenance program and create a Commodity Code.
-
Then, open the Pallet Tracking program (DPE.EXE).
-
Enter the slip number, the date, customer information, and the type of transaction (i.e., was it a delivery, a pickup, an exchange or an adjustment). Specify the pallet code, the number of pallets, whether or not they are accountable, and the order number.
-
Every time one of your pallets move, use the Pallet Tracking program to register the Transaction Type. This way the program will keep a running total of the pallet types by customer. Select "Balance Check" and the system will then generate a balance or total of the "Pallet Types" and "Customers" as specified in the Header Section.
-
Filter your entries either by customer or by pallet code to view your entries in a more organized fashion. Select the pencil eraser button to clear your filter selection.
-
Select "Print" to select and print any reports you may have.
Menu Bar / Toolbar
File Menu
Print Reports
![]() Selecting the Print Reports button will bring up the report selection window, common to many TruckMate applications. Here, you will select a report file from those available in your system and a Crystal Report will be generated.
Selecting the Print Reports button will bring up the report selection window, common to many TruckMate applications. Here, you will select a report file from those available in your system and a Crystal Report will be generated.
For more information on Report functionality in TruckMate, see the Crystal Reports Reference.
Exit
![]() Selecting this option will close the Pallet Tracking program.
Selecting this option will close the Pallet Tracking program.
Multi-Company
For more information on the Multi-Company options available from the Menu Bar, see the Multi-Company documentation.
Navigate Menu
The Navigate Menu contains the standard TruckMate Navigation Bar, used to browse your Database records.
Tools Menu
TruckMate Monitor
![]() Click the down arrow next to this button to access the various functions of the new TruckMate Monitor.
Click the down arrow next to this button to access the various functions of the new TruckMate Monitor.
Remember Position / Size
Selecting this option will maintain the program window position and size upon close. When the program is re-opened, it will appear the same.
Help Menu
TruckMate Help
![]() Selecting this button will open the Pallet Tracking topic in the TruckMate Online Help file (the page you are currently viewing).
Selecting this button will open the Pallet Tracking topic in the TruckMate Online Help file (the page you are currently viewing).
Service Portal
![]() Selecting this button will open an instance of your default Internet browsing software, with the https://www.tmwcare.com login page displayed.
Selecting this button will open an instance of your default Internet browsing software, with the https://www.tmwcare.com login page displayed.
About
![]() Selecting this button will open the standard TruckMate About window, which contains important information about the application you are currently using, including its version number (important for support calls).
Selecting this button will open the standard TruckMate About window, which contains important information about the application you are currently using, including its version number (important for support calls).
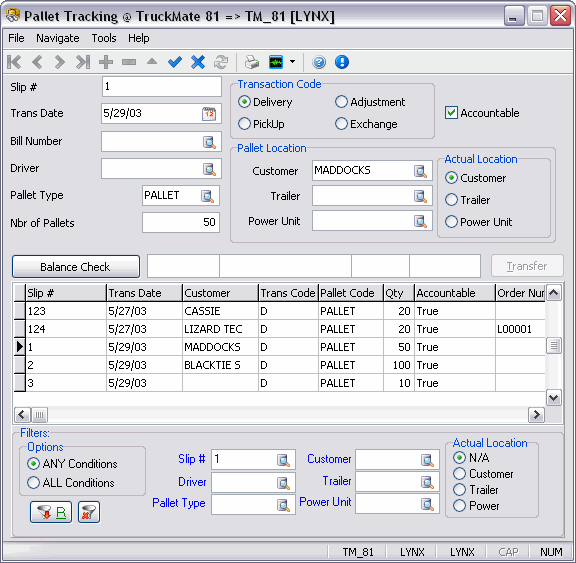
Transaction Information
Slip #
Enter the manifest number in this field. Most shipments with leased pallets involved will be accompanied with a separate manifest for the pallets. The field may optionally be left blank.
Trans Date
Enter the date the pallet transfer took place (this being when the pallets left a location or were picked up).
Bill Number
Use the search button to bring up the search options of: Order Number, Shipper, Consignee, Customer, and Pick Up Date.
Driver
Use the search button to locate your desired Driver.
Pallet Type
Enter a valid pallet code. Pallet codes are maintained in the Codes Maintenance program and are designated as a Pallet Type. As pallet codes are a commodity code, they may be used as such when creating a load for hauling pallets as well as associating tariff classes as the case may be.
Number of Pallets
Enter the number of pallets associated with the transaction.
Transaction Code
Identifies the type of transaction. Options are:
-
Delivery
Implies pallets left at or delivered to a customer location. -
PickUp
Implies pallets retrieved from the customer location. -
Adjustment
Allows an adjustment of the pallet stock at a customer location as a way to correct errors. Entering a positive adjustment amount would have the same effect on the pallet stock as Delivery, while entering a negative adjustment amount would affect the stock in the same as a Pickup would. -
Exchange
This item will have no effect on the stock. This means that the amount of pallets brought delivered to the customer location were also retrieved or picked up on the same trip. Some receiving docks will not accept responsibility or do not have the room to store pallets and will insist the carriers take their pallets with them after unloading. Using this option creates a tracking history of pallets, but does not affect reporting balances.
Accountable
Selected means that the pallets involved in this transaction are the responsibility of the carrier involved, even if they are leased pallets. Accountable is checked by default, but may be de-selected if this is not the case. Only Accountable transactions are included in pallet balance calculations. Non-accountable entries are a means of tracking pallet movements only.
Pallet Location
-
Customer
Double-click the search button to view client names available and enter a valid Client profile code. This could be the consignee location where the pallets were left at or retrieved from. Some operations allow two transactions to be entered for each load: one for the pallet pick-up location/return to shipper, and one for the pallets. -
Trailer
Use the search button to bring up the Select Trailer dialog box. Search by Trailer ID, Make, Class, or Length. -
Power Unit
Use the search button to bring up the Select Power Unit dialog box. Search by Power Unit, Make, and Year. -
Actual Location
Select the actual location of the pallets from the following: Customer, Trailer, or Power Unit.
Balance Check
Clicking the Balance Check button displays key transaction information: 'from location type', 'location code', 'pallet type', and 'pallet balance'.
![]()
In other words the "Balance Check" keeps a running total of all pallets at a customer/consignee location (not including accountable pallets). You are then given the option of picking up these pallets, if you see there are a number there for pick-up and if you have the space in the truck/trailer.
Transfer
Selecting the "Transfer" button will bring up the Pallet Stock Transfer window where you can view your transfer selections and make further modifications to the transfer.
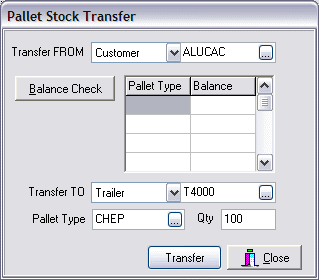
The Stock Transfer grid is merely a summary listing of the pallet tracking information for this particular customer. It does have some standard customization and sort options and does reflect all information in the current slip number shown such as: Slip #, Trans Date, Customer, Trans Code, Pallet Code, Quantity, Accountable, and Order Number. You can use the filter to search for a certain customer and see what pallets are there requiring a pick-up or drop-off.
Filters Panel
Allows the option to filter by Customer location and/or pallet type. The Filters Panel also has a refresh option and an erase option

| Field | Definition |
|---|---|
Options |
Select ANY or All conditions, whichever is applicable. |
Slip # |
Enter the Slip ID # or use the search button to search by Slip ID #. |
Driver |
Use the search button to bring up the Driver dialog box where you can search by Driver Name, or Driver ID. |
Pallet Type |
Select the search button and a Pallet Type search dialog box appears. Select a Pallet Type from the list. |
Customer |
Select the search button and a Client search dialog box appears. Select a client ID from the list. |
Trailer |
Use the search button to bring up the Select Trailer dialog box. Search by Trailer ID, Make, Class, or Length. |
Power Unit |
Use the search button to bring up the Select Power Unit dialog box. Search by Power Unit, Make, and Year. |
Actual Location |
Select from one of the following choices: N/A, Customer, Trailer, or Power. |
Refresh |
Resets the record to include any new additions of information. |
Erase |
Clears any filter fields and resets the grid display. |
Provides access to the accompanying Crystal Report supplied with the program 'PALLET.RPT'. You can input a particular client and then view a Pallet Summary Report.
See the Crystal Reports Reference for more information on Report Functions.