Using Split/Merge Bill

In LTL shipping scenarios, the need to physically separate a single freight bill’s shipment may arise (say when a trailer is near capacity). When this occurs, it may become difficult to keep track of that single freight bill record. To ease this process, we have updated the 'Split/Merge Bill' functionality for Multi Mode Dispatch. The new LTL Split/Merge windows will allow you to split out a freight bill’s manifest in any quantity you require, and will make tracking the split bills much simpler. Once a freight bill is split, you will see the temporary split bills appear in the Deliveries and CrossDock tabs of Multi Mode Dispatch, and when you access the LTL FB Split window a second time, the 'Merge' functions will become available. Furthermore, it is possible to split a bill more than once with different details. For example, a freight bill can be split by pallets, and then can be split again be pieces.
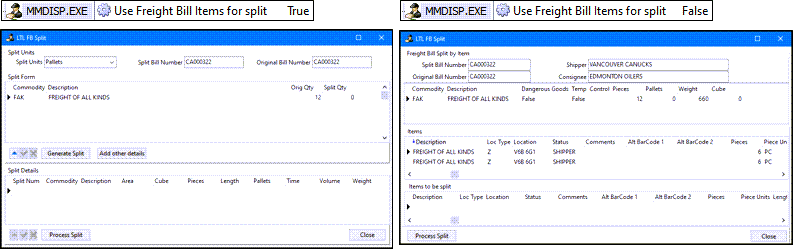 The LTL FB Split window will appear and function differently if the Application Configurator program > MMDISP.EXE > Use Freight Bill Items for split config is set to True. The window will then only allow you to split a freight bill by the number of Items assigned to the freight bill (via the Customer Service program > Details tab > Items field). The LTL FB Split window will appear and function differently if the Application Configurator program > MMDISP.EXE > Use Freight Bill Items for split config is set to True. The window will then only allow you to split a freight bill by the number of Items assigned to the freight bill (via the Customer Service program > Details tab > Items field).
|
-
Review the MMDISP.EXE > Application Configuration options which affect freight bill splitting.
-
MMDISP.EXE > FB Split Auto Merge
-
MMDISP.EXE > FB Split Charges
-
MMDISP.EXE > FB Split Copy Load Detail User Fields
-
MMDISP.EXE > FB Split Units
-
MMDISP.EXE > Use Freight Bill Items for split
-
-
The freight bill splitting process begins on either the Deliveries tab or CrossDock tab of Multi Mode Dispatch, when the user right-clicks a freight bill that needs to be split and selects the Split/Merge Bill option.
-
The LTL FB Split window will appear with the splitting options available. The form is dynamic in that it will offer splitting options for freight bills that are not yet split, and offer merging options for already split freight bills.
-
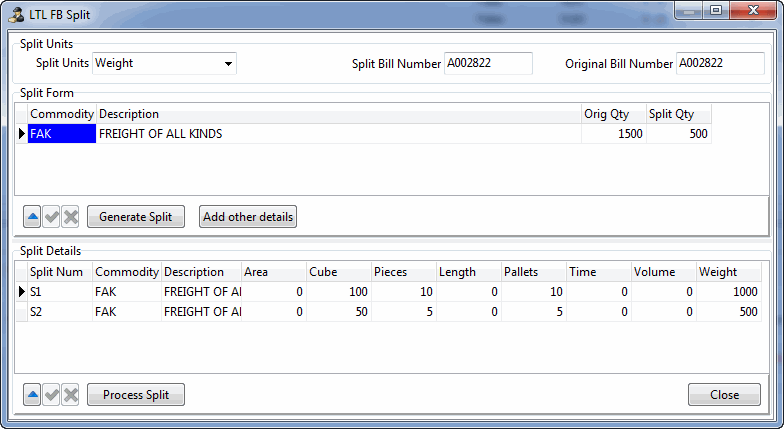
Pay attention to the header portion of the window: the Split Units menu allows you to select which unit you wish to use when splitting the contents of the freight bill. You have the option of splitting the shipment by its Area, Cube, Pieces, Length, 'Pallets', Time, Volume, or Weight value. In the above example, the contents of the freight bill are being split by Weight.
-
Change the Split Units value. The 'Orig Qty' column in the Split Form grid will update with the freight bill’s (TLORDER) value for that unit. Upon selection of 'Weight' in the above example, '22000' populated in the 'Orig Qty' field (i.e. the freight bill’s TLORDER.WEIGHT value is '22000').
-
Next, enter a value into the 'Split Qty' column in the Split Form grid. This specifies the amount of freight that will be split apart from the original shipment. In the above example, we chose to split the original shipment in half by entering '11000' in the 'Split Qty' field.
-
Note: If the Application Configurator program > MMDISP.EXE > 'FB Split Charges' configuration option is set to 'True', the freight bill charges ('Sub Cost', 'Discount' and 'Charges') will be split using the same percentage ratio used to split the freight bills.
-
Once you have specified the 'Split Qty', select the 'Generate Split' button. You will then see the results of the split in the Split Details grid. Each freight bill you split will have two records generated: 'S1' (or "split one") and 'S2' (or "split two").
-
At this point, you have the option of adding details for an additional split, selecting the 'Add Other Details' button will allow you to add additional split details. If not applicable, proceed to the next step.
-
Now take the time to look over the 'S1' and 'S2' records in the Split Details grid. When you are satisfied that the split records match how the freight was physically split at the door, select the 'Process Split' button. TruckMate will process the split and then inform you of its completion. Select the 'OK' button to continue.
-
The LTL FB Merge window will now automatically appear. Users will most likely close this window for the time being, in order to process the actual transport of the split bills, but for educational purposes there are several items to note:
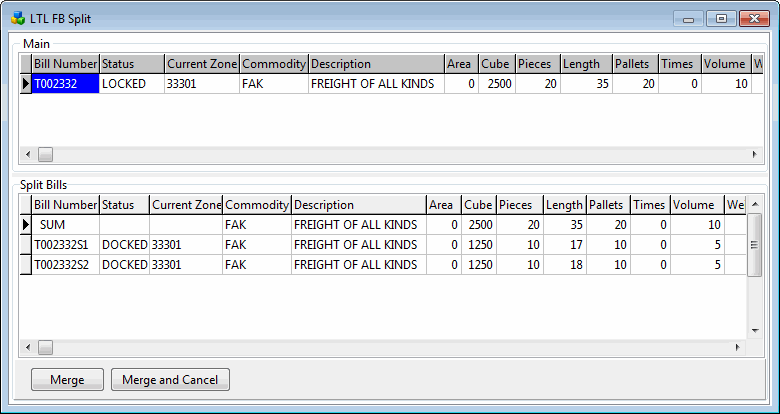
The Main grid lists information about the original freight bill the split was performed on. One very important thing to note is that once a freight bill is split, its 'Status' (TLORDER.CURRENT_STATUS) is set to 'LOCKED'. This means that no other processing on the freight bill will be allowed while it is in a split state. The user cannot enter the Customer Service program and edit the detail records (TLDTL) of the bill, nor can it be approved for billing, and so on.
-
The Split Bills grid lists information about the splits that were created from the original freight bill. Split Bill numbers take the form of the original freight bill number with 'S1' and 'S2' appended. All split bills will be created with the status of 'DOCKED', and they can be viewed from the Deliveries tab, CrossDock tab and from within the Customer Service program (where "Split Bill" will appear below the bill number of the freight bill).
-
If required, the user can access a right-click option from the Split Bills grid that will further split a split freight bill. Selecting the 'Split a Split Bill' context option will return you to the LTL FB Split window with the selected split bill entered into the Split Form grid. When you process a further split, another split bill ('S3') will be added to the LTL FB Merge window.
-
At this point in the process, the split freight bills will be dispatched normally. When they arrive at the destination terminal door or dock, the user will right-click either the original or any of the split bills and choose the 'Split/Merge Bill' option a second time. The LTL FB Merge window will automatically appear for any split bill.
-
The user has two choices at this point: the 'Merge' button or the 'Merge and Cancel' button. These buttons produce different results:
-
Merge: selecting 'Merge' will merge all the generated split freight bills together, back into the original freight bill. The original freight bill’s status will change from 'LOCKED' to 'DOCKED', so that further processing can take place. You will also notice status code updates on the Customer Service program > Status tab for each of the split bills that were merged back into the original. The split bills will have their status set to 'COMPLETE'.
-
Merge and Cancel: selecting 'Merge and Cancel' will generally function the same as 'Merge', but the split bills will be set to 'CANCL' status. In this case, the original freight bill will not have individual entries for each split bill merge on the Customer Service program > Status tab, it will only show that a split took place (i.e. when the 'LOCKED' code was applied) and that a merge has been done (i.e. against the 'DOCKED' status code).
-
The original bill can now have any further processing completed from the destination door/dock.