Resource tab details - Power Unit

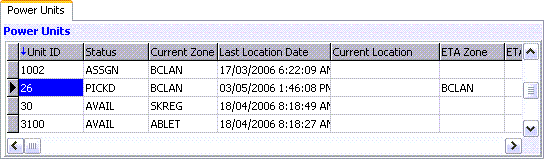
The Power Unit Tab displays a list of summary information about all active power units along with current dispatch activity. The columns include pertinent information from the Power Unit’s setup, as configured in the Power Unit Profiles program.
| For more information on General Color Codes, see the Color Code Information section. |
Assign a Power Unit to a Trip
In most cases a double-click on a field in the power unit grid will assign the Power Unit to a the selected Trip. If there are multiple legs on the trip, the power unit will be assigned by default to all legs subsequent to the leg currently selected in the Trip grid.
| Power Units that have a current status of 'Unavailable' cannot be assigned to trips. |
Update Fields
In a few cases the information in a field can be modified using a double-click in those fields, as follows:
ETA Zone / ETA Location / ETA Date / Planned Time Available: displays the ETA / PTA Adjustments window to make manual adjustments to the resources' Estimated Time of Arrival and Planned Time Available, as follows:
-
New ETA Zone: select the search button to select the zone the resource is expected to be in at the time entered in the ETA Date field.
-
New ETA Date: displays the calendar to provide Estimated Time of Arrival date selection.
-
New PTA Date: displays the calendar to provide Planned Time Available selection.
| The ETA Zone, Location, Date and PTA fields are also updated automatically by activity in the Trip grid, and manual changes will be overwritten if trip activity occurs for this resource. |
MSG_NR
Double-click this field to open the Message Center program, which will be filtered to display only messages for the selected Power Unit.
In/Out Gate Status
This field shows if the equipment has been In-Gated or Out-Gated from the Container Depot.
Context Menu
Full Screen
The Full Screen option will enlarge the selected grid so that it fills the whole screen which allows you to view many more records and columns than in the normal view. To return to the normal view, right mouse click and de-select the Full Screen option. While in Full Screen mode, you can switch from grid to grid by selecting the right and left arrow buttons at the bottom of the window.
Clear Last Poll Zone
The Clear Last Poll Zone option is used to manually clear the last poll zone reported by the mobile communications provider. This option is selected when a leg of the trip is hauled by a vendor without mobile communications.
Reposition/Status Change
This option allows the user to Reposition resources, Change Status of selected resources or do both. Need more details?
Location History
The Locations History Report is a summary report of the selected equipments' dispatch activity for the period selected.
For more information about report functions see the Crystal Reports Reference.
Find Power Units Near
The Find Near option allows you to search for any driver, power unit, trailer, miscellaneous equipment, freight bill, or trip that is within a specified distance of the desired zone.
Planning
The Planning option provides a calendar view, by day, of trips for each driver and power unit. This view includes icons to indicate late pick-up, late delivery, hours violation, hazardous and temperature controlled.
Set/Clear Filter
The Set Filter option supports the ability to create and apply a filter to any grid, regardless of the grid you were in when you opened the window.
Anchored Columns
To keep the columns on the far left of the grid from disappearing when you scroll the grid to the right, use the Anchored Columns menu option. You will be prompted to enter the number of columns you wish to anchor. The anchored columns will appear with a grey background and when you scroll the grid to the right, these columns will still be displayed.
Permits
The Permit option displays permit information in the Permits window. The permit information for the equipment has been entered in the Power Unit Profile program. No data can be changed in this form.
Trip View
The Trip View window provides very detailed information about a trip. When this option is invoked the trip on which the driver or equipment is currently active will be displayed. If the driver or equipment is currently available, or is assigned to a trip that is not yet active, the trip on which the driver or equipment was last active will be displayed.
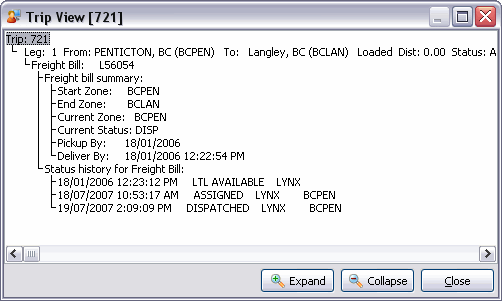
At the top of the hierarchy is the 'Trip number'.
Under the 'Trip Number' is each 'Trip Leg'.
Under the 'Trip Legs' is the 'Driver', Resources and Freight Bill(s) assigned to the leg.
Under each 'Driver' and Resource their location history (for the Trip) and their status history (for the Trip).
Under the Freight Bill is a Freight Bill summary and the Freight Bill status history (for the Trip).
Each level of the hierarchy can be collapsed or expanded by double clicking on the level above. The 'Expand' button at the bottom of the screen will expand all collapsed levels, while the 'Collapse' button at the bottom of the screen will collapse all expanded levels.
PACOS Event History
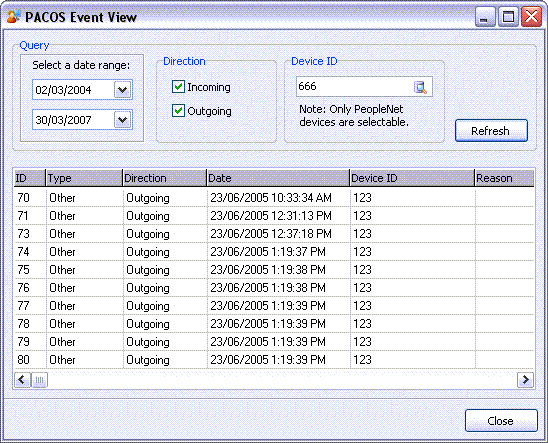
The PACOS Event View window is used to query power unit event history, provided by PACOS. The query can be defined by dates, direction and Device ID.
| Field | Definition |
|---|---|
Date Range |
Use the two drop-down menus to select a Date Range using the Calendar menu. All PACOS messages which fall within this range will be displayed. |
Direction |
Select 'Incoming' and/or 'Outgoing' to filter on a specific message type. |
Device ID |
Use the Database search button to select a PeopleNet Mobile Device that is attached to the selected Power Unit. |
Refresh |
Once you have defined all the Filter criteria, use the Refresh button to refresh the records on the bottom Grid. |
PACOS Event Grid |
This Grid details all of the PACOS Events/Messages that fall within your defined Query Filter. |
Perform X History
Selecting this option will open Peoplenet’s Perform X history window. The window provides vehicle performance information based on Proplenet’s vehicle management platform. Information regarding engine usage, odometer and speed broken down by date and duration can be found for the selected Power Unit.
New
This feature will launch the Power Unit Profile program to add a new power unit.
View Power Unit Profiles
Selecting this option launches the Power Unit Profile program to view the power unit profile details.
View Owner’s Profile
Selecting this option allows the user to view the profile of the selected power unit in Customer and Vendor Profiles program.
Special Events
The Special Events menu option displays all special events in the Special Events window, including those assigned to the equipment in the Special Events program and those created here.
|
Using the Application Configurator program, 'SE Warning Level' setting you can configure what level provides warnings for Special Events that are displayed when the equipment is assigned to a trip. When a maintenance job is scheduled on the R&M Maintenance program > Schedule RM Tab, it automatically creates a Special Event record for the equipment using the Special Event Code 'MAINT'. |
Attach / Open Related Files…
Selecting this option will open the Attach / Open Related Files window.
Copy
Select this option to copy the text from within the selected field.
Navigate
The Navigate option contains the standard TruckMate Navigation Bar, used to browse the records within this Grid.
| If you do not see the Power Unit Tab, you may have to access the 'View Menu' and enable it (or do so using the Toolbar icon). |