TruckMate 2021.1 - Release Notes
Operations
Framework
Display TruckMate license expiration date
The TruckMate License window has been modified to allow Subscription customers to see when their subscription licenses are going to expire so they can reach out to Support and update the license.
The license expiry date is displayed in the upper right of the licence information list window.
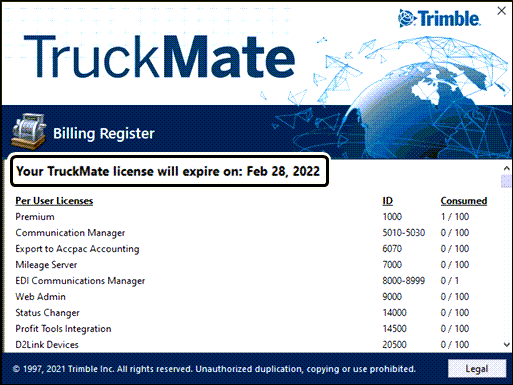
The License window is accessed from the Help menu > About window > Licenses button.
-
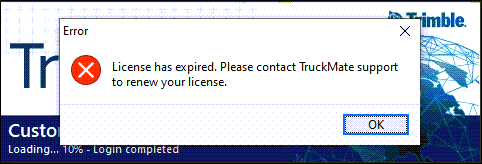
If the license has expired, when you attempt to log into the application you will receive an error message stating the license has expired, and you will need to reach out to Trimble Transportation Support to renew the license.
-
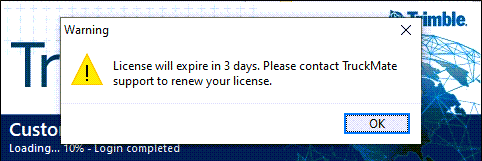
If the license is set to expire within ten (10) days, when you log into an application you will receive a warning message stating the license is set to expire on an upcoming date, and you should proceed to renew the license to prevent being locked out of the system.
-
If the license has an expiry date, but is not within ten days, you will be able to login without any warnings/errors, but you will be able to see the expiration date within the About screen.
-
If the license has no expiration date, you will notice no change.
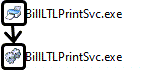
Displaying consistent service icon for service executables
In order for the icons for applications to be more consistent, a number of applications received new icons. The applications that are actually services received new icons in order to distinguish between the stand-alone application and the service variant.
For example:
The icon has been updated for the following services:

-
ART Server (ART.exe)
-
Billing Register Service (BillRegSvc.exe)
-
Check Register Service (ApNcrSvc.exe)
-
Driver Pay Register Service (DPRegSvc.exe)
-
Interliner Payable Accrual Register Service (IPAccrualRegSvc.exe)
-
Interliner Payable Audit Register Service (IpiiprSvc.exe)
-
Invoice Print Service (BillPrintSvc.exe)
-
Mileage Server (Msservice.exe)
-
Statement Printing Service (BillLTLPrintSvc.exe)
-
Storage Billing Service (StorageBillSvc.exe)
-
Timeclock Windows Service (TimeClockSvc.exe)
-
TruckMate Communications Manager Service (MobCommSvc.exe)
-
TruckMate Windows Service (MadWinServiceHost.exe)
Move SQL Execute ' Allow changes to the Security / Administration tab
In the previous release of TruckMate (2020.4), a new Administration tab was created to provide an additional layer of security within the Security Configuration tab, so Administrators could still allow some access to Security Configuration for users, but not give them the ability to change every element of their user profile.
To provide additional security control, the Allow SQL Execute Changes option was moved into the Administration tab. This was previously located under the Security > Business Events > Miscellaneous > SQL Execute tab, but it was possible for a user to change if they had access to the Security tab.
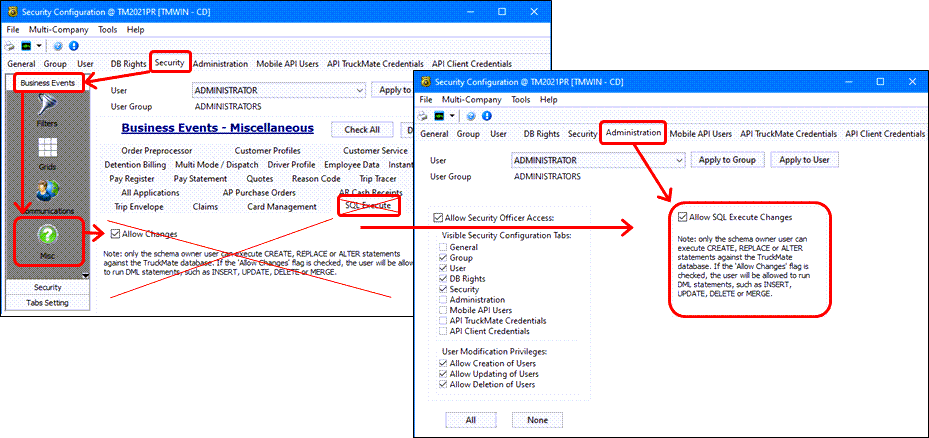
Given the impact a user can have on the TruckMate system with this particular option, it has now been moved into the Administration tab. No change to the actual value of this setting has been made per the upgrade - users that previously had this applied to them will still contain the setting, and users that do not will continue to not do so.
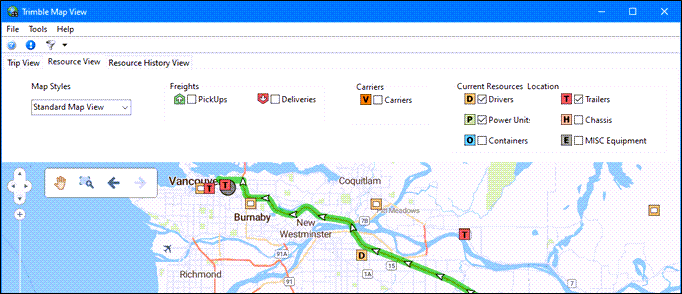
Mapview.exe removed from TM21.1
| The Mapview.exe program was deprecated and removed from TruckMate in version 2021.1 and replaced with an enhanced and much more powerful mapping interface that interacts with Dispatch and other TruckMate applications. |
Enhanced new visual dispatch and mapping capabilities were added to Multi Mode Dispatch and to Truckload Dispatch with the release of TruckMate 20.2 for visualizing trip/order/resource data, and as another way of planning trips. All of the mapping functions previously available within TruckMate were modified to use this new Trimble Map View window to provide a consistent standard interface.
(Refer to the TruckMate 20.2 Release Notes available on the Trimble Transportation Learning Center for details about this new and improved map interface.)
Mobile Communications
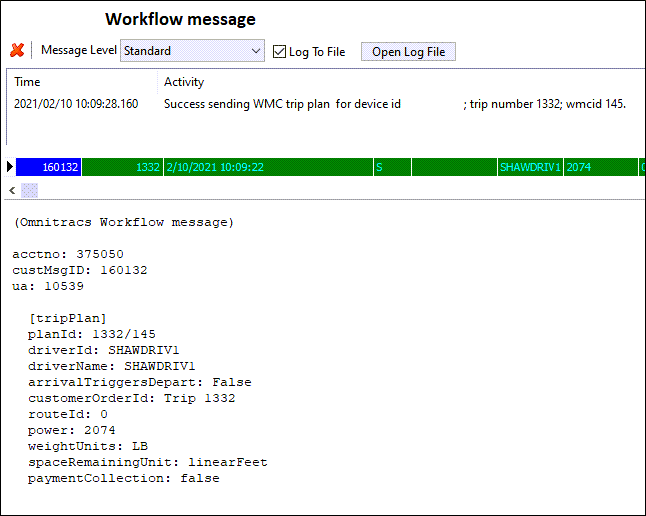
Now you can view Omnitracs Workflow "control messages"
The data being sent to Omnitracs workflow devices are now formatted into a freeform message (stored in MESSAGE_FORWARD) so you can see the data sent to the driver.
Previously, this content was only visible in logs and by manually querying the database.
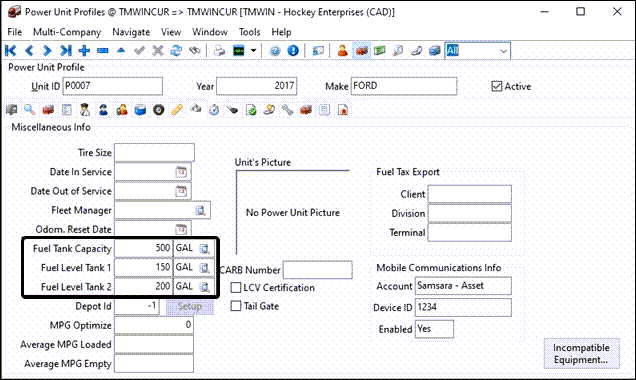
Update current fuel levels using the TruckMate API
The TruckMate API can now update a power unit’s fuel levels and run the Expert Fuel Automation process via a new API call called SendFuelRequest.
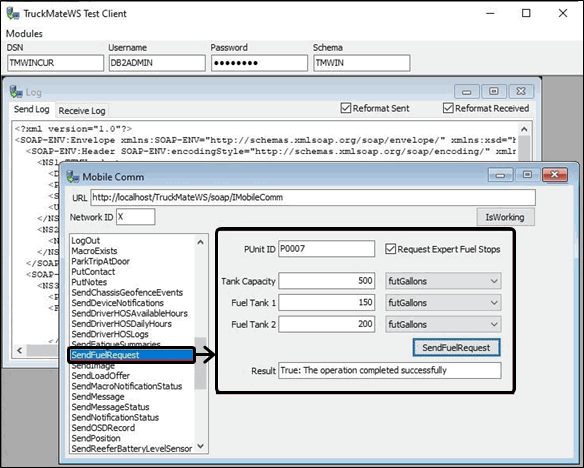
This will allow third party vendor’s to update the power unit’s fuel tank levels and if desired, run the Expert Fuel Automation process for the trip associated to the power unit at the time of update. The flag (RequestExpertFuelStops) passed in determines if we are merely updating the power unit’s fuel and running the Expert Fuel Automation which will in-turn generate a 'Route & Fuel Solution' and intersperse fuel stops as waypoints if configured using the IDSC Expert Fuel Server.
The ability has also been added to retrieve the current fuel levels for a power unit via GetPUnit.
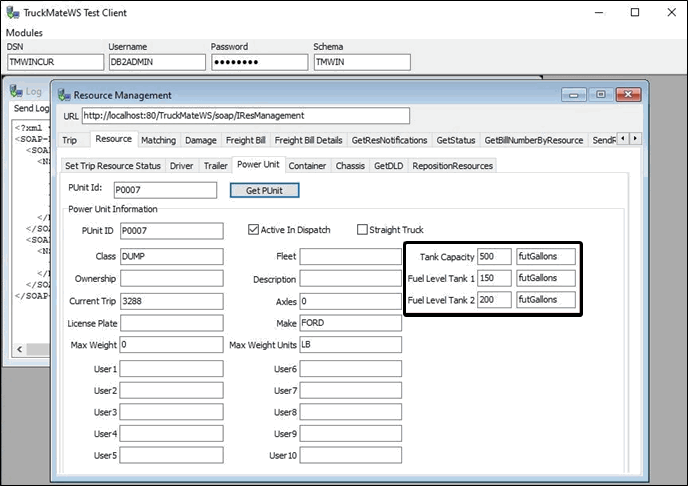
The total fuel capacity and two fuel tank levels can be viewed or manually edited using the Profiles > Power Unit Profiles program.
Certification of ISAAC

During this release cycle, the certification of ISAAC was completed. ISAAC is a third party technology and fleet management solutions company that has been certified for the following actions in TruckMate:
-
Basic Certification Items
-
Truckload Circle of Service
-
Macro Definition Functionality
They have NOT been certified for the following:
-
LTL Circle of Service
-
Hours of Service Functionality
-
Intermodal Functionality
ISAAC have been certified and is valid for use with TruckMate Versions 2019.4 and above.
Certification of MTData

During this release cycle - the certification of MTData was completed. MTData is a third party GPS and fleet management solutions provider that has been certified for the following actions in TruckMate:
-
Basic Testing (freeform & pings)
-
TL Testing (load offers & trip workflow)
| This integration was developed and is tailored specifically for Follomont’s linehaul moves between terminals. This is by no means an end to end solution and anything outside of Followmont’s linehaul workflows has NOT been tested. |
They have NOT been certified for the following:
-
LTL Circle of Service
-
Hours of Service Functionality
-
Intermodal Functionality
Certification of Keep Truckin

During this release cycle, the certification of Keep Truckin was completed. Keep Truckin is a third party mobile solutions provider that has been certified for the following actions in TruckMate:
-
Basic Certification Items
-
Truckload Circle of Service
-
Macro Definition Functionality
-
Hours of Service Functionality/GPS Tracking
They have NOT been certified for the following:
-
LTL Circle of Service
-
Intermodal Functionality
Keep Truckin have been certified and is valid for use with TruckMate Versions 2020.4 and above.
New fields in Shipper Schedule form
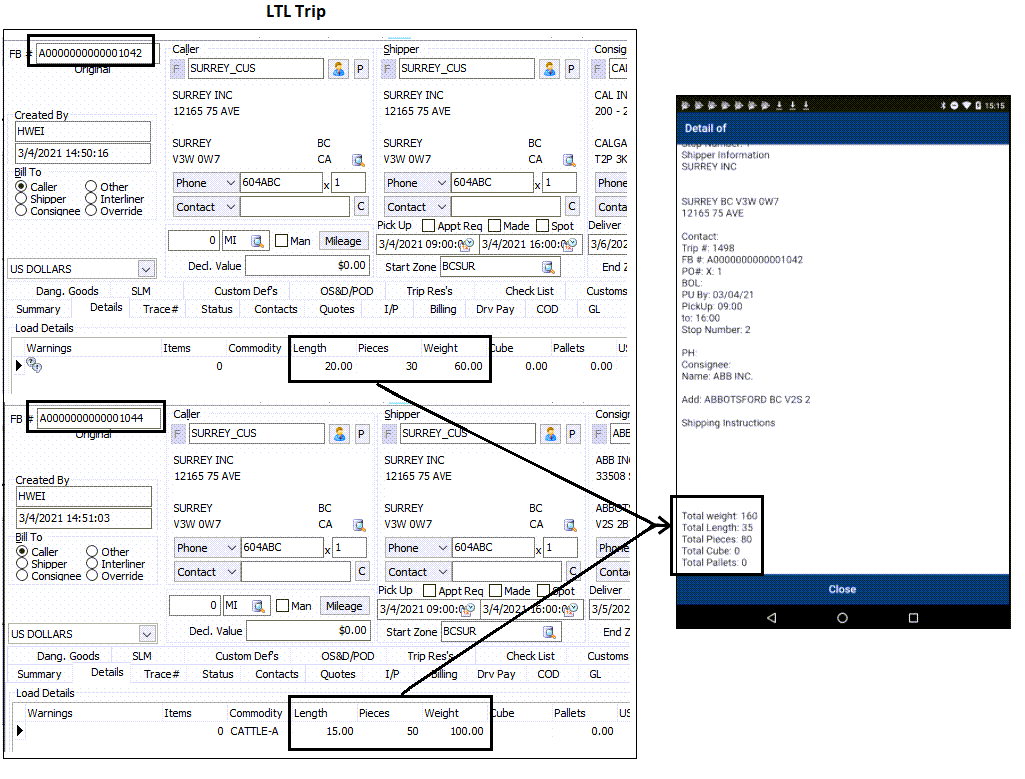
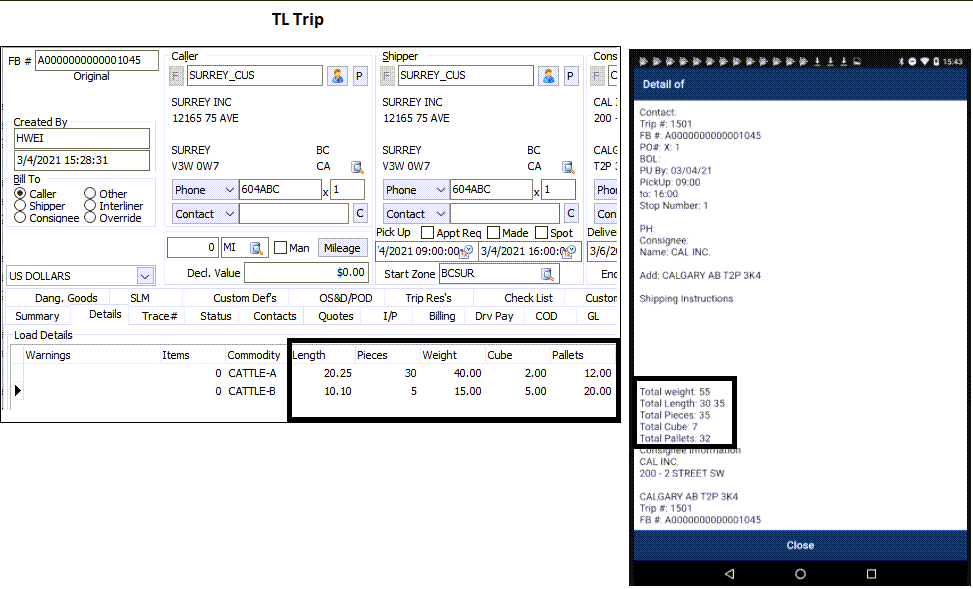
In hte Communications Macro Definition tool, the original forward macro data type 26 LTL Stop has been renamed to 26 Stop for both LTL and TL trip stops. Also two new field Total Cube and Total Length are added.

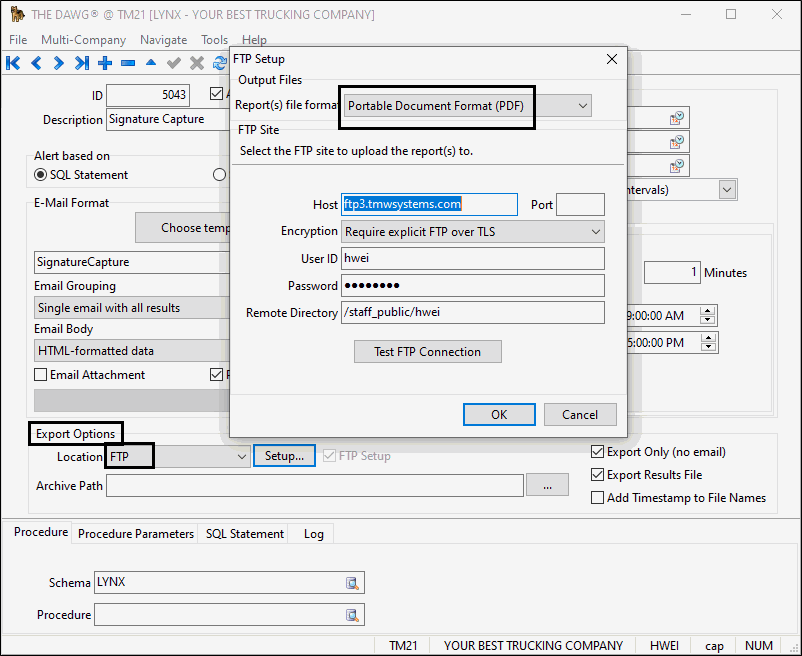
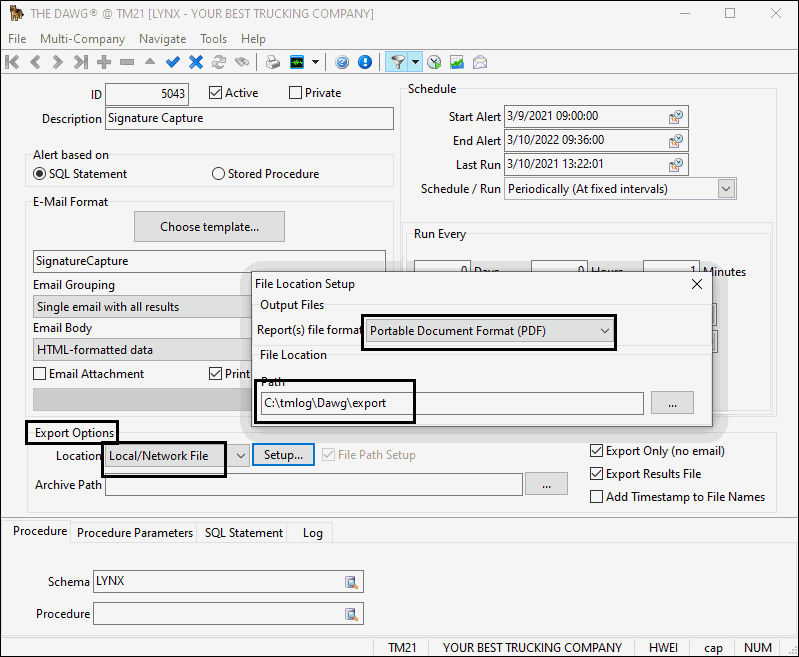
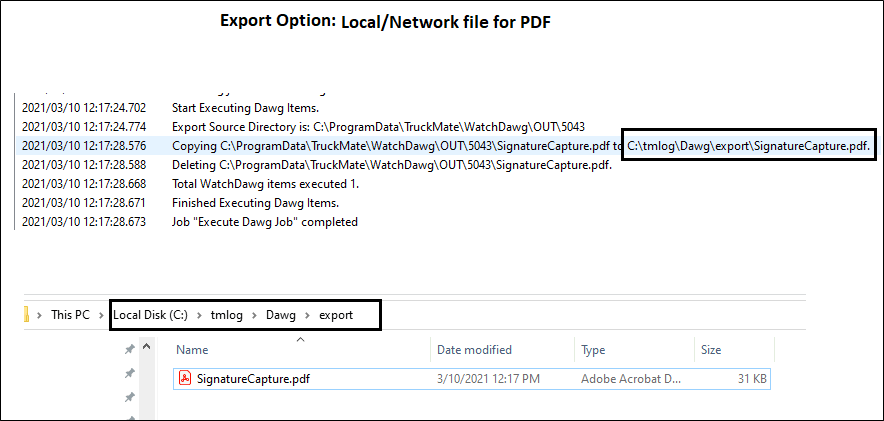
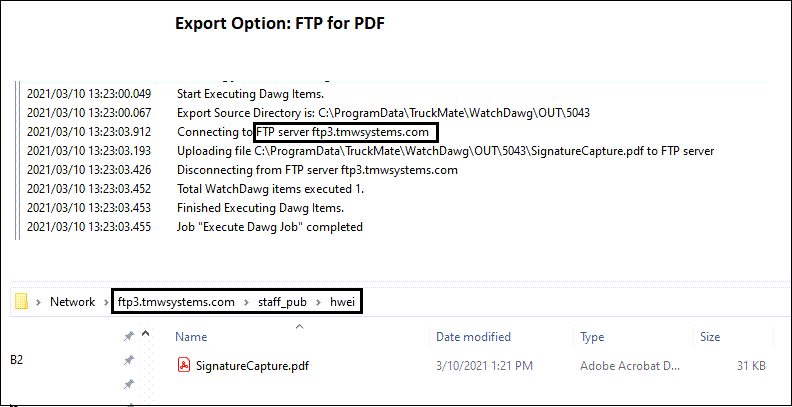
New ability To get POD Signatures out of TruckMate
The PDF file format has been added into The DAWG Export Option. This means that now you can export a Crystal Report output in PDF format to FTP or to a Local/Network file. Now you can export the signed POD (Proof of Delivery) document out of TruckMate as a PDF document.
Proof of delivery receipt
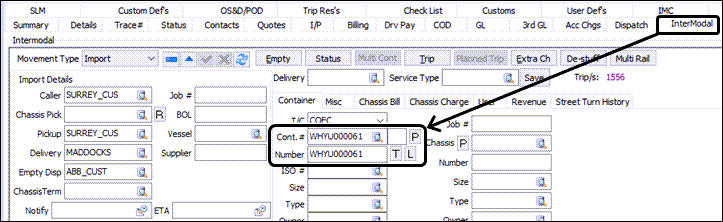
Ability to enter Container Number on Pickup against a FB or Container profile
The project added a feature enabling the driver to add a container through a macro form message (i.e. At Shipper) using only the container #.

-
When the CSERVE.EXE > Require Check Digit app. config is set to True, if the container # is invalid (i.e., 12345678901) the driver would get a check digit invalid" message of , container creation/match failed.
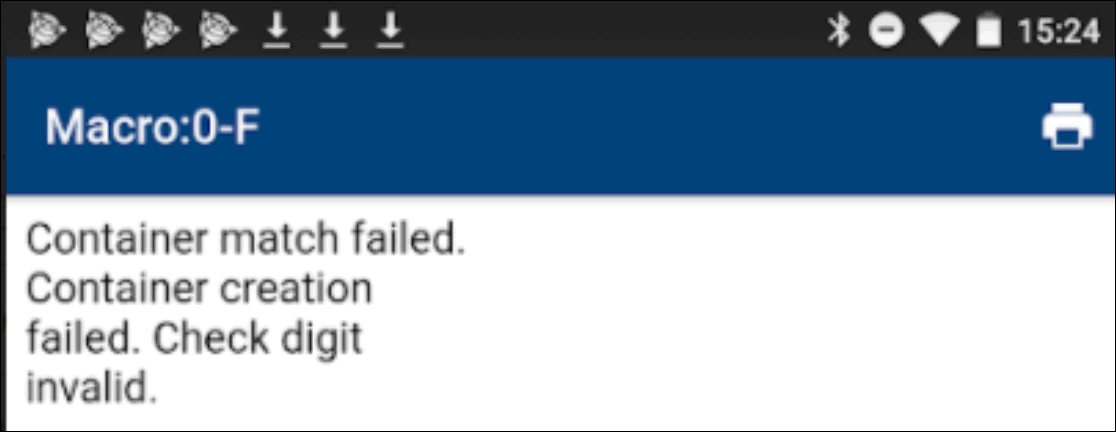
If the container # is valid (i.e. WHYU000061) the container will be created and assigned to the FB.
-
When the CSERVE.EXE > Require Check Digit app. config is False, the container # entered would be created and assigned to the FB without validation.
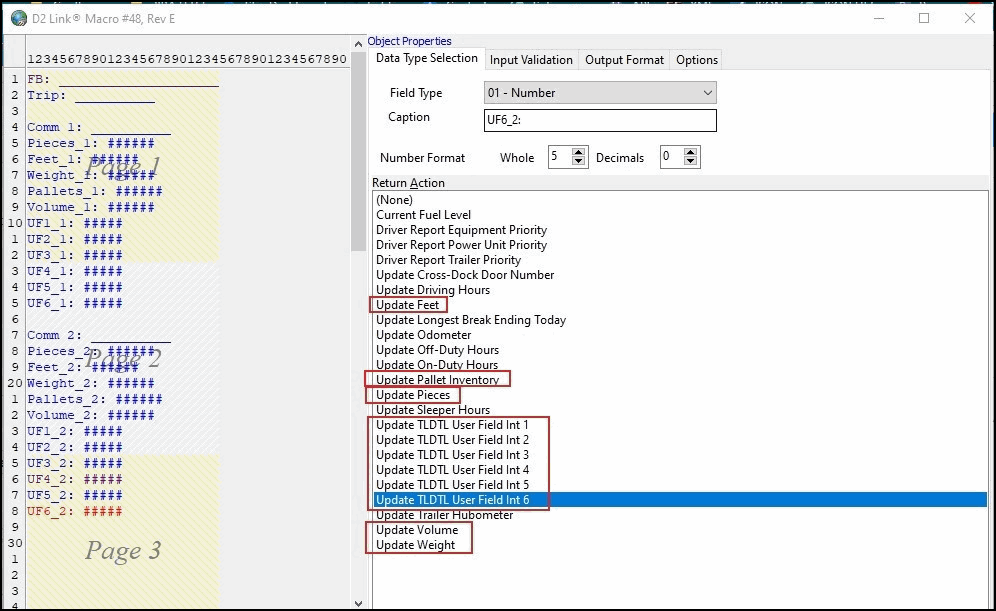
D2Link - Allow updating specific commodities (TLDTL records) via macro
The ability to configure D2Link return macros using commodity grouping logic thus allowing direct update to specific TLDTL records has been added. This allows you to update more than one commodity at a time via a return macro without creating adjustment records.
A new application configuration was added to control whether you would like to use this new functionality or continue to use the old adjustment functionality.
Utilities > Application Configurator > COMMGR.EXE
| Option | Description |
|---|---|
Multi-commodity (TLDTL) macro support |
Determines whether to enable multi-commodity updates via macros for fields like update weight, pieces or pallets, etc.
|
COMMGR.EXE > Enable multi-commodity macro support (set to ‘False’ by default)
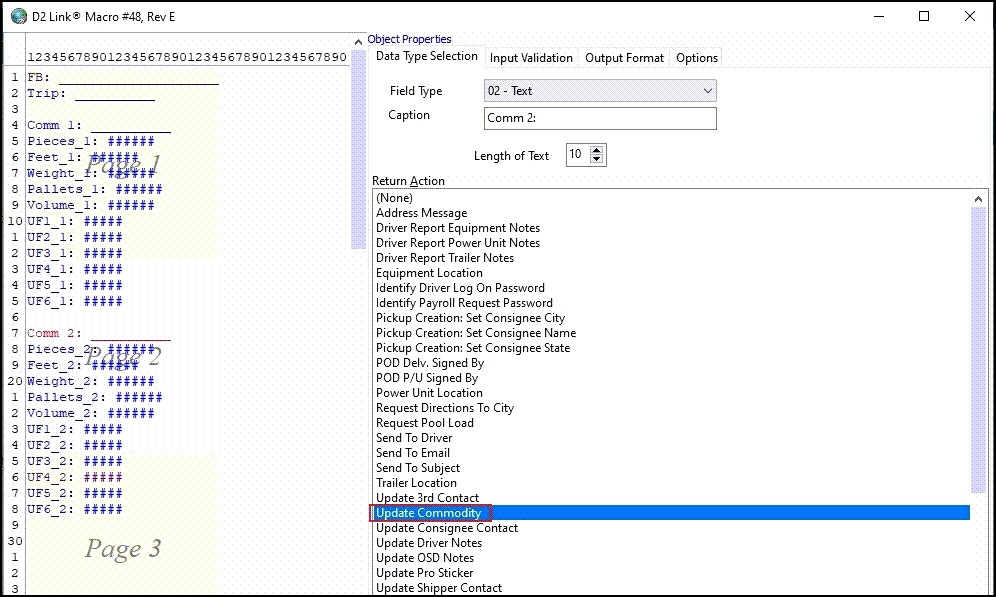
The addition of two new macro options has been added for D2Link return macros TLDTL_Group_Start & TLDTL_Group_End.
There are 12 macro fields that can be used in conjunction with the new functionality allowing you to decide which values on the TLDTL record you would like to update when the return macro is processed Pieces, Pallets and Weight etc.
Dispatching Operations
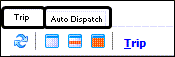
New Trip Operations window (Beta)
Before TruckMate 2021.1, there were three different versions of Merging and Switching within the multiple different Dispatching applications with each using a different user interface and different approaches.
-
Merge/Switch Resources (Dispatch + Multi Mode Dispatch)
-
Preplan Doubles (Dispatch)
-
Merge Trips (Yard Tab, Multi Mode Dispatch)
The NEW Trip Operations Window With this 2021.1 release, the Pre-Plan Doubles feature in the Dispatch program and the Trip Merge feature in Multi Mode Dispatch have been merged and unified within a new Trip Operations window.
| At the current time (April 16, 2021), this functionality has been added into TruckMate in a "beta" format. This means that your TruckMate Users can be granted a new security option by your local Truckmate system administrator to use this new functionality at the current time. The functionality it is designed to replace has not yet been removed from the product. We actively encourage you to use this new functionality and provide feedback on it to help us further improve this feature for you. |
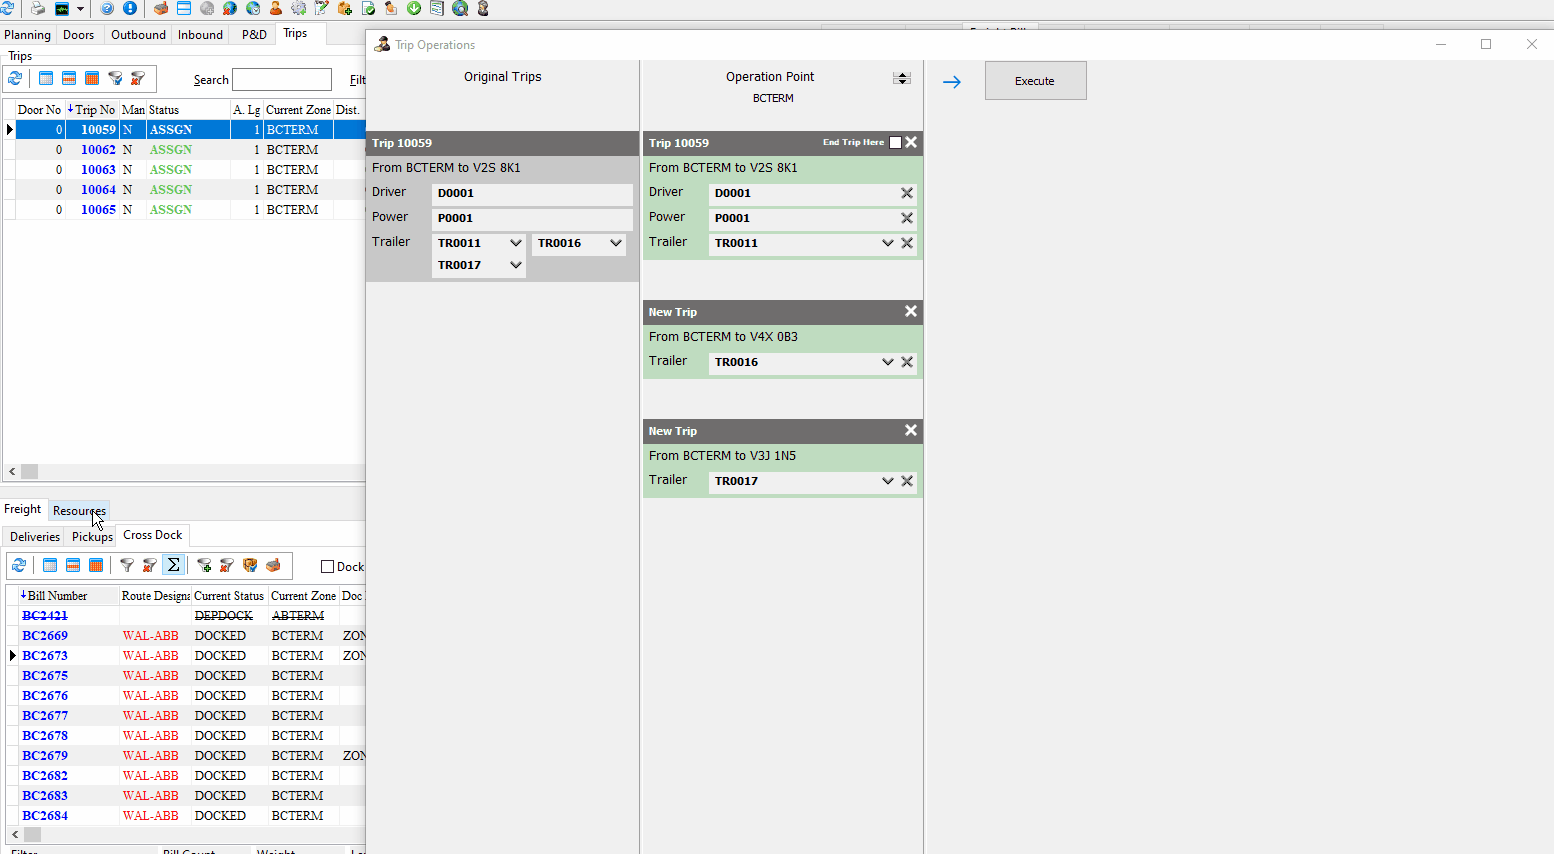
The new Trip Operations window can be accessed from the following locations:
-
The right-click shortcut menu > Merge/Switch Resources (beta) option on ALL Trip Grids within the Multi Mode Dispatch application.
-
The right-click shortcut menu > Merge/Switch Resources (beta) option on the Trip Grid within the Dispatch application (nested under the Trip Operations sub-menu).
-
The right-click shortcut menu > Merge/Switch Resources (beta) option on the Yard tab within Multi Mode Dispatch application.
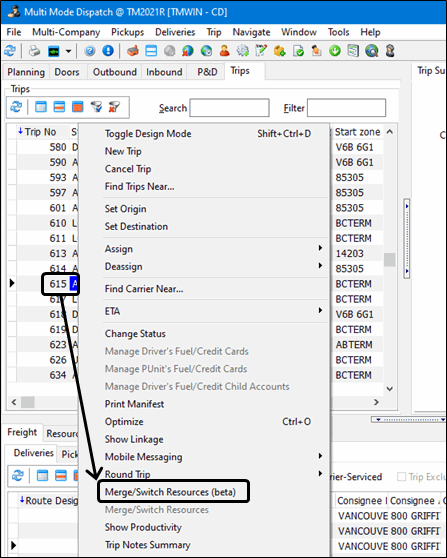
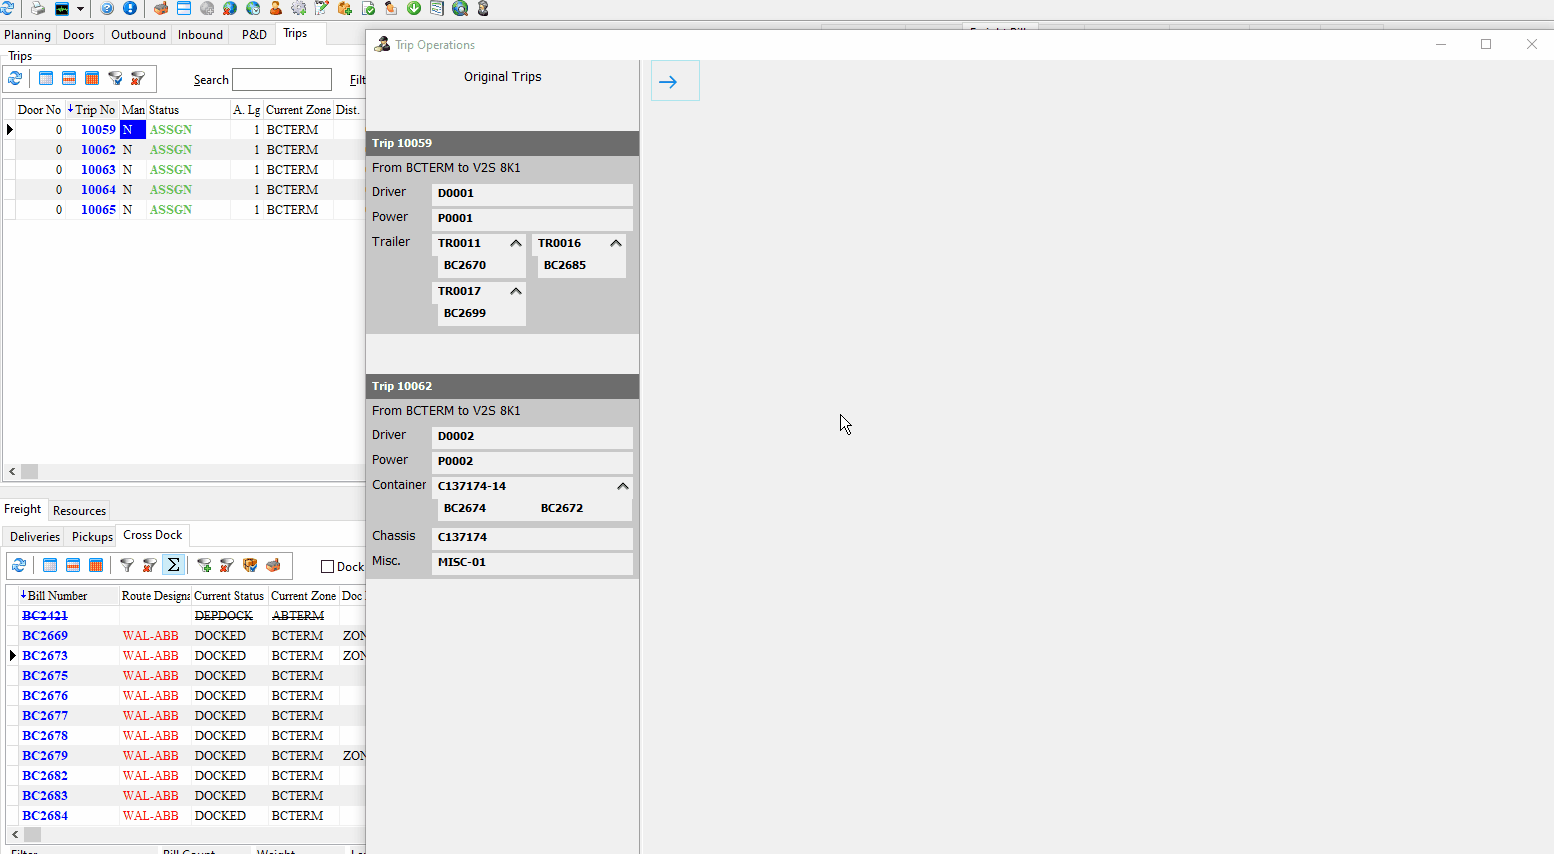
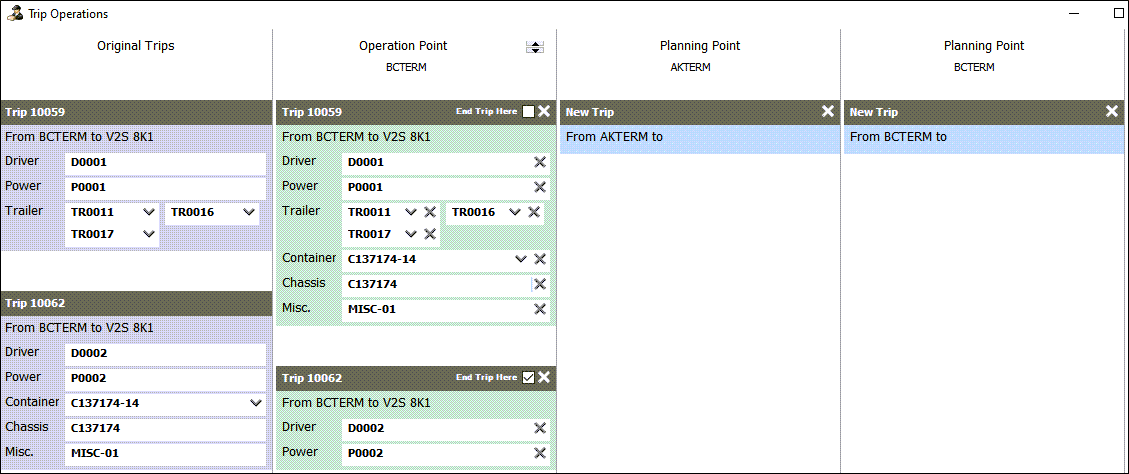
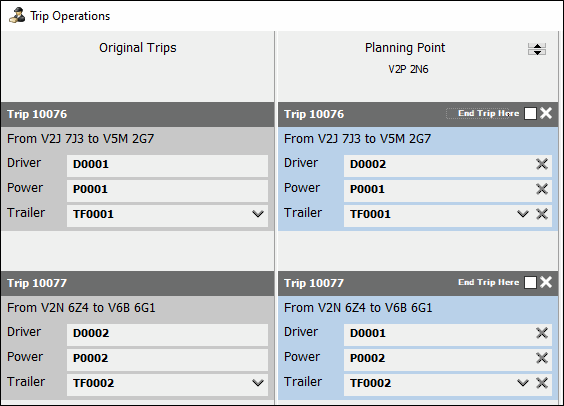
When this option is selected against a trip, the new Trip Operations window will open and any Trips that were selected prior to opening the window will automatically be pulled into the window:
How to use the New TM 2021.1 Trip Operations window
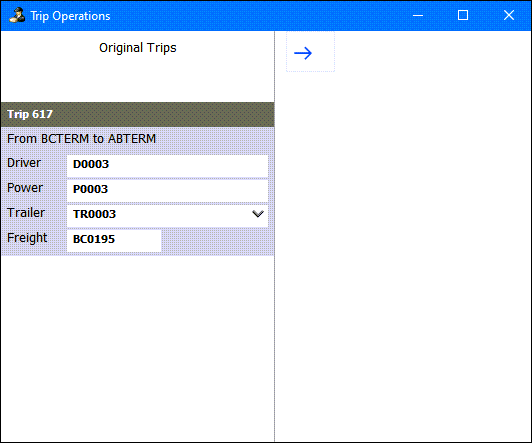
Initially, all you will see within this window is the 'Original Trips' column, with an arrow to the right of it. The Original Trips column will hold all of the Trips you want to include within the "Operational Plan" that will be created as per these Trips. These Trips will always appear in grey, and will show the following information about the Trips:
-
The Trip Number, visible on the darker banner at the top of each individual Trip panel.
-
The From and To location of a particular Trip. This will display the ZONE_CODE values, which will match the Trip record inside the chosen Trip Grid.
-
The Resource information, including:
-
Drivers
-
Power Units
-
Trailers
-
Chassis
-
Containers
-
Misc. Equipment
-
Carriers
-
-
Freight Bills will also be displayed, with special rules:
-
If a Freight Bill is nested under a particular resource using the linkage rules within TruckMate, it will display underneath that resources. Freight Bills can only be nested underneath Trailers, Straight Trucks and Containers - nesting under any other resource is not permitted.
-
If a Freight Bill is not nested underneath a particular resource using linkage rules, then it will be displayed as a separate item underneath the Trip, defined as 'Freight Bills'.
-
You will be unable to edit the original Trips on this panel; it will simply be a read-only panel. At any time, however, you can drag additional Trips into the window. The Trip Operations popup is non-modal, meaning you can interact with the Dispatch grid behind, thereby being able to add additional Trips into your plan if you desire:
When you are happy with the initial setup of your Trips inside the Trip Operations window, use the arrow to start the next column or you can right-click against the Original Trips column to bring up a context menu, which will give you an option of actions you can proceed with. (The functionality around each of these is described later in this document.)

When the next column is created, regardless of which option above is chosen, you will have the option to either choose between an Operational Point or a Planning Point.
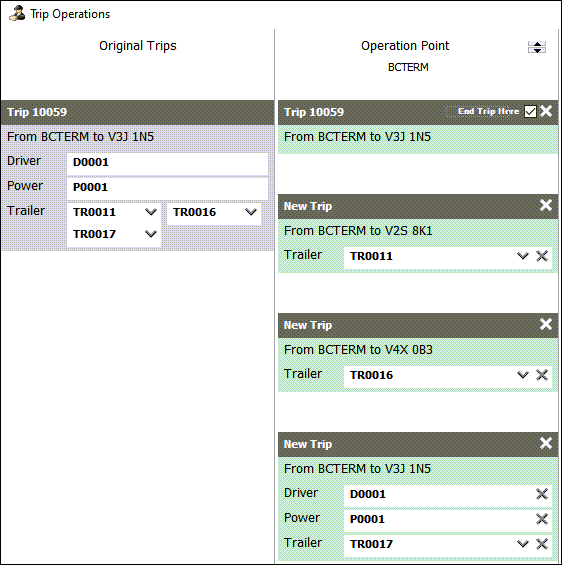
Operational Point
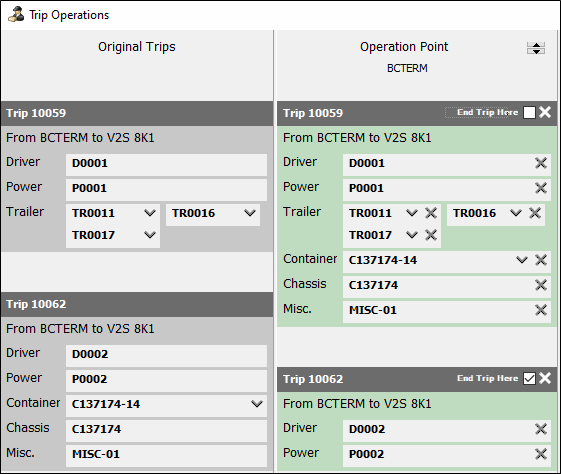
The Operational Point will display all of the Trip panels nested underneath it in green, to effectively show that the action being requested will occur immediately. When creating the column, you will have the option to select the zone where this will occur in (in this case, BCTERM). Therefore, when you execute the Operational Plan, any action being requested (split, merge, switch, new trips, etc.) will be created immediately. If Trips are not currently at the Operation Point, the system will force you to this new location to complete the actions requested. The system will proceed to create new legs to move the Trips to these zones if required.
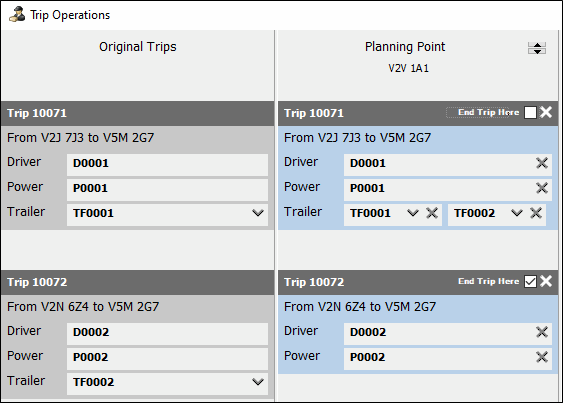
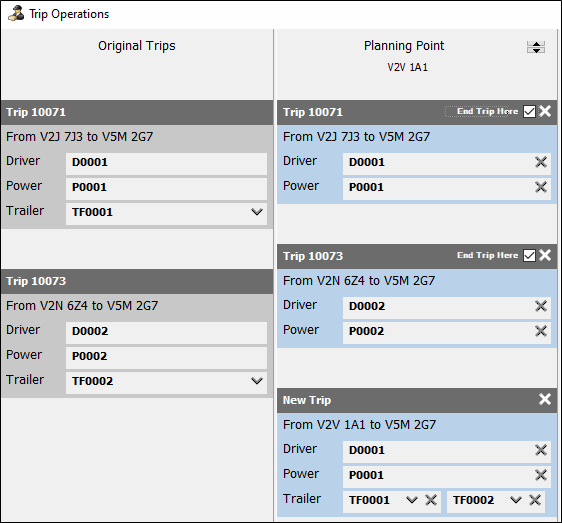
Planning Point

The Planning Point will display all of the Trip panels nested underneath it in blue, to effectively show that the action being requested will not occur immediately. When creating the column, you will have the option to select the zone this will occur in (in this case, BCTERM). Therefore, when you proceed to execute the Operational Plan, any action being requested (split, merge, switch, new trips, etc.) will be planned ahead of the current legs. The system will proceed to adjust all of the original Trips to accommodate the new plans ahead. Depending on the action being prepared this will create new legs on Original Trips, and proceed to create new Trips as required.
Multiple Columns
Within the Trip Operations window, multiple columns can be created, allowing you to plan multiple different steps in the future. Only the FIRST column may be set as either Operational or Planning - any subsequent columns after the first will always be fixed to Planning Point (because technically you can only have one action happen 'immediately', versus all others which will occur in the future).
Split Trip
The 'Split Trip' option will require the following to work:
-
Only one single Trip must be present within the Original Trips column in the Trip Operations window.
-
If more than one Trip is present, the option to split the Trip will be greyed out.
-
When the Split Trip option is pressed, the Trip Number at the top of the Original Trips column (these can be reorganized) will be brought into the next column as one of the new Split Trips. In addition to the original Trip being pulled over, the system will then create subsequent Trips per resource that can be used as needed.
During this process, you will need to enter the 'Split Zone', which will result in one of two things:
-
If you enter in the CURRENT ZONE for the Split Trip, the system will pre-select 'Operation Point' by default.
-
If you enter in a zone that does not match the Current Zone of the Trip, the system will pre-select 'Planning Point' by default.
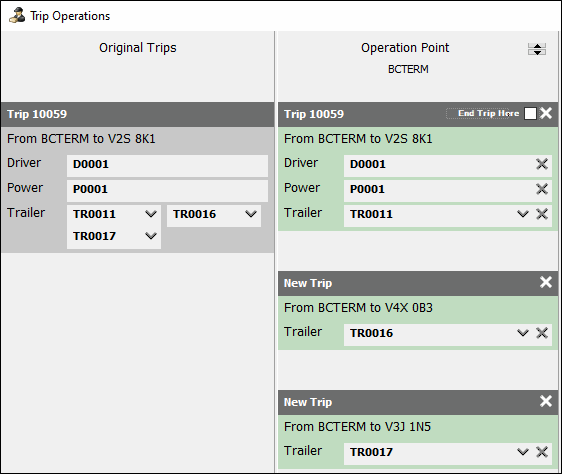
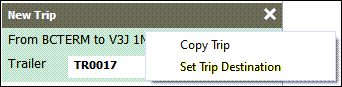
The New Trips will be evident by the 'New Trip' banner above the block. At any time, you can right-click -the 'New Trip' options and select Set Trip Destination to set the End Zone of the New Trips being created:
You can also use the non-modal nature of the window to add additional resources to the New Trips as needed. For example, with our plan in the screenshot above, you could proceed to add resources to hook with the TR0016 and TR0017 Trailers:
All existing Application Configurations that determine the maximum number of resources that can be applied to Trips will be respected during this process - if this restriction is broken the system will disallow the creation of the Operational Plan.
Once the 'EXECUTE' button is pressed, the window will be closed and the actions will occur. If Operation Point is used the actions will occur immediately. If the Planning Point is used, the system would create the 'New Trips' as requested, and a waypoint would be added to the original Trip (10059) for BCTERM - when the Trip reached this destination, the splits would have the ability to be moved as required.

Split with New Trips
The 'Split with New Trips' option will require the following to work:
-
Only one single Trip must be present within the Original Trips column in the Trip Operations window.
-
If more than one Trip is present, the option to split the Trip will be greyed out.
When the Split with New Trips option is pressed, the original Trip Number will be brought into the next column, but it will not be actively used on the Trip Plan. Only New Trips will exist in the column by default, with the breakdown of the new Trips occurring accordingly. It should be noted that you CAN drag the original Trip into the column if you want to, but it will conflict with the New Trip.
During this process, you will need to enter the 'Split Zone', which will result in one of two things:
-
If you enter in the CURRENT ZONE for the Split Trip, the system will pre-select 'Operation Point' by default.
-
If you enter in a zone that does not match the Current Zone of the Trip, the system will pre-select 'Planning Point' by default.
The New Trips will be evident by the 'New Trip' banner above the block. At any time, you can right-click on the 'New Trip' options and select the End Zone of the New Trips being created.
You can also use the non-modal nature of the window to add additional resources to the New Trips as needed.
All existing Application Configurations that determine the maximum number of resources that can be applied to Trips will be respected during this process - if this restriction is broken the system will disallow the creation of the Operational Plan.
Once the 'EXECUTE' button is pressed, the window will be closed and the actions will occur. If Operation Point is used the actions will occur immediately. If the Planning Point is used, the system would create the 'New Trips' as requested, and a waypoint would be added to the original Trip (10059) for BCTERM - when the Trip reached this destination, the splits would have the ability to be moved as required. Note that in this example, because Operation Point is used and the 10059 Trip is set to End, it will immediately be completed upon execution of the Operational Plan.

Merge on Trip XXXXX
The 'Merge on Trip XXXXX' option will require the following to work:
-
At least two Trips must be present within the Original Trips column in the Trip Operations window.
-
If only one single Trip (or no Trips) are present within the Trip Operations Tool, the Merge option will be greyed out. When the Merge on Trip XXXXX option is pressed, the Trip Number specified in the menu option will be brought into the next column and will be used as the merge Trip. The other Trip Number(s) that the merge is not occurring on will be brought into the column, but will be marked in a state that they will end at the point provided (be it immediately if the Operational Point is being used, or in the future if the Planning Point is being used). New Trips can be created and adjusted as needed if required for a secondary purpose.
During this process, you will need to enter the 'Merge Zone', which will result in one of two things:
-
If both of the Trips are in the same zone, and you enter in that shared zone, Operation Point will be selected by default (you will not actually need to enter a merge zone if this is the case).
-
If the Trips are in different zones, the prompt to enter a zone will appear. If the zone entered in the prompt matches one of the Trips, the system will select Operation Point by default. If the zone entered matches neither of the options, then Planning Point will be selected by default.
You can also use the non-modal nature of the window to add additional resources to the New Trips as needed.
All existing Application Configurations that determine the maximum number of resources that can be applied to Trips will be respected during this process - if this restriction is broken the system will disallow the creation of the Operational Plan.
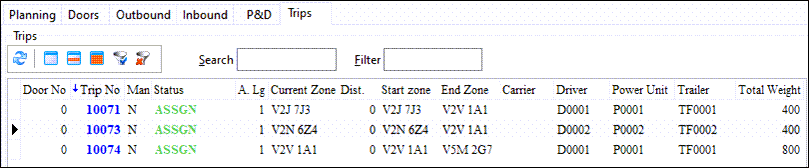
Once the 'EXECUTE' button is pressed, the window will be closed and the actions will occur. If Operation Point is used the actions will occur immediately. If the Planning Point is used, the system would add a waypoint to both of the original Trips for the selected Planning Point zone and would end them there. On 10071, a leg would be created from V2V 1A1 to the end zone of the original Trip (V5M 2G7) with both bills present as expected.

Merge on New Trip
The 'Merge on New Trip' option will require the following to work:
-
At least two Trips must be present within the Original Trips column in the Trip Operations window.
-
If only one single Trip (or no Trips) are present within the Trip Operations Tool, the Merge option will be greyed out. When the Merge on New Trip option is pressed, a new Trip will be created from the selected waypoint (merge zone) to the original End Zone(s) of the Trip(s) included in the Original Trip column. The other Trip Number(s) that the merge is not occurring on will be brought into the column, but will be marked in a state that they will end at the point provided (be it immediately if the Operational Point is being used, or in the future if the Planning Point is being used). New Trips can be created and adjusted as needed if required for a secondary purpose.
During this process, you will need to enter the 'Merge Zone', which will result in one of two things:
-
If both of the Trips are in the same zone, and you enter in that shared zone, Operation Point will be selected by default (you will not actually need to enter a merge zone if this is the case).
-
If the Trips are in different zones, the prompt to enter a zone will appear. If the zone entered in the prompt matches one of the Trips, the system will select Operation Point by default. If the zone entered matches neither of the options, then Planning Point will be selected by default.
You can also use the non-modal nature of the window to add additional resources to the New Trips as needed.
All existing Application Configurations that determine the maximum number of resources that can be applied to Trips will be respected during this process - if this restriction is broken the system will disallow the creation of the Operational Plan.
Once the 'EXECUTE' button is pressed, the window will be closed and the actions will occur. If Operation Point is used the actions will occur immediately. If the Planning Point is used, the system would add a waypoint to both of the original Trips for the selected Planning Point zone and would end them there. The new Trip would then go from there.
Merge & Split
The 'Merge & Split' option will require the following to work:
-
At least two Trips must be present within the Original Trips column in the Trip Operations window.
-
If only one single Trip (or no Trips) are present within the Trip Operations Tool, the Merge option will be greyed out.
The Merge and Split option is unique in the sense that it will allow you to effectively emulate the old pre-plan doubles option - allowing for two+ Trips/Resources to be merged into a single Trip, moved to a new point (the Split Point), and then once again broken into individual Trips to be moved from there. The first column will be the merge - both of the original Trips by default will end at the Merge Point, and a new Trip will be created going from the Planning Point of the Merge to the chosen Split Point zone. In the second column, the splits will occur. These will break down into the individual resources attached to the parent Trip, and will absorb the End Zones of the original Trips based on the Freight present in the resources attached. All of this will be done automatically for the user is the information is present for the system to accurately determine the End Zones required.
During this process, you will be required to enter in both a 'Merge Zone' and a 'Split Zone', which will be used in tandem as explained above and seen below.

You can also use the non-modal nature of the window to add additional resources to the New Trips as needed.
All existing Application Configurations that determine the maximum number of resources that can be applied to Trips will be respected during this process - if this restriction is broken the system will disallow the creation of the Operational Plan.
Once the 'EXECUTE' button is pressed, the window will be closed and the actions will occur.

Switch Drivers
The 'Switch' option will require the following to work:
-
At least two Trips must be present within the Original Trips column in the Trip Operations window.
-
If only one single Trip (or no Trips) are present within the Trip Operations Tool, the Merge option will be greyed out. The Switch Drivers option will pull both Trips into the second column without making any base changes to the Trips. Instead, the only change that will occur is that the Drivers will be flipped on both Trips.
You must enter in a zone in where this will occur.
If Operation Point is used, the switch will occur immediately (the drivers will switch Trips on the current leg). If the Planning Point is used, the switch will not occur immediately (the drivers will switch Trips on the upcoming leg).
Local P&D Trips
One of the options of Trips that can be created underneath the second column and beyond are 'Local P&D Trips'. These Trips will be marked as P&D movements, and will appear under the P&D Tab within the Multi Mode Dispatch application. By default, they will be stamped as a Terminal to Terminal movement, and are expected to be single leg Trips with multiple bills (matching the format of a standard P&D Trip in TruckMate). If required, you can proceed to optimize your P&D Trips after creation if desired.
These Trips can be created for any action as needed (split, merge, etc.).
Manifest Y Actions
At the current time, all actions related to Trips in Manifest Y status can be used without restriction. This logic may change as the progress sees more functionality added against it.
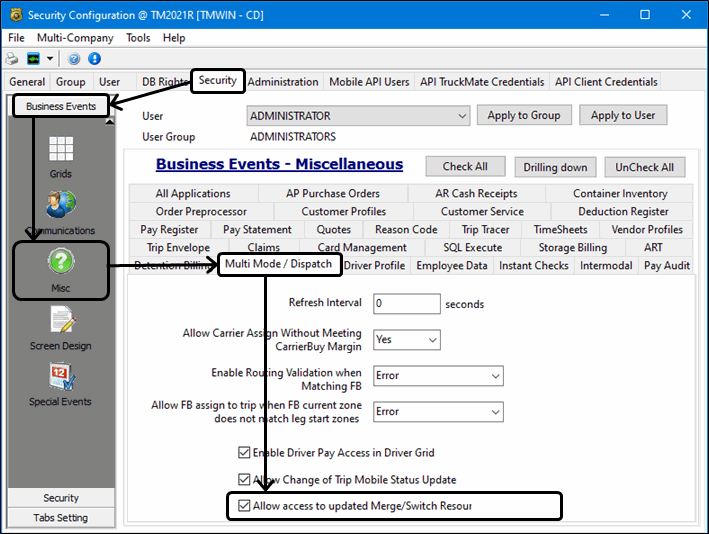
What does being in 'BETA' mode mean?
The fact we are adding this project in 'Beta' mode means we can keep the old logic in place for now to allow users to continue with their standard workflow, but we will encourage them to use the new functionality moving forward, seeing as eventually the old workflow will be deprecated and the new workflow will be the only option.
This means that the new Trip Operations window options will all contain a (beta) bracket next to them. In addition, a Security Config exists so that Administrators can choose which of their users will have the option to test out and use the new functionality.
Adding fields to Profiles, Dispatch/MMDisp, adding Picklist Editor, User Field modifications
Part One - New Fields Added To Profiles
As part of this project, a number of new fields were added into the following applications:
-
Driver Profiles
-
Power Unit Profiles
-
Trailer Profiles
-
Misc. Equipment Profiles
These are all fixed fields, directly written into the applications respective data table.
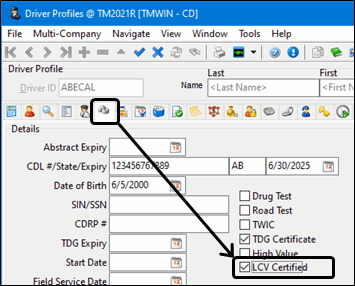
Driver Profiles > Details tab - New Fields:
-
LCV Certified
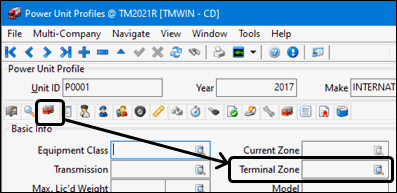
Power Units > Basic Info tab - New Fields:
-
Terminal Zone
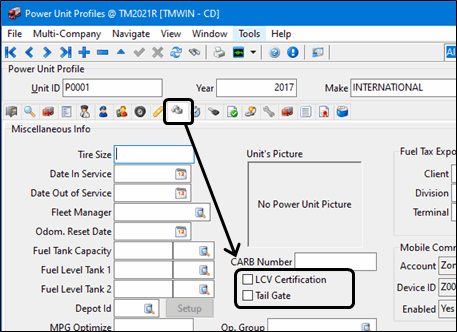
Power Unit Profiles > Miscellaneous Info tab - New Fields: * LCV Certification * Tail Gate
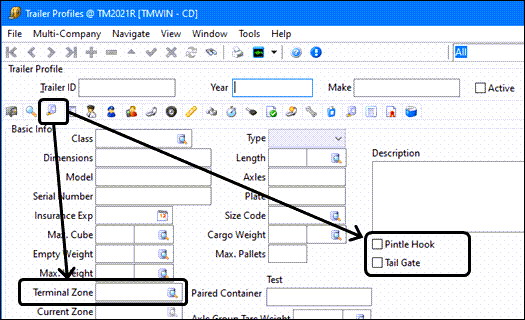
Trailer Profiles > Basic Info tab - New Fields:
-
Terminal Zone
-
Pintle Hook
-
Tailgate
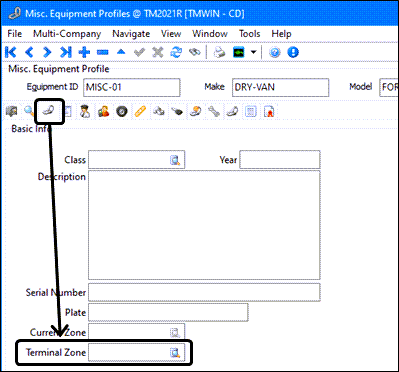
Misc. Equipment Profiles > Basic Info tab - New Fields:
-
Terminal Zone
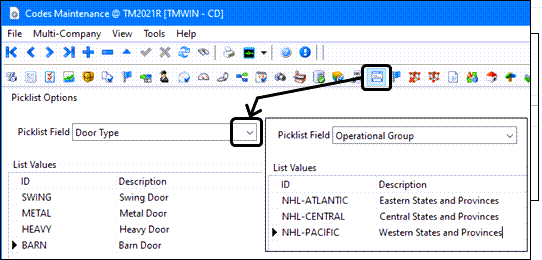
Part Two - Picklist Editor
A new tab was added to Codes Maintenance allowing you to specify your own values for two new fields within the Profile applications. The new tab, called the 'Picklist Editor', has a dropdown in where you can select between two new fields:
-
Door Type
-
Operational Group
Within this tab, you can manually enter the records to display under these options. The ID can be up to 20 characters in length, and the Description can be up to 255 characters. Duplicate and NULL values are not permitted.
A new Security program > Security > Tabs Setting - Codes checkbox option was added to control access to the 'Picklist Editor' tab. This will default to True on new systems.
Once you have entered values into these grids as required, go to the following Profile applications to assign the values:
-
Driver Profiles
-
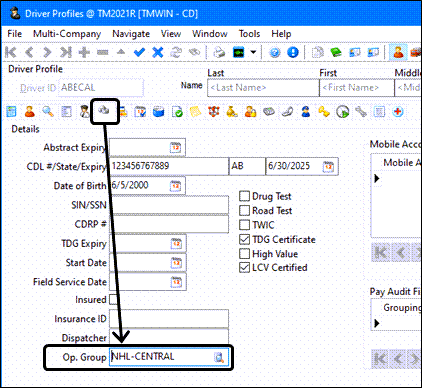
Driver Profiles > Details tab will contain only 'Operational Group' values.
-
-
Power Unit Profiles
-
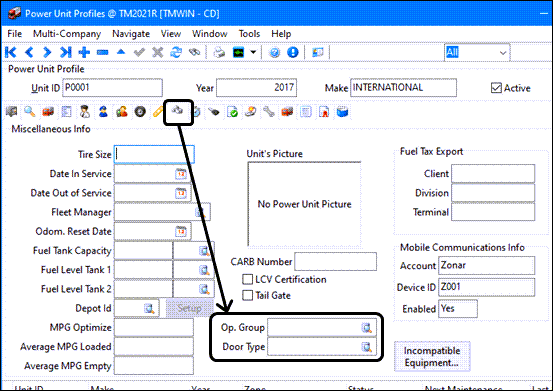
Power Unit Profiles > Miscellaneous Info tab contains both of the 'Operational Group' and 'Door Type' fields.
-
-
Trailer Profiles
-
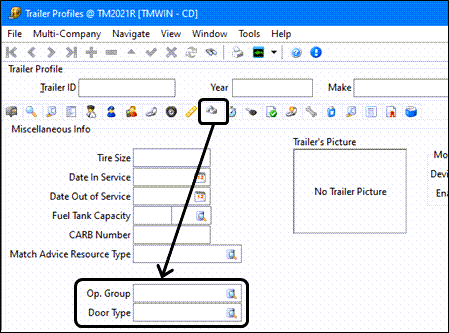
Trailer Profiles > Miscellaneous Info tab contains both of the 'Operational Group' and 'Door Type' fields.
-
-
Miscellaneous Equipment Profiles
-
Misc. Equip. Profiles contains both 'Operational Group' and 'Door Type', which can both be found under the 'Miscellaneous Info' tab of this application.
-
These fields provide a dropdown list to help you select an item from the lists created in the Codes program > Picklst Editor tab. You can manually enter text into the fields but the entry must match an existing option or you will receive an error message and the entry will not be saved.
Note that the design of this new feature has the potential to be utilized in the future for new values that use a dropdown list to select items from a table as their base (meaning this could expand beyond the Profile approach it is being used for now).
Part Three - User Field Modification
The biggest change of this project came in the form of the modification of how User Fields can function inside the TruckMate applications.
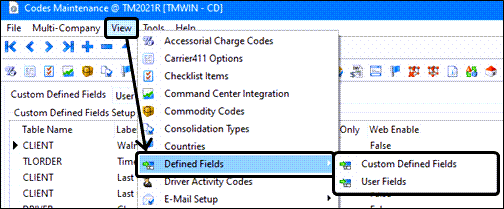
A new sub-tab was added to Codes Maintenance under the renamed Defined Fields tab. This contains the old Custom Defined Fields Tab, and also contains the User Defined Fields tab.
To create a new User Field:
-
Go to the Table Name field and use the dropdown list to select from any of the following tables:
-
CLIENT
-
CONTAINER
-
DRIVER
-
EQUIP
-
PUNIT
-
TLORDER
-
TRAILER
-
VENDOR
-
-
Select the User Field you want to adjust.
-
Specify a Field Type. There are three options:
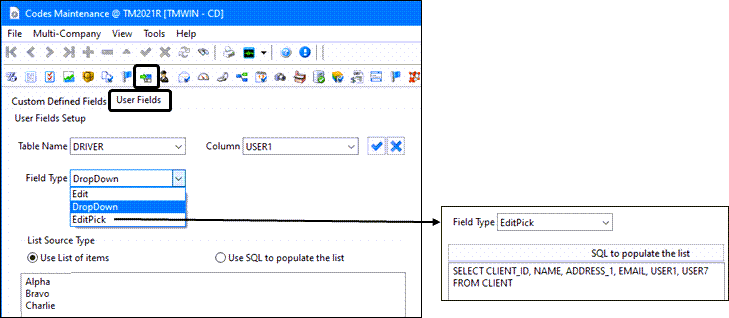
Option Description Edit
This is the standard User Field used today (freeform text entry). By default, all of the User Fields will retain this value.
DropDown
The dropdown will switch the User Field from being a freeform text field into a dropdown, in which the user can select from a list of items. This list can be generated in two manners:
-
Use List of items (freeform) - Manually enter in new values, separated by being on a new line.
-
Use SQL to populate the list - Enter in a SQL statement which will generate the list of items that will be shown. No more than 30 specific columns can be referenced by the statement, and only the first/primary column will be displayed.
EditPick
The editpick option will switch the User Field from being a freeform text field into a picklist, in which the user can select from a selection of items. This picklist is generated from a SQL statement, which will list multiple columns in the picklist itself. When a value is chosen, however, only the FIRST column will be displayed in the User Field.
-
If you have created a manual list, the system will scan the table in question (with the exception of TLORDER) and determine if any values currently reside in the selected user field that are not on the list. If so, the system will give a prompt to the user informing them of this, meaning it is up to the user to modify the values as needed.
All of these modifications per Codes are stored as JSON formats in the UDF_SETUP table.
Within each of the individual applications, the changes will be immediately seen. If a field has been defined as a Dropdown field, the user will be able to click the arrow and select from items in the list. If the field has been defined as a Picklist field, the user can click the picklist icon and select from a list of items.
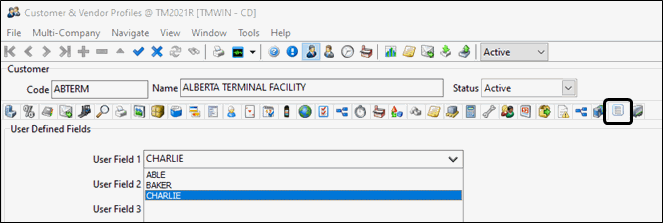
If a bad record is entered that does not align with a dropdown/editpick list option, an error message will be displayed.
In the Dispatch and MMDisp applications, you are permitted to update all of these User Fields, and the correct format will be respected when entering these values into resources via these applications.
Part Four - New Fields in MMDisp/Dispatch:
A number of new fields were added into the Multi Mode Dispatch and standard Dispatch application:
-
DRIVER:
-
LCV Certified
-
Terminal Zone
-
Operational Group
-
-
POWER UNIT:
-
Fleet Manager
-
LCV Certified
-
Tailgate
-
Terminal Zone
-
Operational Group
-
Door Type
-
-
TRAILER:
-
Fleet Manager
-
Pintle Hook
-
Tailgate
-
Terminal Zone
-
Operational Group
-
Door Type
-
-
MISC EQUIP:
-
Terminal Zone
-
Operational Group
-
Door Type
-
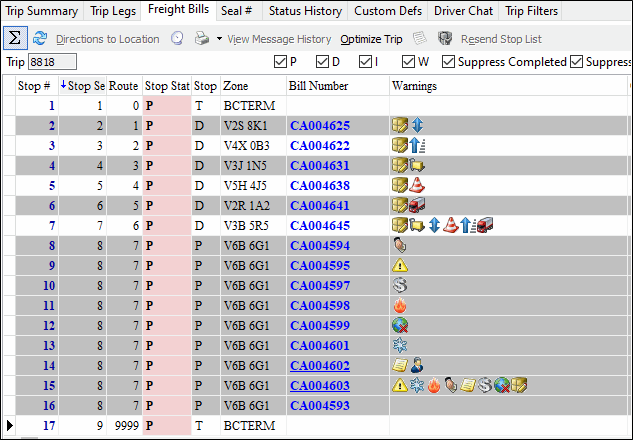
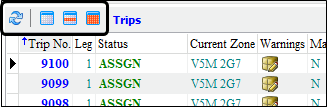
Warning Icon Updates Within TruckMate (Dispatch/MMDisp)
The warning icons and the way they are displayed has been completely overhauled within a number of different TruckMate application.
![]()
![]()
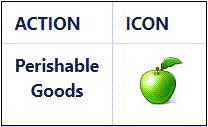
A new "green apple" Warning icon has also been added across the platform to symbolize when there are any items that may become spoiled or damaged if not handled appropriately (ie. food, flowers, etc.). See New Perishable icon and column in TruckMate for details.

Customer Service:
The Customer Service application saw a number of major changes, mainly split between the Details and the Summary tab.
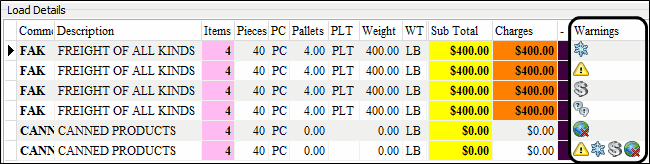
In the Details tab, all of the grey icons that used to reside in the Warnings columns column have been removed. Now, only detail-specific warning icons are displayed in this field. Detail-Specific warnings refer to warnings that are specific to the Detail Line, and not to the Freight Bill as a whole. Therefore only the following Warning Icons will be present in the Warnings grid:
-
Dangerous Goods
-
High Value
-
Temperature Controlled
-
Default Commodity Override
-
Regional Restrictions
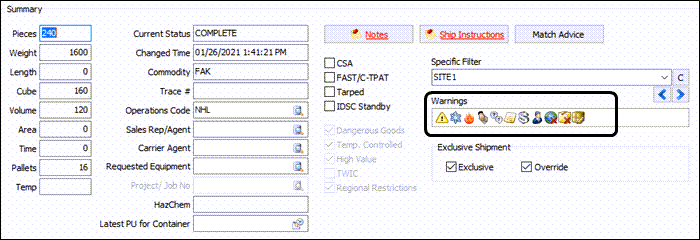
On the Customer Service > Summary tab, a major UI overhaul of the tab gives it a cleaner, more organized look and a new Summary Warnings box was added. This box displays all warnings present on a bill so both detail-specific and bill-specific warning icons will be displayed. This means the following Warning icons could be present in this field if active on the freight bill:
-
Cash Collect
-
Dangerous Goods
-
Exclusive Freight
-
High Value
-
Hot Rush
-
Regional Restrictions
-
Shipping Instructions
-
Standard Bill Notes
-
Temperature Controlled
-
Client Popup Notes
-
Default Commodity Override
Dispatch:
The Dispatch application saw a number of changes as a result of this project.
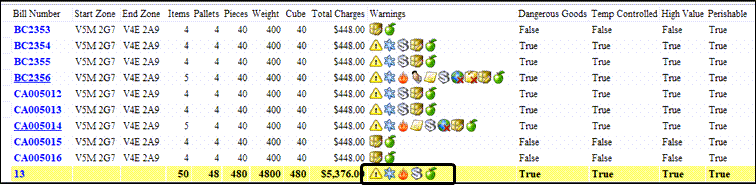
In the Dispatch > Freight Bills grid, a new Warning column was added to correctly display the attributes that can be active against a Freight Bill in the grid. The following attributes can be viewed from this grid:
-
Cash Collect
-
Client Popup Notes
-
Dangerous Goods
-
Exclusive Freight
-
High Value
-
Hot Rush
-
Regional Restrictions
-
Shipping Instructions
-
Standard Bill Notes
-
Temperature Controlled
In the Dispatch > Trips Grid, a number of new columns were added to the grid:
-
Cash Collect
-
Dangerous Goods
-
Exclusive
-
High Value
-
Hot Rush
-
Regional Restrictions
-
Shipping Instructions
-
Temperature Controlled
-
Dock
-
Elevators
-
Site Survey
-
Stairs
-
Vehicle Restrictions
New columns have been added into the LEGSUM grid for each of these values, so you can add filtering/checks against these specific columns.
The icons will display on a per-leg basis, so they will display across all legs that the FB is present on. The only exception to this rule are the latter five (Dock, Elevators, Site Survey, Stairs, Vehicle Restrictions) - they will only display on the specific leg the bill is either being picked or dropped at a customer in which these warnings are set against the Customer Profile level.
Multi Mode Dispatch:
The Multi Mode Dispatch application includes a number of changes:
Trip Grids:
In each of the six Trip Grids in Multi Mode Dispatch, a number of new columns and options were added.
First, the following attribute columns will now be present in all of the Trip Grids:
-
Cash Collect
-
Dangerous Goods
-
Exclusive Freight
-
High Value
-
Hot Rush
-
Regional Restrictions
-
Shipping Instructions
-
Temperature Controlled
-
Dock
-
Elevators
-
Site Survey
-
Stairs
-
Vehicle Restriction
In addition, a Warnings column will be present and will display icons for each when these attribute columns are set to True. These columns will be set to True when a particular Freight Bill is added to a Trip that contains one or more of these attributes.

The original "Warnings" column in these grids was renamed to Capacity, and will continue to show the standard Capacity warnings related to filling out Weight, Length, and Cube on a particular resource(s) assigned to a Trip.

Freight Bill Grid:
In the DrillDown Freight Bill grid, the Warnings and MobComm Warnings columns will now be present on the tab.
The Warnings column will display the following warnings:
-
Cash Collect
-
Client Popup Notes
-
Dangerous Goods
-
Exclusive Freight
-
High Value
-
Hot Rush
-
Regional Restrictions
-
Shipping Instructions
-
Standard Bill Notes
-
Temperature Controlled
-
Dock
-
Elevator
-
Site Survey
-
Stairs
-
Vehicle Restrictions
They will display as required per a particular Freight Bill.
The MobComm Warnings column will display the following icons:
-
Pickup Sent
-
Delivery Sent
-
Delivery Acknowledgement
-
Driver Read
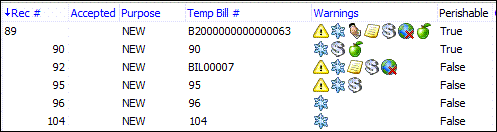
In the Trap Grid, a Warnings column has been added, which will display the following information about Freight Bills attached to the Trap:
-
Cash Collect
-
Client Popup Notes
-
Dangerous Goods
-
Exclusive Freight
-
High Value
-
Hot Rush
-
Regional Restrictions
-
Shipping Instructions
-
Standard Bill Notes
-
Temperature Controlled
Trip Legs Grid:
In the Trip Legs grid, a new Warnings column was added to display the icons of all individual Freight Bill and Trip-level warnings that can exist for a particular leg. The following icons can be displayed in this new field:
-
Cash Collect
-
Dangerous Goods
-
Exclusive
-
High Value
-
Hot Rush
-
Regional Restrictions
-
Shipping Instructions
-
Temperature Controlled
-
Dock
-
Elevators
-
Site Survey
-
Stairs
-
Vehicle Restrictions
New columns have been added into the LEGSUM grid for each of these values, so customers can also easily add filtering/checks against these specific columns should they wish to do so.
The icons will display on a per-leg basis, so they will display across all legs that the FB is present on. The only exception to this rule are the latter five (Dock, Elevators, Site Survey, Stairs, Vehicle Restrictions) - they will only display on the specific leg the bill is either being picked or dropped at a customer in which these warnings are set against the Customer Profile level.
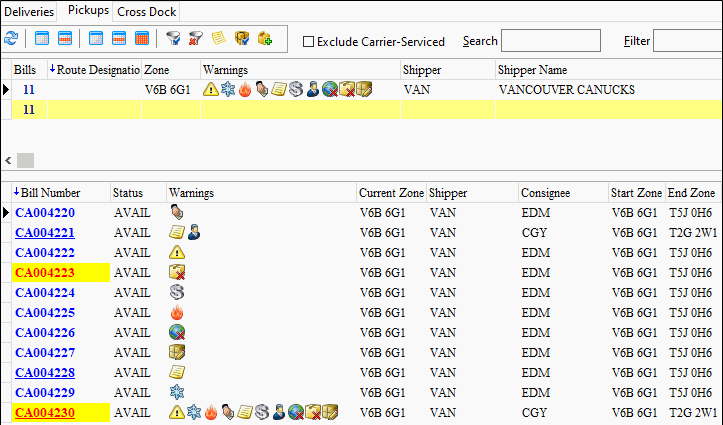
Freight Grids (Deliveries, Pickups, CrossDock):
In the Freight Grids, the 'High Value' column has now been added to each of the grids. This will be 'True' when the High Value attribute on the Freight Bill is also set to True, and will be 'False' when the attribute is False on the Freight Bill.
In addition to this, the Warnings columns on these tabs have been updated to correctly show Warning attributes that are related to a Freight Bill. The following icons will be visible from each of the Freight tabs:
-
Cash Collect
-
Client Popup Notes
-
Dangerous Goods
-
Exclusive Freight
-
High Value
-
Hot Rush
-
Regional Restrictions
-
Shipping Instructions
-
Standard Bill Notes
-
Temperature Controlled
Order PreProcessor:
The Order PreProcessor application sees a pair of changes to the warning icons inside of the application.
In the Details tab, all of the grey icons that used to reside in the Warnings column have been removed. Now, only detail-specific warning icons will be displayed in this field. This means only the following icons will be present:
-
Dangerous Goods
-
High Value
-
Temperature Controlled
-
Regional Restrictions
In the Summary tab, the grey icons have also been removed from the Warnings column. This will display all warning icons, both Detail and Freight based, that exist against a bill. This means the following icons can be present:
-
Dangerous Goods
-
High Value
-
Temperature Controlled
-
Regional Restrictions
-
Standard Bill Notes
-
Cash Collect
Quick Bill:
The Quick Bill application in TruckMate had its icons updated as part of this case. It should however be noted that Quick Bill only previously displayed Dangerous Goods and Temperature Controlled only. This case does not add extra icons (only the existing ones were replaced).
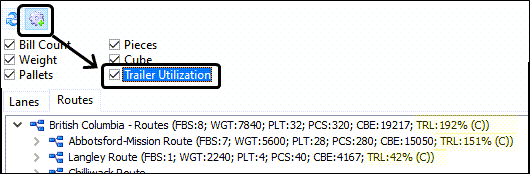
Trailer Utilization in Multi Mode Dispatch
The Multi Mode Dispatch application now provides trailer utilization calculations to estimate the number of trailers required for Linehaul moves based on freight already on the dock and what is being picked up by local P&D that day.
This requires you to enter a default trailer weight and cube value for the trailer profiles. Based on these values TruckMate wil be able to add up the weight and cube totals required for a single or a group of orders, and then do the calculation to determine the total trailer utilization percentage. For example:
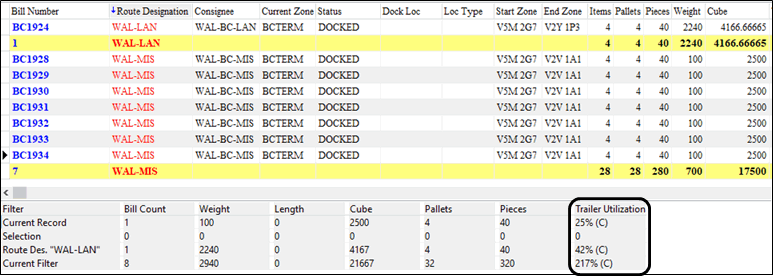
The Multi Mode Dispatch Lanes and Routes tabs totals and the associated default app. configs. have been updated to include the Trailer Utilization statistic as part of their summary display.

Enhancements to the CrossDock Tab in Multi Mode Dispatch
Two small improvements were made to the Multi Mode Dispatch > CrossDock tab.
-
Remove Filter* function was added to the CrossDock tool bar to remove "non-Quick" filters. Previously, the only way to remove a filter from this tab was to go into the Filter Setup screen, and remove it by pressing the "Clear" button.
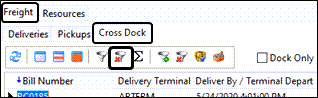
-
The toolbar at the bottom of the CrossDock tab was rearranged to display more field length and avoid having the text truncated.

Minimum Processing Date added to Status Change Job Process
A new field, MINIMUM_PROCESS_DATE, was added into the Status Change Job table, and also included in the processing logic of the Status Changer Windows service.
Initially, all entries inside of the STATUS_CHANGE_JOB table will be set so that the MINIMUM_PROCESS_DATE column will match up with the ENTERED_ON column. This will also be the same process for new columns - there will always be a 1:1 match.
The concept behind the column is that a number of TruckMate customers have custom code around custom statuses being entered against Freight Bills and Trips, and most of this code creates jobs in the STATUS_CHANGE_JOB table. To satisfy a requirement to have the jobs processed at a certain time, this MINIMUM_PROCESS_DATE field was added.
This means jobs will only process via the service IF the MINIMUM_PROCESS_TIME is greater than the CURRENT_TIMESTAMP. If this is not the case, the jobs will simply sit in the queue and wait until they can be processed. When the Status Change Service refreshes, it will always scan from the lowest non-Processed Job ID it can find - when the records are ready to be processed, they will be picked up as normal.
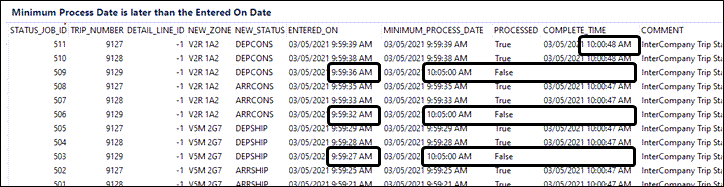
If you do not have any custom code, you will see no changes; however, this opens the door for you to utilize this field to control when records should be processed if you are entering records into the table.
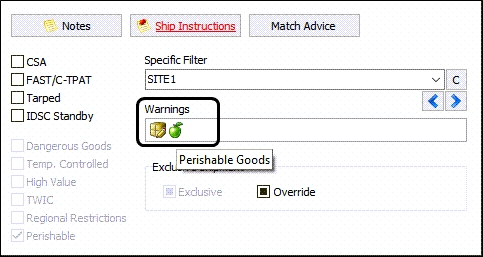
New Perishable icon and column in TruckMate
A brand new Freight Bill and Trip level attribute and food icon was added to the TruckMate product. The new attribute is 'Perishable Goods', referring to items that may become spoiled or damaged if not handled appropriately (ie. food, flowers, etc.). As with all attributes in TruckMate, you can utilize this 'attribute' however you choose to do so.
The new "green apple" Warning icon was added across the platform to symbolize when a 'Perishable Goods' attribute is present.
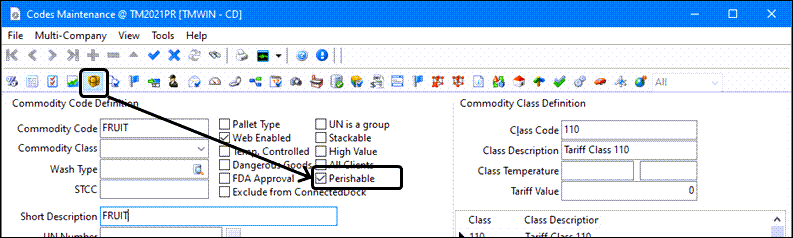
Codes Maintenance:
Within the Codes Maintenance application, a new 'Perishable' checkbox was added within the Commodity codes. It will default to 'False' against both existing commodities in the database and against any new commodities being created. If you have access to the Commodity tab in Codes Maintenance, you will be able to enter the application and mark a particular commodity as being 'Perishable'.
Customer Service:
Within the Customer Service application, a new 'Perishable' column was added to the Details Grid. It will always default to 'False' as standard, in alignment with the other attribute columns. If a Commodity entered against a Detail contains the 'Perishable' attribute as standard, then the column will automatically be updated to True. You will have the ability to flip the setting between False and True as needed. When the column is set to True, the Perishable icon will display within the 'Warnings' column.

In addition to the above, when the Perishable column is set to True for any Detail Lines against a given Freight Bill, the warning will also be displayed within the Summary Warnings panel.
Dispatch:
Within the Dispatch application, a new column was added to the Freight Bill grid called 'Perishable'. This column effectively works in the same manner as the Summary Warnings bar - if any Detail Line on the Freight Bill contains a Perishable attribute marked as True, the column will display a 'True' value. If there are no Detail Lines on a bill, or all Detail Lines are marked as False, then the Perishable column will display as False. If the column is True, a Perishable icon will be displayed in the Warnings column in the Freight Bills grid. The 'Perishable' column cannot be manually modified from this grid.
On the Trips grid, a new Warning column was added called 'Perishable'. This column will be set to True if any Freight Bill on a particular leg contains a Perishable attribute as True. This will cover all legs where the Freight Bill is present (effectively from pickup to drop-off). For all legs where the attribute is set to True, a Warning icon will also be displayed for the leg in question. The 'Perishable' column cannot be manually modified from this grid - its value will be completely derived from the bill level setting.

Multi Mode Dispatch:
Within the Multi Mode Dispatch application, a number of different changes were made among the many different grids and tabs:
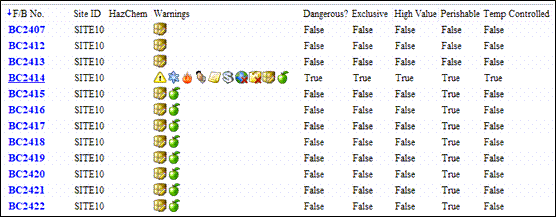
On the Trip Grids (Planning, Doors, Outbound, Inbound, P&D, Trips), a new column called 'Perishable' has been added. This column will be set to 'True' when any Freight Bill present on the entire Trip contains a Perishable attribute set to True. At the same time, if the column is set to True then the Perishable icon will appear within the Warnings grid. This column will be read-only and cannot be modified by a user.
On the Trip Legs grid, a new column called 'Perishable' has been added. This column will be set to 'True' if any Freight Bill on a particular leg contains a Perishable attribute as True. This will cover all legs where the Freight Bill is present (effectively from pickup to drop-off). For all legs where the attribute is set to True, a Warning icon will also be displayed for the leg in question. The 'Perishable' column cannot be manually modified from this grid - its value will be completely derived from the bill level setting.
On the Freight Bill grid, a new column called 'Perishable' has been added. This column will be set to True if any Detail Line on the Freight Bill contains a Perishable attribute marked as True. If there are no Detail Lines on a bill, or all Detail Lines are marked as False, then the Perishable column will display as False. If the column is True, a Perishable icon will be displayed in the Warnings column in the Freight Bill grid. The 'Perishable' column cannot be manually modified from this grid.
On the Deliveries, Pickups and CrossDock Grids, a new column was added called 'Perishable'. This column effectively works in the same manner as the Summary Warnings bar - if any Detail Line on the Freight Bill contains a Perishable attribute marked as True, the column will display a 'True' value. If there are no Detail Lines on a bill, or all Detail Lines are marked as False, then the Perishable column will display as False. If the column is True, a Perishable icon will be displayed in the Warnings column in the respective grid. The 'Perishable' column cannot be manually modified from this grid.
Order PreProcessor:
Within the Order PreProcessor application, a new column was added to the Details Grid. This column is called 'Perishable', and will always default to 'False' as standard, in alignment with the other attribute columns. If a Commodity entered against a Detail contains the 'Perishable' attribute as standard, then the column will automatically be updated to True. A user will have the ability to flip the setting between False and True as needed. When the column is set to True, the Perishable icon will display within the 'Warnings' column.
In addition to the above, a 'Perishable' column was also added into the Summary tab. When the Perishable column on the Details grid is set to True for any Detail Lines against a given Freight Bill, the column will be displayed as True in the Summary tab, along with a warning also be displayed within the Summary Warnings column.
Integer User Fields added to TLDTL table and dispatch grids
A new USERFIELDS application configuration section with six user fields was added to allow you to control how to roll up the TLDTL user field integer data.
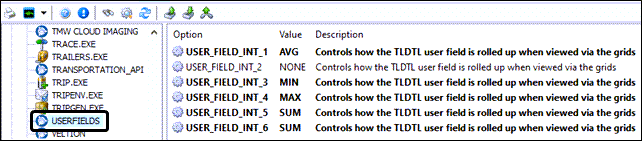
Utilities > Application Configurator > USERFIELDS
| Option | Description |
|---|---|
USER_FIELD_INT_1 to 6 |
Controls which rollup method is used when the TLDTL user field is displayed on the Dispatch and MMDisp freight grids (Deliveries/Pickups/CrossDock).
|
You can add/edit the values in these six new user fields in the Customer Service program > Details grid.

-
These six new user fields have been added to the Dispatch > Freight Bill grid and the Trip grid (displaying a total of all bills on that particular leg).

-
These six new user fields are added to the MMDisp > Freight grids (Deliveries/Pickups/CrossDock) and the Trip grids (Planning, Doors, Outbound, Inbound, P&D, Trips (a total of all bills on that particular Trip), Trip Legs Grid (a total of all bills on that particular leg)


-
NULL is not a valid aggregation value for AVG and is distinct
-
No roll up is displayed for user fields set to NONE
Freight Bill Summary panel added to Dispatch
A new Show/Hide Summary checkbox was added to the top of the Dispatch program > Freight Bills grid to provide summary information about the contents of the grid.
When selected, a new Summary Panel is visible at the bottom of the Freight Bill grid containing three rows:
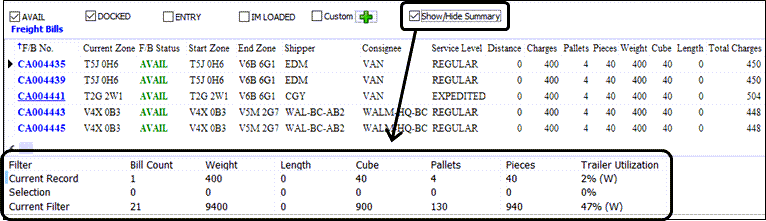
-
Current Record (record currently focused on)
-
Selected (all lines physically 'selected' using SHIFT/CTRL+click)
-
Current Filter (all records in the FB grid). Route Designation will not be included in Dispatch (it is in MMDisp). Reason is due to the fact that there can be both a Pickup and Delivery Route Designation…this is easy to distinguish in MMDisp per the three grids, but not in Dispatch).
The checkbox setting is retained after the application is closed so if selected when closed, it will still be selected the next time you open the Dispatch program.
The individual columns are controlled by the same CROSSDCK.EXE Configs (the same ones that are used to control which columns are shown inside the MMDisp application).

You also implement Screen Design using this new Summary grid, and can effectively remove it from the Panel to have it always displaying the information. However, there is a specific process that must be followed in order for this to occur:
If yo want the Summary grid to always be visible in Dispatch, but not display the panel, do the following:
-
Activate Screen Design, and cut/paste the Summary grid from the new panel to place it where you want.
-
Use Edit Properties to set the new panel to 'Visible = False'.
-
(optional) If You want to remove the ability to hide the grid, set the 'Show/Hide Summary' checkbox to 'Visible = False' and make sure the checkbox is selected before hiding.
This allows you to have the panel always active and calculating WITHOUT requiring the checkbox or the panel.
New 'Out of Zone' resource behavior logic
The existing DISPATCH.EXE > Out of zone resource behaviour application configuration option has been modified to remove the Zone Only option and create a second app. config. to handle this.
In Dispatch, resource repositioning (to teleport resources to a new location) will be applied as per the new DISPATCH.EXE > Out of zone resource auto-position before applying the Out of zone resource behaviour logic. If any of the 6 resource types are selected in the new app. config., the existing config 'Out of zone resource behaviour' setting will be ignored for this resource type.
Utilities > Application Configurator > DISPATCH.EXE
| Option | Description |
|---|---|
Out of zone resource auto-position |
Controls which out of zone resources are automatically moved to the start zone of the trip.
This new app. config. replaces the previous DISPATCH.EXE > Out of zone resource behaviour > ZONEONLY app. config. option which has been removed. |
Out of zone resource behaviour |
Controls how to handle out of zone resources.
|
Dispatch > Freight Bill and Trip grid updates
The Dispatch > Freight Bill and Trip grids were modified to add features previously only available in Multi Mode Dispatch to provide more consistency between the two Dispatch programs.
Freight Bill Grid:
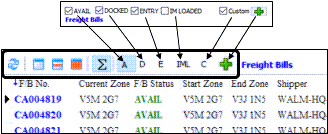
A new set of buttons were added to the Dispatch > Freight Bill grid:
| Icon/Keybd | Menu Option | Definition |
|---|---|---|
|
Refresh |
Refreshes the Freight Bills grid ONLY to check for any new entries in the system and avoid the performance of a refresh if you just want to update the bill list. |
|
Clear Selection |
Clears any selected freight bills. |
|
Select/Unselect This Bill |
Select this button to highlight or remove highlighting a single detail line in the Deliveries grid. Hold the <CTRL> key and use this button to select multiple freight bills. |
|
Select All |
Select all records in the grid. |
|
Show/Hide Summary |
Toggles the summary information panel (the grey area beneath the grid) on and off. * The Summary Grid button will display the newly added Summary Panel; this symbol is parallel to the one used in MMDisp. |
A, D, E, IML |
Show/Hide Summary |
These reflect the old Available Docked Entry and IM Loaded status checkboxes used to display certain types of bills in the grid. |
C |
Custom |
Applies the custom filter, if setup and selected. |
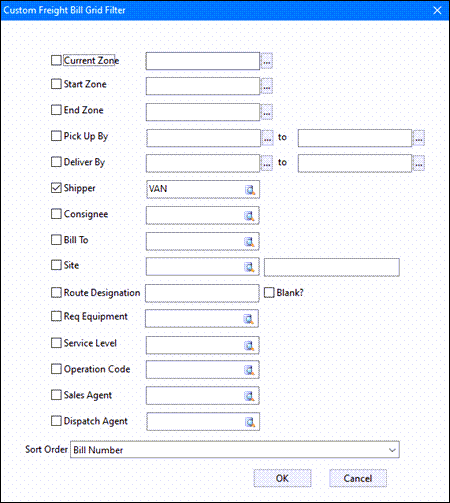
|
Custom Freight Bill Grid Filter |
Allows you to define a custom filter.
|
All existing functionality around filtering remains the same.
Trip Grid:
Similarly, a new set of buttons were added to the Dispatch > Trip grid:
| Icon/Keybd | Menu Option | Definition |
|---|---|---|
|
Refresh |
Refreshes the Trip grid ONLY to check for any new entries in the system and avoid the performance of a refresh if you just want to update the bill list. |
|
Clear Selection |
Clears any selected items. |
|
Select/Unselect This Trip |
Select this button to highlight or remove highlighting a single detail line in the Deliveries grid. Hold the <CTRL> key and use this button to select multiple freight bills. |
|
Select All |
Select all records in the grid, taking into account any applied filters. |
Other Elements Modified:
-
A new option was added to hide the Template bar at the bottom of the Dispatch grid. Typically, this will be set once by a user in a session and then takes up valuable real estate. An option has now been added to hide this.
-
The 'Trip' tab panel has also been hidden. It will only emerge once again if a user initiates either Auto Dispatch or Sort Driver Trips, which will add a second tab.
IC Transfers FB will now copy the Service Level when Carrier IC Option = Yes (TM-90778)
A new DISPATCH.EXE > IC Freight Bill Default Service Level application configuration option has been added to govern which service level should be used when FB is assigned to inter-company and a IC FB is posted.
Utilities > Application Configurator > DISPATCH.EXE
| Option | Description |
|---|---|
IC Freight Bill Default Service Level |
Determines how the service level will be initially determined when the freight bill (FB) is assigned to inter-company and a IC FB is posted.
|
With this new app. config. logic in place, the service level for IC FB will look at this IC Freight Bill Default Service Level config setting regardless of whether you click Yes or No on the following prompt that appears during the carrier assignment.
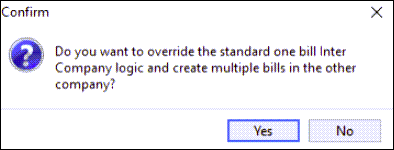
| Please note there is an existing CSERV.EXE > Service Level on Post app. config. option. If True, it will override and alter the service level that is populated from the above logic to the one defined in the Site table. |
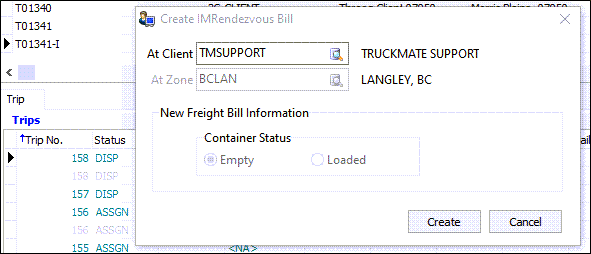
Extend 'IM Rendezvous' shortcut menu to apply to empty FBs (TM-154659)
The Rendezvous logic on the Dispatch program > freight bill grid has been updated so that when you right-click on an Empty intermodal freight bill (-I or -E), and select the Intermodal > IM Rendezvous shortcut menu option to bring up the IM Rendezvous form, the 'empty' container status will be locked in so that the system always creates an -RE bill.
ConnectedDock
New Quick Receiving Function
The purpose of this project was to add functionality into ConnectedDock to allow for a Quick Receiving functionality. This would allow for Dock Workers to quickly create single item Freight Bills in back-to-back fashion, allowing for extremely quick data entry for Freight Bills that do not currently exist within the TruckMate system.
Along with the main purpose of the project, this case would also see changes made to the standard Freight Receiving workflow, along with some changes to Trace Validation in TruckMate.
Disable Photo Requirement in Freight Receiving:
A new WCD > Reqire Item Photo in Freight Receiving application configuration was added to allow you to modify your workflow and control whether you require a photograph to be taken when entering a new Freight Bill via Freight Receiving.
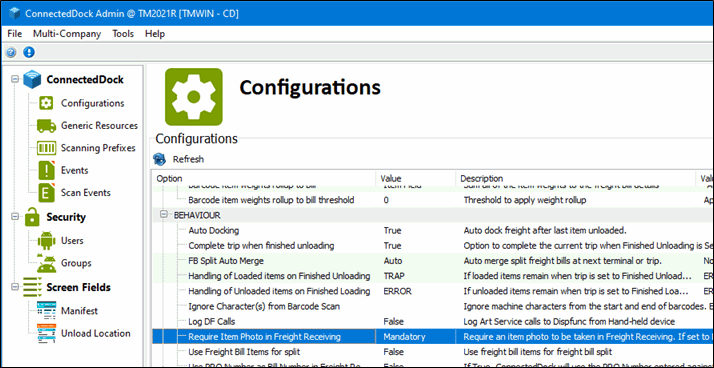
There are three settings:
Mandatory
-
When set to Mandatory, this requires that a photograph be taken when entering a new Freight Bill via Freight Receiving.
-
This is the standard workflow today, and therefore is the default setting of the new App Config.
Optional
-
When set to Optional, the Dock Worker can choose to take a photograph when entering a new Freight Bill into the system - this is not a mandatory action.
Never
-
When set to Never, the Dock Worker will not be able to take a photograph when entering a new Freight Bill into the system, as the option to take an image will have been removed.
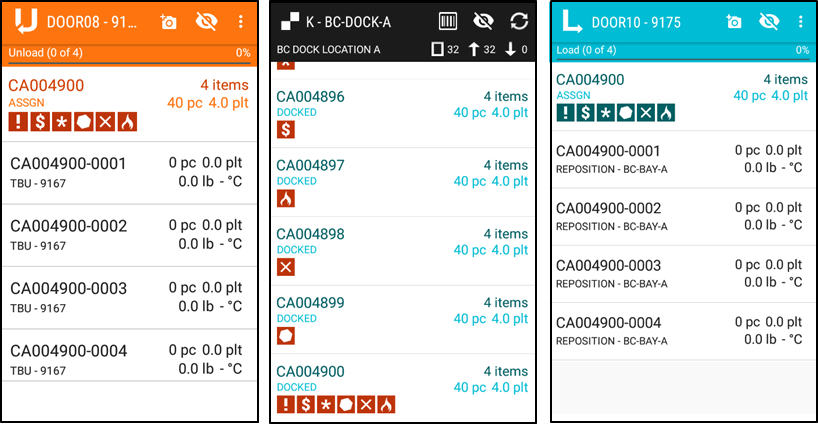
TruckMate warning icon updates (ConnectedDock)
The warning icons area in the ConnectedDock application has been enhanced to display up to 6 instead of only 4 icons and to remove the empty grey icons that were previously used to indicate they didn’t apply.
Only the specific icons that apply to this freight bill are displayed now in a new third line and no icons are visible if none apply which frees up more screen space.

| Icon | Definition |
|---|---|
|
Dangerous Goods |
|
High Value |
|
Temperature Controlled |
|
Exclusive Freight |
|
Hot Rush |
|
Special Equipment Requested |
|
Perishable Item |
This new design is present on all screens where icons would be visible inside ConnectedDock:
-
Unloading/Quick Unloading screen
-
Dock Location
-
Bay Location
-
Trap Location
-
Cage Location
-
Receiving Freight Screen
-
Multi-Trace Screen
-
Loading Screen
For example:
New Perishable Icon in TruckMate (ConnectedDock Portion)
As part of the Perishable Goods project, a new warning icon was added into ConnectedDock. This will display in the new logic format also introduced within TruckMate 2021.1:
-
If a Freight Bill contains the Perishable attribute set to 'True', the warning icon will display on the bill card on a new third row. If other attributes are also True for this bill, they will also be displayed next to the Perishable attribute.
-
If a Freight Bill contains the Perishable attribute set to 'False', the warning icon will not display on the bill card as all grey icons were removed from the application.
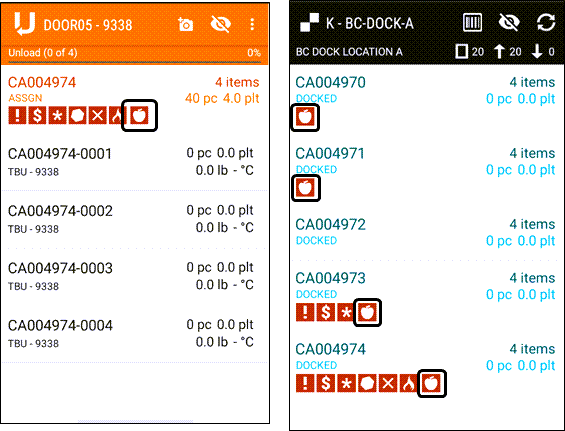
This will display on all of the same screens as the other attribute icons do today:
-
Unloading/Quick Unloading screen
-
Dock Location
-
Bay Location
-
Trap Location
-
Cage Location
-
Receiving Freight Screen
-
Multi-Trace Screen
-
Loading Screen