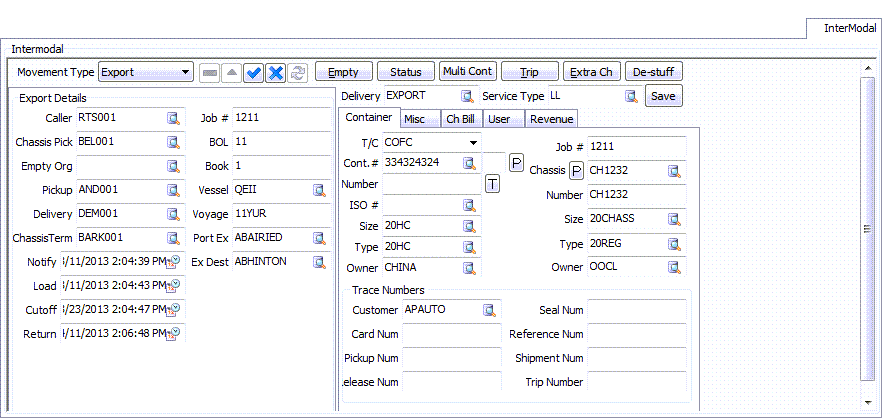
Detail tabs: Intermodal

Moving freight in containers between rail, cargo ship, and other intermodal carriers requires tracking of additional information about the container and the intermodal customer. This Tab manages data for reporting, dispatch operations, and container billing. If the freight to be carried is stored in an intermodal container owned by a maritime, rail, or other intermodal carrier, then the intermodal transportation information can now be captured in this Tab. The information stored here can be used for reporting, dispatch operations, or for billing on container storage.
Header
| Field | Definition |
|---|---|
Delivery |
Enter a Delivery type or use the search button to bring up a Delivery type window where you can search by code or description. To enter a new Delivery type, go to the Intermodal Setup program, Delivery Tab. |
Service Type |
Enter a service type or use the search button to bring up a service type window where you can search by code or description. To enter a new service type, go to the Intermodal Setup program, Service Tab. |
Movement Type
Use the pull-down menu and make a selection from the following choices:
-
Import
-
Export
-
Dom IB
-
Dom OB
-
Empty Repo
-
Other
-
IMC'
Setting the movement type for all options except 'Empty Repo' and 'Other' changes the detail information fields which appear in the panel below the drop-down box.
|
Client Codes
There are potentially six client-based selection fields available on the Intermodal Tab, depending on the 'Movement Type' selected. All of these Client fields ('Caller', 'Pickup', 'Delivery', etc.) now have error-checking. Invalid client ID’s will not show up in the edit-picks. Additionally, you will get an error if you try to save Intermodal changes with an invalid client in one of these fields.
The first field, 'Caller' is valid only if it is an 'Active' client with 'Caller' or 'Bill To' checked in Customer Profiles program > Address Tab > 'Client Is' section. The remaining client-based fields are valid only if the chosen client is an 'Active' client with 'Shipper' and 'Consignee' checked in the Customer Profiles program > Address Tab > 'Client Is' section. Both of these checks are required as these fields can be used as both the Shipper on one Intermodal movement and the Consignee on another.
|
Client Code Synchronization
When working with an Intermodal Freight Bill, the 'Caller', 'Shipper' and 'Consignee' fields in the header section of a Freight Bill (TLORDER table) are synonymous with the 'Caller', 'Pickup' and 'Delivery' fields on the Intermodal Tab (CONTAINER_TLORDER table).
The Customer Service program will now keep these Client Codes in synch for you automatically. For example, if the user changes the 'Shipper' in the header section, the 'Pickup' field on the Intermodal Tab will automatically be updated. If the user changes the 'Delivery' Client on the Intermodal Tab, then the 'Consignee' code is automatically changed in the header, and so on.
This synchronization between TLORDER and CONTAINER_TLORDER only occurs up until the user creates 'Empty' Intermodal Freight Bills (via the 'Empty' button on the Intermodal Tab). Once empties are created, it is up to the user to maintain synchronization manually (on both the loaded bill and the related empties). Therefore, a user should not click the 'Empty' button until he/she is sure that there will be no further changes to the various Client IDs involved in the Intermodal movement.
Chassis Pickup / Termination
Often, the pickup (on export) or delivery (on import) location of the chassis is the same as that of the empty container. To allow for these kind of situations, TruckMate will allow a user to set the chassis and container locations as the same Zone Code, and will not generate an associated Freight Bill. More specifically, an Intermodal Bill will not be created in the following situations:
-
A chassis pickup on an import if 'Chassis Pick' Zone = 'Pickup' Zone.
-
A chassis pickup on an export if 'Chassis Pick' Zone = 'Empty Org' Zone.
-
A chassis termination on an import if 'Empty Disp' Zone = 'Chassis Term' Zone.
-
A chassis termination if 'Chassis Term' Zone = 'Destination' Zone.
Import
If the container to be moved represents goods being imported via a container ship, set the movement type to 'Import' and the following fields will appear:
| Field | Definition |
|---|---|
Caller |
Select the Caller party for the Import movement. A Client chosen as Caller will be valid only if it is an active client with 'Caller' or 'Bill To' checked in Customer Profiles program > Notes Tab > 'Client Is' section. |
Chassis Pick |
Select the Chassis Pick Client ID. See above for a note on the restrictions placed upon this field. |
Pickup |
Select the Pickup Client ID. See above for a note on the restrictions placed upon this field. |
Delivery |
Select the Delivery Client ID. See above for a note on the restrictions placed upon this field. |
Empty Disp |
Select the name of the company that verified this container was empty. Use the search button to view more choices from your customer list. See above for a note on the restrictions placed upon this field. |
Chassis Term |
This field indicates which of your terminals may have supplied the chassis. Click the search button to view possible choices. |
Notify Date / Last Free Date / Empty Date / Return Date |
Select the search button to bring up a calendar where you can scroll to the desired date. |
Job # |
Enter the Intermodal Job number. Certain Intermodal functions, such as the use of the Multi-Container window, require that a 'Job #' be specified. |
BOL # |
Enter the Bill of Lading number. Used for tracing purposes. |
Vessel |
If a vessel number is supplied or required, enter it here. Used for tracing purposes. |
Voyage |
Enter the voyage name or number, as is applicable. Used for tracing purposes. |
Supplier |
Enter the supplier name, if applicable. Used for tracing purposes. |
Export
If the container to be moved represents goods being exported via container shipping, set the movement type to 'Export' and the following fields will appear:
| Field | Definition |
|---|---|
Caller |
Select the Caller party for the Export movement. A Client chosen as Caller will be valid only if it is an active client with 'Caller' or 'Bill To' checked in Customer Profiles program > Notes Tab > 'Client Is' section. |
Chassis Pick |
Select the Chassis Pick Client ID. See above for a note on the restrictions placed upon this field. |
Empty Org |
Select the search button to bring up a 'Select Empty Origin' dialog where you can search by Client ID or name. See above for a note on the restrictions placed upon this field. |
Pickup |
Select the Pickup Client ID. See above for a note on the restrictions placed upon this field. |
Delivery |
Select the Delivery Client ID. See above for a note on the restrictions placed upon this field. |
Chassis Term |
Select the search button to bring up a 'Select Chassis Termination' dialog where you can search by Client ID or name. See above for a note on the restrictions placed upon this field. |
Notify Date / Load Date / Cutoff Date / Return Date |
Select the search button to bring up a calendar where you can scroll to the desired date. |
Job # |
Enter the Intermodal Job number. Certain Intermodal functions, such as the use of the Multi-Container window, require that a 'Job #' be specified. |
BOL # |
Enter the Bill of Lading number. Used for tracing purposes. |
Booking Number |
Enter the booking number. Used for tracing purposes. |
Vessel |
Enter the Vessel name or number. Used for tracing purposes. |
Voyage |
Enter a voyage name or number. Used for tracing purposes. |
Port of Exit |
Select the search button to bring up a 'Select Port of Exit' dialog where you can search by zone ID or description. |
Ex Dest. |
Select the search button to bring up a 'Select Export Destination' dialog where you can search by zone ID or description. |
Domestic Inbound
If the container to be moved represents goods which are produced in-country and are being brought into the local area, set the movement type to 'Dom IB' and the following fields will appear.
| Field | Definition |
|---|---|
Caller |
Select the Caller party for the Domestic Inbound movement. A Client chosen as Caller will be valid only if it is an active client with 'Caller' or 'Bill To' checked in Customer Profiles program > Notes Tab > 'Client Is' section. |
Chassis Pick |
Select the Chassis Pick Client ID. See above for a note on the restrictions placed upon this field. |
Pickup |
Select the Pickup Client ID. See above for a note on the restrictions placed upon this field. |
Delivery |
Select the Delivery Client ID. See above for a note on the restrictions placed upon this field. |
Empty Disp |
Select the name of the company that verified this container was empty. Use the search button to view more choices from your customer list. See above for a note on the restrictions placed upon this field. |
Chassis Term |
This field indicates which of your terminals may have supplied the chassis. Click the search button to view possible choices. |
Notify Date / Last Free Date / Empty Date / Return Date |
Select the search button to bring up a calendar where you can scroll to the desired date. |
Job # |
Enter the Intermodal Job number. Certain Intermodal functions, such as the use of the Multi-Container window, require that a 'Job #' be specified. |
BOL # |
Enter the Bill of Lading number. Used for tracing purposes. |
Domestic Outbound
If the container to be moved represents goods produced locally and are being transported to other locations in-country, set the movement type to 'Dom OB' and the following fields will appear:
| Field | Definition |
|---|---|
Caller |
Select the Caller party for the Domestic Outbound movement. A Client chosen as Caller will be valid only if it is an active client with 'Caller' or 'Bill To' checked in Customer Profiles program > Notes Tab > 'Client Is' section. |
Chassis Pick |
Select the Chassis Pick Client ID. See above for a note on the restrictions placed upon this field. |
Empty Org |
Select the search button to bring up a 'Select Empty Origin' dialog where you can search by Client ID or name. See above for a note on the restrictions placed upon this field. |
Pickup |
Select the Pickup Client ID. See above for a note on the restrictions placed upon this field. |
Delivery |
Select the Delivery Client ID. See above for a note on the restrictions placed upon this field. |
Chassis Term |
Select the search button to bring up a 'Select Chassis Termination' dialog where you can search by Client ID or name. See above for a note on the restrictions placed upon this field. |
Notify Date / Load Date / Cutoff Date / Return Date |
Select the search button to bring up a calendar where you can scroll to the desired date. |
Job # |
Enter the Intermodal Job number. Certain Intermodal functions, such as the use of the Multi-Container window, require that a 'Job #' be specified. |
BOL # |
Enter the Bill of Lading number. Used for tracing purposes. |
Booking Number |
Enter the Booking number. Used for tracing purposes. |
Deramp |
Select the search button to bring up a 'Select Deramp Code' dialog where you can search by Client ID or description. See above for a note on the restrictions placed upon this field. |
Empty Reposition
| Field | Definition |
|---|---|
Caller |
Select the Caller party for the Empty Reposition movement. A Client chosen as Caller will be valid only if it is an active client with 'Caller' or 'Bill To' checked in Customer Profiles program > Notes Tab > 'Client Is' section. |
Pickup |
Select the Pickup Client ID. See above for a note on the restrictions placed upon this field. |
Delivery |
Select the Delivery Client ID. See above for a note on the restrictions placed upon this field. |
IMC
An Intermodal Marketing Company (IMC) operation typically manages the movement of freight from origin to destination through a number of carriers. The freight moves within a container and passes through multiple carriers from origin to destination. As the name implies, at least one leg of the movement is handled by rail. (IMC requires a license. The option will not appear if the license is not present.)
| Applying a credit on an IMC 'parent' Freight Bill will not create credits for any attached 'child' bills (i.e. extra stops). The user must manually apply the credit to each child bill. However, there is an app config, CSERV - IMC Details Propagation, which allows for three different propagation scenarios, based on the value selected for the option. |
| Field | Definition |
|---|---|
Caller |
Select the Caller party for the IMC movement. A Client chosen as Caller will be valid only if it is an active client with 'Caller' or 'Bill To' checked in Customer Profiles program > Notes Tab > 'Client Is' section. |
Empty Org |
Select the search button to bring up a 'Select Empty Origin' dialog box where you can search by Client ID or name. See above for a note on the restrictions placed upon this field. |
Pickup |
Select the Pickup Client ID. See above for a note on the restrictions placed upon this field. |
Delivery |
Select the Delivery Client ID. See above for a note on the restrictions placed upon this field. |
Empty Disp |
Select the name of the company that verified this container was empty. Use the search button to view more choices entered on your system. See above for a note on the restrictions placed upon this field. |
Notify / Load / Cutoff / Last Free / Empty / Return |
Select the search button to bring up a calendar where you can scroll to the desired date. |
Intermodal Sub-Tabs
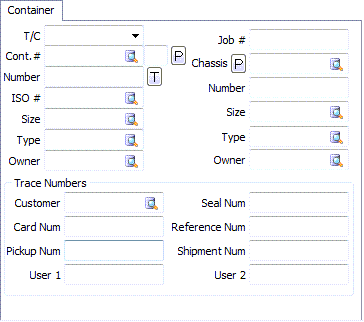
Container
| Field | Definition |
|---|---|
T/C |
The two options offered by the drop-down list: 'COFC' (Container on Flat Car) or 'TOFC' (Trailer on Flat Car). These indicate what type of container is to be moved. 'COFC' containers require a Chassis. 'TOFC' have their own wheels. |
Job # |
Enter a Job # (if required) for the Container movement. If you are working with a 'Master' order with multiple Containers (and Freight Bills), you can link the child orders together via their 'Job #' value. |
Cont # |
Enter a Container ID or code as set up in the Container Profiles program, or use the 'P' button to create a container 'on the fly' in the Quick Container Entry window. The values in the pop-up form will appear in the Container Info area after the form is closed. |
Chassis # |
Enter a Chassis ID or code or use the 'P' button to create a Chassis 'on the fly' in the Quick Chassis Entry window. The values in the pop-up form will appear in the Chassis Info area after the form is closed. |
ISO # |
Enter the Container’s ISO # (if applicable). |
Number / Size / Type / Owner |
These fields will populate following the use of the 'Quick Entry' popup forms, or, you can manually enter the data by clicking the search buttons and selecting the available values from your system. |
Trace Numbers |
|
Customer |
Enter a valid customer number or click the search button to view customer numbers already entered on your system. |
Card Num |
Enter a Card number, if applicable. |
Pickup Num |
Enter a Pickup number, if applicable. |
Seal Num |
Enter a Seal number, if applicable. |
Reference Num |
Enter a Reference number, if applicable. |
Shipment Num |
Enter a Shipment number, if applicable. |
User 1 / User 2 |
Manually enter the User details in these two fields. |
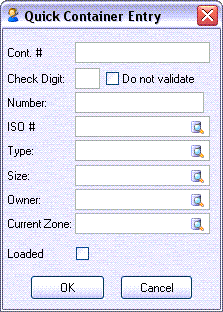
Quick Container Entry
| Field | Definition |
|---|---|
Cont # |
This field will pre-populate based on the Container ID or code as entered in the previous field. Once you select the 'Container #', the rest of the fields on the Quick Container Entry window should automatically populate. If the Container you have selected is currently set to 'Active' status, there will be a warning message. If any other information has not automatically populated, enter values as required using the following options: |
Check Digit |
Enter a Check Digit for this Container. The Check Digit is displayed next to the Container # whenever it is referenced. |
Do not validate |
This checkbox controls whether to apply the check digit validation or not. checking this flag (setting it to 'True') will disable the check digit validation. An application configuration option is available to set the default value for the 'Do not validate flag'. Setting 'CSERV.EXE - No Validate Chkdigit' in Application Configurator > Billing > CSERVE to 'False' will set the default value of this option to 'False' (not checked). if you want the default value of this option to be 'True' (checked), then set the 'No Validate Chkdigit' app config to 'True'. |
Number |
Enter a number for this Container, if required. |
ISO # |
Enter the ISO # or select an ISO # from those available in your system by clicking the search button. |
Type |
Enter a Container Type or use the search button to view container types already entered on your system. |
Size |
Enter an appropriate size or use the search button to view Container size information already entered on your system. To enter a new container size, go to the Intermodal Setup program > Size Tab. |
Owner |
Enter a valid owner for this Container or use the search button to view Clients entered on your system. To add an owner to a Client profile, go to the Profile program > Customer Tab > Intermodal Tab and select the desired type or types of transport relevant for this Client. |
Current Zone |
Click the search button to select a Current Zone value for this Container. |
Loaded |
Check this flag if the selected Container is loaded. |
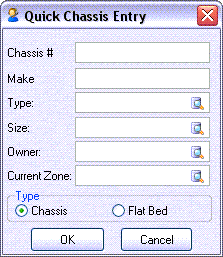
Quick Chassis Entry
| Field | Definition |
|---|---|
Chassis # |
This field will pre-populate based on the Chassis ID or code as entered in the previous field. In TruckMate 2010, once you select the 'Chassis #', the rest of the fields on the Quick Chassis Entry window should automatically populate. If the Chassis you have selected is currently set to 'Active' status, there will be a warning message. If any other information has not automatically populated, enter values as required using the following options: |
Make |
This field will pre-populate after the Chassis # is chosen, or you can manually enter a Chassis make. |
Type |
Enter a Chassis Type or use the search button to view container types already entered on your system. |
Size |
Enter an appropriate size or use the search button to view Chassis size information already entered on your system. To enter a new Chassis size, go to the Intermodal Setup program, Size Tab. |
Owner |
Enter a valid owner for this Chassis or use the search button to view Clients entered on your system. To add an owner to a Client profile, go to the Profile program > Customer Tab > Intermodal Tab and select the desired type or types of transport relevant for this Client. |
Current Zone |
Click the search button to select a Current Zone value for this Chassis. |
Chassis / Flat Bed |
Select whether this is a 'Chassis' or 'Flat Bed' type Chassis. |
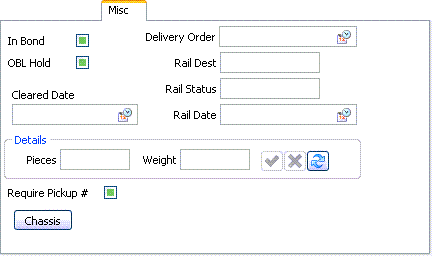
Miscellaneous
| Field | Definition |
|---|---|
In Bond |
Place a check in this option if the current InterModal shipment has an 'In Bond' status. 'In Bond' usually refers to a shipment that has not yet cleared Customs. |
OBL Hold |
Place a check in this option if the current InterModal shipment has an 'OBL Hold' status. |
Cleared Date |
Click the Calendar button to select a Cleared Date, referring to when the shipment cleared Customs. |
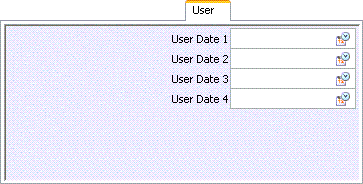
User Date 1 / 2 / 3 / 4 |
Use the Calendar buttons to select an appropriate Date for each User involved in the current Freight Bill. |
Pieces / Weight |
Click within these fields and enter the amount of Pieces and the shipment’s total Weight. |
Require Pickup # |
Select this flag if the Container must be picked up. |
Chassis |
Select the Chassis button to assign a specific Chassis to this Intermodal shipment. Chassis Codes are maintained by the Trailer Profiles program. |
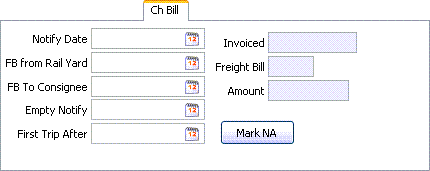
Chassis Bill
| Field | Definition |
|---|---|
Notify Date |
Click the search button to select a date of Notification. |
FB from Rail Yard |
Click the search button to select the date that the Freight Bill was processed through a Rail Yard, if applicable. |
FB To Consignee |
Click the search button to select the date that the Freight Bill was received by the Consignee. |
Empty Notify |
Click the search button to select the date that Notification of a Freight Bill’s empty status was received, if applicable. |
First Trip After |
Click the search button to select the 'First Trip After' date, if applicable. |
Invoiced / Freight Bill / Amount |
These fields will populate automatically as their values are updated within the Customer Service program. |
Mark NA |
Click this button to mark the current Chassis Freight Bill as 'N/A' (Not Applicable). After clicking this button, you will be prompted to confirm, and if confirmed, the 'Invoiced' status of the Freight Bill will be set to 'NA'. |
Revenue
The Revenue Tab Grid displays the total charges and expenses for the Intermodal movement.
Selecting Intermodal User Fields from the context menu will open the Intermodal User Fields window, which allows you to edit the 25 Intermodal User Defined fields for this Freight Bill available in the CONTAINER_TLORDER Table.
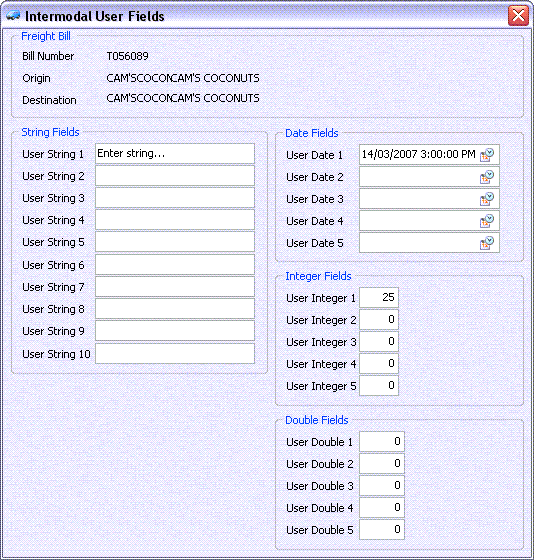
This window displays the Intermodal User Fields available for the selected Freight Bill. Enter your additional/miscellaneous information using these fields. To configure the labels of the various fields, use the Application Configurator program > CSERV.EXE options labelled 'IM USER <field name>'.
| The Intermodal User Fields will only display on this window once they have been given a label in the Application Configuration program. By limiting the fields available, you can streamline data entry for your Users. |
Intermodal Buttons
Empty
The 'Empty' button invokes a function that will create a new 'Empty' Chassis Freight Bills if the Client IDs have been entered into the Customer Service header. A message will appear at the end to show bills have been created. Once these Freight Bills have been posted and a value has been entered into the 'Empty Org' (Empty Origin) field of the 'Export' Movement Type, you may create an 'Empty' leg with an associated Freight Bill.
Status
The Status button (accessible also via hot key <Ctrl-Alt-S>) will open the Intermodal Status Change window, which allows you to change an IM Freight Bill to IM Empty/Loaded from within Customer Service (previously, you could only do so from dispatch).
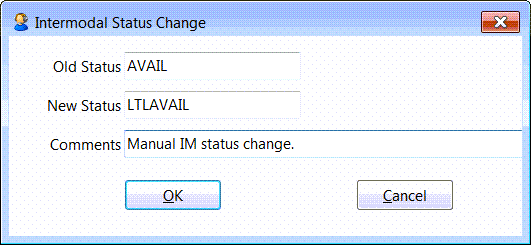
| For this button to work, you must have the 'IM Avail Status' and 'IM Empty Status' config options set in the Application Configurator program > CSERV.EXE section. Furthermore, the button will not be available until the freight bill is posted. |
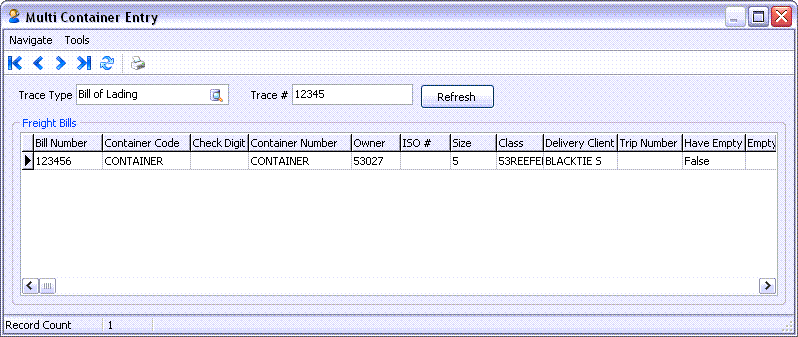
Multi Container (Multi Cont)
The Multi-Container Entry window is accessed via the 'Multi Cont' button on the main body of the Customer Service program > Intermodal Tab. This window is essentially a separate Order Entry form within the Customer Service program that can streamlines the entry/maintenance of Intermodal Freight Bills. This form allows you to link any Freight Bills that you create via a master 'Job Number', and further link those records to a specific Intermodal Trace Type. Any Container information entered in the Multi-Container Entry window will be saved to the CONTAINER_TLORDER Table.
Freight Bills created and linked via their master Job Number can then be processed by the Accounts Receivable modules of TruckMate as a Master Bill, where they will be invoiced as a group.
|
The Navigate menu contains the standard TruckMate Navigation Bar options, which allow you to browse through the records setup in your database.
Selecting  Print Reports will bring up the report selection window, common to many TruckMate applications. Here, you will select a report file from those available in your system and a Crystal Report will be generated.
For more information on Report functionality in TruckMate, see the Crystal Reports Reference.
Much of the functionality of the Multi-Container window is accessed from the Tools Menu.
| Option | Definition |
|---|---|
Create New Container |
Selecting this option will open the Quick New Container Entry window, which will allow the user to define specific details regarding a new Container resource and immediately apply it to the selected Freight Bill. See the Container Sub-Tab documentation for more information about the Quick New Container window. |
Update Container |
Selecting this option will allow you to change the Container Code attached to a Freight Bill in the Multi Container Entry window’s Freight Bill Grid. You can also access this function by double-clicking the 'Container Code' field value in the Freight Bill Grid. |
Change Client |
Selecting this option will allow you to update the 'Delivery Client' that is attached to the selected Intermodal Freight Bill. |
Update FB Details |
Selecting this option will open the Freight Bill Update window, which lets you set the following information for the Freight Bill number attached to the selected detail Grid line: 'Commodity Code', 'Pieces' (and 'Pieces Units'), 'Weight' (and 'Weight Units'), 'Pickup Number', 'Pickup Date Range' (By, End)', 'Delivery Date Range' (By, End), and for both Pickup and Delivery there are checkboxes to indicate if there is a need for appointment and if the appointment has been made or not. In addition the form also allows the user to define multiple trace types by entering each trace type and its number in the specified grid. |
Update FB Status |
Selecting this option will allow you to change the selected Freight Bill’s status to any of the Status Codes available in your system. |
Set Notify Date |
Selecting this option will open the Get Notify Date window, which allows the User to set the 'Notify Date' and 'Last Free Date' that will be used for any Detention or Per Diem calculations. |
Update ETA |
Selecting this option allows you to set the ETA (Estimated Time of Arrival) and ATA (Actual Time of Arrival) Date/Times for the selected Freight Bill, which will then be viewable in the Dispatch program. |
Create Empty Freight Bills |
Selecting this option will create Empty Freight Bills for the selected Intermodal movements. |
Create Intermodal Trip |
Selecting this option will create Trips for all valid Intermodal movements listed on the Multi-Container Entry window. |
Check List Functionality |
The Check List options available to the Multi-Container Entry window allow you to access Check List Items that have been setup in the Intermodal Setup program > Check List Tab. This will allow a check list item to be linked to one of the 10 user string fields in CONTAINER_TLORDER. When the check list item is assigned or completed on a freight bill the user field will be updated. See the Intermodal User Fields window for more information. |
Add Check List Item |
Select this option to specify which Check List Item you would like to attach to the selected Freight Bill. |
Mark Check List Item Complete |
If the Check List Item that has been added has 'Mandatory' = 'True' (in the Codes Maintenance program > Check List Tab) then you will have to set the Check List Item to 'Complete' before the selected Freight Bill can be posted. |
View Check List Items |
Selecting this option will open the Check List Items window, which details which Check List Item Codes have been attached to the selected Freight Bill. |
View Freight Bill |
Select this option to open the selected Freight Bill in the main Customer Service program window. Any edits to the Freight Bill in the main Customer Service form will be reflected on the Multi Container Entry window. |
Copy |
Selecting this option will copy the details of the currently highlighted grid detail line into a new detail line. By entering the details for one Bill and then copying it multiple times, you can quickly enter a group of Bills for a multi-Container scenario, and have them all stay linked to the master Job Number. |
Header Information
| Field | Definition |
|---|---|
Trace Type |
Select the Trace Type you wish to use to tie the Multi-Container Freight Bills together. |
Trace # |
Enter the Trace Number that you wish to associate with the selected Trace Type and the Multi-Container Freight Bills. |
Refresh |
Selecting the Refresh button will gather database records that reflect the 'Trace Type' and 'Trace #' information you have entered (or have just changed). |
Freight Bills Grid
The Freight Bills Grid lists the Freight Bills that have been created via the Multi Container Entry window, and allows you to change values assigned to them. This grid contains all of the detail fields necessary for an Intermodal Freight Bill. When entering Freight Bills, use the many functions available on the right-click Context Menu to make things (such as copying details lines) easier.
For information regarding the Context Menu options on the Freight Bills Grid, see the 'Tools Menu' documentation, above.
Chassis Pickup / Chassis Termination
The User can type the <Delete> key to remove a Chassis Pickup or Chassis Termination record from a single Multi-Container detail line (no multiple deletion).
Extra Charges
Selecting this button will apply the details entered on the Intermodal Tab and create a new Accessorial Charge Freight Bill based on those details. The Customer Service program will then refresh with the new Freight Bill displayed.
|
De-Stuff
Selecting this button opens the Create De-Stuff Freight Bill window, which allows you to 'De-Stuff' a Container at their own dock and then send the actual Freight to multiple Consignees.
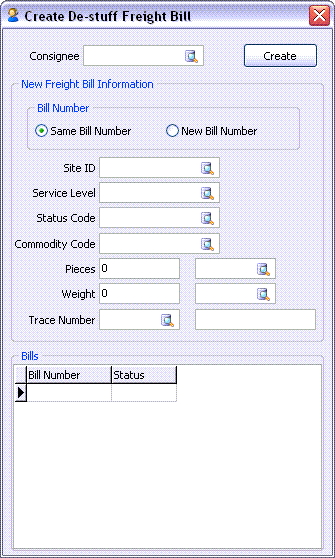
The Create De-Stuff Freight Bill window will create a Freight Bill that is similar to an Empty Origin/Destination bill. It will copy the Caller information from the loaded freight bill to the De-Stuff/Drayage bill (as well as the Consignee information from the loaded Freight Bill to the 'Shipper' field of the Drayage bill).
| If using De-Stuff functionality, a 'Bill Size' value of '7' (or in certain cases, '6') is recommended. See the Codes Maintenance program > Site Setup Tab > 'Bill Size' field documentation for more information. |
| Field | Definition |
|---|---|
Consignee |
Users are required to enter the Client ID for the final Consignee(s) via the 'Consignee' field at the top of the window. New Freight Bills are billed individually (not 'rolled up' as with Extra Stop bills). |
New Freight Bill Information The values you choose in this section will be applied to the De-Stuff Freight Bill that is created and delivered to the 'Consignee' chosen above. |
|
Bill Number |
You can choose to have the 'Same Bill Number' as the original Freight Bill, or give a 'New Bill Number' to the De-Stuff Bill. |
Site ID |
Select a Site ID for the De-Stuff bill. |
Service Level |
Select the appropriate Service Level for the De-Stuff bill. |
Status Code |
Select the Status Code that will be applied to the De-Stuff/Drayage Bill. Only those Status Codes of 'DOCKED' behaviour are selectable from the Database Search button. |
Commodity Code |
Enter the Commodity Code that will be applied to the Detail Line of the created De-Stuff Freight Bill. |
Pieces / Weight |
Enter the 'Pieces' and 'Weight' values of the Freight Bill, and select their respective units via the Database Search field. |
Trace Type / Number |
Enter a 'Trace Type' and 'Number' for the De-Stuff Freight Bill that will be created. |
Create |
Select this button to create the De-Stuff/Drayage Freight Bill based on the criteria you have specified in the De-Stuff window. |