General tasks

How do I Complete a Quick Find?
Using the quick-find option in Dispatch provides the ability to find a particular Driver, Carrier, Equipment or Trip by entering the ID number in the applicable grids ID column. The ID will be found and the row selected in the grid. When the ID entered cannot be found the closest match is displayed.
| Need to view only certain trips, freight bills or resources, try creating Filters. |
-
In the Dispatch program select the applicable grid to perform the quick find. For example, when looking for Driver JLOK select the Driver grid.
-
Position (single mouse-click) in the ID field of the grid. For example, to find a trip you would position in the 'Trip No.' column, for a Driver, position in the 'Driver ID' column.
-
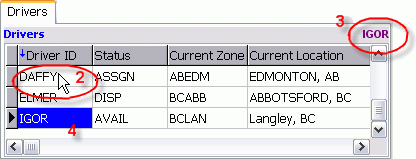
Enter the value you are trying to find. In the below example, the text 'IGOR' was entered. The quick find value entered displays in the top right corner of the grid.
Warning: The Quick Find entry is case sensitive so you must enter the ID exactly as it appears.
-
The Driver ID will be found and the row selected in the grid.
-
To Clear the quick find value use the <Back Space> key until the entry no longer displays in the top right corner of the grid.
| Depending on your configuration setting the quick-filter will remain indefinitely or may time-out based on the specified time. Refer to the Application Configuration program for the setting details. |
How Do I Assign Multiple Freight Bills?
You can assign multiple freight bills to a single trip. If this is a Truckload trip (ie, a long haul trip where the driver and equipment ends up in a different location than the starting location), you can handle the trip through the trip grid. Use the Optimization option to create legs that describe the trip movements (ie, the first leg might be a pickup of freight bill #3, the second leg a pickup of freight bill #1, etc). If this is an LTL trip (ie, a local trip where the driver and equipment ends up at the same location where they started) use the Trip Details - Drill Down option to process the status changes on the freight bills individually. You will need to configure a set of LTL status codes in the Codes Maintenance program. These codes should only apply to freight bills. When all the freight bills have been delivered, apply a status change to complete the trip and make the driver and equipment available.
-
Leg Distance / Driver Pay
The distance between each legs Leg From Zone and Leg To Zone is displayed in the Leg Dist column of the Trip grid. It is calculated in the background by the Mileage Server program. You can configure driver pay to be automatically calculated based on mileage, pickups and drops, and other criteria using the Driver Pay Contracts program.
-
Secondary Contract
In the Driver Profiles program, you can specify a Secondary Contract for each driver. The secondary contract refers to a second pay contract (as configured in the Driver Pay Contracts program). In the Dispatch program, in the Trip grid, the dispatcher can change the value in the Secondary Contract field to "True", which will result in driver pay calculations being based on the contract number specified in the Secondary Contract field in the Driver Profiles program.
-
Empty Legs
If the Power Unit is in a different location than the Trailer, an "empty" leg (ie, a leg with no freight bill) will be created. The Leg From Zone will be the current location of the Power Unit (but the Current Zone will be the current location of the driver). The Leg To Zone will be the current location of the trailer. If the Trailer is in a different location than the freight bill, a second empty leg will be created. The Leg From Zone will be the current location of the Trailer. The Leg To Zone will be the pickup location of the first freight bill on the trip.
For more information, see "How do I group my freight onto trips?"
How do I Manage Auto-Dispatch (1.0)?
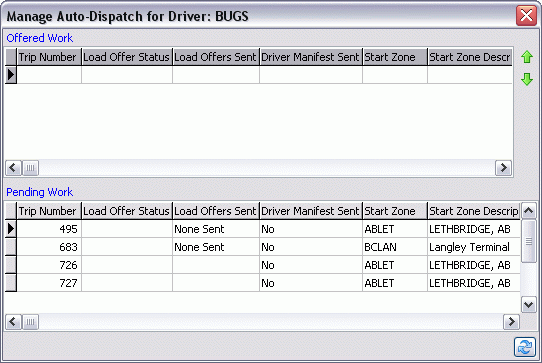
The Manage Auto-Dispatch feature lets dispatchers view the status of any load offers, control the order of any newly offered trips for a particular driver, and automatically inform a driver when the system activates him on a particular trip or when dispatch revokes an offer on the Manage Auto-Dispatch window.
| The Auto Dispatch 1.0 functionality will send a single Load Offer message to a Driver, containing all the offered and pending Trips. If you would like to use the Auto Dispatch 2.0 functionality, which sends separate Load Offers to the Driver automatically as he/she completes Trips, see the Auto Dispatch Tab documentation. |
To use the Auto Dispatch window, the 'Enable Auto-Dispatch' flag on the Communications Manager program > Configuration > General Tab must be checked.
Offered Work |
This grid outlines all work offered to this particular driver, with the accompanying status of that offer. Use your context menu, anywhere in the Offered Work grid to access additional options. |
Pending Work |
This grid outlines all pending work and its accompanying status. Use your context menu, anywhere in the Pending Work grid to access additional options. |
A dispatcher can then access a number of options via the right mouse Context Menu.
Send Load Offers |
The Load Offer function is used to send a "Load Offer" message to the Driver for review/acceptance. The message is sent though the Mobile Dispatch system to the mobile device installed on the power unit that is assigned to the trip. By default, the Load Offer macro is configured in the Communication Macro Setup program with the specific information required for your Load Offer communication and displayed on the Batch TL Load Offer window. |
Send Driver’s Manifest |
Selecting this option will send a driver’s manifest to the recipient. |
Revoke Load Offer(s) |
Selecting this option will revoke the load offer. |