Driver Logs (Logbooks)
| As of TruckMate 2022.2, the Driver Logs program is no longer available. For more information, contact Trimble Transportation Support. |

LogBooks is a Windows based software program used to enter and analyze Driver Log Book details. The program has been designed to find ways to put Drivers into compliance with the hours of service Regulations, not simply report Violations. This means that prior to reporting a Violation, LogBooks searches for possible exceptions that the Driver may take advantage of, and then automatically applies these.
LogBooks is designed to handle multiple jurisdictional Regulations, allowing a Driver to switch between U.S., Canadian, or any other specific state or provincial Regulations you set up. Violations are reported on these Regulations, and you can also enter manual Violations.
To address the high volume of data entry involved with entering Driver Logs, LogBooks has been optimized for fast keyboard data entry. However, you can also enter Driver Logs by using the mouse.
The LogBooks Analysis program is broken into two main sections, the Log Entry section (where the visual representation of the Driver’s Log resides) and the Driver Grid section (which contains a list of all the Drivers setup in your system). The program’s Toolbar is found above the Log Entry section, and consists of four sections: 'Find', 'Report', 'Options' and 'Help'.
To access Driver Logs in TruckMate 2022.1 and earlier:
| From this location | Go to |
|---|---|
TruckMate Menu and TruckMate Task List |
Safety & Compliance > Driver Logs |
Windows Start Menu |
TruckMate 20xx > Driver Logs |
Windows Explorer |
C:\Program Files (x86) > TruckMate 20xx > LogBooks.exe |
Helpful Links
Federal Motor Carrier Safety Administration - official information site for new Driver Rules:
Canada Gazette - official Canadian Hours of Service Rules as of January 1st, 2007:
Licensing
This new module requires a new license key to be added to your existing set. If you have received your revised license set, be sure to enter it into the License Registration program (KEYSAVE.EXE) before proceeding.
How Do I?
How do I enter Driver Logs using my Keyboard instead of the Mouse?
There are three ways to enable 'Easy Entry Mode' (keyboard entry):
-
Press F10 (function key 10)
-
Using the mouse, select Options from the menu, then Easy Entry. A check mark will be displayed beside the menu selection to indicate the Easy Entry mode is enabled.
-
Type '<ALT>+<O>' (for the Options menu), then 'E' (for Easy Entry). A check mark will be displayed beside the menu selection to indicate the Easy Entry mode is enabled.
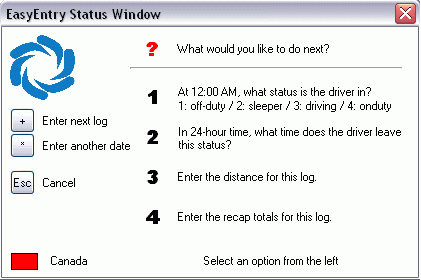
Once in 'Easy Entry Mode' (you will see the EasyEntry Status Window displayed to the screen), the keyboard controls are as follows:
-
The format for each of the entries is 5 numbers. LogBooks automatically assumes you have completed your entry when the 5th digit is entered, so there is no need to press the ENTER key after each entry. The 5 digit number is made up of:
-
A single digit of 1,2,3 or 4 (which indicates the type of hours) and
-
A 4 digit military time value that represent the time that the type of hours ends.
-
-
The first digit of the five numbers identifies the log entry as 1 for "Off Duty", 2 for "Sleeper", 3 for "Driving" or 4 for "On Duty". The second segment, the time value entered in 24 hour format, is the time that the type of hours (as indicated by the first number in the 5 digit sequence) ends. For example: 0500 is 5am, 1145 is 11:45am, 1500 is 3pm, or 2400 is midnight. Therefore a log entry might be composed of the following entries:
-
20600 = Sleeper Until 6am
-
40630 = On Duty Until 6:30am
-
31300 = Driving Until 1pm
-
41400 = On Duty Until 2:00pm
-
12400 = Off Duty Until the end of the day
-
Menu and toolbar options
This topic describes menu and toolbar options and functionality that are specific to the System Integrity Checker window.
For information about common menu and toolbar options (i.e. File menu, Refresh, Multi-Company, etc.), see General menu and toolbar options.
File Menu
Find
Clicking the 'Find' button will generate the Find Log window.
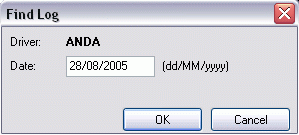
The 'Driver' field will pre-populate based on the Driver highlighted in the Driver Tab of the Drivers Grid Section.
Enter a Date in the 'Date' field in 'dd/MM/yyyy' format and click the 'OK' button.
If a Driver Log is found for that Date, it will display in the Log Entry Section as it was created. If no Log is found for that Date, yet Logs exist for the selected Driver, the User will be prompted to use the closest Log to the Date entered. Click 'Yes' if this is the case.
Print Reports
![]() Selecting this option will bring up the standard TruckMate Report Selection form. Use this to select the Crystal Report configured to handle Driver Log Entries and click 'OK' to generate a preview of the Report to be printed. Click 'Print' if everything appears correct.
Selecting this option will bring up the standard TruckMate Report Selection form. Use this to select the Crystal Report configured to handle Driver Log Entries and click 'OK' to generate a preview of the Report to be printed. Click 'Print' if everything appears correct.
For more information on Report Functions, see the Crystal Reports Reference.
Options Menu
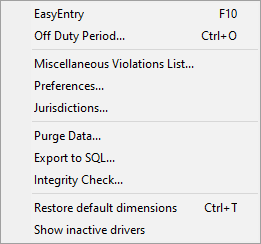
Easy Entry
Changes the entry mode of the Log Entry section to 'Easy Entry' (keyboard entry). While in Easy Entry mode, the Easy Entry window will display, which gives you hints on how to progress through the Entry process with the keyboard.
For more information on keyboard entry, see the How Do I? page.
Off Duty Period
Clicking the 'Off Duty Period' option will display a Date Range selection window. Choose the two Dates that correspond to the beginning and ending of the Driver’s Off Duty Period and click 'OK'.
Miscellaneous Violations List
Allows you to create/modify Miscellaneous Violation Codes for use in the Misc. Violations Window described above.
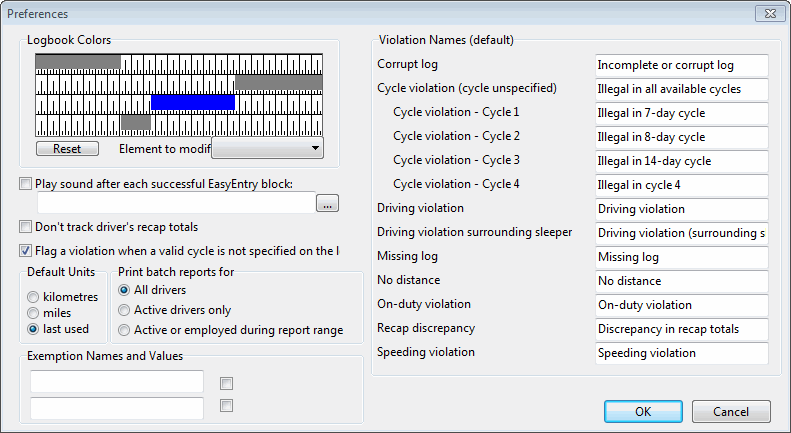
Preferences
Clicking this option displays the Preferences window.
Field |
Definition |
LogBook Colors |
This section is used to configure the colors in which grid entries are displayed. You can configure custom colors for the 'Off Duty', 'Sleeper' and 'On Duty' rows using this form. (The color displayed in the 'Driving' row is configured in the Regulations form.) You can also configure the color that displays in the grid background. To change colors, select the option you wish to change from the 'Element to modify' drop down menu. Then click on the color in the palette that you wish to use. The 'Reset' button resets the color settings to their Default values for that Zone. |
Play Sound after each successful EasyEntry block |
If this option is checked, and you are using the EasyEntry entry method, a sound will play after each successful entry block. Click the search button to select a '.wav' sound clip from your system that will be used. |
Don’t track Driver’s recap totals |
If you don’t want to track the Driver recap totals, check this option. |
Flag a Violation when a valid cycle is not specified on the log |
If this option is checked, a Violation will be logged if a Driver is given a Log Entry without using a valid Cycle value. |
Default Units |
This selection is used to configure the distance value displayed on the Log Entry section of the program. When you change this value, the text label for the Distance field will change from 'Distance (mi)' to 'Distance (km)', depending on which value is selected. Also, the miles per hour calculation that displays at the bottom right corner of the Log Entry section will change from 'km/h' to 'm/h', depending on which value is selected. If you select the 'last used' option, the program will use the distance value of the last log entry. Note: When you change the Default Units value, only subsequent log entries will be affected. Previous log entries will keep the unit that was selected at the time the log entry was made. |
Print batch reports for |
Choose if you would like to have 'All Drivers', 'Active Drivers only' or 'Active or Employed during report range' IDs to be included in your batch report prints. |
Violation Names |
The options in this section allow you to alter the Default labels for the various Violation names used throughout the LogBooks program. Simply delete the text in the field and enter new text to change the name. |
Exemptions Names and Values |
These two checkboxes are for informational purposes only and will not change how the log is actually processed, the labels can be configured as needed. The Corresponding database columns are: 'LOG.EXEMPTION_1' and 'LOG.EXEMPTION_2'. |
Jurisdictions
See the Jurisdiction Setup section.
Purge Data
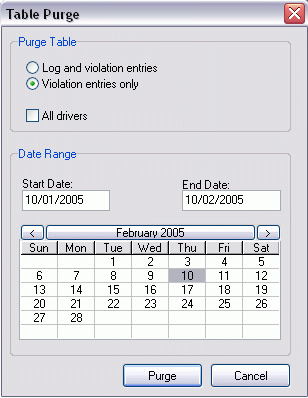
This option will allow you to Purge the Log Entry and Violations records for a specified Date Range, using the Table Purge window.
| Field | Definition |
|---|---|
Purge Table |
Choose to Purge either 'Log and violation entries' or 'Violation entries only' by selecting the appropriate radio option in this section. Check the 'All Drivers' option if you want to include all Driver records in this Purge function. If unchecked, only the currently selected Driver’s records will be Purged. |
Date Range |
To select a Start Date and End Date for the Date Range, simply click within the Date field you wish to edit and choose a Date from the Calendar menu below. Use the right and left arrow buttons to scroll through the months. |
Purge |
When everything is setup as you want it, click the Purge button to Purge the Log Entry Tables. A warning dialog will display, reminding you that this is function will permanently erase the Log Entry data in the Table. If you are sure you would like to Purge the data, click 'OK'. |
Import from LogBooks 2.x
This option allows you to import Log Entry files from an older version of the LogBooks program. Clicking this option will open a search dialog that will allow you to browse your system for LogBooks data files (in the '.db' file format). Select the older file and click 'Open' to import.
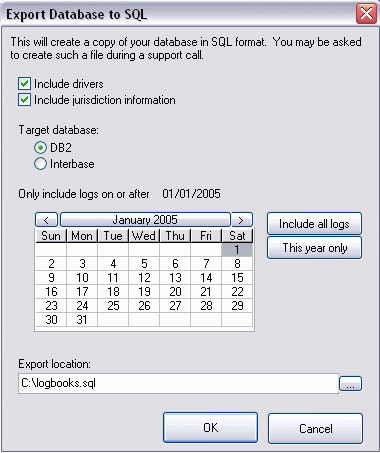
Export to SQL
This option opens the Export Database to SQL window, which will create a copy of your Log Entry database in SQL Format. You may be asked to create such a file during a support call.
| Field | Definition |
|---|---|
Include drivers |
If you would like to include Driver information in the generated '.sql' database file, check this option. |
Include jurisdiction information |
If you would like to include Jurisdiction information in the generated '.sql' database file, check this option. |
Target database |
Choose either 'DB2' or 'Interbase', depending on the Database software your Company uses. |
Only include logs on or after |
The date displayed here will alter when you click a date in the Calendar menu below, or will change to '01/01/1980' if you click the 'Include all logs' button. If you click the 'This year only' button, the date will change to the first day of the current year. |
Export location |
Click the search button to choose the location you would like the .sql file to be generated to. The default filename is 'logbooks.sql'. Click 'OK' to begin generating the database file. |
Integrity Check
This option opens a dialog window that allows you to check the integrity of the database you are using LogBooks on. Click the 'Check' button to scan your database for integrity errors. A list of commands will appear in the text window, and if any errors are found, the patches required will be displayed. Contact Support for information on how to obtain these patches.
Restore default dimensions
If you have resized or maximized the LogBooks program window, choosing this option will shrink the window back to it’s default dimensions.
Show Inactive Drivers
Choosing this option will display Inactive as well as Active Drivers in the Drivers Tab at the bottom of the main LogBooks window.
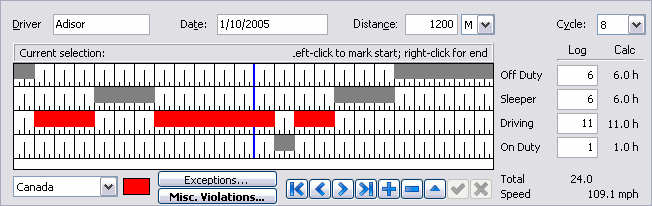
Log Entry Section
The Header section is where the Driver Log is created, using either the mouse or the keyboard.
Driver
The Driver field will automatically populate with the Driver ID Code that is currently highlighted in the Driver Grid below when the User clicks the '' button to add a new record. You cannot change this value once it is inserted. If you have chosen the wrong Driver, simply delete the new record by clicking the 'X' button, and select the correct Driver in the Driver Grid and hit '' again.
Date
This field will automatically populate with the current Date when you create the first record for a particular Driver. For subsequent entries, the Date will default to the day after the last Log entry for the selected Driver. For example, if you make your first Log entry for a Driver for '25/08/2005', the next Log entry you make for that Driver will default to '26/08/2005'.
Distance
To calculate Speed Violations, you must enter the Distance traveled by the Driver for this Date. This value is divided by the time recorded in the 'Driving' row of the Log Entry Grid in order to determine the Average Speed, which is displayed in the bottom right corner of the Log Entry section.
Cycle
Select the Cycle for this particular Driver. For more information on Cycles, see below.
Zone
Click the down arrow to select a new Zone.
Log Entry Interface
Position the mouse pointer at the desired Start Time Column and category row ('Off-Duty', 'Sleeper', 'Driving', or 'On-Duty', in that order) then click the left mouse button once. The start time for the Current Selection will display above the Grid.
Next, position the mouse pointer to the end time in the same row. Press the right mouse button. A line will be displayed that represents the same line the Driver has drawn on their Logbook sheet. Notice the hint given on top of the Grid when in mouse mode, including the time you are pointing to on the Grid.
Any areas of the form that are not filled in will be filled in automatically by the program, assigning the unassigned hours to the 'Off Duty' row.
If a Driver crosses the border into a different regulatory area, you must indicate the time that this occurred. Regulations are changed by selecting the Zone from the drop down list box under the Grid. Click the down arrow to select a new Zone. The time that displays in the Driving row will change color according to the Zone selected.
As you add entries to the Grid, the total hours will be displayed to the right of each row. Compare these totals to what was reported by the Driver on the actual Log. This is your control check that you’ve entered the Log correctly.
Enter the Distance traveled (in Miles or Kilometers), followed by any Miscellaneous Violations you want to record. Click on the 'Check' button on the navigator bar to save the Log, then click the '+' button to start entering the next Log.
Note: For keyboard entry help, see the How Do I? page.
Exceptions
Clicking the 'Exceptions' button opens Exceptions window, where you can select from a list of available Exceptions.
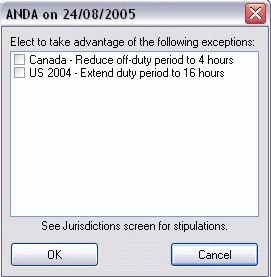
Simply click the box next to the Exception you wish to use. Most Exceptions are based on the Zone that the Driver is working in, so be sure not to select an Exception for a different Region than the one the Log was taken in.
See the Jurisdictions section below for more information on Exception Stipulations.
Click the 'OK' button to save the highlighted Exceptions.
Miscellaneous Violations
The 'Misc. Violations' button below the Log Entry Grid opens the Miscellaneous Violations window, which is used to manually enter Violations that would not be automatically detected by the LogBooks program, such as 'Non-Time' and 'Non-Cycle' Violations. Miscellaneous Violations are included on the Violation Reports, and on the Violations Tab in the Driver section. They can be purged using the Purge Table function, as described in the Purging Logs section below.
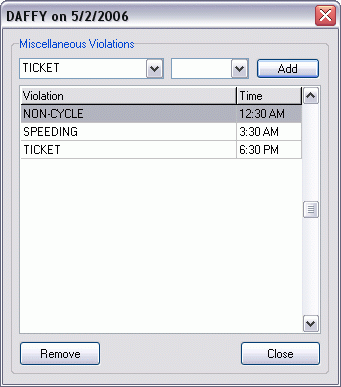
Use the drop-down menu to select a Miscellaneous Violation in the field at the top, choose a time from the second drop-down menu, then click the 'Add' button (or type your 'Enter' key) to add the Violation to the list of Violations for the selected Log.
To delete a Violation, click on the Violation in the list and the click the 'Remove' button.
Use the 'Close' button to close the form and return to the main screen.
Violation Codes are setup using the 'Miscellaneous. Violations List' option on the toolbar.
Drivers Section
The Driver and Violations section at the bottom of the screen is used to view the Drivers in your system (on the Drivers Tab) and to review the calculated Violations for each Driver (on the Violations Tab).
Driver Tab
The Driver tab is used only for informational purposes, and cannot be edited. It displays a list of all the Drivers currently setup in your system. The Driver record that is highlighted here (by clicking it’s detail line with the mouse) will be added to the Log Entry Section upon clicking the '+' button above.
Find Driver
Typing text into this field will cause the highlight arrow to move the to Driver record most closely resembling the text that has been typed. You need not type a Driver’s full name here for the search to work. For example: typing 'A' into this field will cause the first Driver record with a name starting with 'A' to be highlighted.
Violations Tab
When you select the Violations Tab, you will be prompted to specify a Date Range, and then Violations will be displayed for the driver currently selected on the Drivers Tab.
Date
The Date displayed in the Date column corresponds to the Log Date. Note that a single Log may be in violation of more than one rule. When that is the case, there will be more than one item with the same Date on the Violations Tab.
Code
For each driving Violation, a Code will be displayed in this column. The codes are interpreted as follows:
-
S: indicates a speeding violation. Speeding violations are determined by dividing the value entered in the Distance field by the number of hours entered in the Driving row of the Log grid. The result is compared with the Speeding Violations values entered on the Regulations / Zones form.
-
N: indicates that no value was entered in the Distance field of the Log for that Date.
-
M: indicates that no Log was entered for that Date.
-
C: indicates that the Cycle Regulations were violated. Cycle Regulations are configured on the Regulations / Zones form.
Note: Each of the cycle Regulations that are checked off in the Regulations / Zones form will be tested, and a violation will only be displayed if all cycle Regulations are violated. For example, the driver may be in violation of the 7 day rule, but not in violation of the 8 day rule. In that case, no violation will be reported.
-
D: indicates that a 'Non-Cycle' or 'Non-Distance' Regulation has been violated. For example, if your Regulations are configured so that 8 off duty hours must be taken after the driver has driven for 13 hours, and you enter a Log that shows Driving from 6 AM to 8 PM, a Driving Violation will be reported for that Log.
-
U: indicates a violation that was manually entered in the Misc Violation form.
Description
For each driving Violation, a brief Description will display in this field. Note that when manual violations are entered in the 'Misc Violation' field, the value entered in that field will display here.
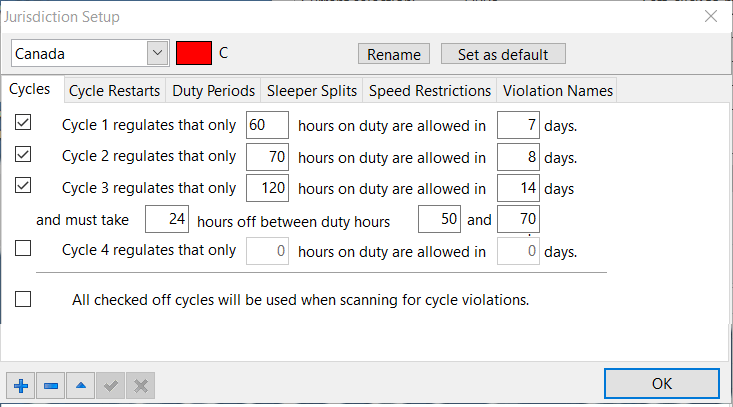
Jurisdiction Setup Information
Clicking the 'Jurisdictions' option within the Options menu of the Toolbar will open the Jurisdictions Setup window, which is divided into five Tabs: 'Cycles', 'Duty Periods', 'Sleeper Splits', 'Speed Restrictions' and 'Violation Names'.
The options available to edit within the Tabs do not change as the Region is changed in the topmost pull down menu, but the values that default into those fields will, depending on the Region chosen. You may change any of the values you find here simply by clicking within the field you wish to change, and entering a new text value.
Region
Click the pull down arrow to select a Region you wish to edit the Jurisdiction information for. Available Regions are: 'Canada', 'US' and 'US pre-2004'.
Rename
Clicking this button will allow you to alter the Region name for the Region currently displayed in the Region pull down menu. Enter a new name in the space provided and click 'OK' to change the name.
Set as Default
Clicking this button will set the Region currently displayed in the Region pull down menu as the Default Region. When you open TruckMate for LogBooks, the Default Region will automatically apply to any new Log Entries made. Once this button is clicked, it becomes unavailable to the Default Region.
Cycles Tab
The Cycles Tab of the Jurisdiction Setup window allows you to define the Cycle values for your Drivers. These values are defined by the Labour Laws within the selected Region. The values that Default within the Cycles Tab for the various Regions have been determined by TMW Systems Inc., based on the Labour Laws for Canada and the United States of America.
You may edit any of the values found within this Tab simply by clicking the 'Edit' button from the TruckMate Navigation bar at the bottom of the window and clicking inside the text fields and manually entering numerical values.
Duty Periods Tab
The Duty Periods Tab of the Jurisdiction Setup window allows you to define the Duty Periods for your Drivers. These Periods are defined by the Labour Laws within the selected Region. The values that Default within the Cycles Tab for the various Regions have been determined by TMW Systems Inc., based on the Labour Laws for Canada and the United States of America.
You may edit any of the values found within this Tab simply by clicking the 'Edit' button from the TruckMate Navigation bar at the bottom of the window and clicking inside the text fields and manually entering numerical values.
Sleeper Splits Tab
The Sleeper Splits Tab of the Jurisdiction Setup window allows you to define the Sleeper Splits for your Drivers. These Periods are defined by the Labour Laws within the selected Region. The values that Default within the Cycles Tab for the various Regions have been determined by TMW Systems Inc., based on the Labour Laws for Canada and the United States of America.
You may edit any of the values found within this Tab simply by clicking the 'Edit' button from the TruckMate Navigation bar at the bottom of the window and clicking inside the text fields and manually entering numerical values.
Speed Restrictions
This Tab displays the Speed Restrictions for the Region currently selected. A 'Speeding Violation' will be entered whenever a Driver’s speed exceeds the values setup here.
Speeding violations exceed
Enter the numerical values that determine the speed limit for the selected Region in 'miles per hour' (mph) and 'kilometers per hour' (kmh). The values that Default into these fields are those normal for the selected Region.
Calculate mph / kmh conversion for me
When checked, all 'miles per hour' and 'kilometers per hour' values will be converted to the value used for the Region the Driver was in.
Violation Names Tab
This Tab allows you to edit the names of the various Violation Codes used throughout the LogBooks program. These names affect what Violations are called in Reports and in the Violations Tab. You can use different names in different Jurisdiction Regions, if you wish.
To use the same names in every Jurisdiction / Region, leave these boxes blank. To edit the Violation names, cilck the 'Edit' button found on the TruckMate Navigation bar on the bottom of the window.