Trip Tab Details

The Trip Tab displays all active trips for dispatch planning and execution. Dispatch generally includes interfacing with a 3rd party mileage software through our Mileage Server program and interfacing with 3rd party communications software through the Communications Manager program, which provides electronic Load Offers and Manifests. Dispatch provides many features such as trip optimization, split trips and dispatch report viewing and printing. Trips that have been completed or canceled can be displayed in the Trip Tracer program.
Some new features available in the Trip Tab include Optimization for Trips with Interliners, Service Failure Code entry when the Trip or Pickup/Delivery Status changes and security features to prevent/warn dispatchers when dispatching loads with incomplete resources (drivers, trailers) attached. There have also been several improvements in Mobile Communications functionality with the PACOS 2.6 upgrades to Dispatch.
|
If you do not see the Trip Tab, you may have to access the 'View Menu' and enable it (or do so using the Toolbar icon). Dispatch will automatically perform a refresh every time you make a change. A Refresh reads current information from the database to display the updated data in each grid including new freight bills, changes to Driver information etc. You can manually force a refresh by selecting the 'Refresh' button at the bottom of the screen. |

| For more information on General Color Codes, see the Color Code Information section. For information on Color Codes specific to the Trip Tab, see Trip Tab Color Codes. |
Common Functions / Edit Fields
Create a Trip
A New trip can be created in multiple ways:
-
A double click on a Freight Bill in the Freight Bill grid.
-
The 'New Trip' option on the Trips Grid Context Menu.
Trip Tab Fields
The Trip Tab contains a variety of read-only and editable fields. All read-only fields are populated with information from the Freight Bills attached to the Trips. In some cases leg and trip information can be modified using a double-click in a field, as follows:
Update Fields - Trip Related (common for all legs)
Trip #
Provides the ability to update the Trip Status on the Status Change window.
Dispatch Agent / Dispatch Agent Date / Dispatch Agent Hours
These fields provide the ability to attach a Dispatch Agent (Brokerage) to a Trip. Double click in the 'Dispatch Agent' field to choose an Agent from your system. Dispatch Agents are configured in the Customer and Vendor Profiles program > Vendor > Types Tab. Double click the 'Dispatch Agent Date' field to select the date that the Agent was attached to the Trip. The 'Dispatch Agent Hours' field will then calculate how many hours the Dispatch Agent was assigned to the selected Trip.
ETA for Leg
This field displays the estimated time of arrival for the trip leg. This value is automatically populated from the Customer Service program’s 'Deliver By Start' date/time stamp on each Freight Bill. If the value of this field is changed, the value of the same field for subsequent legs can either be changed or not, based on an App Config. If the value in Application Configurator program > Dispatch > 'Update ETA for Subsequent Legs' is set to 'True', the new ETA date will be copied to all subsequent legs on the trip.
Last FB Status
This field shows Freight Bill status updates received from PACOS (or other satellite messaging systems) for a Freight Bill that is currently assigned to a Trip. The value displayed in the field is based on the Freight Bills associated to the Trip Leg rather than the entire Trip. Dispatchers will now be able to quickly see the last status that a Freight Bill had on a Trip, and this field will be updated as status updates come in from the Mobile Communications devices.
Load Offer Status
Displays the load offer status to provide dispatchers easy reference on driver availability. Statuses include 'Offered', 'Read', 'Accepted', 'Declined', 'Active', and 'Completed'. For example, if a driver reads a load offer, the status will be changed to 'Read', and only if the current load offer status is 'Offered'. If a load offer is declined, the load offer status will be set to 'Declined'.
See the Dispatch User Manual for more information on sending Load Offers.
LTL Status
While the LTL Status column cannot be itself edited, it will change depending on the Freight Bill details.
PACOS Dispatch
New PACOS 2.6 Dispatch edit functionality has been added to TruckMate. When making changes to a trip that has a PACOS Dispatch attached to it, the Dispatch program will automatically send messages to the remote OBC (On Board Computer) that reflect these changes. Typically, the changes will be limited to adding and removing stops. In the past, the Dispatcher would have to delete the entire Trip and recreate it to make changes.
| You can add a list of e-mails to get cc-e-mail messages when sending the PACOS. The list of available e-mails can be edited in Customer Profile > Tools > Stop Profiles. |
User Field 1 - User Field 10
These fields are available for any information that the User would like to have entered into them. To be able to enter data into the User Fields, you must set the Application Configurator program > DISPATCH.EXE > 'Allow User Typeover' option to 'True'. You can then double-click on these fields to enter any information you would like.
| You can also add the data included in these fields on Load Offers to your Drivers, if you configure a Load Offer Macro in the Communication Macro Setup program to pull data from these fields. |
Date User Field 1
This field has been added to the Dispatch Trip Tab in order to accommodate Companies that require Appointment Dates for their Trips. This Appointment field is normally used to advise when inbound loads are due into a specific 'Leg To Zone' (a Terminal or other Zone). Simply double-click inside this filed to select the Appointment Date from a Calendar menu.
Update Fields - Leg Specific
Bill Number
Launches the Customer Service program and displays the first freight bill assigned to the trip leg that was selected.
Leg #
Provides the ability to split a leg into two or append a new leg to the end of the trip on the Split Leg window.

The 'Trip Start' and 'Selected leg information' details will be pre-populated (and read-only) from the Leg you double-click in the Trip Grid.
Action
Depending on which type of Leg Split operation you would like to complete, choose one of the available options:
-
Split existing leg into two legs: selecting this option will create a new Trip leg between the 'From Zone' and 'To Zone', splitting that Trip into two separate Trips.
-
Append new leg to end of trip: selecting this option will create a new Trip leg and add it to the end of the selected Leg.
Ending Zone for new leg
Enter the new ending Zone for the new Trip leg. Use the Database search button to select a Zone Code from your system.
Planned Departure / Planned ETA
Enter Dates for these two fields.
Planned Departure
You can enter a Planned Departure Date and time for each leg on the Planned Departure window. Double-click in the 'Planned Departure' field to open the calendar menu and select the new date. If you are using mile server, this field will be populated for you automatically. If for any reason you don’t want your mile server to update this field, set the application configuration option in Application Configurator program > Util > MILESERVER.EXE - Update LEG Planned Departure to 'False'.
Driver
Launches the Driver Call-in program to manage dispatch-related Driver information such as Driver Hours, Driver Position, free-form Notes and the remaining hours in a Driver’s Cycle. You can also reposition Drivers and change Trip status in the Driver Call-In program.
Leg From Zone
Modify this information by double-clicking on the Leg # information in the previous column. The information comes from the freight bill information you entered in the Customer Service program. The program will default to the lowest freight bill number information.
Leg To Zone
Modify this information by double-clicking on the Leg # information in the previous column. The information comes from the freight bill information you entered in the Customer Service program. The program will default to the lowest freight bill number information.
Leg Distance
Modify this information by double-clicking on the 'Leg #' information in the previous column, and then this column will pre-populate with calculations from the Mileage Server program, if installed.
Leg Weight
Pre-populated with information found in the Carrier. You can modify the information here. The information comes from the freight bill information entered in the Customer Service program.
Leg Notes
Enter any relevant notes regarding this leg of the trip in the field provided. To be able to type into this field, you have to have the Application Configurator program > DISPATCH.EXE > 'Allow User Typeover' option set to 'True'.
ETA for Leg
Provides the ability to enter/update the ETA date for the leg on the ETA / PTA Adjustment window , double-click on the 'New ETA Date' field to access the calendar selection window to select the new date. If the value of this field is changed, the value of the same field for subsequent legs can either be changed or not, based on an App Config. If the value in Application Configurator program > Dispatch > 'Update ETA for Subsequent Legs' is set to 'True', the new ETA date will be copied to all subsequent legs on the trip.
Carrier
Provides the ability to add a carrier to the trip on the Carrier Information window which allows rates to be entered, margins calculated and payment contracts defined.
# P/U / # Del / TlCnt
These three fields provide the ability to view Pickup and Delivery details for each stop on the Pickup/Delivery Details window. In a LTL Dispatch situation where the Driver and Equipment is assigned to one daily trip but the trip includes multiple freight bills you can apply individual status changes to the freight bills here.
Toll
This field displays the Toll amount returned for the leg from either the Mileage Server program (with PC*Miler 22 & Tolls integration) or from the DMILE Table (setup by the user between two Zone points on the Customer Service program > Mileage window).
Travel Mode
This field displays the chosen Travel Mode for the Trip Leg. The user can double-click this field to manually override the chosen Travel Mode. The Trip Leg Travel Mode value is copied into the Carrier Find Near logic as well. Travel Mode codes are created on the Codes Maintenance program > Travel Modes Tab.
FB View String 1 - 10 / FB View Double 1 - 10
These 20 user-customizable fields have been added for truckload/brokerage users who wish to hide the Freight Bill grid entirely (via Screen Design) and display various freight bill details in the Trip grid. These 20 fields are accessed by a customized view that selects up to 10 string and 10 numeric fields directly from TLORDER (or other tables).
Applying the view method (and getting access to these twenty fields) is a three-step process:
Customize the view VIEW_LEGSUM_TLORDER to select the fields you wish. By default, all the string fields select a blank and all the numeric fields select zero. You can change the view to populate any one or more of these 20 fields. You can select directly from TLORDER (using T.column syntax), or a calculation on several TLORDER fields (perhaps using a CASE statement), or a sub-select to pull data from other tables. Here is an example:
CREATE VIEW VIEW_LEGSUM_TLORDER AS
SELECT
L.LS_DLID,
T.SERVICE_LEVEL LS_TLO_STR_1,
T.REQUESTED_EQUIPMEN LS_TLO_STR_2,
T.SALES_AGENT LS_TLO_STR_3,
T.BILL_TO LS_TLO_STR_4,
T.ORIGNAME LS_TLO_STR_5,
T.DESTNAME LS_TLO_STR_6,
T.CURRENCY_CODE LS_TLO_STR_7,
(SELECT MAX(BUSINESS_PHONE) FROM VENDOR_LOAD_SUMMARY WHERE LEG_ID = L.LS_LEG_ID AND CANCELLED = 'False') LS_TLO_STR_8,
T.DISPATCH_AGENT LS_TLO_STR_9,
'' LS_TLO_STR_10,
T.CHARGES LS_TLO_DBL_1,
T.XCHARGES LS_TLO_DBL_2,
T.TOTAL_CHARGES LS_TLO_DBL_3,
T.INT_PAYABLE_AMT LS_TLO_DBL_4,
CASE WHEN T.CHARGES + T.XCHARGES = 0 THEN 0 ELSE T.CHARGES + T.XCHARGES - T.INT_PAYABLE_AMT END LS_TLO_DBL_5,
CASE WHEN T.CHARGES + T.XCHARGES = 0 THEN 0 ELSE ROUND(CAST((T.CHARGES + T.XCHARGES - T.INT_PAYABLE_AMT) * 100 / (T.CHARGES + T.XCHARGES) AS DECIMAL(16,4)),2) END LS_TLO_DBL_6,
0 LS_TLO_DBL_7,
0 LS_TLO_DBL_8,
0 LS_TLO_DBL_9,
0 LS_TLO_DBL_10
FROM TLORDER_V T, LEGSUM L
WHERE T.DETAIL_LINE_ID = L.LS_DLID
AND L.LS_DLID IS NOT NULL
AND T.INTERFACE_STATUS_F IS NULL
AND (T.CURRENT_STATUS NOT IN ('BILLD','CANCL','COMPLETE','APPRVD','PRINTED','UNAPPRVD','CANCEL'))
Optionally modify procedure CUSTOM_GETDLIDFORTRIPLEG to modify the logic to select the desired FB when there is more than one on the leg. Currently, the standard logic is to select the first drop on the leg (or first pick if there is no drop); this follows the logic for existing column LS_FREIGHT (Bill Number). If the custom proc return a non-zero value, then that number is used to as the DETAIL_LINE_ID to use to get FB info. For truckload environment (only one FB per trip), this step can be skipped.
Go into the Dispatch program and user the Grid Customizer to customize the trip grid. For each column you populated in step 1:
Check the 'Visible' flag (they are all hidden by default as users who do not customize the view will not want to see 20 columns of blanks and zeroes), and
Change the field 'Title' to something meaningful. For our example in step 1 above, we would check the visible flag on the first nine strings fields and the first 6 numeric fields, with labels something like:
LS_TLO_STR_1 -> Service Level
LS_TLO_STR_2 -> Requested Equip
LS_TLO_STR_3 -> Sales Agent
LS_TLO_STR_4 -> Bill To
LS_TLO_STR_5 -> Shipper Name
LS_TLO_STR_6 -> Consignee Name
LS_TLO_STR_7 -> Currency Code
LS_TLO_STR_8 -> Carrier Phone #
LS_TLO_STR_9 -> Dispatch Agent
LS_TLO_DBL_1 -> Charges
LS_TLO_DBL_2 -> Extra Charges
LS_TLO_DBL_3 -> Total Charges
LS_TLO_DBL_4 -> Total Interline Charges
LS_TLO_DBL_5 -> Gross Margin $
LS_TLO_DBL_6 -> Gross Margin %
Trip Tab Context Menu
The Trip Tab’s Context Menu is where the majority of Trip-related tasks are accessed.
Full Screen
The Full Screen option will enlarge the selected grid so that it fills the whole screen which allows you to view many more records and columns than in the normal view. To return to the normal view, right mouse click and de-select the Full Screen option. While in Full Screen mode, you can switch from grid to grid by selecting the right and left arrow buttons at the bottom of the window.
Trip Status Change
The Trip Status Change option is used to update the current status of the trip on the Trip Status Change window, and can be used to update Driver Detention charges. Changing the trip can affect the processing of the trip including updates to the Leg State.
Deassign
The De-assign option is used to manually remove freight bills, drivers or equipment from a leg. It is important to note that the equipment or freight bills cannot be assigned to a trip leg that has a Completed Leg State.
De-assignment of a Carrier from a trip must be completed on the Carrier Information window.
Cancel Trip
The Cancel Trip option is used to cancel a trip while in the planning stages. To Cancel a trip all legs of the trip must be in a Planned Leg State. However, to be able to perform a cancellation of an active trip, you need to have a security option " Dispatch - Allow Cancellation of Active Trip" to be set up for you in Security Setup program > Security > Business Events > Allow Changes.
New Trip
The New Trip option provides the ability to quickly add a new trip by defining the zone on the Supply Zone window. You can enter the zone code or select the search button for the list of available choices. Once a zone is chosen, select 'OK' and your new trip will display in the Trip grid area for dispatch planning.
Reset Leg State
Provides the ability to change the Leg Status from Finished to 'Planned' or 'Active' Status.
Split Trip
The Split Trip function is used to create two (or more) trips from one trip on the Trip Split window. It is designed for situations where 'B Train' Trailers must be split and moved individually through areas where B Trains are prohibited. Note that freight bills are not split; they must be assigned in their entirety to one of the staging areas. Therefore, only trips with more than one freight bill can be split using the Split Trip function. In order to use the Split Trip option, the trip must be active on its last leg.
Merge / Switch Resources
The Merge / Switch Resources option is used to transfer resources such as freight bills, drivers and / or equipment from one trip to another. To use the option, both trips must be active and only the resources assigned to the trip’s active leg will be available for merging and splitting.
Switch Trailer (on current leg)
This option allows the User to switch the currently assigned Trailer on each leg and its subsequent leg, allowing a Driver to switch an empty Trailer with a loaded Trailer at the pick point.
To accomplish this:
-
Select the 'Switch Trailer# (on current leg). This will display a list of Trailers with a status code of 'Availability' behavior at the current leg’s End Zone. In short, Trailers available at the end of the current leg.
-
Select a Trailer you would like to switch in from the lookup form. This will cause all Trailers on subsequent legs to be 'switched' to the new Trailer. If the user selects the 'Cancel' button at this point, the Trailer(s) on subsequent legs will be dropped.
| If there are no subsequent legs, the program will prompt the user for an End Zone and a new leg will be created with the appropriate resources. |
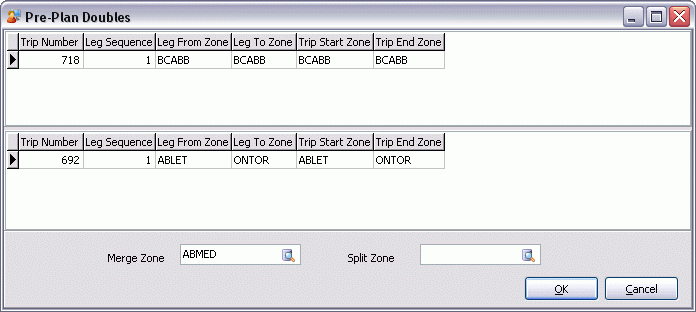
Preplan Doubles — Trip %d
This option provides the ability to merge/split zones on the Pre-Plan Doubles window.
View Details
The View Details option provides 5 windows to view Drivers, Power Units, Trailers, Misc. Equipment or Freight Bills associated with the trip, displayed in leg number sequence.
Print Manifest
The Print Manifest option provides the ability to view and print a manifest for the selected trip from the Reports Selection window. Users have access to two new buttons on the Report Selection form when accessing it via the 'Print Manifest' option: 'Email' and 'Fax'. When a User selects the 'Email' or 'Fax' button, a Trip Contact List form will pop up and the Users can select which email / fax address to send the Manifest to (depending on the setting of an App. Config- see note below). After exiting the form, Users are still able to change and/or add email / fax information passed from the Trip Contact form. When an Email or Fax is sent by this new form, the 'Email Sent' and/or 'Fax Sent' column in the Trip Tab will be updated accordingly.
| The 'Email' and 'Fax' button functionality for Trip Manifests depends upon several Application Configurator program > DISPATCH.EXE options: 'Contacts Displayed inside the Trip Contact List', 'Default Report Type', 'Manifest Report Email Subject', 'Open a new Dialog to select email address for trip manifest email', and 'Manifest Report Output Path'. |
For more information on Report functionality in TruckMate, see the Crystal Reports Reference.
Print Dispatch Reports
The Print Dispatch Reports option provides the ability to view and print dispatch reports from the Reports Selection window. The Special Events Expiry report is an example of a standard dispatch report available for printing, however you can add custom dispatch reports to meet your reporting needs.
For more information on Report functionality in TruckMate, see the Crystal Reports Reference.
Print Trip Costs
The Print Trip Costs option provides the ability to view and print the Trip Cost report which includes a summary of Revenue, Costs and Profit Margin information along with details by leg including Driver Pay, Equipment and Brokerage costs. For more information on Report functionality in TruckMate, see the Crystal Reports Reference.
Find Trips Near
The Find Near option allows you to search for any driver, power unit, trailer, miscellaneous equipment, freight bill, or trip that is within a specified distance of the desired zone.
Find Carrier Near
The Find Near option allows you to search for any Carrier that is within a specified distance of the desired zone and/or other items of reference.
| Access to the Find Carrier Near window is based on the availability of the #46000 License. If you do not have this license, you must obtain a copy of a new License file and enter it into the License Key Entry program. |
Set/Clear Filter
The Set Filter option supports the ability to create and apply a filter to any grid, regardless of the grid you were in when you opened the window.
Trip View
The Trip View window provides very detailed information about a trip. When this option is invoked the trip on which the driver or equipment is currently active will be displayed. If the driver or equipment is currently available, or is assigned to a trip that is not yet active, the trip on which the driver or equipment was last active will be displayed.
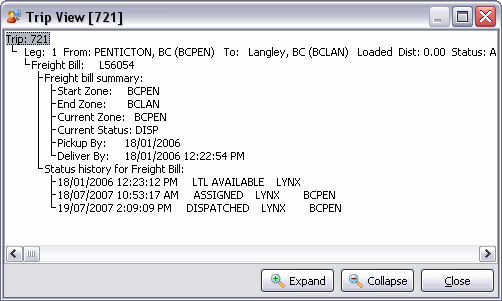
At the top of the hierarchy is the 'Trip number'.
Under the 'Trip Number' is each 'Trip Leg'.
Under the 'Trip Legs' is the 'Driver', Resources and Freight Bill(s) assigned to the leg.
Under each 'Driver' and Resource their location history (for the Trip) and their status history (for the Trip).
Under the Freight Bill is a Freight Bill summary and the Freight Bill status history (for the Trip).
Each level of the hierarchy can be collapsed or expanded by double clicking on the level above. The 'Expand' button at the bottom of the screen will expand all collapsed levels, while the 'Collapse' button at the bottom of the screen will collapse all expanded levels.
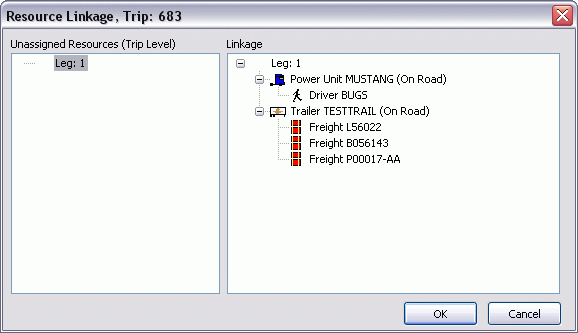
Show Linkage
The Show Linkage option provides a split window view for the selected leg that includes any unassigned resources in the left pane and the resource linkage in the right pane of the Resource Linkage window.
Trip Details (Drill Down)
The Trip Details option provides the ability to view Pickup and Delivery details for each stop on the Pickup/Delivery Details window. In a LTL Dispatch situation where the Driver and Equipment is assigned to one daily trip but the trip includes multiple freight bills you can apply individual status changes to the freight bills here.
Trip Notes
The Trip Notes function is used to enter and view notes relating to the selected trip on the Trip Notes window.
Trip Notes Summary
This option opens the Trip Notes Summary window, which displays a summary of all trip notes, including trip-related notes, freight bill-related notes, and freight bill shipping information, on one form.
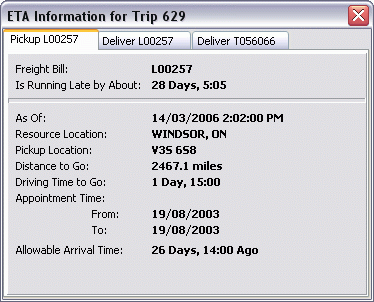
ETA
ETA Details
Selecting this option will open the ETA Details window, which outlines Estimated Time of Arrival (or late) information for every Leg of the selected Trip, separated into individual Tabs.
Calculate ETA
Selecting this option will calculate the Estimated Time of Arrival for the selected Trip. Your Mileage Server program must be up and running to calculate your ETA’s. It is important to note that Leg ETA’s and Departure dates are NOT considered — only the Freight Bill’s 'Pickup By' and 'Deliver By' Date Ranges are considered.
Freight Bill Details
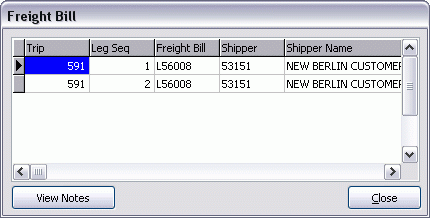
The Freight Bill Details option displays the Freight Bill Details window to view select Freight Bill information including start & end zones, shipper, pick up by date and commodity details. Select the 'View Notes' button to display any notes associated with the Freight Bill.
View Custom Defined Fields
The View Custom Defined Fields option displays the Custom Defined Fields window to display or edit these fields. These fields are created in the Codes Maintenance program and used to support fields that are necessary to your current business process but not currently available in TruckMate Trips. It is important to note that these fields do not display in the trip grid and must be viewed using this menu option.
Find Freight Bill
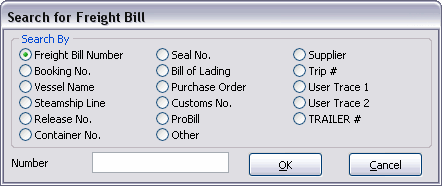
The Find Freight Bill option is used to search for a freight bill in the trip grid. The Search for Freight Bill window displays with multiple search criteria including freight bill and trace number, bill of lading and customs number along with many others. On the Search for Freight Bill window simply select the radio button for the type of search then enter the details in the Number field and select Find. You will be positioned to the Freight Bill in the grid or notified with a message indicating the Freight Bill does not exist in the trips grid.
Driver Pay
The Driver Pay option automatically generates Driver pay records based on the Driver’s Dispatch activity and the Application Configurator program > DISPATCH.EXE > 'Driver Pay Popup' option. The Unapproved Driver Pay window also supports the ability to add manual pay and deduction entries. You can also edit the automatically generated driver’s pay. On save you will be prompted to maintain these changes to the automatically generated pay values, select 'Yes' to keep the changes, select to 'No' to allow the changes to be recalculated on post.
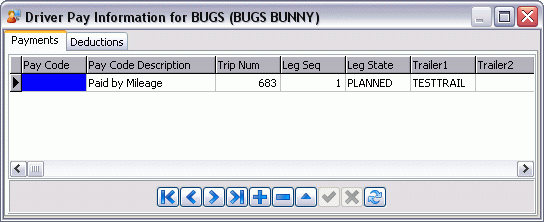
The Gross Pay Deductions field shows which Drivers have had Gross Pay Deductions setup in the Driver Profiles program. If this field is 'True', the selected Driver has such a deduction configured.
Driver Pay is approved in the Driver Pay Audit program. The parameters for automatic driver pay are configured in the Driver Pay Contracts program and Pay contracts are assigned to drivers in the Driver Profile program
Optimize Trip
The Trip Optimizer window is used to create trip legs based on the Pickup and Delivery locations of the freight bills assigned to the trip on the Load Optimizer window. A trip can be optimized or re-optimized at any time using this function. For example, after one or more legs on a trip have been completed you may assign additional freight bills to the trip and re-optimize any pickups or deliveries that have not been completed.
Mobile Messaging
The Mobile Messaging option contains several other options used to send Mobile Messages/Load Offers to the various Mobile Communication enabled Power Units attached to the Trips in your system.
Update Dispatch
The Update Dispatch menu item will show the same dispatch menu as before except that changes that were made to the trip are applied. When you select 'Send', it does NOT generate a new load offer, but simply sends out a new dispatch edit. For simplicity, the new dispatch deletes ALL of the stops on the existing dispatch and then replaces them with its own.
PACOS / AAAD / Geologics Load Offer
This option is only available when the Application Configurator program > DISPATCH.EXE > 'SplitLO' option is set to 'True'. The actual name of the menu item will change depending on the type of Mobile Device assigned to the selectede Trip. If more than one Device is available, both will show ('Geologic/PACOS Load Offer' for example) If an appropriate label can’t be found, the test 'PACOS/AAAD Load Offer' will appear.
Selecting this option will open the Load Offer window, which gives you the ability to send Load Offer messages with the enhanced PACOS 2.6 integration. For more information on the new changes for PACOS 2.6 (including details on Embedded Forms), see the Customer & Vendor Profiles program > Configure Stop Profiles section, and click on the 'PACOS' option.
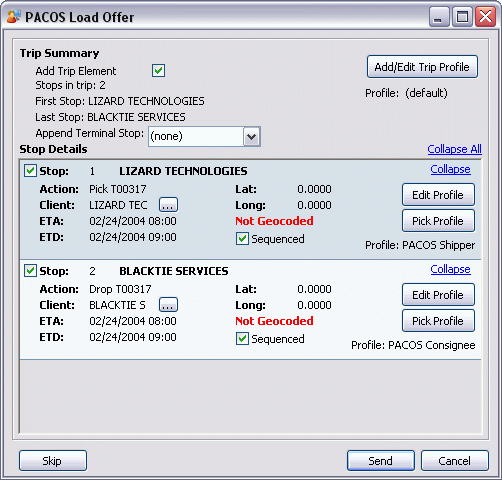
Several enhancements have been made to both the Trip Summary and Stop Details sections of the Load Offer window in order to comply with PACOS 2.6:
| Enhancement | Description |
|---|---|
Add Trip Element |
Selecting this checkbox will add a Trip Element to the PACOS Load Offer and enable the 'Add/Edit Trip Profile' button to the right. |
Add/Edit Trip Profile |
Select this button to open the Trip Profile Editor window (described below). |
Edit Profile |
Select this button to Edit the Profile that has been assigned to this Stop. Stop Profiles are created in the Customer Profiles program > Configure Stop Profiles > Profile Details section. |
Pick Profile |
Select this button to choose a Stop Profile for the current Stop from those available in your system. Stop Profiles are created in the Customer Profiles program > Configure Stop Profiles > Profile Details section. |
Sequenced |
This sets the current Stop to 'Sequenced' status. Basically, this means that it will ignore stops that are not in order (although the user can still manually select these stops). |
The Trip Profile Editor window is used to maintain commonly used option combinations.
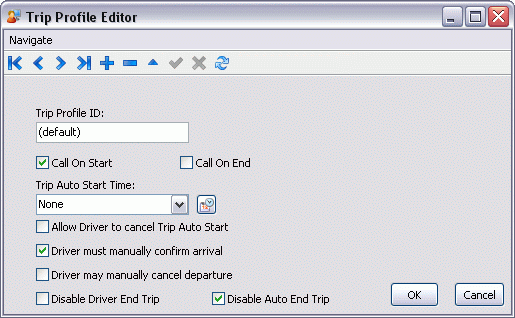
You can use the '+' button at the top of the window to configure a new Trip Profile for use with your PACOS Load Offers.
| Field | Definition |
|---|---|
Trip Profile ID |
Enter the name of the Trip Profile ID. |
Call on Start / Call on End |
These options tell the system when to send the Load Offer to the PACOS Device. Select 'Call on Start' to send the message at the beginning of the Trip Sequence, or 'Call On End' to send the message when the Driver reaches the last Trip Leg. |
Trip Auto Start Time |
This option determine when the Trip should automatically start. In addition, the user can select the calendar button to the right to select a specific time/date from a calendar menu. |
Allow Driver to Cancel Trip Auto Start |
Selecting this checkbox will allow the Driver to cancel the configured auto-start time for the Trip. |
Driver Must Manually Confirm Arrival |
Selecting this checkbox will force the Driver to manually confirm his arrival using his Mobile Device. |
Driver May Manually Cancel Departure |
Selecting this checkbox will allow the Driver to manually cancel his Departure Trip if the need arises. |
Disable Driver End Trip |
Selecting this checkbox will allow the Driver to manually cancel his End Trip if the need arises. |
Disable Auto End Trip |
Selecting this checkbox will disable auto-end Trip functionality. |
When you do a Load Offer, the system will check how many Mobile Communications devices are assigned to both the Driver and Power Unit on the selected Trip. If the number of devices is > than 1, a dialog message will be displayed allowing the User to choose which devices to send the Load Offer to. The User will then be shown a Load Offer dialog for each selected device.
|
Load Offer details are recorded in the LOAD_OFFER Table, and are sent via the TruckMate API. When AAAD stops are being created, if one of the stops can not be geocoded properly, the latitude and longitude will come back as '0000000N/0000000E' or blank. If this happens, AAAD Load Offers have a field that lets the Driver know to send a 'Client GPS Update Macro'. This Client GPS Update Macro is sent by the Driver to update the Client’s lat/long when they have arrived at the stop. |
Load Offer
The Load Offer function is used to send a Mobile messages to the Driver for review/acceptance. The message is sent though the Mobile Dispatch system to the mobile device installed on the power unit that is assigned to the trip. You can also send a different macro than the Load Offer macro, or a free form message. The Load Offer macro is configured in the Communication Macro Setup program with the specific information required for your Load Offer communication and displayed on the Load Offer window. You can also use the <Ctrl><A> hotkey combination to send a Load Offer for the selected Trip.
When you do a Load Offer, the system will check how many Mobile Communications devices are assigned to both the Driver and Power Unit on the selected Trip. If the number of devices is greater than 1, a dialog message will be displayed allowing the User to choose which devices to send the Load Offer to. The User will then be shown a Load Offer dialog for each selected device.
When sending a Load Offer with multiple Trace number fields, these will be automatically added to the Load Offer sequentially. If there are more fields than numbers, the excess fields will be left blank.
| Load Offer details are recorded in the LOAD_OFFER Table, and are sent via the new TruckMate API. You can include details regarding your Customs Brokerage Agent in a Load Offer. Several fields have been added from the TLORDER Table to support this functionality. |
Load Offer for All Trips in this Filter
Selecting this option will send out Load Offer messages for All Trips displayed in the Trips Grid (provided those Trips have a Mobile Device equipped Power Unit attached to them). With the use of specific Trip Tab Filters, this option can reduce the time needed to send multiple Load Offers by a large margin. The User will then be prompted to confirm that they want to send a Load Offer for every Trip displayed in the Trip Tab. If 'Yes' is selected, Dispatch will then loop through all of the Trips in the Grid and attempt to send a Load Offer to each of them automatically using the default parameters, Load Offer Macros and Macro Data. At the end of the Batch Load Offer process a dialog will summarize how many Load Offers were sent.
| Improperly configured Power Units or Mobile Networks will require User intervention for each Freight Bill assigned. For example, if a Load Offer Macro has not been specified as default in the Communications Macro Setup program, each Trip on that Network will popup a dialog asking for the User to select a Macro. |
When you do a Batch Load Offer, the system will also check how many Mobile Communications devices are assigned to both the Driver and Power Unit on the selected Trip. If the number of devices is > than 1, a dialog message will be displayed allowing the User to choose which devices to send the Load Offer to. The User will then be shown a Load Offer dialog for each selected device.
Using the Application Configurator program > DISPATCH.EXE > Suppress Load Offer Dialogs option will further streamline this process by removing some of the common error dialogs that appear during the Batch Load Offer process.
| Load Offer details are recorded in the LOAD_OFFER Table, and are sent via the new TruckMate API. |
Geologics AA Load Offer
This option will only be selectable for Trips with a Geologics enabled Mobile Device attached. These load offers are similar to PACOS and Cancom/Omnitracs Load Offers, but are designed with Geologic (formerly Xata) Trips in mind.
Driver Manifest
The Driver Manifest option provides the Manifest pick-up and delivery information into an outbound message Forward Message window to send to the Driver.

Manage Auto-Dispatch
The Manage Auto-Dispatch feature lets dispatchers view the status of any load offers, control the order of any newly offered trips for a particular driver, and automatically inform a driver when the system activates him on a particular trip or when dispatch revokes an offer.
| This option accesses what is now known as Auto Dispatch 1.0 functionality. To use the new Auto Dispatch 2.0 functionality, see the Auto Dispatch Tab documentation. |
View Reefer Monitoring Plan
This option is only available if a network with reefer trailer monitoring is installed. Selecting this option allows the user to access the 'Reefer Monitoring Plan' window.
Load Cards
The Load Cards option provides the ability to view and print the Load Card Report from the Reports Selection window. The Load Cards report provides the prints the trip instructions to a driver.
Carrier
The Carrier option provides the ability to assign a Carrier (Interliner) to a trip from the Carrier Information window. This allows Rates to be entered, Margins calculated and Payment contracts defined.
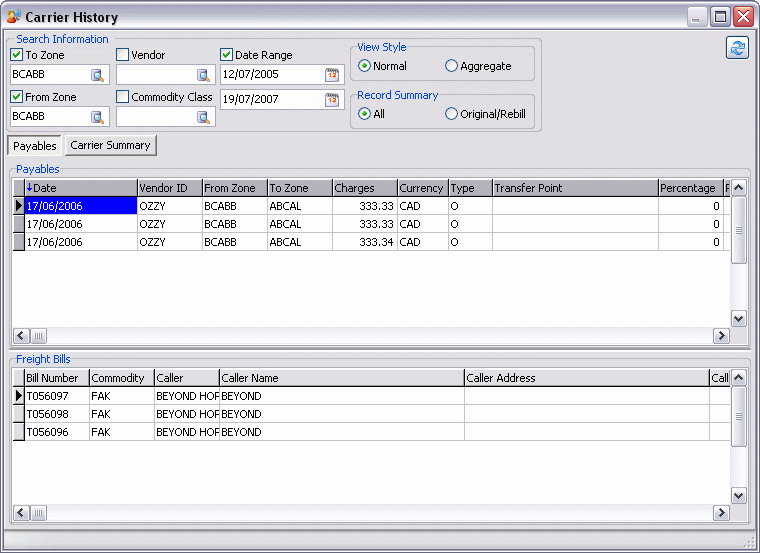
Carrier History
The Carrier History option displays information about carriers who were previously assigned to trips on the Carrier History window. This includes 2 grids, the Payables grid displays a summary of the interliner charge (complete details about the charge can be viewed in the Customer Service program). The Freight Bills grid displays a summary of the freight bills that were included in the Interliner carriage that is selected in the Payables Grid.
Enter Load Request For Carrier
This option will invoke the Load Request tab with the carrier of the selected trip being the active carrier. This functionality serves as a shortcut when an additional load needs to be assigned to the carrier of the current trip.
Round Trip
The Round Trip options provide the ability to:
-
Set as Head Haul: defines the trip as the Head Haul for the Round Trip.
-
Set as Back Haul: defines the trip as the Back Haul for the Round Trip and requires entry of the Head Haul trip number on the Set Back Haul Round Trip window.
-
Set as Back Haul (Searching): defines the trip as the Back Haul of the Round Trip and provides a search window to select the Head Haul trip number on Select Trip Number window.
-
Set as Back Haul (Advanced): This will pop up a search box similar to the 'Set as Back Haul (Searching)' search box but it will allow you to search by Power Unit or Driver. The records will be displayed in reverse date order using the 'Actual Date' of the Trip (most current will be displayed at the top). The number of records that will be displayed will be limited to the number specified by the 'Back Haul Advanced' option in the Application Configurator program > TRIPENV.EXE section.
View Carrier’s Profile
Selecting this option will invoke the Vendor Profile window and display the selected carrier’s profile.
Change Op Code on Trip
The Change Op Code on Trip option provides the ability to change the trips Operation Code. You can also use (Ctrl + T) shortcut key combination to use this option directly from the trip grid.
Change Op Code on Leg
The Change Op Code on Leg option provides the ability to change the legs Operation Code. You can also use (Ctrl + G) shortcut key combination to use this option directly from the trip grid.
Manage Driver’s Fuel / Credit Cards
This option will open an instance of the Fuel Card Management program with the Fuel and/or Credit Cards belonging to the Driver attached to the Trip displayed.
Manage Power Unit’s Fuel / Credit Cards
This option will open an instance of the Fuel Card Management program with the Fuel and/or Credit Cards belonging to the Power Unit attached to the Trip displayed.
Trip Templates
Opens the Trip Template Selection window.
FB Match to Trip Legs
After creating Trip Templates using the 'Trip Template' option, you can match multiple Freight Bills to Trips using this option. When the Match Freight Bills window displays, enter all the Bill Numbers of the Freight Bills that you want to be associated to your Trip, adding them to the Trip by using the '+' button. The '-' button will remove Freight Bills from the pending list. Select the 'OK' button when you have added all the Freight Bills to the Trip.
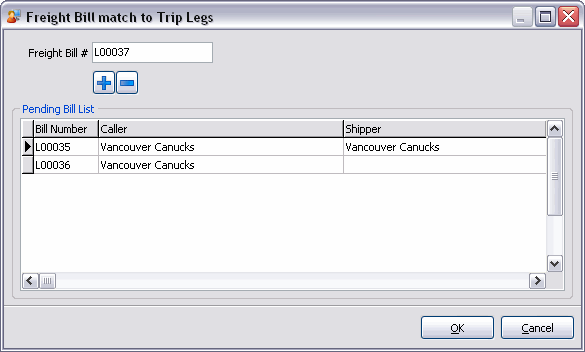
Make sure to add to the Trip some Freight Bills that have a final destination that is not equal to any of the predetermined Trip Template stops.
| The system will inform you of these freight bill numbers as well as the Terminal site that was used as a delivery point instead of the final destination. If you assign to the Trip a Freight Bill with a 'Current Zone' not equal to any of the predetermined Trip Template stops, the system will reject this Freight Bill and will not assign it to the Trip. |
Your newly created trip that was created using a predetermined Trip Template is now populated with Freight Bills.
To properly use this function with Trip Templates, ensure that the 'Create Bills When Generating Trips from Templates' option is set to 'False' in the Application Configurator program > DISPATCH.EXE section.
Expert Fuel Optimization
Selecting this option will display the Fuel Optimization Query window, which allows the Dispatch program to connect to the IDSC Fuel Expert Server and receive a list of fuel stops and route. For more information on this feature, see the Expert Fuel Optimization window documentation.
Driver Detention
Selecting this option will open the Detention Form, which allows quick entry of Detention information as it happens on the Dispatch side of operations. See below for more information.
Build Carrier Legs
If a Freight Bill has been created with several Interliner Payable records (on the Customer Service program > I/P Tab), selecting this option will "build out" the Freight Bill into an appropriate Trip (one Trip Leg for each assigned Carrier). This process can also be setup to occur automatically with new Freight Bills created in the Customer Service program, in a process known as pre-planning Carrier Trips.
New Container
The New Container option provides the ability to add a new container with the minimum required information on the Quick Container Entry window.
Intermodal
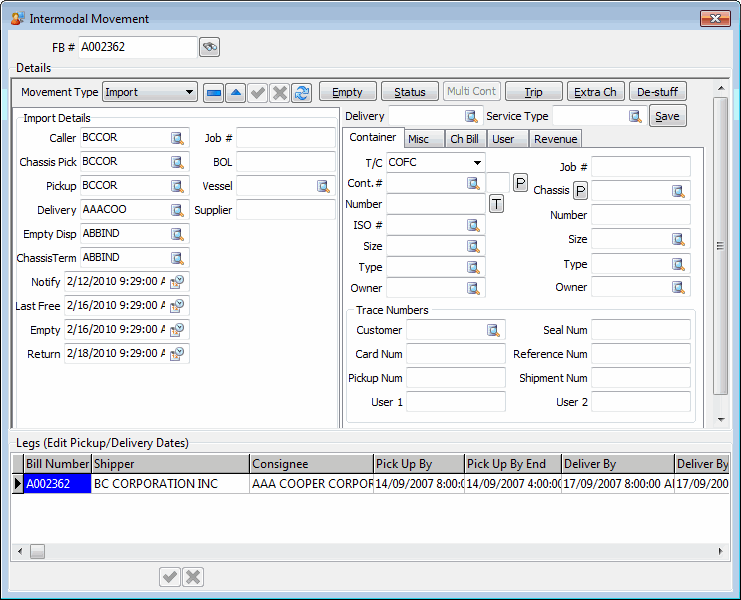
Intermodal Dates / Details
The Intermodal Movements window provides a view of all of the information defined in the Customer Service program > Intermodal Tab for the Freight Bill, as well as the existing grid of the various freight bills/legs so you can change the pickup/deliver dates in a single screen.
| Field | Definition |
|---|---|
FB # |
Displays the number of the Freight Bill that was selected from the Dispatch program’s Freight Bill / Trip Grid. |
Search |
Once you are in the Intermodal Movement screen, you can find another Intermodal Movement to view/update by simply clicking the search button (small button with binoculars to right of FB # box at top of screen). |
Details |
The entirety of the Details section mirrors the Customer Service program > Intermodal Tab, and includes all functions available from Customer Service. This means you can do many things from dispatch that previously you could only do from Customer Service, such as create empties, change trace number fields, change container info, etc. The dates available are specific to the Movement type, for example an Export movement requires a 'Load Date' and an Import movement requires an 'Empty Date'. Dates can also be modified here, simply select the calendar button to select the new date. The modified date becomes available in Customer Service. |
IM Change Leg End Zone
Selecting this option will change the 'End Zone' of the current Trip Leg and the 'Start Zone' of the subsequent Trip Leg (if present). Note that this option will only change the Trip data (i.e. it will not update the Freight Bills attached to the Trip Legs).
IM Change Empty Disposition / Chassis Terminal
Selecting this option will allow the user to change the 'Client ID' of the empty disposition or chassis termination. This option will update both the Trip information and the Freight Bill details.
IM Swap Return Bills
When the user right-clicks on Trip Grid and selects the 'IM Swap Return Bills' option, a new pickup list will show all Import, Export, Dom IB, Dom OB, Empty Repo, and any associated empties bills that are in an 'Availability', 'Assignment', 'Terminal' or 'Spotting' status behavior. The user can remove the pickup text to show all Intermodal empty bills. After selecting an Intermodal empty bill, it will be swapped with the original empty bill on the selected leg. A warning message will popup if users right-click on a leg without an Intermodal empty bill.
IM Empty
Selecting this option will immediately create an empty Intermodal Freight Bill based on the selected Freight Bill (the new FB will have the '-I' suffix). For more information on empty Freight Bills, see the Customer Service program > Intermodal Tab.
IM Status
Selecting this option will open the Intermodal Status Change window, which allows you to change the Freight Bill’s current status to the status code defined by the 'IM Avail Status' Application Configurator option for CSERV.EXE.
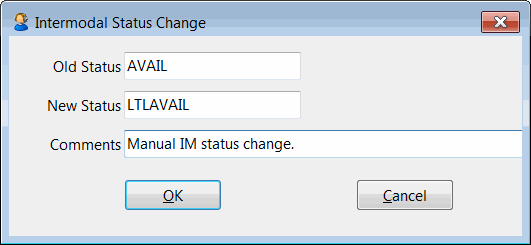
| The Application Configurator program > CSERV.EXE > 'IM Avail Status' config option must have a value for this option to work. |
IM Multi Container Update
Selecting this option will open the Multi Container Update window used for Intermodal purposes. This window will allow you to update the Status of multiple Freight Bills in Dispatch by different information (i.e., by vessel or scheduled rail shipment). You also the ability to do mass status update and mass updates of 'Notify' dates and 'Last Free' days (via the IM Dates form). This window will update the Vessel or Rail Shipment ETA and have it update all related containers automatically.
To select multiple Freight Bills to include in the Multi Container Update, simply select two or more Freight Bills from the Available Freight Bill Grid while holding the <Ctrl> key on your keyboard.
| Freight Bills are grouped by their 'Job Number' value for Intermodal purposes. |
IM Trip
Selecting this option will create an Intermodal Trip, similar to how the 'Create Trip' button functions on the Customer Service program > Intermodal Tab, which creates a Trip for a two-way move automatically. It creates a Leg going from the port to the Customer site, and a second leg going from the Customer back to the port.
IM Extra Ch
Selecting this option will apply the details entered on the Intermodal Movements window and create a new Accessorial Charge Freight Bill based on those details.
| You can also create more than one Extra Charge Freight Bill. A confirmation message will display if an Extra Charge Freight Bill already exists for the Intermodal record, asking if you want to create another. The first freight bill will have a bill number with '-X' added (same as current); additional bills with be '-X2', '-X3', etc. |
IM De-Stuff
Selecting this button opens the Create De-Stuff Freight Bill window, which give the User the ability to 'de-stuff' a Container at their own dock and then send the actual Freight to multiple Consignees.
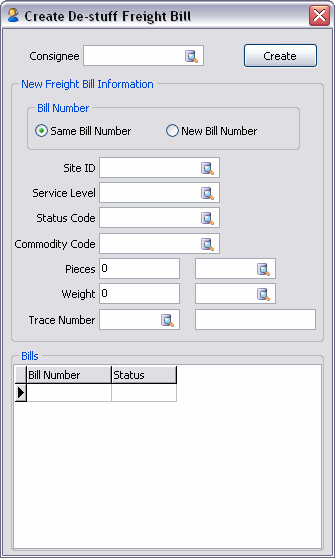
The Create De-Stuff Freight Bill window will create a Freight Bill that is similar to an Empty Origin/Destination bill. It will copy the Caller information from the loaded freight bill to the De-Stuff/Drayage bill (as well as the Consignee information from the loaded Freight Bill to the 'Shipper' field of the Drayage bill).
| Field | Definition |
|---|---|
Consignee |
Users are required to enter the Client ID for the final Consignee(s) via the 'Consignee' field at the top of the window. New Freight Bills are billed individually (not 'rolled up' as with Extra Stop bills). |
New Freight Bill Information The values you choose in this section will be applied to the De-Stuff Freight Bill that is created and delivered to the 'Consignee' chosen above. |
|
Bill Number |
You can choose to have the 'Same Bill Number' as the original Freight Bill, or give a 'New Bill Number' to the De-Stuff Bill. |
Site ID |
Select a Site ID for the De-Stuff bill. |
Service Level |
Select the appropriate Service Level for the De-Stuff bill. |
Status Code |
Select the Status Code that will be applied to the De-Stuff/Drayage Bill. Only those Status Codes of 'DOCKED' behaviour are selectable from the Database Search button. |
Commodity Code |
Enter the Commodity Code that will be applied to the Detail Line of the created De-Stuff Freight Bill. |
Pieces / Weight |
Enter the 'Pieces' and 'Weight' values of the Freight Bill, and select their respective units via the Database Search field. |
Trace Type / Number |
Enter a 'Trace Type' and 'Number' for the De-Stuff Freight Bill that will be created. |
Create |
Select this button to create the De-Stuff/Drayage Freight Bill based on the criteria you have specified in the De-Stuff window. |
| If using De-Stuff functionality, a 'Bill Size' value of '7' (or in certain cases, '6') is recommended. See the Codes Maintenance program > Site Setup Tab > 'Bill Size' field documentation for more information. |
Override Deliver By
This feature can be used to override a deliver by date and time. Selecting this option will open a pop-up form asking the user to select a date/time. (The default is the current date/time.) After the user selects OK, they will be asked to confirm the change; it will then update the Deliver By field to the new date/time.
Freight Board Interface
The Freight Board Interface (FBI) is an application that runs in the system tray. It accepts requests (via TCP strings) from various TruckMate applications to post (or cancel) a Freight Bill load or equipment to various load matching websites (currently, TransCore’s DAT format and PostEverywhere are supported).
Right-clicking anywhere within the Trip Tab in the Dispatch program will allow you to access FBI functionality, provided you have installed the TMW FBI application, and have one of either License #36001 (or #36002) installed via the License Registration program. Once installed, just run the TMW FBI application (which will load into your system tray) and then access the right-click options in Dispatch:
Post Truck (Trip)
Selecting this option launches the FBI application, and attempts to create a posting for the Trip data you right-clicked from. The first time you the FBI, you will need to fill out some setup info ('FTP site', etc.).
Additional Details
Driver Detention
The User has the ability to view Driver Detention information on the Trip Status Change window if the Application Configurator program > RATES.EXE > 'Use Detention' option is set to 'True' and Detention Rating has been properly setup on the Rates Maintenance program > Detention Tab. As a Trip goes through its various stages, the Dispatcher will enter date/time information into these fields, and the Driver Detention logic will calculate the Detention charges based on the rating setup.
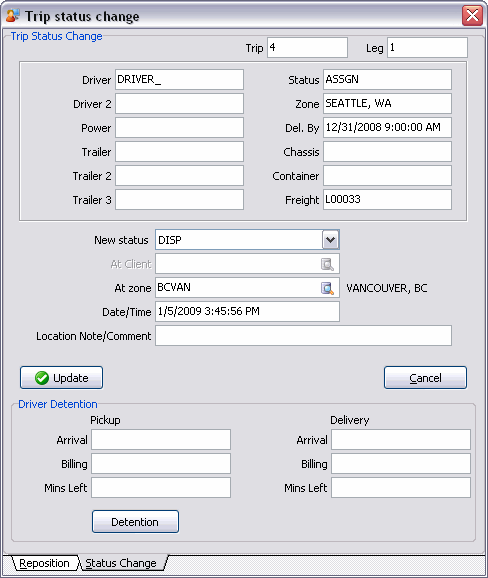
If Detention Rating is setup and the User sees something he/she does not like in the six fields in this window, they can select the 'Detention' button at the bottom of the window to go into the Detention Form and manually adjust information or send an e-mail using the TruckMate E-mail System. The 6 fields are also visible on the Trip Tab.
ETA Basics
It is important to understand the basic functionality that provides the ETA for Leg dates of the trip. When you create a trip and assign the Freight Bill, the Freight Bill’s Deliver by earliest date becomes the ETA for Leg Date/Time for the trip leg. Next you assign a Power Unit to the trip, the Mileage Server program along with your mileage software calculates the time it will take to get the Power Unit from where it is and populates the ETA Date/Time.
For example, create a trip with all 3 freight bills and optimize. Legs should look as follows:
-
03/25/2019 1:00 pm LANGLEY to CALGARY
-
01/01/1980 (default date) CALGARY to EDMONTON
-
01/01/1980 (default date) EDMONTON to REGINA
Then, you assign the truck to the leg and wait until MileServer processes the GENETA job. The ETAs are calculated by Mileage Server program calling your mileage software, and the planned depart for the next leg gets set.
| Dispatch now allows ProMiles to be used as an ETA service. Mileage Server program version 8.0.2.7 or greater is required. |
Then Refresh dispatch, based on the assumption that it will take an hour to get from Hope to Langley, the legs will look like this for the Planned Departure and ETA Dates:
-
03/25/2019 10:30 am LANGLEY CALGARY 3/25 10:30 pm
-
03/25/2019 10:45 pm CALGARY EDMONTON 3/26 12:30 am
-
03/26/2019 12:30 am EDMONTON REGINA 3/26 9:am
As status changes occur, the ETA/PLANNED DEPART fields will be recalculated. The 'LS_PLANNED_DEPARTURE' field only gets updated if the leg is in PLANNED state.
Mileage Basics
Dispatch generally includes interfacing with a 3rd party mileage software through our Mileage Server program. Zone codes must have latitude and longitude values, available in the Codes Maintenance program as the distances are calculated based on the zone codes latitude and longitude values. Use the Latitude and Longitude Update program to automatically update your zone codes.
Dispatch provides the Distance for each leg of a trip in the Leg Dist column of the trip grid. For example, when a dispatcher creates a new trip the Leg From Zone and the Leg To Zone is sent to the Mileage Server program automatically. This feeds the points to the third party mileage program, and then relays the response (the mileage) back to the Dispatch program. The mileage for each trip leg displays in the Leg Dist column of the Trip grid.
| The Mileage Server program must be running for mileage lookups to occur. |
The mileage lookup is not necessarily performed at the moment the trip leg is created depending on the volume of entries in the database. You can select the Refresh button to immediately refresh the data.
Refresh Mileage Settings
The Refresh Mileage Settings is available when your Mileage Server program setup changes or if the Mileage Server has stopped running and had to be re-started. You can access this option by clicking the right mouse button anywhere in the grey area that surrounds the dispatch grids.