How Do I?
General Tasks
How do I create and view codes that are used throughout the TruckMate system?
-
Open the Codes Maintenance program (CODES.EXE).
-
Select the Tab related to the kind of Code you would like to create. If you want to create a 'Status' Code, select the Status Tab.
-
Use the '+' button on the navigational bar to begin a new record, and enter the details as described in the Online Help page for the specific Tab.
How do I create site codes?
The Codes Maintenance program is used to configure billing 'Sites'. These sites are used within the Customer Service program and the Quick Bill Entry program to differentiate groups of freight bills by their freight bill number configuration. Also, you can set defaults for data entry for different sites, such as the Service Level and Default Delivery Zone. In the Quick Bill Entry program, you are prompted to specify the site from which you wish to enter bills as the program loads. You can also change the site from within the program by clicking on the arrow buttons beside the Site field at the bottom of the screen. In the Customer Service program, you can change the site by clicking on the Site button in the bottom right corner of the screen.
-
Open the Codes Maintenance program (CODES.EXE).
-
Click the 'Site' icon on the Toolbar, or open the 'Go' Menu on the Menu Bar and select the 'Site' option.
-
Enter the Site Name. Make this as descriptive as possible as this is the text displayed to users when they select a site.
-
Enter a Prefix. You can specify up to three characters as a prefix to the freight bill number. While the freight bill number will increase sequentially, the prefix will remain the same. Keep in mind that each character of the prefix reduces the possible number of bills that can be entered for a site. For example, if you configure a bill size of 6 digits and a single letter prefix, the first freight bill will be number X00001 (a total of 6 digits), with a total number of possible freight bills being 99,999.
-
Enter a Bill Size. This is a maximum of 7 digits. This includes the Prefix.
-
Enter a Default Delivery Zone. If you specify a zone description here, it will become the End Zone (in the Customer Service program), or the Consignee Zone (in the Quick Bill Entry program), when no other value is specified for those fields. Normally, those fields will default to the zone code configured in the consignee’s profile (in the Customer & Vendor Profiles program). If consignee details are manually entered (rather than using a customer configured in the Customer & Vendor Profiles program), the zone code specified in the Default Delivery Zone field will be used.
-
Enter a Terminal Zone. This is the zone description selected here will be used by the Cross Dock program to organize incoming freight for cross docking purposes. If you do not specify a zone here, freight bills entered from this site will not be displayed in the Cross Dock program. Only zone codes that are configured as Terminal zones in the Codes Maintenance program are available for selection.
-
Enter a Site Type. Configuring a site as an LTL site generates certain data entry defaults in the Customer Service program (for example, the caller’s name and details). For freight bills entered from LTL sites, the shipper name and details will default to the caller’s name and details, the consignee name and details will not be required, and the cursor will move to the Details tab as soon as the bill header is filled in.
-
Enter a Service Level. Select the default Service Level for this site. Service Levels are configured on the Service Levels tab of the Codes Maintenance program. The level selected here will become the default on the Details tab of the Customer Service program, and the default Service Level in the Quick Bill Entry program.
-
Enter the Availability Status. When a freight bill is posted, it is assigned a freight bill number, and is displayed in the Dispatch program. You can assign the status that will be applied to the freight bill when it is posted. Only status codes of the Available and Docked behaviors can be selected.
-
Enter a Bill Series. This determines the numbering convention used for freight bills generated from this site. The Bill Series feature allows you to assign the same bill numbering series to two different sites. For example you may have Site 1 set with the prefix "A" so that the freight bill number appears as "A0001". Site 2 may be set with the prefix "B" so that the bill number appears as "B0001". If you assign the same bill series to both of these sites, the system will number them consecutively. For Example: A0001, A0002, B0003, A0004, B0005, … Notice that the prefix changes depending on the site, but the rest of the freight bill numbers increase as if they were from the same site. You can have up to twenty five bill series. If you want each site to have it’s own bill series (eg: A0001, A0002, B0001, B0002, A0003, …); make sure that you select a separate bill series for each.
-
Enter a Current Series Value. The highest number that has been applied to a freight bill in this Bill Series is displayed in this field.
-
Enter an Edit Value, if applicable. This allows you to change the Current Series Value. If you change this value, the next freight bill posted in the Customer Service or Quick Bill Entry program will have the next consecutive number above the one specified here. Be careful that you do not set the starting freight bill number to a value that has already been used. This value will apply to all freight bills in the same Bill Series.
-
Place a checkmark in Allow Rate Sheet Override, if applicable. Select this when using automatic rating. Then, the system will allow a user to override the rate-sheet selected and use an alternative one for this freight bill only.
-
Select the Options Tab and fill in the following option:
-
'Commit frequency' = 500
-
Select the 'OK' button at the bottom of the 'Import Table - Zone' window.
-
Select the Options Tab and fill in the following option:
-
-
'Commit frequency' = 500
-
-
Select the OK button at the bottom of the 'Import Table - Zone' window.
How do I load zone codes using Data Studio (DB 10.5 process)?
To load the ZONE.ixf file using Data Studio 10.5, follow these steps.
-
Open the DB2 Data Studio utility by selecting: Start
 Programs IBM Data Studio Data Studio Client.
 -
In the Administration Explorer, select your database to expand.
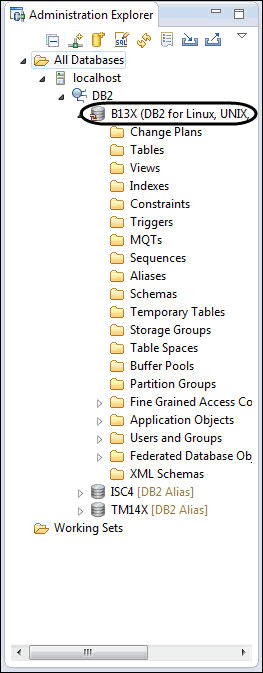
-
Right-click on Tables and select Database Catalog Filter.
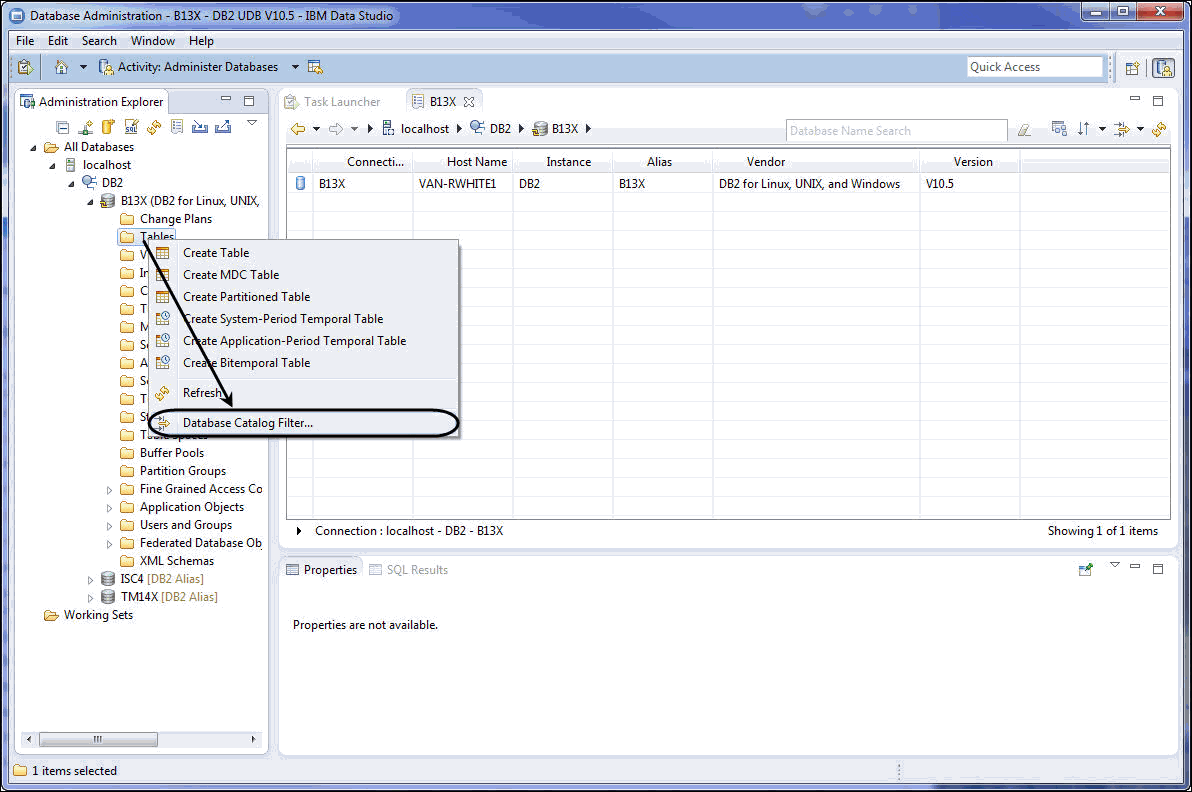
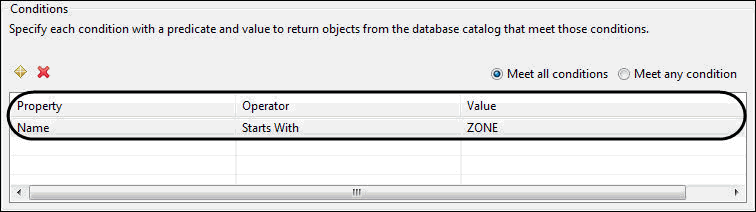
-
On the Database Catalog Filter for Tables screen, enter ZONE in the Value column to find a table and click Finish.
-
In the returned table results, right-click the ZONE table name. Point to Load and then click With Load Utility.
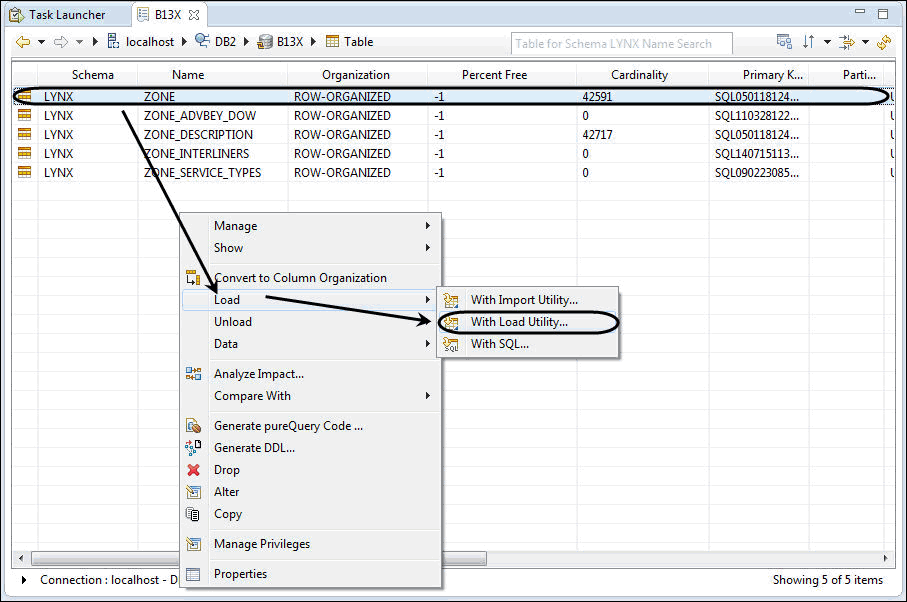
-
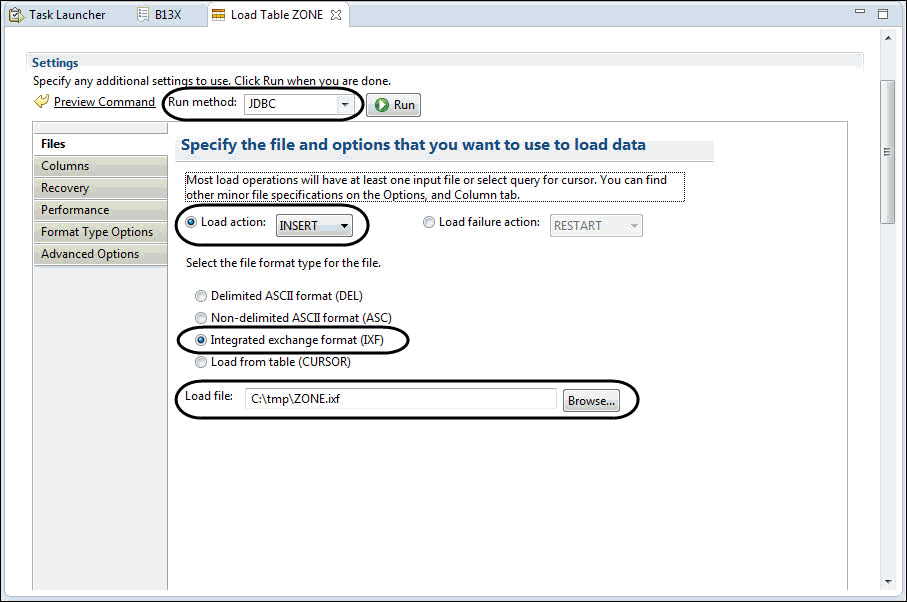
From the Files menu, under the Load Table ZONE tab, select the following file and options to load data:
-
Ensure the Run method: is JDBC.
-
Enure Load action is INSERT.
-
Select the Integrated exchange format (IXF) option as the file format.
-
-
On the Load file field, click Browse to the directory that contains ZONE.ixf file and click Open. It is recommended to keep the directory path short. For example, C:\tmp\ZONE.ixf.
-
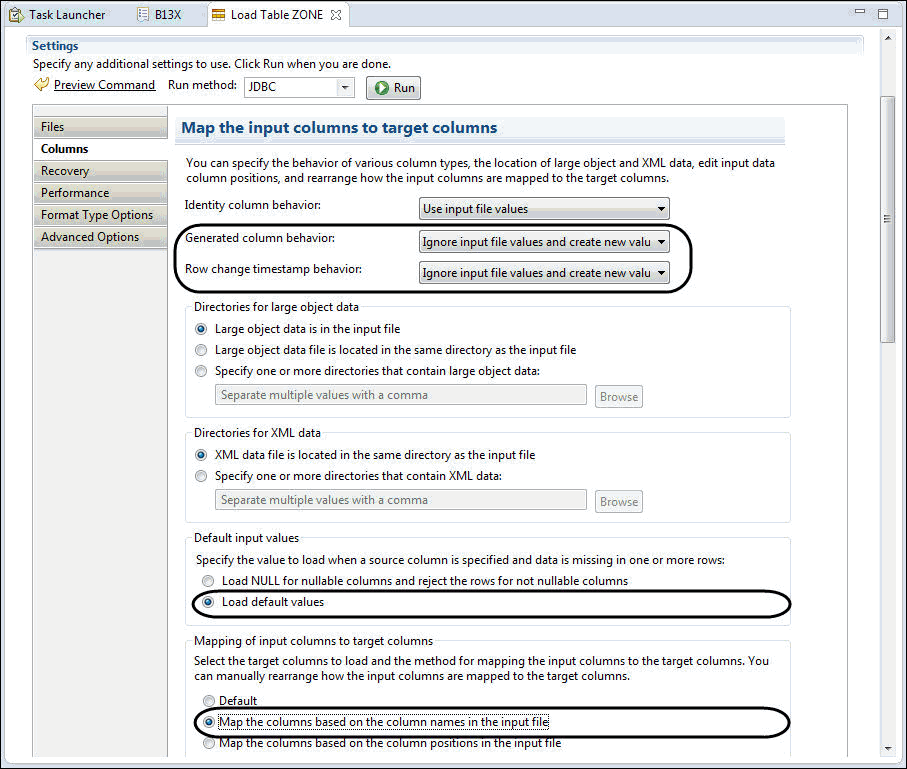
Click the Columns tab.
-
On the Columns tab, modify the following input options to target columns.
-
Generated column behavior* - Ignore input file values and create new values.
-
Row change timestamp behavior* - Ignore input file values and create new values.
-
In the Default input values section, select Load default values option.
-
In the Mapping of input columns to target columns section, select Map the columns based on the column names in the input file.
-
-
-
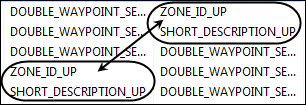
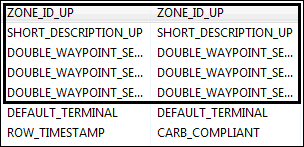
At the bottom of the column names, the Input Column Name and Target Columns Name are not lined up. Use Move Up to line them up.
-
Select ZONE_ID_UP and click Move Up three times and then select SHORT_DESCRIPTION_UP and click Move Up three times.
-
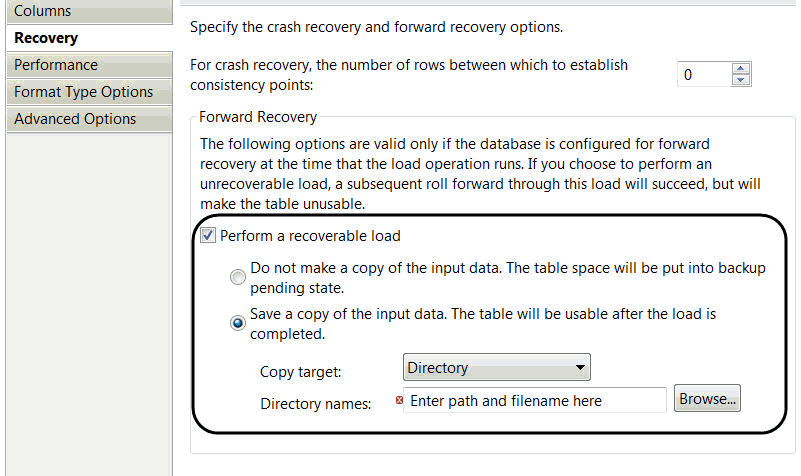
On the Recovery tab, when doing a LOAD action,select Perform a recoverable load and then select Save a copy of the input data option.This prevents the tablespace in the table you are loading into from requiring a backup.
-
Click Run at the top of the wizard.

Repeat the steps in the load the ZONE.ixf file procedure to load the FASTZONE.ixf file using Data Studio 10.5. Be sure to replace ZONE.ixf with FASTZONE.ixf.
Note: If you have issues importing the fast_zone table, you can run the REBUILD_FASTZONE procedure and will accomplish the same thing. Note that the REBUILD_FASTZONE procedure should be run after hours as it will most likely impact database performance.
How do I create an accessorial charge based on a fuel price range?
-
Set up Average Codes: the Average codes are used to indicate a regional market you are tracking (average) fuel prices for. Imagine that the Southwestern US States (CA, AZ, NM, NV) may be set up as a single fuel market. Set up a code, USSW, to represent the average fuel price assigned this market.
-
Click on the Fuel Price button to open a pop-up form.
-
Go to the Averages tab and create your code.
-
Enter in Fuel Prices: you now can start entering average fuel prices for your USSW region by date. These are usually set weekly. If you also service customers in the US NW (OR, WA, ID, MT) you can track a separate set of average fuel prices using an Average Code you would have set up in Step 1, USNW.
-
Click on the Fuel Price button to open the same form as above. Go to the Prices tab to enter in your fuel price rates.
-
Assign FSC Percentages per Accessorial Charge Code, per Customer, per Date, Per Average Code.
The Accessorial Charge system allows you to set up one or more accessorial charge codes to apply to FSC, but as you can see, you can pretty much just run one from here forward.
In the code details for your FSC code specifiy:
-
An Average Code to pull in the current fuel price.
-
A fuel price range and percentage to apply.
-
The percentage to apply to one customer, or if you leave it blank, all customers will be included.
-
An effective date range.
You can make this as simple or as complicated as you want.
Example 1
The US SW Market is designated as Average Code USSW. For the first week of September let’s say the average fuel price for the market was 211.3. You have one accessorial charge FSC which is auto-assigned everyone.
In the details for FSC you have set up a rule that looks like this:
-
Average Code is USSW, indicating the charge is to be calculated based on the applicable fuel price for USSW. Your FB is billed as of Sept 5 so the accessorial charge will be based on the 211.3 fuel price.
-
The fuel price range is set to start at 0.0 and end at 3.00, and the percentage is 0.04. This indicates that 4% of the fuel price will be applied if the fuel price falls between $0 and $3.
-
Client ID is blank, indicating the rule applies to everyone.
-
The Start Date is from 1/1/2000 to 1/1/2006, which indicates that this rule is valid for calculating any charges on billing from January 1, 2000 to January 1, 2006.
Example 2
You could also set up a rule to apply to a specific customer code, BAN05, to be charged 5.2% of the USSW fuel price. Sequence this before the general rule so that any billing to BAN05 will pick up the rule and generate the increased charge before the rating hits the more general rule.
Example 3
You could set up your rule so it applied to any billing in Q1 2004. You could then increase the percentage to 4.5% for Q2 2004 on an USSW fuel price between $0 and $3.
Example 4
You could also set up multiple rules so that for any USSW fuel price between $0 and $1.50 the percentage would be 3%; between $1.51 and $2.00 the percentage would be 4%; and between $2.01 and $3.00 the percentage would be 4.5%.
Extra Stop Accessorials - How to set up for specific stop pay?
Example
Parent freight bill + 2 Xstops: You want to charge $90.00 for the first stop and $150 for the second stop for a total of $240.
-
In Codes Maintenance > Accessorial Charges, set up a code for Extra Stops; Charge Behaviour = Extra Stops. Check the Roll Up Extra Charges flag. Check the Auto Assign By Default (only if you want them to auto add to the FB).
-
In the details, add a line for the first Xstop at $90.00; so if there is only one Xstop on the freight bill, then the $90.00 charge would apply. Add any other criteria needed in the detail line.
-
Then right-click on the detail line and click on Show Memo and add the following to the first Xstop charge: NO_STOPS = 1. Note: This will look at the TLORDER.NO_STOPS value of the parent bill.
-
For the second Xstop, add another detail line at $120.00 (this is the manual part where you must determine what the charge would be for twp Xstops in this scenario). In this example it would be $90.00 for the first stop plus $150 for the second stop = $240, divided by two stops = $120.00 each stop.
-
Add any other criteria needed in the detail line. Then right-click on the detail line and click on Show Memo and add the following to the second Xstop charge: NO_STOPS = 2. Note: This will look at the TLORDER.NO_STOPS value of the parent bill.
When you look at your freight bill with the two Xstops on it, you will see the Accessorials displayed.
Imaging Tasks
How do I setup imaging?
The right-click access is available in many TruckMate executables (See the full list at the Imaging Overview). However, right click access is not there automatically. You must decide which executables you want to access the viewer from and set them up in the Codes Maintenance program > Imaging Tab. Basically, when in the Codes Maintenance program you must indicate the following:
-
The text label for the Imaging document that you will see in the right-click Context Menu of TruckMate applications.
-
Which piece of data from TruckMate (table and column) is going to be passed to the viewer for searching.
-
The TruckMate program from which the right-click is to be available.
-
The places / parameters in the viewer that will accept the search value.
Note: This last item is dependent on the imaging vendor (for example, Microdea requires that you specify 3 values: server, repository and imaging field; Pegasus uses base name and field name, and PaperWise uses Environment ID and Search Field).
To speed up the setup process, once you have filled in the TruckMate table on the left side of the screen, you may click the button at the bottom right to auto-load all possible executables into the grid for the given TruckMate table. Alternatively, if you add executables to the right-hand grid one at a time, you may either press enter or double-click the cell to select from a list; this list includes user-friendly descriptions of the executables.
Finally, note that if using a 3rd-party imaging vendor that is new to TMW Systems, you would need to get an updated (rebuilt) copy of every TruckMate executable from which you want access. As of TruckMate 6.0, all executables in the Document Imaging Overview online help topic have the interface in place for Microdea, Pegasus and PaperWise.
How do I use document imaging?
Before proceeding, you must have the third party Document Imaging software from your Imaging Vendor installed. Purchase this 3rd party software from your TMW Systems Inc. Customer Service Representative, or supported third party Imaging Vendor.
Microdea
-
Select the '+' sign to add a new document image preference format. For example, for each type of document, i.e., bill of lading, equipment inspection form, etc., you should have setup a document image preference format.
-
Enter your document type, server name, repository location, imaging field, TruckMate table and field.
Pegasus
-
Select the '+' sign to add a new document image preference format. For example, for each type of document, i.e., bill of lading, equipment inspection form, etc., you should have setup a document image preference format.
-
Enter your menu label/document type, your Pegasus DB Insert #, your TruckMate table, field, and stored procedure information.
-
Ensure the necessary executable is referenced in the program name grid.
-
Go to the Rendition tab to select your printing preferences.
How do I setup the Crystal Method of document imaging?
The setup required for TruckMate’s part of the Imaging integration is done in the Codes Maintenance program, and is quite straightforward.
-
Open the Codes Maintenance program (CODES.EXE).
-
Open the 'Go' menu and select the 'Imaging' option. The Imaging Tab will display. Choose the Imaging Vendor you are using from the 'Imaging Vendor' section near the top of the screen.
-
Select the Rendition Print Tab.
-
Select the 'Crystal Report' option in the 'Method' section and 'Invoice Print' in the 'Print From' section. The 'Order By' section should have 'Bill Number' selected, and both of the options in the 'Interaction' section should be selected.
-
You need to specify the name of the Imaging Company’s custom printer driver: do so by using the pull-down menu labelled 'Printer Driver'.
-
Specify the location and name of the XML data file that will be written in the 'XML Data File (Including Path)' field. An example might be: 'C:\IMAGING\DATA.XML'. This file will be read and deleted by the Imaging Company.
-
Enter a Timeout specification in the 'Timeout After' section- this will tell TruckMate how long to wait in case the Imaging Company’s service is not running or not deleting the .XML file properly.
-
(Optional) Some Imaging Vendors require a 'Backup Documents String' that indicates what kind of documents (Bills of Lading, etc.) that they should search for in their system. There isn’t a dedicated field for this in the Codes Maintenance program, so you must enter this value in one of the 'User Defined' fields in the Customer Profiles program. Once this is done, enter the number of the User Defined field you used for the string in the 'Backup Docs List in Client User #' field.
How do I setup the spool file method of document imaging?
The setup required for TruckMate’s part of the Imaging integration is done in the Codes Maintenance program, and is quite straightforward.
-
Open the Codes Maintenance program (CODES.EXE).
-
Open the 'Go' menu and select the 'Imaging' option. The Imaging Tab will display. Choose the Imaging Vendor you are using from the 'Imaging Vendor' section near the top left of the screen.
-
Select the Rendition Print Tab and then select the 'Spool File' option in the 'Method' section before selecting the Method Tab.
-
You need to specify the directory that the Spool Files are to be created in and their filename extension. Spool Files are named according to the current day/time stamp (ex: YYYYMMDDHHMMSS.TXT) to avoid overwriting a previous Spool File.
-
Enter 'TXT' in the 'Extension' field, if it is not already there.
-
You can change any of the other minor formatting options ('Max. Detail Lines per page' will control how page breaks occur in the generated Spool File, for example).
-
(Optional) With the 'Pegasus' viewer, you also have the option of using a 'Backup Documents String' value. See 'Step 8' above for more information.
How do I do a rendition print of an invoice?
-
Configure your Rendition Printing options in the Codes Maintenance program > Imaging Tab for your specific Vendor.
-
Open the Invoice Printing program (BILL.EXE), click: Start
Programs TruckMate Billing Invoice Print -
Choose the options required to select the batch of Invoices that you would like to print. When the 'Select Crystal Report' window opens, you can either choose the Default Crystal Report to 'preview' what the Invoice will look like when printed, or click the 'Cancel' button to close the Crystal Selection window and proceed to the Rendition Print options. If you have selected a Crystal Report and see the 'report preview' screen, simply close the preview window to proceed.
-
You will now be prompted (if setup is correct in the Codes Maintenance program > Imaging Tab) as to if you would like to do a Rendition print.
-
If you are using the Spool Method, the text file will be generated to the directory you have specified (see above). If you have turned on the 'progress bar' (again, in the Codes Maintenance program > Imaging Tab), you will see a '1 of x' progress bar displayed during the Rendition printing process.
-
If you are using the Crystal Method, then you will again be prompted for a Crystal Report to print to (as in the 'preview' step above). Once you select the report you wish to use, the Rendition print will begin. The Crystal Report will be run/called for each and every Freight Bill/Invoice included in your selected Invoice batch. The output from Crystal is sent to the custom printer driver supplied by the Imaging Company, which converts it to a '.TIFF' file, stores the image in the system, and indexes it with information generated from a small '.XML' file that is created during the printing of the Crystal report.
How do I view debugging information from rendition printing?
If your rendition printing process is not working or is working incorrectly, you can engage a debug log for its processes. Rendition Print logging will work for a variety of Imaging Vendors.
-
Open the SQL Execute program (SQLEXEC.EXE).
-
Select the SQL Tab.
-
Enter and execute the following script:
UPDATE CONFIG SET THE_VALUE='C:\RendLog' WHERE PROG_NAME=''RENDPRINTDRIVER.DLL' AND THE_OPTION='LogFile' -
Open the created 'RendLog.txt' file in the C:\ directory.
Note: The RENDPRINTDRIVER.DLL config is normally hidden and can only be edited via SQL.
How do I do an invoice rendition print from the Billing Register?
If you setup (in the Codes Maintenance program > Imaging Tab) the Rendition print to occur from the Billing Register program instead of the Invoice Printing program:
-
Open the Billing Register program (BILLBR.EXE), click: Start
Programs TruckMate Billing Billing Register -
The steps are basically the same as from the Invoice Printing program: Fill in the selection boxes, click the 'Print' button, either 'Cancel' or 'Preview' and then close the Crystal Report selection options, and then click 'Yes' to do a Rendition Print.
How do I do an invoice rendition print from Statement Printing?
-
Open the Statement Printing program (BILLLTL.EXE), click: Start
Programs TruckMate Billing Statement Printing -
The printer is selected on the main program screen. If it is not, select one.
-
If the 'Preview' option is checked, a Crystal Report preview will display when you click the 'Print' button; if it is not selected, the program will go directly to the Rendition Print (the output of the Rendition Print goes to the Imaging Company’s printer driver).
How do I run a rendition print of a statement?
Statement Rendition printing is only currently available with Imaging software from EBE and when using the Crystal Method.
-
You can complete this process from either the AR Inquiry program (ARRA.EXE) or the Statement Printing program (BILLLTL.EXE)- indicate which of these you would prefer to use in the Codes Maintenance program > Imaging Tab.
-
The process is basically as outlined in the above question when in the Statement Printing program.
-
In A/R Inquiry, click one of the 'Print' icons on the toolbar, and choose 'Statement of Account' from the list of available options. Then follow the same process as outlined above.
Note: In A/R Inquiry, only Statements can be Rendition printed, but the Statement Printing program allows you to print both statements and invoices, as long as both of the checkbox options have been selected.
How do I run a rendition print of an Interline Payables contract?
This is currently only available with EBE software and only with the Crystal Report Method. It is done from the Dispatch program and is an alternative way of sending Load Offers/contracts to Interliners (standard TruckMate already allows you to send these via printing, faxing, or the Communications Manager program)- EBE refers to the process as 'Contract Management'.
-
Open the Codes Maintenance program > Imaging Tab (CODES.EXE). Choose 'EBE-Ships' as your Imaging Vendor.
-
Set the 'Method' to 'Crystal Report', then select the 'Method Tab'. Select the 'EBE-Ships custom printer driver' in the 'Printer Driver' pull-down menu. Set a valid path and name for the '*.XML' file.
-
Open the Dispatch program (DISPATCH.EXE), click: Start
All Programs TruckMate 2013 Dispatch -
Right click in the Trip Grid and select the right-click context menu 'Carriers' option. After previewing (or cancelling) the Crystal Reports screen, you will be asked if you want to 'Send Crystal Reports to the Imaging Printer?'. If you answer 'Yes', you will again be prompted to select a Crystal Report, but this time, instead of the Report printing to the screen (and you having the option of sending it to the printer), it is sent directly to EBE-Ships.
-
EBE-Ships Contract Management then takes care of faxing or emailing the Interliner, getting a response (accept or reject) and updating the status in TruckMate.
Note: The Interliner/Carrier shown in the report/fax/email is the 'Assigned' Carrier (not the one shown in the Vendors Grid at the top of the screen). To change the Carrier, select one in the Vendor’s Grid and click the 'Assign Carrier' button (before clicking the 'Contract' button).
For EBE-Ships to update the Freight Bill’s status, you must have valid options set in the Application Configurator program > DISPATCH.EXE section ('Carrier Assign' and 'Carrier Deassign').
How do I set up automatic Accordex imaging queries?
This process requires the AcordexUpdate.dll file, the TMW Service Host program and the Scheduler Run DLL service. Access to an Acordex imaging system is also required.
-
Open the Codes Maintenance program > Imaging Tab (CODES.EXE). Choose 'Acordex' as your Imaging Vendor.
-
Setup an imaging document that uses the 'TLORDER' Table and the 'BILL_NUMBER' field.
-
Open the TMW Service Host program. Create and configure the Scheduler Run DLL Service.
-
Select the ellipsis button next to the 'DLL File' field and choose the AcordexUpdate.dll file.
-
In the 'Routine' field, enter 'AcordexRecentUploads'.
-
In the DLL Setup Tab Grid, enter the following values:
-
Sequence = 0
-
Value* = blank (this is ignored by Acordex)
-
Type* = DBHANDLE
-
-
-
Start the Scheduler Run DLL Service by right-clicking the service name and selecting the 'Start' button. As long as the service is running, your Acordex scanned document names will be automatically downloaded.
How do I set up document cross-referencing with Acordex?
This process requires the AcordexUpdate.dll file, the TMW Service Host program and the Scheduler Run DLL service. Access to an Acordex imaging system is also required.
-
Open the TMW Service Host program and choose the Scheduler Run DLL Properties window.
-
Select the ellipsis button next to the 'DLL File' field and choose the AcordexUpdate.dll file.
-
In the 'Routine' field, enter 'AcordexCrossReferenceUpdate'.
-
In the DLL Setup Tab Grid, enter the following values:
-
Sequence* = 0 (or 1)
-
Value* = blank (this is ignored by Acordex)
-
Type* = DBHANDLE
-
-
To test, add an Interliner record to a Freight Bill and set its 'Probill' number. When the TruckMate Scheduler calls the AcordexCrossReferenceUpdate function of AcordexUpdate.dll a file will be created in the same folder with a timestamp filename containing the updated cross reference records.