Chassis Invoice Reconciliation (Chassis AP)
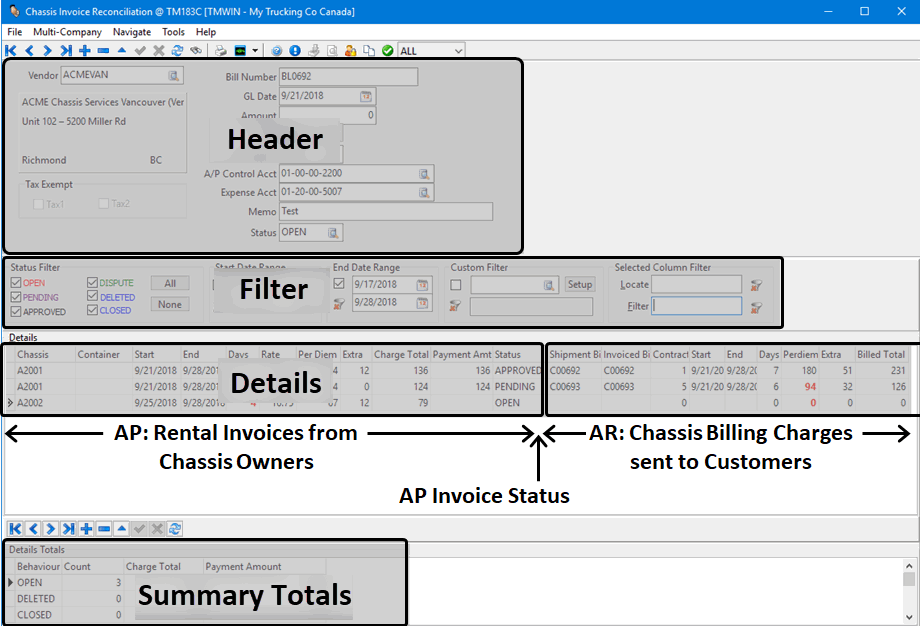
The Chassis Invoice Reconciliation (formerly Chassis AP) program is used to compare and reconcile chassis usage charges from the chassis owners to the actual chassis usage fees being billed to the customers. It can also be used to add lease charges for the chassis units being used for orders. These records can be reconciled against the billables to find out the profit margin on the chassis usage. This program allows you to:
-
Import, review and compare the vendor chassis charge invoices to the customer chassis billings.
-
Selectively approve vendor chassis charges for payment.
-
Highlight vendor chassis charges for possible investigation and/or dispute.
The Chassis Invoice Reconciliation program works in concert with the Customer Service program > Intermodal tab and the Chassis Billing program.
To access Chassis Invoice Reconciliation:
Go to |
|
TruckMate Menu and TruckMate Task List |
|
Windows Start Menu |
|
Windows Explorer |
C:\Program Files (x86) > TruckMate 20xx > ChassisAP.exe |
Setting up Chassis Invoice Reconciliation
Most of the setup for chassis invoice reconciliation is actually associated with the Chassis Billing and Intermodal Configuration programs. The Chassis Billing program must be able to produce the chassis billing charges for the freight bills.
Setting up Chassis Invoice Reconcilation consists of creating a suitable import file format to allow for automatically importing the chassis owner / chassis pool invoice data directly into the Chassis Invoice Reconciliation program and ensuring there is a suitable folder created to store these invoice import files in the location described by the Import sch Files Directory value in the Application Configurator program.
| Chassis Invoice Reconciliation requires the TruckMate Chassis Invoice Reconciliation license #62000. |
Setting up Application Configurator for Chassis Invoice Reconciliation
Configure Chassis Invoice Reconciliation using the options found under Configuration Options > CHASSISAP.EXE.
Auto-set Chassis Owner to invoke Chassis A/R Recalc |
Determines if udating the chassi onwer on intermodal freight bills causes the A/R to be recalculated.
|
Import sch Files Directory |
Sets the default file folder indicating where the ChassisAP.exe program will find the ImportChassisInvoice.sch file used to provide the field mapping information for importing invoice data from a .CSV file. If left blank, it will default to use the same location as the ChassisAP.exe program file. Usually C:\Program Files (x86)\TruckMate 2018. |
Chassis Invoice Reconciliation Process Overview
The basic steps for using the Chassis Invoice Reconciliation program are:
-
Create a new vendor chassis bill header.
-
Manually enter chassis owner invoice detail information or import the chassis invoice data into the Details grid.
-
Auto-match the chassis billing charges to associate them with their corresponding invoices.
-
Manually match any unmatched detail line item chassis billing charges.
-
Review the information and update the status for each line item in the Details grid.
-
Post to AP when ready.
-
Change the status of the vendor chassis bill header to Closed.
Creating a new vendor chassis bill header
To start the process of comparing chassis rental usage invoices against the chassis billing charges create a new vendor chassis bill header to display the information from the invoice you received from the chassis pool / chassis owner.
-
Click the
 Insert item button at the top of the window.
 -
Enter values into each of the fields to create a new vendor chassis bill header:
Field Definition Vendor
The Vendor refers to the company who submitted the invoice to you and must be a valid, active vendor visible to the login company and with an assigned customer code that is defined as a Chassis Owner in Customer Profiles.
The selected vendor’s name and address information will be displayed below this field.
Bill Number
Vendor’s invoice number. (Maximum 20 characters.)
GL Date
Vendor invoice date.
Amount
The total amount of the invoice. The value entered must balance to sum of the Charge Total of all detail lines before posting to AP Invoice Entry is allowed.
Type
Hardcoded to Bill.
Currency
Defaults to the vendor’s currency.
A/P Control Acct
Defaults to the currency’s AP control account for login company.
Must match with currency.
Expense Acct
Defaults to vendor’s Invoice Entry > Default GL Accounts for login company.
If more than one GL Account then default to first Default GL Account for login company with Type beginning with 'PE'.
Memo
Free form text field where you can enter any comments. Maximum 40 characters.
Status
The status of the vendor chassis bill header. Typically, you would change the status from OPEN to CLOSED when the reconciliation is complete and the results have been posted to AP.
Tax Exempt - Tax1
Disable if APNE.EXE Application Configurator Automatic Tax Calculations for AP = False.
If the Vendor checkbox for Tax Code 1 in Tax Calculation Configuration is selected then:
-
If vendor’s Tax Code 1 is selected in Vendor Profile, uncheck Tax Exempt - Tax 1.
-
If vendor’s Tax Code 1 is not selected in Vendor Profile, check Tax Exempt - Tax 1.
If the Vendor checkbox for Tax Code 1 in Tax Calculation Configuration is not selected, uncheck Tax Exempt - Tax 1.
Tax Exempt - Tax2
Disable if APNE.EXE Application Configurator 'Automatic Tax Calculations for AP' = 'False'.
If the Vendor checkbox for Tax Code 2 in Tax Calculation Configuration is selected then:
-
If vendor’s Tax Code 2 is selected in Vendor Profile, uncheck Tax Exempt - Tax 2.
-
If vendor’s Tax Code 2 is not selected in Vendor Profile, check Tax Exempt - Tax 2.
If the Vendor checkbox for Tax Code 2 in Tax Calculation Configuration is not selected, uncheck Tax Exempt - Tax 2.
-
-
Click
 Post to save.
Manually entering chassis owner invoice details
You can either manually enter the chassis owner invoice details by entering data directly into the Details grid on the Chassis Invoice Reconciliation main window or you can do a mass import from a .SCH import file.
To manually enter chassis owner invoice details into an existing vendor chassis bill header:
-
Make sure you are on the correct vendor chassis bill header by verifying the Vendor and Bill Number, etc. are correct.
-
Click the
Insert item button at the bottom of the Details grid. -
A new empty entry line will appear at the top of the grid.
-
Enter values into each of the fields to create a new vendor chassis bill header.
Chassis Chassis Code is free-format or selectable from the edit-pick of chassis visible to the login company. It is not validated against Trailer Profiles. Container
Container Code is optional and is free-format or selectable from the edit-pick of containers visible to the login company.
It is not validated against Container Profiles.
Start
Invoice charge start date.
End
Invoice charge end date.
Days
Days will default to the Use Days calculated from Start Date and End Date but can be overridden with either 0 for no charge or the actual Bill Days.
Rate
Charge rate is optional.
Per Diem
The Per Diem amount defaults to Days multiplied by Rate.
May be overridden only if Rate is $0.
Extra
Extra Amount is optional.
Charge Total
Charge Total defaults to Per Diem Amount plus Extra Amount.
Payment Amt
Approved payment amount.
Set to null (i.e. delete the contents of the cell) rather than using $0 at the record’s initial creation and whenever clearing of payment is necessary.
Status
Set to OPEN at the record’s initial creation.
Select from a pick list of:
APPROVED, CLOSED, DELETED, DISPUTE, OPEN, PENDING
-
Continue adding additional line items until all of the entries from the invoice have been entered into the Details grid.
-
Click
Post to save.Now you can match these invoice line items to their corresponding chassis billing charges.
Importing chassis invoice data
There are two ways to import the chassis invoice data:
-
Request the vendor to provide the invoice in CSV format using the format specified by the ImportChassisInvoice.sch field mapping file. You can import the CSV data into MS Excel first to add any missing columns or reformat the date formats if necessary.
-
Manually enter the data into MS Excel ordering the columns and complying with the format specified by the ImportChassisInvoice.sch field mapping file.
To import chassis owner invoice details into an existing vendor chassis bill header using the Chassis Invoice Reconciliation program and a .CSV file:
-
Make sure you are on the correct vendor chassis bill header by verifying the Vendor and Bill Number, etc. are correct.
-
Select Import Chassis Invoice from the Tools menu.
The Select Import File window will be displayed. -
Browse to select the .CSV file containing the invoice information you wish to import and click Open.
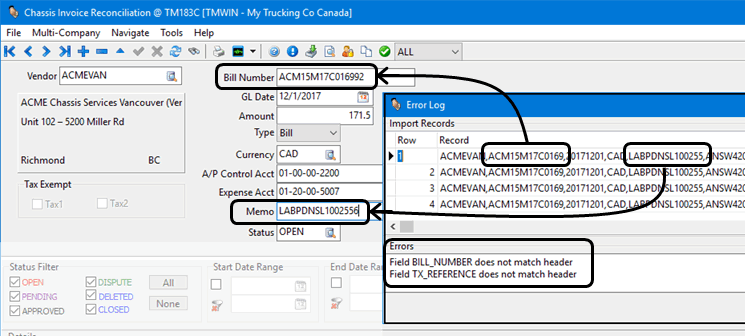
If any of the vendor chassis bill header information does not match the field data in the .CSV file, a message box will be displayed and allow you to open up the error log together with a list or the records being imported to help you remedy the mismatched header information. No data will be imported if any errors are encountered anywhere in the import file.
For example:
Using the list of errors, the vendor chassis bill header contains some typing errors in the Bill Number and the Memo (tax reference) numbers. (An extra number at the end.)
-
Make any required corrections and select Import Chassis Invoice from the Tools menu again to import the data.
-
The data will be displayed in the Details grid.
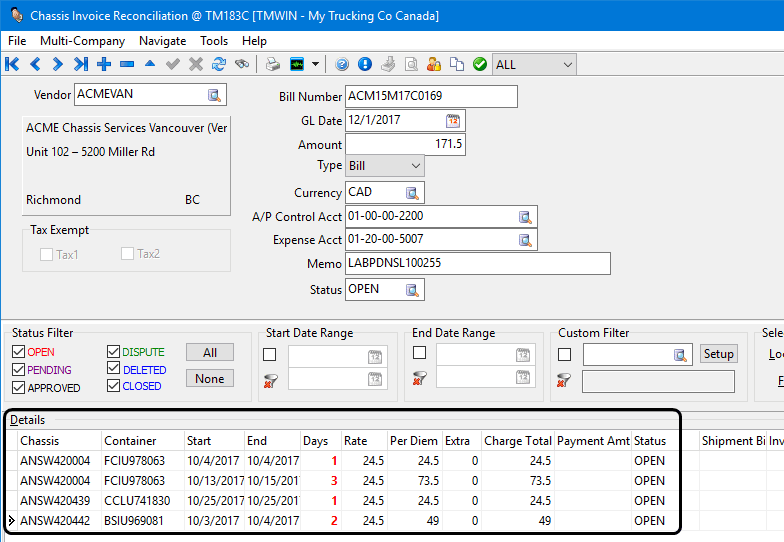
Now you can match these chassis owner invoice line items to their corresponding chassis billing charges.
Auto-matching chassis billing charges
| The chassis billing charges must have been generated either as accessorial charges on the original freight bill or as charges appearing generated by the Chassis Billing program on a new freight bill and the freight bills must have been posted using the TruckMate Billing Registry in order to be available to interface with the Chassis Invoice Reconciliation program. (i.e. Billing status = BILLD) |
To have the Chassis Invoice Reconciliation program auto-match the chassis billing charges with the chassis vendor invoice line items automatically for you:
-
Make sure you are on the correct vendor chassis bill header in the Chassis Invoice Reconciliation program.
-
Select Auto Match Chassis Billing from the Tools menu.
Note: The Auto Match Chassis Billing function will only operate on line items with a status of OPEN.
A message is displayed to summarize the results of the auto-matching process.
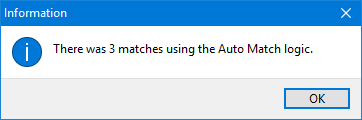
The Chassis Invoice Reconciliation window will display the updated information in the Details Grid and assign the auto-matched line items a status of APPROVED (for an exact match) or PENDING (for a partial match).
An exact match means all the following values are a match AND only one exact match occurrence is found AND the freight bill is owned by the login company and has been interfaced to billing AND customer chassis billing has Contract populated and is not previously been linked to a vendor chassis charge.
-
Chassis Code (or if empty then Chassis Number)
-
Chassis Owner = Vendor Customer Code
-
Container Code (or if empty then Container Number)
-
If provided on both the vendor chassis charge and the customer chassis billing, must be the same (can be either with or without check digit).
-
If provided on one but not the other or on neither, this is considered a match.
-
-
Start Date
-
End Date
Note: A match is always made to the last freight bill so, if there is a credit/rebill, it looks to the AR chassis billing information on the rebill.
-
-
Review the remaining unmatched detail line items and manually match them by right-clicking the invoice line item in the Details grid and selecting Manual Match Chassis Billing from the shortcut menu.
Manually matching chassis billing charges
| The chassis billing charges must have been generated either as accessorial charges on the original freight bill or as charges appearing generated by the Chassis Billing program on a new freight bill and the freight bills must have been posted using the TruckMate Billing Registry in order to be available to interface with the Chassis Invoice Reconciliation program. (i.e. Billing status = BILLD) |
To manually match a chassis billing charge with a chassis vendor invoice line item:
-
Make sure you are on the correct vendor chassis bill header in the Chassis Invoice Reconciliation program.
-
Right-click the invoice line item in the Details grid and select Manual Match Chassis Billing from the shortcut menu.

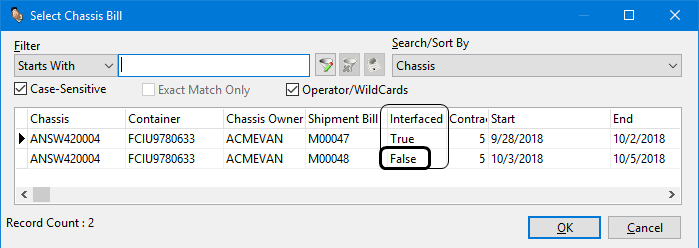
The Select Chassis Bill window will appear and display a list of chassis billing records for this Chassis ID number.
If the value of False appears in the Interfaced column, it indicates this chassis billing charge is associated with a freight bill that has not been processed by the Billing Registry program yet.
-
Double-click to select the matching chassis bill.
The Chassis Invoice Reconciliation window will display the updated information in the Details Grid and assign the line item a status of PENDING.
The Payment Amt column will be used to update the Payment Amount information displayed on the Details Total section at the bottom of the window. (Once all the line items have been matched up, everything should balance.)

The Days column value will be flagged in red if it disagrees with the days used for the Per Diem chassis billing calculation.

-
Once you have finished matching the chassis owner rental invoice line items with the chassis billing charges you are ready to update the invoice line item status (if you have not already done so), check for a balanced total and Post this to AP Invoice Entry.
Unmatching chassis billing charges
To unmatch a chassis billing charge with a chassis vendor invoice line item:
Right-click the invoice line item in the Details grid and select UnMatch from the shortcut menu.

The Select Chassis Bill window will be refreshed and the line item will have the chassis billing data removed and return to a status of OPEN.
Updating the invoice line item status
To change the status for any individual line item in the Chassis Invoice Reconciliation program Details grid.
-
Make sure you are on the correct vendor chassis bill header.
-
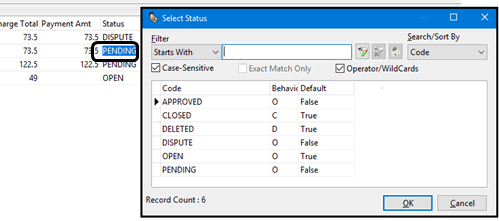
Double-click the Status field in the Details grid to display the Select Status window.
-
Select the new Status for this line item.
For example, you can flag items with a status of DISPUTE to indicate follow up is required or APPROVED if everything is in order. If all is in order, a typical workflow is OPEN > APPROVED > CLOSED.
Note: You cannot change to or from the CLOSED status. The CLOSED status is automatically assigned by the Chassis Invoice Reconciliation program upon posting to AP Invoice Entry. No further amendments are allowed.
-
If a line item is disputed and later assigned a status of DELETED, the freight bill link and payment amount will be nulled.
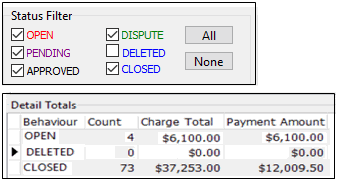
Using the Status Filter
You can filter the detail lines by one or more status codes. You can filter the detail lines by chassis charge Start Date Range, End Date Range, and/or Custom Filter, and/or partially match data using the Filter field and/or find specific data using the Locate field, these latter two working in conjunction with the selected column.

Setting the Status Filters to only include certain statuses will affect the totals displayed in the Detail Totals section.
Posting to AP
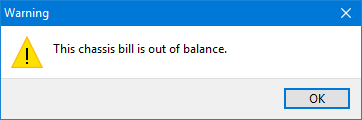
The Chassis Invoice Reconciliation window must have a status of Balanced before you can use the Post to AP function or you will receive a warning message.
If the Amount field in the header section equals the Charge Total value displayed in the Details Total section at the bottom of the window, the bottom TruckMate status bar will display a text string saying "Balanced".
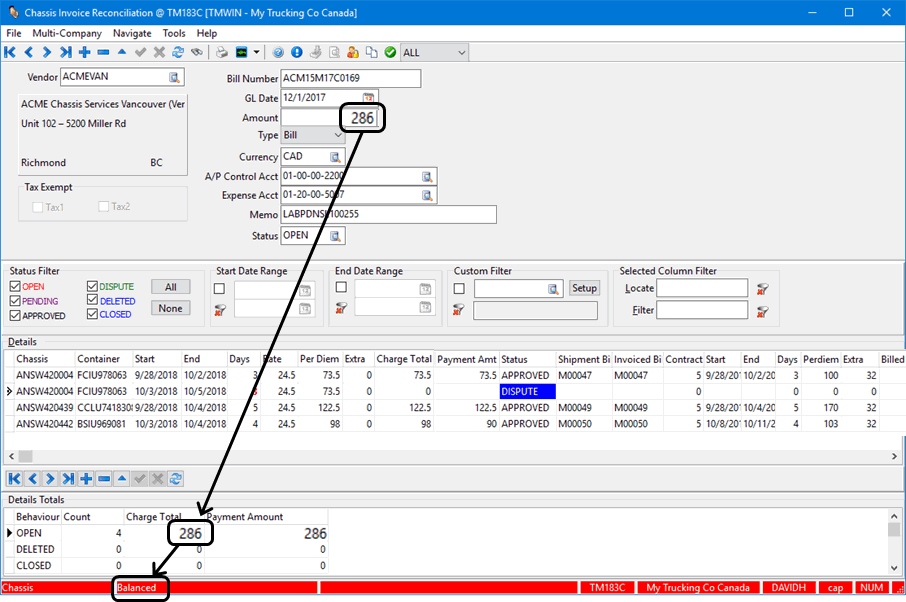
The text in the bottom TruckMate status bar will show as a positive amount if sum of the Charge Total exceeds the header Amount and as a negative amount if the reverse is true.

![]()
To auto-post all APPROVED status detail lines containing a Payment Amount >= $0 to AP Invoice Entry:
-
Make sure you are on the correct vendor chassis bill header in the Chassis Invoice Reconciliation program.
-
Select Post to AP from the Tools menu.
Note: The Chassis Invoice Reconciliation window must show as Balanced before you can use the Post to AP function or you will receive a warning message.
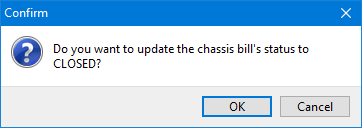
If the Chassis Invoice Reconciliation window shows as Balanced in the TruckMate status bar at the bottom of the window and all the line items are marked as approved (or Deleted) you will receive a confirmation message asking if you want to change the status in the vendor chassis bill header to CLOSED.
-
If you are finished with this invoice and want to mark it as CLOSED, Click OK.
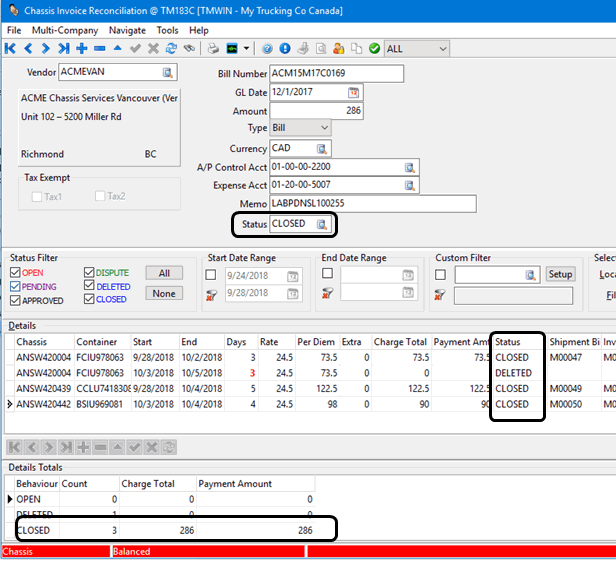
Upon successful posts:
-
The status in the header section of the Chassis Invoice Reconciliation program will change to CLOSED.
-
The detail line item statuses will change from APPROVED to CLOSED.
-
The Details Totals section at the bottom of the page will show the summarized totals as CLOSED items.
-
An invoice will be created (in the AP Invoice Entry program).
-
No further amendments to posted detail lines are allowed.
-
The invoice is created in the Accounting and Finance > Accounts Payable > AP Invoice Entry program under the login company, summing up all Payment Amounts into one detail line. You will be able to click the CI# link to open the source document in Chassis Invoice Reconcile.
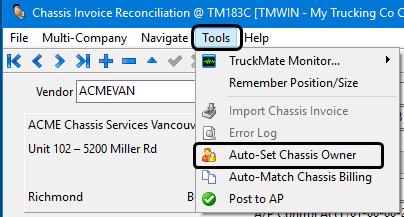
Auto-Setting Chassis Owner
The Chassis Owner is a required field when working with containers and chassis in the Customer Service > Intermodal / IMC tab > Container sub-tab.
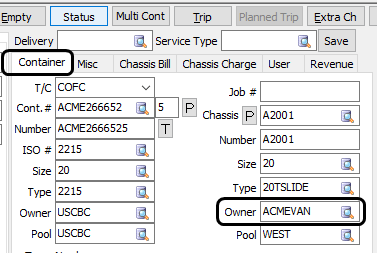
If you are working with older versions of TruckMate, the owner field was previously not a required field so this data may be missing from some of the pre-existing freight bills. Use the Auto-Set Chassis Owner function available in the Chassis Invoice Reconciliation’s Tools menu to automatically populate the chassis owner information.
The chassis Owner field will be auto-populated according to the chassis vendor’s Customer Code field if the following conditions are all true:
-
Chassis Code (or if empty then the Chassis Number) in Customer Service > Intermodal / IMC tab > Container sub-tab matches to an existing trailer chassis
-
Owner field in Customer Service > Intermodal / IMC tab > Container sub-tab is missing
-
Contract field in Customer Service > Intermodal / IMC tab > Chassis Bill sub-tab is populated, and
-
Freight Bill has been interfaced to billing.
In addition, for chassis that exist in Trailer Profiles where the Client Code field is empty, the Client Code will also be populated.