Charge behavior in the Accessorial Charge Details grid
The Charge Behavior field determines the method by which the charge is calculated. The value selected here will also cause the Accessorial Charges Details grid at the bottom of the screen to be modified to include columns specific to this charge behavior type. Some grid field definitions are shared by and common to all charge behavior grids but some grid column fields are unique to specific charge behaviors.
These sections describe fields and menus that are common to all charge behaviors:
Each charge behavior is associated with a unique set of columns in the Accessorial Charges Details grid. The procedure for creating a new accessorial charge is unique to each of the following charge behavior types.
Shared field definitions for all Details grid accessorial charges
The following fields in the Accessorial Charges Details grid are common to all the charge behaviors.
| Field | Definition |
|---|---|
Works with the End Date field to specify the range of dates within which this charge applies. Enter the starting date of the range. Double-click for a calendar selection form. |
|
Enter the ending date to specify the range of dates within which this charge applies. Double-click for a calendar selection form. |
|
Double-click in the column or use your context menu to bring up the 'Find Client ID' dialog box displaying a list of Client IDs and Descriptions. This list allows you to select multiple client names for a one-to-many relationship where this accessorial charge can apply to multiple clients. If more than one client has been selected, the Client ID will be displayed as three dots.
|
|
Displays the Zone where the freight originates. The Zone Code, specified in the Shipper’s customer’s profile, will default (as configured in the Customer & Vendor Profiles program). You can manually enter the Start Zone by entering the first few characters of the Zone’s short description or Code, then clicking the search button to the right to display a list of Zones that match the characters you entered. |
|
Displays the Zone where the freight is to be delivered. The Zone Code, specified in the Shipper’s customer’s profile, will default (as configured in the Customer & Vendor Profiles program). You can manually enter the End Zone by entering the first few characters of the Zone’s short description or Code, then clicking the search button to the right to display a list of Zones that match the characters you entered. |
|
The default setting is 'False'. Double-click in the column to toggle the setting to 'True'. For example, your Start Zone is set at Kelowna, BC, and you have a number of End Zones set up, one of which is Langley, BC. Setting the 'Allow Between' option to 'True' would mean that rating would only occur if your route was Kelowna to Langley, or vice-versa. |
|
Enter the appropriate Rate Sheet ID as generated in the Rates Maintenance program, Rate Sheet tab. If you would like this Acc. Charge to be applied to multiple Rate Sheets, create multiple detail lines with different values in the 'Rate Sheet ID' field. |
|
Enter the preferred sequence of calculation for each line item. For example, if you want this rating to be used first, enter 1 in the Calc Seq column. Add leading zeros if necessary. |
|
Double click this field to select a Service Level appropriate to this Accessorial Charge. A menu will be open with a list of available Service Level Codes in your system. |
|
You can manually specify Custom Minimum and Custom Maximum values in these fields by entering numerical values in the space provided. |
|
Double-click to display the Select Vendor window where you can search for and select the Vendor identification code. This field only allows for one Vendor ID to be selected. (Use the Assign to All Vendors checkbox if this accessorial charge applies to all vendors.) Note: This field can only be populated if the Vendor Code checkbox In the Accessorial Charges header section has been selected. |
|
Double click this field to select a Commodity for this Accessorial Charge. A menu will be open with a list of available Commodity Codes in your system. |
|
Stairs / Elevator / Dock / Site Survey / Vehicle Restriction |
Double click within these fields to set their values to either 'True' or 'False' depending on the Delivery Site for this Accessorial Charge Code. |
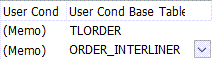
The User Condition field will permanently display the text (Memo) as a visual cue to indicate you need to use the Show Memo function to see the user condition SQL statement.
Use the right-click shortcut menu and select Show Memo to see the memo text describing any unique user conditions (i.e., a SQL query statement) for this row entry. Select the Hide Memo shortcut menu option to close the memo information. |
|
Indicates which table the SQL query statement(s) associated with the user conditions is acting on. (The TLORDER table is used for client accessorial charges. The ORDER_INTERLINER table is only used for vendor accessorial charges.)
|
|
Double click this field to select the Intermodal ISO# for this Accessorial Charge. A menu will open displaying the available ISO# codes in your system. |
|
Double click this field to access the Intermodal Movement drop down options for the Accessorial Charge. Choose from either: 'Import', 'Export', 'Domestic Inbound', 'Domestic Outbound', 'Empty Reposition' or 'Other'. |
|
Double click this field to select the Intermodal Size for this Accessorial Charge. A menu will open displaying the available Size codes in your system. |
|
Double click this field to select the Intermodal Type (or Equipment Class) for this Accessorial Charge. A menu will open displaying the available Equipment Classes in your system. |
|
Double click this field to select the Intermodal Container Pool for this Accessorial Charge (if appropriate). A menu will open displaying the available shipping container pools in your system. |
|
Double click this field to select a specific shipping instruction for this Accessorial Charge. The list of available standard shipping instructions is maintained in the Profiles > Codes Maintenance program on the Shipping Instruction Definitions tab. |
|
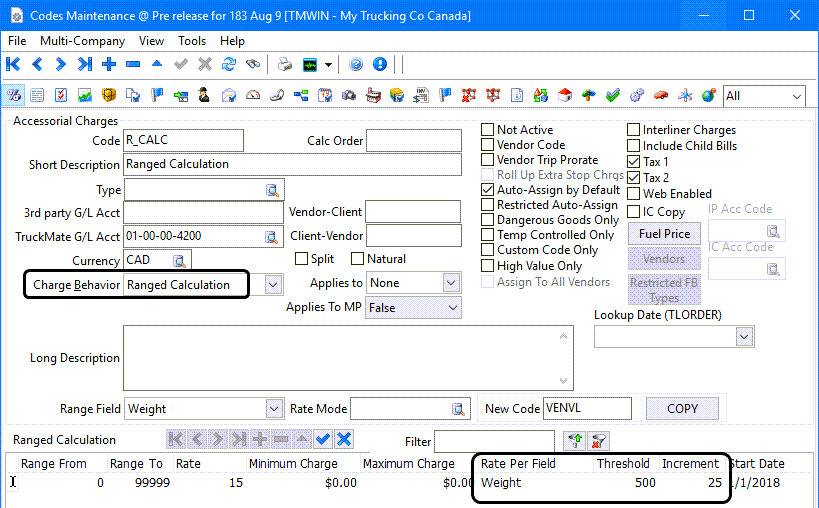
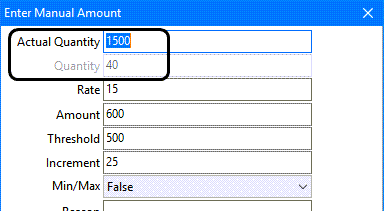
The threshold value is the minimum value of the field selected in the 'Rate Per Field' column required to have the system calculate and include the accessorial charge. Threshold and Increment are used together to calculate a rated quantity for accessorial calculations which use ranges. The threshold is set to a value where only quantities above the threshold will be used to calculate the accessorial charges. The increment refers to a divisor also used as part of the calculation. For example, here is a range calculated accessorial charge based on weight with a threshold of 500 and an increment of 25. The QUANTITY is 40 because (1500 - 500 threshold) / 25 increment = 40. The Amount = Quantity * Rate (40 x 15 = 600).
See Actual and rated quantity on accessorial charges for more details. |


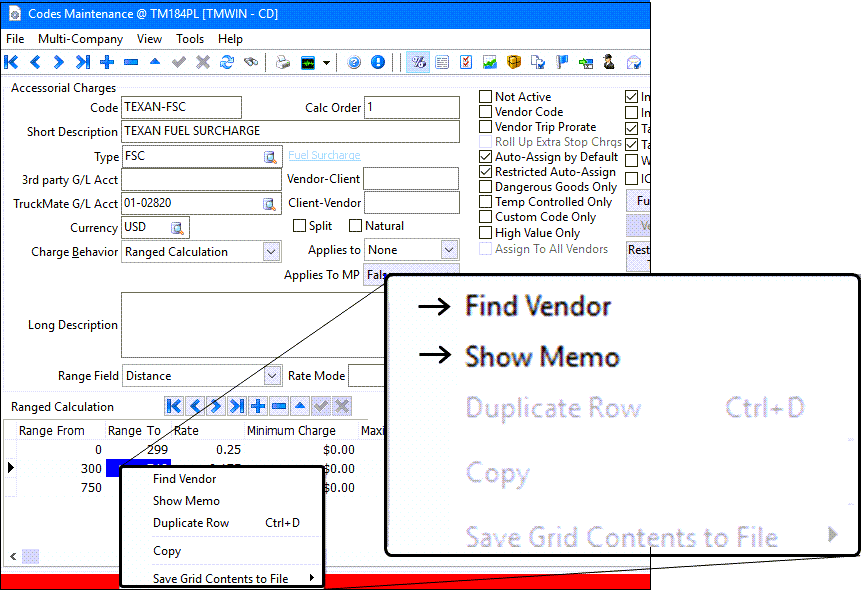
Shortcut Menu - Accessorial Charges Details grid
The right-click shortcut menu for the charge behavior grid contains the Find Vendor and Show Memo functions.
| Function | Description |
|---|---|
Find Vendor |
Displays a 'Select Vendor' dialog box where you can search by Vendor ID, or Name. This function only displays the list of vendors. It does not insert or select a vendor. |
Displays / Hides the 'User Condition Memo' field. See the 'User Cond' field description for more information. |
Current Fuel Price
The Current Fuel Price charge behavior uses the information entered using the Fuel Price button by referencing the defined Average Code(s) in the Fuel Average grid field.
Creating an accessorial charge based on the current fuel price
-
Go to Profiles > Codes Maintenance > Accessorial Charges tab.
-
Click
 Insert from the top left navigation bar.
 -
See Creating a new accessorial charge for instructions and details about each of the fields in the header section.
-
Click
 Post occasionally as you proceed to save your entries.
 -
Go to the Charge Behaviors field and select Current Fuel Price from the drop-down list.
-
The label for the Accessorial Charges Details grid is set to Current Fuel Price Percentage.
-
Use the Current Fuel Price Percentage - Accessorial Charges Details grid to enter the date ranges indicating when this charge will be applied and the details regarding how the charge will be calculated.
The following field descriptions are unique to this charge behavior. Click the hyperlink to see the descriptions for the common shared fields in the Accessorial Charges Details grid. (Fields are listed in default sort order.)
Grid field definitions - Current Fuel Price PercentageRequired field: *
Field Definition < (Shared field common to all Accessorial Charges Details grid.
Click the hyperlink to see the description.)End Date *
<
Fuel Average
Double-click in this column to bring up the 'Find Average' dialog box where you can search by Average and Name.
Create a new Average Name and Average Code by selecting the 'Fuel Price' button located in the upper right-hand area of the Codes Maintenance program, Accessorial Charge tab. Go to the 'Prices' tab and locate the Average Code previously entered, and enter your current price. Use the 'Fuel Price' button to change the fuel rates periodically. The number entered as the 'Current Fuel Price' will be used to determine the % or factor applied to the freight charges.
<
Price From *
Enter the lowest value of the fuel price that should generate an extra charge.
Price To *
Enter the highest value of the fuel price that should generate an extra charge.
Percent
Enter the percentage that you want to multiply by the value assessed for the selected extra charges.
Factor
The factor field functions exactly as the 'Percentage' field above, but is in a different format. Enter an amount in either the percentage or the factor field, not both. If both fields contain values, the 'Factor' field will be used.
Note: If using the percentage, enter 10% as 10, not 0.10, (i.e., no decimal). Alternately, if using the factor field, enter the factor as 0.1 with the decimal.
Percent/Factor Of *
Use the pull-down arrow to select the one of the following choices. The choice you select will be the multiplication factor or percentage used in the calculation.
Minimum *
Optionally, you can enter a Minimum Charge for the range. That is, if the calculation falls below the amount entered in the Minimum field, the Minimum will be used instead of the calculation.
Maximum *
Optionally, you can enter a Maximum for the range. That is, if the calculation falls below the amount entered in the Maximum field, the Maximum Charge will be used instead of the calculation.
<
<
<
<
<
<
<
<
<
Stairs / Elevator / Dock / Site Survey / Vehicle Restriction *
<
<
<
<
<
<
<
<
<
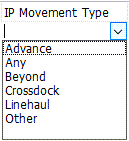
IP movement type
Select the Interline Payable movement type from the drop down list you want this charge to be tied to in order to restrict when this charge would be applied. 'Any' is the default.
<
Example accessorial charge based on the current fuel price and fuel price range
Use the Fuel Average column to indicate which average code to use for determining which line item to apply. Similarly, use the Price From and Price To columns to define a range of fuel prices which will be associated with the Percent or Factor calculation.
To create an accessorial charge based on a fuel price range:
-
Set up Average Codes. Click on the Fuel Price button to open a pop-up form. Go to the Averages tab and create your code.
The Average codes are used to indicate a regional market you are tracking (average) fuel prices for. Imagine that the Southwestern US States (CA, AZ, NM, NV) may be set up as a single fuel market. Set up a code, USSW, to represent the average fuel price assigned this market.
-
Enter in Fuel Prices. Click on the Fuel Price button to open the same form as above. Go to the Prices tab to enter in your fuel price rates.
Enter average fuel prices for your region, (e.g., a region called USSW for the US South West), by date. These are usually set weekly. If you also service customers in the US NW (OR, WA, ID, MT) you can track a separate set of average fuel prices using an Average Code you would have set up in Step 1, USNW.
-
Assign FSC (fuel surcharge) Percentages per Accessorial Charge Code, per Customer, per Date, Per Average Code.
The Accessorial Charge system allows you to set up one or more accessorial charge codes to apply to FSC, but you can pretty much just run one from here forward.
-
In the code details for your FSC code specifiy:
-
An Average Code to pull in the current fuel price.
-
A fuel price range and percentage to apply.
-
The percentage to apply to one customer, or if you leave it blank, all customers will be included.
-
An effective date range.
-
You can make this as simple or as complicated as you want.
Example 1

When this charge is applied, the system will use the freight bill pickup and delivery dates to determine what the fuel price was for during that time. The charge applied will be calculated using the Percent/Factor Of entry (e.g., weigh or distance or any other criteria) and applying either a percentage or a factor value.
Example 2
The US SW Market is designated as Average Code USSW. For the first week of September suppose the average fuel price for the market was 211.3. You have one accessorial charge fuel surcharge which is auto-assigned everyone.
Set up a rule in the grid that looks like this:
-
Average Code is USSW, indicating the charge is to be calculated based on the applicable fuel price for USSW. Your FB is billed as of Sept 5 so the accessorial charge will be based on the 211.3 fuel price.
-
The fuel price range is set to start at 0.0 and end at 3.00, and the percentage is 0.04. This indicates that 4% of the fuel price will be applied if the fuel price falls between $0 and $3.
-
Client ID is blank, indicating the rule applies to everyone.
-
If the Start/End Dates are from 1/1/2019 to 1/1/2026, it indicates that this rule is valid for calculating any charges on billing from January 1, 2019 to January 1, 2026.
Example 3
You could also set up a rule to apply to a specific customer code, BAN05, to be charged 5.2% of the USSW fuel price. Sequence this before the general rule so that any billing to BAN05 will pick up the rule and generate the increased charge before the rating hits the more general rule.
Example 4
You could set up your rule so it applied to any billing in Q1 2020. You could then increase the percentage to 4.5% for Q2 2020 on an USSW fuel price between $0 and $3.
Example 5
You could also set up multiple rules so that for any USSW fuel price between $0 and $1.50 the percentage would be 3%; between $1.51 and $2.00 the percentage would be 4%; and between $2.01 and $3.00 the percentage would be 4.5%.
Note: You can also use the FSC (DOE Average) - Fuel Surcharge based on Department of Energy average Charge Behavior type to handle other scenarios based on the fuel price.
Declared Value
This type of charge applies an extra charge to the freight bill that is calculated based on a percentage applied to the difference between two values. The Apply-If Factor is multiplied by the value in the Apply-If Field, and compared against the value in the Declared Value Field. The difference is multiplied by the percentage entered in the Percent-Of DV field.
Creating an accessorial charge based on the declared value
-
Go to Profiles > Codes Maintenance > Accessorial Charges tab.
-
Click
Insert from the top left navigation bar. -
See Creating a new accessorial charge for instructions and details about each of the fields in the header section.
-
Click
Post occasionally as you proceed to save your entries. -
Go to the Charge Behaviors field and select Declared Value from the drop-down list.
-
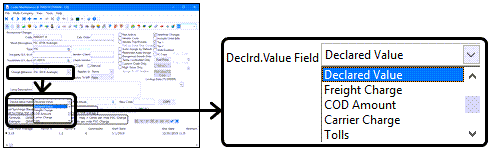
The label for the Accessorial Charges Details grid is set to Declared Value.
-
The Declrd. Value Field will be displayed and enabled.
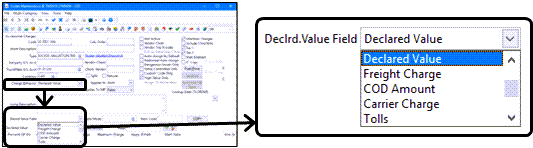
-
Use the drop-down list to select the appropriate value to reflect what the declared value amount is based on.
| Field | Definition |
|---|---|
Declared Value |
Uses the Declared Value amount entered in the Freight Bill header in the Customer Service program. |
Freight Charge |
Uses the total charges on the Freight Bill. This can be viewed on the Customer Service program > Billing tab, or in the bottom right corner of the Quick Bill Entry program. |
COD Amount |
Uses the COD amount that is to be collected for the Freight Bill, as entered on the Customer Service program > COD tab, or in the COD field in the Quick Bill Entry program. |
Carrier Charge |
Uses the total carrier charge associated with the freight bill as displayed on the Customer Service program > I/P tab > Charges sub-tab > Extra field or on the Customer Service program > Billing tab > IP Accrual field. |
Tolls |
Uses the total for any toll fees associated with the freight bill. The value for the toll fee totals are calculated by the mileage server engine, (PC*Miler). |
-
Use the Declared Value - Accessorial Charges Details grid to enter the date ranges indicating when this charge will be applied and the details regarding how the charge will be calculated.
The following field descriptions are unique to this charge behavior. Click the hyperlink to see the descriptions for the common shared fields in the Accessorial Charges Details grid. (Fields are listed in default sort order.)
Grid field definitions - Declared ValueRequired field: *
Field Definition Percent-Of DV *
Will be applied to the difference between the value in the Declared Value Field subtracted from the Apply-If Factor multiplied by the value in the Apply-If Field.
Apply-If Factor *
Is multiplied by the value in the Apply-If Field, then subtracted from the value in the Declared Value Field.
Minimum Charge *
Optionally, you can enter a Minimum Charge for the range. That is, if the calculation falls below the amount entered in the Minimum Charge field, the Minimum Charge will be used instead of the calculation.
Maximum Charge *
Optionally, you can enter a Maximum Charge for the range. That is, if the calculation is more than the amount entered in the Maximum Charge field, the Maximum Charge will be used instead of the calculation.
Apply-If Field *
Select the field that you want to multiply by the Apply-If. Click in the field to access the arrow that will display the drop down list box.
< (Shared field common to all Accessorial Charges Details grid.
Click the hyperlink to see the description.)End Date *
<
<
<
<
<
<
<
<
<
Stairs / Elevator / Dock / Site Survey / Vehicle Restriction *
<
<
<
<
<
<
<
<
<
<
Example accessorial charge based on the declared value
By law, the carrier is liable for a certain amount per load, for example, $2 per load. The apply-if factor is the $2 amount and the apply-if field is weight. The user can change this amount to be say, $3, and base it on the length of load, or cube, etc. In this example, we will use the $2 amount. If the load is worth more than that value, the customer can arrange insurance coverage for the difference (accessorial charge). The customer would then insure themselves for the difference between the declared value of the load minus whatever the carrier is liable for. An example would be if the declared value of the goods is $5000 and the load is 200 lbs., the carrier would be liable for $2/lb. The calculation to determine what the customer would need to insure is:
Declared Value - (Apply-IF Factor x Apply-IF Field) = Calculated Value so...

$5,000 - ($2 x Weight) = Calculated Value

$5,000 - ($2 x 200) = $4,600

The customer would then insure for the amount of $4,600.
Note: There are two ways to set up the Declared Value accessorial charge. The first is a percentage based on the calculated value, and the second is using the Declared Value Flat charge. This allows the user to set up ranges of values and charge a flat fee for each range.
Declared Value Flat
This type of charge will calculate the Declared Value and then apply a Flat rate. It will follow the previous logic for calculating the Declared Value. Declared Value is a calculation method where a user creates an extra charge that is calculated based on a percentage applied to the difference between two values. The Apply-If Factor is multiplied by the value in the Apply-If Field, and compared against the value in the Declared Value Field. The difference is multiplied by the percentage entered in the Percent-Of DV field. In this instance, a flat rate would then be applied.
Creating an accessorial charge based on the declared value flat
-
Go to Profiles > Codes Maintenance > Accessorial Charges tab.
-
Click
Insert from the top left navigation bar. -
See Creating a new accessorial charge for instructions and details about each of the fields in the header section.
-
Click
Post occasionally as you proceed to save your entries. -
Go to the Charge Behaviors field and select Declared Value Flat from the drop-down list.
-
The label for the Accessorial Charges Details grid is set to Declared Value Flat.
-
The Declrd. Value Field will be displayed and enabled.
-
Use the drop-down list to select the appropriate value to reflect what the declared value amount is based on.
| Field | Definition |
|---|---|
Declared Value |
Uses the Declared Value amount entered in the Freight Bill header in the Customer Service program. |
Freight Charge |
Uses the total charges on the Freight Bill. This can be viewed on the Customer Service program > Billing tab, or in the bottom right corner of the Quick Bill Entry program. |
COD Amount |
Uses the COD amount that is to be collected for the Freight Bill, as entered on the Customer Service program > COD tab, or in the COD field in the Quick Bill Entry program. |
Carrier Charge |
Uses the total carrier charge associated with the freight bill as displayed on the Customer Service program > I/P tab > Charges sub-tab > Extra field or on the Customer Service program > Billing tab > IP Accrual field. |
Tolls |
Uses the total for any toll fees associated with the freight bill. The value for the toll fee totals are calculated by the mileage server engine, (PC*Miler). |
-
Use the Declared Value Flat - Accessorial Charges Details grid to enter the date ranges indicating when this charge will be applied and the details regarding how the charge will be calculated.
The following field descriptions are unique to this charge behavior. Click the hyperlink to see the descriptions for the common shared fields in the Accessorial Charges Details grid. (Fields are listed in default sort order.)
Grid field definitions - Declared Value FlatRequired field: *
Field Definition Range From *
Enter the lowest value of the Range Field that should generate an extra charge.
Range To *
Enter the highest value of the Range Field that should generate an extra charge.
Flat Fee *
Enter the amount that should be charged if the value of the Freight Bill’s Range Field falls within the Range From and Range To values.
Apply-If Factor *
Is multiplied by the value in the Apply-If Field, and then subtracted from the value in the Declared Value Field.
Minimum Charge *
Optionally, you can enter a Minimum Charge for the range. That is, if the calculation falls below the amount entered in the Minimum Charge field, the Minimum Charge will be used instead of the calculation.
Maximum Charge *
Optionally, you can enter a Maximum Charge for the range. That is, if the calculation is more than the amount entered in the Maximum Charge field, the Maximum Charge will be used instead of the calculation.
Apply-If Field *
Select the field that you want to multiply by the Apply-If. Click in the field to access the arrow that will display the drop down list box.
< (Shared field common to all Accessorial Charges Details grid.
Click the hyperlink to see the description.)End Date *
<
<
<
<
<
<
<
<
<
Stairs / Elevator / Dock / Site Survey / Vehicle Restriction *
<
<
<
<
<
<
<
<
<
<
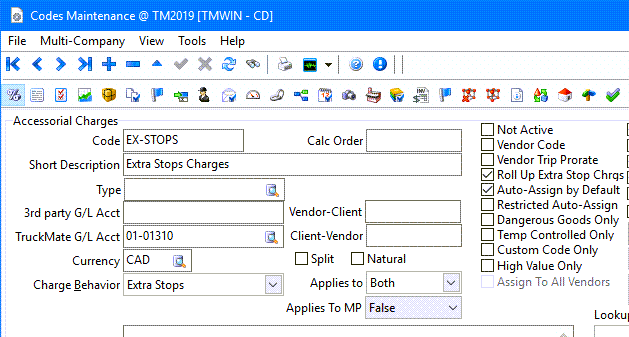
Extra Stops
This type of charge is defined as the situation where a customer wants you to make several stops, but you only want to create a single Freight Bill for billing purposes. This Accessorial Charge would be applied to multiple stop orders for every multiple stop. The charge will appear on parent bills. Enter a per stop charge to enable free stops.
Creating an accessorial charge based on extra stops
-
Go to Profiles > Codes Maintenance > Accessorial Charges tab.
-
Click
Insert from the top left navigation bar. -
See Creating a new accessorial charge for instructions and details about each of the fields in the header section.
-
Click
Post occasionally as you proceed to save your entries. -
Go to the Charge Behaviors field and select Extra Stops from the drop-down list.
-
The label for the Accessorial Charges Details grid is set to Extra Stops.
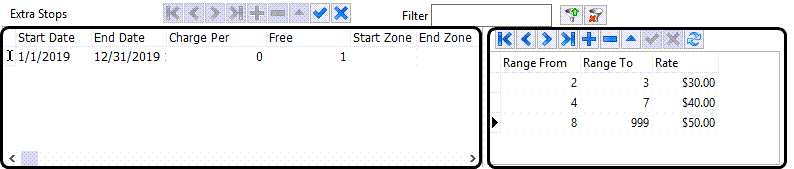
The Extra Stops grid consists of two parts. The grid on the left includes fields to define the general information about the extra stop charges and the one on the right is for rating based on a defined range of the number of extra stops made. Based on this kind of Rating, the rate per extra stop for a customer can vary based on the number of extra stops made.
Rating Based on Number of Extra Stops
Different charges can be applied to different Extra Stops for the same customer on the same trip. The second grid on the right side (The Vendor Detail Rates Grid) allows the user to define ranges of extra stops with different charges for each range. A range could be one extra stop or multiple extra stops defined based on sequence of occurrence. For example, your first range could be the first stop, your second range is the second and third stops and your third range could be extra stops from the fourth to the seventh. For each range, you can define a different rate.
-
Use the two Extra Stops - Accessorial Charges Details grid to enter the date ranges indicating when this charge will be applied and the details regarding how the charge will be calculated.
The following field descriptions are unique to this charge behavior. Click the hyperlink to see the descriptions for the common shared fields in the Accessorial Charges Details grid. (Fields are listed in default sort order.)
Grid field definitions - Extra StopsRequired field: *
Field Definition < (Shared field common to all Accessorial Charges Details grid.
Click the hyperlink to see the description.)End Date *
<
Charge Per *
Enter the charge amount per extra stop.
Free *
This refers to the number of stops made without charging. For example, often a trucking company will offer a no-charge fee for the first stop, but after that, all other stops are charged out at $50.00. To further this example, if there were five stops, the charge for the extra stops would be $200 (4 x $50).
<
<
<
<
<
<
<
<
Stairs / Elevator / Dock / Site Survey / Vehicle Restriction *
<
<
<
<
<
<
<
<
<
<
Exclude Legs of Same From/To Zone *
This field can be set to False (the default value), to include all legs (including legs of the same From/To Zone values) in counting the number of stops. If this field is set to 'True', legs of the same From/To Zone will be EXCLUDED from counting the number of stops. Only legs with differing From/To Zone values will be included.
The Vendor Detail Rates grid on the right side allows you to create specific rates for the amount of Stops (per Trip Leg) that a Vendor will be completing. You can configure many detail lines here, so that any possible Extra Stops scenario is covered for the selected Vendor.
If you leave the Vendor Detail Rates grid empty, the charges setup in the Extra Stops - Accessorial Charges Details grid will apply to every stop not covered by the Free column value.
| Field | Definition |
|---|---|
Range From / Range To |
Enter integer values into these two fields to configure the Vendor Stop Range. If, for example, the User enters '0' in the 'Range From' field, and '5' in the 'Range To' field, the Vendor receive the Rate listed in the 'Rate' field (below) if the Trip Leg they have been assigned contains any number of Extra Stops between 0 and 5. |
Rate |
Enter the dollar amount that will be applied to the Vendor when the amount of Extra Stops they must accomplish falls within the Range specified by the 'Range From' and 'Range To' fields (above). |
Example accessorial charge based on extra stops
Parent freight bill + 2 Xstops: You want the first stop to be free, the second and third stops to charge $30.00, the fourth to the seventh stops to charge $40 and any stops after that to charge $50.
-
In Codes Maintenance > Accessorial Charges, set up a code for Extra Stops; Charge Behaviour = Extra Stops.
-
Select the Roll Up Extra Stop-Chrgs checkbox.
-
Select the Auto-Assign by Default checkbox if you want them to be automatically added to the freight bill.
-
In the Accessorial Charges Details grid, set the Free column value to 1. Add any other criteria as needed in the details grid.
-
In the Vendor Detail Rates grid, define the ranges and rates.
Extra Stop Accessorials - How to set up for specific stop pay?
Example - Parent freight bill + 2 Xstops: You want to charge $90.00 for the first stop and $150 for the second stop for a total of $240.
-
In Codes Maintenance > Accessorial Charges, set up a code for Extra Stops; Charge Behaviour = Extra Stops. Check the Roll Up Extra Charges flag. Check the Auto Assign By Default (only if you want them to auto add to the FB).
-
In the details, add a line for the first Xstop at $90.00; so if there is only one Xstop on the freight bill, then the $90.00 charge would apply. Add any other criteria needed in the detail line.
-
Then right-click on the detail line and click on Show Memo and add the following to the first Xstop charge: NO_STOPS = 1. Note: This will look at the TLORDER.NO_STOPS value of the parent bill.
-
For the second Xstop, add another detail line at $120.00 (this is the manual part where you must determine what the charge would be for twp Xstops in this scenario). In this example it would be $90.00 for the first stop plus $150 for the second stop = $240, divided by two stops = $120.00 each stop.
-
Add any other criteria needed in the detail line. Then right-click on the detail line and click on Show Memo and add the following to the second Xstop charge: NO_STOPS = 2. Note: This will look at the TLORDER.NO_STOPS value of the parent bill.
-
When you look at your freight bill with the two Xstops on it, you will see the Accessorials displayed.
Flat Charge
This type of charge applies an extra charge of a fixed amount to the Freight Bill.
Creating an accessorial charge based on a flat charge
-
Go to Profiles > Codes Maintenance > Accessorial Charges tab.
-
Click
Insert from the top left navigation bar. -
See Creating a new accessorial charge for instructions and details about each of the fields in the header section.
-
Click
Post occasionally as you proceed to save your entries. -
Go to the Charge Behaviors field and select Flat Charge from the drop-down list.
-
The label for the Accessorial Charges Details grid is set to Flat Charge.
-
Use the Flat Charge - Accessorial Charges Details grid to enter the date ranges indicating when this charge will be applied and the details regarding how the charge will be calculated.
The following field descriptions are unique to this charge behavior. Click the hyperlink to see the descriptions for the common shared fields in the Accessorial Charges Details grid. (Fields are listed in default sort order.)
Grid field definitions - Flat ChargeRequired field: *
Field Definition Charge *
Enter the amount of the extra flat rate charge.
< (Shared field common to all Accessorial Charges Details grid.
Click the hyperlink to see the description.)End Date *
<
<
<
<
<
<
<
<
<
<
Stairs / Elevator / Dock / Site Survey / Vehicle Restriction *
<
<
<
<
<
<
<
<
<
<
Ranged Calculation
This type of charge applies an extra charge that is based on a rate multiplied by the value in the selected Rate-Per Field. The extra charge is only calculated if the Range Field falls into the Range From and Range To values.
Creating an accessorial charge based on a ranged calculation
-
Go to Profiles > Codes Maintenance > Accessorial Charges tab.
-
Click
Insert from the top left navigation bar. -
See Creating a new accessorial charge for instructions and details about each of the fields in the header section.
-
Click
Post occasionally as you proceed to save your entries. -
Go to the Charge Behaviors field and select Ranged Calculation from the drop-down list.
-
The label for the Accessorial Charges Details grid is set to Ranged Calculation.
-
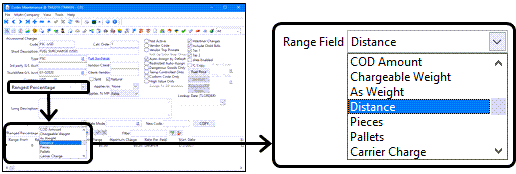
The Range Field is enabled.

-
Use the Range Field drop-down list to select the appropriate value to reflect what the ranged calculation value amount will be based on.
| Field | Definition |
|---|---|
Weight |
Uses the sum of all weight amounts entered on the detail lines of the freight bill as displayed on the Customer Service program > Summary tab. |
Length |
Uses the sum of all length amounts entered on the detail lines of the freight bill as displayed on the Customer Service program > Summary tab. |
Area |
Uses the sum of all area amounts entered on the detail lines of the freight bill as displayed on the Customer Service program > Summary tab. |
Cube |
Uses the sum of all cube amounts entered on the detail lines of the freight bill as displayed on the Customer Service program > Summary tab. |
Deliver By Day of Week |
Uses the day of the week (ie, Monday, Friday, etc) that corresponds with Deliver By date of the freight bill. |
Time |
Uses the sum of all time amounts entered on the detail lines of the freight bill as displayed on the Customer Service program > Summary tab. |
Declared Value |
Uses the Declared Value amount entered in the Freight Bill header in the Customer Service program. |
Freight Charge |
Uses the total charges on the Freight Bill. This can be viewed on the Customer Service program > Billing tab, or in the bottom right corner of the Quick Bill Entry program. |
COD Amount |
Uses the COD amount that is to be collected for the Freight Bill, as entered on the Customer Service program > COD tab, or in the COD field in the Quick Bill Entry program. |
Chargeable Weight |
Will multiply the sum of all chargeable weight amounts entered on the detail lines of the Freight Bill by the value entered in the Adjust Factor field. |
As Weight |
Uses the sum of all As Weight amounts entered on the detail lines of the Freight Bill. As Weight is based on a weight conversion (e.g., a cube to weight conversion ratio.) The As Weight is set to the higher value between the actual weight and the converted weight. |
Distance |
Uses the sum of all distance amounts entered on the detail lines of the Freight Bill. |
Pieces |
Uses the total number of Pieces entered on the detail lines of the freight bill as displayed on the Customer Service program > Summary tab. |
Pallets |
Uses the total number of Pallets entered on the detail lines of the freight bill as displayed on the Customer Service program > Summary tab. |
Carrier Charge |
Uses the total carrier charge associated with the freight bill as displayed on the Customer Service program > I/P tab > Charges sub-tab > Extra field or on the Customer Service program > Billing tab > IP Accrual field. This option should be selected when the Ranged Calculation applies to a Vendor (Brokerage). This option is especially helpful when dealing with fuel surcharges. |
Tolls |
Uses the total for any toll fees associated with the freight bill. The value for the toll fee totals are calculated by the mileage server engine, (PC*Miler). |
ORM Distance |
ORM (Off Route Mileage) Distance is the difference between the mileage inclusive of all stops and the direct miles from origin to destination exclusive of stops, the direct miles being the furthest distance on the parent or child bills. When the distance from the origin to the final destination via the stop off points deviates from the most practical route by more than the agreed allowance, Circuitous/Off Route Mileage (ORM) charges will apply. |
Volume |
Uses the volume entered on the detail lines of the freight bill as displayed on the Customer Service program > Summary tab. |
-
Once the Range Field value is selected, use the Ranged Calculation - Accessorial Charges Details grid to enter the date ranges indicating when this charge will be applied and the details regarding how the charge will be calculated.
The following field descriptions are unique to this charge behavior. Click the hyperlink to see the descriptions for the common shared fields in the Accessorial Charges Details grid. (Fields are listed in default sort order.)
Grid field definitions - Ranged CalculationRequired field: *
Field Definition Range From *
Enter the lowest value of the Range Field that should generate an extra charge.
Range To *
Enter the highest value of the Range Field that should generate an extra charge.
Rate *
Enter the amount that will be multiplied by the value in the field specified in the Rate-Per Field to determine the amount of the extra charge. Enter zero if you are not going to use the rate value.
Minimum Charge / Maximum Charge *
Optionally, instead of entering a rate, you can enter a Minimum Charge / Maximum Charge for the range. That is, if the calculation (Rate multiplied by Rate-Per Field) falls below (or above) the amount entered in the Minimum Charge / Maximum Charge fields , the Minimum Charge / Maximum Charge will be used instead of the calculation. Enter zero if you are not going to use these values.
Rate Per Field *
The value in the field selected here will be multiplied by the Rate to determine the amount of the extra charge.
< (Shared field common to all Accessorial Charges Details grid.
Click the hyperlink to see the description.)End Date *
<
<
<
<
<
<
<
<
<
<
Stairs / Elevator / Dock / Site Survey / Vehicle Restriction *
<
<
<
<
<
<
<
<
<
<
IP movement type
Select the Interline Payable movement type from the drop down list you want this charge to be tied to in order to restrict when this charge would be applied. 'Any' is the default.
<
Example accessorial charge based on a ranged calculation
Suppose you entered two detail records for a 'Range Calculation' type accessorial charge as follows:
-
The first detail record 'Calc Seq' = 1, 'Rate' = 5, 'Rate Per Field' = Weight and 'Threshold' = 1000.
-
The second detail record 'Calc Seq' = 2, 'Rate' = 1, 'Rate Per Field' = Weight and 'Threshold' = 0.
If a Freight Bill has a 'Weight' greater than or equal to 1000 LBs (the Threshold value), then the first record (Calc Seq = 1, Rate = 5, Threshold = 1000) will be used. The Threshold weight is subtracted from the Freight Bill Weight to determine the Weight for the Accessorial Charge. For example, if the Freight Bill weight is 1300 LBs and the Threshold is 1000 LBs - the accessorial charge’s weight/quantity is 1300 - 1000 = 300 LBs at $5.00. In this case the accessorial charge that will be calculated is 300 X $5 = $1500.
If a Freight Bill has a 'Weight' less than 1000 LBs, then the first record (Threshold = 1000 LBs) is not used. Instead the program moves on and looks at additional Accessorial Charge detail records to see if they apply. For instance, if the Freight Bill Weight is 800 LBs then the second record (Calc Seq = 2, Rate = 1, Threshold = 0) is used. The accessorial charge Weight/quantity is 800 (freight bill weight) - 0 (threshold) = 800. In this case the accessorial charge that will be calculated is 800 X $1 = $800.
Ranged Flat Charge
An extra charge based on other details of the Freight Bill. If you select this Charge Behavior, the display will change to show the Range Field and a grid for entering the range. The value specified in the Range Field is analyzed to see if it falls into the Range From and Range To values specified in the grid.
Creating an accessorial charge based on a ranged flat charge
-
Go to Profiles > Codes Maintenance > Accessorial Charges tab.
-
Click
Insert from the top left navigation bar. -
See Creating a new accessorial charge for instructions and details about each of the fields in the header section.
-
Click
Post occasionally as you proceed to save your entries. -
Go to the Charge Behaviors field and select Ranged Flat Charge from the drop-down list.
-
The label for the Accessorial Charges Details grid is set to Ranged Flat Charge.
-
The Range Field is enabled.

-
Use the Range Field drop-down list to select the appropriate value to reflect what the ranged calculation value amount will be based on.
-
See the table in Ranged Calculation for descriptions of the entries in the Range Field drop-down list.
-
Once the Range Field value is selected, use the Ranged Calculation - Accessorial Charges Details grid to enter the date ranges indicating when this charge will be applied and the details regarding how the charge will be calculated.
The following field descriptions are unique to this charge behavior. Click the hyperlink to see the descriptions for the common shared fields in the Accessorial Charges Details grid. (Fields are listed in default sort order.)
Grid field definitions - Ranged Flat ChargeRequired field: *
Field Definition Range From *
Enter the lowest value of the Range Field that should generate an extra charge.
Range To *
Enter the highest value of the Range Field that should generate an extra charge.
Flat Fee *
Enter the amount that will be multiplied by the value in the field specified in the Rate-Per Field to determine the amount of the extra charge.
< (Shared field common to all Accessorial Charges Details grid.
Click the hyperlink to see the description.)End Date *
<
<
<
<
<
<
<
<
<
<
Stairs / Elevator / Dock / Site Survey / Vehicle Restriction *
<
<
<
<
<
<
<
<
<
<
Ranged Percentage
This type of charge applies an extra charge that is a percentage of another charge on the Freight Bill. If you select this Charge Behavior, the display will change to show the Range Field and a grid for entering the range. The value specified in the Range Field is analyzed to see if it falls into the Range From and Range To values specified in the grid.
Creating an accessorial charge based on a ranged percentage
-
Go to Profiles > Codes Maintenance > Accessorial Charges tab.
-
Click
Insert from the top left navigation bar. -
See Creating a new accessorial charge for instructions and details about each of the fields in the header section.
-
Click
Post occasionally as you proceed to save your entries. -
Go to the Charge Behaviors field and select Ranged Percentage from the drop-down list.
-
The label for the Accessorial Charges Details grid is set to Ranged Percentage.
-
The Range Field is enabled.
-
Use the Range Field drop-down list to select the appropriate value to reflect what the ranged calculation value amount will be based on.
-
See the table in Ranged Calculation for descriptions of the entries in the Range Field drop-down list.
-
Once the Range Field value is selected, use the Ranged Calculation - Accessorial Charges Details grid to enter the date ranges indicating when this charge will be applied and the details regarding how the charge will be calculated.
The following field descriptions are unique to this charge behavior. Click the hyperlink to see the descriptions for the common shared fields in the Accessorial Charges Details grid. (Fields are listed in default sort order.)
Grid field definitions - Ranged PercentageRequired field: *
Field Definition Range From *
Enter the lowest value of the Range Field that should generate an extra charge.
Range To *
Enter the highest value of the Range Field that should generate an extra charge.
Rate *
Enter the amount that will be multiplied by the value in the field specified in the Rate-Per Field to determine the amount of the extra charge. Enter zero if you are not going to use the rate value.
Minimum Charge / Maximum Charge *
Optionally, instead of entering a rate, you can enter a Minimum Charge / Maximum Charge for the range. That is, if the calculation (Rate multiplied by Rate-Per Field) falls below (or above) the amount entered in the Minimum Charge / Maximum Charge fields , the Minimum Charge / Maximum Charge will be used instead of the calculation. Enter zero if you are not going to use these values.
Percentage *
Enter a numerical value that will represent the Percentage to be measured against the Freight Bill’s charges (depending on which charge is selected in the adjacent 'Percentage Of' field).
Percentage Of *
Use the pull down menu to select if your Percentage value will be applied to the 'Declared Value' amount, the 'Freight Charge' amount, or the 'COD Amount' of the Freight Bill.
< (Shared field common to all Accessorial Charges Details grid.
Click the hyperlink to see the description.)End Date *
<
<
<
<
<
<
<
<
<
<
Stairs / Elevator / Dock / Site Survey / Vehicle Restriction *
<
<
<
<
<
<
<
<
<
<
IP movement type
Select the Interline Payable movement type from the drop down list you want this charge to be tied to in order to restrict when this charge would be applied. 'Any' is the default.
<
Example accessorial charge based on the current fuel price
Suppose you entered two detail records for a 'Range Percentage' type accessorial charge as follows:
-
The first detail record 'Calc Seq' = 1, 'Percentage' = 5, 'Percentage Of' = Declared Value and 'Threshold' = 1000.
-
The second detail record 'Calc Seq' = 2, 'Percentage' = 1, 'Percentage Of' = Declared Value and 'Threshold' = 0.
If a Freight Bill has a 'Declared Value' greater than or equal to $1000 (the Threshold value), then the first record (Calc Seq = 1, Percentage = 5, Threshold = 1000) will be used. The Threshold value is subtracted from the Freight Bill Declared Value to determine the Value for calculating the Accessorial Charge. For example, if the Freight Bill Declared Value is $1300 and the Threshold is 1000 then the value to be used for accessorial charge calculation is 1300 - 1000 = $300 at 5%. In this case the accessorial charge that will be calculated is 300 X .05 = $15.
If a Freight Bill has a 'Declared Value' less than $1000 then the first record (Threshold = 1000) is not used. In this case, the program moves on and looks at additional Accessorial Charge detail records to see if they apply. For instance, if the Freight Bill Declared Value is $800 then the second record (Calc Seq = 2, Percentage = 1, Threshold = 0) is used. The value used for calculating the accessorial charge is 800 (freight bill declared value) - 0 (threshold) = 800. In this case the accessorial charge that will be calculated is 800 X .01 = $8.
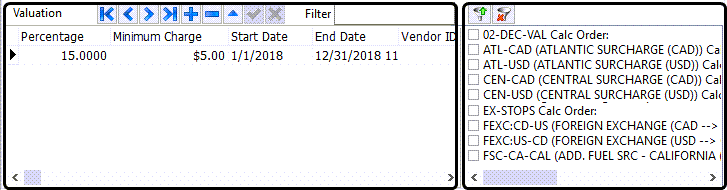
Valuation
This type of charge calculates an extra charge based on a percentage of another extra charge. Select the Accessorial Charges on which you want the Valuation charge to calculate by checking the appropriate box on the right side of the screen. Configure the details of the Valuation charge in the grid on the left side of the screen.
Creating an accessorial charge based on valuation
-
Go to Profiles > Codes Maintenance > Accessorial Charges tab.
-
Click
Insert from the top left navigation bar. -
See Creating a new accessorial charge for instructions and details about each of the fields in the header section.
-
Click
Post occasionally as you proceed to save your entries. -
Go to the Charge Behaviors field and select Valuation from the drop-down list.
-
The label for the Accessorial Charges Details grid is set to Valuation.
-
The Valuation grid consists of two parts. The grid on the left includes fields to define the method for calculating the valuation charges and the list of checkboxes on the right indicate which existing accessorial charges will be used to determine the base value for the valuation charge calculation.
-
Use the two Valuation - Accessorial Charges Details grid to enter the date ranges indicating when this charge will be applied and the details regarding how the charge will be calculated.
The following field descriptions are unique to this charge behavior. Click the hyperlink to see the descriptions for the common shared fields in the Accessorial Charges Details grid. (Fields are listed in default sort order.)
Grid field definitions - ValuationRequired field: *
Field Definition Percentage *
Enter the percentage that you want to multiply by the total value sum of the selected extra charges.
Minimum Charge *
If the percentage calculation yields less than the amount entered in this field, this amount will be used instead.
< (Shared field common to all Accessorial Charges Details grid.
Click the hyperlink to see the description.)End Date *
<
<
<
<
<
<
<
<
<
<
Stairs / Elevator / Dock / Site Survey / Vehicle Restriction *
<
<
<
<
<
<
<
<
<
<
Valuation Accessorial List
The area to the right of the Valuation Details grid allows you to select an Accessorial Charge that has been previously setup in the TruckMate database. When you select an accessorial from this list, the Valuation charge you are configuring will use the chosen Accessorial value(s) when calculating this value.
Note: The 'Calc Order' value given to a Valuation accessorial is crucial, as it must be greater than the accessorial charge(a) that it is assigned to ensure the amounts used in the calculation already exist. For example: most accessorials are given a 'Calc Order' of '1', so that they immediately auto-assign to a Freight Bill. Because a 'Valuation' type accessorial is based on other accessorial that must already be present on the Freight Bill, the user must enter a 'Calc Order' value higher than the Accessorial Charge to which it is assigned.
Value Adjustment
This type of charge creates a new detail line on the Freight Bill rather than creating an Accessorial Charge. The new detail line will adjust the summary values on the Freight Bill. Note that the new detail line will not automatically be rated. You must manually enter edit the detail line to assess manual or automatic charges. The value selected in the Adjustment Field will be compared against Adjust Factor multiplied by the value in the field selected in the Adjust-If field. The difference will be entered on a new detail line for the field selected in the Adjustment field.
Creating an accessorial charge based on a value adjustment
-
Go to Profiles > Codes Maintenance > Accessorial Charges tab.
-
Click
Insert from the top left navigation bar. -
See Creating a new accessorial charge for instructions and details about each of the fields in the header section.
-
Click
Post occasionally as you proceed to save your entries. -
Go to the Charge Behaviors field and select Value Adjustment from the drop-down list.
-
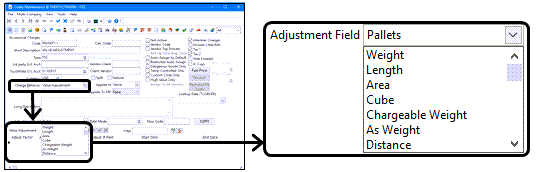
The label for the Accessorial Charges Details grid is set to Value Adjustment.
-
The Adjustment Field is enabled.
-
Use the Adjustment Field drop-down list to select the appropriate value to reflect what the ranged calculation value amount will be based on.
| Field | Definition |
|---|---|
Weight |
Uses the sum of all weight amounts entered on the detail lines of the freight bill as displayed on the Customer Service program > Summary tab. |
Length |
Uses the sum of all length amounts entered on the detail lines of the freight bill as displayed on the Customer Service program > Summary tab. |
Area |
Uses the sum of all area amounts entered on the detail lines of the freight bill as displayed on the Customer Service program > Summary tab. |
Cube |
Uses the sum of all cube amounts entered on the detail lines of the freight bill as displayed on the Customer Service program > Summary tab. |
Deliver By Day of Week |
Uses the day of the week (i.e., Monday, Friday, etc.) that corresponds with Deliver By date of the freight bill. |
Time |
Uses the sum of all time amounts entered on the detail lines of the freight bill. |
Declared Value |
Uses the Declared Value amount entered in the freight bill header in the Customer Service program. |
Freight Charge |
Uses the total charges on the Freight Bill. This can be viewed on the Customer Service program > Billing tab, or in the bottom right corner of the Quick Bill Entry program. |
COD Amount |
Will analyze the COD amount that is to be collected for the Freight Bill, as entered on the Customer Service program > COD tab, or in the COD field in the Quick Bill Entry program. |
Chargeable Weight |
Will multiply the sum of all chargeable weight amounts entered on the detail lines of the Freight Bill by the value entered in the Adjust Factor field. |
As Weight |
Uses the sum of all weight amounts entered on the detail lines of the Freight Bill. |
Distance |
Uses the sum of all distance amounts entered on the detail lines of the freight bill as displayed on the Customer Service program > Summary tab. |
Pieces |
Uses the number of Pieces entered on the detail lines of the freight bill as displayed on the Customer Service program > Summary tab. |
Pallets |
Uses the number of Pallets entered on the detail lines of the freight bill as displayed on the Customer Service program > Summary tab. |
Volume |
Uses the volume entered on the detail lines of the freight bill as displayed on the Customer Service program > Summary tab. |
-
Once the Range Field value is selected, use the Value Adjustment - Accessorial Charges Details grid to enter the date ranges indicating when this charge will be applied and the details regarding how the charge will be calculated.
The following field descriptions are unique to this charge behavior. Click the hyperlink to see the descriptions for the common shared fields in the Accessorial Charges Details grid. (Fields are listed in default sort order.)
Grid field definitions - Value AdjustmentRequired field: *
Field Definition Adjust Factor *
Is multiplied by the value in the Freight Bill’s Adjust-If Field to determine the total amount that the Freight Bill should have for the Adjustment Field. If the Adjust Factor multiplied by the value in the Freight Bill’s Adjust-If Field is greater then the summary value of the Freight Bill’s Adjustment Field, a new detail line will be created using the Adjustment Field and the difference in amounts.
Adjust-If Min *
Optionally, you can enter the minimum value that must be present in the Freight Bill’s Adjust-If Field to perform the calculation and (potentially) generate a new detail line.
Adjust-If Max *
Optionally, you can enter the maximum value of the Freight Bill’s Adjust-If Field to perform the calculation and (potentially) generate a new detail line.
Adjust-If Field *
Select the field that you want to multiply by the Adjust Factor to determine the adjusted value of the field specified in the Adjustment Field. Click in the field to access the arrow that will display the drop down list box.
< (Shared field common to all Accessorial Charges Details grid.
Click the hyperlink to see the description.)End Date *
<
<
<
<
<
<
<
<
<
<
Stairs / Elevator / Dock / Site Survey / Vehicle Restriction *
<
<
<
<
<
<
<
<
<
<
Fuel surcharge (FSC) based on DOE average
This type of charge applies a fuel surcharge (FSC) to the freight bill that is calculated based on the current average fuel price as reported by the Department of Energy (DOE) average.
(https://www.eia.gov/petroleum/gasdiesel/)
Creating an accessorial charge based on the FSC (DOE average)
-
Go to Profiles > Codes Maintenance > Accessorial Charges tab.
-
Click
Insert from the top left navigation bar. -
See Creating a new accessorial charge for instructions and details about each of the fields in the header section.
-
Click
Post occasionally as you proceed to save your entries. -
Go to the Charge Behaviors field and select FSC (DOE Average) from the drop-down list.
-
The label for the Accessorial Charges Details grid is set to Fuel Surcharge (Based on DOE average).
-
The Declrd. Value Field will be displayed and enabled.
-
Use the drop-down list to select the appropriate value to reflect what the declared value amount is based on.
| Field | Definition |
|---|---|
Declared Value |
Uses the Declared Value amount entered in the Freight Bill header in the Customer Service program. |
Freight Charge |
Uses the total charges on the Freight Bill. This can be viewed on the Customer Service program > Billing tab, or in the bottom right corner of the Quick Bill Entry program. |
COD Amount |
Uses the COD amount that is to be collected for the Freight Bill, as entered on the Customer Service program > COD tab, or in the COD field in the Quick Bill Entry program. |
Carrier Charge |
Uses the total carrier charge associated with the freight bill as displayed on the Customer Service program > I/P tab > Charges sub-tab > Extra field or on the Customer Service program > Billing tab > IP Accrual field. |
Tolls |
Uses the total for any toll fees associated with the freight bill. The value for the toll fee totals are calculated by the mileage server engine, (PC*Miler). |
-
Use the Fuel Surcharge (Based on DOE average) grid to enter the date ranges indicating when this charge will be applied and the details regarding how the charge will be calculated.

The following field descriptions are unique to this charge behavior. Click the hyperlink to see the descriptions for the common shared fields in the Accessorial Charges Details grid. (Fields are listed in default sort order.)
Grid field definitions - FSC (DOE Average)Required field: *
Field Definition Fuel Price Average *
Double click this field to select an Average Code based on a specific Region. A menu will be displayed with all the currently setup Average Codes in your system.
Note: You can create Fuel Price Average Codes by selecting the 'Fuel Price' button in the Acc Charge tab > Header section.
Factor A *
Used in the DOE Average calculation (as shown in the image above).
Factor B *
Used in the DOE Average calculation (as shown in the image above).
Commodity *
Double-click this field to select a Commodity Code from the available Commodity Codes in your system.
< (Shared field common to all Accessorial Charges Details grid.
Click the hyperlink to see the description.)End Date *
<
Minimum Charge / Maximum Charge *
Optionally, you can enter a Minimum Charge / Maximum Charge for the range. That is, if the calculation (Rate multiplied by Rate-Per Field) falls below (or above) the amount entered in the Minimum Charge / Maximum Charge fields , the Minimum Charge / Maximum Charge will be used instead of the calculation.
<
<
<
<
<
<
<
<
Stairs / Elevator / Dock / Site Survey / Vehicle Restriction *
<
<
<
<
<
<
<
<
<
Percent/Factor Of
<
IP movement type
Select the Interline Payable movement type from the drop down list you want this charge to be tied to in order to restrict when this charge would be applied. 'Any' is the default.
Status Codes
This type of charge applies a fuel surcharge to the freight bill that is calculated based on specific status codes assigned to the freight bill as the shipment progresses.
Creating an accessorial charge based on the status
-
Go to Profiles > Codes Maintenance > Accessorial Charges tab.
-
Click
Insert from the top left navigation bar. -
See Creating a new accessorial charge for instructions and details about each of the fields in the header section.
-
Click
Post occasionally as you proceed to save your entries. -
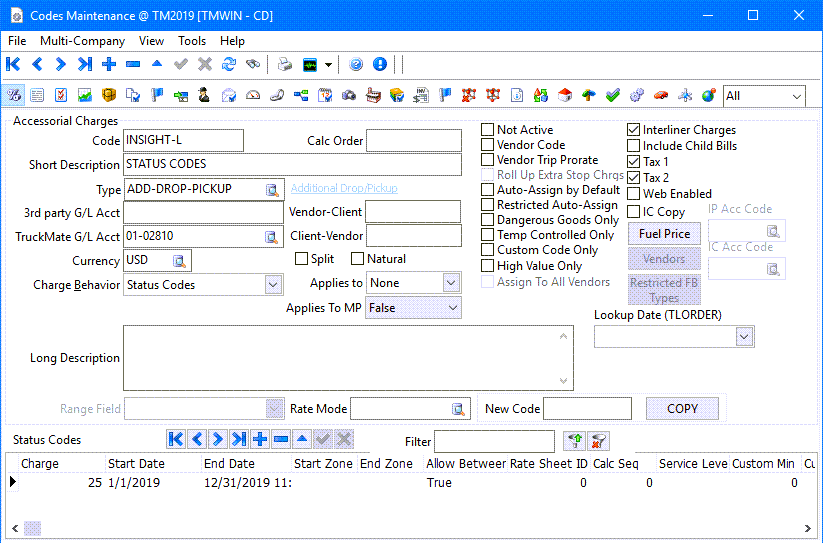
Go to the Charge Behaviors field and select Status Codes from the drop-down list.
-
The label for the Accessorial Charges Details grid is set to Status Codes.
-
Use the Status Codes - Accessorial Charges Details grid to enter the date ranges indicating when this charge will be applied and the details regarding how the charge will be calculated.
The following field descriptions are unique to this charge behavior. Click the hyperlink to see the descriptions for the common shared fields in the Accessorial Charges Details grid. (Fields are listed in default sort order.)
Grid field definitions - Status CodesRequired field: *
Field Definition < (Shared field common to all Accessorial Charges Details grid.
Click the hyperlink to see the description.)End Date *
<
Fuel Average
Double-click in this column to bring up the 'Find Average' dialog box where you can search by Average and Name.
Create a new Average Name and Average Code by selecting the 'Fuel Price' button located in the upper right-hand area of the Codes Maintenance program, Accessorial Charge tab. Go to the 'Prices' tab and locate the Average Code previously entered, and enter your current price. Use the 'Fuel Price' button to change the fuel rates periodically. The number entered as the 'Current Fuel Price' will be used to determine the % or factor applied to the freight charges.
<
Price From *
Enter the lowest value of the fuel price that should generate an extra charge.
Price To *
Enter the highest value of the fuel price that should generate an extra charge.
Percent
Enter the percentage that you want to multiply by the value assessed for the selected extra charges.
Factor
The factor field functions exactly as the 'Percentage' field above, but is in a different format. Enter an amount in either the percentage or the factor field, not both. If both fields contain values, the 'Factor' field will be used.
Note: If using the percentage, enter 10% as 10, not 0.10, (i.e., no decimal). Alternately, if using the factor field, enter the factor as 0.1 with the decimal.
Percent/Factor Of *
Use the pull-down arrow to select the one of the following choices. The choice you select will be the multiplication factor or percentage used in the calculation.
Minimum *
Optionally, you can enter a Minimum Charge for the range. That is, if the calculation falls below the amount entered in the Minimum field, the Minimum will be used instead of the calculation.
Maximum *
Optionally, you can enter a Maximum for the range. That is, if the calculation falls below the amount entered in the Maximum field, the Maximum Charge will be used instead of the calculation.
<
<
<
<
<
<
<
<
<
Stairs / Elevator / Dock / Site Survey / Vehicle Restriction *
<
<
<
<
<
<
<
<
<
Status Code
Double-click to select a status from the list of status codes available within the TruckMate system. The charge will be created and added to the freight bill when this status is assigned to the freight bill.
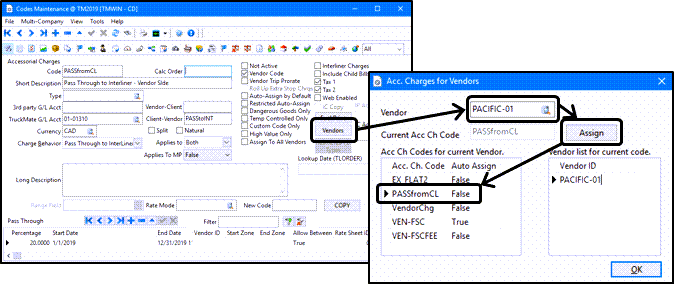
Pass Through to InterLiner
This charge behavior provides the ability to 'Pass Through' some accessorial charges and amounts to interliners while maintaining the ability to pay other interliners a calculated accessorial charge. In either situation, this particular accessorial charge will only be paid if it is matched to an accessorial charge billed to the customer. Using this behavior, you can choose to pass the entire amount of the accessorial charge or any percentage of that amount to the interliner.
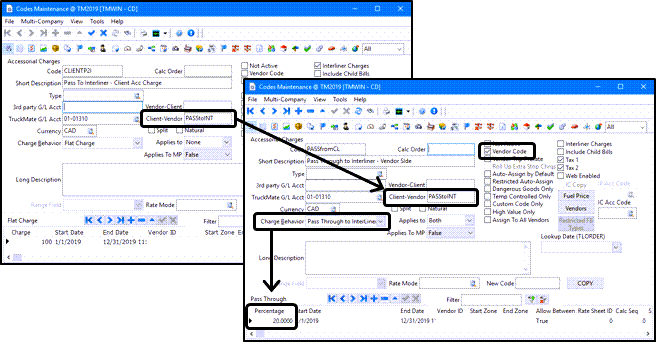
To create a Pass Through to Interliner accessorial charge, the "source" charge and the "target" charge are linked by the matching entries in the Vendor-Client field. You must create two separate charges and this entry linking the two together can be anything but it must match exactly in the Vendor-Client fields for the source vendor charge and the target client charge.
The Pass Through to Interliner accessorial charge behavior requires you to setup two accessorial charges:
-
. One for the Client that will have charges that will be passed to the Interliner
-
. Second one for the Interliner/Vendor with a Charge Behavior of Pass Through to Interliner
Creating an accessorial charge using Pass Through to InterLiner
-
Go to Profiles > Codes Maintenance > Accessorial Charges tab.
-
Go to the client charge (i.e., the source) or create it from scratch. (See Creating a new accessorial charge)
-
Ensure the Interliner Charges checkbox is selected.
Note: Not all accessorial Charge Behavior types are compatible.
-
Enter a code, (can be anything), in the Client-Vendor field.
-
Create and save a new target Interliner accessorial charge.
Note: Has to be assigned but NOT auto assigned to the vendor(s).
-
Set the Charge Behavior to Pass Through to InterLiner for this target client accessorial charge.
-
Enter the identical matching code in the Client-Vendor field. (It must match the code you used in the source client charge exactly.)
-
The label for the Accessorial Charges Details grid is set to Pass Through.
-
Use the Status Codes - Accessorial Charges Details grid to enter the date ranges indicating when this target client accessorial charge will be applied and the details regarding how the charge will be calculated. (There must be at least one entry in this grid.)
-
The defined detail lines will set the percentage that will be paid to the interliner/vendor.
-
Click the Vendors button and assign this charge to the Interliner vendor.
-
Use the Status Codes - Accessorial Charges Details grid to enter the date ranges indicating when this charge will be applied and the details regarding how the charge will be calculated.
The following field descriptions are unique to this charge behavior. Click the hyperlink to see the descriptions for the common shared fields in the Accessorial Charges Details grid. (Fields are listed in default sort order.)
Grid field definitions - Pass Through to InterLinerRequired field: *
Field Definition Percentage *
Defines how much of the charge will be 'Passed Through' to the interliner, with '1' representing 100%.
< (Shared field common to all Accessorial Charges Details grid.
Click the hyperlink to see the description.)End Date *
<
<
<
<
<
<
<
<
<
<
Stairs / Elevator / Dock / Site Survey / Vehicle Restriction *
<
<
<
<
<
<
<
<
<
<
<
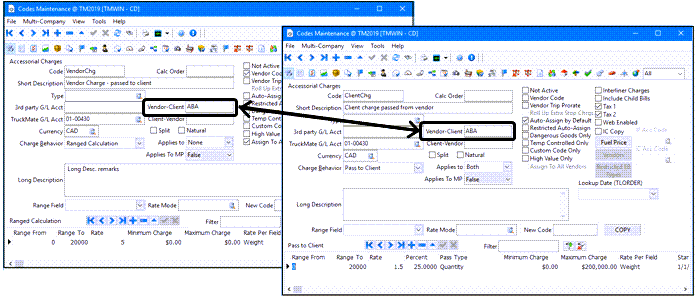
Pass to Client
This charge behavior provides the ability to "pass" some accessorial charges and amounts to clients based on a vendor accessorial charge. As this vendor assembly accessorial is added, the system will also add an associated client assembly accessorial charge to the freight bill. This client accessorial will fall into 1 of 3 scenarios allowing you to choose to pass the entire amount of the accessorial charge or any percentage of that amount.
-
The associated client accessorial uses the same quantity and rate as the vendor accessorial.
-
The associated client accessorial is rated based upon freight bill criteria and not based upon the vendor accessorial entries (other than the vendor accessorial being present).
-
The associated client accessorial uses the same quantity as the vendor accessorial but a different rate is used.
With a Pass to Client accessorial charge, the "source" charge and the "target" charge are linked by the matching entries in the Client-Vendor field. You must create two separate charges and this entry linking the two together can be anything but it must match exactly in the Client-Vendor fields for the source vendor charge and the target client charge.
Creating an accessorial charge based using Pass to Client
-
Go to Profiles > Codes Maintenance > Accessorial Charges tab.
-
Go to the vendor charge (i.e., the source) or create it from scratch. The source charge can be based on any Charge Behavior. (See Creating a new accessorial charge)
-
Enter a code, (can be anything), in the Vendor-Client field.
-
Create and save a new target client accessorial charge.
-
Set the Charge Behavior to Pass to Client for this target client accessorial charge.
-
Enter the identical matching code in the Vendor-Client field. (It must match the code you used in the source vendor charge exactly.)
-
The label for the Accessorial Charges Details grid is set to Pass to Client.
-
Use the Status Codes - Accessorial Charges Details grid to enter the date ranges indicating when this target client accessorial charge will be applied and the details regarding how the charge will be calculated. (There must be at least one entry in this grid.)
-
Indicate the Pass Type to determine how the Client accessorial charge will be calculated.
-
Percentage: CServe > Acc Chgs tab will apply this percentage to the originating vendor charges to calculate the final charge being passed along to the Client.

-
Quantity: CServe > Acc Chgs tab will use the rate specified on the receiving client charge entry on the grid instead of the rate from the originating vendor charge to calculate the final charge being passed along to the Client.

-
None: The same quantity and rate as the vendor accessorial is used so the vendor charge value is copied to this client charge unchanged or the associated client accessorial is rated based upon freight bill criteria and not based upon the vendor accessorial entries (other than the vendor accessorial being present).
-
The following field descriptions are unique to this charge behavior. Click the hyperlink to see the descriptions for the common shared fields in the Accessorial Charges Details grid. (Fields are listed in default sort order.)
Required field: *
| Field | Definition |
|---|---|
Range From * |
Enter the lowest value of the Range Field that should generate an extra charge. |
Range To * |
Enter the highest value of the Range Field that should generate an extra charge. |
Rate * |
Enter the amount that will be multiplied by the value in the field specified in the Rate-Per Field to determine the amount of the extra charge. Enter zero if you are not going to use the rate value. |
Minimum Charge / Maximum Charge * |
Optionally, instead of entering a rate, you can enter a Minimum Charge / Maximum Charge for the range. That is, if the calculation (Rate multiplied by Rate-Per Field) falls below (or above) the amount entered in the Minimum Charge / Maximum Charge fields, the Minimum Charge / Maximum Charge will be used instead of the calculation. Enter zero if you are not going to use these values. |
Rate Per Field * |
The value in the field selected here will be multiplied by the Rate to determine the amount of the extra charge. |
< (Shared field common to all Accessorial Charges Details grid. |
|
End Date * |
< |
< |
|
< |
|
< |
|
< |
|
< |
|
< |
|
< |
|
< |
|
< |
|
Stairs / Elevator / Dock / Site Survey / Vehicle Restriction * |
< |
< |
|
< |
|
< |
|
< |
|
< |
|
< |
|
< |
|
< |
|
IP movement type |
Select the Interline Payable movement type from the drop down list you want this charge to be tied to in order to restrict when this charge would be applied. 'Any' is the default.
|
< |
|
Percent * |
Enter the percentage that you want to multiply by the total value of the source Vendor accessorial charge. |
Pass Type * |
Indicates whether you want the calculation based on the quantity or the percent. None: The associated client accessorial uses the same quantity and rate as the vendor accessorial. Percentage: CServe > Acc Chgs tab will apply this percentage to the originating vendor charges to calculate the final charge being passed along to the Client. Quantity: CServe > Acc Chgs tab will use the rate specified on the receiving client charge entry on the grid instead of the rate from the originating vendor charge to calculate the final charge being passed along to the Client. |
Actual and rated quantity on accessorial charges
An ACTUAL_QUANTITY column has been added to the ACHARGE_TLORDER table in order to avoid confusion regarding the accessorial charge details. This new field displays the actual value of the Rate Per Field / Percentage Of. The QUANTITY column will be the value after the threshold and increment have been applied.
| You do not have to use the threshold and increment features. If the values for threshold and increment are set to the default of zero, they will be ignored and the Actual Quantity value will be the same as the Quantity. |
For example, here is a range calculated accessorial charge as setup in the Profiles > Code Maintenance > Accessorial Charges tab based on weight with a threshold of 500 and an increment of 25.
In this example, the weight of the order is 1500 lbs.
The new column ACTUAL_QUANTITY is set to 1500 as shown on the Customer Service program > Accessorial Charges tab.

The QUANTITY is 40 because (1500 - 500 threshold) / 25 increment = 40. Amount = Quantity * Rate (40 x 15 = 600), as has always been the basic behavior even before the threshold and increment columns were added.
The increment and threshold only apply to some accessorial charge behaviors:
-
Range Percentage
-
Range Calculated
-
Range Calculated with Out Route Mile
-
Pass to Client
-
Fuel Price
-
Pass Through to Interliner
This does apply to clients and vendors.
The Edit Manual Amount form used for the manual adjustment of accessorial charges includes the actual quantity column and sets the quantity column to read only. The actual quantity can be manually updated but the quantity is always a calculated value.
Viewing user-defined fields
While in the Accessorial Charges section of the Codes Maintenance program, use CTRL+U to access the User Defined Fields window where you can add any additional details regarding the accessorial charge.
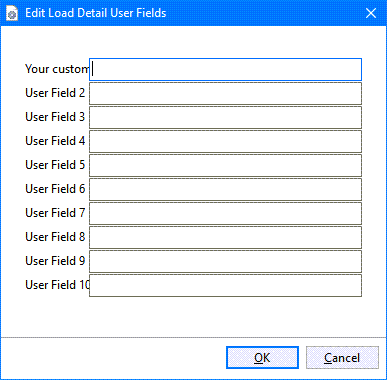
| The field labels/names of the 10 included user-defined Fields are configured in the CODES.EXE section of Application Configurator. Limit the labels to 12 characters. |