Data Purge Utility
Purging means deleting unwanted data from the database. DATAPURGE.EXE allows you to purge transactional type data from your database. Transactional data is usually time-stamped data - e.g. FB’s, GL, etc. Reference data is usually not time-stamped and is used as properties of transactions - e.g. clients, site/op codes, etc.
To access Data Purge:
| From this location | Go to |
|---|---|
TruckMate Menu and TruckMate Task List |
|
Windows Start Menu |
TruckMate 20xx > Data Purge Utility |
Windows Explorer |
C:\Program Files (x86) > TruckMate 20xx > DataPurge.exe |
Application Configurator options for Data Purge
Utilities > Application Configurator > DATAPURGE.EXE
| Option | Definition |
|---|---|
Default Years to Keep |
When the application starts this value is used to set the default Up To date in the Purge Filter section. 5 is the recommended default. Anything lower than 5 years is not recommended. |
Overview - Data Purge Utility
There may be situations where you may need to delete data from the TruckMate database such as:
-
You are new to TruckMate and you have been adding test data to learn TruckMate and now wish to go live and remove the test data (but not the reference type data).
-
You have been using TruckMate for many years and wish to reduce the physical size of your database by purging data you no longer need (i.e., transactions that are five years old or older).
Deleting data manually could be a very tedious process that can be remedied by using the DataPurge program. The basic steps are:
-
Ensure users are off and services are stopped
-
Go to Utilities > Database Utilities > Data Purge Utility
-
Set the purge filters
-
Select Records to Purge to run the query
-
Review the set of selected records
-
Use Save Selections to save your Purge Filter settings
-
Purge the selected records
-
Use SQL Execute program to run REORGS, RUNSTATS AND REBINDS
By using "Save Selections* saving the selection settings you can save your selection criteria and add a "watchdawg" entry to call an "auto-run" DATA_PURGE_DELETE_AUTO_UPTO procedure (with a parameter like CURRENT TIMESTAMP - 5 YEARS) to speed up the setup of future scheduled purging.
| Aside from being a useful tool, the Data Purge Program can lead to very critical outcomes. The program deletes selected data sets permanently and irrevocably from the database, which can lead to very serious problems if there is still a potential need for the data deleted. From there it’s advisable to set the proper level of security on the usage of this program and allow only those who are high enough in the hierarchy to make decisions on data needs to use it. |
|
Menu Bar / Toolbar
This topic only includes menu and toolbar options and functionality specific to the Data Purge window.
For information about common menu and toolbar options (i.e. File menu, Refresh, Multi-Company, etc.), see General menu and toolbar options.
Toolbar
![]()
| Toolbar option | Toolbar icon | Keyboard shortcut | Description |
|---|---|---|---|
Select Records to Purge |
|
Apply the current filter selections on the chosen table(s) and select records. The 'Progress/Summary' tab in the 'Data' section will show the progress and at the end will show the number of records selected for purging. The 'Records/Details' tab will show the details of the records selected for purging. |
|
Purge All Records Displayed in Grid |
|
Performs the purge operation and deletes the records. There is no undo. Selecting the 'Purge' button will also bring up the Report Selection dialog box where you can locate the 'DISPPURGE.RPT', review relevant data, and purge this information. A confirming dialog box will appear prior to the purge function process completing. |
|
View Audit History |
|
Opens the Data Purge History window where you can review audit history. |
|
Define Tables Available for Purging |
|
Opens the Active Tables List where you can exclude some tables to ensure these records are not accidentally purged.
|
|
Connect to Database |
|
Opens the TruckMate Login as a different user (like in sqlexec) to save/prepare settings for the user that will run the "auto-run" proc from scheduler/dawg. |
|
Save Selections |
|
Save your Purge Filter choices (type, tables, checkbox options). |
|
Load Selections |
|
Load the last set of selection criteria. |
File Menu
| Menu option | Menu icon | Keyboard shortcut | Description |
|---|---|---|---|
Save Selections |
|
Save your Purge Filter choices (type, tables, checkbox options). |
|
Load Saved Selections |
|
Load the last set of selection criteria. |
|
Connect to Database |
|
Opens the TruckMate Login as a different user (like in sqlexec) to save/prepare settings for the user that will run the "auto-run" proc from scheduler/dawg. |
Tools Menu
| Menu option | Menu icon | Keyboard shortcut | Description |
|---|---|---|---|
Select Records to Purge |
|
Apply the current filter selections on the chosen table(s) and select records. The 'Progress/Summary' tab in the 'Data' section will show the progress and at the end will show the number of records selected for purging. The 'Records/Details' tab will show the details of the records selected for purging. |
|
Purge Selected Records |
|
Performs the purge operation and deletes the records. There is no undo. Selecting the 'Purge' button will also bring up the Report Selection dialog box where you can locate the 'DISPPURGE.RPT', review relevant data, and purge this information. A confirming dialog box will appear prior to the purge function process completing. |
|
View Purge History |
|
Opens the Data Purge History window where you can review audit history. |
|
Define Active Tables |
|
Define tables available for purging. Opens the Active Tables List where you can exclude some tables to ensure these records are not accidentally purged.
|
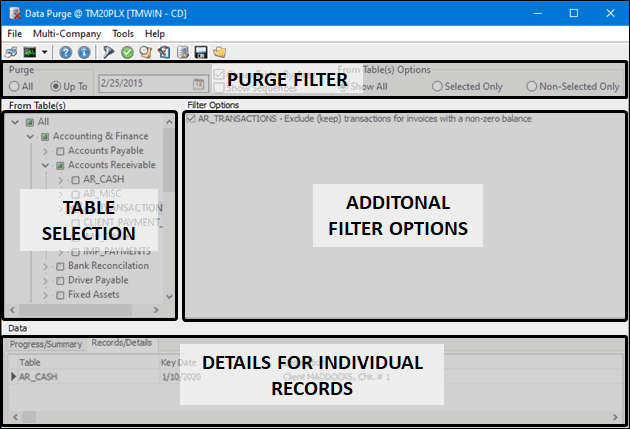
Purge Filter section
This Purge Filter section sets the criteria used for selecting records. You can select all records or records up to a specified time.
![]()
| Option | Definition |
|---|---|
All / Up To |
Indicate whether you want to include ALL records or only records up to a specified date (recommended to be at least 5 years prior to today’s date). When All is selected, it means that all transactions in the selected table will be marked for deletion. A Reset Sequence checkbox will appear when this radio button is selected to reset the sequence in the tables. The sequence is an integer column that is assigned a unique sequential number for each new record, using a DB2 sequence.
It is recommended to select the Reset Sequence checkbox when deleting all records in a table. This will restart the sequence from '1' again, which is logical when there are no loonger any records in the table and you want to start all over again. |
Group Tables by Area |
Controls whether the From Table(s) section displays a list of tables or a branching tree where the tables are grouped together. |
Show Sequence |
Displays sequence data. Many tables have an integer column that is assigned a unique sequential number for each new record, using a DB2 sequence. An example is the primary key column, DETAIL_LINE_ID, for the main FB table, TLORDER. |
From Table(s) Options |
Allows you to display only the selected tables, only the non-selcted tables or all of the tables in the From Table(s) section.
|
From Tables section
This section displays a hierarchal selection tree for table selection. The tables are grouped under different TruckMate applications in a hierarchy similar to how TruckMate application group is organized. Not all applications are listed in this selection tree, only the ones available for data purging are present. The new design of the Data Purge program is designed to be scalable, in other words, additional applications and tables can be added in the future for data purging that are not currently available.
To select a table for data purging, drill down starting with the relevant TruckMate title, then select the application and then select the table you want to purge. As mentioned in the introduction part, the tables available for data purging are transactional tables, with records that have some kind of a time stamp attached. Reference Data tables are not available for purging.
For multiple selection of tables, you can use the 'Ctrl' button with a mouse click.
Once your tables are selected (highlighted) from the tree, you can use the 'Filter Options' section to add additional table-specific filters, and then you can run the filter to select records for purging by clicking the 'Filter' button from the tool bar or selecting the 'Tools' menu > Select Records to Purge.
Filter Options section
This section displays additional filtering options specified for the selected table(s). The table-specific filters are represented in checkboxes, selecting (checking) the checkbox will add the additional option to the filter criteria. Select all the filtering option you want to apply then chose Tools > Select Records to Purge.
Data grid
This section displays information about the selected records. The tabs available in this section provide information about the actual selection of records to be purged.
Progress/Summary tab
The Progress/Summary tab displays the progress of selecting records for purging, and then displays a summary of the records selected. After selecting a table, then using the filter button to select records to purge, the selection process will displayed step by step, and then a summary of how many records were selected in all will be displayed. This information is very valuable for the user to know before resuming the purge process. First the progress will give an idea of what kind of records are being selected, and then the summary will give a better idea of whether the selected records are actually what the user want to delete or not. The user should have an estimate of how many records is expected to be deleted, and the summary either increases the confidence level of the selection criteria or raises doubts, in which case, the user should go back and review and maybe conduct more research before proceeding with the purge.
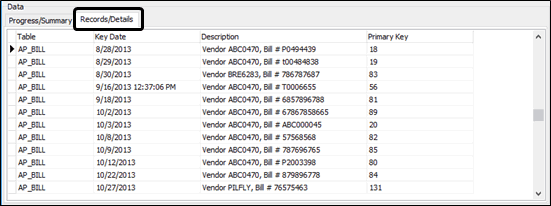
Records/Details tab
This tab displays information about each selected record, the user can scan the results to see if there are any records that are not supposed to be deleted.
The information displayed about each record includes:
| Field | Description |
|---|---|
Table |
The table name that the current record is selected from. |
Key Date |
The creation date of the record that lead to the selection of this record based on the 'Up To' date provided in the 'Purge' (Filter) section. |
Description |
A brief description of the record extracted from the actual data of the record. Enough information to give the user an idea on what the record is related to. |
Primary |
This field displays the value of the primary key for the displayed record, which can also help in identifying the accuracy of selecting the displayed record. |
How to use the Data Purge Utility
-
Before selecting records for deletion, consider the following:
-
Do you want to retain the Quotes you have created?
-
Do you want to retain Special Event Data?
-
Do you use screen design?
-
What zone code do you want your rescourens placed at?
-
Do you use EDI?
-
Do you want to keep Trip Schedules?
-
Do you want to retain the credit history for your clients?
-
-
Before running the Data Purge Utility, ensure that all users are off the system and all services have been stopped. Nothing can be connected to the database.
-
Open Data Purge Utility.
-
Select
 Define Tables Available for Purging to open the Active Tables List where you can verify the appropriate tables have been added to the "Inactive" list to ensure these records are not accidentally purged.
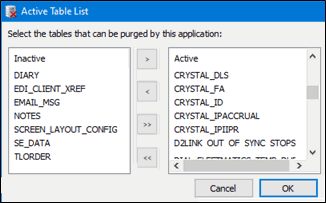
-
Set the purge filters by indicating the Up To date, selecting the From Table(s) and the additional filter options.
-
Select
 Select Records to Purge to run the query and see how many of which records were selected.
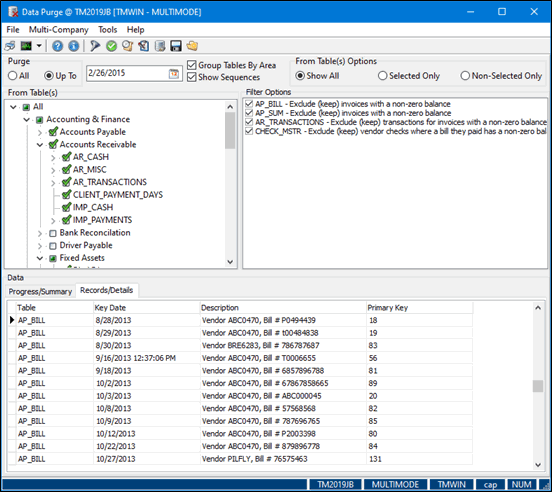
-
Go to the Records/Details tab to review the records and ensure the correct set of data will be purged.
-
Select
 Save Selections to
save your Purge Filter choices for use by the DAWG if you want to setup and run a watchdawg "auto-run" DATA_PURGE_DELETE_AUTO_UPTO procedure in the future.
Save Selections to
save your Purge Filter choices for use by the DAWG if you want to setup and run a watchdawg "auto-run" DATA_PURGE_DELETE_AUTO_UPTO procedure in the future. -
Select
 Save Selections to bring up the Report Selection dialog box where you can locate the 'DISPPURGE.RPT', review relevant data, and purge this information.
A confirming dialog box will appear prior to the purge function process completing. There is no Undo function.
-
Use the Utilities > Database Utilities > SQL Execute program and run REORGS, RUNSTATS AND REBINDS to avoid performance issues,