Billing Consolidation

The Billing Consolidation program enables the user to select bills for consolidation, rate them, and process a master bill representing freight bills that have been consolidated.
To access Billing Consolidation:
| From this location | Go to |
|---|---|
TruckMate Menu and TruckMate Task List |
Billing > Billing Consolidation |
Windows Start Menu |
TruckMate 20xx > Billing Consolidation |
Windows Explorer |
C:\Program Files (x86) > TruckMate 20xx > Billcons.exe |
How Do I?
How do I Consolidate multiple Freight Bills onto one Bill?
-
Open the Billing Consolidation program.
-
Go to the 'New' Tab. Rest your mouse over the text 'Freight Bill' above the first Grid and use the Context Menu (right-click) to select 'Setup Filters'. The left-hand box will show all available fields that you can choose to filter by. This allows you to customize your filter specifications by selecting as many or as few filters as you need. In this example, we’ll add the 'Bill-To Code', 'Bill Date' and 'Bill Range'. Use the red arrow to add these to the right side of the page.
Note: You can select either 'Soft' or 'Hard' filters by selecting the tabs at the lower portion of the screen. The hard filters are system codes. Select all that apply. Most situations will require that all of the hard filter choices be selected. Once you select 'OK', your filters will appear at the top of the page.
-
Check the Filter(s) you wish to use.
-
Now you’re ready to view all approved Bills. Select the 'New' button at the bottom of your screen and the Freight Bill grid will populate with approved Bills.
-
Still on the 'New' tab, go to the 'Consolidations' grid. Here’s your opportunity to allow the system to re-rate the Bill or Bills. Before you rate any Bills, decide whether you want one new master Bill or if you wish to re-rate the individual Bills based on the sum of the Bills. To do this use your context menu, and select 'Setup Processing Options'. Select either the 'Individual' or 'Master Bill' tab, whichever is relevant, and make your choices. Ensure that either 'Re-Rate Individual Bills' (on the Individual tab) or 'Create Master Bill' (on the Master Bill tab) is selected, but not both.
-
Still on the 'New' tab, use your Context Menu (right-click) and select 'Commit'. The Freight Bill will process based on your setup in Freight Processing Options in the Consolidated Billing program.
-
Your next step would be to update the Bill. You would do this by going to the 'Committed' tab.
-
Use your Context Menu (right-click) and select 'Update master Bill' and once the process has completed proceed to the Billing Register program and process the Master Bill through the register.
How do I determine if I should use the Statement Printing or Billing Consolidation (or neither, or both- consolidations for some Clients, statements for others)?
| There are many subtle differences and 'pros and cons' between Statement Printing and Billing Consolidation. The below article should help you determine which is best (or which method is best for which of your clients). |
A Statement will usually show only one line per Freight Bill (usually containing basic info like 'bill of lading number', 'shipper', 'consignee' etc. that your client can quickly and easily match up to shipping documents, so they can verify what they are being billed for).
One purpose of this is to reduce the amount of paperwork for your high-volume clients with many repetitious Freight Bill’s. Secondly, it allows your Client to refer to a single number and dollar amount when writing a check. A Statement simply sums up the charges from the individual Freight Bill’s, unlike Billing Consolidation which can re-rate the total (based on 'pooled weight' or however you do rating).
If you are proficient at Crystal, or commission a custom report from our Crystal Development Department, you could theoretically show anything you want on a Statement as you could select the Freight Bill’s for the given 'statement number'. However, if you want to see multiple TLDTL lines per Freight Bill on the statement, although possible, it kind of defeats the first purpose of a statement- you should then either use consolidation or nothing at all (ie: send the Freight Bill 'as is').
The Statement Printing program allows you to either print just the Statements, or the Statements and corresponding Freight Bill’s in correct collation order (S1, FB1, S2, FB2, etc..). This second option again defeats the first purpose of a statement (reducing paperwork), as you are actually sending the client more pages, not less (but at least they can pay by Statement Number, making their check printing and your cash receipt entry easier).
Statements can be setup to get assigned automatically, whereas with the Billing Consolidation program, someone must constantly go in and manually select Freight Bill’s to group together (and this can be a slow and tedious process, especially if you re-rate the group). With Statements, you would have to approve and run the individual Freight Bill’s through the Billing Register program (for approving, there is a right-click option from the filter view in Customer Service to quickly do a batch). With Billing Consolidation, you only have to 'approve' and 'post' (run through Billing Register) the generated Master Freight Bills (theoretically a much lower number of Freight Bill’s).
With Statements, your Accounting and Dispatch staff see the exact same set of Freight Bill numbers; with Consolidation, Dispatch sees the original 'part-lot' bills, but not the Master Bill, wihle Accounting sees the Master but not the original Freight Bills. Because of this, with Statements, you would see many more rows in A/R Inquiry than you would with Consolidation (and the same is true in the Cash Receipts program- but again, there is an option to apply a payment to all Freight Bill’s on a statement at once).
Menu Bar / Toolbar
File Menu
Print Reports
 Selecting the Print Reports button will bring up the report selection window, common to many TruckMate applications. Here, you will select a report file from those available in your system and a Crystal Report will be generated.
For more information on Report functionality in TruckMate, see the Crystal Reports Reference.
Exit
 Closes the Billing Consolidation program.
Multi-Company Menu
For more information on the Multi-Company options available from the Menu Bar, see the Multi-Company documentation.
Navigate Menu
The Navigate Menu contains the standard TruckMate Navigation Bar as well as the following options:
Refresh
 Click this button to refresh the records displayed in the Billing Consolidation display window.
Tools Menu
TruckMate Monitor
 Click the down arrow next to this button to access the various functions of the new TruckMate Monitor.
Remember Position / Size
Selecting this option will maintain the program window position and size upon close. When the program is re-opened, it will appear the same.
New
 Clicking this button will populate the 'New' Tab’s three Grids with Freight Bills based on the 'Bill To' Customer Range defined in the 'Filter On' section on the New Tab.
Clear Filters
![]() If a Filter has been setup and you do not with to use it, select the Clear Filters button and all filter information will be cleared from the Filter Setup.
If a Filter has been setup and you do not with to use it, select the Clear Filters button and all filter information will be cleared from the Filter Setup.
Setup Filters
![]() Selecting this option will bring up the ' Billing Consolidation-Filter Setup' dialog box where you can view available filters (in the left-hand side of your screen), and any desired filters to the 'Installed Filters' area (the right-hand side of your screen). See the Filter Setup section for more information.
Selecting this option will bring up the ' Billing Consolidation-Filter Setup' dialog box where you can view available filters (in the left-hand side of your screen), and any desired filters to the 'Installed Filters' area (the right-hand side of your screen). See the Filter Setup section for more information.
Setup Processing Options
![]() Here’s your opportunity to allow the system to re-rate the bill or bills. Before you rate any bills, decide whether you want one new master bill or if you wish to re-rate the individual bills based on the sum of the bills. Ensure that either 'Re-Rate Individual Bills' (on the Individual Tab) or 'Create Master Bill' (on the Master Bill Tab) is selected, but not both.
Here’s your opportunity to allow the system to re-rate the bill or bills. Before you rate any bills, decide whether you want one new master bill or if you wish to re-rate the individual bills based on the sum of the bills. Ensure that either 'Re-Rate Individual Bills' (on the Individual Tab) or 'Create Master Bill' (on the Master Bill Tab) is selected, but not both.
For more information, see Setup Processing Options below.
Setup Consolidation Types
![]() The user will need to configure Billing Consolidation Types that determine the common columns that freight bills will need in order to be grouped together. Select this option to open the Codes Maintenance program > Consolidation Types > Billing Tab, where you can configure the Consolidation Types used by the Billing Consolidation program.
The user will need to configure Billing Consolidation Types that determine the common columns that freight bills will need in order to be grouped together. Select this option to open the Codes Maintenance program > Consolidation Types > Billing Tab, where you can configure the Consolidation Types used by the Billing Consolidation program.
Interactive Mileage
![]() Selecting this option will open the Interactive Mileage Lookup window, which allows the user to manually sequence freight bills that have been consolidated so that an appropriate mileage can be calculated and recorded on the consolidated billing for rating purposes.
Selecting this option will open the Interactive Mileage Lookup window, which allows the user to manually sequence freight bills that have been consolidated so that an appropriate mileage can be calculated and recorded on the consolidated billing for rating purposes.
When invoking Interactive Mileage, a form will appear listing all picks and drops for this specific consolidated bill. The order of the shipments will be based on actual pickup/delivery time. The User can re-sequence the Pickups/Drops as required and lookup the mileage.
Newly created sequences will be stored in the STOP_EVENT Table for the Consolidated Bill, so that subsequently invoking the Interactive Mileage functionality will give the same order as perviously updated.
Ensure that the Mileage Server program is running in order to use this window.
Help Menu
TruckMate Help
 Selecting this button will open the Billing Consolidation topic in the TruckMate Online Help file (the page you are currently viewing).
Service Portal
 Selecting this button will open an instance of your default Internet browsing software, with the https://www.tmwcare.com login page displayed.
About
 Selecting this button will open the standard TruckMate About window, which contains important information about the application you are currently using, including its version number (important for support calls).
Billing Consolidation Setup
Filters, Consolidation Types and re-rating options must be setup in advance to effectively use the Billing Consolidation program. Right click beside any of the Grid titles: 'Freight Bills', 'Consolidations', and 'Freight Bills on Selected Consolidations', and you will view the following menu:
Context Menu
Clear Filters
Once you’ve set up filters, in the next step, by selecting 'Clear Filters' you will clear all filter information from the Filter Setup.
Setup Filters
Selecting this option will bring up the ' Billing Consolidation-Filter Setup' dialog box where you can view available filters (in the left-hand side of your screen), and any desired filters to the 'Installed Filters' area (the right-hand side of your screen). See the Filter Setup section for more information.
Setup Processing Options
Here’s your opportunity to allow the system to re-rate the bill or bills. Before you rate any bills, decide whether you want one new master bill or if you wish to re-rate the individual bills based on the sum of the bills. To do this use your context menu, and select 'Setup Re-Rating' option. Select either the 'Individual' or 'Master Bill' Tab, whichever is relevant, and make your choices. Ensure that either 'Re-Rate Individual Bills' (on the Individual Tab) or 'Create Master Bill' (on the Master Bill Tab) is selected, but not both.
For more information, see the Setup Processing Options section below.
Setup Consolidation Types
![]() The user will need to configure Billing Consolidation Types that determine the common columns that freight bills will need in order to be grouped together. Select this option to open the Codes Maintenance program > Consolidation Types > Billing Tab, where you can configure the Consolidation Types used by the Billing Consolidation program.
The user will need to configure Billing Consolidation Types that determine the common columns that freight bills will need in order to be grouped together. Select this option to open the Codes Maintenance program > Consolidation Types > Billing Tab, where you can configure the Consolidation Types used by the Billing Consolidation program.
(Also available from the Tools menu).
Filter Setup
Selecting 'Setup Filters' from the context menu will bring up the Billing Consolidation Filter Setup window. In the Available Filters Grid, highlight the desired filter and click on the right arrow button to move the available filter to the Installed Filters Grid. The filters work in top-down order and can be re-ordered by using the 'Up' and 'Down' arrow buttons.

Soft Tab
Available Filters
Filters available for selection. Select as few or as many filters from the list shown. Highlight the desired filter and use the right arrow button to move the available filter to the 'Installed Filters' Grid.
Installed Filters
Those filters you have chosen to install. After selecting your filters and moving them to the 'Installed Filters' Grid, they will appear here. These filtering options will allow you to customize your filter specifications by selecting as many or as few filters as you need. In this example, we’ll add the Bill-To Code, Bill Date and Bill Range. Use the red arrow to add these to the right side of the page.
| You can select either 'Soft' or 'Hard' filters by selecting the Tabs at the lower portion of the screen. The hard filters are system codes. (See image below). Select all that apply. Most situations will require that all of the hard filter choices be selected. Once you select 'Okay', your filters will appear at the top of the page. |
Hard Tab
Exclude Quotes
Placing a checkmark in this box will exclude quotes from your filtering selection.
Exclued NA Bills
Placing a checkmark in this box will exclude NA bills from your filtering selection.
Exclude No Charge FB’s
Placing a checkmark in this box will exclude No Charge freight bills from your filtering selection.
Exclude Parent Extra Stop FB’s
Placing a checkmark in this box will exclude Parent Extra Stop Freight Bills from your filtering selection.
Exclude Child Extra Stop FB’s
Placing a checkmark in this box will exclude Child Extra Stop Freight Bills from your filtering selection.
Exclude Manually Rated FB’s
Placing a checkmark in this box will exclude any manually rated freight bills from your filtering selection.
Exclude Un-Balanced FB’s
Placing a checkmark in this box will exclude any unbalanced freight bills from your filtering selection.
Exclude Un-Approved FB’s
Placing a checkmark in this box will exclude any unapproved freight bills from your filtering selection.
Exclude Credits
Placing a checkmark in this box will exclude any Credit type Freight Bills from your filtering selection.
Exclude Rebills
Placing a checkmark in this box will exclude any Rebill type Freight Bills from your filtering selection.
Exclude Consolidated Masters
Placing a checkmark in this box will exclude Consolidated Master Freight Bills from your filtering selection. This will allow you to effectively re-consolidate previously consolidated master bills into one totalizing consolidated master.
Filter Selection
Once you’ve setup your filters accordingly, your filter choices will appear at the top of the Billing Consolidation program. As a user, you would then place a checkmark in the filters to be used in this consolidation. Further filtering options are sometimes available as shown by the Deliver By filter options below.
Sometimes certain Filters have specific functionality. These will be listed here:
-
Trace Number: If you click the button (in edit-pick field), a standard modal pick form will display. You may sort this by either the code or the description. Only 'Active' trace types will appear; setup of 'Active' flag (and descriptions) is done via the Codes Maintenance program > Trace Number Types Tab.
As an added bonus, you previously could not match on a trace number range of any type (you were forced to select a single type). Now, you may simply leave the edit-pick / trace type box blank (to match on the trace number range regardless of type).
-
Trip List: the Trip List filter allows the user to enter any number of specific 'Trip Numbers' into a simple text box, separated by commas (or on different lines). Trip numbers can be entered non-sequentially. The Trip details will be pulled from the ITRIPTLO Table.
-
Custom Filter: when you select the 'Custom Filter' option, you will see a new filter box on the main screen that allows you to select a Custom SQL Filter that you have created for the Customer Service program. If a filter is selected (and the checkbox above it is checked), then the custom filter will apply an 'AND' statement to the 'SELECT' for determining which invoices to consider for consolidation.
There is also a 'Setup' button that brings up the SQL Filter window, which allows you to add new filters (or edit existing ones).
Consolidation Types
When attempting to gather records based off of your filters, you may receive an error that states that no freight bills are match the criteria of your chosen Consolidation Type. In order for freight bills to be consolidated, they must meet the criteria of the Consolidation Type(s) setup in the Codes Maintenance program > Consolidation Types > Billing Tab. See the information at the previous link for more information on what Consolidation Types are and how to set them up for Billing Consolidation.
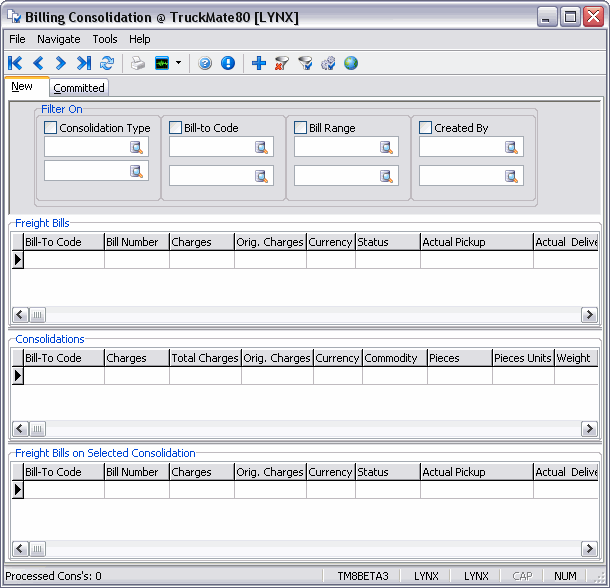
New Tab
The 'Create New' Tab is broken down into three main areas: 'Freight Bills to Be Consolidated', 'Consolidations', and 'Freight Bills on Selected Consolidations'. Once you have made your filter choices in the Filter Setup section, you can then select the 'New' button at the bottom right-hand side of the screen and the Grids will be filled in with your preferred freight bills.
Installed Filters
The top part of the New Tab displays all of the Filters that have been configured using the Filter Setup window. The specified Filter Ranges here will be used when the 'New' button is used to search for Freight Bills.
Freight Bills Grid
All of the information appearing in the Freight Bill Grid is pre-populated based on the freight bill entry in the Customer Service program.
Context Menu
Update Freight Bill
Selecting the 'Update Freight Bill' option will load an instance of the Customer Service program for the selected Freight Bill. The Customer Service Summary Tab will be displayed, where you can edit the details of your Freight Bill, if required.
Remove FB from Consolidation
The 'Remove FB from Consolidation' option allows you to select Remove either 'This One FB' or 'Selected FB’s' (depending on if multiple Freight Bills are selected in the Grid). Choosing either of these options will remove the selected Freight Bill(s) from the consolidation process. A program window will appear, asking you for confirmation. Once removed, a Freight Bill can only be re-opened in the Bill Consolidation program by using the 'New' button.
Change Color of .. Consolidated / Unconsolidated FB’s
Selecting this option, for either 'Consolidated' or 'Unconsolidated' Freight Bills, will change their respective color values. A window will appear, asking you to select a color from the available options, or to define your own custom color. Once chosen, the appropriate records will be changed.
Attach / Open Related Files
Selecting this option will open the Attach / Open Related Files window, which allows you to attach separate images and/or documents to this record.
View Images
This option allows access to your configured Imaging software. To setup Imaging software with TruckMate see the Codes Maintenance program > Imaging Tab and/or the Document Imaging Overview.
Consolidations Grid
All of the information appearing in the Freight Bill Grid is filled in from the freight bill information entered in the Customer Service program, with the exception of:
Total Charges
This column will detail the total charge values for newly created consolidated Freight Bills only.
Total X-Charges
This column will detail the total amount of extra charges (accessorial charges) for the selected consolidated Freight Bill.
Context Menu
Commit and Process
Selecting this option will move one or more consolidated bills from the 'Create New' Tab to the 'Process Existing' Tab, where a Master Bill can be created. From there, the 'Process' function will begin. Process re-rates both individual freight bills and consolidated bills after freight bills or consolidated bills have been updated. The 'Original Charges' field and 'Charges' field in the Consolidations Grid allow the user to see the rating before and after the bills for that grouping have been consolidated.
Commit
Selecting this option will move one or more consolidated bills from the 'Create New' Tab to the 'Process Existing' Tab, where a Master Bill can be created.
Process
Re-rates both individual freight bills and consolidated bills after freight bills or consolidated bills have been updated. The 'Original Charges' field and 'Charges' field in the Consolidations Grid allow the user to see the rating before and after the bills for that grouping have been consolidated.
Undo Process
Returns the re-rate specifications back to the original amounts.
Re-Calculate Totals
Re-calculates both individual freight bills and consolidated bills after freight bills or consolidated bills have been updated. The 'Original Charges' field and 'Charges' field in the Consolidations Grid allow the user to see the rating before and after the bills for that grouping have been consolidated.
Change Color of
You have the option of selecting preferred color choices to differentiate between re-rated groups, and not re-rated groups.
Freight Bills on Selected Consolidation
All of the information appearing in the Freight Bill Grid is pre-populated based on the freight bill entry in the Customer Service program.
(Bill Cons) Stop Order
You can edit the 'Stop Order' of records in this section by using this field. The Billing Consolidation program will use this order to retrieve the optimal mileage from the Mileage Server.
Committed Tab
The Committed Tab is broken down into three main areas: Header, Consolidations, and Freight Bills on Selected Consolidations. The main function of the 'Committed' Tab is to allow the user to create and void or cancel master bills based on the consolidated bills that have been processed.
Filter Section
There are four different Filters available in the header portion of the Committed Tab: 'Filter By Status', 'Filter By Date', 'Filter By Bill-To' and 'Filter By Creator'. By using one, or a combination of these Filters, the User can access specific consolidation records, no matter how many may exist in the TruckMate Database.
Filter By Status
The Filter By Status radio options allow you to Filter Consolidated Bills in your system by their current Status, i.e.: 'Non-Posted', 'Posted', 'Voided' or 'All' (All Statuses).
| The Filter by Status section can be toggled on/off by changing the value of the Application Configurator program > BILLCONS.EXE > 'Show Committed Filtr' option. |
Filter By Date (Only Show Consolidations From Past)
The Filter By Date allows the User to effectively tell the system how many records to display when Filtering. Depending on the radio option you select, this Filter will restrict the number of rows displayed so that the Application Configurator program > BILLCONS.EXE > 'Max Com Rows Display' option can be kept reasonably small (⇐ 1000).
Remember that you can still re-sort the displayed results in the grid by title-clicking any column.
Filter By Bill-To (Blank = All)
The Filter By Bill-To option has been added to make looking for an 'old' Consolidated Bill for a particular Client easier. Simply enter a Client ID and refresh the Grid to see only those Consolidations attached to the Client. Otherwise, leave this field blank.
Filter By Creator (Blank = All)
The Filter By Creator option allows you to filter on only those Consolidations created by a particular TruckMate User. If not looking for a Consolidation from a specific User, leave this field blank.
Consolidations Grid
Displays consolidated bills that can be further processed into master freight bills. If a consolidated bill has to be processed to a master freight bill, the master freight bill itself can be updated or voided from this Grid.
Total Charges
This column will detail the total charge values for newly created consolidated bills only.
Posted
If a master bill is created for the group, then the flag is set to True when the master bill is posted (via the Billing Register). If no master was created, then the flag gets set to True when the last freight bill in the group is run through the register. For example, for a group with some posted freight bills and some unposted freight bills, the flag will be False.
Context Menu
Update Master Bill
Generates a master bill number and master bill details in the Customer Service program.
Locate Specific Freight Bill
Selecting this option will bring up a 'Find Freight Bill' dialog box where you can search for the desired freight bill by freight bill number, booking number, vessel name, steamship line, release number, container number, seal number, bill of lading, purchase order, customs number, probill, and other.
Process
Re-rates both individual freight bills and consolidated bills after freight bills or consolidated bills have been updated. The 'Original Charges' field and 'Charges' field in the Consolidations Grid allow the user to see the rating before and after the bills for that grouping have been consolidated.
Undo Process
Returns the re-rate specifications back to the original amounts.
Re-Calc Totals
Re-calculates both individual freight bills and consolidated bills after freight bills or consolidated bills have been updated. The 'Original Charges' field and 'Charges' field in the Consolidations Grid allow the user to see the rating before and after the bills for that grouping have been consolidated.
Void/Un-Group
Selecting this option will cause the master bill and/or individual freight bill to be cancelled, and their entry(ies) will appear in the Create New Tab. You have the option of selecting 'This One Group' (Void only the Selected record) or 'All Groups' (Void all Groups in the Grid).
| If you choose to Void All Groups a window will appear, asking for your confirmation before proceeding. As this is an irreversible function, make sure that you want to proceed before clicking 'Yes'. |
Undo Void/Regroup
Will 'undo' the Void procedure (i.e. will re-group the Freight Bills). This is an interactive process and so you must do only one group at a time- there is no 'undo all' option. You will not be allowed to run this option if you have:
-
Changed the Currency on one or more of the part lots.
-
Changed the Bill-To code on one or more of the part lots.
-
Interfaced (run through Billing Register program) one or more of the part-lots after voiding and before 'undoing'.
Change Color Of
You have the option of selecting preferred color choices to differentiate between re-rated groups, and not re-rated groups.
Attach / Open Related Files
Selecting this option will open the Attach / Open Related Files window, which allows you to attach separate images and/or documents to this record.
View Images
This option allows access to your configured Imaging software. To setup Imaging software with TruckMate see the Codes Maintenance program > Imaging Tab and/or the Document Imaging Overview.
Freight Bills on Selected Consolidation
This Grid displays the individual bills that are part of a consolidated master bill, and allows them to be updated if necessary.
(Bill Cons) Stop Order
You can edit the 'Stop Order' of records in this section by using this field. The Billing Consolidation program will use this order to retrieve the optimal mileage from the Mileage Server.
Context Menu
Update Freight Bill
Allows individual bills that are part of a consolidated master bill to be updated if necessary.
| If an individual bill is updated, the master bill / consolidated bill should be re-rated or re-calculated from the Consolidations Grid. |
Remove FB from Consolidation
The 'Remove FB from Consolidation' option allows you to select Remove either 'This One FB' or 'Selected FB’s' (depending on if multiple Freight Bills are selected in the Grid). Choosing either of these options will remove the selected Freight Bill(s) from the consolidation process. A program window will appear, asking you for confirmation. Once removed, a Freight Bill can only be re-opened in the Bill Consolidation program by using the 'New' button.
Attach / Open Related Files
Selecting this option will open the Attach / Open Related Files window, which allows you to attach separate images and/or documents to this record.
Printing Master Bills
Selecting the 'Print' button will bring up an invoice report selection dialog box. Select the invoice report of your choice. Master bills can also be printed from the Customer Service program using the 'Print' button, and also in the Invoice Printing program, assuming that normal audit and approval processes have been employed.
Processing Options Setup
Here’s your opportunity to allow the system to process the bill(s). Before you process any bills, decide whether you want one new Master Bill or if you wish to re-rate the individual bills based on the sum of the bills. To do this use your context menu (click anywhere outside of the Grid space), and select 'Setup Processing Options'. Select either the Individual or Master Bill Tab, whichever is relevant, and make your choices. Ensure that either 'Re-Rate Individual Bills' (on the Individual Tab) or 'Create Master Bill' (on the Master Bill Tab) is selected, but not both.
| The processing options that you configure will apply to your unique user only. If you begin a consolidation, for example, then leave it processed but not committed, and another user logs in and commits your consolidations, your processing options will be respected. |
Individuals Tab
Re-Rate Individual Bills
Allows you the option to apply a base re-rate for each bill or group totals for the following:
Rate-Sheet Minimum
Select either 'Group Total' or 'Each Bill'.
Rate-Sheet Maximum
Select either 'Group Total' or 'Each Bill'.
Client-Info Discount/Min
Select either 'Total Weight' or 'Individual Weight'.
Client-Info Minimum
Select either 'Group Total' or 'Each Bill'.
Master Bill Tab
Create Master Bill
Place a checkmark in the box provided if you wish to create a master bill.
General Tab
The General Tab contains options that control exactly what Freight Bill details are copied to the Master Bill, and configuration options that limit what information will be posted to the Accounts Receivable GL Accounts.
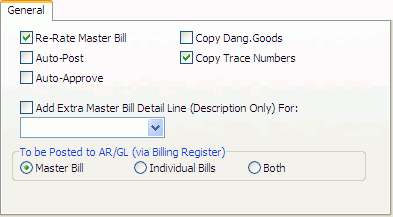
Re-Rate Master Bill
Place a checkmark in the box provided if you wish to re-rate a master bill.
Auto-Post
Place a checkmark in the box provided if you wish to automatically post this information.
Auto-Approve
Place a checkmark in the box provided if you wish to automatically approve this information.
Add Extra Master Bill Detail Line (Description Only) For
To add a master bill detail line, select one of the pull-down options of: Bill Numbers, Consignees, Shippers, and Trip Number.
To Be Posted AR/GL (via Billing Register)
Select one of 'Master Bill', 'Individual Bills', or 'Both' to post this information to the A/R and GL Accounts. If you select 'Master Bill', all of the Freight Bills included in the batch will be posted to the GL as one Consolidated Freight Bill. If you select the 'Individual' option, each Freight Bill will be posted as a separate line in the A/R GL.
If you select the 'Both' option, a Master Freight Bill is created and posted as well as the Individual Freight Bills that make it up. This option was created for a special case needed by one of our clients and should not be used by the majority of TruckMate Users.
Copy Dangerous Goods
Place a checkmark in the box provided if you wish to copy Dangerous Goods information to the created Bill.
Copy Trace Numbers
Place a checkmark in the box provided if you wish to copy trace numbers to the created Bill.
X-Stops
The options in the X-Stops Tab allow you to tell the Billing Consolidation program how to deal with extra stops.
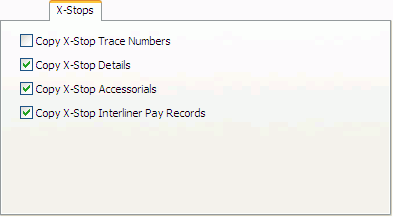
Copy X-Stop Trace Numbers
Place a check mark in the box provided if you wish to copy X-Stop trace numbers to the created bill.
| If neither 'Copy Trace Numbers/Copy X-Stop Trace Numbers' option checked, you should get no trace numbers on the Master Bill. If only 'Copy Trace Numbers' option checked, you will only have trace numbers that are on the parent on the Master Bill (no trace numbers from X-Stops). If only 'Copy X-Stop Trace Numbers' option is checked, you will only get X-Stop trace numbers on the Master Bill (no trace numbers from parent). |
Copy X-Stop Interliner Pay Records
This will copy interliner pay records for extra stops.
If you are not consolidating extra stop bills, then you probably want this option checked (so that when you consolidate a parent bill, both its black/original interliner records and its grey/rolled-up interliner records get copied to the consolidated master). If you do consolidate extra stops, then you probably do not want this option checked (so that IP records do not get doubled up).
Copy X-Stop Accessorials
This option will enable copying accessorials from extra stops.
Copy X-Stop Interliner Pay Records
This option will enable copying interliner pay records for extra stops.
Site ID Tab
The options on the Site ID Tab allow you to tell the Billing Consolidation program ton include or exclude Freight Bills depending on their Site IDs.
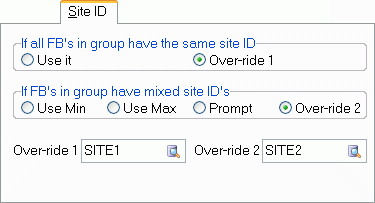
If all FB’s in group have the same Site ID
Select either 'Use it' or 'Over-ride '1. If you select 'Over-ride 1', the 'Over-ride 1' bottom field becomes enabled, allowing you to select your site by either entering the site ID in the field, or by selecting the search button and locating your site from the entries shown.
If FB’s in group have mixed Site ID’s
Select one of 'Use Min', 'Use Max', 'Prompt', 'Over-ride 2'. If you select 'Over-ride 2', the 'Over-ride 2' bottom field becomes enabled, allowing you to select your site by either entering the site ID in the field, or by selecting the search button and locating your site from the entries shown.
Zones Tab
The options on the Zones Tab are provided to help resolve issues where the zones on the bills which were consolidated are not homogenous.
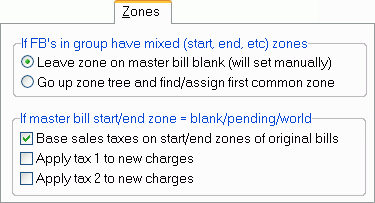
If FB’s in group have mixed (start, end, etc) zones
Choose either 'Leave zone on master bill blank (manual)' or 'Go up zone tree and find/assign first common zone'. Based on your choice, the Bill Consolidation program will act accordingly.
If master bill start/end zone = blank/pending/world
Check the appropriate checkbox you would like to set to occur whenever there are blank start/end zones on a Freight Bill.
Acc. Chgs Tab
The options on the Acc. Chgs Tab allow the user to specify how to deal with Accessorial Charges collected from the consolidated bills.
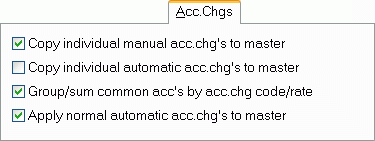
Copy individual manual acc.chg’s to master
If this option is checked, all manually added Accessorial Charges will be copied over into the new Master Bill that will be created.
Copy individual automatic acc.chg’s to master
If this option is checked, all automatically added Accessorial Charges will be copied over into the new Master Bill that will be created.
Group/sum common acc’s by acc.chg code/rate
If this option is checked, all Accessorial Charges with the same rate and/or Accessorial Charges Code (as determined in the Codes Maintenance program) will be grouped together on the Master Bill.
Apply normal automatic acc.chg’s to master
If this option is checked, all automatically added Accessorial Charges will be copied over into the new Master Bill that will be created.
| By default, TruckMate will not copy Zero Charge Accessorial Charges to the Consolidated Master Bill. But if there is a business need for that to be done, an app config option is available to allow the user to control that. The app config 'Keep Zero Charge Accessorial Charge' which can be set in Application Configurator > Bill > BILLCONS.EXE can be set to 'True' to allow copying of Zero Charge Accessorial Charges to Consolidated Master Bills. |
Status Tab
The options on the Status Tab controls how the original Freight Bill’s Status values are treated when the Master Bill is processed through the Billing Register program.
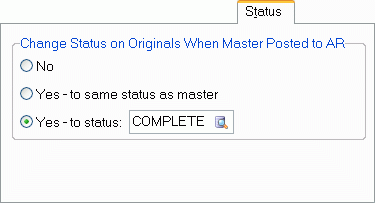
Select 'No' to have the original Bill Statuses remain at their original value.
Select 'Yes - to same status as master' to have the original Bills match the Master Bill’s Status.
Select 'Yes - to status:' and double-click the pick field to choose a Status from those available on your system. Doing this will update the original Freight Bills Statuses to the value you require.
| Status Codes are created/maintained in the Codes Maintenance program. |