Trip Tab procedures

How do I Create a New Trip?
Trips can be created manually or automatically in the Dispatch and Multi Mode Dispatch applications. There are different ways to create a new trip depending on the type of trip. Truckload, LTL, Brokerage, Bulk Tanker or Intermodal.
Manually create a trip by:
-
Double-clicking a freight bill in the Freight Bill grid.
-
Selecting New Trip on the Trip Grid shortcut menu.
-
Clicking the Trips button on the Customer Service > Intermodal tab.
Automatically create a trip by:
-
Selecting Reposition on the shortcut menu for drivers and equipment
-
De-assigning a loaded Trailer
-
Splitting a trip
-
In the Dispatch program Freight Bill grid select the freight bill to be assigned.
-
Double-click the freight bill.
-
The Assign Freight Bill window displays, select * New Trip*.
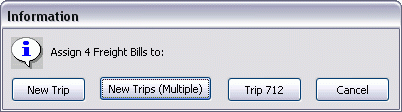
The New Trip displays in the Trip Grid with the selected Freight Bill in the Bill Number field and a trip Status of ASSGN. Also, the freight bill is no longer available in the Freight Bill grid as it has been assigned to the new trip.
-
If required, assign multiple freight bills to the trip.
Note: Need to group freight bills by a particular start and end zone for trip assignment, try creating a Filter.
-
In the Trip grid select the new trip and assign the required resources:
-
Drivers: select the Driver Tab, in the grid double-click on the required Driver assign to the trip. The assigned driver’s ID displays in the Driver column of the trip grid.
-
Power Units: select the Power Unit Tab, in the grid double-click on the required Power Unit to assign it to the trip. The assigned Power Unit ID displays in the Power Unit column of the trip grid.
-
Trailers: select the Trailer Tab, in the grid double-click on the required Trailer to assign it to the trip. The assigned Trailer ID displays in the Trailer column of the trip grid.
-
Misc. Equipment: select the Misc. Equipment Tab, in the grid double-click on the required Equipment to assign it to the trip. The assigned Equipment ID displays in the Misc. Equip column of the trip grid.
-
Chassis: select the Chassis Tab, in the grid double-click on the required Chassis to assign it to the trip. The assigned Chassis ID displays in the Chassis column of the trip grid.
-
Containers: select the Container Tab, in the grid double-click on a Container to assign it to the trip. The assigned Container ID displays in the Container column of the trip grid.
OR
-
Carriers: select the Carriers Tab, double click on the required Carrier in the Carrier grid to assign it to the trip. The Carrier option provides the ability to assign a Carrier (Interliner) to a trip from the Carrier Information window, including Trip Information, Margins and Payments.
-
Select Optimize Trip from the trip grid context menu to optimize a trip containing two or more freight bills.
Note: When assigning a Freight bill to a trip with multiple legs, the freight bill will be automatically assigned to the selected leg and all subsequent legs.
-
Activate the Trip.
Note: When multiple freight bills exist for the trip, only the first bill number displays in the Bill Number field of the trip grid.
-
How do I Create a Trip with Multiple Stops?
The Dispatch program is used to create trips that represent the movement of freight and / or equipment. Trips can be organized into multiple legs, each leg representing a stop on the trip. For example, on a trip with a single Freight Bill, the first leg of the trip is the movement of the equipment to the pickup location of the freight, the second leg is the movement of the equipment and the freight to the delivery location of the freight. Empty and Loaded miles can be calculated for all legs, thus creating automatic driver payments and location and usage history for equipment (useful in the Repairs and Maintenance module).
There are two different scenarios that you can follow: first, creating a multiple stop trip with Freight Bills from an "Extra Stop" series, or second, creating a multiple stop trip with LTL Freight Bills.
Multiple-stop trip with 'Extra Stop' series
-
Open the Dispatch program.
-
Find the Parent bill, and double-click on the bill number. A pop-up window will appear asking if you would like to create a new trip, or add the bill to an existing trip. Select "New Trip". Another pop-up window will appear asking if you would like to Match an Extra Stop #xxx-AA, Match All, or Cancel. Select "Match All".
-
Now you will have one trip with one leg and multiple Freight Bills. What you need to do now is create the extra stops or in other words, extra legs.
-
To have the system automate this as much as possible, use the "Trip Optimizer". To access this, right-click on the trip that you have just created and select "Optimize Trip" from the menu. A Trip Optimizer dialog box will open.
-
On the left-hand side you’ll see where the trip information is displayed. Notice that the only leg of the trip is divided into two parts. The start zone of the leg is the section that is labeled "1", and is where pickups are listed. The end zone of the leg is labeled "2", and is where deliveries are listed.
-
Now you’ll create the necessary extra legs for extra stops. To do this, click on the calculator button. This will calculate and create needed legs based on the start and end zone of each Freight Bill. You should now see either the pickup section or the delivery section split up into new portions of legs. We are referring to "portions of legs" because sections 1 to 2 equal the first leg. Sections 2 to 3 equal the second leg, and so on.
-
You may have noticed that the stops are out of order. If this is the case, or you are not sure, you can open your Mileage software (PC Miler, Rand McNalley, Promiles, etc), and this will place in order the stops for you. To do this, select the button that has two dots with an arrow -just to the right of the calculator button. This is called the "Optimize" button. Now the stops should be in order, according to your preferred mileage software.
-
Now when you click "Okay", and go back to the Dispatch screen, you will see that your trip has multiple legs for each extra stop.
Multiple-stop trip with LTL Freight Bills
There are two ways that you can create this trip:
-
The first is by finding and selecting each bill that you want to add to the trip by holding down the CTRL key on your keyboard, and selecting each bill. When all bills have been selected, double-click on any one of the bills to create your trip.
-
The second is by double-clicking on any of the bills you wish to add to create the trip. Then double-click on the next bill and choose the option Trip xxx, which should be the trip that you just created. You will have to do this for each bill that you want to add to the trip.
Now you will have one trip with one leg, just like in our previous example. Just as before, you need to create the extra legs for this trip.
Follow steps 4 though 8 above.
How do I Activate a Trip?
Once a trip has been created, resources assigned and optimization completed the trip can be activated.
-
In the Dispatch program Trip Grid, select the trip to activate.
-
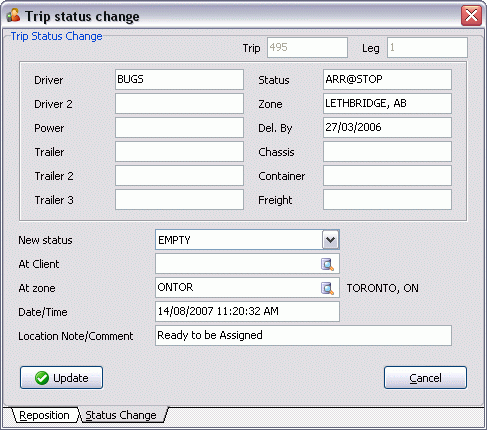
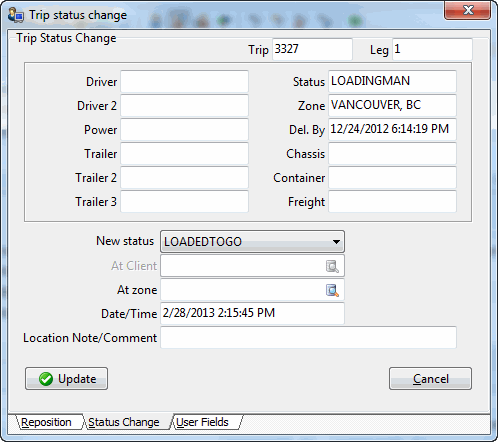
From the context menu select Trip status change. The Trip Status Change window displays.
-
Update the New Status: select DISP (or the applicable code for Dispatching the trip) from the list.
-
Select the Update button. The trip is now active.
How do I Complete a Trip?
Once a trip has delivered a status change is required to complete the trip and remove it from the trip grid.
-
In the Dispatch program Trip Grid, select the trip to complete.
-
From the context menu select Trip status change. The Trip Status Change window displays.
-
Update the New Status: select DELVD (or the applicable code for delivered behavior) from the list.
-
Select the Update button. The trip is now complete and no longer displays in the trip grid. The assigned resources i.e. Driver, Power Unit and Trailer become available.
| Completed trips can be displayed in the Trip Tracer program. |
How do I Cancel a Trip?
A trip can be cancelled when all of its legs are still in the Planned Leg State. This procedure includes the steps required when Freight Bills and resources are associated to one or more legs of the trip.
-
In the Dispatch program Trip Grid, select the trip to cancel.
-
From the context menu select Cancel Trip. A confirm cancellation message displays, select Yes.
-
Enter the reason for cancelling the trip on the User Input window, and then select OK. This is only required when one or more Freight Bills are associated to the trip. Also, depending on your current configuration you may or may not be prompted for a reason entry.
Note: To enforce a reason to be entered for cancelling a trip that has a Freight Bill attached the FB Deassign Prompt is set to True in the Application Configurator program.
-
The driver or equipment is de-assigned during a cancel, you will be prompted to specify the location where the driver or equipment is to placed when unmatched. Select one of the listed options or specify a new location on the Un-Match Location window.
-
The Trip is cancelled. Freight bills will become available again in the Freight Bill grid for assignment to another trip. Drivers and equipment will also resume their previous availability status.
Note: The trip will no longer display in the Trip grid, however, you can view cancelled trips using the Trip Tracer program.
How do I Terminal a Trip?
To terminal a trip simply requires a status change and will free up the resources currently assigned to the trip. You cannot terminal a trip that is on its last leg.
-
In the Dispatch Trip Grid, select the trip to terminal. The trip must be in a 'DISP' (Code Behaviour Category 'Dispatch'), 'PICKD' (Code Behaviour Category 'Pickup'), or 'STOPOFF' (Code Behaviour category 'Terminal - Default for Category') status.
-
Complete a Trip Status Change selecting the 'TERMINAL' code from the New status drop down. The 'At Zone' will automatically be populated with the 'To Zone' of the leg,
-
Select 'Update'. The trip will be "Terminalled" at the 'To Zone' of the leg. The driver and power unit are released from the trip leg and subsequent legs and are available for dispatch in the 'At Zone'. The status of the next leg is set to 'Planned'.
How do I Change a Trip’s Status?
Trip Status changes are used to move a trip through the system. Default Status codes are available in the Codes Maintenance program which also identifies the behavior of the codes. These code names and behaviors can be modified to suit your dispatch needs, however, the minimum required steps for a trip are Dispatch, Arrive Shipper (Pick Up) and Depart Consignee (Delivery), as follows:
-
DISPATCH: 'Load has been given to the Driver and he is on his way to the Shipper'.
-
PICK UP: 'Driver has loaded the freight and is on his way'.
-
DELIVERY: 'Driver has delivered the freight and trip is completed'.
The Dispatch program has a number of rules regarding status codes. For example, you cannot assign a status with the Pick Up code behavior unless the freight bills, drivers and equipment assigned to the leg have a current status of the Dispatch code behavior.
A Status Update of a Trip with a Carrier attached to it will add a record to the LOCHIST Table (of resource type 'I'), which will in turn generate a Mileage Server program ETA job.
-
In the Dispatch program Trip Grid, select the trip requiring the status change.
-
From the Context Menu select 'Trip status change'. The Trip Status Change window displays. This window includes 3 tabs: Reposition, Status Change and User Fields. The Reposition tab is used for repositioning and changing the status of resources, as described in Dispatch > Resource Tabs > Using the Resource Tabs > Reposition / Change Status of a Resource. The Status Change tab is the tab you will be using to update the status of the selected trip. The Status Change tab will be the active tab when the window opens. The User Defined fields tab includes user defined fields that can be used for any business purpose. The user defined fields consist of 10 string fields (grouped as User Fields), 10 integer fields (grouped as Double User Fields) and 3 date fields (grouped as Date User Fields). User fields are displayed in Trip Grid.
-
Update the Status, as follows:
-
New Status: depending on your current configuration a default "next" status code displays. To change, select the a status from the list.
-
At Client: only applies when the trip status is changed to Spotted or Arrive at Dock behaviors, to identify the location of the load . When the trailer is spotted or arrives at a Client location, click the search button and select the client. The At Zone will default to the Client’s zone location.
Note: For a Client to be searchable, they must have the 'Trailer Pool' flag checked in the Customer Profiles > Notes Tab > Client Is section.
-
At Zone: displays the applicable zone location. For example, if this zone will correspond with the Current Zone when status is DISP. The Zone Code entered in the At Zone will become the Current Zone of the trip.
-
Date/Time: displays the current date/time. To change, double-click in the field to select the date/time on the calendar window.
-
Location Note/Comment: enter status change information, if required.
-
-
Select the 'Update' button. If the 'Update' button is un-selectable, you may have to adjust your permissions on the Security Setup program > Security > Business Events > Allow Changes Tab, in particular the 'DISPATCH - Allow Trip Status Change without <Resource>' option.
|
When you assign a status code to a trip, the Trip Status field on all legs of the trip can be changed, as well as the status of the freight bill, drivers and equipment that are assigned to the Active leg. If a window appears requesting a Real-Time Card Vendor User ID & Password, one of the resources on the trip (Driver or Power Unit) has been configured for Real-Time Fuel Card Management. If you wish to disable this message, you must use the Fuel Card Management program and un-select the 'Dispatch Assigns (send)' and/or 'Dispatch Unassigns (send)' flags on the Setup > Vendors > Real-Time > General Tab for the assigned fuel card Vendor. |
Additional Trip Status Change Information
-
Leg State: It is important to note that the status of the Leg, or Leg State also affects the processing of trips and therefore is considered in a status code change. The Leg State field has three possible values: Planned, Active or Finished.
-
Planned: indicates that the leg is not yet Active. You can assign drivers and equipment to any leg that is in a Planned State.
-
Active: indicates that prior legs on the trip have been completed (if applicable) and that this leg describes the trip activity that is current. You can assign drivers and equipment to any leg that is in a Active State.
-
Finished: indicates that the leg has been completed, and a subsequent leg is now the Active leg. Finished legs are displayed in light grey text, with a strike-out line. No changes can be made to finished legs.
So, when changing the trip status the leg state will be considered, for example, you cannot apply a status code of the DELVD (Delivery code behavior) unless the last leg on the trip is the Active leg. These rules help ensure that empty legs are created when necessary, that all freight bills get a Completed status (except when they are Docked) and that all drivers and equipment eventually return to an Available status.
-
-
At Zone: the zone code that defaults here depends on the Code Behavior of the status code that is being assigned (as configured in the Codes Maintenance program). For example:
-
If the status code has a Dispatch code behavior, the At Zone will correspond to the Current Zone of the Active leg.
-
If the status code has a Pick Up code behavior, the Leg From Zone of the next loaded leg will be used.
-
If the status code has a Delivery code behavior, the Leg To Zone of the last leg on the trip will be used. You can enter a different zone code in this field instead of the default.
Note: The Zone Code entered in the At Zone field will become the Current Zone of the trip.
-
How do I De-Assign Freight Bills and Resources from a Trip?
The De-assign option provides the ability to de-assign the selected freight bill or resources from a trip, either individually or all resources at once. When you de-assign a freight bill, the freight bill will be made available in the Freight Bill grid for assignment to another trip. It’s Current Zone will be defined from the Leg From Zone on the leg from which it was de-assigned.
-
In the Dispatch program Trip Grid, select the trip that requires de-assignment.
-
From the Context Menu select 'Deassign'. The list of options display including Drivers and Equipment. Also, Freight Bills can be selected for de-assignment..
-
Select the resource type to de-assign, the applicable De-Assign Resource window displays the list of resources assigned to the trip.
-
Select the resource in the grid, select the Deassign button.
-
Enter the reason for de-assigning the trip on the User Input window, select OK. Depending on your current configuration you may or may not be prompted for a reason entry.
Note: To enforce a reason to be entered for de-assigning a freight bill the FB Deassign Prompt is set to True in the Application Configurator program.
-
If the leg from which the driver or equipment is de-assigned is active, you will be prompted to specify the location where the driver or equipment is unmatched from the trip on the Un-Match Location window. This will become the driver or equipment’s Current Zone. The driver or equipment will be removed from the current leg, and from all subsequent legs.
-
Once complete, select Close.
OR
To remove all resources at once, select Deassign > Deassign Resources. This option de-assigns all resources however, Freight Bills need to be de-assigned separately using the Deassign > Freight Bills option.
How do I Create Trip Templates?
The Trip Template window is used to configure multiple stop Trips that your Company services regularly (such as retail delivery situations).
-
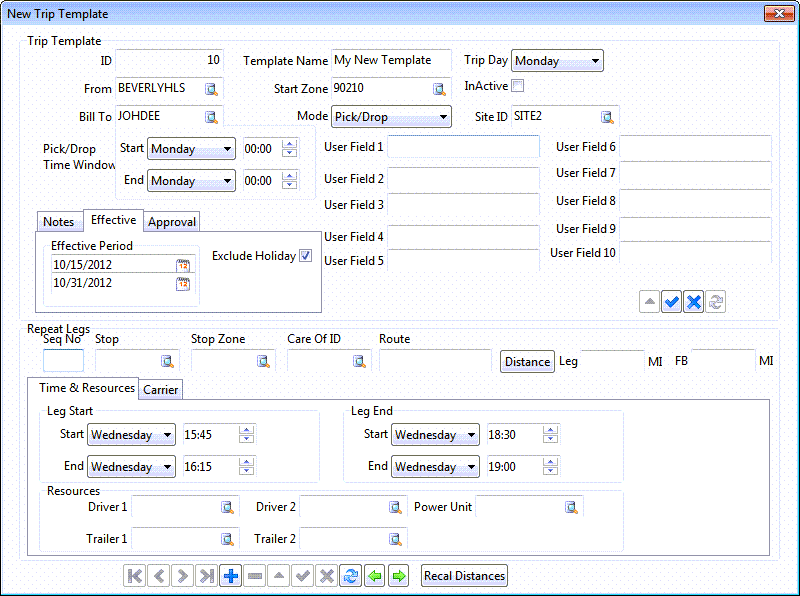
In the Trip Template window, click the 'Add' (+) button to open the New Trip Template window.
-
In the New Trip Template window, the user must first give the Trip Template a unique 'Template Name'. Note that this must be unique for all currently active Template records.
-
The user must then specify a 'Starting Zone' OR an 'Ending Zone' (Based on the trip mode), if the mode is 'Pickup', the zone entered will be considered an End Zone. If , on the other hand, the mode is 'Delivery' or 'Pickup/Drop', the Zone field will be considered a Start Zone. The user can split the leg into as many segments and fixed way-points as needed to define the Trip route.
-
Select the 'Trip Day' from the drop down list, you can select any day of the week. You can also leave empty, which will not limit the template to any specific day. There is an application configuration option, Application Configurator program > DISPATCH.EXE > 'Trip Template first day of week', which determines the first day of week of the trips/bills created based on trip templates. The start of the week for created trips/bills will be determined by both values of the app config and the value of this field.
-
The 'In Active' checkbox allows you to determine whether this template is active of inactive. Sometimes a business need might require the user to inactivate a template.
-
The visibility of the 'Site ID' field is controlled by an app config. Application Configurator program > DISPATCH.EXE > 'Trip Template for the Selection of Site Id'. If this app config is set to 'True', the 'Site ID' field becomes visible and must be entered at template creation time. If the app config is set to 'False', the 'Site ID' becomes invisible and the user must enter it at time of Trip/Bill creation.
-
The template can be defined as a 'Pickup', 'Delivery' or 'Pickup/Drop'. Select the appropriate 'Mode' from the drop down list.
-
The user can define a time constraint by entering values for the 'Time Window' fields. The Pickup/Delivery can only take place within the defined time window.
-
The user can put a time restriction on template usage. Select the 'Effective' tab at the left side in the middle of the screen, then enter the start date of he effective period, the end date of the effective period (you can use the calendar button for both those fields) and then choose whether you wane to exclude or include holidays in the effective period (put a check mark in the checkbox 'Exclude Holidays' if you want to exclude holidays from the effective period). How does this exclusion work: When orders and trips are created via trip template, TruckMate looks at the holidays schedule (as defined in Codes Maintenance program > Holidays) and doesn’t create any orders or trips when the start of the trip begins on a day that is identified as a Holiday for that zone or Region. When a trip schedule for subsequent legs fall on a holiday, a leg will NOT be created if it falls in a holiday, instead, the next working day will be used to create the leg.
-
The user can optionally add any free-form Notes about the Template Trip in the 'Note' (memo) field. Select the 'Notes' tab in the middle left side of the window and enter the note you want to save for the selected template.
-
Save the Trip Template’s global details by selecting the check mark button in the middle of the form.
-
Once the Trip route is defined, a generic schedule can be set. The user will click the '+' button on the TruckMate Navigation Bar at the bottom of the form to add additional Repeated Leg points to the Trip Template. Use the fields in the 'Repeat Legs' section to set the 'Leg Start' and 'Leg End' date/time windows associated with that leg point. For each entry the user will set a 'Day of the Week' (default is 'Monday') and time of day (default is midnight).
The user can click the 'Distance' button to determine the actual distance between the 'Start Zone' (in the Trip Template section) and the selected 'Stop Zone' that will be the point of pickup / delivery that this Leg will represent. Ensure that the Mileage Server program is running to use this functionality.
If the Application Configurator program > DISPATCH.EXE > 'Trip Template Set Leg Planned Departure' config is set to 'True', the 'Leg Start' value will be used as the 'Planned Departure' date for each of the trip legs. If it is set to 'False', the 'Planned Departure' will default to the current date/time when the template trip is created. Note that the defaulted values can always be manually overridden on the actual Trip to reflect real conditions.
-
The user should then use the 'Time & Resources' section at the bottom to choose default 'Leg Start' and 'Leg End' date/times and a default Driver, Power Unit, and Trailer to be automatically assigned to the leg when the actual Trip is created. If the same resources are to be used for the whole trip, these values should be set for just the first point and the resource assignments left blank for the rest of the way-points.
-
Repeat steps 4 - 6 for the other Repeat Legs you wish to attach to the Trip Template.
-
Optional: In the Carrier Tab, the user can assign a carrier/interliner to be used with this template. The carrier will be assigned to the trip when it is created, and the rating details will be copied into the Carrier/Interliner record associated with the trip. If Carriers are assigned to empty legs, IP records can be created when the trip is dispatched and the option Application Configurator program > DISPATCH.EXE >'Recalculate IP charges on trip status change' is set to 'True'.
For more information on specific fields available on the Carrier tab, see the Carrier Assignment window documentation.
-
Select the check mark button at the bottom of the form to save the Trip Template once you have added and configured all the Legs that will be part of the Template. Close the New Trip Template window.
-
Use the Context Menu options available on the Trip Templates Selection window to Create Trips based on the new Trip Template. See above for description of the available Context options.
-
Optional: depending on the Application Configurator program > DISPATCH.EXE > 'Allow Multiple Trips on Trip Template' option you may or may not be able to access the '# of Trips' field on the Create Trips window, which allows you to configure how many times a Trip Template can be used in a single day (or multiple times per week). The default of this config option is set at 'False', so to enable multiple Trips from the Template, you must set it to 'True'.
How do I Split a Trip?
The Split Trip function is used to create two (or more) trips from one trip on the Trip Split window. It is designed for situations where B train trailers must be split and moved individually through areas where B trains are prohibited. In order to use the Split Trip option, the trip must be active on its last leg and the Trip must be in Dispatched, Picked or Late status.
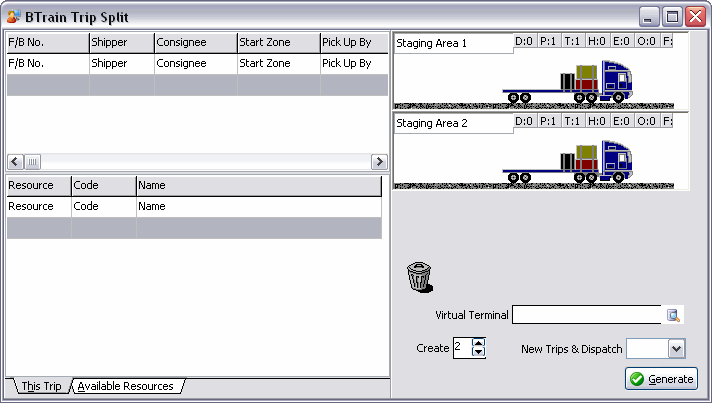
| Freight bills are not split; they are assigned in their entirety to one of the staging areas. Therefore, only trips with more than one freight bill should be split. |
This feature is available from the Trips grid Context Menu.
| A trip can only be split on the last leg of the trip, and the leg must be in an Active state. |
Staging Areas
When the Split Trip option is invoked, by default two Staging Areas will be created. Each staging area will have one freight bill and one trailer (assuming that the original trip had two trailers). Staging Area 1 will also have the power unit and driver that were assigned to the original trip.
To see the items assigned to each Staging Area, click once on the Staging area.
To remove an item from a Staging Area, click once on the Staging Area, then click and drag the item you wish to remove from the Staging Area list box to the garbage can icon. Items dropped into the garbage can will display in the freight bill and resource tables on the left. To move items from one staging area to another, click and drag the item from the grid to the desired staging area.
Virtual Terminal
Enter the zone code of the location where the trip is being split. Enter the starting characters of the zone code or short description, the click on the search button to display a search form. The zone selected here will become the Current Zone and Leg From Zone on the newly created trips.
Create New Trips
Each Staging Area will become a new trip when the Generate button is used. To create more than two trips, enter the number of trips you wish to create in this field. The corresponding number of Staging Areas will be displayed.
Freight Bill Table
If the original trip had more freight bills than the number of Staging Areas, additional freight bills will be displayed here. To assign a freight bill to a Staging Area, click and drag the freight bill to the desired Staging Area.
Resource Table
Will display equipment and drivers that have been manually removed from Staging Areas.
Available Resources Tab: use this tab to display drivers, power units, trailers and miscellaneous equipment for the purpose of assignment to a Staging Area. Use the tabs at the bottom to view different resource types. Only resources that are currently have an available status will be displayed. To assign a resource to a Staging Area, click and drag the resource to the desired Staging Area.
Sort/Search option: you can display the records in order of their code, or in order of their name.
Filter by Terminal Zone: if this option is checked, displays only drivers and equipment whose current zone matches the zone of the specified Virtual Terminal.
Generate
Will cause the original trip to be completed and a new trip to be created for each staging area with the bills and resources you assigned here.