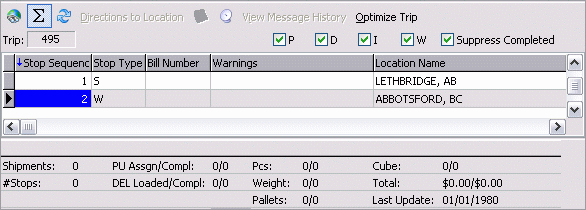
City Dispatch main window
| As of TruckMate 2022.4, City Dispatch is no longer available. Trimble still provides support for older versions. |

Trip Details Section
The Trip Details Grid lists the Freight Bills (and their details) that have been assigned to the Trip which is currently highlighted in the Trips List index to the right.
Toolbar
Map Route
![]() Selecting this button will open an instance of the Mapview program with all your Routing information displayed.
Selecting this button will open an instance of the Mapview program with all your Routing information displayed.
Toggle Summary Information
![]() Selecting this button will toggle the Summary Information section (grey area beneath the Trip Grid detail lines) on / off.
Selecting this button will toggle the Summary Information section (grey area beneath the Trip Grid detail lines) on / off.
Refresh
![]() Select this button to refresh the records available on the Trip Grid.
Select this button to refresh the records available on the Trip Grid.
Directions to Location
Selecting this option will display the directions from the Users default Site to the Zone Code of the Terminal Site. This function requires that the Mileage Server program is running and is using recognized third party Mileage software (such as PC*Miler, ProMiles or Microsoft MapPoint).
Shipment Notes
![]() Selecting this button will display any Notes associated with the currently selected Trip (Notes from the TRIP Table). These Notes are entered using the Trips List > 'Trip Notes' option.
Selecting this button will display any Notes associated with the currently selected Trip (Notes from the TRIP Table). These Notes are entered using the Trips List > 'Trip Notes' option.
Load Offer
![]() The Load Offer function is used to send a 'Load Offer' message to the Driver for review/acceptance. The message is sent though the Mobile Dispatch system to the mobile device installed on the power unit that is assigned to the Trip. You can also send a different macro than the Load Offer macro, or a free form message. The Load Offer macro is configured in the Communication Macro Setup program with the specific information required for your Load Offer communication and displayed on the Load Offer window. Need to know how?
The Load Offer function is used to send a 'Load Offer' message to the Driver for review/acceptance. The message is sent though the Mobile Dispatch system to the mobile device installed on the power unit that is assigned to the Trip. You can also send a different macro than the Load Offer macro, or a free form message. The Load Offer macro is configured in the Communication Macro Setup program with the specific information required for your Load Offer communication and displayed on the Load Offer window. Need to know how?
|
Load Offer functionality is now enabled for Resources that have multiple Mobile Communications devices. When sending a Load Offer you will be prompted for:
|
Print Batched Reports
This option allows you to print a variety of Dispatch-specific Reports. Selecting the 'Printer' icon itself will print a Trip Manifest report (MANIFEST.RPT), whereas selecting the drop-down arrow next to the 'Printer' icon will allow you to select from other options, as follows:
-
Trip Manifest: selecting this option will print a Trip Manifest report (MANIFEST.RPT). This is the same as selecting the 'Printer' icon itself. This is the same report that TruckLoad Dispatch uses.
-
Delivery Receipts: selecting this option will print a Delivery Receipt. Note that this report is a new type (cannot use the standard 'DLVRECPT.RPT' designed for the Invoice Printing program). The Crystal used by this report MUST have the CITYD_TRIP_DETAILS Table linked into the main report (this is the same table that the grid is populated from).
-
Reports: selecting this option will open the Report Selection window with no default report, allowing you to select from any report available to the regular (TruckLoad) Dispatch program.
-
Setup Batch Reports: selecting this option will bring up the standard Report Selection screen, where multiple reports can be added into a specific Reporting Batch.
-
Print Batched Reports: selecting this option will print all of the reports in the list that is setup in the 'Setup Batch Reports' window.
-
Print Preview: if this flag is checked, batched reports will preview to the screen (normal TruckMate behaviour) and will need to be printed from the Preview window, if desired. If unchecked, the reports will (all) print directly to the printer without preview. This setting is saved on the individual machine, so when you open the City Dispatch program again, it will have the same setting (checked or un-checked).
See the Crystal Reports Reference > Dispatch Module section of the Help File for more details regarding the Dispatch reports used by the City Dispatch program.
View Message History
Selecting this option will open a window detailing any Messages associated with the selected Freight Bill.
Optimize Trip
This option is the same function as is offered in the Dispatch program. The Trip Optimizer window offers you the ability to edit the trip legs and assign Freight Bills to be picked or dropped in whatever order required.
Freight Bill Notes
![]() Selecting this button will display any Notes associated with the currently selected Trip or Freight Bill. The Notes window has several of its own Tabs near the bottom of the window. These Tabs are used to quickly enter Notes for the different aspects of the selected Freight Bill. The default Tab is the Billing Tab, where you may enter Notes relating to the Billing information of the Freight Bill. Clicking on any of the other Tabs will allow you to enter free form Notes for the Container, Driver, etc.
Selecting this button will display any Notes associated with the currently selected Trip or Freight Bill. The Notes window has several of its own Tabs near the bottom of the window. These Tabs are used to quickly enter Notes for the different aspects of the selected Freight Bill. The default Tab is the Billing Tab, where you may enter Notes relating to the Billing information of the Freight Bill. Clicking on any of the other Tabs will allow you to enter free form Notes for the Container, Driver, etc.
View Shipping Instructions
![]() Selecting this button will display any Shipping Instructions that have been attached to the Client(s) included on the selected Freight Bill. Shipping Instructions are created in the Codes Maintenance program > Shipping Instructions Tab, and attached to specific Client Codes in the Customer Profiles program > Shipping Instructions Tab.
Selecting this button will display any Shipping Instructions that have been attached to the Client(s) included on the selected Freight Bill. Shipping Instructions are created in the Codes Maintenance program > Shipping Instructions Tab, and attached to specific Client Codes in the Customer Profiles program > Shipping Instructions Tab.
Resend Stop List
A user can click this button to resend the stop list when they are finished with re-sequencing of stops. A warning popup will show if the dispatcher has not clicked on this button before moving anywhere else in the City Dispatch application.
Filter Options
Pickups (P)
Check this flag to Filter the Assigned Freight Bill Grid by those Freight Bills that are 'Pickup' type Bills.
Deliveries (D)
Check this flag to Filter the Assigned Freight Bill Grid by those Freight Bills that are 'Delivery' type Bills.
Interliner (I)
Check this flag to Filter the Assigned Freight Bill Grid by those Freight Bills that are Interliner 'Pro-Bill' type Bills.
WayPoints (W)
Check this flag to Filter the Assigned Freight Bill Grid to display / hide WayPoints to allow for the planning of Terminal to Terminal Trips.
Suppress Completed
If this option is checked, any Freight Bills with a status of 'Completed' will not show in the Assigned Freight Bills Grid.
Suppress Attempts
If this option is checked, any Freight Bills with a status of 'P01, P02, etc.' (Attempted/Missed Pick) or 'D01, D02, etc.' (Attempted/Missed Delivery) will not show in the Assigned Freight Bills Grid. Attempted/Missed Picks and Deliveries are status codes of 'Pickup' and 'Delivery' behavior (respectively) that are assigned specific rules on the Codes Maintenance program > Status > Additional Rules Tab to reflect a situation where the Shipper arrives at a Terminal and the allotted Freight is not available for Pick or Delivery, for whatever reason.
| The 'P01' status code on a Freight Bill designates that one attempted Pick has occurred ('P02' meaning two attempts have been made). Depending on the Status Code setup, Freight Bills that are set to an Attempted Pick/Delivery Status may disappear from the Assigned Freight Bill Grid. |
Assigned Freight Bill Grid
The Assigned Freight Bill Grid shows the Freight Bills attached to the Trip selected in the Trip List window (and also displayed in the 'Trip' field described in the last section). The details of this Grid cannot be edited, but you may accomplish certain Freight Bill related tasks by using the Grid Context Menu.
Stop Sequence
The Stop Sequence column details the order of the Trip Stops in Truckload (TL) Dispatch situations. The order of the Stops cannot be edited by the User from this Grid.
Route Sequence
The Route Sequence column details the order of the Trip Stops in Less-Than-Load (LTL) Dispatch situations. The User can update the Route Sequence values by selecting a particular field and entering a new sequence value. If the User then sorts on the 'Route Sequence' column by clicking the column lablel, the Routes will re-order themselves automatically.
Context Menu
Clear Selection
This option will remove the Freight Bill currently selected from those available on the Grid.
Full Screen
Selecting this option will enlarge the Assigned Freight Bill Grid to a full screen view. Use this option if you have many Freight Bills in the Delivery Tab and wish to select many of them at once.
Unload Bill
Will set the currently selected Freight Bill to 'Unloaded' Status.
Unload Selected Bills
Will set the currently selected Freight Bills to 'Unloaded' Status. Hold the '<Ctrl>' key on your keyboard while selecting Bills with your mouse to select multiple Freight Bills.
Directions to Location
Selecting this option will display the directions from the Users default Site to the Zone Code of the Terminal Site. This function requires that the Mileage Server program is running and is using recognized third party Mileage software (such as PC*Miler).
Change Status
This option allows you to change the Freight Bill’s Status value. The Status Codes available from this menu are those with an 'LTL Sort' value defined in the Codes Maintenance program > Status Codes Tab.
| There are some special functions related to Status Codes with the 'Depart Shipper' behavior in City Dispatch. For more information, see the Codes Maintenance program > Additional Rules Tab. |
Change Next Terminal Zone
Will open a small window that will allow you to alter the Freight Bill’s next Terminal Zone.
Change Delivery Terminal
Will open a small window that will allow you to alter the Freight Bill’s Ending Zone.
Set Via Zone
Selecting this option will allow the user to select an additional zone, this zone represents an intermediate terminal to be used for reaching the destination terminal. Based on the selected zone, the milage calculation will be adjusted. The terminal plan will not be changed, only milage calculation will be affected.
Show Appian Optimization
This option opens a window to display the optimization results received from Appian Direct Route.
Optimize Trip
This option is the same function as is offered in the Dispatch program. The Trip Optimizer window offers you the ability to edit the trip legs and assign Freight Bills to be picked or dropped in whatever order required.
Load Offer (all)
Will create Load Offers for all the Freight Bills in this Grid. For more information on Load Offer functionality, see above.
Load Offer (selected)
Will create Load Offers for only those Freight Bills selected (single or multiple using '<Ctrl>' key) in this Grid. For more information on Load Offer functionality, see above. You can also use the <Ctrl><A> hotkey combination to send a Load Offer for the selected Trip.
View Message History
Selecting this option will open a window detailing any Messages associated with the selected Freight Bill.
Use Microsoft MapPoint
Select this option if you are using Microsoft MapPoint Mapping software in concert with TruckMate.
Use PC*Miler Map
Select this option if you are using PC*MIler Mapping software in concert with TruckMate.
Use ProMiles Map
Select this option if you are using ProMiles Mapping software in concert with TruckMate.
Mapping Settings
Opens a window that details Mapping settings, based on the Mapping software you have selected above.
Available Freight Bills
The Available Freight Bills section contains three Tabs that organize the Freight Bills available to be assigned to Trips. The 'Pickups' Tab lists Freight Bills with a 'Start Zone' value that corresponds to one of the zones included in the base route assigned to the Terminal, while the 'Deliveries' Tab lists Freight Bills with a corresponding 'End Zone'.
Freight Bills on these Tabs can be assigned to Trips in the Trips List section, but you cannot add a single Freight Bill to more than one Trip (Pickup or Delivery). Freight Bills that have been added to Trips will NOT appear in neither the Pickups nor the Deliveries Tabs.
| In TruckMate, you can limit access to these Tabs for your Users using the Security Setup program > Security > Tabs Setting section. You can limit the user to using any number of these Tabs, in order to keep your data secure. |
Freight Bill Warnings
Depending on the Commodity and Shipping/Consignee Client of the Freight Bill, one of several Warning Icons will display for each Freight Bill record line on all of the three following sub-Tabs.
| Icon | Definition |
|---|---|
|
Similar to the Customer Service program, this designates that the Freight Bill’s Commodity is temperature controlled (TLDTL.TEMP_CONTROLLED = 'True'). |
|
Similar to the Customer Service program, this designates that the Freight Bill’s Commodity is classified as a Dangerous Good (TLDTL.DANGEROUS_GOODS = 'True'). |
|
Specifies that the Freight Bill has a Service Level of Hot Rush type (TLORDER.SERVICE_LEVEL = a Service Level flagged as 'Hot Rush'). |
|
Specifies that the Shipper site is accessible by Stairs. |
|
Specifies that the Shipper site is accessible via Elevator. |
|
Specifies that the Shipper site has a Dock. |
|
Specifies that the Shipper site requires a survey. |
|
Specifies that the Shipper site has vehicle accessibility restrictions. |
|
Specifies that there are freight bill notes. |
|
Specifies that a pickup request has been sent. |
|
Specifies that a delivery notice has been sent. |
|
Specifies there is a Mobile Comm Device Acknowledgement message. |
|
Specifies that the driver has read the load offer/message. |


| Those Warning icons without a field name description above are specified on a per-Client basis on the Customer & Vendor Profiles program > Customers > Accessibility Options Tab. |
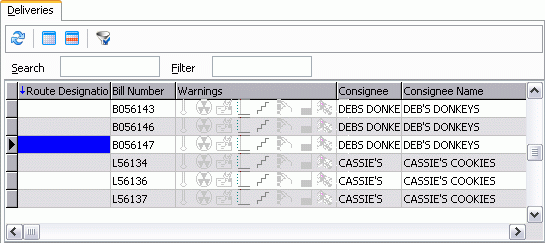
Deliveries Tab
The Deliveries Tab displays the details of all the Delivery-type Freight Bills available to be assigned to a Trip in the Trips List section of City Dispatch. The Details of this Tab cannot be edited, but certain functions can be accessed using the Context Menu. You may also simply drag & drop these Freight Bills into the Trips List section to add them to the Trip you are working with.
Toolbar
Refresh Deliveries
![]() Select this button to refresh the Deliveries Grid for any new Delivery Freight Bills in the system.
Select this button to refresh the Deliveries Grid for any new Delivery Freight Bills in the system.
Clear Delivery Selection
![]() Select this button to remove the highlighting from any selected Freight Bill(s).
Select this button to remove the highlighting from any selected Freight Bill(s).
Select/Unselect this Bill
![]() Select this button to highlight or remove highlighting a single detail line in the Deliveries Grid. You can hold the <CTRL> key and use this button to select multiple Freight Bill lines.
Select this button to highlight or remove highlighting a single detail line in the Deliveries Grid. You can hold the <CTRL> key and use this button to select multiple Freight Bill lines.
Filter
![]() Select this button to open the Additional Filters window, which allows you to create custom filters for the Deliveries Grid.
Select this button to open the Additional Filters window, which allows you to create custom filters for the Deliveries Grid.
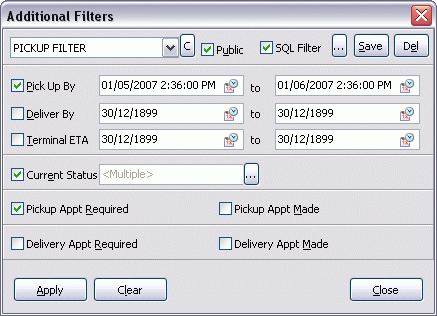
| Field | Definition |
|---|---|
Filter Name |
After Saving a configured Filter, its name will appear in this field. You can use the drop-down menu to quickly view the details of the Filters you have previously configured. |
Clear |
Selecting this button will remove all of the Filtering options you have selected for the displayed Filter. |
Public |
Selecting this flag will allow other Users access to this Filter. |
SQL Filter / Configure SQL |
Selecting this flag and then selecting the ellipsis button will open the SQL Filter configuration window. For more details on this window see the Menu Bar / Toolbar > Trip Menu > Filter Editor option. |
Save / Del |
Once you have configured some Filtering options, select the 'Save' button to save the details and provide a name for the Filter. If you wish to delete a previously configured Filter, use the drop-down menu in the 'Filter Name' field and then select the 'Delete' button. |
Pickup By Range |
If you would like to Filter records on the Delivery Tab by the Freight Bill 'Pickup By' date, configure a Date Range by selecting the calendar buttons in the 'Start' and 'End' range fields. |
Deliver By Range |
If you would like to Filter records on the Delivery Tab by the Freight Bill 'Deliver By' date, configure a Date Range by selecting the calendar buttons in the 'Start' and 'End' range fields. |
Terminal ETA Range |
If you would like to Filter records on the Delivery Tab by the Freight Bill 'Terminal ETA' date, configure a Date Range by selecting the calendar buttons in the 'Start' and 'End' range fields. |
Pickup Appointment Required / Pickup Appointment Made |
These flags Filter the Freight Bills available by only displaying those bills that have a Pickup Appointment Required or if they have had their Pickup Appointment completed, respectively. |
Delivery Appointment Required / Delivery Appointment Made |
These flags Filter the Freight Bills available by only displaying those bills that have a Delivery Appointment Required or if they have had their Delivery Appointment completed, respectively. |
Apply |
Select 'Apply' to apply the displayed Filter to the Deliveries Tab Grid. |
Clear Filter
![]() Select this button to clear any Filter that has been applied to the Deliveries Grid.
Select this button to clear any Filter that has been applied to the Deliveries Grid.
Freight Bill Notes
![]() Selecting this button will display any Notes associated with the currently selected Trip or Freight Bill. The Notes window has several of its own Tabs near the bottom of the window. These Tabs are used to quickly enter Notes for the different aspects of the selected Freight Bill. The default Tab is the Billing Tab, where you may enter Notes relating to the Billing information of the Freight Bill. Clicking on any of the other Tabs will allow you to enter free form Notes for the Container, Driver, etc.
Selecting this button will display any Notes associated with the currently selected Trip or Freight Bill. The Notes window has several of its own Tabs near the bottom of the window. These Tabs are used to quickly enter Notes for the different aspects of the selected Freight Bill. The default Tab is the Billing Tab, where you may enter Notes relating to the Billing information of the Freight Bill. Clicking on any of the other Tabs will allow you to enter free form Notes for the Container, Driver, etc.
View Shipping Instructions
![]() Selecting this button will display any Shipping Instructions that have been attached to the Client(s) included on the selected Freight Bill. Shipping Instructions are created in the Codes Maintenance program > Shipping Instructions Tab, and attached to specific Client Codes in the Customer Profiles program > Shipping Instructions Tab.
Selecting this button will display any Shipping Instructions that have been attached to the Client(s) included on the selected Freight Bill. Shipping Instructions are created in the Codes Maintenance program > Shipping Instructions Tab, and attached to specific Client Codes in the Customer Profiles program > Shipping Instructions Tab.
Grid Fields
Route Designation
If you select the 'Route Designation' column header (as in the above screenshot,) the Freight Bill records will be sorted by their 'Route Designation' value, then by their 'Route Sequence' value, and finally (if neither of the previous are available,) by their 'Zone' value.
When sorting by Route Designation, an additional detail line will appear below records grouped for a similar Route Designation, detailing the total amounts of all the Bills attached to that Route. The user can edit the Route Designation value on the fly, in order to attach particular bills to a route.
| If the user drags the value from the 'Route Designation' field into the Trips/Doors Grid, all Freight Bill records with that Route Designation will be added to the Trip. With this in mind, the user can use the 'Sequence' column to adjust the order of Freight Bills for a particular Route Designation, and then add them to a Trip pre-Optimized. |
Notes
At the far-right side of the Tab Grid is the 'Notes' field, which designates if the selected Freight Bill has any Notes entered against it ('1) or not ('0'). Those Freight Bills with Notes on the Customer Service program > Summary Tab > Notes window > Driver Tab will have a value of '1' in this field.
Context Menu
The Context Menu contains some of the same options available from the Deliveries Tab > Toolbar. Those options described above will not be detailed below:
Select All
This option allows the user to select all available deliveries requests. This is useful in the case of performing a process that involves mass numbers of deliveries. Exporting deliveries to Appian - Direct Route would be one example on that.
Reset EXPORTING Bills' Status
When Freight Bills are sent to Direct Route their statuses become 'Exporting'.If for any reason the process is interrupted, the statuses of the Freight Bills that were not successfully processed remain as 'Exporting', preventing them from being selected for future routing. This option allows you to collectively revert the Freight Bills with the status of 'Exporting' back to their previous statuses. Selecting this option will open the Reset Exporting Bills' Status window.
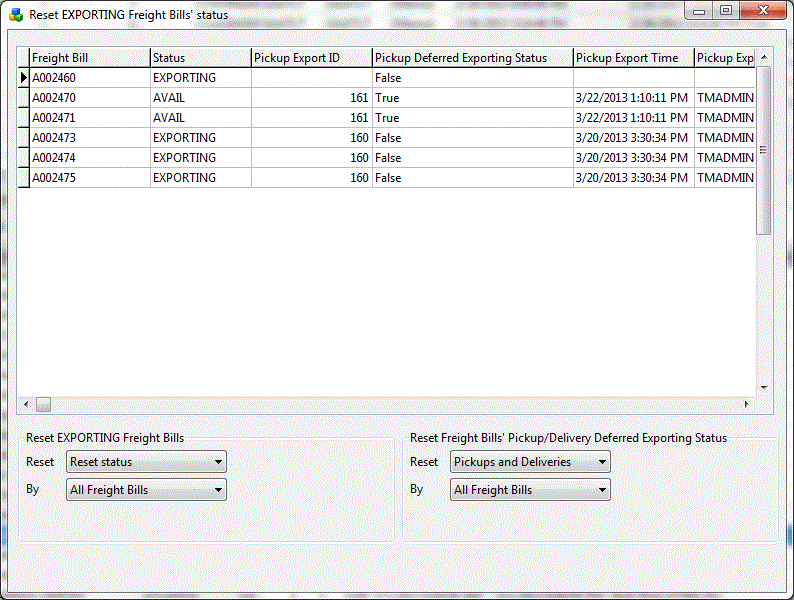
This option displays all freight bills that were sent to Direct Route, with information on their current status, Pickup / Delivery times, whether their exporting status was deferred and other information that can help you make you selection and decision.
You can use the drop down lists to select your criteria for selecting which freight bills to apply the reset action to.
| Field | Definition |
|---|---|
Reset EXPORTING Freight Bills |
|
Reset |
This option allows you to select whether to Reset the Exporting Status of Freight Bills. |
By |
This drop down list allows you to apply a filtering criteria on freight bills to be updated. Below are the available values to select from.
|
Reset Freight Bills' Pickup/Delivery Deferred Exporting Status This section allows you to handle (reset) only freight bills with deferred Exporting status. |
|
Reset |
This drop down list allows you to select to reset the status of freight bills with a deferred Exporting status, based on transaction type.
|
By |
This drop down list allows you to apply a filtering criteria on freight bills with deferred Exporting status to be reset. below are the available values to select from.
|
Change Delivery Terminal
This option will open a new window that will allow you to edit the Ending Zone of the selected Freight Bill.
Freight Bill Terminal Plan
Selecting this option will display the Freight Bill Terminal Plan window, which details the scheduled Terminal Plan for the selected Freight Bill.
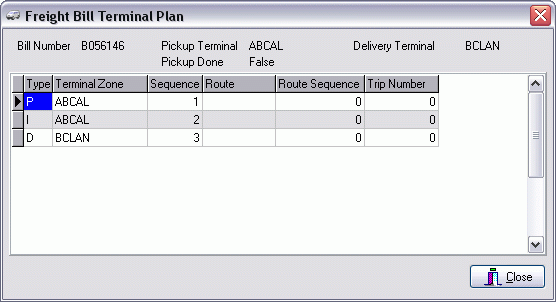
The following options are available on the context menu for this window:
-
Change Pickup Terminal
Selecting this option will open a search window where you can select a different Terminal from those available in your system. This option is only available for Terminals labelled 'Pickup (P)' in this window. -
Change Delivery Terminal
Selecting this option will open a search window where you can select a different Terminal from those available in your system. This option is only available for Terminals labelled 'Delivery (D)' in this window. -
Transfer To
This option is only available for 'Intermediate (I)' Terminals (those not set as 'Pickup (P)' or 'Delivery (D)' Terminals), and setup a Terminal Split for the selected Terminal. -
Set Trip Number
Select this option to open a window that will allow you to enter the Trip Number for this Terminal Leg. -
Set Trip to Zero
Select this option to reset any custom defined Trip Number back to zero. -
Copy
Select this option to copy the selected detail line.
Change Status
This option allows you to change the Freight Bill’s status (TLORDER.CURRENT_STATUS). Available options are those status codes with an 'LTL Sort Order' value in on the Codes Maintenance program > Status tab.
Multi Route Update
If you have selected multiple Freight Bills in the Deliveries Grid, you can select this option to update the 'Route Designation' field for all of them at once. A small window will appear asking you to enter a Route name. When you select 'OK', this Route name will be entered into the 'Route Designation' field.
Multi Route Clear
If some of the records in the Deliveries Grid have data in the 'Route Designation' field, you can select all of these records and then choose this option to remove the data from this field.
Full Screen
Selecting this option will enlarge the Deliveries Tab to a full screen view. Use this option if you have many Freight Bills in the Delivery Tab and wish to select many of them at once.
Freight Bill Details
This option will open a window that shows the details of the selected Freight Bill (TLDTL table data). The data that appears in the window is pulled directly from the Customer Service program > Details Tab for the selected record.
Dangerous Goods Details
If there are any Dangerous Goods attached to a Delivery Freight Bill (signified by icons in the 'Warning' field,) you can select this option to open a window that shows the Dangerous Goods information for the selected Freight Bill. The data that appears in the window is pulled directly from the Customer Service program > Dangerous Goods Tab for the selected record.
Export to Load Builder
Selecting this will flag the selected bill(s) for import into the IDSC Load Builder application. This option will flag the TLORDER_STATUSES.IDSC_STANDBY value for the record to 'True' so that Load Builder will find the freight bill when it pings the TruckMate database for records that need optimization. Once optimized, the freight bills can be re-imported into TruckMate as Dispatch trips.
See the IDSC Load Builder integration page for more information.
Pickups Tab
The Pickups Tab displays the details of all the Pickup-type Freight Bills available to be assigned to a Trip in the Trips List section of City Dispatch. The Details of this Tab cannot be edited, but certain functions can be accessed using the Context Menu. You may also simply drag & drop these Freight Bills into the Trips List section to add them to the Trip you are working with. This grid also lists the various pick-ups inbound to the terminal. Each row shows a summary data from a given location.
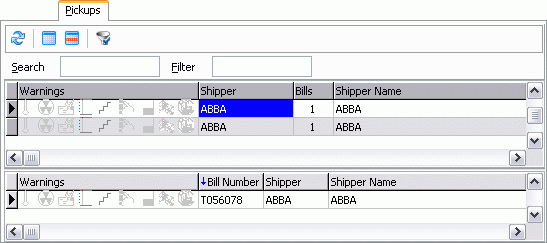
The Pickups Tab is split into two Grids, the top Grid showing Pickup Summary information, and the bottom showing Freight Bill Detail information (all pulled from the Customer Service program). You can add a Pickup Freight Bill to a Trip by simply dragging and dropping its Freight Bill record into the Trips List section of the City Dispatch program.
If a Pickup Freight Bill has 'Route Sequence' value of '0' (zero) on the Freight Bill Terminal Plan window, and it is dragged onto a Trip, it will automatically be set 'Route Sequence' value to one greater than the highest existing Route Sequence value for the Trip in question (appending the Freight Bill to the end of the Trip). The Application Configurator program > CITYDISP.EXE > 'Auto-Sequence Picks' option must be set to 'True' for this functionality to work correctly.
Furthermore, if a Pickup Freight Bill has a Route Sequence assigned to it, when you set to Direct, the 'D' record will inherits the same route sequence of the pick that generated it. Because D’s automatically sort after P’s, if they have the same route sequence, this will alleviate any potential sequence problems.
Toolbar
Refresh
![]() Select this button to refresh the Pickups Grid for any new Delivery Freight Bills in the system.
Select this button to refresh the Pickups Grid for any new Delivery Freight Bills in the system.
Clear Pickup Selection
![]() Select this button to remove the highlighting from any selected Freight Bill(s).
Select this button to remove the highlighting from any selected Freight Bill(s).
Select/Unselect this Bill
![]() Select this button to highlight or remove highlighting a single detail line in the Pickups Grid. You can hold the <CTRL> key and use this button to select multiple Freight Bill lines.
Select this button to highlight or remove highlighting a single detail line in the Pickups Grid. You can hold the <CTRL> key and use this button to select multiple Freight Bill lines.
Filter
![]() Select this button to open the Additional Filters window, which allows you to create custom filters for the Pickups grid. For more information on this window, see the Deliveries Tab > Toolbar > Filter option.
Select this button to open the Additional Filters window, which allows you to create custom filters for the Pickups grid. For more information on this window, see the Deliveries Tab > Toolbar > Filter option.
Clear Filter
![]() Select this button to clear any Filter that has been applied to the Deliveries Grid.
Select this button to clear any Filter that has been applied to the Deliveries Grid.
Freight Bill Notes
![]() Selecting this button will display any Notes associated with the currently selected Trip or Freight Bill. The Notes window has several of its own Tabs near the bottom of the window. These Tabs are used to quickly enter Notes for the different aspects of the selected Freight Bill. The default Tab is the Billing Tab, where you may enter Notes relating to the Billing information of the Freight Bill. Clicking on any of the other Tabs will allow you to enter free form Notes for the Container, Driver, etc.
Selecting this button will display any Notes associated with the currently selected Trip or Freight Bill. The Notes window has several of its own Tabs near the bottom of the window. These Tabs are used to quickly enter Notes for the different aspects of the selected Freight Bill. The default Tab is the Billing Tab, where you may enter Notes relating to the Billing information of the Freight Bill. Clicking on any of the other Tabs will allow you to enter free form Notes for the Container, Driver, etc.
View Shipping Instructions
![]() Selecting this button will display any Shipping Instructions that have been attached to the Client(s) included on the selected Freight Bill. Shipping Instructions are created in the Codes Maintenance program > Shipping Instructions Tab, and attached to specific Client Codes in the Customer Profiles program > Shipping Instructions Tab.
Selecting this button will display any Shipping Instructions that have been attached to the Client(s) included on the selected Freight Bill. Shipping Instructions are created in the Codes Maintenance program > Shipping Instructions Tab, and attached to specific Client Codes in the Customer Profiles program > Shipping Instructions Tab.
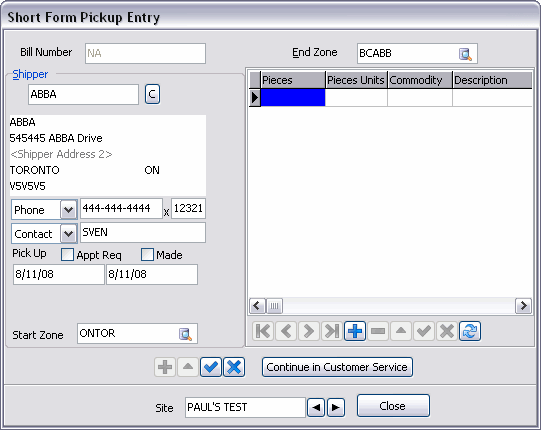
Create New Pickup
![]() Selecting this option will open the Short Form Pickup Entry window, which you can use to enter Pickup information from within the City Dispatch program. You can access the Short Form Pickup Entry window with the <Ctrl><C> hot key combination.
Selecting this option will open the Short Form Pickup Entry window, which you can use to enter Pickup information from within the City Dispatch program. You can access the Short Form Pickup Entry window with the <Ctrl><C> hot key combination.
| Field | Definition |
|---|---|
Bill Number |
This field will automatically populate when a Shipper is chosen for the new Freight Bill. |
Shipper |
Click within the text field directly below the 'Shipper' label and hit the 'Enter' key on your keyboard to access a Grid listing of all the available Shippers in your system. Once you choose a Shipper from this window, the Shipper’s address information will appear in the fields below. You can edit this information if you wish by clicking within the fields and using your keyboard. When the Pickup Freight Bill is created, the 'Shipper' field will automatically default back to the Shipper code that was last selected, making it easier to enter multiple Pickup Bills for a single Shipper: the user can just change the 'Delivery Zone' and post the record. |
Start Zone |
This field will automatically populate based on the Shipper you select. The Shipper’s Starting Zone is configured in the Customer & Vendor Profiles program. You may change this Start Zone Code by clicking the search button and choosing another Zone. |
End Zone |
Choose the Delivery Zone for the Freight Bill you are creating by clicking the search button and selecting a Zone Code from those available on your system. |
Freight Bill Details Grid |
Click the '+' button to begin adding Commodities to the new Freight Bill. This Grid functions similarly to the Grid found on the Details Tab of the Customer Service program. |
Continue in Customer Service |
As the Short Form Pickup Entry window only contains a small number of options concerning the creation of a Freight Bill, this button is included. By clicking this button you will invoke an instance of the Customer Service program with the partial Freight Bill details automatically copied from the fields you have setup in this window. This way, you save time in creating the new Freight Bill, and can quickly modify your already started Bill using the advanced functionality of Customer Service. |
Clear Shipper Info |
Because the Create Pickup window remembers the previous Shipper’s information (to make multiple Freight Bill entry for a single Client easier,) you may have to clear this information if you are switching to a different Client. Simply select this button to remove the Shipper (and origin) information from the fields on this window. |
Pickup Details Grid |
This Grid is used to enter some basic information about the nature of the Freight being shipped in this Freight Bill. The functionality here is similar to the Details Tab of the Customer Service program. Context Menu Cancel When this option is selected, the Freight Detail line selected will be grayed out if the Freight Bill is not in an 'Available' or 'Docked' status. If the Freight Bill is assigned to a Trip, the cancel function is not allowed. |
Grid Fields
Route Designation
If you select the 'Route Designation' column header, the Freight Bill records will be sorted by their 'Route Designation' value, then by their 'Route Sequence' value, and finally (if neither of the previous are available,) by their 'Zone' value.
When sorting by Route Designation, an additional detail line will appear below records grouped for a similar Route Designation, detailing the total amounts of all the Bills attached to that Route. The user can edit the Route Designation value on the fly, in order to attach particular bills to a route.
| If the user drags the value from the 'Route Designation' field into the Trips/Doors Grid, all Freight Bill records with that Route Designation will be added to the Trip. With this in mind, the user can use the 'Sequence' column to adjust the order of Freight Bills for a particular Route Designation, and then add them to a Trip pre-Optimized. |
User 1,…,User 10
Those fields are user defined fields. They are hidden by default. To make those fields visible the 'Add User Fields to Pickup Form' config option in CITYDISP.EXE must be set to 'True'.
Notes
At the far-right side of the Tab Grid is the 'Notes' field, which designates if the selected Freight Bill has any Notes entered against it ('1) or not ('0'). Those Freight Bills with Notes on the Customer Service program > Summary Tab > Notes window > Driver Tab will have a value of '1' in this field.
Context Menu (Top Grid)
The Context Menu contains some of the same options available from the Deliveries Tab > Toolbar. Those options described above will not be detailed below:
Create Pickup
See the 'Create New Pickup' option above.
Full Screen
Selecting this option will enlarge the Pickups Tab to a full screen view. Use this option if you have many Freight Bills in the Pickups Tab and wish to select many of them at once.
Find a Pickup Freight Bill
Selecting this option will open a small window where you can search for a Pickup Freight Bill by entering its Freight Bill number.
Change Pickup Terminal
Selecting this option will open a small window that will allow you to change the selected Freight Bill’s Pickup Terminal.
Context Menu (Bottom Grid)
The Context Menu contains some of the same options available from the Deliveries Tab > Toolbar. Those options described above will not be detailed below:
Modify Date
If the User right-clicks on the 'Pick Up By' field in the bottom grid, they will have access to this option. Selecting 'Modify Date' will open the Adjust Pickup/Delivery window, which allows the user to change the Freight Bill’s 'Pick Up By/Pick Up By End' and 'Delivery By/Delivery By End' dates, as well as check (or un-check) the 'Appt Req.' and 'Made' fields.
These fields are initially set in the Customer Service program.
Reset EXPORTING Bills' Status
When Freight Bills are sent to Direct Route their statuses become 'Exporting'.If for any reason the process is interrupted, the statuses of the Freight Bills that were not successfully processed remain as 'Exporting', preventing them from being selected for future routing. This option allows you to collectively revert the Freight Bills with the status of 'Exporting' back to their previous statuses. Selecting this option will open the Reset Exporting Bills' Status window. For more information on this window, see the corresponding item under the Deliveries Tab topic.
Change Status
This option allows you to change the Freight Bill’s Status value. The only status change option available with this Context option is to change the Freight Bill status to: 'Deassign Freight from Driver (RESCHED)'.
Select All
This option allows the user to select all available pickup requests. This is useful in the case of performing a process that involves mass numbers of deliveries. Exporting deliveries to Appian - Direct Route would be one example on that.
Full Screen
Selecting this option will enlarge the Pickups Tab to a full screen view. Use this option if you have many Freight Bills in the Pickups Tab and wish to select many of them at once.
View Freight Bill Terminal Plan
Selecting this option will display the Freight Bill Terminal Plan window, which details the scheduled Terminal Plan for the selected Freight Bill. For more information on this window, see the Deliveries Tab > Context Menu > 'View Freight Bill Terminal Plan' option.
Freight Bill Details
This option will open a window that shows the details of the selected Freight Bill (TLDTL table data). The data that appears in the window is pulled directly from the Customer Service program > Details Tab for the selected record.
Dangerous Goods Details
If there are any Dangerous Goods attached to a Pickup Freight Bill (signified by icons in the 'Warning' field,) you can select this option to view further details regarding the Dangerous Goods. The data that appears in the window is pulled directly from the Customer Service program > Dangerous Goods Tab for the selected record.
Hold Delivery
Selecting this button will set the selected Delivery record to a 'Hold' Status. You will be prompted to confirm.
Cross Dock Tab
The Cross Dock Tab shows Freight Bills that will be processed from the current Terminal to another Terminal. The Crossdock Tab uses the same component used by the Crossdock application, allowing you to access the functionality of the Freight Bill Grid of the CrossDock program from within the City Dispatch program, simplifying the process. The CrossDock Tab shows a single line for each shipment for the given filter for the Terminal selected.
| The User has the ability to edit the Dates in the 'Deliver By' and 'Deliver By End' fields from within this Tab grid. (If the user changes the delivery date, then it will have the effect of setting Delivery Appointment Made to 'True'.) |
Active Trips/Routes List
This area provides an index of local Pickup and Delivery Trips which are currently active. As mentioned in the Route Filter section, a route filter can be applied to this list so that only those Trips which are servicing Zone Codes in the route are displayed. The numbers displayed simply indicate a 'slot' on the virtual board.
Bills from the Available Freight Bills section can be assigned to a Trip on this list by dragging and dropping the Freight Bill Number with the mouse from any of the Deliveries or Pick-ups Tabs, or by double-clicking on the Freight Bill Number itself.
Color-Code Information
As you go through normal City Dispatch operations, the color of the Active Trips List records will change depending on which step of the process flow the user is currently at. The colors correspond as follows:
-
PINK: an Active Trip will be pink until a Driver and/or Carrier are assigned to the Trip.
-
YELLOW: an Active Trip will be yellow when a Driver and/or Carrier are assigned, but the scheduled Deliveries are not yet complete.
-
GREEN: an Active Trip will be green when all scheduled Deliveries for the Trip have been completed.
Context Menu
Assign Resources
This option has several sub-options. Use these to add Resources to the currently selected Active Trip. You have the choice of assigning 'Drivers', a 'Power Unit', 'Trailer', 'Chassis', 'Container' or any other Miscellaneous 'Equipment'. Once you choose a Resource sub-category, a search window will appear so that you may select the appropriate Resource from your system.
Several additional options have been added to the 'Assign Resources' menu so that the user can quickly match different types of Freight Bills to the City Dispatch Trip. The user now has access to the following options:
-
Match Pickup Freight Bill: allows the quick match of any Freight Bill listed on the Pickups Tab.
-
Match CrossDock Freight Bill: allows the quick match of any Freight Bill listed on the CrossDock Tab.
-
Match Delivery Freight Bill: allows the quick match of any Freight Bill listed on the Deliveries Tab.
-
Match Bill by Trace Number: allows the quick match of any Freight Bill by an assigned Trace Number.
When you select one of first three options, a small dialog window will open, allowing the quick entry of Freight Bill numbers. TruckMate will try to fetch a freight bill with a number that matches the entered value. Selecting 'OK' will keep the window open, allowing the user to enter multiple Bills at once. When 'Cancel' is selected, the dialog will close and the Freight Bills will be added to the selected Trip in the order they were entered. If you select Match Bill by Trace Number option (the last option in the list), a different window will open, which allows you to enter a trace number type and a trace number and then match a freight bill based on the entered Trace number.
| Pickup Freight Bills will update the TLORDER_TERM_PLAN 'P' record, while Delivery Bills will updated the TLORDER_TERM_PLAN 'D' record, and CrossDock Bills the TLORDER_TERM_PLAN 'I' record. If no corresponding TLORDER_TERM_PLAN record for that Terminal with a Trip number of zero is found, then the user will receive an error message that no Terminal Plan exists for the Terminal. |
De-assign Resources
If you would like to remove any Assigned Resources from the currently selected Active Trip, use this option. You have the choice to remove 'Drivers', a 'Power Unit', 'Trailer', 'Chassis', 'Container' or any other Miscellaneous 'Equipment'. Once you choose a Resource sub-category, a search window will appear so that you may select the appropriate Resource from your system.
Carrier Assignment
Selecting this option will open the Carrier Assignment window which will Assign / De-assign a Carrier on the currently selected Trip (route).
Find Near
Choosing the 'Find Near' option will open the Find Near window, which allows you to search for Resources by location.
Reposition Resource
Selecting this option will open the Trip Status Change and Equipment Repositioning window, which will allow you to alter the current Zone Code of a variety of resources attached to the selected Trip. You can access the Trip Status Change and Equipment Repositioning window using the <Ctrl><S> hot key combination.
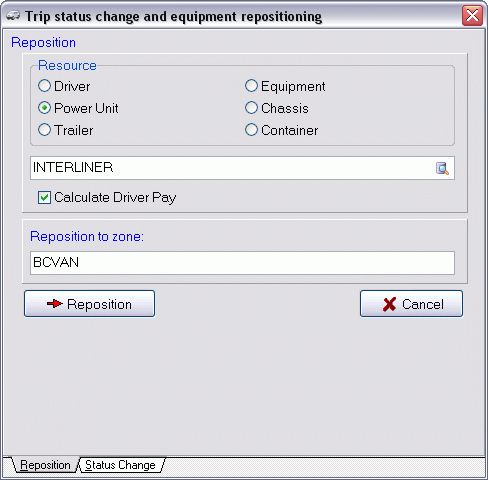
| Field | Definition |
|---|---|
Resource |
Select the type of Resource you would like to Reposition. You can alter the attached 'Driver', 'Power Unit', 'Trailer', 'Misc. Equipment', 'Chassis' or 'Container' of the selected Trip. |
Resource Code |
Once you have selected a 'Resource' type above, you must then double click in this field to select the Resource Code you would like to Reposition. Select the edit pick button to choose a Resource Code from your database. |
Reposition to Zone |
Double click this field or select the edit pick button to choose a new Zone Code for the Resource to be Repositioned to. Once you have selected the new Zone, you may click the 'Reposition' button below to complete the Reposition. |
Switch Trailer
This option allows the User to switch the currently assigned Trailer on each leg and its subsequent leg, allowing a Driver to switch an empty Trailer with a loaded Trailer at the pick point.
To accomplish this:
-
Select the 'Switch Trailer# (on current leg). This will display a list of Trailers with a status code of 'Availability' behavior at the current leg’s End Zone. In short, Trailers available at the end of the current leg.
-
Select a Trailer you would like to switch in from the lookup form. This will cause all Trailers on subsequent legs to be 'switched' to the new Trailer. If the user selects the 'Cancel' button at this point, the Trailer(s) on subsequent legs will be dropped.
Note: If there are no subsequent legs, the program will prompt the user for an End Zone and a new leg will be created with the appropriate resources.
Cancel Trip
This option Cancels the Active Trip, removing it from the Trips List window. To be able to perform a cancellation of an active trip, you need to have a security option " Dispatch - Allow Cancellation of Active Trip" to be set up for you in Security Setup program > Security > Business Events > Allow Changes.
Change Status
This option allows you to update the Trip Status of the currently selected Trip. The Trip Status Change window will appear, which functions as it does in the Dispatch program.
| Status Codes are configured in the Codes Maintenance program. |
Enter Trip Description
Selecting this option will open a small window where you may enter a 'Description' for the selected entry in the Door Grid. When you click 'OK', the text you entered in the window will be applied to the item in the Door Grid. You can access the Trip Description window by using the <Ctrl><T> hot key combination.
Set Destination Terminal
Selecting this option will open a window where you will be asked to select a Terminal Code. The Code you select will become the new 'Destination Terminal' for the selected Trip leg.
Trip Notes
Selecting this option will open a window where you can enter free-format Notes regarding the selected Trip Leg. Click the 'Close' button when you are done to save the Notes. Trips with Notes entered against them will have a small 'Notes' icon (![]() ) in the lower-right section of their Trips List detail box.
) in the lower-right section of their Trips List detail box.
| You can have any Notes entered become 'Journal-styled' (i.e. Date/Time stamped) by setting the 'TRIPS Journal-Style' option in the Application Configurator program > NOTES section to 'True'. |
Optimize Trip
This option is the same function as is offered in the Dispatch program. The Trip Optimizer window offers you the ability to edit the trip legs and assign Freight Bills to be picked or dropped in whatever order required.
Create Drop→Pick Legs
When the menu option is clicked and following conditions are met: there is only one leg on the trip; trip is in Assign or Dispatch Status behavior; and none of bills on the bill has been picked up or delivered on the trip, then all bills on the trip will be checked and the following process will occur:
-
Will scan for LTL tab of all bills on the trip, if there is type I or D records where term_zone = origin terminal and put those as 'picking' on the first leg (terminal depart).
-
For each of those bills, add the drops using the care_of_zone (delivery points).
-
Will scan for LTL tab 'P' records where term_zone = origin terminal and put those as picks after all drops have been accounted for.
-
If any of these pick records have a 'D' record with the same trip number, also add the drop event (this is a direct pickup/delivery on this trip) right after the Pick Event. As a result, the drop event created in step b for this D record will be removed.
-
Bills that don’t have 'P','D' action on the trip (probably linehaul bill/trip), then these bills will be Picked at Trip Start and Dropped at Trip End.
-
Resources on the trip (D,P, etc.) will be picked at first leg and dropped at last leg.
Set Trip ETA
Selecting this option will open the standard TruckMate calendar menu, which will allow you to specify the Estimated Date/Time of Arrival for the selected Trip Leg.
Find / Find Next
Choosing the 'Find' option opens a small window where you may enter a text string to search the Trips List section by. Once you use the 'Find' option, you can continue to search the Trips List by using the 'Find Next' option via the Context Menu, or by simply typing the '<F3>' key on your keyboard. Using the 'Find Next' function makes scrolling through your Trips a quick and easy process.
Print Manifest
This option opens the Report Selection screen common to TruckMate applications. The default report for City Dispatch is 'MANIFEST.RPT'. For more information on Report Functionality in TruckMate, see the Crystal Reports Reference.
Import Trip
The 'Import Trip' function is used to add a recently created Trip (from the CrossDock program or Dispatch program) into the City Dispatch Trips List section. When you chose this option a 'Select Manifest' window will open, with all the Trips currently available in your system that do not have a TRIP.TERMINAL_ID defined. Simply select a Trip and click the 'OK' button to add the Trip into the Trips List.
| In TruckMate, City Dispatch Trips from other Terminals will now be included in the list of trips that can be imported into a route, allowing the user to "hand-off" a City Dispatch Trip from one Terminal to another. |
Show Linkage
Selecting this option will open the Resource Linkage window. For more information on the Resource Linkage window, see the Crossdock program.
Export Trip
Selecting this option will Export the currently selected Trip, removing it from the Active Trips/Routes List area. Using this option on a Trip record will set its TRIP.TERMINAL_ID value to '0', allowing it to be imported later (in this or any other Terminal) by using the 'Import Trip' option.
Filter on Route ID
Selecting this option will open a small window all of the 'Terminal' records found in your database. Selecting a 'Terminal Code' will Filter the records in the Door Grid by the Terminal you have selected. Use this option to see all the Trips scheduled to arrive at a particular 'Terminal', for example.
Clear Route Filter
If you have previously selected the 'Filter on Route ID' function of the Context Menu and would like to have the Door Grid returned to its original state, select this option. All Trips, regardless of 'Terminal', will be displayed.
Set Merge Anchor
Use this option to set the first Trip you would like to merge / switch Resources with using the 'Merge / Switch Resources' option described below. You will right-click the first Trip, select this option (setting the Merge Anchor point) and then right-click the next Trip and select 'Merge / Switch Resources'.
Set External Merge Anchor
This will allow user to use Trips attached to a different Terminal (other than the current Terminal) to set a 'Merge Anchor' value (see 'Set Merge Anchor' option above).
Merge / Switch Resources
The Merge / Switch Resources option is used to transfer resources such as Freight Bills, Drivers and / or Equipment from one Trip to another. To use the option, both Trips must be active and only the Resources assigned to the Trip’s active leg will be available for merging and splitting. Need to know how?
Expert Fuel Optimization
Selecting this option will display the Expert Fuel Optimization window, which allows the Dispatch program to connect to the IDSC Fuel Expert Server and receive a list of fuel stops and route.
Route Filter
This area allows you to select and apply a pre-defined route filter to the Trips List area. A route is a collection of zone codes which can be serviced from the currently selected terminal. When multiple routes are defined, the filter can be applied to show those Trips which will be picking up or delivering freight to those zone codes which are part of the route definition.
Example: the North Seattle Terminal services the 5 main regions on the north side of the city. All zip codes in the Downtown district, Denny Regrade, Eastlake, Magnolia, Pioneer Square, Pike Place Market, Queen Anne Hill, Lower Queen Avenue, Sodo, and South Lake Union neighbourhoods are grouped into a Central route.
| Routes are defined in the Cross Dock Traffic Lanes program, by right-clicking your top-level record in the Lane Tree window and selecting 'New Route', and then assigning specific Zones to the Route from the 'Zone Tree'. |
Context Menu
Filter By This Route
Select this option to limit the Freight Bills in the Available Freight Bills Tabs by those tied to the selected Route.
Clear Route Filter
If you have previously selected the 'Filter By This Route' function of the Context Menu and would like to have the Available Freight Bill Tabs returned to their original state, select this option. All Available Freight Bills, regardless of Route, will be displayed.
Reload Route Tree
Will re-sort the Route Tree based on any changes made.