Decision Tree Form Builder

Decision Tree Forms (DTFs) are programmable forms that can take different paths based on answers given by a Driver. Typically, when a Driver receives a DTF, he/she will be presented with a question. Depending on how the Driver answers the first question, another question (or form) can be presented, and so on, until the DTF reaches completion. In the context of a return form, this means that a Driver can fill in one field at a time and the DTF can dynamically determine which fields to show to the Driver depending upon his previous answers.
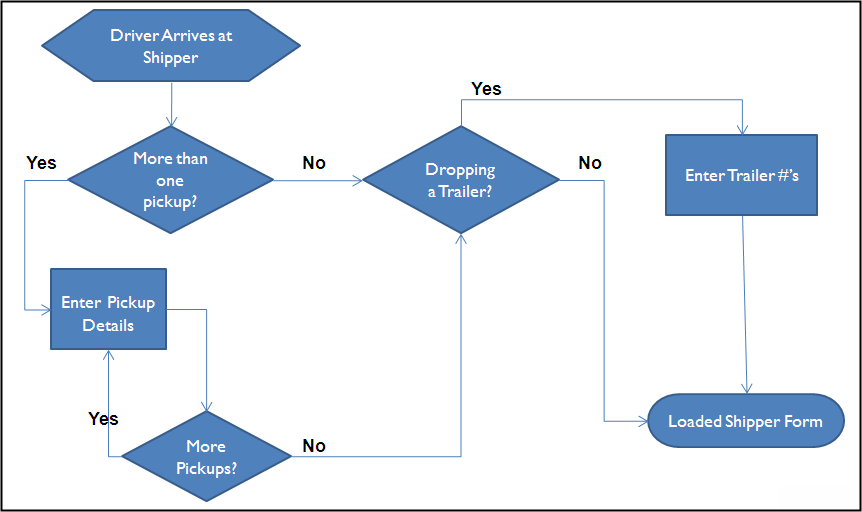
For an example of a typical DTF real-world process, see the following flowchart.
Menu Bar
Navigate
The 'Navigate' menu contains standard TruckMate Record Navigation Bar controls. These controls allow the user to navigate through database records.
Tools
The only option in the 'Tools' menu is 'Test DTF'. Just as the name implies, if selected, this option will open the 'Test Decision Tree' form. This form allows the user to follow an track the created decision tree step by step. This will help the user verify the correctness of the decision tree and make the necessary changes if needed.
Selected
This menu has the controls that can manipulate the selected record. Those include: Move Up, Move Down, Edit and Delete.
DTF Details and Design Tools
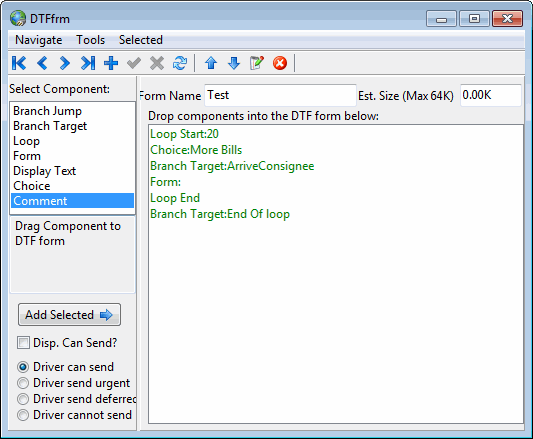
Form Name
Enter a descriptive name for the DTF being created.
Estimated Size (Max 64K)
This field displays the size of the created DTF. The maximum size allowed is 64k bytes.
Control Components:
-
Branch Jump: an instruction to jump to a given 'Branch Target'. If you have already assigned some 'Branch Targets', you can automatically setup Branch Jumps by choosing Branch Targets while in the 'Edit Multiple Choice Question window' (see 'Choice' below).
-
Branch Target: the location inside the DTF that is jumped to when a Branch Jump is encountered.
-
Loop: marks the beginning and end of a loop. Dragging the 'Loop' component into the DTF will open a window asking you to choose the number of times the Loop should occur. Once you have inputted this value, 'Loop Start:#' and 'Loop End' will appear in the DTF. You can then add various other components to the DTF, and then move the 'Loop End' variable down, enclosing a certain branch within a loop, ensuring that the User must enter certain data in order to affect a 'Branch Jump' out of the Loop.
-
Form: a 'regular' (i.e. non-DTF) macro. Must be a 'Linear Macro' (set in the 'Options' section of the Macro Edit window). This component will thus allow you to link two DTFs together in a branching system. For example, you could have a 'Standard' DTF that asks certain questions about the Trip, with one question related to accident information. If the answer is 'No' you could branch to the rest of the 'Standard' DTF; if the answer is 'Yes' you could branch to a 'Branch Target' immediately followed by a different 'Form' component, related to accident details.
-
Display Text: creates a text line in the DTF (such as in the first line of the image above).
-
Choice: a list of options. Choices can be associated with a Branch Target within the DTF. When this component is selected, the Edit Multiple Choice Question window will appear, allowing the user to specify the 'Option' (i.e. possible question answers) and the 'Branch Target' value/location in the DTF that a specific answer will take the user to.
-
Comment: creates a text line in the DTF.
Add Selected
The user can either drag & drop control components into the DTF design area, or they can select them and then click the 'Add Selected' button.
Disp. Can Send?
This flag determines if the DTF can be send by Dispatch staff using the Dispatch program, in addition to the Driver. If this flag is checked, the DTF will be Bi-Directional (see below).
Driver Messaging Controls
Choose one of the available radio options to define how the Driver can send the displayed DTF:
-
Driver Can Send: this option allows the Driver to select the urgency of the message. When he sends the message, a dialog will pop up asking if he wants to sent it 'Urgently' (now) or 'Deferred' (on the next data call).
-
Driver Send Urgent: Driver must send the message with 'Urgent' status. Cannot be 'Deferred'.
-
Driver Send Deferred: Driver must send the message with 'Deferred' status. Cannot be 'Urgent'.
-
Driver Cannot Send: Driver cannot send this Macro. It won’t appear in the list of Driver forms.
DTF Setup
A DTF consists of several elements, most of which are control components like loops and branches. The action (or data) elements that actually do the work of update Freight Bills, etc. are contained within sub-macros, which are normal PeopleNet macros which are embedded into the DTF actions (via the 'Form' component).
-
The first step in setting up a DTF is to give it a name by entering some text in the 'Form Name' field at the top of the window. This name should be descriptive of the User case that this DTF will be employed in. For example, the DTF in the image above is only for testing, therefore we have called it 'Test'.
-
To create the body of the DTF, simply drag the components you need from the 'Components' section into the main DTF form in the center of the window. See the Control Components section, above, for more information on how the various compoents behave.
-
Once you have entered and arranged all of the Components you require in the DTF message using the buttons in the lower-left part of the window ('Move Up', 'Move Down', 'Edit' and 'Delete') you can set some additional options using the flags and radio options in Driver Message Controls section (see above).
-
When you have finished the DTF, select the 'Test DTF' button to go through it as the Driver would upon reception.
-
If everything checks out with your created DTF, select the 'File Menu > Insert New…' option to save your new DTF to the TruckMate database. If you are modifying an existing DTF (that you opened via the 'Load…' button), then you can select the 'Update DTF option to save the changes you have made to the existing DTF.
Select the 'Cancel' button to exit the DTF window without saving your changes.
Bi-Directional Forms
Because of the 'Dispatch Can Send?' field on the DTF window, there is a possibility that a Dispatcher and Driver will send the same macro. In this case you would have a case of a "Bi-Directional" form. This is something introduced in embedded forms and DTF can make use of it as well.
PeopleNet Bidirectional forms can go in both directions, as the name implies. However, our TruckMate Macros only go EITHER forward OR return. So what we do is assign 2 macros to the same form. One macro will be the forward macro and the other will be the return macro, and they both map to the same form.
We start with the macro that has the most information on it. Usually this is the return macro but it could be the forward one. We set the flags so that both dispatcher and driver can use it. We export this macro and use the script to create the bidirectional form.
We then create the other macro. It has the same OR FEWER fields as the first macro. All fields must be in the same relative order. It also helps if the captions are the same. We export this macro as well, BUT WE DO NOT CREATE A FORM from it.
After the form has been created and activated on Peoplenet’s website, we go to "IMPORT" - "DOWNLOAD PEOPLENET DEFINITIONS" and download the Peoplenet forms. This will retrieve the pplnet form ID that can now be used to link the macros with the forms. In most cases, the software is smart enough to assign the form ID to the proper macro by itself.