TruckMate 2021.2 New Features Guide: Operations
Framework
Upgrade Hydra to 6.3.0.1259 (TM-156627)
Major improvements were made to the Crystal Reports processes within TruckMate to remedy some previous issues. On of these improvements involved upgrading to a newer version of an underlying Crystal Reports tool (Hydra) for more stability and consistency when working with TruckMate reports.
Mileage and mapping
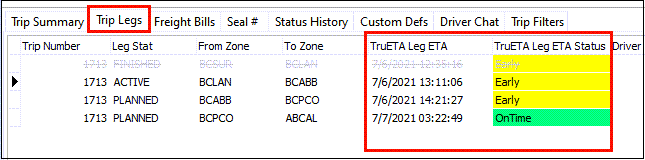
TruETA Leg ETA data added to Dispatch/MMDisp (TM-152922)
The TruETA Leg ETA and TruETA Leg ETA Status columns have been added to the Dispatch and Multi Mode Dispatch > Trip grids and the data displayed here will reflect TruETA updates to the trip legs status.
Update To MAPVIEW.EXE Application Configurations (TM-157009)
As part of the TruckMate 2021.1 release, the Mapview application was removed from TruckMate and replaced with an enhanced and much more powerful mapping interface that interacts with Dispatch and other TruckMate applications. Now that enhanced mapping functionality is available within multiple applications, the Mapview application is no longer required.
As part of this change, several options were revised in the TruckMate 2021.2 Application Configuration program.
-
MAPVIEW > Max number of points to plot on map is no longer relevant and was removed from the system.
-
MAPVIEW > Use Debug was removed from the system since you can use F12 to view the debug of the map if required.
-
MAPVIEW > ALK Map Region Code for Base Map was relocated to the MILESERV.EXE section of the application and was renamed to Trimble MAPS Region Code for Base Map. The way this App. Config. works remains the same.

With these three App Configs adjusted, MAPVIEW.EXE was removed from the side panel of the application.
Certification of PC*MILER 35 and ALK Webservices 35 (TM-157098)
PC*MILER 35 and ALK Webservices 35 have now been officially certified for use within TruckMate. As per normal practice, the pair are certified for the following:
-
Validation of zones within Codes Maintenance and Batch Geocoding Utility.
-
Positioning of zones within Codes Maintenance and Batch Geocoding Utility.
-
Validation of Client Addresses within Customer/Vendor Profiles and Batch Geocoding Utility.
-
Positioning of Client Addresses within Customer/Vendor Profiles and Batch Geocoding Utility.
-
Automatic mileage calculation within Customer Service.
-
Automatic mileage calculation within Dispatch/MMDisp.
-
GenETA calculations for Trips.
-
Fuel Tax Mileage calculation.
-
Support for all different PC*MILER calculation options (Practical, Shortest, Toll Restricted, etc.).
In addition to the above, a few minor tweaks were made to the Mile Server Manager:
-
Removed the DT8 settings from the Data Pad values tab, given that DT8 is no longer supported for use with TruckMate.
-
Removed DT8 from the Data Files section of the application, given that DT8 is no longer supported for use with TruckMate.
-
Increased the length of the Debug box within the Mile Server Manager application, so more customers have the ability to see the path they are setting up.
Mobile communications
Get/set PTA and PTD from a Waypoint (TM-141957)
The TruckMate (SOAP) API has been modified to return the stops ETA and ETD value with the return payload when calling GetStopList.
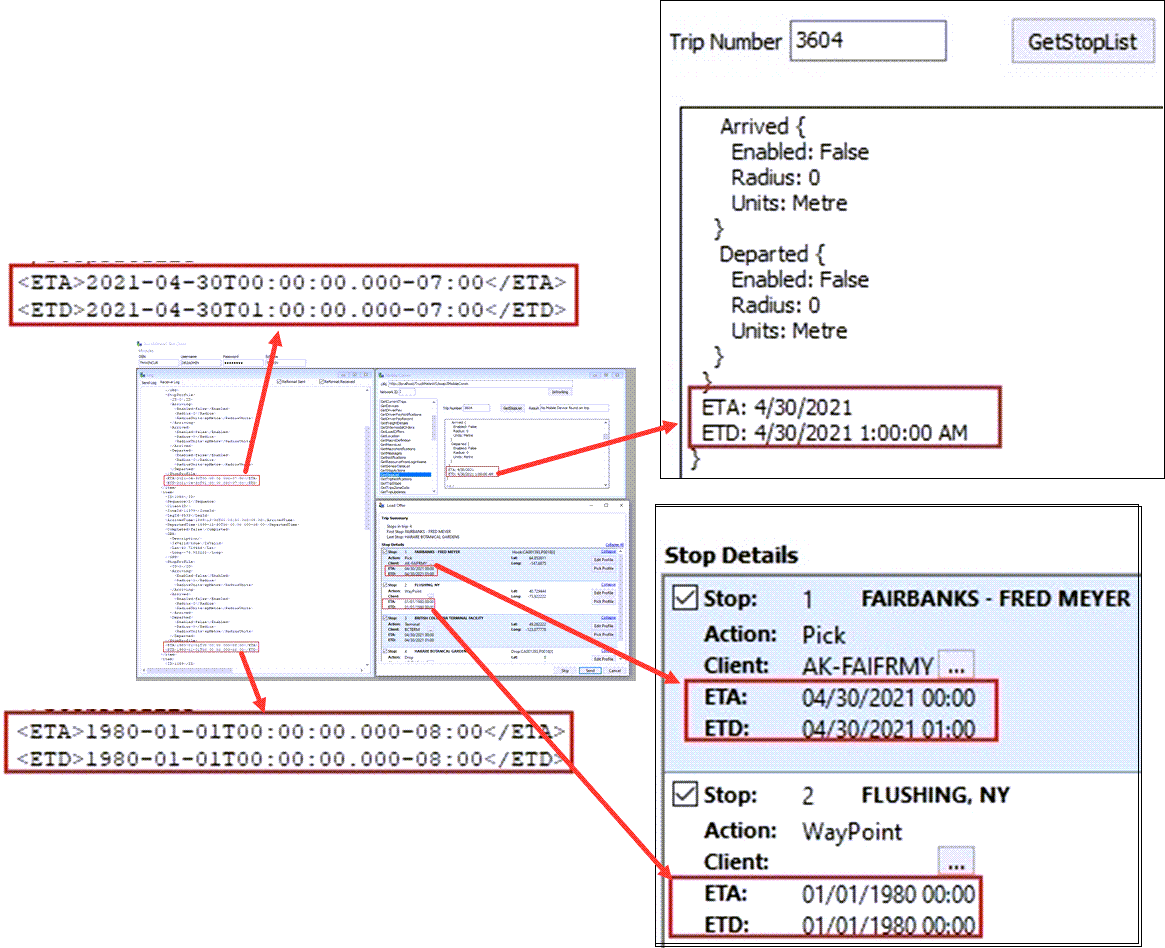
The stop generation logic has been modified to use LS_EXPECTED_DATE and LS_PLANNED_DEPARTURE for a waypoint stop ETA and ETD based on a new app. config. which can be set to Waypoints indicating the use of the values for the ETA and ETD.
Utilities > Application Configurator > DISPATCH.EXE
| Option | Description |
|---|---|
Use LS_EXPECTED_DATE and LS_PLANNED_DEPARTURE for stop ETA and ETD |
Controls which stop type defaults will use LS_EXPECTED_DATE and LS_PLANNED_DEPARTURE for the ETA and ETD.
|
Here is an example when this app. config. is set to Waypoints.
Note: The existing DISPATCH.EXE > Allow Optimizer To Move Leg Expected Date app. config. will need to be set to 'False' to prevent LS_EXPECTED_DATE being overridden when the trip is DISP’d or Optimized.
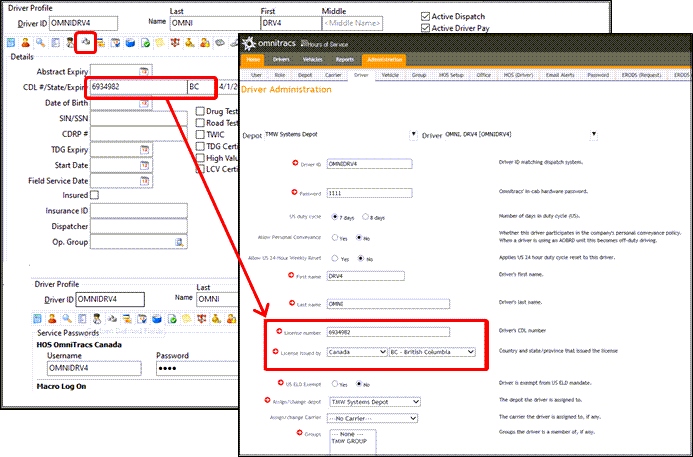
Omnitracs Hours of Service - Driver License Number (TM-154276)
A new feature allows you to insert or update Driver License information (CDL) from the TruckMate Driver Profile > Details tab into the QHOS Portal site.
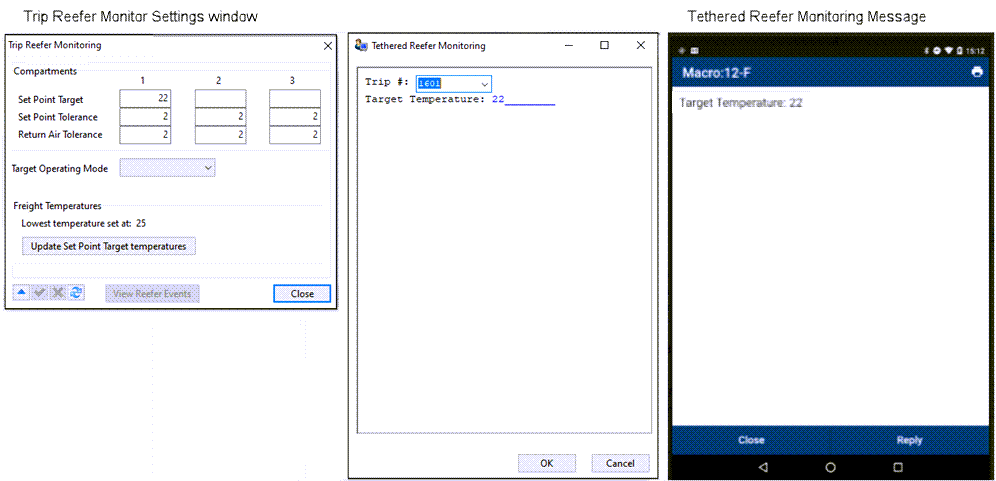
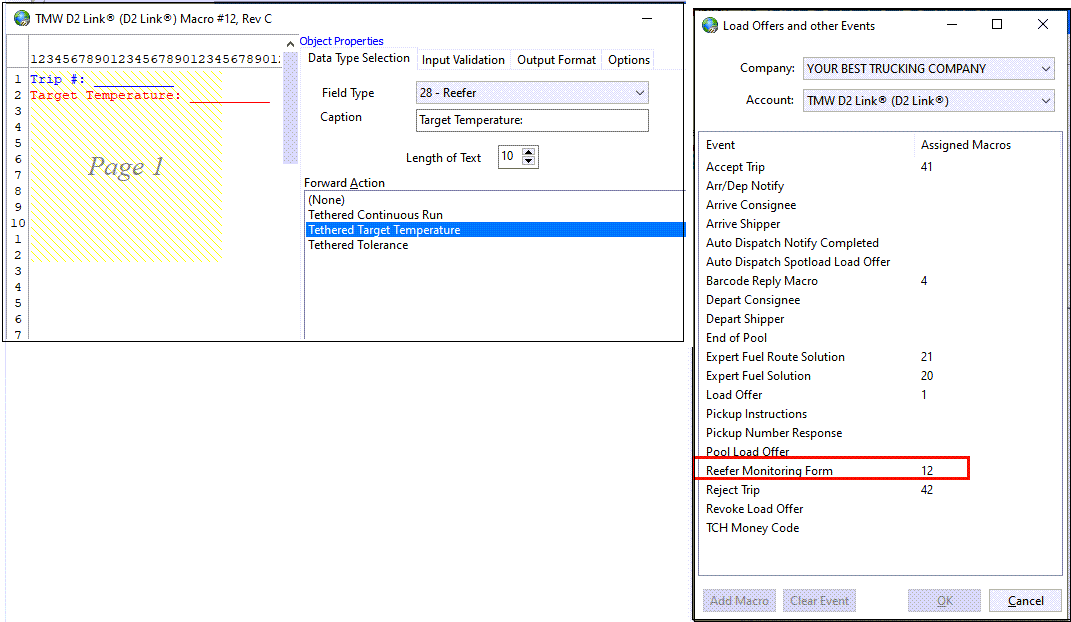
Send Info From Tethered Reefer Monitoring Window To Driver (TM-154356)
The Popup Tethered Reefer Window application configuration option has been modified to add an additional Both option to determine which Thermo King/TracKing Reefer Monitoring program related form or window to automatically display after a trip has been optimized.
Utilities > Application Configurator > DISPATCH.EXE
| Option | Description |
|---|---|
Popup Tethered Reefer Window |
If you are using the Thermo King/TracKing Reefer Monitoring program window, this option determines whether a popup window is displayed after the trip has been optimized. It also allows you to choose which window to display (or both or no window at all).
When the config is set to Both or Form, the Tethered Reefer Monitoring macro form will be sent to a mobile network driver in his/her device inbox after sending the load offer. |
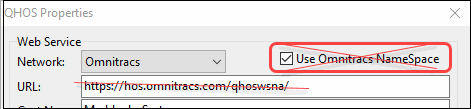
Omnitracs Hours of Service - Default URL Change (TM-155990)
In QHOS properties, the default URL has been changed to https://hos.omnitracs.com/qhoswsna and the Use Omnitracs Namespace option has been removed since all requests now use the http://www.omnitracs.com namespace.

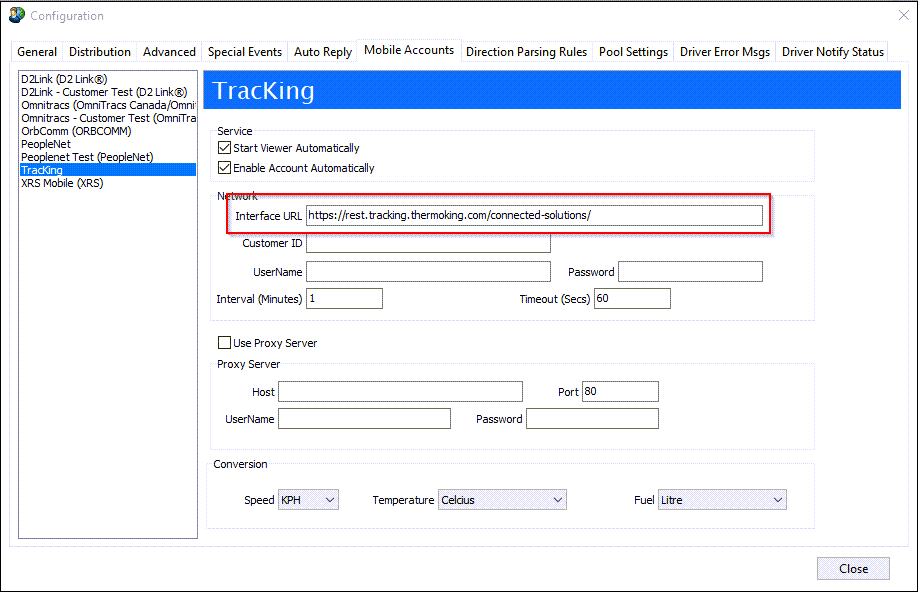
TracKing: URL Change (TM-156004)
TracKing has moved their hosted servers to Amazon Web Services and splitting the database and web site regionally. This move requires you to change the Tracking Interface URL in TruckMate to:
https://rest.tracking.thermoking.com/connected-solutions/
Update to D2Link Container Creation Process (TM-156934)
When a container is auto created via D2Link (Match Container macro field), the newly created container will have the properties copied from the freight bill to the new container record.
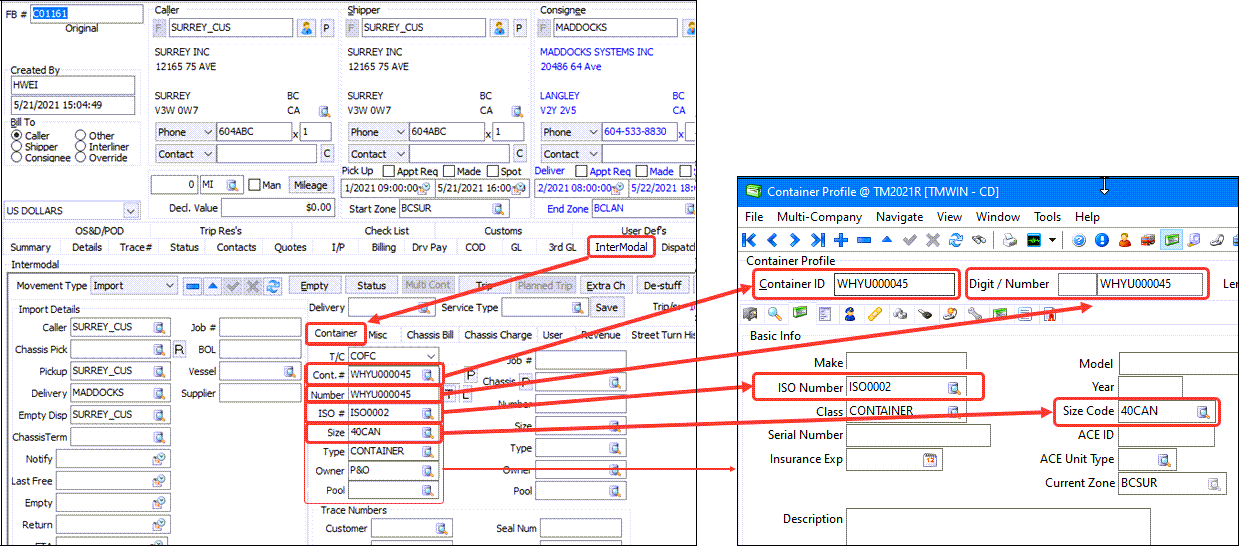
Note: The CSERVE.EXE > Overwrite Container Details application configuration must be set to False to ensure the container profile doesn’t overwrite the container details on the Intermodal bill when the newly created container is added to the trip. After the container has been properly put on the trip and onto the intermodal bills then the new code will copy the container details from the freight bill to the new container profile record.
Dispatching operations
New functionality for Terminal Service Days workflow (TM-137576)
The Terminal Maintenance program has new features to expand on the Direct vs. Indirect Movements (TM-140396) concept that was introduced in TruckMate 21.1 for fleets may still want to use other carriers for some portions of a shipment.
-
See Direct vs. Indirect Movements (TM-140396) in the 20.1 release notes for additional details.
These changes to the Terminal Service Days functionality and changes in Codes Maintenance allow service levels and exceptions to be used within direct SLM calculations, along with more specific calculation rules around Terminal Service Plans. In addition, new functionality was added in Codes Maintenance.
Terminal Maintenance:
In Terminal Maintenance, a number of changes were made.
1) The Terminal Service Days window and the creation wizard was enhanced to include a number of new fields and the interface was revised for a better workflow.:
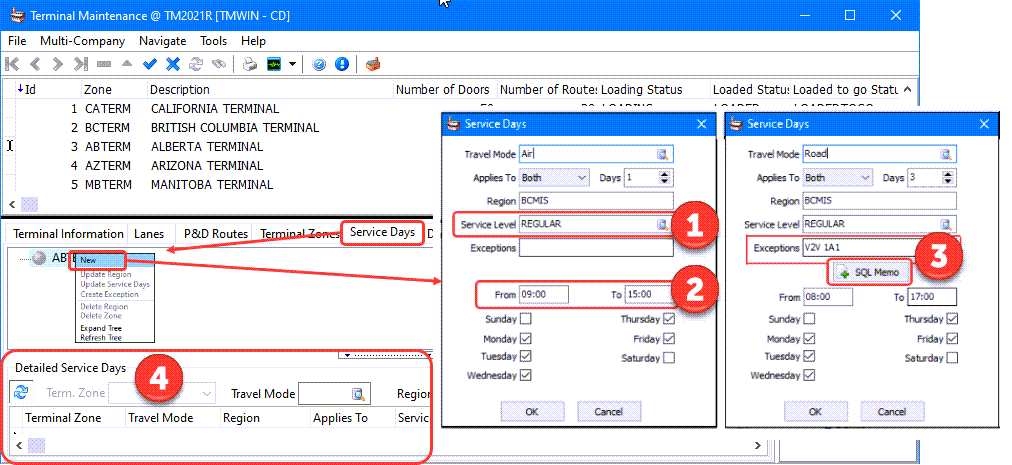
1) Service Level:
This allows you to enter a specific Service Level that will apply when attempting to determine the correct Service Days plan for a Freight Bill. Only one Service Level can be selected per node.
2) From/To Time:
This will designate the from-and-to window when a particular set of zones (within a region) can be serviced. If a bill is created and the zone falls outside of that window, upcoming logic will flag that zone as invalid.
The Days field was also updated. Previously, there was no upper limit on this field which led to potential truncation issues in other applications; this field has now been limited to 999 days at a maximum level.
3) SQL Memo
When text is entered into the Exception field, the SQL Memo button appears allowing you to create a SQL Filter to specify when exactly an Exception will apply against an order. This filter is based on TLORDER.
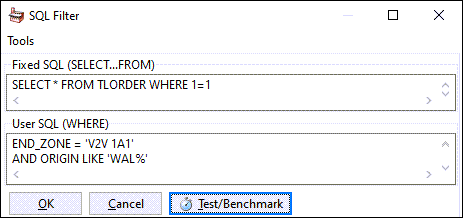
These filters are stored in the TERMINAL_SVCDAYS_FILTER table, liked to the parent TERMINAL_SERVICE_DAYS table via the USER_COND_FILTER_ID field. A unique auditing feature of the filter table is that it will retain deleted filters. Along with the MODIFIED_BY and MODIFIED_TIME columns, this will grant visibility to users to determine whom, if anyone, adjusted a filter record to monitor and maintain any major changes made. This was added since this filtering will start impacting SLM and modifications should be recorded.
4) Detailed Service Grid
This grid shows all of the active Service Days records that are currently functioning within the DB. This will show both standard and exception records. Filtering is now also present on this grid, so users can easily locate exactly which records they wish to review.
Double-clicking a record within the Detailed grid opens the edit screen for that region.
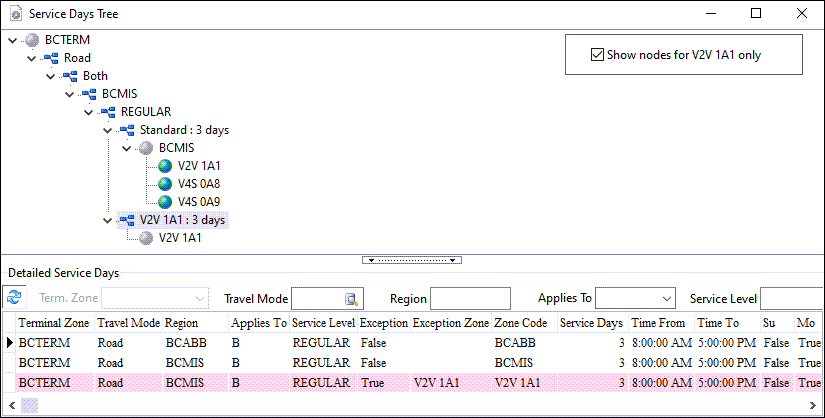
With the addition of the Service Level, the Tree view on the screen was updated. The Tree branching now includes:
-
Terminal Zone
-
Travel Mode
-
Applies To
-
Region Identifier
-
Service Level
-
Standard Information
-
Exception Information
A user can now use the 'Copy Node' functionality. The purpose of the 'Copy Node' option is a user can select a point anywhere on the tree to copy a record from - when done so, it will copy all of the same information below it to include in the record.
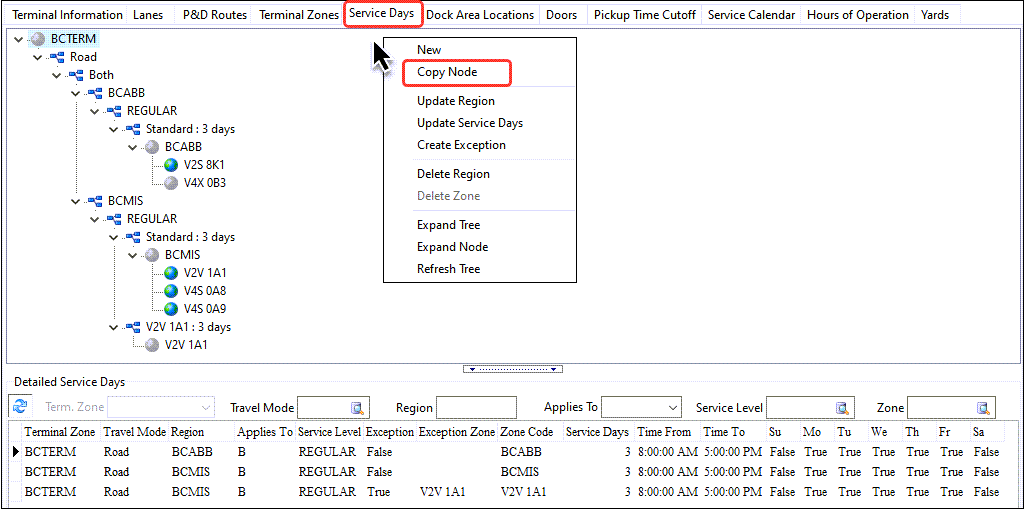
For example, if a user copied from the Service Level node (and changed the Service Level to something different) - all of the above and below information would remain unchanged, but the Tree would be updated accordingly to slot the new Service Level underneath the Region Identifier, but would branch off a separate path for the Standard/Exception information as a result.
5) Codes Maintenance:
In Codes Maintenance, a new button was added called 'Service Days'. This option will be selectable if the user in question has permission to access the Service Days tab in Terminal (via Security). If not, the button will be greyed out.
In order for the new Service Days popup window to open for a particular zone, it must meet one of two criteria:
The zone code must already have an associated Terminal Service Days record associated to it, OR, The zone code must have a default Terminal Zone. If either of these options are met, the user will receive an error message stating that the window cannot open.
If the criteria is met, the user will see effectively a duplicate view of the Terminal Service Days window, with a few exceptions:
1) Multiple Terminal Zone nodes for a specific zone code can be viewed in this window (ie. multi-terminals) which is not possible inside the Terminal Maintenance application.
2) A user can focus down on a specific zone code using the 'Show node' option in the top right corner of the Codes Maintenance window.
3) Users can add zones to the Service Days tree by manually dragging them from the Zone Code tree.
Enhanced Reason Code Logic in Dispatch/Multi Mode Dispatch (TM-141544)
A significant change was undertaken in TruckMate 2021.2 to improve the way Reason Codes are integrated within the Dispatch and Multi Mode Dispatch applications and when users will be required to enter a reason after a status change.

When the Require Reason Code checkbox option for status codes was introduced in TruckMate 19.2, it only applied to Customer Service and not the Dispatch applications. (Reason Codes are created and maintained in the Codes Maintenance program > Service Failure Codes tab.)

A structural overhaul was applied in TruckMate 21.2 to add new ways of controlling when the requirement to enter a Reason Code should be triggered in Dispatch, and to whom they should be triggered.
-
The security options are now also tied to the Require Reason Code checkbox setting for specific status codes. This is an additional setup layer that did not exist prior to this enhancement.
-
A new Both (Picks & Drops) security option has also been added since previously you could only select picks OR drops.
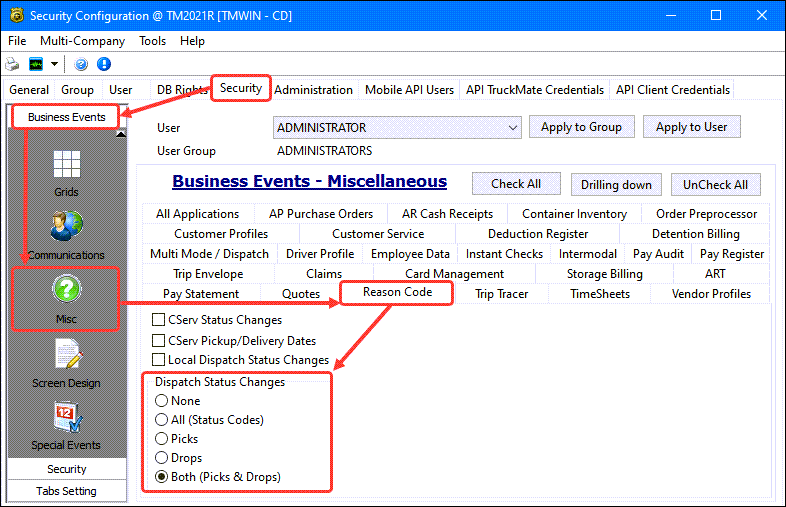
| Option | Description |
|---|---|
None |
No prompts to enter a reason code will ever appear inside Dispatch or Multi Mode Dispatch, regardless of the Require Reason Code setting for any status code. |
All (Status Codes) |
All status codes where the Require Reason Code checkbox is selected will prompt for a Reason Code when that status is applied. |
Picks |
Pick-based status codes (Arrive Shipper/Depart Shipper) where Require Reason Code is selected will prompt for a Reason Code if the drop is late (i.e., Current Timestamp > Pick Up By End). |
Drops |
Drop-based status codes (Arrive Consignee/Depart Consignee) where Require Reason Code is selected will prompt for a Reason Code if the drop is late (i.e., Current Timestamp > Deliver By End). |
Both (Picks & Drops) |
Pick & drop based status codes (Arrive Shipper/Depart Shipper/Arrive Consignee/Depart Consignee) where Require Reason Code is selected will prompt for a Reason Code if the pick/drop is late (i.e., Current Timestamp > Pick Up By End/Deliver By End). |
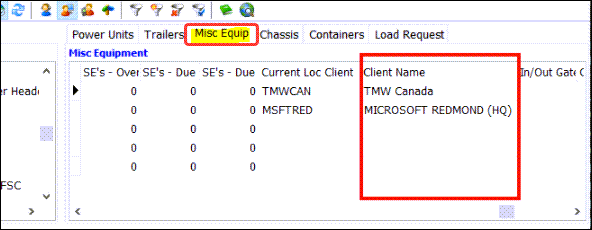
Trailer location displays client name (TM-156100)
The Client Name column displaying the name of the customer where a trailer is located has been added to the Dispatch and Multi Mode Dispatch applications > resource grids to facilitate operations and help better manage equipment localization.
This includes the Drivers, PowerUnit, Trailers, Chassis, Containers and Misc Equipment tab resource grids in the Dispatch and MMDisp applications.
Here is an example of the Client Name being displayed on the Dispatch > Misc Equip tab.
User Integer fields added to ART Server (TM-154824)
The six new User Integer fields (TLDTL USER_FIELD_INT_1 through USER_FIELD_INT_6) have been added to the TruckMate REST API service GET, POST & PUT methods for the tm/orders and tm/orders/{orderId} endpoints.

Ability to view Active and Total FB counts on MMDisp trips (TM-156102)
A number of areas in the Multi Mode Dispatch application have been updated to display the number of active freight bills on a trip at any given time and the total number of freight bills present on a trip as a whole.
Two new fields were added to each of the six Trip Grids (Planning, Doors, Outbound, Inbound, P&D, Trips):
-
Active FB (ACTIVE_COUNT_OF_FB)
-
Total FB (TOTAL_COUNT_OF_FB)
For example:
The 3 active freight bills and 5 total freight bills associated with this trip are summarized by the two new columns displayed in the Multi Mode Dispatch > Trips grids.

In addition, an addtional two new fields were added to the Multi Mode Dispatch > Trip Summary tab, displaying the same two fields as panels to match the rest of the design of the tab.
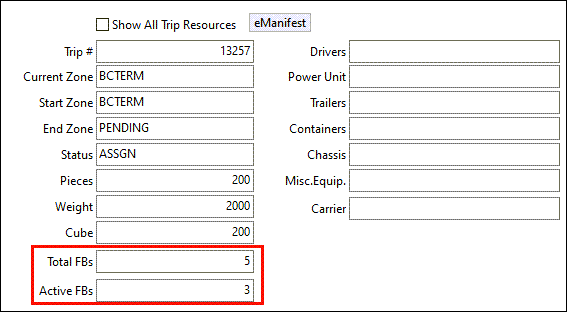
The purpose of each of the two fields is as follows:
-
Active FB - the Active FB column displays how many freight bills are current active and present on the shown trip at any given time. This effectively means any freight bill that was picked/loaded onto the trip, and has not yet been delivered/dropped will be counted as an active bill on the trip. This will NOT include bills that have already been delivered/dropped, or bills that have not yet been picked up.
-
Total FB - the Total FB column displays the entire number of freight bills that are either currently active or have been delivered/unloaded from the current trip. For Trips, the Total FB value would will always be equal to or higher than the Active FB column.
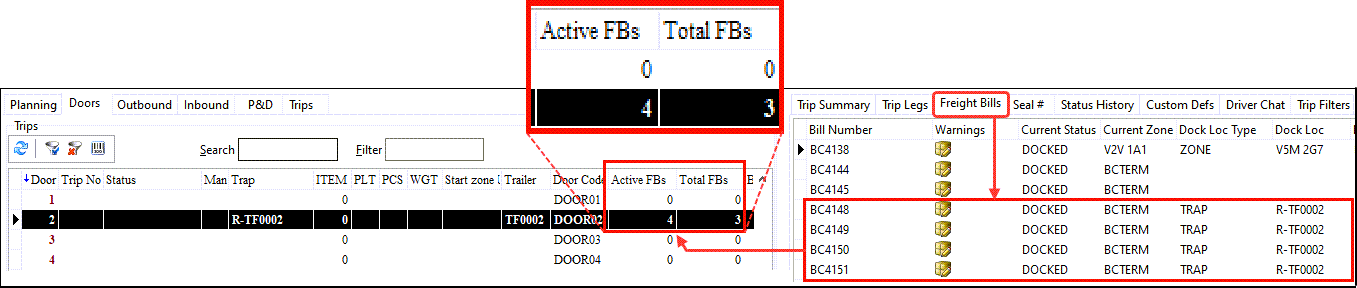
This behavior will be observed against all Trips in every tab. The only exception to this workflow is when a user has a Trap parked at a Door, and it is visible in the Doors tab of the application. In this situation, the columns will behave as the following:
-
Active FB - the Active FB column will display how many Freight Bills are physically loaded to the Trap in question.
-
Total FB - the Total FB column will display how many Freight Bills are planned, but not loaded, to the Trap in question.
A Freight Bill will not increase the count of both columns - it may only increase the count of one. For example…
-
If a Freight Bill is planned and loaded to a Trap, only the Active FB column will be updated.
-
If a Freight Bill is loaded but not planned on a Trap, only the Active FB column will be updated.
-
If a Freight Bill is planned but not loaded on a Trap, only the Total FB column will be updated.
-
If a Freight Bill is neither planned nor loaded on a Trap, no count will be updated.
New Carrier Equipment grid in Vendor Profiles (TM-158005)
A new Carrier Equipment grid has been added to the Profiles > Vendor Profiles > Interliner page. This grid allow you to link equipment such as a Power Unit, Trailer, or Container to Vendors who are set as an Interliner.
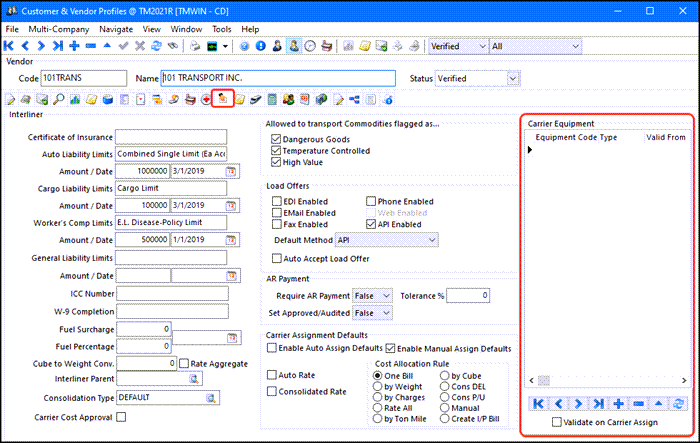
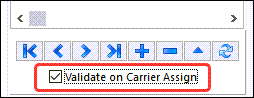
Selecting the Validate on Carrier Assign checkbox will ensure that when a carrier is selected during the dispatch process, the equipment is linked to the selected carrier.
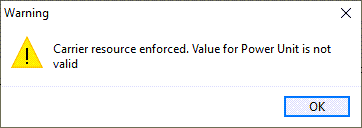
This new feature allows you to populate the carrier’s resource, in the Dispatch > Carrier Assign > Resources tab with an equipment code which has been defined under the carrier’s profile. An error message similar to the following will be displayed if the Validate on Carrier Assign checkbox is selected and inappropriate equipment is selected.
To support this new feature a Carrier Equipment checkbox has been added to the Profiles > Codes Maintenance > Equipment Class Definitions tab to indicate this equipment item has been linked to a vendor.

Intermodal operations
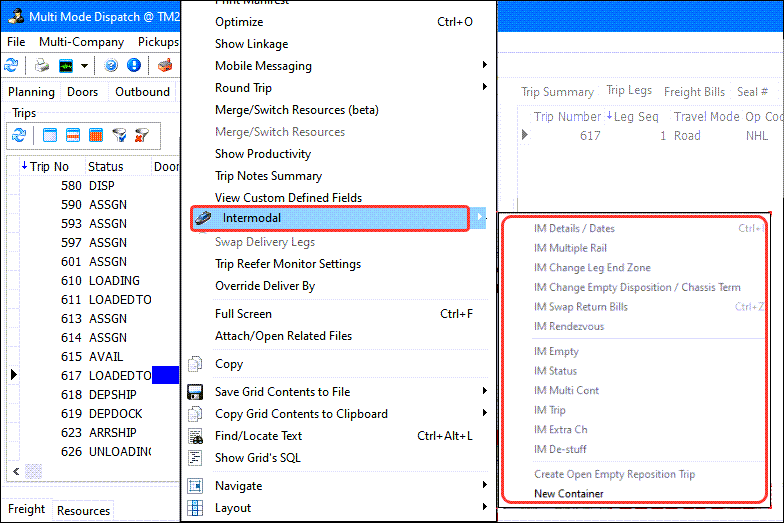
Update Intermodal shortcut menu options on Dispatch Trips grid (TM-156324)
As part of the Empty Intermodal project completed during this release, an update was made to how the Intermodal right-click shortcut menu options work with the Trips grids in the Dispatch and Multi Mode Dispatch programs.
Previously, the menu options for the Intermodal menu would always be displayed and enabled against every trip regardless of whether any Intermodal bills were actually present on a particular leg/trip or not.
This has now been updated and the following rules will be applied in both Dispatch and Multi Mode Dispatch:
Dispatch:
-
If a leg contains just Intermodal bills, all of the Intermodal menu options will be enabled.
-
If a leg contains no Intermodal bills, all of the Intermodal menu options will be disabled.
-
If a leg contains both Intermodal and non-Intermodal bills, the Intermodal menu options will be enabled (and the options will only apply to the IM bill on the leg in question).
Multi Mode Dispatch:
-
If the Trip contains just Intermodal bills, all of the Intermodal menu options will be enabled.
-
If the Trip contains no Intermodal bills, all of the Intermodal menu options will be disabled.
-
If the Trip contains both Intermodal and non-Intermodal bills*, the Intermodal menu options will be enabled.
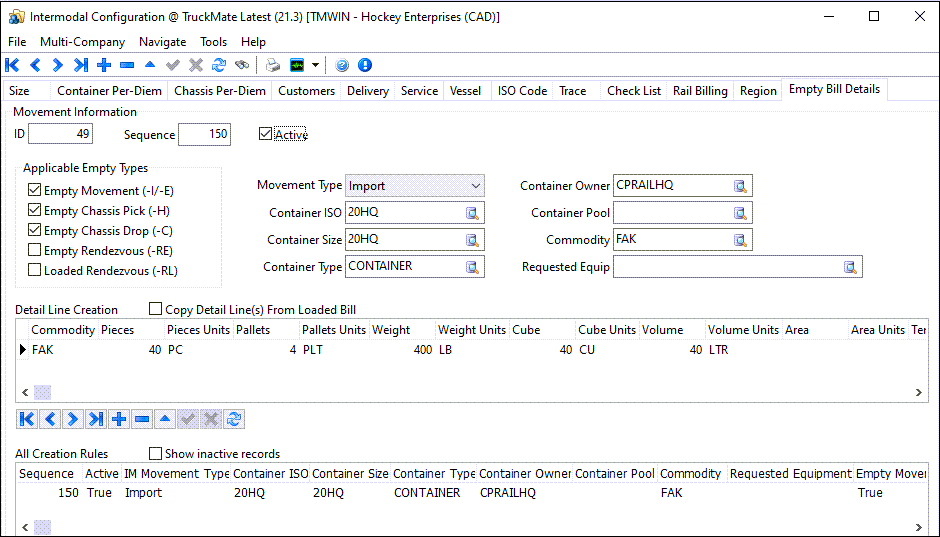
Auto-created detail lines added to intermodal freight bills (TM-152661)
A new Empty Bill Details tab has been added to the Intermodal Configuration window.
The Empty Bill Details tab allows you to specify which order detail lines will automatically be populated on empty intermodal bills based on a certain rule set or based on conditions derived from how the parent bill has been setup. All of the setup is handled inside the Intermodal Configuration application, and the process itself is controlled in Customer Service.
The tab has three sections: a Header, the Details grid and the All Creation Rules grid.
Header section
The Header fields determine when a specific rule should apply and which bills a specific rule should be applied too.
| Field | Description |
|---|---|
ID |
The TruckMate generated ID used to identify a record. This value will always be unique. |
Sequence |
A freeform integer indicating the sequence this record should be used in if you create more than one empty bill details rule. The first rule which matches will be applied so the most restrictive and specialized rules must be assigned the lowest number. Negative numbers are permitted and values can go from -999999 to 9999999. |
Active |
Determines whether this record is Active and thereby considered when detail lines are copied over. |
Applicable Empty Types |
Use the checkboxes to indicate which bill types a Detail Line should be copied over to. All of the options listed are valid empty bills that could be generated by the system. Only those checked will be included when a rule is generated. |
Movement Type |
Use the drop-down list to specify which Movement Type the rule will be applied against. The options include 'Import', 'Export', 'Domestic IB' and 'Domestic OB'. This is a mandatory field. |
Container ISO |
Use the edit-pick list to specify the ISO value that must be present in order for a rule to apply. If left NULL, the Container ISO value is ignored and the rule will apply. |
Container Size |
Specify the Container Size value that must be present in order for a rule to apply. If left NULL, the Container Size is ignored and the rule will apply. |
Container Type |
Specify the Container Type value that must be present in order for a rule to apply. If left NULL, the Container Type is ignored and the rule will apply. |
Container Owner |
Specify the Container Owner value that must be present in order for a rule to apply. If left NULL, the Container Owner is ignored and the rule will apply. |
Container Pool |
Specify the Container Pool value that must be present in order for a rule to apply. If left NULL, the Container Pool is ignored and the rule will apply. |
Commodity |
Specify the specific Commodity value that must be present in order for a rule to apply. If left NULL, the Commodity value is ignored and the rule will apply. |
Requested Equip |
Specify the Requested Equipment value that must be present in order for a rule to apply. If left NULL, the Requested Equipment is ignored and the rule will apply. |
(All of this information is stored in the IM_EMPTY_DLID_HEADER table.)
Detail Line Creation
The Detail Line Creation grid is used to set up what the Detail Line will look like when imported into the Empty Bills and which values to use. The fields in this grid are all matched up with TLDTL fields and include:
-
Commodity (the only mandatory field)
-
Pieces
-
Pieces Unit
-
Pallets
-
Pallet Units
-
Weight
-
Weight Units
-
Cube
-
Cube Units
-
Volume
-
Volume Units
-
Area
-
Area Units
-
Temperature
-
Temperature Units
-
Field 1 thru 20
Anything entered in this grid will be copied into the specified Empty Bills should the rule be called into action.
An alternative to manually creating Detail Lines is to copy the Detail Lines from the Parent using the Copy Detail Line(s) from Loaded Bill checkbox option available at the top of the Detail Line Creation grid. This will do a direct copy of all the field values listed above from the Parent Bill into the specified Empty Bills when this rule is called into action.
If a you select the Copy Detail Line(s) from Loaded Bill checkbox but the receiving bill already has Detail Line values in the grid, you will receive the following prompt:
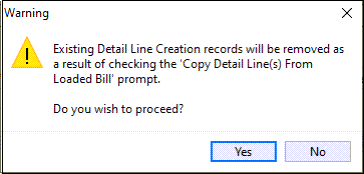
-
YES - The Empty Detail Lines will be removed from the grid and the grid will become read-only.
-
NO - The Empty Detail Lines will remain and the record will remain in edit mode.
All Creation Rules
This grid lists all the Empty Bill Details creation rules and provides an easy way select a specific rule for viewing and editing. You can use the mouse to select a rule or scroll vertically within the grid to move between records
The grid contains most of the header information that you can review as you are switching between rules. Inactive records can be included in the grid using the 'Show inactive records' checkbox.
Customer Service
If the empty record in the Customer Service program aligns with a Parent Intermodal Bill, then the Detail Lines will automatically be created in the specified empty bills.
For example, suppose this is the empty bill creation rule:
This rule will apply a Detail Line to the following Empty Bills:
-
Empty Movement (-I)
-
Empty Chassis Pick (-H)
-
Empty Chassis Drop (-C)
and if the following conditions are True:
-
The Movement Type value is IMPORT.
-
The Container ISO value is 20HQ.
-
The Container Size value is 20HQ.
-
The Container Type value is CONTAINER.
-
The Container Owner value is CPRAILHQ.
-
The Commodity is FAK.
For any empty bills matching this criteria, the order detail line values specified in the Detail Line Creation grid will be copied over to the empty bills to be used as needed (i.e., to generate rates, etc.).
Bill List option added to Multi-Container window (TM-152661)
As part of ongoing improvements to the Intermodal workflow in TruckMate, a new Bill List option type was added into the Multi Container screen. This option type will display a wider range of Intermodal bills based on where it is launched from, among a few other criteria. (Previously, the Multi Container screen would only look up specific Intermodal Bills based on Job Numbers (which were used as 'Trace Numbers') and this required a bill to "share" a Job Number with another bill in order to be displayed in the grid.

The new "Bill List" option can be used in the following locations:
Dispatch
-
Freight Bills grid - Intermodal > Multi Container
Multi Mode Dispatch
-
Deliveries grid - Intermodal > Multi Container
-
Pickups grid - Intermodal > Multi Container
-
CrossDock grid - Intermodal > Multi Container
In all other locations where the Multi Container window can be accessed, the Bill List option will be greyed out.
When the Bill List option is selected, the system will pull all of the posted, loaded Intermodal bills (i.e., no empties), into the Multi Container grid that are also present in the grid it was loaded from. For example, if the Multi Container window was launched from the Freight Bills grid in Dispatch, it would display all posted, loaded Intermodal bills present in that grid in that moment and you can proceed to update and interact with these bills as required.
In each of the location specified above, any SQL Filters, Quick Filters or Custom Filters also applied to that grid will adjust the outcome of the bill list - effectively, the Multi Container grid should always match 1:1 with the grid it is being launched from.
A new DISPATCH.EXE > IM Default Multi Container List View application configuration was added to control whether the default option in the Multi Container window, when applicable, should be set to Trace List or Bill List. Utilities > Application Configurator > DISPATCH.EXE
| Option | Description |
|---|---|
IM Default Multi Container List View |
Determines the default option in the header of the Multi Container window as to which list view to display. (This setting will only apply where the list contents are such that both options are valid to be used.)
|
Trip Operation Planning
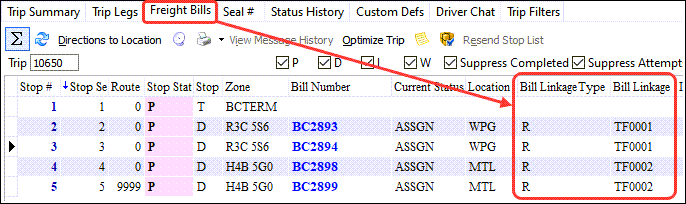
Resource Linkage information added to Multi Mode Dispatch > Freight Bills grid (TM-155348)
As part of the new Trip Operations logic added to TruckMate in 2021.1, the Freight Bills grid in the Multi Mode Dispatch program has been enhanced with new "Bill Linkage" and "Bill Linkage Type" fields to show which resource was assigned to a particular freight bill on a trip and make this linkage logic makes this a more dynamic Trip building and resource-assignment tool.
| Option | Description |
|---|---|
Bill Linkage Type |
Displays the Resource Type this freight bill is assigned to:
|
Bill Linkage |
Displays the Resource ID this freight bill is assigned to:
|
When a freight bill is added to a trip, if there are no resources present the columns will remain NULL indicating the bill isn’t assigned to a resource at this time.
Once a resource is assigned, however, if the resource added is a valid linkage match then the bill will automatically be assigned to the resource. The following will be true:
-
If a bill is matched to a Power Unit, the Link Type will be P and the Bill Linkage will reflect the PUNIT_ID.
-
If a bill is matched to a Trailer, the Link Type will be T and the Bill Linkage will reflect the TRAILER_ID.
-
If a bill is matched to a Container, the Link Type will be O and the Bill Linkage will reflect the CONTAINER_ID.
-
If a bill is matched to a Chassis, the Link Type will be H and the Bill Linkage will reflect the TRAILER_ID.
If a resource is already assigned and bills are added to the trip, freight bills will automatically be associated with a resource. If more than one assignable resource is present on the trip, freight bills will "split" between the resources, trying to balance the loads as evenly as possible which is already part of the existing standard workflow.
Users can open the Linkage window anytime by double-clicking either of the two new columns. From here, you can adjust bills by dragging and dropping them as required.
-
If the trip is a LTL/one-stop move, double-clicking any bill will open the focus on the only leg of the Trip, and bills can be adjusted as required.
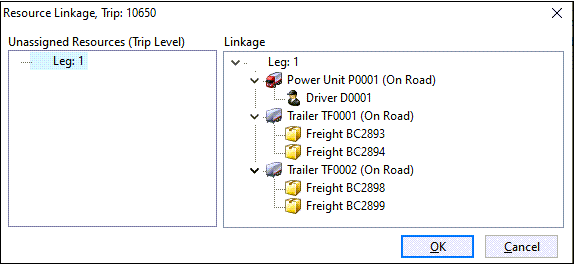
-
If the trip is a TL/multi-stop move, double-clicking a bill will open the window specifically at the point it was triggered. For example, if you double-clicked a bill on Leg 4, the view would open at Leg 4.
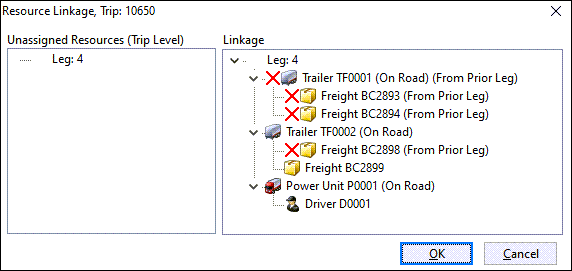
-
Making any changes would adjust the resource linkage for the entire trip from that point onwards.
-
-
When using the linkage window, if a user opens a leg in the future and there are resources/bills no longer present on the bill, these will not be accessible to interact with, but will still show for historical purposes.
Trip Operations window
The new Trip Operations window first released in TruckMate 2021.1 can be accessed from the following locations:
-
The right-click shortcut menu > Merge/Switch Resources (beta) option on ALL Trip Grids within the Multi Mode Dispatch application.
-
The right-click shortcut menu > Merge/Switch Resources (beta) option on the Trip Grid within the Dispatch application (nested under the Trip Operations sub-menu).
-
The right-click shortcut menu > Merge/Switch Resources (beta) option on the Yard tab within Multi Mode Dispatch application.
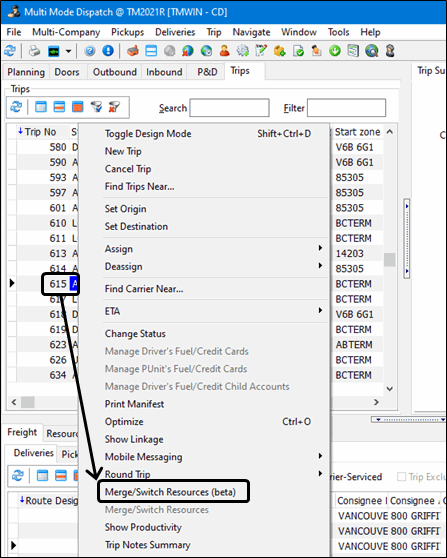
When this option is selected against a trip, the new Trip Operations window will open and any Trips that were selected prior to opening the window will automatically be pulled into the window:
New Functionality To Display Trip Operations Linkage (TM-156147)
As part of the new Trip Operations logic added to TruckMate in 2021.1, a further enhancement in 21.2 was added to help you determine which trips were associated together based on a single Trip Operations plan.
A new operational Op Plan ID column was added to all of the Trip grids in the Multi Mode Dispatch application (Planning, Doors, Outbound, Inbound, P&D, Trips) and the Trip grid in Dispatch. Once a Trip Operations action has been completed, all Trips in the plan (both existing and new trips) are stamped with this Op Plan ID to provide a simple way of viewing the linkage between the trips within one plan.
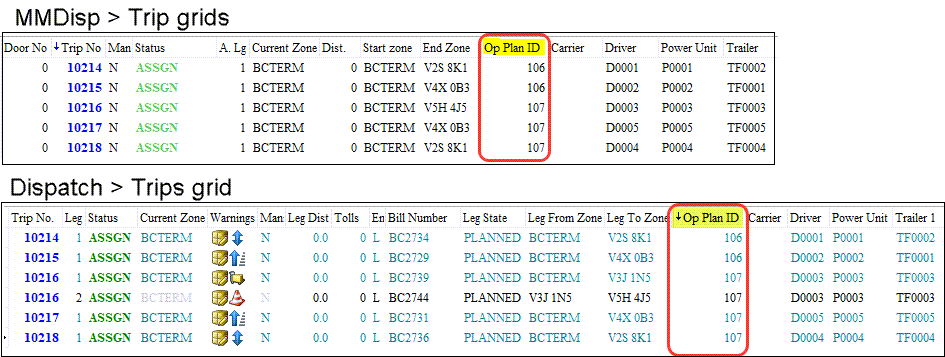
This can be enhanced with Quick Filter usage. You can create a Quick Filter based on the Op Plan ID column allowing you to enter the ID associated with a particular trip and quickly find all records matching that value.
-
If a single trip from the plan is deleted, all of the other trips originally in that plan will have their Plan ID reset to 0 because the entire plan is deleted if a single trip planned from it is cancelled.
-
If a trip is included in a second Operational Plan while still being part of another, the Plan ID will be overridden with the new plan. Any reference to the old plan will be lost (as expected).
-
The Plan ID will be stamped against every leg of a trip since the plan effectively covers the entire trip.
-
You cannot manually override the Plan ID value - this is a read-only column that can only be set automatically by the Trip Operations functions.
Seal numbers follow merged/split resources via the Trip Operations tool (TM-156148)
As part of the new Trip Operations logic added to TruckMate in 2021.1, Multi Mode Dispatch logic was updated to support moving Seal Information automatically between Trips.
When trips are split or merged using the Trip Operations tool, if the freight bills still contain Seal Numbers then these should be retained, as the loads inside the resources have not been affected by the split/merge process (except for one exception noted below).
When you do a Merge or a Split via the Operations Tool now, the Seal Number will follow the resource onto the new Trip.
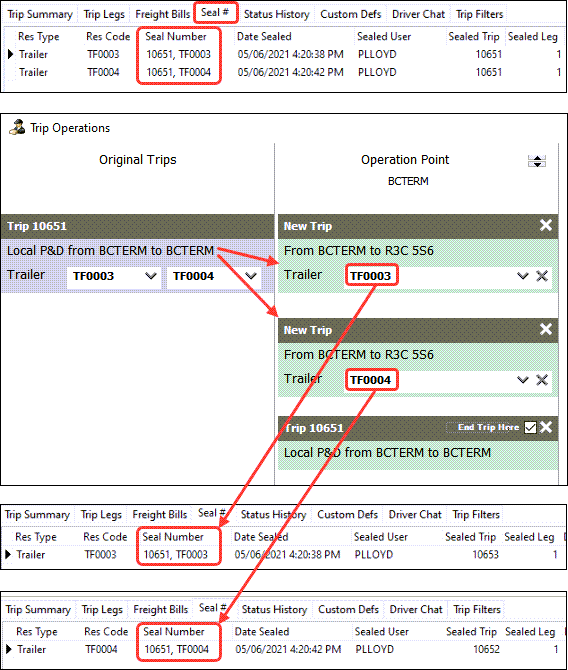
-
For a Merge (i.e., combine 2+ trips into one), all Seal Numbers associated with resources on the previous trips will be carried over automatically into the new trip. The SEALED_TRIP column is updated to reflect the new current trip, allowing it to appear on the Seal Numbers grid.
-
For a Split (i.e., split one trip into 2+ trips), all Seal Numbers associated with the resources on the original trips will follow these resources onto the new Trips. The SEALED_TRIP column is updated to reflect the new current trip, allowing it to appear on the Seal Numbers grid.
The one exception to this new rule occurs you adjust Freight Bills inside of the Trip Operations window. In this case, the Seal Number will automatically be marked as opened since it was previously sealed and has since been modified. As a result, when the Merge or Split occurs, the Seal Number is automatically marked as OPENED. In some cases, the Open Seal will be visible on the new trip(s), and in some cases it will not (an additional future improvement case is pending to adjust this logic). In either case, if the SEAL_NUMBERS table is consulted, it will indicate the Seal Number has been opened and is no longer valid. You will need to re-add a Seal Number after this process, if applicable.
Future versions of TruckMate will contain additional enhancements for working with Seals.
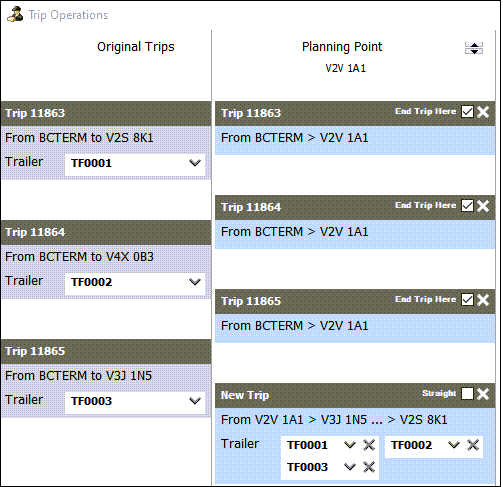
Improve Planning Point movements via Trip Operations window (TM-156163)
As part of the new Trip Operations and long combination vehicles (LCV) logic in the Dispatch and Multi Mode Dispatch programs, new code was added to improve the 'Planning Point' process dealing with certain moves.
Within the Trip Operations window, there are two types of moves that can be processed.
Operation Point
-
These moves occur "immediately", meaning all bills and resources on the trip(s) provided inside the Trip Operations tool will update immediately, as if it was happening this second.
Planning Point
-
These moves occur "in the future". This means that original trip(s) still need to be advanced to a certain location before the specified LCV actions can occur.
The Operation Point scenarios are already being handled in the Trip Operations window since the action happens immediately and the trips are updated immediately. The Planning Point scenario required addtional refinements to the status workflow since the trips required a creation state that could "begin" once previous trips and resources arrived from earlier planned trips.
Now when Original Trips arrive at a specified Planning Point, a SPOTTED status is assigned to the trip if the DISPATCH.EXE > Set Trip To Tomplete When Spotting at Destination application configuration is set to True.
This example uses a status labelled as LCV-MERGE for the Spotting code behaviour.
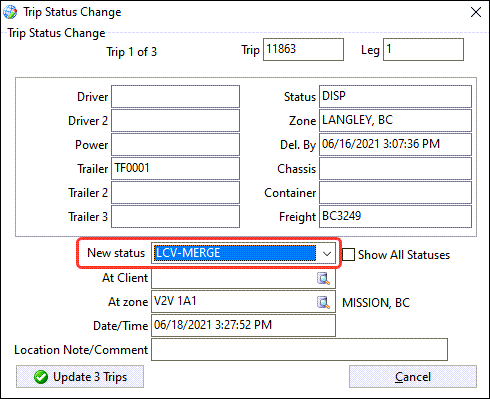
When this occurs, the following changes will take place:
-
The trip will complete at the specified Trip Destination zone, removing it off of the Trip board.
-
The Freight Bill will initially have a 'DOCKED' status applied against it, and this will be immediately updated to an 'ASSGN' status in preparation for the new trip.
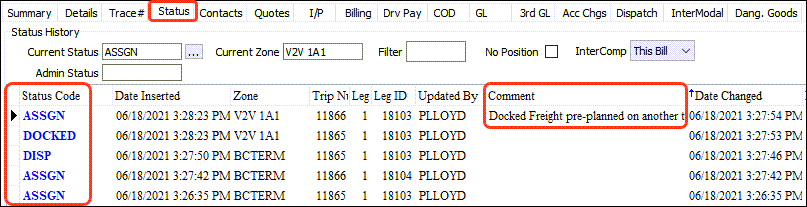
-
The LTL Plan of the Freight Bill will be updated. An "attempted" record will be added into the Term Plan, with the expected Pickup/Delivery record remaining with the new Trip the bill was assigned too.

-
The ITRIPTLO records of both the original and new Trip aligned as expected.
Once all Freight Bill(s)/Trip(s) within the plan have arrived at the planning point, and spotted statuses have been applied against all of them, the new Planned Trips may continue as expected with no issue.
LCV Trip Notes Summary enhancement (TM-156970)
As part of the new Trip Operations and long combination vehicles (LCV) logic in the Dispatch and Multi Mode Dispatch programs, improvements were made to the Trip Notes for these trips.
Previously, in both Dispatch and Multi Mode Dispatch, the Trip Notes Summary window would only show notes for a single trip. Even if multiple trips were selected, only one set of notes were displayed at a time.
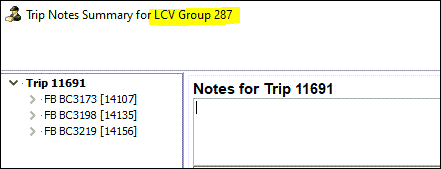
If a trip is part of an LCV plan when the Trip Notes Summary window is opened for this trip, ALL active and in progress trips in this same plan are now displayed at the same time. Completed and cancelled trips are not displayed.
This new logic allows you to view the notes of all Trips in the plan to determine if the information is relevant for future planning of bills and/or the Trips.
In addition, a custom hook (CUSTOM_LCV_LINK_TRIPS) was added. By default, this new custom hook will be an empty stub, meaning that no notes will be copied between trips when an LCV plan is made. However, you may request custom code around this logic so that notes will be copied in certain circumstances when a plan is made.
Option added to set new trips as 'Straight To End Zone' (TM-156984)
New logic was added to the Trip Operations window to handle situations where the End Zones on the Trip board may not reflect the actual location where Dispatchers want the trips to go.
A Straight checkbox was added to a Trip panel in the Trip Operations window when a particular movement contains more than one 'non-planned' stop as a result of a Split or a Merge. There may be occasions where the End Zones on the Trip board may not reflect the actual location where Dispatchers want this new trip to go. Adding a 'Straight' option against a panel is intended to remedy this.
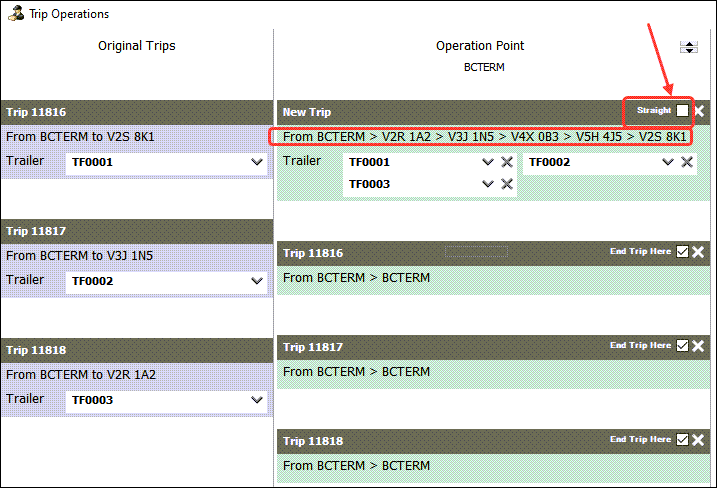
When the Straight checkbox is selected, all non-planned stops generated as a result of new bills being added to the trip are removed and only the Start and End Zones for the trip remain.
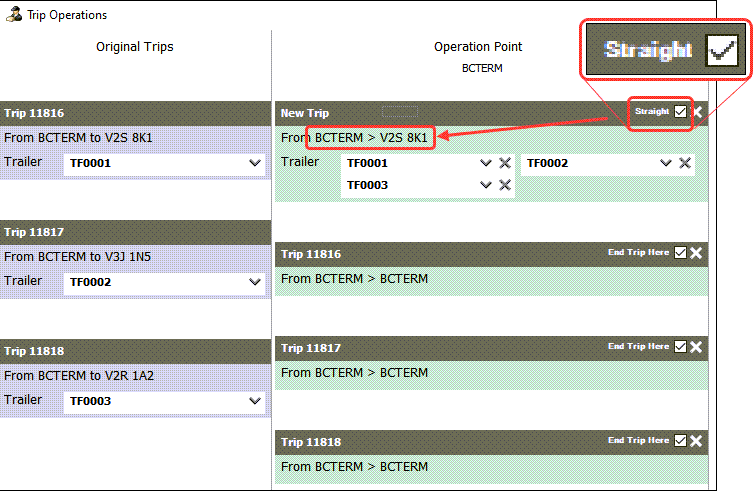
There are some notable exceptions to this rule:
-
If additional legs were already physically planned onto a trip (which could be the case from Merge on 'X' Trip and Split on 'X' Trip options), these will be retained even when Straight is selected. This is because, as noted above, the purpose of the Straight checkbox option is to remove non-planned stops due to new bills being added - it will not remove already preplanned waypoints/pickups/deliveries on the trip.
-
If a user is including a 'Planning Point' move in their Trip Operations plan, in some cases this may result in the point itself being included in the Trip Plan. When the Straight checkbox is selected, this zone will not be removed since removing this zone would cause teh pre-planned movement to fail.
Once these plans are 'Executed' with the Straight checkbox selected, the trips themselves will reflect what was designed inside of the Trip Operations window.
Displaying subsequent stops in Trip Operations window (TM-156985)
New logic was added to the Trip Operations window to handle situations where a new Trip is created containing multiple stops as a result of the split or merge action. These stops will now be displayed inside of the Trip Oerations window to let you know which stops will end up being created as a result of their process before proceeding with the split or merge.
If there are more stops to be displayed than what the column width inside of the the Trip Operations window can hold, an ellipses will be displayed to show to the user that more stops are present, they just cannot be displayed without truncation occurring in the column itself.

Once you 'Execute' the Trip Operations plan, a trip with all subsequent displayed stops will be created.
This functionality works with all mode sets inside of the window, and will work with both Operational Point and Planning Point actions.
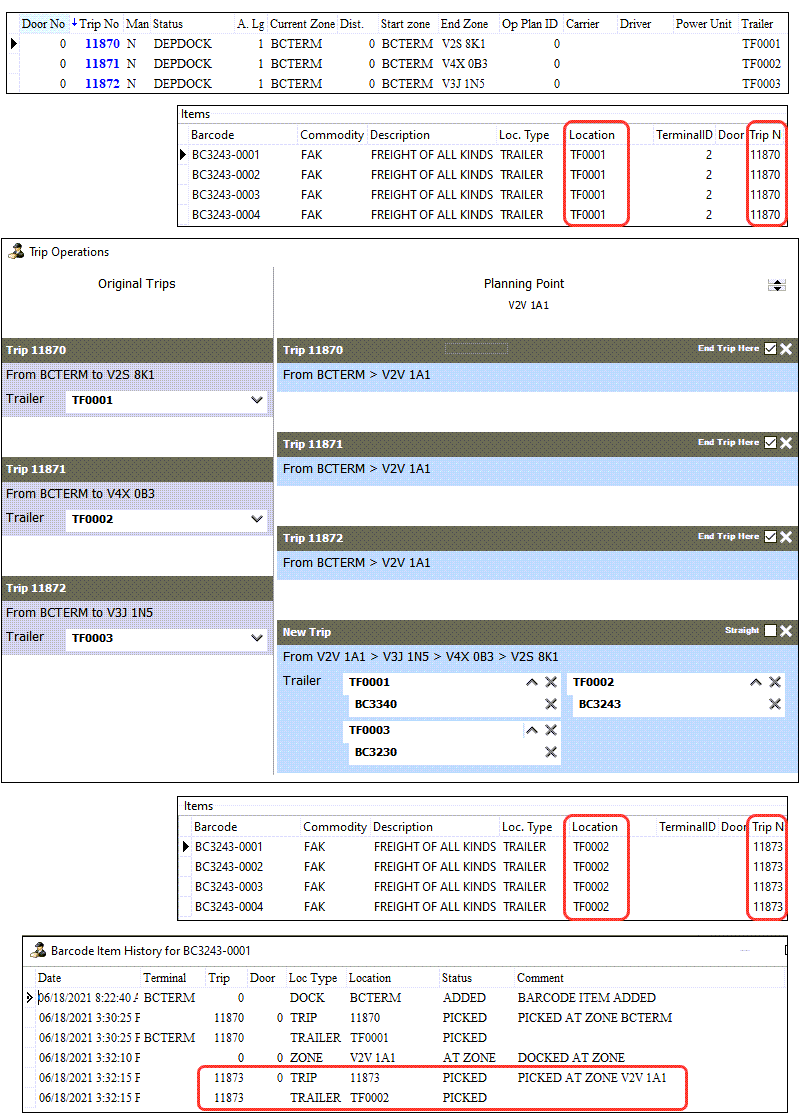
Ensuring items follow resources when LCV trip advances (TM-157295)
As part of the ongoing Development around the new Trip Operations window and LCV functionality in Dispatch and Multi Mode Dispatch, new code was added to ensure that Items would correctly follow the resources they were loaded to during a Merge or Switch process.
Previously, during Merge and Split activities, items were not correctly loading back onto the appropriate trips once the Merge or Split action had occurred. This was especially noticeable on Planning Point moves, where items would potentially be moved to an entirely new trip but were not "re-loaded" back into the Trailer on the new Trip.
With the revisions, items will reliably follow the resource to which they were assigned after a Split or Merge has occurred. This includes situations where a bill remained on the same resource after the split/merge, and even scenarios where they didn’t.
This covers the following scenarios:
-
Merge on New Trip
-
Operation Point, No movement of bills
-
Operation Point, movement of bills
-
Planning Point, No movement of bills
-
Planning Point, movement of bills
-
-
Merge on X Trip
-
Operation Point, No movement of bills
-
Operation Point, movement of bills
-
Planning Point, No movement of bills
-
-
Split on New Trip
-
Operation Point, No movement of bills
-
Operation Point, movement of bills
-
Planning Point, No movement of bills
-
Planning Point, movement of bills
-
-
Split on X Trip
-
Operation Point, No movement of bills
-
Operation Point, movement of bills
-
Planning Point, No movement of bills
-
-
Merge & Split
-
Operation Point, No movement of bills
-
Operation Point, movement of bills
-
Planning Point, No movement of bills
-
Planning Point, movement of bills
-
In this example, three trips (associated with trailers TF0001, 2 and 3 are merged into a new trip 11873 using trailer TF0002 and the barcode items previously on trailer TF0001 are moved to trailer TF0002 for trip 11873.
ConnectedDock
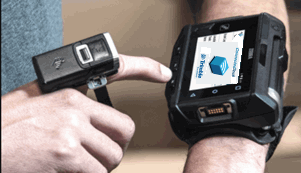
Certification of Zebra WT63B0 (and RS5100 Scanner) (TM-156677)
The Zebra WT63B0 was certified for use with ConnectedDock. This device is designed to be worn around your wrist so it does not contain a built-in camera or scanner so it should be used alongside the Zebra RS5100 finger scanner, which was also certified as part of this project.
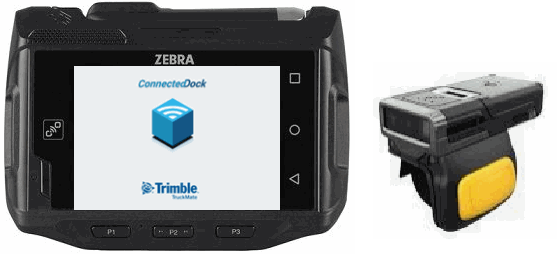
The RS5100 finger scanner connects to the WT63B0 via bluetooth, and together can be used to scan in all areas of the ConnectedDock application.
This device uses the symbolRelease of ConnectedDock. Because no modifications were required as a result of this certification, while officially certified against TruckMate 2021.2, this suggests it can be used back to the last major modification of the symbolRelease (TruckMate 2020.1+).
This is also the first ConnectedDock device certified against Android 10.x.