Payroll Processing

The Payroll Processing program is used to review entries made in the Payroll Time Sheets program, to print payroll reports, and to generate payroll Checks. The source of the payroll entries is the Payroll Time Sheets program. After you create the checks, they can be viewed and printed in the Check Printing program and Instant Checks program.
| The Payroll Register program does not create general ledger postings. These are created when the A/P Check Register program updates the payroll checks. |
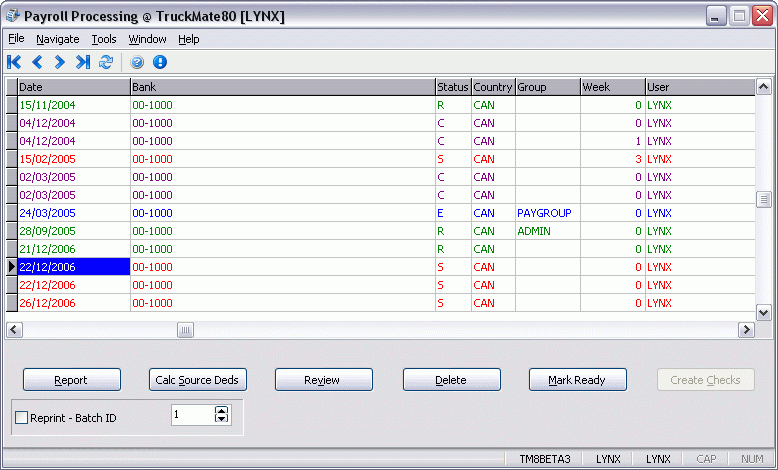
Each batch that has been created in the Payroll Time Sheets program will display in the grid. The batch will continue to display until the checks are posted by the A/P Check Register program. The colour of the batch indicates its status. Batches coloured in blue text have not yet had checks generated (using the Create Checks button). Batches coloured in red text have had checks generated, but those checks have not yet been approved (using the Mark Ready button). Batches coloured in green text have had checks generated, and the checks have been approved. These checks are ready for printing (in the Check Printing program or Instant Checks program).
The Payroll Processing program uses the Symmetry Tax Engine (STE) instead of previously used Tax Table Libraries. Primary changes are:
-
Increase in precision: STE handles numbers with 15 digits (WORD replaced by DOUBLE data type).
-
Retro calculations: tax tables are loaded based upon a calculation date > only payroll calculation date, STE then loads the correct tax table to calculate tax.
The STE Engine is automatically installed and configured when you first install TruckMate.
To access Payroll Processing:
| From this location | Go to |
|---|---|
TruckMate Menu and TruckMate Task List |
Accounting & Finance > Payroll > Payroll Processing |
Windows Start Menu |
TruckMate 20xx > Payroll Processing |
Windows Explorer |
C:\Program Files (x86) > TruckMate 20xx > PRRegister.exe |
How Do I?
How do I Review entries made in the Payroll Timesheets program in the Payroll Register?
-
Open the Payroll Register program (PRREGISTER.EXE), click: Start > Programs > TruckMate > Accounting & Finance > Payroll > Payroll Register.
-
Select the 'Report' button.
-
In the Report Selection box select 'PAYROLL.RPT'. This will print out a listing of the Timesheet entries.
How do I Create Payroll Checks using the Payroll Processing Register?
-
After your Payroll Timesheet entry information is complete, open the Payroll Register program (PRREGISTER.EXE), click: Start > Programs > TruckMate > Accounting & Finance > Payroll > Payroll Register.
-
Select the Detail Line for the 'Batch ID' you want to create checks for.
-
Select the 'Report' button and review the report ('PAYROLL.RPT') for accuracy (if desired).
-
If the Report information shown is accurate, proceed to the next step, which is to click the 'Create Checks' button.
-
The Detail Line will then turn from the color blue to red.
-
Click the 'Review Checks' button. If, after reviewing, the Check Report looks acceptable, select the 'Mark Ready' button and checks will be created. The detail line will turn from red to green.
-
Go to the Check Printing program or Direct Deposit program to continue processing the payments. If the payment showing is not correct, select the 'Delete Checks' button. Make your changes in the Timesheets program and repeat the process, as needed.
How do I Print Payroll Reports using the Payroll Register program?
-
Open the Payroll Register program (PRREGISTER.EXE), click: Start > Programs > TruckMate > Accounting & Finance > Payroll > Payroll Register.
-
Select the 'Report' button.
-
In the report selection box select 'PAYROLL.RPT'. This will print out a listing of the Timesheet entries.
How do I update my STE setup?
You must perform these steps if you are working with US payroll using any of these TruckMate versions:
-
2021.1, 2021.2, 2021.3, 2021.4
-
2022.2, 2022.3
A patch release is available for these versions. For more information, contact Trimble Support.
Change Windows Path environment variable
-
In your Windows environment, go to Start > Run or press
 +R.
+R. -
In the field that appears, type
sysdm.cpl. -
Click OK or press ENTER.
The System Properties window opens.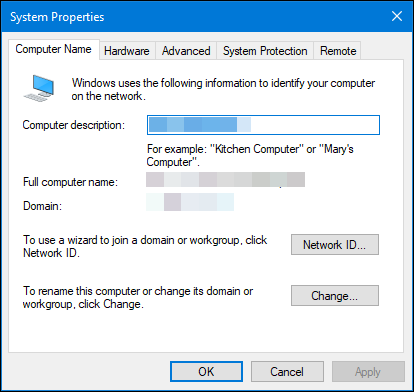
-
On the Advanced tab, click Environment Variables.
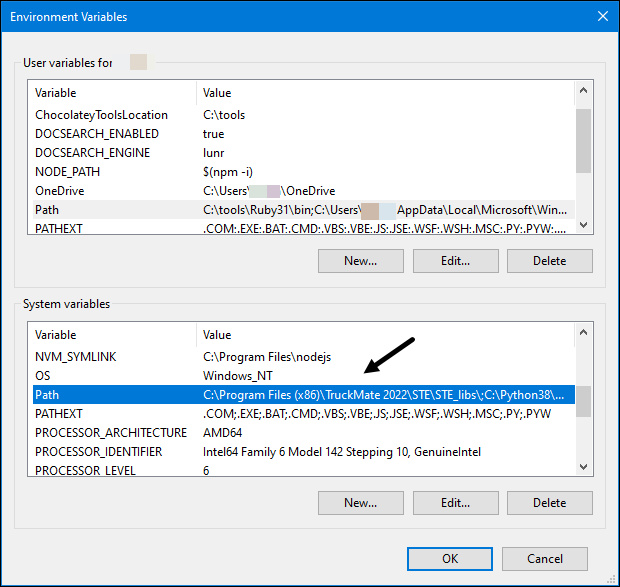
The Environment Variables window opens. -
In the System Variables section, select Path.
-
Click Edit.
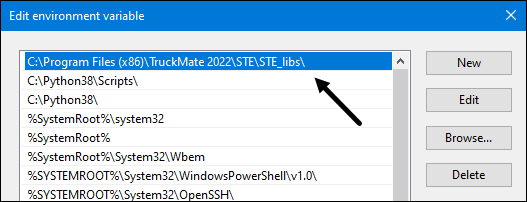
The Edit environment variable window opens. -
Edit all instances of
C:\Program Files (x86)\TruckMate 20xx\STE\STE_libs
as shown:-
Select the instance.
-
Click Edit.
-
Change the value to
C:\Program Files (x86)\TruckMate 20xx\STE\ste-shared-libraries\
where20xxis your TruckMate version number.
-
-
Click OK to close the Edit environment variable window.
-
Click OK to close the Environment Variables window.
-
Click OK to close the System Properties window.
Menu Bar / Toolbar

Multi-Company
For more information on the Multi-Company options available from the Menu Bar, see the Multi-Company documentation.
Navigate Menu
The Navigate Menu contains the standard TruckMate Navigation Bar used to browse the records in your database, as well as the following options:
Refresh
 Refreshes the Payroll Register program’s records grid for any new/updated information.
Tools Menu
TruckMate Monitor
 Click the down arrow next to this button to access the various functions of the TruckMate Monitor.
Remember Position / Size
Selecting this option will remember the window position and size upon close. When you reopen the program, the window will appear the same.
Status Color Legend
Selecting this option will open the Status Color Legend window.
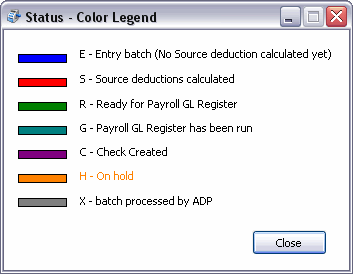
Selecting the 'Status Color Legend' option simply brings up a window detailing the statuses that the various text colors in the Payroll Processing program refer to.
Once you are ready to return to the Payroll Processing program, click the 'Close' button.
Window Menu
Payroll Time Sheets
![]() Select this option to open an instance of the Payroll Time Sheets program.
Select this option to open an instance of the Payroll Time Sheets program.
Payroll GL Register
 Select this option to open an instance of the Payroll GL Register program.
Check Printing
![]() Select this option to open an instance of the Check Printing program.
Select this option to open an instance of the Check Printing program.
Direct Deposit
![]() Select this option to open an instance of the Payroll Direct Deposit program.
Select this option to open an instance of the Payroll Direct Deposit program.
Help Menu
TruckMate Help
 Selecting this button will open the Payroll Processing topic in the TruckMate Online Help file (the page you are currently viewing).
About
 Selecting this button will open the standard TruckMate About window, which contains important information about the application you are currently using, including its version number (important for support calls).
Service Portal
 Selecting this button will open an instance of your default Internet browsing software, with the https://www.tmwcare.com login page displayed.
Payroll Processing Grid
Batch ID
Displays the number assigned to the payroll batch in the Payroll Time Sheets program.
Description
Displays the description entered for the payroll batch in the Payroll Time Sheets program.
Date
Displays the date assigned to the payroll batch in the Payroll Time Sheets program.
| If the date of the Payroll Batch is one or more years later than the current tax table the system will issue a Warning whin the user selects the 'Calculate Source Deds' button. |
Bank
Displays the general ledger bank account assigned to the payroll batch in the Payroll Time Sheets program.
Status
There are seven possible Status Codes.
-
R - (Ready to Print, indicated by green text)
-
C - (Checks generated but not approved, indicated by red text)
-
E - (Entry mode, no checks generated, indicated by blue text). Use the Create Checks button to generate check entries and change the batch status from 'E' to 'C'. Use the Mark Ready button to approve checks and change the batch status from 'C' to 'R'.
-
S - (Source deductions calculated)
-
G - (Payroll GL Register program has been run)
-
H - (On hold). The Batch has been exported to a file using the Payroll Export to ADP program, but has never been Posted (i.e. the Driver Pay and Driver Deductions records were not locked)
-
X - (Exported). The Batch has been exported and sent to ADP for processing.
Country
Displays the country of the payroll batch, as configured in the Payroll Time Sheets program.
Group
Displays the group assigned to the payroll batch in the Payroll Time Sheets program.
Week
displays the deduction week assigned to the payroll batch in the Payroll Time Sheets program.
User
Displays the user name of the user who created the batch in the Payroll Time Sheets program. User names are configured in the Security Setup program.
Payroll Control Account
Displays the Payroll Control Account number of the selected payroll batch.
Check Date
Displays the date that will be added to the checks upon creation.
Void
Displays either 'True' or 'False', depending on the 'Void' status of the checks.
Context Menu
Reprint Checks
This option allows you to Reprint checks by right clicking on a batch and selecting Reprint Checks. Selecting this option will set 'TX_SELECTED' and 'TX_TO_BE_PRINTED' to 'TRUE' for all CHECK_IDs in selected batch. This menu is accessible only if :
-
User is a member of supervisor group in the Security Setup program.
-
Selected batch has STATUS = C, and
-
TX_POSTED = TX_SELECTED = TX_TO_BE_PRINTED = FALSE in CHECK_MSTR.
Processing Buttons
Report
Will display the Report Selection form. The Crystal Report template supplied with the TruckMate system is called 'PAYROLL.RPT'. The report will preview to the screen. Click the printer icon at the top of the screen to send the report to the printer that is configured as the default printer for your workstation.
See the Crystal Reports Reference for more information on report functions.
Calculate Source Deds
Click on the 'Calc Source Deductions' button to generate source deductions records for each employee from the Time Sheet program’s data records. Once complete, the program will display a window showing that the Source Deductions have been calculated. Once completed for a specific payroll batch, this button becomes unavailable.
|
After calculating source deductions the system checks the amounts in the payroll batch, if any negative values are found an error message will be generated. If the date of the Payroll Batch is one or more years later than the current tax table the system will issue a Warning. |
Review
Will display the Report Selection form. The Crystal Report templates supplied with the TruckMate system are called PAYCHECK.RPT and PPP.RPT. The PAYCHECK.RPT shows a summary of the pay and deduction entries included on the check. The PPP.RPT produces a detailed payroll report that includes year to date pay and deduction amounts. The selected report will preview to the screen. Click the printer icon at the top of the screen to send the report to the printer that is configured as the default printer for your workstation.
See the Crystal Reports Reference for more information on report functions.
Delete
Will delete the payroll check entries. They will no longer display in the Check Printing program or Instant Checks program. After deleting checks, you can make changes to the batch in the Payroll Time Sheets program, then re-generate the checks as described above.
Mark Ready
Will change the status of the check entry from 'held' to 'approved' (in the Check Printing program). The check entries will display in green text, rather than red text (both in the Payroll Processing program and the Check Maintenance program). After you have marked the checks as ready, you can print the checks using the Check Maintenance or Instant Checks program.
| You will no longer be allowed to edit your pay records after this step. This is the point of no return in the payroll process. |
Create Checks
Will display the Report Selection form. The Crystal Report template supplied with the TruckMate system is called PAYROLL.RPT. The report will preview to the screen. Click the printer icon at the top of the screen to send the report to the printer that is configured as the default printer for your workstation.
See the Crystal Reports Reference for more information on report functions.
After the Payroll Report is run, check entries will be generated. These can be viewed using the Check Maintenance program, or the Instant Checks program. When the payroll checks are created, the 'Vendor_ID' field will be populated in the CHECK_MSTR_PAYROLL Table if a Vendor ID was defined.
| In the Check Printing program, these checks will have the status of 'held'; that is, they will display in red text. To approve the checks for printing, click the Mark Ready button. |
Reprint - Batch ID
To reprint reports for a previous batch, check the 'Reprint - Batch ID' box and enter the batch number in the Audit Number field. Then click either the Report button or the Review button. See above for a description of these functions.
Negative Checks
From time to time an employee may not have earned enough pay to offset her deductions and a negative check is generated. Previously the only options available were:
-
to move the payroll batch back to time sheets and remove the employee from the batch, or
-
move the payroll batch back to time sheets and enter an advance against the employee to bring their net pay to 0, which would allow the batch to be processed.
You can now enable an Application Configurator option to have this 2nd procedure automated in the Payroll Processing program. If this option is not enabled, you will see an error message appear in the Payroll Processing program after you click on the 'Mark Ready' button. You must then use one of the methods described above to deal with the negative check.
If the Application Configurator 'Auto Create Advance' option is set to 'True', you will see a confirmation window appear in Payroll processing after you click on the 'Calc Source Deds' button. If you want to create advances to balance your negative checks, click the 'OK' button.
When you click on the 'OK' button another window will appear, this time displaying the details of the advance check. The Employee’s 'Code' and 'Name' will be displayed, as well as their negative check amount and the 'Advance' amount that will counteract the negative total.
Click on the 'OK' button once again after you have reviewed and/or edited the advance amounts. You will be prompted for confirmation.
After you click on 'OK', you will return to the Payroll Processing program where you can then choose to review, delete, or mark the batch as ready.