Contract Billing

The purpose of the Contract Billing program is two-fold:
-
To allow you to charge hourly for your trucking services. Say, for example, you’re a trucking company and a local furniture company hires you now and again to deliver furniture. This way, you can set up bills for each delivery, and the program will calculate hourly charges as well as any overtime charges that may occur.
-
To allow users to enter Contract Billing information and create Consolidated Freight Bills. You enter the contract billing information by freight bill, and then create consolidated bills. You’ll notice new fields in the Customer Service program > Dispatch Tab, where you can enter an equipment rating class.
Before opening the Contract Billing program, you need to set up a rate sheet in the Rates Maintenance program > Rate Sheet Tab. Ensure you select the 'Contract' button in the sheet-type options.
To access Contract Billing:
| From this location | Go to |
|---|---|
TruckMate Menu and TruckMate Task List |
Billing > Contract Billing |
Windows Start Menu |
TruckMate 20xx > Contract Billing |
Windows Explorer |
C:\Program Files (x86) > TruckMate 20xx > ConBill.exe |
How Do I?
How do I Create a Contract Bill?
-
Open the Contract Billing program (CONBILL.EXE).
-
Go to the 'Entry Tab' and fill in the Client ID (use the search button for choices), and Service Level (again, use the search button for choices). Select the 'Find Freight Bills' button and the grid on your right-hand side will display with the appropriate Freight Bills.
-
Optional Step: Once you select or highlight one of the Bills in the grid, the 'View Freight Bill' button will bring you to the selected Freight Bill in the Customer Service program.
-
Enter your starting and ending date and time. The program will automatically pre-populate with today’s date. Double-click in the date field to bring up a calendar. You can enter a time in the 24-hour clock as well. Or, in the field just to the right of where the date field pre-populates with today’s date, you can enter your start/end time. Use a 24-hour clock. For example, for 8:00 am, enter '0800'.
-
Enter any down time for say, lunch, or other occurrences. Decide if these down times are to be AR Deductions or Driver Deductions, or neither. The AR Totals, and Driver Totals will calculate once you save ('checkmark' button on the TruckMate Navigational Bar) this record.
-
Enter any travel AR or Driver times.
-
Enter your starting and ending Odometer readings. To calculate Odometer totals automatically, set up your 'CONBILL.EXE' Application Configuration option 'Add Odometer to R&M' to 'True'.
-
Enter your Reefer starting and ending Odometer readings, if applicable. If you have set the previous Application Configuration option, then these Odometer readings will calculate automatically as well.
-
Approve this Bill in the far right-hand bottom corner of the screen for either AR, Driver, or both.
-
Remember to save this record ('checkmark' button on the TruckMate Navigational Bar).
-
Move to the 'Consolidation' tab and ensure your date range, Client ID, and Service Levels are set up correctly. Select 'Get Contract Bills'. The selected Bill(s) will appear in the grid.
-
Go to the 'Create Bills' section at the bottom of the screen. Set you Bill Status, Side ID, Child Status, and any Stat Holidays, if applicable. Select 'Create Bills'. A new Bill (with a new Freight Bill number) will be created in the Customer Service program.
-
Go to the 'Find Consolidated Bill' tab and select your Client ID. Select the 'Get Consolidated Bills'. Your consolidated Bills will appear in the grid.
Menu Bar / Toolbar
File Menu
Print Reports
 Selecting the Print Reports button will bring up the report selection window, common to many TruckMate applications. Here, you will select a report file from those available in your system and a Crystal Report will be generated.
For more information on Report functionality in TruckMate, see the Crystal Reports Reference.
Exit
 Closes the Contract Billing program.
Multi-Company
For more information on the Multi-Company options available from the Menu Bar, see the Multi-Company documentation.
Navigate Menu
Find Freight Bill
Once you’ve entered a valid Client ID, and Service Level, selecting this button will attempt to locate any matching freight bills and, if successful, will populate the grid with details of those freight bills.
This button is also available from within the Entry Tab.
Tools Menu
TruckMate Monitor
 Click the down arrow next to this button to access the various functions of the new TruckMate Monitor.
Remember Position / Size
Selecting this option will maintain the program window position and size upon close. When the program is re-opened, it will appear the same.
Help Menu
TruckMate Help
 Selecting this button will open the Contract Billing topic in the TruckMate Online Help file (the page you are currently viewing).
Service Portal
 Selecting this button will open an instance of your default Internet browsing software, with the https://www.tmwcare.com login page displayed.
About
 Selecting this button will open the standard TruckMate About window, which contains important information about the application you are currently using, including its version number (important for support calls).
Edit Menu
Setup
![]() Selecting this option will open the Setup window, which allows you to define the Accessorial Charge Codes used throughout the Contract Billing program.
Selecting this option will open the Setup window, which allows you to define the Accessorial Charge Codes used throughout the Contract Billing program.
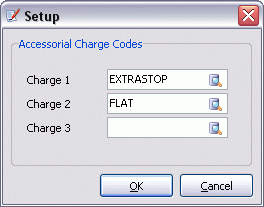
Use the edit pick icons to choose the Accessorial Charge Codes you would like to use throughout the Contract Billing program.
Accessorial Charge Codes are defined in the Codes Maintenance program.
View Freight Bill
![]() Opens an instance of the Customer Service program with the currently selected Freight Bill’s details displayed. This option is also available as a button on the Entry Tab and as a Context Menu option on the Entry Tab Grid.
Opens an instance of the Customer Service program with the currently selected Freight Bill’s details displayed. This option is also available as a button on the Entry Tab and as a Context Menu option on the Entry Tab Grid.
Get Contract Bills
![]() Selecting this button will pre-populate the Create Invoice Tab > Contract Bills Grid with contract bills. Ensure you’ve selected appropriate starting/ending date ranges, Client ID, and Service Level.
Selecting this button will pre-populate the Create Invoice Tab > Contract Bills Grid with contract bills. Ensure you’ve selected appropriate starting/ending date ranges, Client ID, and Service Level.
Create Bills
![]() Selecting this option will create Freight Bills based on the data entered into this program.
Selecting this option will create Freight Bills based on the data entered into this program.
This option is also available as a button on the Create Invoice Tab
Get Invoice Bills
![]() Selecting this button will cause all consolidated bills to appear in the Find Invoice Tab Grid.
Selecting this button will cause all consolidated bills to appear in the Find Invoice Tab Grid.
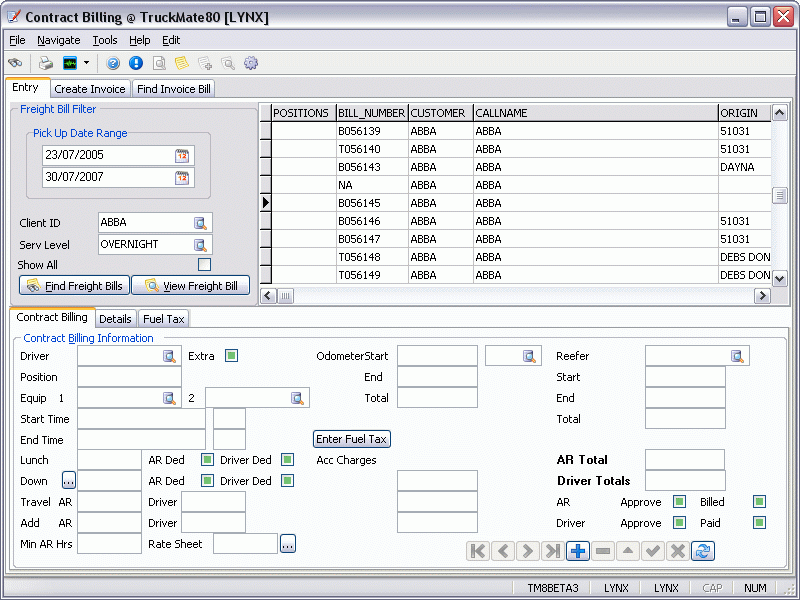
Entry Tab
Freight Bill Filter
Pick Up Date Range
Use the pull-down arrow to select the appropriate date.
Client ID
Use the search button to bring up the 'Select Bill-To Code' dialog box where you can search by Client ID or Name.
Service Level
Use the search button to bring up available service levels.
Show All
Select 'Show All' to bring up all freight bills associated with this client.
Find Freight Bills
Select the 'Find Freight Bills' button to bring up all bills associated with this client.
View Freight Bills
Once you highlight a freight bill in the grid, then select the 'View Freight Bills' button to go to the Customer Service program and view information for a specific freight bill.
Contract Billing Tab
The options on the Contract Billing Tab allow you to specify the Driver involved (and the length of the contract) as well as many other options, including the setup of various Accounts Receivable options.
Driver
Can be used to specify a driver for the bill. The search button button will generate a list of drivers based on your Driver Profiles program information.
Position
Can be used to keep billing batches separate. This information is entered in the Customer Service program, Dispatch Tab. It is editable in the Contract Billing program.
Equipment 1 / Equipment 2
Use the search button to bring up the 'Select Equipment Class' dialog box where you can search by Code or Description. This information is entered in the Customer Service program, Dispatch Tab. It is editable in the Contract Billing program.
Start Time
The program will automatically pre-populate with today’s date. Double-click in the date field to bring up a calendar. You can enter a time in the 24-hour clock as well. Or, in the field just to the right of where the date field pre-populates with today’s date, you can enter your start time. Use a 24-hour clock. For example, for 8:00 am, enter 0800.
End Time
The program will automatically pre-populate with today’s date. Double-click in the date field to bring up a calendar. You can enter a time in the 24-hour clock as well. Or, in the field just to the right of where the date field pre-populates with today’s date, you can enter your end time. Use a 24-hour clock. For example, for 4:00 pm, enter 1600.
Lunch
Enter the time spent away from work having lunch. For half an hour, enter '.5'.
A/R Ded
Select this checkbox if you’d like this entry to be processed as an A/R Deduction.
Driver Ded
Select this checkbox if you’d like this entry to be processed as a Driver Deduction.
Down
Enter the time spent away from work, called 'Down Time'. For half an hour, enter '.5'.
A/R Ded
Select this checkbox if you’d like this entry to be processed as an A/R Deduction.
Driver Ded
Select this checkbox if you’d like this entry to be processed as a Driver Deduction.
Travel A/R
Enter the time spent away from work for A/R travel purposes. For half an hour, enter '.5'.
Travel Driver
Enter the time spent away from work for Driver travel purposes. For half an hour, enter '.5'.
Add A/R
If applicable, enter a second A/R account for the Contract to be applied to.
Add Driver
If applicable, enter another Driver to the Contract.
Min. A/R Hrs.
Enter the minimum amount of hours applicable to this Contract.
Rate Sheet
Manually enter a rate sheet for use with the contract bill, or use the search button button to select one from the Rates Maintenance program.
Odometer Start / End / Total
Use the search button to select a unit of measurement (km/miles). Enter your starting and ending Odometer readings. if you’ve set your Application Configurator option 'Add Odometer to R&M' to 'True', then the total odometer miles will be calculated automatically.
Enter Fuel Tax Button
Clicking this button allows the addition of a Fuel Tax to the current Contract.
Reefer Start / End / Totals
Use the search button to view choices for your Reefer entry. Enter your starting and ending Reefer readings. The program will subtract the starting value from the ending value to display a total value.
A/R Totals
Once you’ve entered the starting and ending time, and any deductions, press the 'checkmark ' (Save) button and the program will automatically calculate your A/R Totals, and Driver Totals.
Driver Totals
Once you’ve entered the starting and ending time, and any deductions, press the 'checkmark' (Save) button and the program will automatically calculate your A/R Totals, and Driver Totals.
A/R Approve
Select this checkbox if you wish to approve this entry and move forward in the process.
A/R Billed
Select this checkbox if this entry has been billed.
Driver Approve
Select this checkbox if you wish to approve this entry and move forward in the process.
Driver Paid
Select this checkbox if this bill has been paid.
Details Tab
Clicking the Details tab will reveal the Freight Bill details of the selected Freight Bill.
Fuel Tax Tab
Clicking the Fuel Tax Tab will reveal several options for adding a Fuel Tax to the current Contract.
Power Unit
Click the search button to choose a Power Unit from those available in the Power Unit Profiles program.
Jurisdiction
Enter an area code or click the search button to select one from your Codes Maintenance program.
Start Zone / End Zone
Use these fields to enter your Start Zone and End Zone for the Fuel Tax calculation. The search button will generate a list based on the Zones outlined in the Codes Maintenance program.
Trailer / Trailer 2
Use these fields to choose one (or more) trailers for the trip, for use in calculating the Fuel Tax. The search button will generate a list based on the Trailer Profiles program.
Enter Fuel Tax Button
Clicking this button allows the addition of a Fuel Tax to the current Contract.
Down Time
Start Time / End Time
Enter the Start Time and End Time for the current freight bill.
Down
Enter the time spent away from work, called 'Down Time'. For half an hour, enter '.5'.
A/R Ded
Select this checkbox if you’d like this entry to be processed as an A/R Deduction.
Driver Ded
Select this checkbox if you’d like this entry to be processed as a Driver Deduction.
Create Invoice Tab
The Create Invoice Tab is used to turn the Contracts you setup on the Entry Tab into Freight Bills that can be processed through the Accounting Modules of TruckMate.
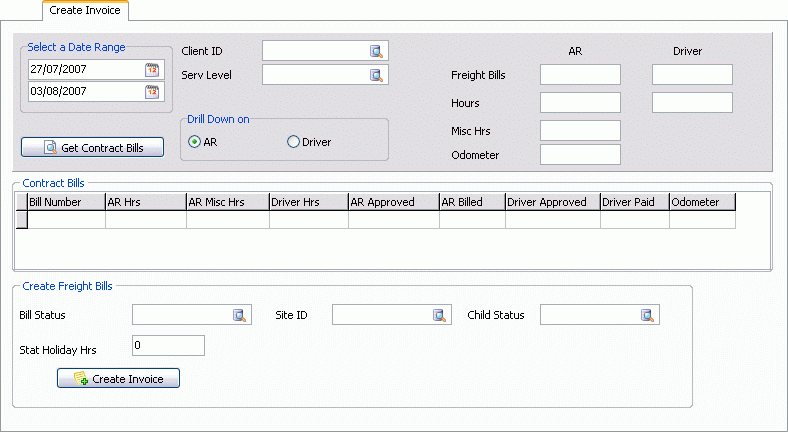
Select a Date Range
Use the pull-down arrow to select the appropriate starting and ending dates.
Get Contract Bills
Ensure you’ve selected appropriate starting/ending date ranges, Client ID, and Service Level. Selecting this button will pre-populate the grid with contract bills.
Client ID
Use the search button to bring up the 'Select Bill-To Code' dialog box where you can search by Client ID or Name.
Service Level
Use the search button to bring up available service levels. Service Levels are configured in the Codes Maintenance program.
Drill Down on
Allows further billing information to display based on your selection of either A/R or Driver information. To view drilled down information, double-click on any column in the grid.
-
A/R
Will pre-populate the grid with applicable Accounts Receivable information. -
Driver
Will pre-populate the grid with applicable Driver Pay information.
Create Freight Bills
In preparation of the new consolidated bills that are about to be created, this area allows you specify which bills will be affected.
Bill Status
Use the search button to bring up the 'Select Bill Status' dialog box where you can search by either Status Code or Description.
Site ID
Use the search button to bring up the 'Select Site ID' dialog box where you can search by either Site ID or Name.
Child Status
Use the search button to bring up the 'Select Child Status' dialog box where you can search by either Status Code or Description.
Stat. Holiday Hours
Enter any statutory holiday hours.
Create Invoice
Selecting this button will create a newly numbered freight bill in the Customer Service program.
Find Invoice Bill Tab
The Find Invoice Bill Tab allows you to search for Invoice Bills that have been previously created in your system.
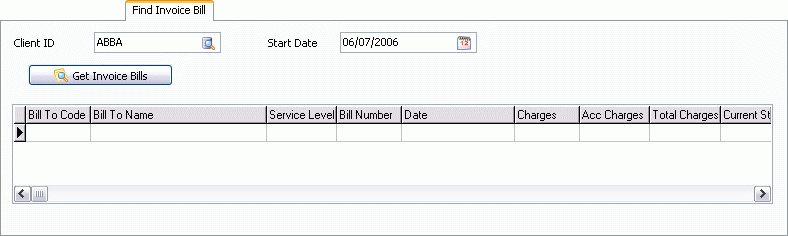
Client ID
Use the search button to bring up the 'Select Bill-To Code' dialog box where you can search by Client ID or Name.
Start Date
Use the pull-down menu to select a Start Date for searching for applicable Invoice Bills.
Get Invoice Bills
Selecting this button will cause all consolidated bills to appear in the grid.