Detail tabs: 3rd Party - Customs

This topic discusses the following tabs:
-
3rd Party General Ledger
-
Accessorial Charges
-
Billing
-
Check List
-
COD
-
Contacts
-
Custom Definitions
-
Customs
3rd Party General Ledger
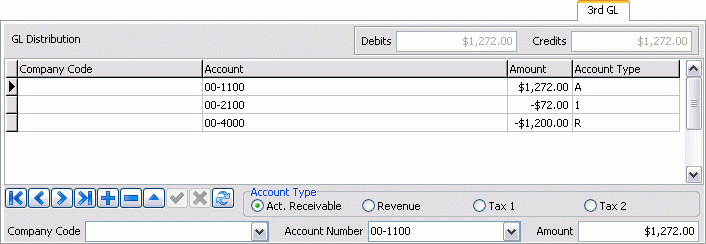
This Tab serves a similar purpose as the GL Tab. The difference is that the information detailed is exported to a 3rd party accounting package such as AccPac.
The 3rd Party GL Tab displays the automatic GL postings that are created based on the configuration of the GL Distribution Setup program and the Distribution code specified in the Bill-To customers profile (as configured in the Customer & Vendor Profiles program). You can add, change and delete the entries that are automatically made here at any time until the bill is processed through the Billing Register program. Once the bill has been registered, you can no longer add, change or delete entries.
| Field/Column | Definition |
|---|---|
Debits / Credits |
Displays the sum of all Debit and Credit amounts. |
Company Code |
Displays the Company Code specified in the GL Distribution Setup program and attached to the Bill-To customers profile in the Customer & Vendor Profiles program. When making manual entries, select a Company Code from the drop down list box. |
Account Number |
Displays the account number specified in the GL Distribution Setup program and attached to the Bill-To customers profile in the Customer & Vendor Profiles program. When making manual entries, type in the appropriate account code from your third-party accounting package. |
Account Type |
Will default according to the type of entry made on the other Tabs in the Customer Service program. 'A' indicates an Accounts Receivable account. 'R' indicates a Revenue account. '1' indicates a Tax 1 account. '2' indicates a Tax 2 account. When making manual entries, select the appropriate radio button. |
Amount |
Will default according to entries made on the other Tabs in the Customer Service program. When making manual entries, precede credit amounts with a '-' (negative) symbol. Note: When making manual entries in the Amount field on this Tab, prefix credit amounts with a '-' (negative) symbol. If no prefix is entered, the amount will be treated as a debit. |
GL Distribution Grid |
Displays the information entered in the Company Code field, the Account Number field, the Amount field, and the Account Type field. |
Accessorial Charges
Also known as Extra Charges, Accessorials are added to the Freight Bill for expenses or services in addition to the carrying of freight.Tarp, Tolls, Insurance, COD payment for freight, and Fuel Surcharges are all examples of accessorial charges, and are all added here on the Accessorial Charges Tab.
To enter a new Accessorial Charge against the freight bill, simply select the '*' button on the navigation bar, or select the grid and use the '*' key on your keyboard to add a new record.When a new record is inserted, a search window will appear with all the Accessorial Charge Codes in your system that match the currency of the freight bill you are working with.Users can then type in the first few characters of the Accessorial Charge code they wish to use to filter the results in the search window.
| Accessorial charge codes and rate schedules are defined in the Codes Maintenance program.Codes that are configured in the Codes Maintenance program to 'Auto-Assign by Default' will be created automatically.To manually assign an Accessorial Charge, select the desired code from the drop down list, then click on the red arrow to add it to the grid.Note that the available Accessorial Charge codes in the drop down list box depend on whether the code is configured as Custom Code Only in the Codes Maintenance program.If it is, it will not be displayed in the drop down list unless it has been assigned to the Bill-To customer in the Rates Maintenance program. |
| Column | Definition |
|---|---|
Charge Code |
Will display the Accessorial Charge code created in the Codes Maintenance program. To manually add a charge, select the desired code from the drop down list, then click on the red arrow to add it to the grid. |
Description |
Will display the Accessorial Charge description configured in the Codes Maintenance program. |
Manual Amt. |
If the charge amount has not been overridden, the Manual Amt field will be 'False'. If you change the quantity, rate, or amount of the Accessorial Charge, the value will change to 'True'. |
Quantity |
Will default to '1'. You can manually change this value. Enter a value in the Quantity field or click on the right-mouse button when the mouse pointer is anywhere on the grid. Then select the 'Edit Manual Amount' menu option. An edit form will be displayed. The Quantity is multiplied by the Rate to calculate the value in the Amount. |
Rate |
Will default according to the value specified in the Codes Maintenance program. You can manually change this value. Enter a value in the Rate field or click on the right-mouse button when the mouse pointer is anywhere on the grid. Then select the 'Edit Manual Amount' menu option. And edit form will be displayed. The Quantity is multiplied by the Rate to calculate the value in the Amount. |
Amount |
Amount will be calculated based on the Quantity value multiplied by the Rate. You can manually change this value. Enter a value in the Amount field or click on the right-mouse button when the mouse pointer is anywhere on the grid. Then select the 'Edit Manual Amount' menu option. And edit form will be displayed. |
Notation |
To enter a notation for an Accessorial Charge, begin typing in the field, or click on the right-mouse button when the mouse pointer is anywhere on the grid. Then select the 'Edit Manual Amount' menu option. And edit form will be displayed. |
Requested Code |
Refers to the ability to configure Accessorial Charge Code Substitutions for specific customers in the Rates Maintenance program. The Requested Code field will display the code that would apply if no substitution were configured. |
Position |
Used in conjunction with the Contract Billing program. When a new 'summarized' bill is created, the position that is used to group/consolidate the bills will be entered here by the program. |
User 1 - User 15 |
These user fields are dedicated for time stamp type fields. You can use them for time stamps as you need them. |
Min / Max |
This field will contain either a 'True' or 'False' value, depending on if the Accessorial Charge is being applied because the of a Minimum or Maximum Rating scenario. This field is read only. |
Multi Point Seq |
Displays the multi point sequence for multi point rating. |
Rate Mode |
Displays rate mode for multi point rating. The way the accessorial charge is applied when multi point rating is involved is dependant on the value set for the Apply to MP field in Codes Maintenance program. For details on the different ways the accessorial charge is applied based on the value of the Apply to MP field go to Codes Maintenance Program > Accessorial Charges. |
Context Menu
Force (Automatic) Recalculation
Will look up Accessorial Charge parameters in the Codes Maintenance program and re-set the record to its original values, over-riding any manual changes. The value in the Manual Amt. field will be changed back to 'False'.
Recalculate All
Will recalculate the charges for all Accessorial Charge entries.
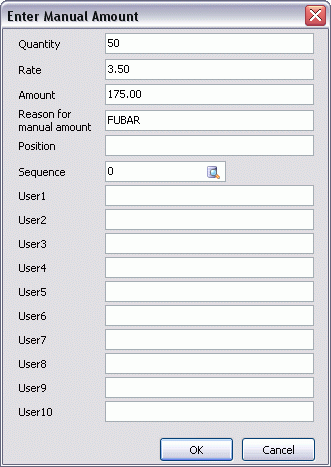
Edit Manual Amount
Clicking on this option opens the Enter Manual Amount window, that allows editing of the Accessorial Charge record currently highlighted. Click on the 'OK' button to accept the edits or 'Cancel' to quit the form without applying any changes.
Change Bill To
Creates a new Freight Bill with the Accessorial Charge you right click, and assigns it to the 'Bill To' customer you choose.
Default Sort
Selecting this option resets all custom sorting changes that have been made (i.e. double clicking a specific column).
Add to Inter Company
This option is enabled if the selected bill is an inter-company bill (in multi company database) and the selected accessorial charge is flagged as being an Intercompany accessorial charge (by selecting the 'IC Copy' checkbox in Codes Maintenance program > Accessorial Charges). This option allows the accessorial charge entered in the working company to be assigned to the associated bill in the billing company (the working company is the company currently selected as the active company performing the transaction, and the billing company is the company that the selected bill belongs to).
This option has two sub options:
-
Both FB and IP
If this option is selected, the accessorial charges assigned to the freight bill and the accessorial charges assigned to the Interline Payable Record will both be passed to the associated bill in the billing company. -
IP Only
Selecting this option will only allow accessorial charges assigned to the Interline Payable Record be passed to the associated bill in the billing company.
| If the bill in the working company is already posted through the Billing Register program, or, if the bill in working company has been posted and the user privileges don’t allow to updated posted bills, or, if the bill in the working company and the associated bill in the billing company are in different currencies, then, an error message will popup and the accessorial charges will not be passed from the selected bill in the working company to the associated bill in the billing company. |
Billing
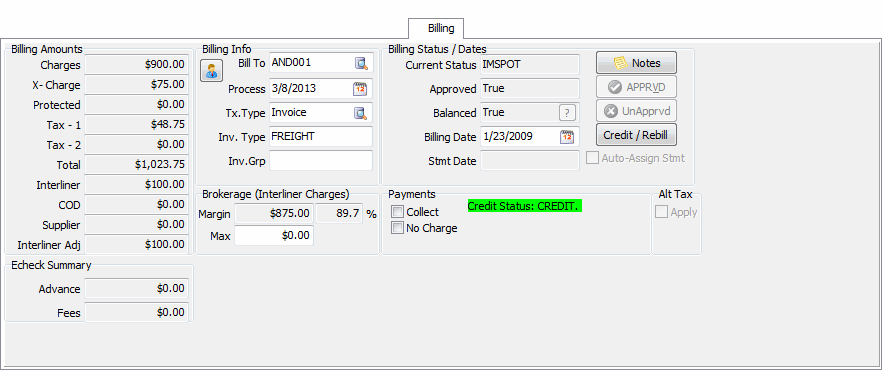
The Billing Tab displays summarized information from the Load Details, Accessorial Charges, Interline Payables, and COD Tabs. It also offers Dispatch History information, and Billing functions.
Billing Amounts
All of the fields in this section are read-only.
| Field | Definition |
|---|---|
Charges |
Displays the sum of Charges from the Details Tab. |
X-Charges |
Displays the sum of Amounts from the Accessorial Tab. |
Protected |
If the Interliner charge entered on the I/P Tab was a Protected charge, the total amount of the charge will display in this field. |
Tax - 1 / Tax - 2 |
Taxes will be automatically assessed if the Freight Bill fits the criteria specified for either tax in the Tax Calculation Configuration program. |
Total |
Displays the sum of all charges. |
Interline |
Displays the Total Charges from the Interliner Tab (regardless of whether or not the charge was Protected). |
COD |
Displays the COD Amount entered on the COD Tab. |
Supplier |
Displays the Supplier amount, as entered on the Supplier Tab. |
Interliner Adj. |
Displays the total charges after Interliner Adjustment has taken place. |
Billing Info
| Field | Definition |
|---|---|
Bill To |
Bill To as entered in the header. You can edit this information by entering a client ID or clicking |
Rate Client |
Will pre-populate with the 'Rate Client' name if there is a specific Rate Client applied to this Freight Bill. |
Process Date |
The Process Date field will default with the current date if the Application Configurator 'Bill Date Default' configuration option is set to 'Now'. This basically sets the Global Date Stamp on any Credit or Rebill Freight Bills, but if the 'Bill Date Default' option is changed from the 'Now' value, the Process Date field will not be used. |
Transaction Type (Tx. Type) |
Freight bills default to the A/R Transaction Type that is the Default For Category for freight invoices (as configured in the A/R Transaction Types program). However, account adjustments can also be entered in the Customer Service program: select the appropriate Transaction Type from the drop down list box. In the case of adjustments generated by the AR Inquiry program, the reversing Freight Bill will have the Transaction Type specified when the adjustment was created (such as a credit or write-off). If the Rebill option was selected in the AR Inquiry program when the adjustment was created, the 'Rebill' Freight Bill will have the same Transaction Type as the original invoice. |
Invoice Type (Inv. Type) |
This field will display the Freight Bill 'Type': this value can only be 'FREIGHT', 'DETENTION' or 'DEMURRAGE', and the also it must be supported by they 'Bill Type' of the Bill-To Customer (as specified in the Customer Profiles program > Notes Tab > 'Client Is' section > Ellipsis button). Otherwise, it will show error or warning message. |
Invoice Grouping (Inv. Grp) |
Used to 'group' together invoices onto a 'master' or 'consolidated' bill. It has been used in the past for VESSELS (container billing), daily LTL consolidation, and others. A custom procedure will need to be designed to go along with this procedure to make your consolidated invoices. Placing a value in this field should have NO effect without this added procedure. |
Billing Status / Dates
| Field | Definition |
|---|---|
Current Status |
Displays the Status Code most recently applied to the Freight Bill. A complete list of bill status changes assigned to this Freight Bill can be viewed on the Status Tab. |
Approved / Balanced |
These fields will display either 'True' or 'False' depending upon whether the current Freight Bill has been given 'Approved' status, and if the GL Account for the Freight Bill is balanced. Note: If the Balanced field is displaying 'False', the user can select the '?' button within the field to display an informational window that states why the Freight Bill cannot be balanced. The user can then take the appropriate steps to resolve the balancing conflict. |
Billing Date |
Is assigned when the Freight Bill is approved using the APPRVD button, or using the Approval function from the right-mouse menu on the Filters Tab. A Freight Bill cannot be updated by the Billing Register program until it has a Billing Date assigned to it. Note that, using the Application Configurator program, you can configure the Billing Date to default to either the Pick-Up-By date or the Deliver-By date. |
Stmt Date / Auto-Assign Stmt |
The 'Auto-Assign Statement' option will automatically assign a Statement Number to all Freight Bills that are created for a specific Customer or Vendor. The Statement Date field will allow you to set the date that will be applied to the Statement Number. Note: The functionality of these two fields depends upon a number of options. If, for example, you cannot access the Auto-Assign Stmt field, it is because the 'Auto-Assign Statements' option within Customer & Vendor Profiles must be checked. Furthermore, the 'Stmt Date' can be set to automatically mirror the 'Billing Date' of a Freight Bill from within the Application Configurator program. |
Supplier Data |
Selecting this flag will allow users to manually override the Supplier data defaults from the Site Setup (as configured in the Codes Maintenance program > Site Tab). |
Brokerage
| Field | Definition |
|---|---|
Margin / Percentage |
The Margin and Percentage fields are calculated fields that outline the Freight Bill charges that have been levied against the Interliner Vendor/Carrier attached to the Freight Bill (if present), compared to the overall charges on the Freight Bill. They are determined by the following calculation: 'Margin' = 'FB Charges' + 'Accessorial Charges' + 'Protected Charges' - 'IP Amount' This is simple brokerage math; the calculation does not account for Driver Pay and other miscellaneous expenses. |
Max |
The 'Max' field is intended for a manager to enter a ceiling / maximum allowable dollar amount for the IP charges for the FB. There is a Security Setup program > Security > Allow Changes option ('CSERV - Allow Edit of Maximum IP Amount') to allow/prevent certain users to/from updating this field. Leave as zero (default) to not use this feature; negative figures are not allowed. Normally, the field is entered before any interliner or carrier (IP) is assigned to the FB. If the figure is entered or changed after an IP has been added, then you will not be able to enter a figure that is lower than the existing IP charges. If you add an interliner (or change the charges on an IP record), and the new maximum amount has been set (greater than zero), and you enter IP charges that exceed the specified maximum, then either a) you will not be able to save your changes or b) you will be given a warning and asked if you want to save your charges anyway. Which of these occurs depends on a Security Setup program > Security > Allow Changes option ('CSERV - Allow Override of Maximum IP Amount'). As well, at any time, if the actual IP charges are more than the specified maximum, then a red label 'Maximum exceeded' will appear on the billing tab beside the new field. Note: There is no currency field to go along with the amount; it is assumed that the maximum figure is entered in the same currency as the IP amount(s). This feature is intended for brokers who have simple one FB - one trip - one interliner - one currency scenarios. |
Payments
| Field | Definition |
|---|---|
Collect |
This flag designates that the Freight Bill Payment should be collected in person (usually in cash). This flag Will be automatically checked if the Bill-To customer has the 'Cash Collect' box checked in their profile (as set up in the Customer & Vendor Profiles program). |
No Charge |
This box indicates if the Freight Bill is to posted to A/R or not. This box should normally not be checked. A bill that is flagged as 'No Charge' can have charges, but will not be posted to A/R by the Billing Register program. Note: If this box is checked and there are entries in the GL Tab, these entries will still be written to the GL by the Billing Register. If you do not want entries posted to the GL, you must ensure you have set the 'Manual GL' option and cleared all entries from the GL Tab. |
Payment |
When active, use this drop-down menu to select the Method of Payment that will be applied to the Freight Bill charges. Available options are: 'Cash', 'Certified Funds', 'Check', 'Credit Card' or 'All'. Note: This field is hidden/available depending on the setting for the Application Configurator program > CSERV.EXE > 'Show Payment Option' option. |
Alt Tax
If the Bill-To client of the freight bill has alternate taxation jurisdiction information supplied on the Customer & Vendor Profiles program > Customer > Billing Tab, then the 'Apply' checkbox will be available for selection. Flagging the freight bill as 'Alt Tax' = True will apply the alternate taxation jurisdiction logic to the freight bill, and taxes will be automatically adjusted.
See the previous link for more information on alternate taxation.
Echeck Summary
This section displays a summary of Echeck amounts related to the selected freight bill.
| Field | Definition |
|---|---|
Advance |
This field displays the amount of money used via Echecks as advance payments. |
Fees |
This field displays the amount of money paid as fees for Echecks. |
Billing Tab Buttons
Notes
![]() Clicking the Notes button opens the Notes pop-up form in the same way as the Notes button on the Summary Tab.
Clicking the Notes button opens the Notes pop-up form in the same way as the Notes button on the Summary Tab.
If there are existing Notes, the button icon will change to this: ![]()
Approved
![]() Clicking the Approved button will cause the 'APPRVD' status to be applied to the Freight Bill. You will be prompted to confirm, and then the Freight Bill will be approved and given an 'Approval Date' automatically.
Clicking the Approved button will cause the 'APPRVD' status to be applied to the Freight Bill. You will be prompted to confirm, and then the Freight Bill will be approved and given an 'Approval Date' automatically.
Freight bills with the status of 'APPRVD' will no longer display in the Dispatch program > Freight Bill Grid (see note below). Freight bills should only be approved when they are complete and ready to be updated (via the Billing Register program) to the Accounts Receivable and other affected sub-ledgers. Freight Bills can also be approved using the Filters Tab.
|
UnApproved
![]() Clicking the Unapproved button returns the Freight Bill to 'UnApprvd'; not its prior status (ex. COMPLETE). This button is disabled unless the Freight Bill is in an approved status and the user has been given access to this button in the Security Setup program.
Clicking the Unapproved button returns the Freight Bill to 'UnApprvd'; not its prior status (ex. COMPLETE). This button is disabled unless the Freight Bill is in an approved status and the user has been given access to this button in the Security Setup program.
Credit / Rebill
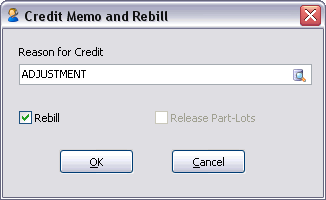
If the Freight Bill that you are currently working on needs to be credited for an amount, you may click the 'Credit / Rebill' button to begin creating a Credit for the Freight Bill. This saves a lot of your time, as you do not need to open the AR Inquiry program to begin the creation of a new Credit Bill. When you click the button, the Credit Memo and Rebill window will be displayed. If either a Credit or a Rebill already exists for the selected freight bill, one of three scenarios will take place based on the value selected for the Application Configurator program > CSERV.EXE - 'Multiple Credit/Rebill Freight Bills' option. You will either be allowed, or you will be warned and given a choice to go ahead or not, or you will be prevented from creating any Credit/Rebill freight bills against the selected freight bill. It will depend on what is the value chosen for the application configuration option (Allow, Warn or Disallow).
| If you are currently working with a 'Credit' or 'Rebill' Freight Bill, the 'Credit / Rebill' button will not be displayed. |
You can use the pull-down menu to select a 'Reason for Credit' for the current Freight Bill. The available options are listed below, select the option that applies to your Credit Bill.
-
Invoice Adjustment
-
Freight Invoice
-
Credit Memo
-
Interest Charge
-
Rate Error
-
Shuttle & Wash
-
Invoice Write-off
When the 'Rebill' flag is checked, a new Freight Bill with status of 'Rebill' will be created. If not checked, only the 'Credit' Bill will be shown.
|
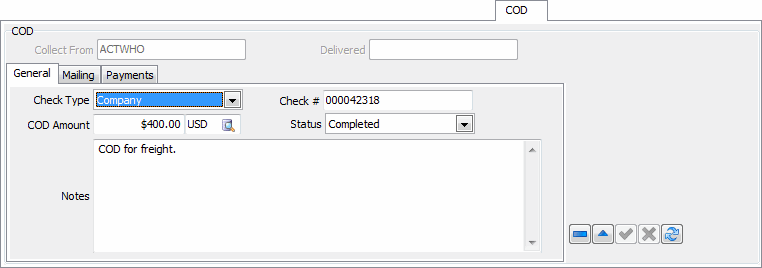
Cash on Delivery (COD)
TruckMate allows tracking of Cash on Delivery on product charges that are to be collected by the driver delivering the load on the COD Tab. These charges are distinct from C.O.D charges for carrying the freight that are to be collected by the driver.
| This tab can be set to read-only for certain users in certain scenarios by changing the two available Security Setup program > Security > Allow Changes Tab options related to the COD Tab. |
Header
| Field | Definition |
|---|---|
Collect From |
Displays the client code of the Consignee party of the freight bill. |
Delivered |
This date will populate as the COD is processed, and is read-only. |
General tab
The General tab is used to define the basic details of the COD record.
| Field | Definition |
|---|---|
Check Type |
There are three types of COD checks:
Notes:
|
COD Amount / Currency |
Enter the amount and currency that should be collected at the Consignee site. |
Check # |
If you receive the COD check, before the bill is posted through the Billing Register program, you can enter the check number here. Otherwise, enter it in the COD Payable Audit program. |
Status |
This field will default to 'Open' on creation of a new COD record, Status, but can be changed to 'Mailed' (when check sent by "us" or our agent) or 'Completed' (when check sent direct by Consignee to Shipper). |
Notes |
Notes pertinent to the COD can be entered here. |
Mailing tab
The Mailing tab has several fields to describe how the COD check was sent.
| Field | Definition |
|---|---|
Method |
Use the drop-down to select the method by which the COD will be sent to the Consignee. |
Mail To / Address |
The Mail To and Address fields default to the freight bill’s Shipper, but the user may:
The 'Profile' button adjacent to the 'Mail to' field will display the address profile of whoever was entered in the 'Mail To' field if selected. |
Mail By |
The Mail By field has three choices: 'AP', 'Agent' or 'Other' and affects the options for the 'Received By' field below:
|
Mailed |
Enter the date that the COD was sent out. |
Tracking # |
Certain methods will require the use of a tracking number. If provided with a tracking number, the user can enter it here. |
Payments tab
The Payments tab may only be used if the 'Check Type' field on the General Tab has been set to 'Bypass GL'. This allows the user to enter multiple payments against the COD. The 'Payment Type' column is error-checked, meaning that the user will not be allowed to save a payment without choosing a valid payment type from the system.
Check List
The Check List tab lists any number of 'Check List' items that are required before a Freight Bill can go through the Approval process and onto the Dispatching process. These Check List items are based on the 'Bill To' Customer Code, and are added/modified to your system’s Customer Codes in the Customer & Vendor Profiles program > Freight Bill Checklist Tab. The Check List items themselves are added to your Database using the Checklist item wizard on the Codes Maintenance program > Check List Tab. The check list items can be edited by the user as long as the bill is not approved. Once the bill is approved, the ability to edit Check List items becomes subject to a Security Setup option. Selecting the 'Allow Edit of Approved Bill - Chick List Tab' option in Security Setup program > Security > Business Events > Approving/Printing section, will allow the selected user to edit check list items for already approved bills in this tab.

If the 'Bill To' Customer Code you have chosen has 'Check List' items in its Customer Profile, several fields on this Tab will populate with data when they are added to a new Freight Bill. Double clicking on a detail line will set the Is Complete field to 'True' and will populate the Last Updated By and Last Updated At fields automatically. The User has the option of entering any comments in the 'Comments' field regarding the documents that have or have not been received.
Mandatory
If a Checklist item has a value of 'True' in this field, then it will be required to be completed (i.e. have a value of 'True' in the 'Complete' field) before the User can change the Freight Bill Status Code from one of 'Entry (N)' status behavior to one of 'Available (A)' behavior. If the value in this field is 'False', then the Check List Item need not be complete ('Complete' = 'True') in order for the Freight Bill to be posted.
|
Contacts
The Contacts Tab allows information to be entered for a fourth party (not Caller, Shipper, or Consignee) who is to be billed. It also allows for information for Pickup At and Care Of Delivery clients to be entered. Many freight bill details are determined by the Pickup At/Care Of Delivery client, such as the 'Appt Req.' flags on the freight bill header and the routing of the freight bill on the LTL/Routing Tab.
| The Pickup At and Care of Delivery clients are automatically defaulted to the Shipper and Consignee clients added to a freight bill. Changing the Shipper and Consignee of a freight bill will also automatically update the Pickup At and Care Of, unless the Pickup At and Care Of Delivery clients were manually changed. If the two sets of clients are different, updating the Shipper/Consignee will not affect the Pickup At/Care Of. |
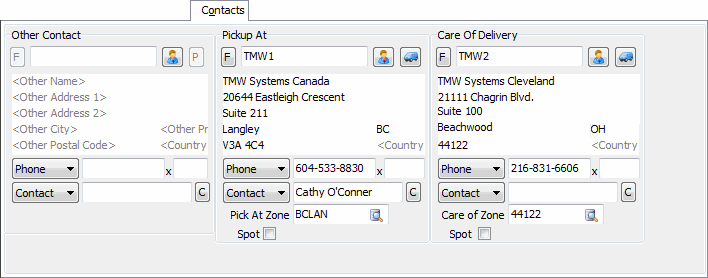
Other Contact
The information in this area is managed in the same way as the Caller information in the Freight Bill header. Refer to the Customer Service Program > Header | Caller section on how to fill values into these fields and use the buttons.
Pickup At
The customer information contained in this area is managed in the same way as the Shipper information in the Freight Bill header and is populated automatically from the Shipper details. Refer to the Customer Service Program > Header | Shipper section on how to fill values into these fields and use the Find button.
| If the Shipper client is different from the Pickup At client, the Pickup At will not be cleared out when the Shipper is cleared. |
| Field | Definition |
|---|---|
Pick At Zone |
This field populates with the value from the 'Start Zone' field of the Shipper header. |
Spot |
A trailer may be left (spotted) at the shipper for loading, or at the consignee for unloading. Currently, the only place to enter this information is in the notes. Have a checkbox in the client profile as Spot Trailer. There would be two new Spot Trailer checkboxes in customer service, one for the shipper and one for the consignee. These checkboxes would default from the client profile when entering new orders. When a status change of arrive at shipper or arrive at consignee occur, then the dispatcher should be warned regarding a pending trailer spot. This checkbox will only appear if the Client chosen as the 'Pickup At' Client has the 'Spot Trailer' option enabled in the Customer & Vendor Profiles program. |
Care of Delivery
The customer information contained in this area is managed in the same way as the Consignee information in the Freight Bill header and is populated automatically from the Consignee details. Refer to the Customer Service Program > Header | Shipper section on how to fill values into these fields and use the Find button.
| If the Consignee client is different from the Care of Delivery client, the Care of Delivery client will not be cleared out when the Consignee is cleared. |
| Field | Definition |
|---|---|
Care of Zone |
This field populates with the value from the 'End Zone' field of the Consignee header. |
Spot |
A trailer may be left (spotted) at the shipper for loading, or at the consignee for unloading. Currently, the only place to enter this information is in the notes. Have a checkbox in the client profile as Spot Trailer. There would be two new Spot Trailer checkboxes in customer service, one for the shipper and one for the consignee. These checkboxes would default from the client profile when entering new orders. When a status change of arrive at shipper or arrive at consignee occur, then the dispatcher should be warned regarding a pending trailer spot. This checkbox will only appear if the Client chosen as 'Care Of Delivery' has the 'Spot Trailer' option enabled in the Customer & Vendor Profiles program. |
Contact List Grid
The Contact List grid is only available for use when the Application Configurator program > CSERV.EXE > 'Contact List Visible' option is set to 'True'.
The Contact List Grid allows the User to manually enter Contacts for the displayed Freight Bill. Contacts can also be selected from Client profile contact list based on the 'Bill To', 'Caller', 'Shipper' or 'Consignee' party of the Freight Bill (double click/enter on record in edit mode).
The data can be added or updated to the Clients contact list using right-click 'Add/Update Client Contact' Context Menu option (similar to the 'P' button functionality available in the Customer Service program > Header | Caller section).
The Contact List Grid data will mainly be used for reports and generated Delivery Confirmation e-mails.
Custom Definitions
These fields store the information you need in your reports to appear with the Freight Bill. The fields displayed on this Tab are User-Defined custom fields. See the Codes Maintenance program for more information on how to modify these fields.
| If the Security Setup program > Security > Allow Changes > 'Allow Edit of Custom Defined fields after the Freight Bill is posted to A/R' option is flagged, then the Custom Defined Field values may be edited even after the Freight Bill has been posted to the accounting modules. |
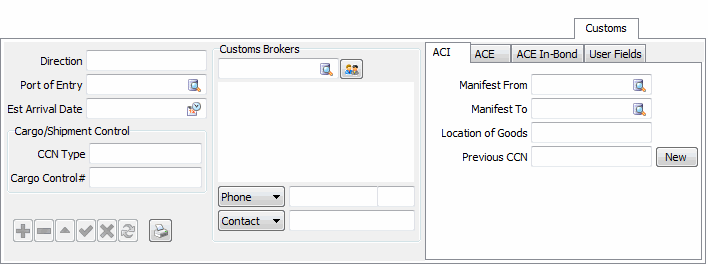
Customs
The Customs tab is used to record data important to cross-border shipments between Canada and the United States of America. Much of the information on this tab is auto-populated based on the client profiles used on the freight bill and the direction- inbound or outbound- of travel (inbound shipments are those from the USA into Canada; outbound shipments are those from Canada into the USA).
|
| Field | Definition |
|---|---|
Direction |
This field will automatically populate with one of two values based on the 'Country Code' provided against the Shipper and Consignee of the freight bill (the 'Country Code' can be manually set in the Customer Service header or automatically set based off of the Client Profile of the Shipper/Consignee). |
Port of Entry |
Use the edit-pick to choose the Port of Entry for the shipment. |
Est Arrival Date |
Use the calendar menu to choose an estimated arrival date for the shipment. |
Customs Brokers |
Select the search button in the first field to select a Customs Broker Vendor for the selected Freight Bill. The Vendors available for selection here will be based on the type of customs movement (Inbound/Outbound) and the Inbound/Outbound Vendors added to the Client profiles of the freight bill parties (on the Customer Profiles program > Customs Broker Tab). To view the profile of the selected Customer Broker select the profile button beside the field. This will display the record of the selected broker in Customer Profiles program > Customs Broker Tab. Note: To create or configure a Customs Broker, open the Customer & Vendor Profiles program and use the Vendor Profiles > Types Tab. |
Customs Sub-Tabs
The sub-tabs available for use will depend on the type of customs movement the freight bill requires (inbound or outbound).
Inbound shipments (US to CA) will use the ACI Tab.
Outbound shipments (CA to US) will use the ACE and ACE In-Bond Tabs.
| Both inbound and outbound shipments have access to the User Fields Tab. |
User Fields Tab
This tab is used to enter any additional information specific to your company. The labels of the ten available user fields are configured via the Application Configurator program > CSERV.EXE > 'Customs User Field 1 - Customs User Field 10' options.