SQL Execute

SQL Execute has grown into a full-featured program that offers a very rich set of database analysis tools to TruckMate database administrators, as well as replacing a number of separate utilities offered in previous versions of TruckMate.
The program screen offers access to different functions and information through Program Menus, a Toolbar, Status Bar, 4 main Tabs (SQL, Stored Procedures, DB2 Functions and Script Files) and Keyboard Shortcuts.
Users who have a strong understanding of the SQL language can add, alter, and delete database structures and data. For this reason, access to this program should be limited to database administrators only.
SQL Execute was originally written for DB2 users to provide a tool which could be used instead of the command line processor and the DB2 command center to execute ad hoc queries and SQL scripts.
To access SQL Execute:
| From this location | Go to |
|---|---|
TruckMate Menu and TruckMate Task List |
|
Windows Start Menu |
TruckMate 20xx > SQL Execute |
Windows Explorer |
C:\Program Files (x86) > TruckMate 20xx > SQLExec.exe |
| Feature | Description |
|---|---|
Program Menus |
The program menus should be familiar to users of other Windows programs. The File, Edit, and Query menus offer functions that generally affect the content of tab that is currently active. The Options menu offers access to items that control how different functions in the program behave. The Tools menu offers additional program functions that supplement the functions on the main tabs. The Help menu offers access to the About function and database information. |
Tool Bar |
The Tool Bar offers quick access to some of the more frequently used options listed in the program menus. |
Program Status Bar |
The program status bar offers information to the user about what functions have been toggled on or off, so that the user is aware of conditions that affect how the program behaves. Users should note that the status bar only appears when the SQL tab is active or when the Script Files tab is active and offers information specific to each. Note: The record count option can affect query performance, so it is useful to offer this information to the user so they remember to toggle the function off before they execute a query. |
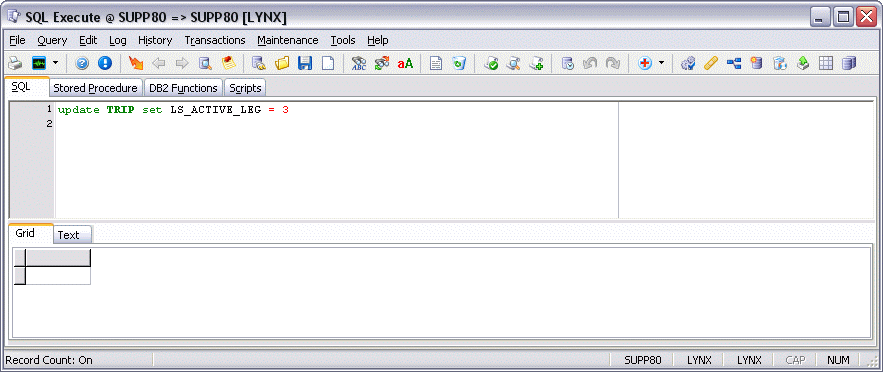
SQL Tab |
The SQL tab is where users build queries and execute them in order to access the raw data in the database. |
Stored Procedure Tab |
SQL Execute uses a different model for executing stored procedures than some other utilities. Instead of building an SQL query and executing it on the SQL tab, database stored procedures are executed from this tab. |
DB2 Functions Tab |
This tab allows you to quickly view all of the DB2 Functions used. |
Scripts Tab |
The Script Files tab differs from the SQL tab in that it processes more than one SQL query command at a time by allowing the user to build a script, load a script, or multiple scripts at one time. |
Keyboard Shortcuts |
SQL Execute supports quite a few Keyboard Shortcuts that allow quick access to program functions. The letter keys are not case sensitive. |
How Do I?
Problems installing a release/service pack patch in Windows Server 2008
If you are receiving a "Cannot create file 'C:\_DBCOMMAND_1.BAT'. Access is denied." error when attempting to install a release/service pack patch in Windows Server 2008, you must change your Windows user privileges.
When opening SQL Execute, do not left-click the program on the Windows Start Menu, but right-click it, and select the 'Run as administrator' option. This will allow the service pack patch to be built and run without issue.
How to execute a SQL script
This article describes how to apply SQL scripts (also known as patches) to your TM70 database.
These instructions were created using SQLEXEC.EXE version 7.0.0.105. Some steps or settings may not apply or may appear in different locations if you are using a prior version.
If your updates have been provided to you in a zip (compressed archive) format, you will need to use a program such as WinZip or RAR to extract the .SQL script file(s).
| You should always ensure you have a current and complete backup of your database before applying any SQL script that alters the definitions of objects in your database. Before starting, DB2 users should complete a full offline backup. |
-
Save the extracted file(s) to your hard-drive. You may save them anywhere, but it is simplest to save them to your TruckMate directory usually found here:
C:\Program Files\TruckMate20xx\ -
Log into SQL Execute as the database owner, which is in most cases LYNX.
-
When you are successfully logged in, you will need to ensure the program options for running scripts on your database platform are set correctly.
-
You must first turn off the Use Transactions option.
You can confirm whether this mode is turned on or off by pointing to the Use Transactions button.
The option is toggled on or off by going to the Options menu and selecting Use Transactions, or by using the Ctrl+T key combination, or by clicking the button on the button bar.
-
Next, go to the Options menu, select Preferences, and set the following options:
-
Scripts tab
-
Set working directory to the folder where you saved the .SQL patches
-
Set use Scripts option at the bottom instead of Files option
-
Check show progress.
-
Additional settings
-
-
DB2 tab
-
Set statement terminator to the @ sign
-
Uncheck blank line terminators
-
-
Dep tab (Dependencies tab)
-
Set to Always run automatically
-
Set Add drop/create statements to Scripts
-
-
-
-
Once you are back in the main screen, you can load the scripts you want to run into the Scripts tab.
-
Load your script files into the program by going to the File menu and selecting Load script from file. You can also use the hot key combination <Ctrl><O>, or you can click the load scripts icon on the program button bar.
A standard Windows file navigation window will open to the working directory you previously specified.
-
Click the appropriate patch file to highlight it. Click the Open button.
-
-
When you get back to the main screen, you will see the script contents displayed.
To apply the script, go to the Query menu and select Execute. You can also use the hot key combination <Ctrl><Enter>, or you can click the Execute icon on the button bar.
-
When the patch completes, you must run the Security Patcher function to make sure any changes to the database structure are also updated for security.
To run the security patcher, go to the Tools menu and select Security Patcher. You can also use the hot key combination <Ctrl><Alt><Q> or click the Security Patcher icon on the program button bar.
The Database Security Patcher Wizard will now appear to guide you through the patching process:
-
The Wizard will require that you enter the password for the database owner.
-
You will next be offered the option of logging successful updates to user permissions. You can also log unsuccessful updates.
-
The program will then start updating user and user group permissions to database objects. Depending on the size and type of the database, this process may take anywhere from 30 seconds to 30 minutes.
-
When this process is complete, a message box will appear indicating the patch process is complete.
-
Finally you will be offered the option to view the patch log after closing the Wizard.
-
If you choose to view the patch log, Windows notepad will open on your screen with the log text.
-
Run a quick Ad-Hoc query to view records in my database
-
Open the SQL Execute program (SQLEXEC.EXE).
-
Go to the SQL tab .
-
Input a SQL statement into the upper section by either (1) typing it from scratch or (2) selecting a statement from history (load from file icon) and optionally modifying it.
Note: Your history must be turned on for this (closed book icon - '<Ctrl><H>'). (3) Loading a statement from a file (use open folder icon - '<Ctrl><O>') or (4) pasting a statement from clipboard (after cutting from some other source such as Notepad).
The SQL tab only accepts single statements (used mostly for select statements) - so, for options 3 & 4, if you have multi-statement files/text, you must use the script tab.
-
(Optional) If you wish to see how many rows returned/processed, make sure record count is turned on (set in options-preferences-general).
-
(Optional) If you can’t remember the tables/columns in the database, use the system info option (closed folder with magnifying glass - '<Ctrl><I>'). If you have already started typing, make sure you use the 'Execute' option so that your partially typed statement is not lost.
-
(Optional) If you wish to save the statement so that you can run it again at a future date, you can either make sure the history is on and find it in there later, or use the floppy disk icon ('<Ctrl><S>') to save your statement to a file.
-
Execute ((lightning bolt icon or '<Ctrl><Enter>').
-
If the statement you typed was a 'select', the results will be displayed in the grid. Further, if the results contain a memo field and you have the memo option turned on (thumbtack/post-it-note icon - '<Ctrl><M>'), the contents of the first memo field will be displayed below grid (use arrow/pgup/pgdn keys to scroll to other fields).
-
(Optional) If you wish to cut the results so that they can be pasted elsewhere (Notepad, Outlook, Word, etc.,) switch from the grid tab to the text tab (then right-click 'Select All' and right-click 'Copy').
Run a TruckMate patch using the SQL Execute program
For further information, refer to the online topic entitled SQL Execute Program Overview.
-
Open the SQL Execute program (SQLEXEC.EXE).
-
Go to the Script Files tab .
Decide if you want to run the scripts as scripts or files (both will work). The 'files' option has the advantages of (1) progress screen, (2) a summary of the types of statements executed, and (3) you can load several patches (listing the filenames on the screen) and run them all at once. The 'scripts' option has the advantage that you can see the patch contents (and possibly modify it) before executing
Ensure the Terminator field has a '@' symbol in it. Ensure the next block of options, i.e., Non-Verbose, Fix Quotes, Ignore Drop Statements, and Blank Line Terminators, do not have any checkmarks in the checkboxes.
-
Load patch, (or patches) by clicking the open folder icon or the 'Load From File' item on the toolbar ('<Ctrl><O>').
-
Run or 'Execute' the script (lightning bolt icon on the toolbar), (<Ctrl><Enter>').
DB2 Configuration Options
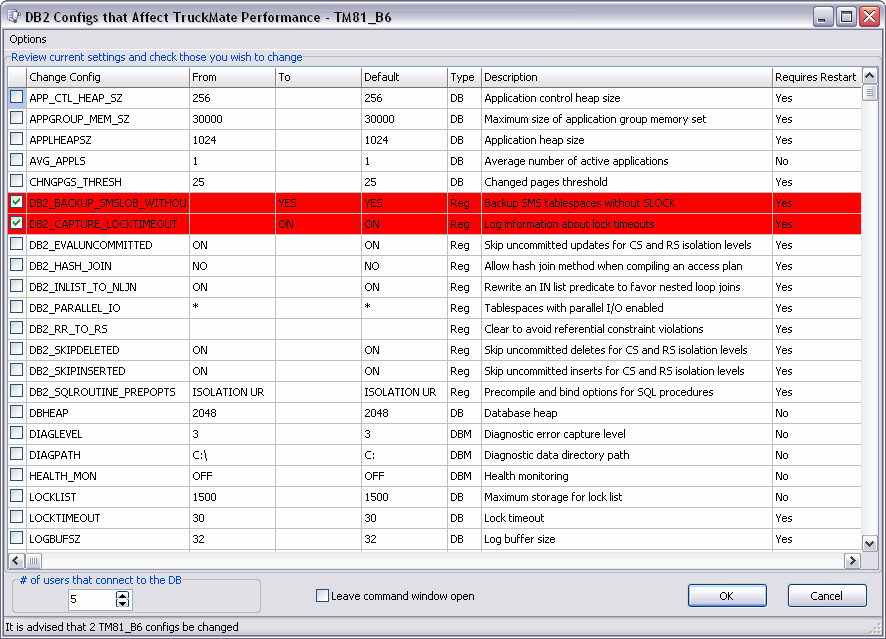
When a TruckMate User selects the 'DB2 Configs' option from the 'Maintenance > Performance' menu of the SQL Execute program the 'DB2 Configs That Affect TruckMate Performance' window displays, listing several DB2 Configuration options that affect your overall TruckMate performance. If you are experiencing performance problems or other DB2 errors, particularly when multiple Users are connected to TruckMate at the same time, adjusting the settings in this window could rectify the issue.
Options Menu
-
Change All
Selecting this option will flag all available options to be changed to the recommended settings.
-
Change None
Selecting this option will remove all flagged options, and no settings will be updated.
-
Advise
Selecting this option will show only those options that are critical and need changing. In the above screenshot, both the 'DB2_BACKUP_SMSLOB_WITH…' and 'DB2_CAPTURE_LOCKTIMEOUT' options have been highlighted by the SQL Execute program as 'required'.
# of users that connect to the DB
When changing the integer value of this option, the recommended settings for the DB2 Configuration options will adjust. Make sure that you enter the correct amount of Users that you expect may be connected at one time during normal operations within your company.
Leave command window open
Enabling this flag will ensure that the DB2 Command window will not automatically close following completion of the DB2 Config adjustment process. This allows you to look over the commands that were run, just to be sure that no errors occurred.
As with adjusting other configuration parameters that affect the optimizer, you should adjust this parameter in small increments. This allows you to minimize path selection differences.
You should consider rebinding applications (using the Maintenance Menu > Performance > Procedures (Rebind) option) after changing this parameter.
List of DB2 Config Options
Documented Options
CHNGPGS_THRESH
Asynchronous page cleaners will write changed pages from the buffer pool (or the buffer pools) to disk before the space in the buffer pool is required by a database agent. As a result, database agents should not have to wait for changed pages to be written out so that they might use the space in the buffer pool. This improves overall performance of the database applications.
You can use this parameter to specify the level (percentage) of changed pages at which the asynchronous page cleaners will be started, if they are not currently active. When the page cleaners are started, they will build a list of the pages to write to disk. Once they have completed writing those pages to disk, they will become inactive again and wait for the next trigger to start.
In a read-only (for example, query) environment, these page cleaners are not used.
Recommendation: For databases with a heavy update transaction workload, you can generally ensure that there are enough clean pages in the buffer pool by setting the parameter value to be equal-to or less-than the default value. A percentage larger than the default can help performance if your database has a small number of very large tables.
DB2_CAPTURE_LOCKTIMEOUT
When set to 'ON', the lock timeout reporting function captures information about lock timeout events, including information about the key applications involved in the lock contention that resulted in the lock timeout.
DB2_EVALUNCOMMITTED
With this variable enabled, predicate evaluation can occur on uncommitted data. This means that a row that contains an uncommitted update may not satisfy the query, whereas if the predicate evaluation waited until the updated transaction completed, the row may satisfy the query. Additionally, uncommitted deleted rows are skipped during table scans. DB2 will skip deleted keys in type-2 index scans if the DB2_SKIPDELETED registry variable is enabled.
DB2_HASH_JOIN
Specifies hash join as a possible join method when compiling an access plan. DB2_HASH_JOIN needs to be tuned to get the best performance. Hash join performance is best if you can avoid hash loops and overflow to disk. To tune hash join performance, estimate the maximum amount of memory available for the sheapthres configuration parameter, and then tune the sortheap configuration parameter. Increase its value until you avoid as many hash loops and disk overflows as possible, but do not reach the limit specified by the sheapthres configuration parameter.
DB2_INLIST_TO_NLJN
Sometimes the optimizer does not have accurate information to determine the best join method for the rewritten version of the query. This can occur if the IN list contains parameter markers or host variables which prevent the optimizer from using catalog statistics to determine the selectivity. This registry variable causes the optimizer to favor nested loop joins to join the list of values, using the table that contributes the IN list as the inner table in the join.
DB2_PARALLEL_IO
When reading data from, or writing data to table space containers, DB2 Universal Database™ (DB2 UDB) may 7 use parallel I/O if the number of containers in the database is greater than 1. 7 However, there are situations when it would be beneficial to have parallel I/O enabled for single container table spaces. 7 For example, if the container is created on a single RAID device that is composed of more than one physical disk, you may 7 want to issue parallel read and write calls.
To force parallel I/O for a table space that has a single container, you can use the DB2_PARALLEL_IO registry variable. This variable can be set to "*" (asterisk), meaning every table space, or it can be set to a list of table space IDs separated by commas. For example:
`db2set DB2_PARALLEL_IO=* \{turn parallel I/O on for all table spaces}
``db2set DB2_PARALLEL_IO=1,2,4,8 \{turn parallel I/O on for table spaces 1, 2, 4, and 8}
`After setting the registry variable, DB2 UDB must be stopped (db2stop), and then restarted (db2start), for the changes to take effect.
DB2_PARALLEL_IO also affects table spaces with more than one container defined. If you do not set the registry variable, the I/O parallelism is equal to the number of containers in the table space. If you set the registry variable, the I/O parallelism is equal to the result of prefetch size divided by extent size. You might want to set the registry variable if the individual containers in the table space are striped across multiple physical disks.
For example, a table space has two containers and the prefetch size is four times the extent size. If the registry variable is not set, a prefetch request for this table space will be broken into two requests (each request will be for two extents). Provided that the prefetchers are available to do work, two prefetchers can be working on these requests in parallel. In the case where the registry variable is set, a prefetch request for this table space will be broken into four requests (one extent per request) with a possibility of four prefetchers servicing the requests in parallel.
In this example, if each of the two containers had a single disk dedicated to it, setting the registry variable for this table space might result in contention on those disks since two prefetchers will be accessing each of the two disks at once. However, if each of the two containers was striped across multiple disks, setting the registry variable would potentially allow access to four different disks at once.
Additional Options
-
DB2_BACKUP_SMSLOB_WITHOUT…
-
DB2_RR_TO_RS
-
DB2_SKIPDELETED
-
DB2_SKIPINSERTED
-
DB2_SQLROUTINE_PREPOPTS
-
DBHEAP
-
DIAGLEVEL
-
DIAGPATH
-
HEALTH_MON
-
LOCKLIST
-
LOCKTIMEOUT
-
LOGBUFSZ
-
LOGFILSIZ
-
LOGPRIMARY
-
LOGSECOND
-
MAXAPPLS
-
MAXFILOP
-
NUM_IOCLEANERS
-
NUM_IOSERVERS
-
NUM_POOLAGENTS
-
PCKCACHESZ
-
STAT_HEAP_SZ
Menu and toolbar options
/(J:\_StagingArea\_TruckMate\ConvertedHTML\util\sqlexec\sqlexec_menutoolbar.adoc)
This topic describes menu and toolbar options and functionality that are specific to the System Integrity Checker window.
For information about common menu and toolbar options (i.e. File menu, Refresh, Multi-Company, etc.), see General menu and toolbar options in TruckMate basics.
File Menu
The functions listed on the File Menu are used in the SQL Tab and Scripts Tab:
Connect to Database
![]() You can select this option, you will be asked to connect to an existing database. If Windows ISQL is currently connected to a database, it closes the connection, prompting you to commit changes to it if there are any. If you choose 'No', then all database changes since the last commit are rolled back and the connection is closed. If you choose 'Yes', then database changes are committed and the connection is closed.
You can select this option, you will be asked to connect to an existing database. If Windows ISQL is currently connected to a database, it closes the connection, prompting you to commit changes to it if there are any. If you choose 'No', then all database changes since the last commit are rolled back and the connection is closed. If you choose 'Yes', then database changes are committed and the connection is closed.
Note: The 'Connect to Database' option no longer affects the default login info for the next TruckMate application that is launched (it will default to the settings ['User ID', 'Password', 'Database' and 'Company'] of the last time you actually typed info into a TruckMate login screen).
Load from File
![]() Opens a dialog box allowing you to browse to the desired location on your computer, where the desired file is stored. If you are on the SQL Tab or on the Script Tab with 'SQL scripts' or 'DB2 command line' checked, the actual contents of the file will be inserted into the input section; over-writing any existing input section contents. However, if you are on the script tab with 'SQL files' checked, only the name of the file (with complete path) will be written to the input section; and it will be appended to the bottom of any existing input section data so that you can use 'load from file' repeatedly to create a list of patches/files to run, and then execute them all at once.
Opens a dialog box allowing you to browse to the desired location on your computer, where the desired file is stored. If you are on the SQL Tab or on the Script Tab with 'SQL scripts' or 'DB2 command line' checked, the actual contents of the file will be inserted into the input section; over-writing any existing input section contents. However, if you are on the script tab with 'SQL files' checked, only the name of the file (with complete path) will be written to the input section; and it will be appended to the bottom of any existing input section data so that you can use 'load from file' repeatedly to create a list of patches/files to run, and then execute them all at once.
Save Script to File
![]() Opens a dialog box allowing you to browse to the desired location on your computer, where you wish to save this file. The behaviour of this option is different depending on which SQL Execute program Tab you are working with:
Opens a dialog box allowing you to browse to the desired location on your computer, where you wish to save this file. The behaviour of this option is different depending on which SQL Execute program Tab you are working with:
-
When using the SQL Tab, selecting the 'Save Script to File' option, you will be presented with two windowes. The first will prompt ask if you would like to save the 'Query' (top section of the Tab) or the 'Result' (bottom 'results' grid section). Once you have chosen a radio option and selected 'OK', you will be presented with another choice of two options: you may either save the SQL results as a 'Text' file (plain .TXT formatted file) or to a 'CSV (Spreadsheet)' file (.CSV format, viewable in Excel). Once you have saved, you will be prompted if you would like to open the file in an external viewer. Click 'Yes' to do so, or 'No' to exit.
-
When using any other Tab you will be presented with only the 'Text' and 'CSV (Spreadsheet)' choices.
Clear Script
![]() Clears the information from the screen.
Clears the information from the screen.
Exit
![]() Selecting this option will close the SQL Execute program.
Selecting this option will close the SQL Execute program.
Multi-Company Menu
For more information on the Multi-Company options available from the Menu Bar, see the Multi-Company documentation.
Note: Since the Multi-Company switch option causes the SQL Execute program to re-launch, everything, including the queries list (SQLMemory) re-initializes. This means that you will lose any remembered queries if you are switching between companies.
Query Menu
The functions listed on the Query Menu are used in the SQL Tab:
Execute
![]() This executes the current SQL command if you are in the SQL tab, or it executes the SQL script if you are in the Script Files Tab.
This executes the current SQL command if you are in the SQL tab, or it executes the SQL script if you are in the Script Files Tab.
Previous SQL
![]() This option allows the User to move back through the SQL commands which have been entered into SQL command area and executed. Clicking on this option will replace the current statement in the SQL text area with the previous statement. If no commands have been entered and executed or if the User is at the very first command entered, this option will be disabled.
This option allows the User to move back through the SQL commands which have been entered into SQL command area and executed. Clicking on this option will replace the current statement in the SQL text area with the previous statement. If no commands have been entered and executed or if the User is at the very first command entered, this option will be disabled.
Next SQL
![]() This option allows the User to move forward through the SQL commands which have been entered into SQL text area and executed. Clicking on this option will replace the current statement in the SQL text area with the next statement. If no commands have been entered or if the User is at the end of the list of commands, this option is disabled.
This option allows the User to move forward through the SQL commands which have been entered into SQL text area and executed. Clicking on this option will replace the current statement in the SQL text area with the next statement. If no commands have been entered or if the User is at the end of the list of commands, this option is disabled.
System Info
![]() Opens a system info dialog box where you can view many of the objects used in the TruckMate database. The user can specify by 'Type', and then further specify by 'Object'. For example, if you use the pull-down menu in the 'Type' box and select 'Procedure - Main', you can then use the pull-down menu in the 'Object' box and view all available Stored Procedures in the system. Your choices from the 'Type' pull-down menu are many and your selections from the 'Object' pull-down menu will vary depending on which item you’ve chosen in the 'Type' pull-down menu.
Opens a system info dialog box where you can view many of the objects used in the TruckMate database. The user can specify by 'Type', and then further specify by 'Object'. For example, if you use the pull-down menu in the 'Type' box and select 'Procedure - Main', you can then use the pull-down menu in the 'Object' box and view all available Stored Procedures in the system. Your choices from the 'Type' pull-down menu are many and your selections from the 'Object' pull-down menu will vary depending on which item you’ve chosen in the 'Type' pull-down menu.
Notes:
-
The 'System' gives you access to all the data in all the system tables; all the other options display more User-friendly versions of these tables.
-
The checkbox 'Current Schema Only' will restrict object drop-downs and generated queries to only the current schema (i.e. to exclude system objects). If checked, the generated SELECT statement will include a clause like AND TABSCHEMA = CURRENT SCHEMA. This checkbox is not applicable (not visible) in a multi-schema database. Like other system info options, whether or not the checkbox is checked is "remembered" to registry.
Show SQL Field Memo
Toggle switch to enable or disable SQL Field Memo.
Edit Menu
The functions listed on the Edit Menu manipulate text in the SQL Tab and Scripts Tab.
Cut
![]() Deletes selected text and keeps it in the Windows clipboard.
Deletes selected text and keeps it in the Windows clipboard.
Copy
![]() Copies selected text and keeps it in the Windows clipboard.
Copies selected text and keeps it in the Windows clipboard.
Paste
![]() Pastes text stored in the Windows clipboard to where the cursor is positioned.
Pastes text stored in the Windows clipboard to where the cursor is positioned.
Select All
![]() Selects all text in the area where the cursor is.
Selects all text in the area where the cursor is.
Undo
![]() This function reverses your most recent text edit(s).
This function reverses your most recent text edit(s).
Find
![]() This function opens a dialog box where you can enter a text string for the program to find in the text entered in the SQL command area or Script area.
This function opens a dialog box where you can enter a text string for the program to find in the text entered in the SQL command area or Script area.
Find Next
![]() This function resumes the find function, using the text string already entered, from where the cursor is currently positioned.
This function resumes the find function, using the text string already entered, from where the cursor is currently positioned.
Replace
![]() This works in combination with the Find function. Once the find locates the specified text string, the program can replace the specified string with the text you specify to replace it.
This works in combination with the Find function. Once the find locates the specified text string, the program can replace the specified string with the text you specify to replace it.
For example: Using the replace, you can change a script used to create stored procedures into a script used to change them by searching for the command CREATE and replacing it with ALTER.
To Upper Case
![]() Clicking this button will format any selected text into UPPER CASE.
Clicking this button will format any selected text into UPPER CASE.
Note: If you highlight/select 1 or more characters/word/lines, then only those will get converted; if nothing is selected, the entire contents is converted.
To Lower Case
 Clicking this button will format any selected text into lower case.
Note: If you highlight/select 1 or more characters/word/lines, then only those will get converted; if nothing is selected, the entire contents is converted.
To Proper Case
image:SQLExecute/image30.png [J:\_StagingArea\_TruckMate\TruckMate decompiled CHM\util\images\81SQLEXECproperScriptButton.png,width=17,12] Clicking this button will format any selected text into correct SQL Statement format.
Note: If you highlight/select 1 or more characters/word/lines, then only those will get converted; if nothing is selected, the entire contents is converted.
Clean SQL or Script
![]() The three options available here help to remove lines of text from the SQL Tab or Script Tab that may not be directly involved in the patch, as follows:
The three options available here help to remove lines of text from the SQL Tab or Script Tab that may not be directly involved in the patch, as follows:
-
Remove Comment Lines*: selecting this option will remove any lines designated as comments (the '--' or '//' characters designate comment lines).
-
Remove Blank Lines:* selecting this option will remove any blank lines from the script.
-
Remove Comment Lines and Blank Lines*: both of the above will be removed from the script.
Log Menu
The functions listed on the Log Menu control the Log options available when running scripts.
Show Log
 Selecting this item will open the SQL script results log in Windows Notepad. See the notes on the Log tab in the program Preferences topic for more information about the script results log. When writing to log files, results
*Warning:* SQL error #, etc) are now comment-tagged (--//) so the file can be re-loaded and re-run.
Clear Log
![]() This will clear the log file. The log file (if one exists) will be deleted and a new, empty file is created.
This will clear the log file. The log file (if one exists) will be deleted and a new, empty file is created.
View Historical Log
![]() Select this option to open a historic log file from those saved to your system. Historic Log settings are configured on the Tools Menu > Options / Setup window > Log Tab > Historical Logs Tab. You can also configure the way in which you’d like to view these historical logs (via Notepad or other application) on the Log > General Tab.
Select this option to open a historic log file from those saved to your system. Historic Log settings are configured on the Tools Menu > Options / Setup window > Log Tab > Historical Logs Tab. You can also configure the way in which you’d like to view these historical logs (via Notepad or other application) on the Log > General Tab.
History Menu
The functions listed on the History Menu allow you to view SQL queries previously entered in the SQL Execute program, and includes functionality for setting up 'Favorite' SQL scripts that you use often.
Enable History
![]() When the 'Enable History' option is enabled, the SQL Execute program will store historical logs in the directory configured on the Tools Menu > Options / Setup window > Log Tab > Historical Logs Tab. Historical logs will allow you to view all the SQL Statements executed by users in the SQL Execute program since the option was enabled.
When the 'Enable History' option is enabled, the SQL Execute program will store historical logs in the directory configured on the Tools Menu > Options / Setup window > Log Tab > Historical Logs Tab. Historical logs will allow you to view all the SQL Statements executed by users in the SQL Execute program since the option was enabled.
Note: You can also configure the way in which you’d like to view these historical logs (via Notepad or other application) on the Log > General Tab. To view this log, use the 'Log Menu > View Historical Log' option.
Show SQL History/Favorites
-
Selecting this option will bring up the SQL Favorites/History window, where you can view previously executed SQL commands and SQL commands saved as favorites.
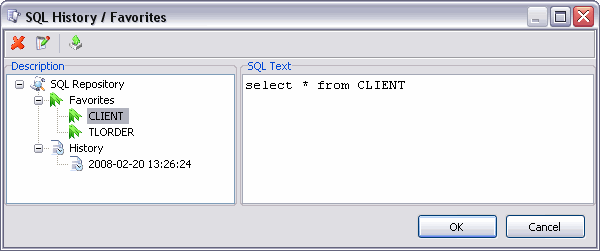
You can select any one of the SQL Favourites in the left-side 'Description' menu and then click the 'OK' button to have it automatically added to the SQL Tab for quick entry.
Toolbar Options are:
-
Delete Selected
![]() This option will delete the selected Favourite or History record from this window.
This option will delete the selected Favourite or History record from this window.
-
Rename Selected Favourite
![]() This option will allow the User to rename the selected SQL Favourite.
This option will allow the User to rename the selected SQL Favourite.
-
Export Favourites to File
![]() This option will open the SQL Favourite Export window, which will allow you to choose which Favourites to export and the location of the export file (.SQL formatted file).
This option will open the SQL Favourite Export window, which will allow you to choose which Favourites to export and the location of the export file (.SQL formatted file).
The export file that is produced will detail all the Favourites, with comments to separate them from one another.
Add Favorite
![]() Selecting this option when a SQL Statement is highlighted in the SQL Tab will that SQL Statement to the SQL History/Favourites window (see above).
Selecting this option when a SQL Statement is highlighted in the SQL Tab will that SQL Statement to the SQL History/Favourites window (see above).
Transactions Menu
The functions listed on the Transactions Menu are used in the SQL Tab.
Use Transactions
![]() Like most RDBM’s (Relational Database Management Systems) DB2 employs the concept of a transaction. A transaction, in simple terms, is the action of inserting, updating, or deleting one or more records in a table. Once the action is completed, you must signal that the change should be either committed (the changes are written into the database), or rolled back (the changes are undone and the records go back to their previous state).
Like most RDBM’s (Relational Database Management Systems) DB2 employs the concept of a transaction. A transaction, in simple terms, is the action of inserting, updating, or deleting one or more records in a table. Once the action is completed, you must signal that the change should be either committed (the changes are written into the database), or rolled back (the changes are undone and the records go back to their previous state).
| Users must make note of this setting when executing an SQL command that will affect large numbers of records. It is recommended that Use Transactions be turned on to allow rolling back if a command to add, update, or delete many records is executed in error. |
By default, the Use Transactions option is turned on, and you must use the 'Commit' command to confirm any changes made by SQL commands that you have executed. Also, when the program exits, a message box will appear to prompt you if you want to commit your work to the database.
If this option is turned off all transactions are automatically committed without User intervention.
Rollback Work
![]() When the Use Transactions mode is enabled this allows the User to undo any changes made by SQL commands executed since the last commit..
When the Use Transactions mode is enabled this allows the User to undo any changes made by SQL commands executed since the last commit..
Commit Work
![]() When the Use Transactions mode is enabled this option allows the User to confirm changes made by SQL commands which have been executed since the last commit.
When the Use Transactions mode is enabled this option allows the User to confirm changes made by SQL commands which have been executed since the last commit.
Multi-Schema Menu
The Multi-Schema Menu contains several options used when working/patching Multi-Schema databases.
Multi-Schema Script Processor
-
. Selecting this option will process any SQL Script on the Scripts Tab for application to a Multi-Schema Database environment. Once selected, scripts will be automatically processed and displayed on the Scripts Tab. If, however, the script that you are processing contains any 'CREATE TABLE…' commands, the Multi-Schema Script Processor window will open, which allows you to adjust the Table creation statements for distribution across multiple Schemas.
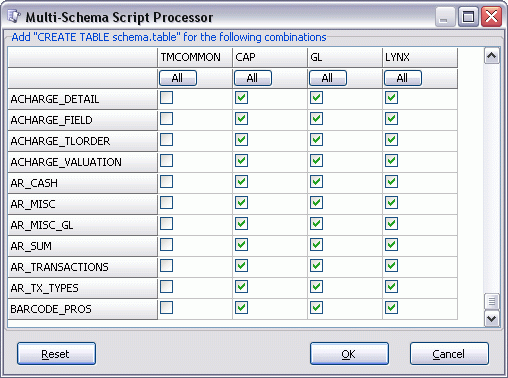
All of the Tables listed within 'CREATE TABLE…' statements appear on the left side of this window. You then have the choice of specifying which Schemas have the 'CREATE TABLE…' statements applied to their Database.
Select the Tables you would like to include by checking their associated checkbox, or by clicking the 'All' button beneath the Schema name.
The 'Reset' button will return the window options to the way they initially appeared, undoing any changes you have made.
Select 'OK' when done. You will then be asked if you would like to run the script. Select 'Yes' to do so, or 'No' to view the changes (you can always execute the script at a later time by using the 'Execute Script' toolbar button).
Note: If you are connected to a Multi-Schema Database that is not set to 'Stand-Alone' Type, you will see this option. On any other configuration, this option will not be available.
Add a Schema / Company
-
Selecting this option will open the Add New Schema / Company window. This option is useful if you have a Single-Schema Database and want to turn it into a Multi-Schema Database, or if you have a Multi-Schema Database that you want to add another Schema to. If your Database is currently Single-Schema or has only 'Stand-Alone' Type Schemas, you will be allowed to add either another 'Stand-Alone' schema or the main 'Common' Schema ('TMCOMMON').
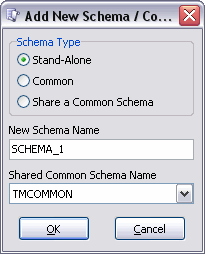
Once a Common Schema is created, you will be allowed to add either another 'Stand-Alone' or a 'Share' Schema (one that will have access to Tables in the 'Common' Schema). When adding a new Schema, the SQL Execute program will check to make sure duplicate Schema names are not used.
You can also access this option by using the <CTRL><ALT><A> hotkey combination.
Note: This tool is just the first step in creating a new Schema (replicates the logic that is normally done in the DB2 Create Wizard progarm). The generated script includes comments as to what further steps are required. One of these steps, if adding a 'Common' Schema, is to "convert" current 'Stand-Alone' Schemas to 'Share' Schemas. See the 'Classify Schemas' option below for more information.
Classify Schemas
Selecting this option will open the Classify Schemas window, which allows you to set your Database Schemas to either 'Stand-Alone' type or tie them to the 'TMCOMMON' Schema.
You can also access this option by using the <CTRL><ALT><K> hotkey combination.
Note: If you are not connected to a Multi-Schema Database, this option will not be available.
Drop a Schema
Selecting this option will drop a database schema when in a Multi-Schema environment. This is to be run once for each 'From' schema selected in the Table Move Wizard after the data move from Multi-Schema to Multi-Company is complete (to format the database as single schema). It calls a DB2 procedure named 'ADMIN_DROP_SCHEMA' via a clp window (you must know a db2admin user login and password).
Note: You will have access to the options on the Multi-Schema Menu only when connected to a Multi-Schema database.
Maintenance Menu
The Maintenance Menu contains a variety of options that will diagnose and fix problems in your database. While selectable as separate items on the Menu, all of the options in the Maintenance Menu are controlled by one drop-down button menu (![]() ) on the Toolbar.
) on the Toolbar.
Note: When you close any Maintenance Menu you have opened, a prompt will appear asking if you "Would you like to rebind all the stored procedures to take advantage of the updated table statistics? (Recommended)". It is recommended that you select 'Yes' at this prompt after completing any Maintenance activities.
Performance Menu
Reorg (Tables/Indexes)
This option reorganizes all indexes defined on a Table by rebuilding the index data into unfragmented, physically contiguous pages. When this option is selected, the Reorg Options window will open, allowing the User to specify how to proceed with the Reorg command.
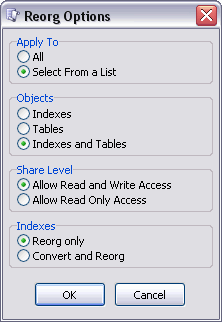
Note: This action now applies to all schemas, including system tables.
Select the radio options you wish to use when completing the Reorg:
-
Apply To
Select 'All' to have the Reorg include all TruckMate Tables, or choose 'Select From a List' to choose which Tables you would like included from a list of all TruckMate Tables.
-
Objects
Select one of either 'Indexes', 'Tables' or 'Indexes and Tables'.
-
Share Level
Choose from either 'Allow Read and Write Access' or 'Allow Read Only Access'. The former selection should be used when you are doing the REORG while others are using the Database (to prevent them getting errors that the table is locked or inaccessible). If no Users are connected, it is faster to use the Read Only option.
-
Indexes
Regarding Indexes, you have the option to 'Reorg only', or to 'Convert and Reorg'. The former simply applies the Reorg command to all Indexes, while the latter adds an extra command convert version 7 DB2 indexes to DB2 version 8 format (i.e. 'Convert and Reorg' only needs to be done once).
Runstats (Tables/Indexes)
The RUNSTATS command updates statistics about the physical characteristics of a Table and the associated indexes. These characteristics include number of records, number of pages, and average record length. The optimizer uses these statistics when determining access paths to the data.
This utility should be called when a table has had many updates, or after reorganizing a table.
Upon selecting this option, you will be given a choice to perform 'Runstats on all Tables' of your Database. If you select 'Yes', the 'Runstats' script will automatically generate for all the Tables in the database. Simply select the 'Execute' button to run the script.
If you select 'No', the DB2 Table Maintenance window will open, where you can view the details of all the tables within the database you are currently connected to, and select a specific number of Tables to be included in the RUNSTATS script.
Note: If you are on a Multi-Schema Database, you will have the option to choose which Schema to run the RUNSTATS command on from an included drop-down menu.
This action now applies to all schemas, including system tables.
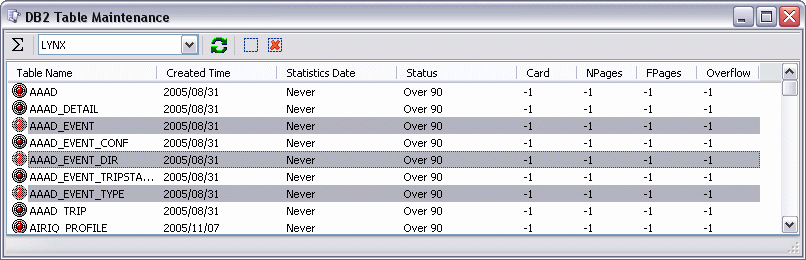
In this window you will see a visual representation of all the Tables in your TruckMate Database. In the image above, the User has held down the <Ctrl> key and used the mouse to select three different Table records to be included in the 'Runstats' script.
Toolbar options are:
-
Generate Runstats Script
-
Clicking this button (or accessing the 'Runstats' function from the Grid Context Menu) will open the Runstats Table window.
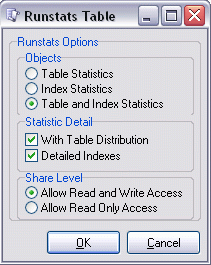
| Field | Definition |
|---|---|
Objects |
Select the Objects that you wish to display for this table: 'Table Statistics', 'Index Statistics' or both. |
Statistic Detail |
Check the options you wish to include to display in the table Statistics. |
Share Level |
Choose the option you wish to use when a User views table Statistics. 'Read Only Access' will not allow the User to modify table information. |
-
User
Choose the User name that you are using. Choosing a different User name will allow access to different Tables, but modifying the Table data under the 'SYSIBM' and 'SYSTOOLS' values is not recommended.
-
Refresh
 Click this button to refresh the Table Grid with any changes.
 -
Select All Tables
 Click this button to select all the tables listed in the Table Grid.
 -
Select None
 Click this button to de-select any selected tables listed in the Table Grid.
Rebind (Procedures/Packages)
Rebinding is the process of recreating a package for an application program that was previously bound. You must rebind packages if they have been marked invalid or inoperative. In some situations, however, you may want to rebind packages that are valid. For example: you may want to take advantage of a newly created index, or make use of updated statistics after executing the RUNSTATS command.
Packages can be dependent on certain types of database objects such as tables, views, aliases, indexes, triggers, referential constraints and table check constraints. If a package is dependent on a database object (such as a table, view, trigger, and so on), and that object is dropped, the package is placed into an invalid state. If the object that is dropped is a UDF, the package is placed into an inoperative state.
Invalid packages are implicitly (or automatically) rebound by the database manager when they are executed. Inoperative packages must be explicitly rebound by executing either the BIND command or the REBIND command. Note that implicit rebinding can cause unexpected errors if the implicit rebind fails. That is, the implicit rebind error is returned on the statement being executed, which may not be the statement that is actually in error. If an attempt is made to execute an inoperative package, an error occurs. You may decide to explicitly rebind invalid packages rather than have the system automatically rebind them. This enables you to control when the rebinding occurs.
Note: This action now applies to all schemas, including system tables.
Other Options
Bind Database
This option will rebind the database schema and utilities, to ensure access to the DB2 tables. This command should be run after any major updates (i.e. schema upgrade patches, etc.).
All of the Above
When you select this option you will be given the option to automatically execute the script that is generated. Select 'Yes' if you would like to automatically run the script, or 'No' if you would like to look it over prior to execution.
After this selection is made, the DB2 Maintenance Script will be generated and include all of the following, in this order:
-
Indexes (reorg)
-
Tables (runstats)
-
Procedures (rebind)
-
Views (recreate)
When the script has been generated, you will be prompted to execute it (if you have selected 'No' at the first prompt) and then directed to run the Security Patcher following completion of the execution.
DB2 Configs menu
The DB2 Configs menu allows two options, both of which run the DB2 Configuration Utility (useful when first installing TruckMate). To use these two options, the currently logged in User must be a 'db2admin' User. If the current User is not part of the 'db2admin' User group, then a prompt will appear asking for 'db2admin' User login credentials. Running the 'Install a Release / Service Pack Patch' option (Tools Menu) will run the two following options automatically.
DB2 Configs
Selecting this option opens the DB2 Configs that Affect TruckMate Performance window, which allows you to configure which Database Tables (on the currently connected Database) will be affected by the DB2CFG.BAT process.

In the DB2 Configs screen, rows that have values that are different than recommended will be highlighted.
If the current config value is lower than the recommended value, it will be highlighted in red and the checkbox to change it will be checked by default (it is highly recommended that you change the config). If the current config value is higher than the recommended value, this is not necessarily a bad thing (you may have had a good reason to tune the config to a higher value); the row will be highlighted in yellow (so that you review/notice it), but it will not be checked by default.
DB2 Bufferpools
On the DB2 Configs window, for any database other than the ISC4, all of the database’s 'bufferpools' are now listed below the last config (currently 'STMTHEAP'). For each bufferpool, the current and recommended minimum size are shown. A bufferpool’s size can be changed just like changing a config (enter desired value into 'To' column and check left-most column).
-
Note:* A bufferpool size (or other listed config’s size, where applicable) can be changed to AUTOMATIC by simply entering a value in the 'To' column starting with "Auto" (case-insensitive- i.e. "Auto" or "AUTO" or "Automatic" or "AUTOMATIC").
Just like configs, a bufferpool row will be highlighted in red or yellow if it is below or above the recommended minimum size (if set to Auto, the row is neither highlighted nor auto-recommended for a change).
Also, upon selecting the 'Advise' menu item, a popup message will indicate the number of settings that should be changed (i.e. status bar info) and indicate what the red/yellow highlighting mean.
Options Menu
Change All
Selecting this option will check all available configuration options, enabling them for the configuration process.
Change None
Selecting this option will un-check all available configuration options, disabling them for the configuration process.
Advise
Selecting this option will check all those configuration settings that require updating. Numeric configs require updating if lower than the default / recommended value and other configs require updating if different than the default. The result of the 'Advise' option is displayed in the status bar (basically, how many configs are checked and require changing).
'Change All' and 'Change None' options are also available from top menu or via grid right-click. When you select 'OK', if you have checked some configs to be changed, the update statements will be executed in a CLP (command line processor) window. There is a checkbox option (default NOT checked) if you wish to keep the CLP open (so you may review the results).
Some of the configs require a DB2 restart (these are indicated in the last column in the grid- you may have to scroll over or widen the form). If you do update a config that requires restart, you will be prompted as to whether you want to do so now or later (no other user may be logged into a TruckMate application and you must log out of all other TruckMate applications other than SQL Execute). If you choose now, you are immediately reconnected to the Database (so you don’t have to restart SQL Execute).
Configuration Settings List
When the DB2 Configs that Affect TruckMate Performance window firsts opens, the recommended configuration settings will automatically be checked in this list. Depending on the value selected in the '# of users that connect to the DB' section the automatically selected options will change.
While it is not recommended by TMW Support, you may select any other configuration options that your company requires changed.
# of users that connect to the DB
Use the 'Up' or 'Down' arrows to adjust the number of Users that you expect to connect to your Database. Depending on the amount of users to be on the system at once, different configuration options must be altered by the DB2CFG.BAT process.
Leave command window open
If you would like to review the SQL issued by the DB2CFG.BAT process, select this option. Select the 'OK' button to run the DB2CFG.BAT process.
Some of the configs require a DB2 restart (these are indicated in the last column in the grid - you may have to scroll over or widen the form). If you do update a config that requires restart, you will be prompted as to whether you want to do so 'Now' or 'Later' (no other user may be logged into a TruckMate application and you must log out of all other TruckMate applications other than SQL Execute). If you choose 'Now', you are immediately reconnected to the Database (so you don’t have to restart SQL Execute).
DB2 Configs - ISC4
Selecting this option runs the Database configuration utility (DB2CFG.BAT) on the ISC4 (security) Database. The DB2 Configs that Affect TruckMate Performance window will appear (as with the above option) with the same functionality.
DB2 Upgrade
Before DB Upgrade / After DB Upgrade
These two options are provided for making database upgrades a simpler process. The two options are very similar and use the same form. In both the 'Before Upgrade' and 'After Upgrade' windows, there are the following checkbox options:
-
'Save DB2 Configs to Files':* this option allows the user to backup the db2 configs to text files. The backup files are written to your log directory (set in Tools Menu > Options).
-
'Adjust Log/Diag Configs':* this checkbox allows you to adjust certain configuration options. In the Before Upgrade window, the log and diagnostic level configs are temporarily increased, while in the After Upgrade window, the configs are set back to "normal". In both modes, you may do the backups and config changes to all local databases in a single step (you are presented with a checklist of databases). This means you must run these options from the server (only databases hosted on the current machine will be included).
-
'Leave Command Window Open':* all changes are made via a single CLP window call, so this option allows you to indicate if you wish to leave the CLP window open when finished (to check results of statements executed).
Cleanup / Repairs
Inoperative Objects (fix)
When you select this option, the SQL Execute program will scan your Database for any Inoperative DB2 Objects (Procedures, Triggers and Views) and will generate an SQL Script that will fix these erroneous objects. A window will appear, showing you the number of objects needing fixing, and once you click 'OK', a script will be generated and displayed on the Scripts Tab. To complete the process, just click the 'Execute' button to run the script.
Temporary Tables (drop)
Selecting this option will "clean-up" (drop) temporary system tables created when certain DB2 tools are used (like 'explain', 'advise', 'monitor', etc). Dropping these Tables will free up disk space.
Revalidate Objects
Selecting this option will create script to validate Data base objects. A decision window will popup asking if you want to run the script or not. The script should capture all invalid database objects.
Views (recreate)
Views can become inoperative:
-
As a result of a revoked privilege on an underlying table.
-
If a table, alias, or function is dropped.
-
If the superview becomes inoperative. (A superview is a typed view upon which another typed view, a subview, is based.)
-
When the views they are dependent on are dropped.
The following steps can help you recover an inoperative view:
-
Determine the SQL statement that was initially used to create the view. You can obtain this information from the TEXT column of the SYSCAT.VIEW catalog view.
-
Re-create the view by using the CREATE VIEW statement with the same view name and same definition.
-
Use the GRANT statement to re-grant all privileges that were previously granted on the view. (Note that all privileges granted on the inoperative view are revoked.)
-
If you do not want to recover an inoperative view, you can explicitly drop it with the DROP VIEW statement, or you can create a new view with the same name but a different definition
All of the Above
When you select this option you will be given the option to automatically execute the script that is generated. Select 'Yes' if you would like to automatically run the script, or 'No' if you would like to look it over prior to execution. Once this option is selected, a DB2 Cleanup / Repairs script will be generated that includes all the above processes.
Tools Menu
The options on the Tools Menu provide many other high level functions for use with SQL Execute, as well as for your TruckMate database in general.
The following options are described in more detail in separate topics:
TruckMate Monitor
![]() Click the down arrow next to this button to access the various functions of the new TruckMate Monitor.
Click the down arrow next to this button to access the various functions of the new TruckMate Monitor.
Remember Position / Size
Selecting this option will maintain the program window position and size upon close. When the program is re-opened, it will appear the same.
Dependency Checker
![]() This function is used to analyze SQL scripts before they are executed by the program. For a more detailed description of this function see the notes on the 'Dep Tab' above.
This function is used to analyze SQL scripts before they are executed by the program. For a more detailed description of this function see the notes on the 'Dep Tab' above.
Note: A progress bar has been added to the Dependency Checker window to aid in estimating how much time is remaining in the checking process.
Install a Release / Service Pack Patch
![]() This item opens a special Wizard that is only to be used to Upgrade or apply Database Service Pack patches. This should only be used by TMW staff or with the assistance of TMW Support. Selecting this option will also run the 'DB2 Configs' and 'DB2 Configs - ISC4' options (Maintenance Menu) automatically.
This item opens a special Wizard that is only to be used to Upgrade or apply Database Service Pack patches. This should only be used by TMW staff or with the assistance of TMW Support. Selecting this option will also run the 'DB2 Configs' and 'DB2 Configs - ISC4' options (Maintenance Menu) automatically.
If you are planning to apply another release patch after the current selection (i.e. in the case that you are performing two subsequent upgrades), you can speed things up by checking the 'Multi Version' flag to skip the 'Fix Inoperatives' and 'Table REORG' processes that are usually done automatically after the upgrade script completes.
Note: The 'Multi Version' checkbox is disabled if you select the last radio button ('Latest Release') as the system will presume that you will not be applying another release patch. The 'Fix Inopreatives' and 'Table REORG' processes will run as normal.
After the release patch has completed and you click 'OK' to close the progress screen, the Maintenance menu option 'Fix Inoperatives' will be run automatically. If no inoperatives are found, no message will display (you will not even know it was called). But, if there are inoperatives, you will be prompted to run the 'Fix Inoperatives' command. Select 'OK' to continue.
Notes:
-
If installing a patch that requires certain Database Tables to be upgraded to an '8K' table space, an error window will appear, prompting you to 'move' these Tables to a larger Table Space. This is accomplished by the 'Move a Table to a Larger Tablespace or another Schema' option listed below, which should only be used in accordance with a TMW Support Representative.
-
When upgrading from a Client machine, the SQL Execute program will ensure that the version of DB2 installed on the machine is up to the recommended FixPak level. If you do not have the recommended FixPaks installed, installation will not continue.
Latest DB2 FixPaks for version 9.5:
Export Schema to a Text File
![]() This item opens the Schema Export Wizard. The term schema in this case refers to the meta-data that defines the database structure. The schema export Wizard allows the User to choose to export to a text file (a) the entire database schema, or (b) selected objects from the schema. If option (a) is selected, the User is then prompted for a file path and name to export the meta-data to. If option (b) is selected, the User is offered lists of tables, views, generators / sequences, indexes, procedures, and triggers. Then the User is prompted for a file path and name. The Wizard then extracts the meta-data and the User is prompted when the process is complete. The User may exit from the Wizard at any time.
This item opens the Schema Export Wizard. The term schema in this case refers to the meta-data that defines the database structure. The schema export Wizard allows the User to choose to export to a text file (a) the entire database schema, or (b) selected objects from the schema. If option (a) is selected, the User is then prompted for a file path and name to export the meta-data to. If option (b) is selected, the User is offered lists of tables, views, generators / sequences, indexes, procedures, and triggers. Then the User is prompted for a file path and name. The Wizard then extracts the meta-data and the User is prompted when the process is complete. The User may exit from the Wizard at any time.
Convert Tablespaces
![]() The Convert Tablespaces option allows you to "copy" (one, some, or all) existing tablespaces to new tablespaces with same properties except MANAGED BY DATABASE instead of MANAGED BY SYSTEM. The new tablespace will have the same name except starting with DMS_ (if this makes name longer than 18 char max, then it is chopped to 18 chars).
The Convert Tablespaces option allows you to "copy" (one, some, or all) existing tablespaces to new tablespaces with same properties except MANAGED BY DATABASE instead of MANAGED BY SYSTEM. The new tablespace will have the same name except starting with DMS_ (if this makes name longer than 18 char max, then it is chopped to 18 chars).
Note: You must be a db2admin user to run this option (done vis the CLP). Also, the CLP window is left open so that you can review whether the CREATE TABLESPACE statements succeeded.
DB Refresh
The Database Refresh button will generate a script to drop and re-create various schema objects depending on the options selected on the DB Refresh window. Be advised of the following warnings when using this feature:
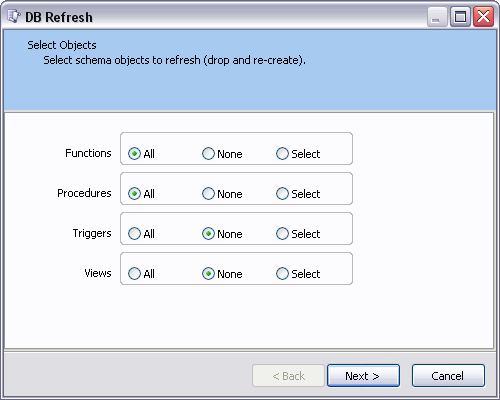
Select the database objects you would like to have dropped/re-created by the generated script by selecting either the 'All', 'None' or 'Select' radio option for each of the included database objects ('Functions', 'Procedures', 'Triggers' and/or 'Views').
If you select the 'Select' option, you will be presented with a full list of the applicable database objects in your database when you select the 'Next' button. You must then select the specific Functions/Procedures/Triggers/Views that you wish to be re-created manually.
-
The script built by this option should only be run when no others are on the system as it can be disruptive.
-
This option only builds a script for the current schema; on a multi-schema database, you should turn the Multi-Schema Script Processing option offf and repeat this option for each schema.
-
Except for Triggers, all the schema objects will have a drop and re-create immediately following one another; for triggers, all drops are added to top of script and all creates after functions and procedures (before views).
-
If you "refresh" functions and/or procedures but not triggers, then you will need to run the Dependency Checker (some triggers call functions and procedures and DB2 will not allow you to drop the func/proc without first dropping the trigger).
Note: The DB Refresh feature only applies to SQL-based functions and procedures. TruckMate does have some C and Java based procedures, but these are ignored (not dropped and re-created).
Options / Setup
 Selecting this item will open a pop-up form that allows you to configure how the SQL Execute program functions behave. The SQL Execute Options form offers the following tabs:
General tab
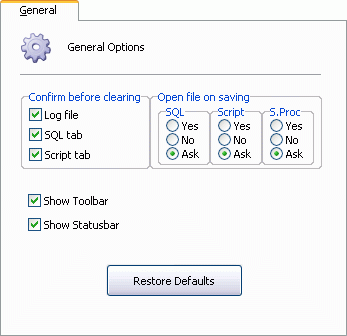
Confirm Before Clearing
The clear function is used to erase whatever is currently being shown in one of 3 areas of the program. Setting this option will cause the program to prompt the User with a confirmation message box before it actually clears the contents of each or all of the the SQL tab, SQL Script Results Log, or the Script tab itself.
Open File on Saving
These settings allow you to configure the program’s behavior when a User selects the 'File Menu > Save Script to File' option. The three sections here: 'SQL', 'Script' and 'S.Proc' apply to the use of the 'Save Script to File' option when a User is on the SQL Tab, Script Tab or Stored Procedure Tab, respectively.
-
Selecting 'Yes' will cause the program to automatically open the save file in its default application upon save.
-
Selecting 'No' will cause the program to save the file, but not to open it.
-
Selecting 'Ask' (default) will produce the prompt window asking whether or not you would like to open the saved file in its default application.
Show Toolbar
The tool bar that appears just below the menus in the main screen is configured to be displayed or hidden by the program by checking or un-checking this checkbox.
Show Status Bar
The program status bar which appears in the SQL tab and the Scripts tab can hidden or displayed by the program depending on whether this checkbox is checked or un-checked.
Restore Defaults
Clicking this button resets all the options on all of the tabs back to the program default.
SQL tab

The options on this tab control how the program behaves when the SQL tab is active.
Show record count
This toggles the record count function on and off. With the option turned on, when an SQL statement is executed, the number of records affected is displayed in the program status bar.
Display text results in list format
When this option is turned on, the records returned as the query results are displayed in the text tab one record at a time with the fields in a vertical list instead of as columns extending to the right as normal.
Include Query in text results
If this flag is checked, the query entered on the SQL Tab will be included at the top of the Text Tab when the query is executed.
Include column titles in text results
If this flag is checked, the column titles of the table will be included next to their values on the Text Tab when a query is executed.
Include column titles in csv results
If this flag is checked, the column titles of the table will be included with their values in the .CSV file that is created upon execution of a query.
Tab-delimit text results (instead of blank spaces)
If the 'Display text results in list format' option in not checked, and this flag is checked, the records will be displayed similar to a spreadsheet format on the Text Tab, and will be separated by a 'tab' (more space then a single 'space').
Format Inserts Tab for Readability
If instead you want to see only 1 line of text per INSERT statement when working with the SQL Tab > Inserts Sub-Tab, enable this flag.
Pad String CSV Fields (with Spaces) to Full Fixed Width
If you wish to open a file that was generated from the results of the SQL Tab in .CSV format with a text editor, you may wish to have text fields padded with spaces ('Pad Left'), just like fixed text format, so the columns line up and the data is easier to read. Or, you may wish to have text fields right-aligned ('Pad Right')when viewing the file in a spreadsheet program like Excel. Note that numbers and dates are not affected by this option.
Maximum history entries
This value determines how many SQL commands will be automatically entered into the SQL history log. Once the log is full, logging function will drop the oldest entry to allow the newest entry to be stored.
Text tab memo fields display width
When an SQL query returns a record with a BLOB (or CLOB) memo field in it that stores a text value, the text tab uses this value to determine the maximum number of characters from the text string that it will display. Any values from the text string past the limit are not displayed.
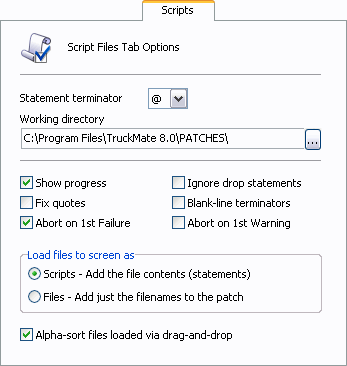
Scripts tab
The options on this tab control how SQL Execute processes SQL scripts in the Script Files tab.
Note: Most SQL scripts written for TM50 and earlier use InterBase SQL dialect. This version of SQL uses the semi-colon as the statement terminator and a blank line to indicate the end of a procedure or function definition. If you are going to execute one of these scripts, you must set the statement terminator option to the semi-colon and turn on the Blank-line terminator option.
Many SQL scripts written after TM50 were written using DB2 SQL dialect, which uses the @ symbol as the statement terminator. As of TM60, all SQL scripts written for InterBase and DB2 use the @ symbol as the statement terminator. In these cases, the Statement Terminator should be set to @ and the Blank-line terminator option turned off.
Statement Terminator
This option refers to SQL scripts and the special character used to indicate the end of each individual command. The default setting is the @ symbol. See discussion below.
Working Directory
A directory path should be entered here. This path is used for three purposes: (a) When the Script Files tab is active, the first time the 'Load from File' function is used, it will open the file search window to this directory. (b) If a file name is referenced in the Script Files tab as part of the script to be executed
Show Progress
This option enables and disables the progress indicator. This is a pop-up window which appears while scripts are being processed by the program and shows what script file (if there is more than one) is being processed, what type of commands were processed, and if the commands were successful or generated errors or warnings.
Fix Quotes
When this option is turned on, the script processor will convert all single quotes in the script text to double single quotes before processing the script. This option should be set if running scripts on InterBase databases.
Abort on 1st Failure
When this option is checked, the SQL Execute program will abort any Script operations when the first failure occurs. This option is helpful for quickly identifying any problems in an SQL Script.
Ignore Drop Statements
Setting this option causes the script processor to skip any statements that drop a database object. This option should be turned off if the dependency checking function is turned on because it adds drop statements to scripts which should NOT be ignored.
Blank-line terminators
This option indicates if the program should treat blank lines as statement terminators or not. This option is available to allow older, InterBase sytle patches to be processed.
Abort on 1st Warning
When this option is checked, the SQL Execute program will abort any Script operations when the first warning occurs. This option is helpful for quickly identifying any problems in an SQL Script.
Load files to screen as
The options here control how scripts are displayed in the script contents area. If the option is set to Scripts, the text that makes up the script is loaded into the window for inspection. If the option is set to Files, only the script filename is written to the screen.
Note: This option also configures the program to process the contents of the scripts area as either scripts or files. This is no longer the case. SQL Execute can now process scripts that are made up of both SQL commands (whether manually keyed in or loaded from a script file) and file names (either just a file name or a fully qualified path and filename).
Alpha-sort files loaded via drag-and-drop
This option, when flagged (default), will make the SQL Execute program automatically sort files that are "dragged and dropped" into the program window alphabetically by filename. When not checked (disabled), then files are sorted as follows: selected file is always first, then the remaining files follow it from top to bottom.
Log tab
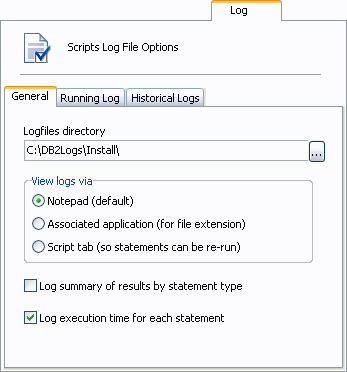
The options on this tab control how the program logs the results of scripts that are processed.
General Tab
Logfiles Directory
Specify a folder where the results log is to be written to.
View Logs Via
Select the way that you wish to use when view your log files:
-
Notepad: the Windows Notepad application will be launched, displaying the log file data.
-
Associated Application: the application that your system associates with .TXT files (such as UltraEdit) will be launched to view the logs.
-
Script Tab: Log data will be automatically loaded into the SQL Execute program > Script Tab, so that it may easily be re-run.
Log summary of results by statement type
When this option is enabled, a summary of the statements executed, along with the results counts (successes, warnings and failures)- similar to what is shown in the progress scree, will be included at the bottom of the log file.
Note: This option is independent of the 'Show Progress' option (i.e. you may choose to show summary to: a) screen, b) file, c) neither, or d) both). Also, on screen, the statement types are listed in the order they are encountered, whereas in the file, the list is alphabetized.
Log execution time for each statement
When checked, this flag will record the time taken to execute each statement that is run in the SQL Execute program.
Running Log Tab
Name (including extension)
Specify a name for the log file and an extension. Note that the file does not require a .log extension. It is recommended that an extension that is valid for a text file be used.
Clear button
The button with the trash can icon represents the clear log file function. The existing log file (if one exists) is deleted and a new, empty file is created with the specified filename, in the specified folder.
Non-verbose
By default the log will include the individual statements in the script and the result for each. Setting the non-verbose flag turns this feature off and only the statement results are logged.
Log
This option controls what results are written into the log. All statements indicates that all results - successes, failures, and warnings are logged. The other options are self-explanatory.
Auto-clear log file
In situations where many scripts are being run repeatedly, you may wish to have the log automatically cleared if the script did not generate any failures. This option complements the above option and assumes you have chosen one of the options other than 'Nothing'.
-
Never means just that. The log will never be automatically deleted when script processing is complete.
-
If no failures indicates that the log will be deleted if the results include successes and warnings.
-
If no failures and no warnings indicates that the log will be deleted if the results are all successes.
Historical Log Tab
The options on this Tab make maintaining historical logs much simpler.
Create Separate Log-File for Every Execution
If you wish your Log Files to not be overwritten when a new Log is created, select either of these two options. New Log files will be automatically named using the current Date/Time information of your system.
Select the 'With All Statements…' option to maintain historic logs with all Statement information, or the 'With Failures Only…' option to maintain historic failure logs (or both).
Auto Delete Old Historical Logs
Use the counter field to choose the amount of log files to maintain. Setting a value of '2' in this field will tell the system to maintain the two latest versions of the historic log files that are being generated. A value of '0' will disable auto-delete functionality.
Auto-View Logfile on Closing Progress
Select the radio option of the Log File that you wish to automatically display once the SQL statement you are running is complete.
Alert tab
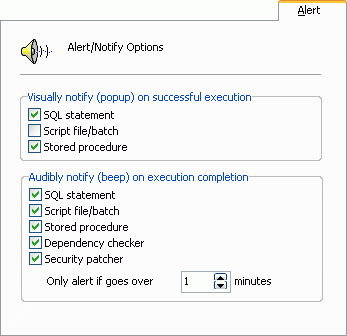
The options on this tab control how the program signals to the User that the (delayed) processing of an SQL command or script is complete.
Visually notify (popup) on successful execution
You can choose to have the program display a message box indicating when one of these processes is complete.
Audibly notify (beep) on execution completion
You can choose to have the program play a sound (the wave file associated with the Windows beep event is used) when one of these processes is complete.
Only alert if goes over
This is a whole number value (no fractional minutes allowed) indicating how many minutes must have elapsed before the alert functions should be used.
That is, if one of the processes listed above is completed in less time than the number of minutes indicated, the alert will not appear.
If the value is set to 0 and all options are selected above, the alert will always appear. A value of 5 minutes or more is the recommended setting.
Dep tab
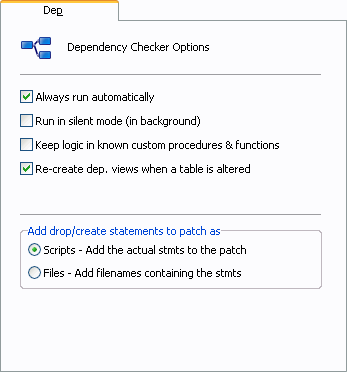
This Tab refers to the Dependency Checker function used in the Script Files Tab, before a patch is actually run on the database.
Dependencies occur when the definition of one database object references another database object. This means that for object B to exist, object A must exist first.
Example: procedure 'PR_VOID_CHK' as part of its definition uses procedure 'INSERT_CHECK_MSTR_EXP' to fill in the expense information into the void check record. 'PR_VOID_CHK' now cannot exist in the database unless 'INSERT_CHECK_MSTR_EXP' exists. It is dependant on the other procedure being defined first.
Scripts that drop and recreate procedures that other procedures depend on will cause problems if they fail to be processed successfully because the procedure depended on will no longer exist in the database.
The dependency checker function inspects scripts before they are to be processed to see if the procedures and functions which are to be defined are depended on by other procedures.
If they are, the depending procedures are dropped and recreated before and after the script by the Dependency Checker function in the correct order.
Note: The Dependency Checker can be fooled by scripts which do not themselves take dependencies into account.
Example: procedure 'C' depends on function 'B', which in turn depends on function 'A'. A script that redefines function 'A' and procedure 'C' must also redefine function 'B' even though its definition does not change.
Note: DB2 scripts are currently only inspected for function dependencies. Database administrators should also be aware that the 'PROCODR.SQL' file must exist in the TruckMate2013 folder. This is a special SQL script that defines the dependency hierarchy. Because the hierarchy is subject to change, an update to this script may be released and will need to be applied for the Dependency Checker to able to properly manage dependencies.
Always run automatically
This option should be set by default, although the dependency checker function can be run manually from the Tools menu.
Run in silent mode (in background)
When the dependency checker has completed inspecting the script(s) loaded into the Script Files window it reports to the screen what objects will be redefined and in what order. This option turns this reporting off.
Keep logic in known custom procedures & functions
If this option is flagged, then the body of any custom procedures and/or functions in a patch will be over-written with whatever the current content of that custom procedure/function is in the TruckMate database. This allows a measure of safety in the case that a patch contains a custom procedure or function that you do not want applied to your database (as you already have custom logic in that procedure/function).
Note: If you hand-type procedure or function changes with this option enabled- rather than working in an editor and copying the content into the Scripts Tab- then you will lose your changes, as this check will not be applied.
Re-create dep. view when a table is altered
If this option is flagged and an SQL script contains an 'ALTER TABLE' statement for a TruckMate Table on which a View is based, the SQL script will be formatted in a specific way. Whether a DROP/CREATE VIEW is added due to this option or due to the new view on view dependency check, the DROP statement will get added to the top of the script and the CREATE statement will get added to bottom (just like with Functions, Procedures, and Triggers).
Furthermore, Views will be dropped after other objects are dropped, and will be re-created before other objects are re-created.
Add drop/create statements to patch as
This option works in much the same way as the 'load files' option in the Scripts Tab. The dependency checker can insert the drop/recreate dependent objects statements directly into the Script Files window as statements, or it can write them into scripts files which are then included before and after the scripts to be run.
Editor tab
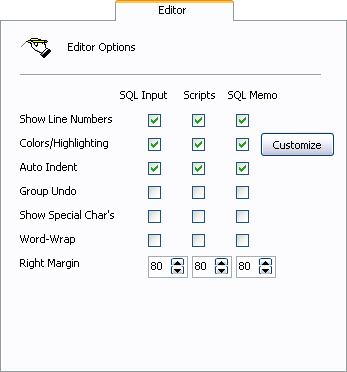
The options on this tab control how the program’s text editing functions behave in the SQL tab and the Script Files tab.
Show Line Numbers
Toggle line numbering on or off on the SQL tab and/or the Script Files tab
Colors/Highlighting
Toggle syntax highlighting of key words in the text on the SQL tab and/or the Script Files tab.
Auto Indent
Toggle auto-indenting of SQL commands and statements in the SQL tab and/or the Script Files tab.
Group Undo
Toggle the undo typing ('<Ctrl><Z>') for single keystrokes or groups of similar keystrokes in the SQL tab and/or the Script Files tab.
Show Special Char’s
Toggle the display of non-printing characters (carriage returns, etc.) in the SQL tab and/or the Scripts tab. This is useful if a script is pasted into the program from source that may use hidden text tags (such as the rich-text tags found in email).
Customize
Clicking the 'Customize' button opens the Colors/Highlighting Setup window, where colours and text display options can be customized. Click the 'Defaults' button to restore the TruckMate default color scheme for SQL Execute.
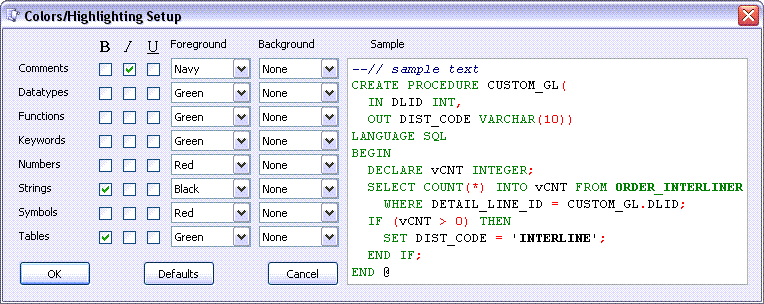
The 'Sample' window will display what your changes will look like when applied to the SQL Scripts windows.
Word-Wrap
Users can turn on Word-Wrap functionality for each of the 3 sections of the SQL Execute program by checking their respective flag. When Word-Wrap is enabled, if a line is too wide to fit across the width of the form, then instead of a horizontal scrollbar, the remainder of the line is displayed on a new line. Note that this is for display purposes only; the text is still stored as a single line. In fact, if you have the 'Show Line Numbers' option enabled, you will see that it does not change the numbering; rather, a special character is displayed (in the left gutter) for the wrapped line.
Right Margin
Users can set the Right Margin (vertical line) value for each of the 3 sections of the SQL Execute program by toggling these three numerical values. Users can move the right-margin to any column position they want (between 1 and 1024), or even turn it "off" (by setting the position to '0'). Note that this is just a guideline indicator, kind of like the bell when you get close to the end of the line on a type-writer (i.e. you can still type beyond the margin). However, to make scripts or SQL statements readable (without having to turn on word-wrap), developers are encouraged to keep line widths under a certain max- having the right-margin reminds you when your line is too long and you should start a new one. Again, users who only want to run statements and scripts (and never write them themselves), will now have the option to "hide" (get rid of) this line (by setting the new option to 0).
Multi Schema tab
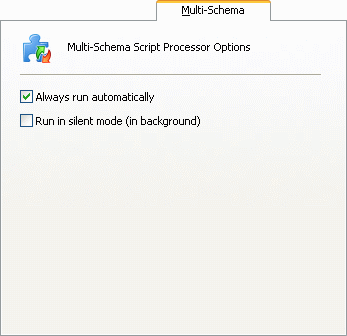
Note: This Tab will only be visible if you are currently connected to a Multi-Schema Database that is not configured as a 'Stand-Alone' Database Type.
Always Run Automatically
When this option is checked, whenever an SQL Script is executed, be it a simple User-entered script or something as large as an Upgrade Patch, the SQL Execute program will automatically call the Multi-Schema Script Processor (MSSP) Utility, which will configure the script and apply it to all connected Schemas.
Run in Silent Mode (in background)
If you check the option 'Run in silent mode (in background)', then the Multi-Schema Script Processor (MSSP) will go ahead and modify the script. Note that if the patch contains any 'CREATE TABLE' statements, these will be replicated in all the non-'Stand-Alone' company Schemas, NOT in the 'TMCOMMON' Schema.
If this option not checked, and the script does not contain a 'CREATE TABLE' statement, you will simply be asked 'Yes/No' to process the script. If silent option not checked, and script does contain 'CREATE TABLE' statements, you will be shown a grid with a row for every table to be created and a column for every non-stand-alone schema. You may check/uncheck each combination and click 'OK' or click 'Cancel' to abort. If not aborted, the processor will then attempt to re-write the patch/script in the Script Tab per the Schema structure of your database.
DB2 Tab
Warn when non schema owner run scripts
Most schema change commands (ALTER, DROP, etc) are in patches that are run from the Scripts Tab and when you do so, if you are not logged in as the schema owner (usually LYNX), you will get a popup warning.
However, it is possible to run a schema change statement (albeit one at a time) from the sql tab. Either disable this option (only allow SELECT’s from the sql tab), or at the very least, warn user that they are not the schema owner.
Auto-check for inoperative objects before closing app or switching db’s
If this option is checked, and you are logged in as the schema owner, then under ceratin conditions, the SQL Execute will automatically check to see if there are any inoperative objects. This check will occur when:
-
The user attempts to close the SQL Execute program.
-
The user attempts to switch the currently connected database (using the 'File Menu > Connect to Database' option).
-
The user attempts to switch the logged in company from the 'Multi-Company' menu.
If there are inoperative objects, you will be asked whether you wish to fix them now. If you click 'Yes', the Fix Inoperative Objects script will load and auto-execute, and your action that caused the check (leaving the database, for example) will be aborted.
Unlike the automatic Security Patcher check, you can click 'No' to continue disconnecting (and run the 'Fix Inoperative Objects' option another time).
Release Patch Tab
The Release Patch Tab contains eight separate checkbox options that allows the administrator to customize how much interaction he/she wants during release patch upgrades.
For example, if 'Skip "Are you Sure?" (last change to abort)' is flagged, the user will not be prompted to confirm if they want to run the release patch once the process has begun.
Security Patcher
![]() Selecting this item opens the Database Security Patcher Wizard.
Selecting this item opens the Database Security Patcher Wizard.
There are two separate types of security enforced in the TruckMate system: (1) program security, and (2) database security. Program security is used to control what programs and parts of programs are accessible to different Users. Database security is used to control what parts of the database are accessible to different Users.
Example: A User may be given program access to the Customer Service program, but they are not given access to the table 'ACHARGE_TLORDER', which stores the accessorial charges associated with Freight Bills. If this User attempts to open Customer Service, they will encounter a database error because Customer Service cannot open without access to accessorial charges.
The security patcher Wizard should be used to re-apply database security to the database whenever you:
-
Apply an SQL command or script that changes the structure of the database. If the SQL contains any of these words — create, drop, alter, or grant, then the Wizard should be used.
-
Add or remove one or more Users to the database.
-
Add, remove, or edit one or more User’s database privileges in Security Set-up.
The Wizard will walk you through three steps: you must first provide the password for the owner of the database, you then specify what to include in the patch log, and then security patch process begins. When the patching is completed, you can choose to review the patch log or close the patcher Wizard.
If you select the review the patch log, you will be prompted to enter a filename and directory location where the patch log will be saved to before it opens.
Notes:
-
If the security patcher finds existing user aliases in databases prior to TruckMate 11.1, a dialog will ask the user if those aliases should be dropped.
-
If you attempt to exit SQL Execute after applying a change to your database that requires to run security patcher without running it, a dialog box will appear warning you that security patcher needs to be run.
-
If you run ANY scripts that contain (successful) CREATE statements, when you try to close the SQL Execute program (or try to switch to another database via the 'Connect' option), you will be disallowed and prompted to run the Security Patcher. Once the Security Patcher has completed, you will be able to continue closing/switching to another database.
DB2 Script Generation
Selecting this option opens the DB2 Script Generation window, which allows you to configure what information will be applied to the DB2 Script that will be generated:
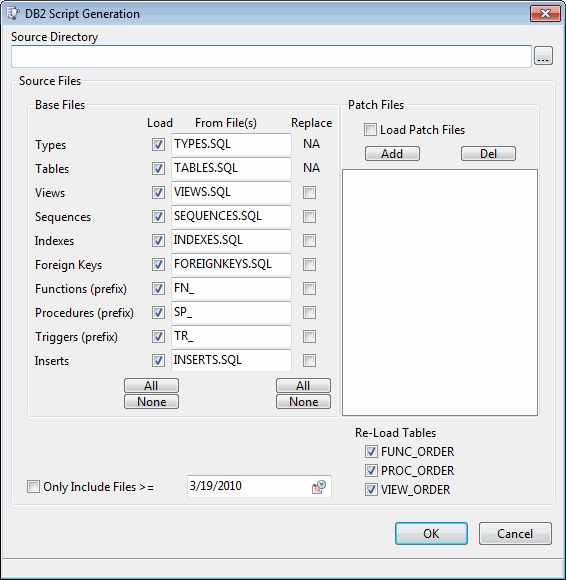
Source Directory
Click the search button to browse to the folder which contains your main TruckMate '.SQL' Source Files.
Source Files
Check the box in the 'Load' column associated with the '.SQL' Source Files you wish to use when generating the Batch File. '.SQL' statements will be gathered from those files that are checked only. You can use the 'All' or 'None' buttons to quickly select/clear all the options here.
| If the 'Procedures (prefix)' option is checked, then the file 'Procordr.sql' must be present in either the specified working directory or the directory that the SQL Execute program resides in. |
Patch Files
If you wish to use previously created SQL 'Patch Files' ('.SQL' formatted files), check this option and use the 'Add' button to browse your system for the '.SQL' files you would like to include in the Script Generation.
Only Include Files >=
This option allows you to quickly filter those files that are 'Greater than or Equal To'- or 'newer than'- a specified date. Use this option if you only want to apply the most recent Patches to your database. You may select a date by clicking the pull down menu arrow and picking a date from the Calendar menu that will display.
Re-Load VIEW_ORDER Table
When this flag is checked, the VIEW_ORDER Table will be created by the schema object creation script that this window builds.
Note: The 'VIEWORDR.SQL' file must exist in the default TruckMate install directory for this functionality to work correctly.
Re-Load Tables
-
FUNC_ORDER
If the 'FUNC_ORDER' Table exists in the Database and has rows, un-selecting this option will allow you to not re-load it.
Note: Database administrators should also be aware that the 'FUNCODR.SQL' file must exist in the TruckMate2013 folder. This is a special SQL script that defines the dependency hierarchy. Because the hierarchy is subject to change, an update to this script may be released and will need to be applied for the Dependency Checker to able to properly manage dependencies.
-
Re-Load PROC_ORDER Table
If the 'PROC_ORDER' Table exists in the Database and has rows, un-selecting this option will allow you to not re-load it.
Note: Database administrators should also be aware that the 'PROCODR.SQL' file must exist in the TruckMate2013 folder. This is a special SQL script that defines the dependency hierarchy. Because the hierarchy is subject to change, an update to this script may be released and will need to be applied for the Dependency Checker to able to properly manage dependencies.
-
VIEW_ORDER
If the 'VIEW_ORDER' Table exists in the Database and has rows, un-selecting this option will allow you to not re-load it.
Note: Database administrators should also be aware that the 'VIEWORDR.SQL' file must exist in the TruckMate2013 folder. This is a special SQL script that defines the dependency hierarchy. Because the hierarchy is subject to change, an update to this script may be released and will need to be applied for the Dependency Checker to able to properly manage dependencies.
Create Script
Selecting the 'OK' button will generate the DB2 Script based on your selected options in this window.
Move a Table to a Larger TableSpace or another Schema
 The Table Move Wizard takes you through the steps to increase the TableSpace size of your database tables. Certain database tables ('TLORDER', 'PTLORDER' and 'EDI_PROFILES' to name a few) require an '8k' TableSpace size. If your database tables reside in '4k' size, you must complete this Wizard in order to move your tables into the proper memory size allocations. You also have the option to move a table to another Schema.
| DO A FULL ONLINE BACKUP BEFORE USING THIS WIZARD! This process should be done when there are no Users on the system database. There is no Wizard to reverse this process, so proceed with caution. If you encounter any errors during this process, contact the TMW Support Department. |
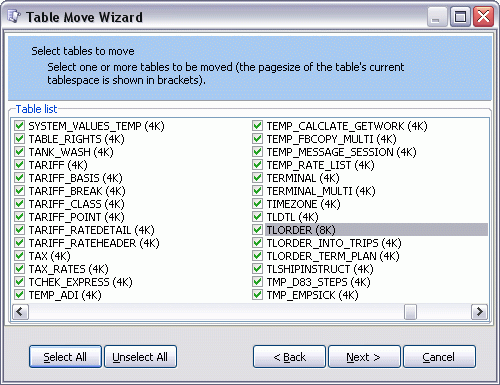
The Table Movement selection process has been streamlined, and now allows you to select multiple tables at once.
On the first page of the wizard you must use the drop-down menu to select the 'from' tablespace (where the Tables will be moved from). It defaults to 'All' (to get the full Table list). However, you can select a specific tablespace to shorten the tablelist on the next wizard page. This is especially useful when moving tables from a MANAGED BY SYSTEM tablespace to a MANAGED BY DATABASE tablespace (select all tables from a particular tablespace and move them to the corresponding DMS_ tablespace).
On the second page of the Wizard you will see all of the TruckMate system tables- simply check the tables that you’d like to be moved to the larger TableSpace.
Before inserting data, the program will check for 'duplicates' from the source table (where a 'duplicate' is a row with the same primary key value(s) as a row in destination table). If any duplicates are found, SQL Execute will prompt the User with this option:
-
Delete: drop the table anyway (the data from 1st schema merged will be the one you see in the target table).
-
Leave: remove the copied rows from the target, but leave behind the conflict ones (user will have to manually review these rows, manually updating the target table with any valuable info, and then manually drop source table).
Tables that require the 8K TableSpace are:
| 8K TruckMate Table | TruckMate Version that Requires Upgrade |
|---|---|
ER_FILTER |
Version 8.0 |
VENDOR |
Version 8.0 |
Once you have selected a Table (or Tables) to be moved to a new TableSpace, you will see the screen below. Select 'Next' to complete the process once you have configured the required options here.
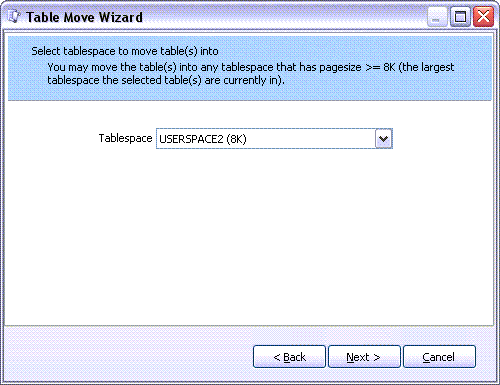
TableSpace
Use the drop-down menu to select the new TableSpace you would like to move the Table(s) to.
Multi-Schema Table Movements
If you are on a Multi-Schema Database, besides being able to move a table from a '4K' TableSpace to an '8K' TableSpace (within the same schema), you may now move a table from the current / connected schema to another schema. After the intro page, the 1st page of the wizard will prompt you to copy to TableSpace (default) or Schema (and if you choose schema you will be presented with a drop-down of schemas other than the current - as opposed to a drop-down of 8K TableSpaces). Note that the table will get created in the target schema if it does not already exist. If the table does exist, you should only use this wizard if you are sure that:
-
There will be no primary key conflicts when the INSERT is done, and
-
The tables have the exact same set of columns in the same order.
Note: An alias will be created in the current schema to point to the table in the target schema. Of course, when the dropped schema objects are re-created in the current schema, the constraints, indexes and primary key are not re-created (not needed for an alias).
Multi-Schema to Multi-Company
If you are upgrading from a Multi-Schema database, you have access to a new 'Move Tables To' option in the Table Move Wizard: 'A Single, Multi-Company Schema'. When selected, you will be prompted for:
-
The schema to move tables to- usually TMWIN (we assume you have already run the 'Multi-Schema Menu > Add a Schema/Company' option).
-
'From' schemas (usually all existing ones, including TMCOMMON) that the data will be moved from, and
-
Tables to move (a list of distinct table names from the 'From' schemas you chose; usually, you will select all).
The wizard will then create a script that will, for each table name:
-
Create a new table in target schema (if it doesn’t yet exist).
-
Do an insert to target schema from every chosen 'From' schema that contains the table.
-
Drop objects in chosen 'From' schemas that depend on chosen tables.
-
Create and execute a temporary procedure that drops the tables from the chosen 'From' schemas if the total row count from all the chosen 'From' schemas exactly matches the row count in the new table in the target schema.
-
Add indexes, constraints, etc., to target schema to match those from chosen schemas (for chosen tables).
The wizard does NOT add functions, procedures, and triggers to the target schema; it is assumed you will use the 'DB2 Script Generator' option to do so. You will also have to re-install any custom code. It also does NOT add aliases; you will do so via the Security Patcher.
It is also assumed that you will need to re-run the failures-only log after fixing some of the schema (i.e. perhaps the CONFIG table in the old schemas does not yet include the COMPANY_ID column, meaning the INSERT INTO … SELECT * … failed due to column mis-match). You can also optionally re-run the Table Move Wizard (table list should be much shorter 2nd time around).
Compare DB Schema to another DB or another Schema
![]() Selecting this option opens the Database Compare Wizard, which allows you to compare two Database schemas.
Selecting this option opens the Database Compare Wizard, which allows you to compare two Database schemas.
-
The first step in this Wizard, following the initial Splash screen, is to select a Comparison Database. Use the pull down menu to select a different Database from the one you are currently connected to. Click 'Next'.
-
You will now be required to log into the Comparison Database. Enter your credentials as required. Click 'OK'.
-
The next step allows you to select which types of objects you want to list that are in your connected Database, but not in the Comparison Database. Check or un-check the various objects types as required, or use the 'Select All' or 'Unselect All' to quickly complete this step. Click 'Next'.
-
The next step allows you to select which types of objects you want to list that are in both Databases (same name) but have different properties. Check or un-check the various objects types as required, or use the 'Select All' or 'Unselect All' to quickly complete this step. Click 'Next'.
-
The Database schema comparison will run. You will see the details of the comparison display in the window as it runs. When it is complete, click 'Next'.
-
You now have the option to save the comparison log to a file on a specific location on your hard drive. Click the 'search' button to choose a location, and specify a filename, or use the default 'dbcompare.txt'. Click 'Next'.
-
The Log is created and saved to the location you have specified. If you would like to automatically view the Log file when the wizard closes, leave the option on the last page checked, and click 'Finished'. Otherwise, uncheck the option and click the 'Finished' button.
Program Tabs
SQL Tab
The SQL Tab offers users an interactive querying mode where they can build SQL query statements, execute them, and then review query results. The Tab itself is made up of two main sections - the Command Area and the Results Area. The Command Area is where query statements can be keyed or pasted in (from another text source). The Results Area is where rows of data are returned (if the query was a select statement) into either a grid representation or a text representation.
Command Area
The Command Area allows users to enter and execute one SQL query command at a time. If many statements must be processed, then the Script Files Tab should be used. You can key in your query directly, paste it in from another text source (such as an .SQL script file, email, web-page, etc.), or load it directly from an .SQL script using the Load from File function in the File menu or Toolbar. Once the query is entered, you can use the text manipulation functions in the Edit menu to exit, cut, paste, search, or replace specific text in your query.
As of TruckMate 6.1, the text editing functions in the Command Area support line numbering and syntax highlighting to aid in creating correct SQL statements. These functions can be configured by going to the Options menu, Preference item.
Also, just like in Scripts Tab, lines in the SQL Tab starting with a comment tag ('--' or '//' etc.) will be ignored when the statement is executed.
Note: You can use several keyboard hot keys to navigate from one SQL Statement to another (previous or next): both '<ALT><left>' (previous SQL) and '<ALT><right>' (next SQL), as well as '<CTRL><B>' (previous) and '<CTRL><N>' (next) will work. <CTRL><R> will popup the 'Find and Replace' window, where you can find and replace text in the 'SQL' tab. The Find/Replace window remains open until the 'Cancel' button is selected.
Results Area
The results of select queries are returned to the Grid Tab and Text Tab. Grid Tab, Text Tab and Inserts Tab:
-
Grid Tab
The Grid Tab will show all the columns selected by the query and allow you to scroll as far right as is required.
-
Text Tab
The Text Tab will show the results of the query in a simple text format, and will include a number of other options, as defined in Preferences > SQL Tab.
Text Tab Format
If you switch to the Text tab after executing a SQL query, the results are displayed in one of two different text formats: 'Grid' or 'List' (the default being chosen by the Options window > SQL Tab > 'Display text results in list format' option). If you switch to the Text Tab and realized that you really wanted the "opposite" format, you can now quickly and easily switch (or even toggle back and forth between) the two formats using their respective radio options here.
-
Inserts Tab
The Inserts Tab lists the INSERT statements (ready to load into Script Tab, including '@' terminators) to re-load the data (presumably to a different database). You will get an error if you try to access the Inserts Tab and the query was not based on a single Table (does not make sense). For example, if you used a join or had a comma-delimited list of tables in the FROM. By default, for readability, long lines will split into multiple lines and a blank line will be included after each INSERT statement. If instead you want to see only 1 line per INSERT, then in Tools Menu > Options/Setup window > SQL Tab, uncheck the 'Format Inserts tab for readability' option. The Inserts Tab contents can be saved to a new tab or to a file, just like the other results tabs.
-
Context Menu
Save Results to a New Tab
All three of the Results Area Tabs have this option, which allows you to save the Results displayed on the Tab to a new Tab, allowing you to keep the displayed results open while you run subsequent SQL commands.
If one of the columns in the rows returned is a text-based memo, 'BLOB', or 'CLOB' field, the contents of the field cannot be displayed in the grid. Instead, they are shown in an area below the results called the memo field panel. This area can be set to be hidden or displayed from the Options menu or by clicking on the Show Memo button (![]() ) on the toolbar.
) on the toolbar.
If there are multiple memo columns in the record, then you must highlight the column by clicking on it in the results grid. The Status bar at the bottom of the field will indicate which Memo Field is currently highlighted.
Temporary Tabs
You can also save the results of your query to a Temporary Tab by using the 'Save results to a New Tab' function available in grid area context menu. You will be prompted to provide the temporary Tab with a name. You can do this as many times as required, but a unique Tab name must be provided each time. If you are in a Temporary Tab, the context menu now offers you the options to 'Delete', 'Rename', or 'Move the Tab Left or Right' among the Temporary Tabs. You may also use the 'Refresh Results' option to re-run the original SQL Query that has created the results on the Temporary Tab (in order to view any changes from the original instance it was run), and use the 'Show Query' option to view the original SQL Query that produced the results on the Temporary Tab.
Note: You can use your mouse wheel to scroll through the results presented in this section.
Stored Procedure Tab
Most SQL interfaces require users to call database procedures using very specific command syntax. For example, procedures that do not return a data set use the EXECUTE or CALL command. Procedures that return a data set use a different syntax. In addition, the user must also remember and use the correct number and type of parameters when calling each procedure.
To simplify all of the above, SQL Execute offers the Stored Procedure Tab. A drop-down list provides the user with the list of stored procedures in the database to select from. (The 'Refresh' button to the right is used to query the database to rebuild this list if SQL scripts have been run that add, drop, or redefine procedures). After the procedure is selected, click on the Execute button or use the '<Ctrl><Enter>' hot key combination.
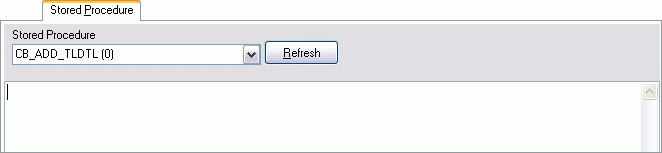
If the procedure requires input parameters, a pop-up form appears, Stored Procedure Parameters, that lists the parameters, their type, and provides a field to enter your values into.
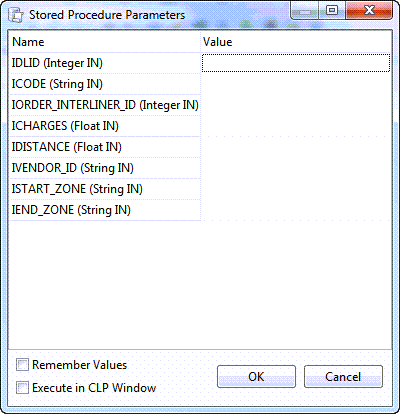
-
Remember Values
This checkbox allows you to save the values you enter for the parameters, so you can use them without re-entering them the next time you run the same stored procedure again. Select the checkbox to have TruckMate memorize your values for you.
-
Execute in CLP Window
If you select this checkbox, the procedure will be executed in DB2’s Command Line Processor window. This will allow you to retrieve SERVEROUTPUT information, which is useful for debugging.
DB2 users should note that DB2 supports 'overloading' procedures where more than one procedure can exist with the same name as long as the number and type of input/output parameters are different. Therefore this feature has some significance since the user must correctly identify the procedure to be run if more versions exist than just one.
DB2 users with multiple schemas should also note that in their environments this Tab will also contain a 2nd drop-down list identifying the schema to be used. Once a schema is selected, then the stored procedure list is filled in with the corresponding procedures.
If the field is a date or date-time field, you can double click in the field area and a calendar control will open that you can use to select a date.
If a result set is returned by the procedure, SQL Execute will generate a grid, much like the one in the Results Area of the SQL Tab. Unlike the Results Area of the SQL Tab, you cannot save the results to a file or view the results as text.
In some rare instances procedures will return text data that cannot be represented as a grid. In these cases SQL Execute will not generate a grid, but will return text to the Results Area instead. These text results can be saved as text files by the 'Save to file' function in the File menu.
At the very bottom of the screen, you can find a 'Record Count' field, which will show the number of records retrieved by the procedure. But in order for this option to show the number of records, the user must set the 'Show Record Count' option 'On' (selected), which can be set in Menu Bar > Tools > SQL Tab. Otherwise the field will only show the word 'Off'. Another helpful field can be also be found at very bottom of the screen is the Time it took the procedure to finish executing. There is no title on the field; it only displays the value in 'Time' format.
Refresh
The Refresh button is used to query the database to rebuild this list if SQL scripts have been run that add, drop, or redefine procedures.
DB2 Functions Tab
The DB2 Functions Tab displays a breakdown of all the DB2 Functions setup in the database the User is currently connected to.
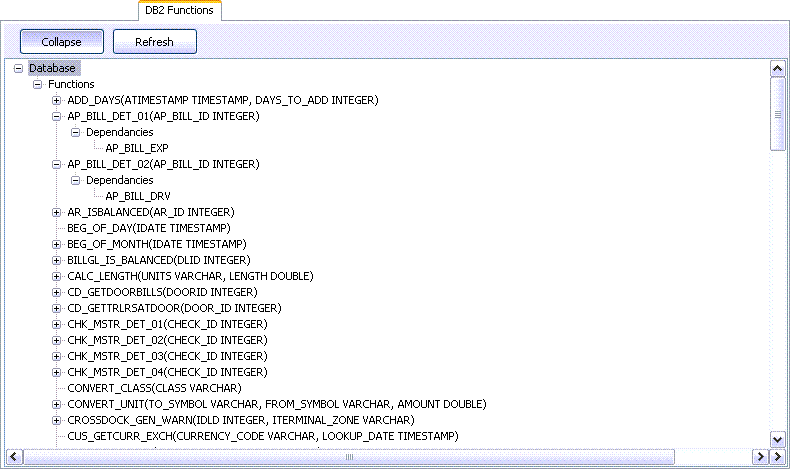
Expand / Collapse
This button’s label changes depending on what state the Tree branch menu is currently in. When the Tree is minimized, clicking the 'Expand' button will open the 'Database Tree' and display the main functions in your current database. Once this is done, the button’s label will change to 'Collapse', and clicking then will collapse the Tree once again.
Refresh
Click the 'Refresh' button to apply any changes (added functions, etc.) to the 'Database Tree' menu.
Scripts Tab
The Scripts Tab is used to process multiple commands at one time using delimited SQL statements. These statements can be keyed in manually- that is, by building a script manually. Or, they can be loaded from one or more script files (identified by the '.SQL' filename extension).
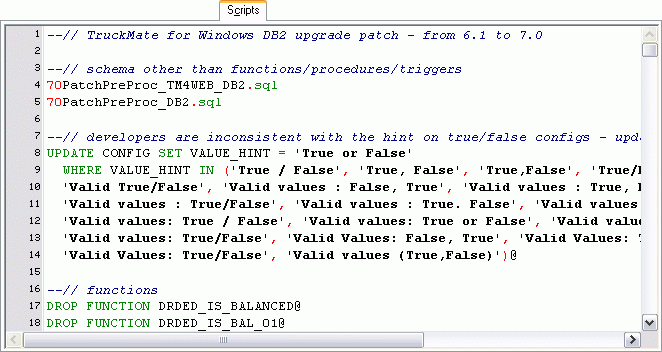
When scripts are loaded into the scripts area, they are represented in one of two ways:
-
If Format 'A' is used: the actual SQL statements from the file are written to screen. If multiple files are loaded, they appear in the order they were loaded in.
-
If Format 'B' is used: only the script filename is written to screen. If multiple files are loaded, they appear as a file list with no blank lines between. Note that if a full path is not provided, SQL Execute will look for the file name given in the Working Directory, which is noted in the status bar area.
The method used and the working directory are configured by going to the 'Scripts' Tab within the 'Preferences' option in the 'Options' Menu.
Users upgrading from previous versions of SQL Execute should note that use of mixed methods is now supported, without having to toggle the 'mode' in the program option. Both SQL statements and file references can appear in the scripts area at the same time.
Script Recursion is now allowed (to any level). For example, a script may contain the line 'MYSCRIPT1.SQL'. This file (assuming it exists and is either absolute path specified or is in the working directory) may in turn contain (statements and) the line 'MYSCRIPT2.SQL'. File MYSCRIPT2.SQL may in turn contain (statements and) 'MYSCRIPT3.SQL' etc. This may be done almost ad infinitum (theoretically up to Delphi’s integer limit of 2,147,483,647 levels) until finally the last file in the chain / tree contains only statements (not filenames).
Two new boxes have been added to the scripts progress screen: a 'Processing line x of y' filed and a progress bar. Note that this is not the most accurate way to show progress as some lines take much longer to execute than others (eg CREATE PROCEDURE vs an INSERT), but it does give a fairly good visual idea of the progress for a reasonably long patch (like a Store Procedure or release patch).
The script you load in the script tab is remembered by TruckMate, you can use the green arrows in the tool bar to navigate back and forth to the script you loaded and used in this tab.