Human Resources Recruiting

The Human Resources Recruiting program allows you to quickly and easily track and maintain data on those individuals who apply to your Trucking Company. The HR Recruiting tool allows you to enter personal data regarding prospective employees, list the interview details with an individual, track the application status of any applicant and much more. This program is an essential tool for any Trucking Company that has a high volume of applicants!
This program requires the purchase of an additional license from TMW Systems Inc. Contact your TMW Service Representative for more information.
|
To access HR Recruiting:
| From this location | Go to |
|---|---|
TruckMate Menu and TruckMate Task List |
Profiles > HR Recruiting |
Windows Start Menu |
TruckMate 20xx > HR Recruiting |
Windows Explorer |
C:\Program Files (x86) > TruckMate 20xx > HRRecruit.exe |
Menu and toolbar options
There are no unique menu and toolbar options and functionality specific to the HR Recruiting window.
For information about common menu and toolbar options (i.e. File menu, Refresh, Multi-Company, etc.), see General menu and toolbar options in TruckMate basics.
View Menu
Application Info
The Application Info Menu contains five options.
-
Information
Selecting this option will take you to the 'Identification' Tab of the Application Info Section.
-
Personal Info
Selecting this option will take you to the 'Personal Info' Tab of the Application Info Section.
-
Notes
Selecting this option will take you to the 'Notes' Tab of the Application Info Section.
-
Status
Selecting this option will take you to the 'Status' Tab of the Application Info Section.
-
User Defined
Selecting this option will take you to the 'User Defined' Tab of the Application Info Section.
-
Location
Selecting this option will take you to the 'Location' Tab of the Application Info Section.
Job
The Job Menu has five options.
-
Checklist
Selecting this option will take you to the 'Checklist' Tab of the Jobs Section.
-
Questions
Selecting this option will take you to the 'Questions' Tab of the Jobs Section.
-
Survey
Selecting this option will take you to the 'Survey' Tab of the Jobs Section.
-
Previous Job Experience
Selecting this option will take you to the 'Previous Job Experience' Tab of the Jobs Section.
-
Other Interests
Selecting this option will take you to the 'Other Interests' Tab of the Jobs Section.
Listview
Selecting this option will take you to the Listview section of the HR Recruiting program.
Setup
The Setup Menu contains four options:
-
Survey Questions
Clicking this option will take you to the 'Survey' Tab of the 'Setup / Tools > Setup' section. See below for more information.
-
Statuses
Clicking this option will take you to the 'Status' Tab of the 'Setup / Tools > Setup' section. See below for more information.
-
Job Titles
Clicking this option will take you to the 'Job Titles' Tab of the 'Setup / Tools > Setup' section. See below for more information.
-
Other Interests
Clicking this option will take you to the 'Other Interests' Tab of the HR Recruiting program.
Options Menu
Show Outlookbar
Selecting this option will Show or Hide the 'Outlook' style section menu from the left side of the HR Recruit program’s main screen.
Preferences
Selecting this option will open the Preferences window. See Preferences Setup for more information.
Applications Section
The Application Info Tab is broken down further into five separate Sub-Tabs. They are: 'Identification' (the Default display Tab for the program), 'Personal Info', 'Notes', 'Status', 'User Defined' and 'Location'. These Tabs are accessible by clicking on them within the Application Info Tab, or by clicking their respective Icons in the left side program menu.
Info (General Information)
Applicant Picture
This window, common to all the Application Info Tabs, displays a selected image of the Applicant for quick reference. Use the 'Load' button to select an image file (*.BMP, *.GIF or *.JPEG) from your system. The 'Clear' button removes the selected image.
Called In
Check this box if the applicant applied via phone.
Context Menu
Right-clicking the image produces two options:
Stretch
This will stretch the image to fit exactly into the Image preview window. In some cases, this might mean shrinking the image file and therefore a reduction in image quality.
Center
Will center the selected image and apply no further modification. In some cases, especially with larger images, this might mean that only a section of the Applicant’s head shot will show. If this is the case, use the 'Stretch' option.
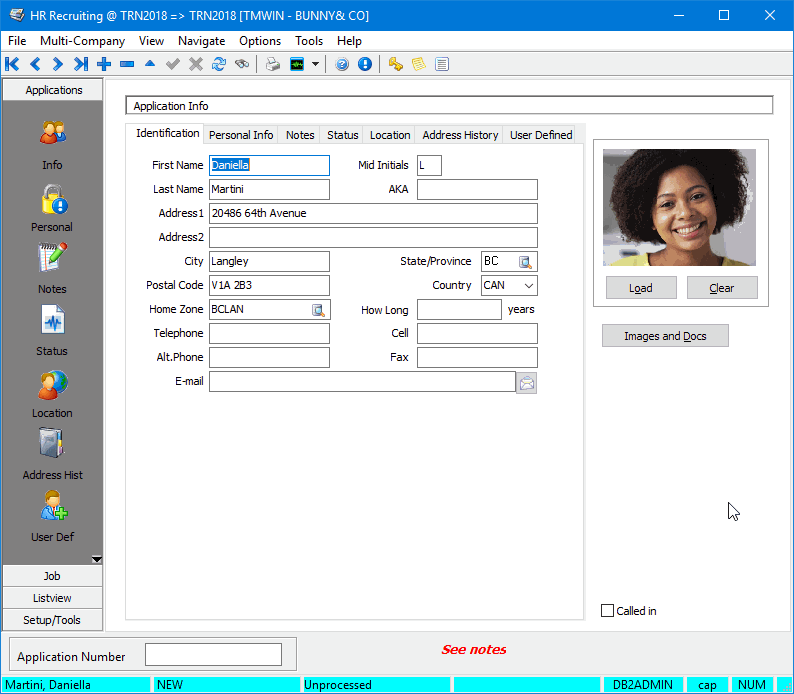
Identification Tab
The Identification Tab allows you to enter contact information regarding your prospective employees.
First Name / Last Name / Mid Initials / AKA
Enter the relevant information for the Applicant.
Address1 / Address2 / City / State/Province / ZIP / Country
Enter the Applicant’s address information. Use the search button to select the Applicant’s State / Province from a search form. Use the pull down menu to select the Applicant’s Country.
Telephone / Cell / Alternative Phone / Fax / E-mail
Enter the Applicant’s contact information.
Send E-mail
![]() Click this button to open your default E-mail software with a message automatically addressed to the Applicant. This button makes quick acceptance / rejection notices a simple process.
Click this button to open your default E-mail software with a message automatically addressed to the Applicant. This button makes quick acceptance / rejection notices a simple process.
Personal Info Tab
The Personal Info Tab allows you to enter some personal details concerning your prospective employees.
Birth Date
Enter the Applicant’s Birth Date in the space provided.
Hazmat Endorsement / Experience
If the prospective Employee has a Hazardous Materials Endorsement, select this flag, then provide the number of years and months of experience in the two fields provided.
SSN / SIN
Enter the Applicant’s Social Security Number (US) or Social Insurance Number (CAN).
Current Driver License
If the prospective Employee has a valid Drivers License, fill in these fields:
Number / Country / State / Province
Enter the Applicant’s Drivers License number and select a Country Code using the pull down menu. Select A Jurisdiction by clicking the search button and choosing a State or Province from the dialog window. If you chose 'US' for the Country value, State Codes will be displayed. If you chose 'CDN', Province Codes will be displayed.
Class
Enter the Employee’s current License Class in the field provided.
Expiry
Select the Calendar icon to open the calendar menu. Select the date that the Emplioyee’s Drivers License expires.
Student Driver
If the prospective Employee has a Student Driver permit, fill in these fields:
School Name / School City / School State/Prov
Enter the contact information for the Driving Instruction School that issued the Student Permit.
Graduation Date
Enter the Employee’s graduation date from the Student Driver program by using the calendar icon.
Notes Tab
The Notes Tab offers functionality similar to other Notes Tabs within TruckMate, except for one unique option. You may enter Free Format Notes in the space provided on the actual Notes Tab, or you can click the Notes button near the bottom of the screen to enter Notes on a different Form.
This second Notes Form is accessible to all Users, but the Notes entered on the new window that opens cannot be deleted without first removing the text from the window and then clicking the checkmark 'Save' button.
Status Tab
The Status Tab is where the Applicant’s application Status is upgraded throughout the application review process. The Applicant’s 'Current Status' value will default to 'New' when they are first entered into the HR Recruit program.

Current Status
Defaults to 'New'. Use the Database search button to change the Status value as the Applicant moves through the hiring process. The Status that you choose will have an associated 'Status Description', which will display directly beneath the Status Code you select in this field.
Once an application is set to 'Accepted' status, the 'Set up as an Employee / Driver' section will become available for use.
See Status Audit
Clicking this button will open a window which details the Status changes for the selected Applicant. This is useful in determining how quickly and through which application steps an Applicant has been taken.
Set up as an Employee / Driver
Once an application has been moved to 'Accepted' status, the following two options become available:
Create an Employee
If the successful applicant is to become an Employee, select this option. The Create an Employee Record window will open, allowing you to create an Employee ID code for the new Employee.
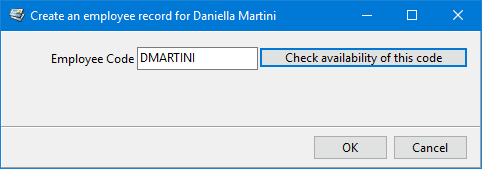
Enter an Employee Code that you would like to use for the successful Applicant, and then click the 'Check availability of this code' button to see if the Code you have entered is already in use by your system (for another Employee, for example).
If the Code is not in use, you may click the 'Ok' button to create the new Employee Code for this successful Applicant.
The user should then continue to the Employee Profiles program to fill in other necessary details regarding the new employee.
Create a Driver
If the successful applicant is to become a Driver, select this option. The Create a Driver Record window will open, allowing you to create a Driver ID code for the new Driver.
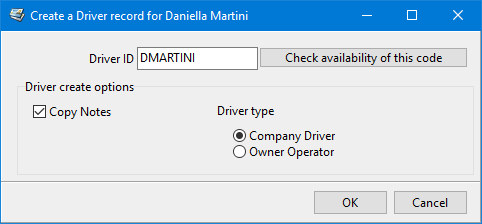
Enter an Employee Code / Driver ID that you would like to use for the successful Applicant, and then click the 'Check availability of this code' button to see if the Code you have entered is already in use by your system (for another Driver, for example).
If the Code is not in use, you may click the 'Ok' button to create the new Driver Code for this successful Applicant.
Continue on to the Driver Profiles program to enter more details for the new Driver Code.
Driver Create Options
These options allow you some specification of the new Driver Code:
Copy Notes
Selecting this flag will copy the Notes included on the HR Recruiting program’s Notes Tab into the Driver Profiles program > Notes Tab upon Driver ID creation.
Driver Type
Select the radio option that corresponds to this new Driver ID. Select either 'Company Driver' or 'Owner Operator' depending on the employee type.
Job Section
The Jobs Tab, accessible from the left side menu of the main HR Recruit program screen, allows you to record certain details of the interview process with the selected Applicant, and to keep track of the Applicant’s Job History and related details.
Job Title
This field is used to select the Job Title of the Job the Applicant is applying for. Use the search button to change the Job Title to another Code that is setup in your system. Job Titles are defined in the Setup Section’s 'Job Titles' Tab.
Years of experience related to this job
Enter the years of experience that this Applicant can apply to the task he / she is applying for.
Checklist Tab
The Checklist Tab allows the HR personnel the ability to record and add details for the various parts of the Application process for an Applicant, and to maintain their list of tasks to complete during the Interview process.
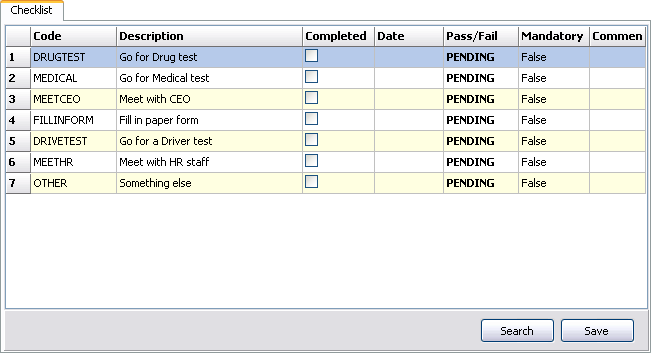
Code
Displays the Code ID of the current Checklist detail line. Code IDs are created in the Setup section’s Checklist Tab.
Description
Displays the Description of the selected detail line’s 'Code ID' value. Descriptions are created in the Setup section’s Checklist Tab.
Completed
Double click the 'Competed' field to check / uncheck the Completed Status of the selected Checklist detail line.
Date
Double click the 'Date' field to select a date from a Calendar menu, representing the date this Checklist task was fulfilled.
Pass / Fail
Double click this field to show whether the prospective Employee Passed or Failed the task associated with the current Checklist detail line.
Mandatory
Displays either 'True' or 'False', depending on if the Interviewer must complete this Checklist item or if it is optional.
Comment
Enter any Comments related to this Checklist task in the space provided using your keyboard.
Search / Save
Use the 'Search' button to search for a text string within any of the Checklist detail lines. A new window will open, where you can enter a text string to search for, select options regarding it’s formatting, and specify 'Where' and in which 'Direction' you would like to search.
Use the 'Save' button to save any changes / additions you have made to the Checklist Grid.
Context Menu
The context menu for the Applications section allows you to save the Grid details into a number of file formats for easy reference. Depending on the File Format, you will see different output styles.
Save as txt
Saves the Grid information as a plain text file, with no additional formatting.
Save as CSV
Saves the Grid information as a Comma Separated Values file, which can then be used with Miscrosoft Excel software programs.
Save as .doc
Saves the Grid information as a Microsoft Word document file, which is formatted into a table.
Save as HTML
Saves the Grid information as an HTML file, which is formatted into a colored table. These files are viewable in a web browser.
Questions Tab
The Questions Tab details the Questions asked during the Interview process, and lets you provide both an 'Answer Type' and 'Answer' value for the questions asked.
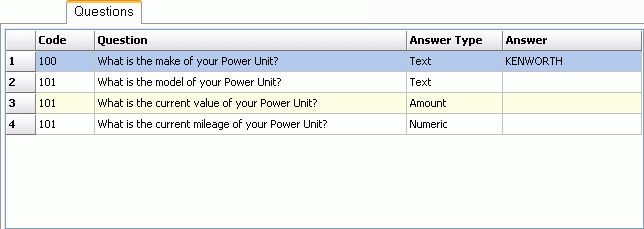
Code
Displays the Question Code of this detail line. Question Codes are created in the Setup section’s Question Tab.
Question
Displays a Question that should be asked of an Applicant. These questions will change depending on the Job Type selected for this Applicant. Questions are created in the Setup section’s Question Tab.
Answer Type
Displays the 'Answer Type' expected for the selected Question detail line. 'Answer Types' are created in the Setup section’s Question Tab.
Answer
Enter the answer that the Applicant provides to the question in the space provided using your keyboard.
Search / Save
Use the 'Search' button to search for a text string within any of the Question detail lines. A new window will open, where you can enter a text string to search for, select options regarding it’s formatting, and specify 'Where' and in which 'Direction' you would like to search.
Use the 'Save' button to save any changes / additions you have made to the Question Grid.
Survey Tab
The Survey Tab allows the HR Personnel conducting the Interview to find out how the Applicant found out about your Company. This information is useful in determining the success of your Company’s marketing projects.
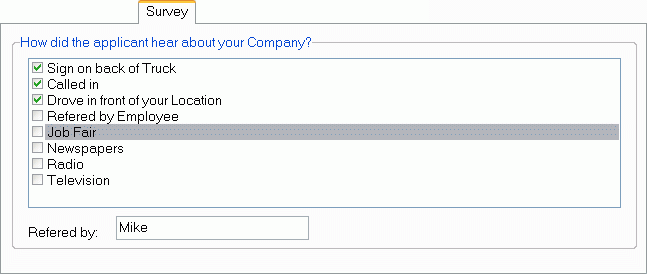
Simply check the checkbox options that the Applicant mentions as the origin of his / her Application to your Company. You may click some options, all options, or none.
Referred by
Enter the Name of the person who referred this Applicant to your Company, if applicable.
Previous Job Experience(s) Tab
The Previous Job Experience(s) Tab allows the HR Personnel conducting the Interview to record the Applicant’s Previous Job History, including the previous Job Locations and Contact Information. All of the fields within the Job Experience Grid are text fields, and can be changed using the keyboard.
Job Title
Enter the Previous Job Title.
From / To
Enter a 'From' and 'To' Date Range for the length of the prior Job.
Note: To include someone’s current employment, insert "12/31/9999" in the To Date field. This signifies that the individual is presently employed in this position.
Company Name
Enter the Company Name of the Applicant’s previous Employer.
Address1 / Address2 / City / State/Province / Country
Enter the previous Employer’s Address information.
Phone
Enter the previous Employer’s phone number.
Job Description
Enter the Job Description of the Applicant’s previous Job.
Nbr. Of
Enter the number of years of experience the Applicant has relating to the Job Title applied for.
Reason for Leaving
Enter the reason why the Applicant left his previous Employer.
Contact Name / May we contact this Employer?
Enter the Contact Name of the Contact the Applicant gives for his previous Employer, and if you have permission to contact this person, type 'Yes' into the last field.
Other Interests Tab
The Other Interests Tab lets the HR Personnel record details specific to each applicant that may or may not apply directly to the Job offer, and lets the HR Personnel add some recommendations regarding the applicant.
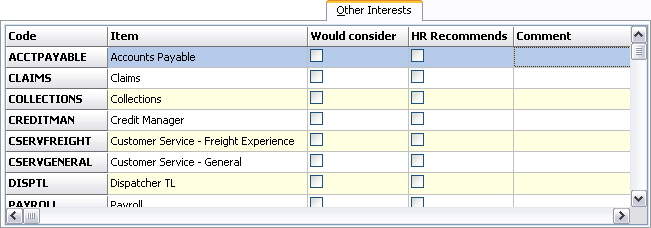
Code
Displays the ID Code of the Other Interest Code being used for this detail line. Codes are setup in the Status Tab of the Setup Section.
Item
Displays the Item Description of the Code being used on the selected Detail Line.
Would Consider
This is a True or False field. Say you have an applicant that would be interested in an office position but could do various things (ie: Payroll , Accounts Receivable, Claims, etc.) this field will be set to 'True'.
HR Recommends
Similar to the 'Would Consider' field, the HR Personnel will set this field to 'True' if they also feel that the Applicant is capable of assisting in other fields than the one they are directly applying to.
Comment
This field allows the HR Personnel conducting the interview to add any free format notes concerning the Applicant.
Driver Tab
The Driver Tab contains two sub-Tabs that let you enter some specific information regarding the applicant if he/she is applying to be a Driver with your Company.
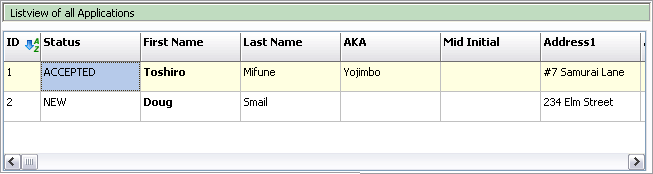
Listview Section
The Listview Section displays a summary of all the Applicants that have recently applied to work for your Company, along with some of their specific details (Address, Drivers License, Status, etc.). The fields within this Tab have all been explained previously in other sections of this help page. The Listview Tab is best used as an information-only summary page for quick reference.
Context Menu
The context menu for the Applications section allows you to save the Grid details into a number of file formats for easy reference. Depending on the File Format, you will see different output styles.
Save as txt
Saves the Grid information as a plain text file, with no additional formatting.
Save as CSV
Saves the Grid information as a Comma Separated Values file, which can then be used with Miscrosoft Excel software programs.
Save as .doc
Saves the Grid information as a Microsoft Word document file, which is formatted into a table.
Save as HTML
Saves the Grid information as an HTML file, which is formatted into a colored table. These files are viewable in a web browser.
Setup Section
The Setup Tab Allows you to add and / or modify the Codes used throughout the HR Recruit program. You can view or change the Codes used in the 'Survey', 'Status' and 'Job Titles' Tabs of the Applications Section of the HR Recruit program by accessing their respective Tabs within the Setup Tab.
Note: You can configure User Access to the Setup Tab (and all of its sub-tabs on an individual basis) by using the Security Setup program > Security > Tabs Setting section.
Survey Tab
The Survey Tab lets you add or modify existing Codes used in the 'Survey' section of the HR Recruit program.
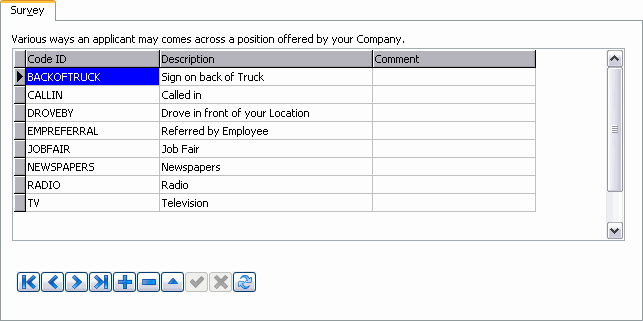
To add a new Code, click the '+' button in the TruckMate Navigation bar. Enter the 'Code ID', 'Description' and 'Comment' information by clicking on the appropriate field and using your keyboard to enter the information. The 'Code ID' values can be anything you wish, as they are not used outside the HR Recruit program itself.
Status Tab
The Status Tab lets you add or modify existing Status Codes used in the 'Status' section of the HR Recruit program.
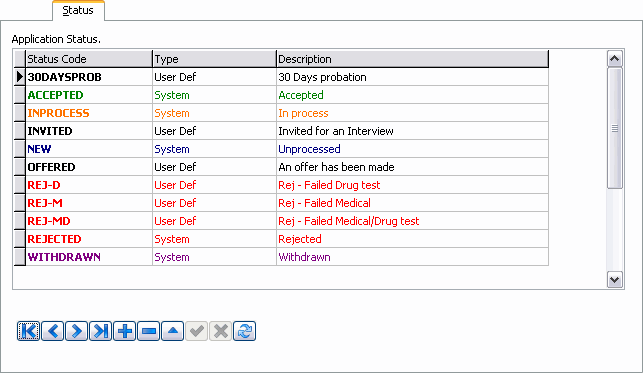
To add a new Status Code, click the '+' button in the TruckMate Navigation bar. Enter the 'Status Code' name and a 'Type' value of 'User Defined' will generate. Enter a description of the Status Code in 'Description' field. Enter the information by clicking on the appropriate field and using your keyboard. The 'Status Code' values can be anything you wish, as they are not used outside the HR Recruit program itself.
Note: Those codes with 'Type' of 'System' cannot be modified, as they are hard coded into the HR Recruiting software.
Job Titles Tab
The Job Titles Tab lets you add or modify existing Job Title Codes used in the 'Job Titles' section of the HR Recruit program.
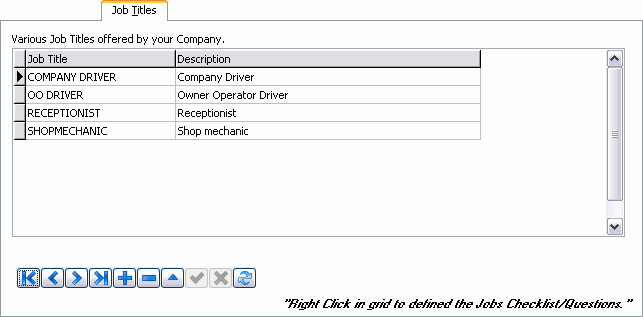
To add a new Job Title, click the '+' button in the TruckMate Navigation bar. Enter the 'Job Title' name and a 'Description' in the associated field. Enter the information by clicking on the appropriate field and using your keyboard. The 'Job Code' values can be anything you wish, as they are not used outside the HR Recruit program itself.
Context Menu
Define Checklist
Clicking this option will open the Application Checklist window, where you can define the Checklist options associated with the selected Job Title.
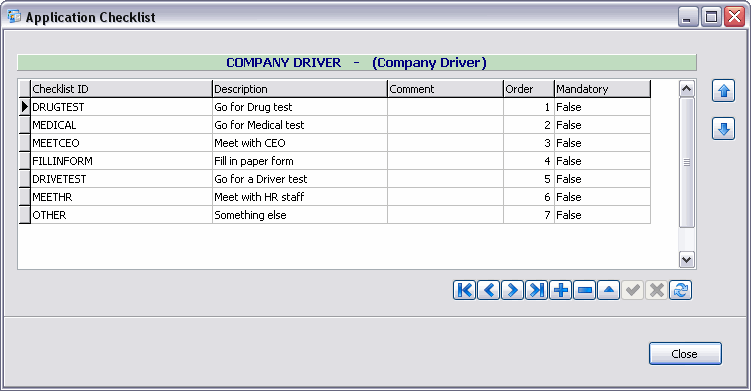
This information will be viewable in the Checklist Tab of the HR Recruit program. You may add a new Checklist record by clicking the '+' button on the TruckMate Navigation bar. Enter the 'Checklist ID', 'Description' and 'Comment' information by clicking the respective field and using your keyboard.
The 'Order' column lists the Order that the 'Checklist ID' values will appear on the Checklist Tab, and you may change the specific order of an entry by selecting it and using the 'Up' and 'Down' arrows to the right of the Grid.
The 'Mandatory' field specifies if the Checklist ID' detail line must be completed during an Interview process. You can toggle this value from 'True' or 'False' by double clicking this field.
Define Questions
Clicking this option will open the Define Questions window, where you can define the Questions associated with the selected Job Title.
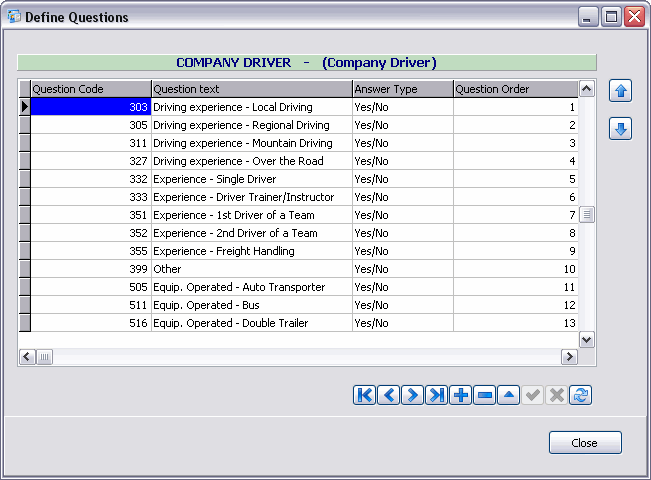
This information will be viewable in the Questions Tab of the HR Recruit program. You may add a new Question record by clicking the '+' button on the TruckMate Navigation bar. Enter the 'Question Code', 'Question Text' and 'Answer Type' information by clicking the respective field and using your keyboard.
The 'Question Order' column lists the Order that the questions will appear on the Questions Tab, and you may change the specific order of an entry by selecting it and using the 'Up' and 'Down' arrows to the right of the Grid.
Interests Tab
The Interests Tab is used to create and or modify the 'Employee Interest' codes used on other Tabs within the HR Recruiting program, such as the Other Interests Tab in the Jobs Section.
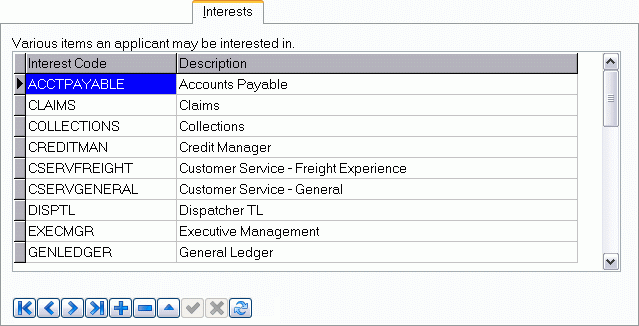
Click the '+' button to enter a new 'Interests' item. You must provide both an 'Interest Code' and a 'Description'.
Preferences Setup
The Preferences Menu is divided into two section Tabs: 'Display Options' and 'Warnings'. Choose the Tab that you wish to edit Preferences for.
Display Options Tab
The Display Options Tab contains options that control how the HR Recruiting program appears on your screen. Some of these options are accessible form within the 'View' Menu of the main program screen. Click the 'Apply' button to apply any changes you make within the Display Options Tab to the main program screen.
Banner / Toolbar / Outlook Bar
Check these options to 'Show' / 'Hide' the options listed. This functionality can be accessed from the 'View' menu option on the main program screen.
Status Bar
Choose the options that you wish to display on the main HR Recruiting screen.
Warnings Tab
The Warnings Tab contains options that control how the HR Recruiting program behaves when problems occur. Click the 'Apply' button to apply any changes you make within the Warnings Tab to the main program screen.
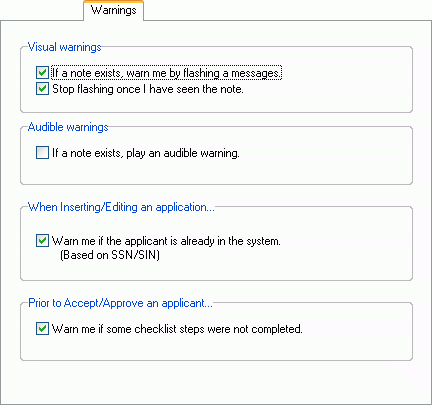
Visual Warnings
Check or uncheck these options depending on if you want the HR Recruiting program to display visual warnings, usually in the form of flashing text within the main program screen.
Audible Warnings
Check or uncheck this option to have an audio sound play if a Note exists for a selected Applicant.
When Inserting / Editing an Application…
Check this option to allow a Warning if Inserting a duplicate Application, based on the entered Social Security Number / Social Insurance Number.
Prior to Accept / Approve an Applicant…
Check this option to receive a Warning dialog box if you are moving an Applicant to 'Accepted' Status without filling out all the Checklist options for that Job Title.