Equipment Rentals

The Equipment Rentals program can be used to view, add, edit, or print rental agreements for your company. This program uses data entered in the Customer & Vendor Profiles program and the Codes Maintenance program in order to determine the rental rates, vendors, equipment classes and equipment available for use in rental agreements.
The Equipment Rentals module requires License # 43000. See the License Registration program for more information.
To access Equipment Rentals:
| From this location | Go to |
|---|---|
TruckMate Menu and TruckMate Task List |
|
Windows Start Menu |
TruckMate 20xx > Equipment Rentals |
Windows Explorer |
C:\Program Files (x86) > TruckMate 20xx > Eqrentals.exe |
The Equipment Rentals program is divided into 5 sections based on the tabs at the top of the screen.
Menu and toolbar options
There are no unique menu and toolbar options and functionality specific to the Equipment Rentals window.
For information about common menu and toolbar options (i.e. File menu, Refresh, Multi-Company, etc.), see General menu and toolbar options in TruckMate basics.
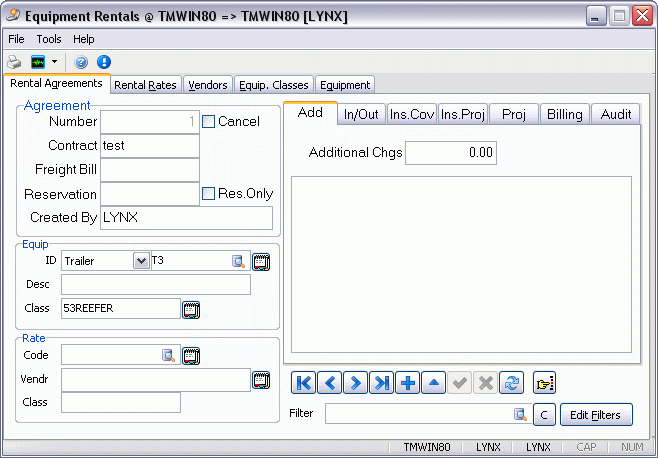
Rental Agreements Tab
The Rental Agreements module allows you to create or edit any rental agreements needed. This is the main module of the Equipment Rentals program, and all data created or edited in other modules will affect Rental Agreements functionality.
Find Button
Click the 'Find' button to select a previously created Rental Agreement.
Filter
Click the search button to select a Filter from those available.
Edit Filters
Clicking the 'Edit Filters' Button brings up the Rental Agreement Filter window where you may create a search Filter for use in the Rental Agreements module:
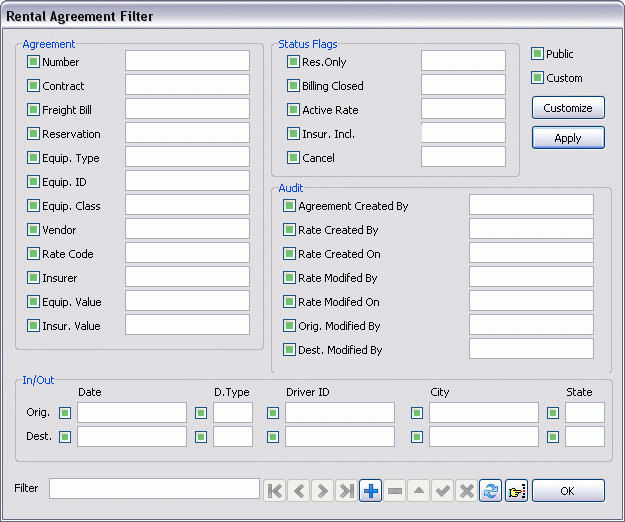
Use the various checkboxes to limit your Filter. When you check an option from the 'Agreement' section, you must provide a working value for that field (ie: entering a Freight Bill number if the 'Freight Bill' option is checked).
If you wish to view/customize the actual SQL code behind your new Filter, click the 'Customize' button after you have named your Filter (in the 'Filter' textbox at the bottom of the screen) and have selected some Filter options. The SQL Filter window will display the SQL code behind your Filter. The SQL code displayed in this window is fully customizable. When you are ready, click the 'Test/Benchmark' button to check if your Filter works properly.
Click the 'Apply' button to apply the current Filter to the Rental Agreements main screen.
Agreement
Clicking the '+' button will begin creating a rental agreement with an automatically generated number. The details in the Agreement section may be entered manually. To close the active rental agreement, click the 'X' button.
| Field | Definition |
|---|---|
Number |
Automatically generated value for the Rental Agreement. |
Contract |
Enter the contract number supplied by the Rental Vendor. |
Freight Bill |
Manually enter a Freight Bill number that applies to this Rental Agreement in this field. |
Reservation |
Enter the Reservation number (supplied by the Rental Vendor) in this text field. |
Cancel |
Check this option if you are cancelling the selected Rental Agreement. |
Res. Only |
Check this option if a piece of equipment has been rented, but hasn’t yet been picked up. |
Equip
Use the pull-down menus to select an ID class for the equipment needed for the rental agreement and the next field to select the type of equipment based on its class by either hitting 'enter' on the keyboard or clicking the search button. The data used in this section is applied from the Miscellaneous Equipment Profiles program.
Rate
Typing the 'Enter' key on your keyboard or clicking the search button will allow you to select a rate rental code for the rental agreement. These rate codes are specified in the Rental Rates Tab of Equipment Rentals.
Rental Agreements Sub-Tabs
For more details on this sub-menu, view the documentation on the Miscellaneous Equipment Profiles program.
Add Tab
Allows the addition of extra charges to the rental agreement.
In/Out Tab
Adds trip details to the rental agreement. The user can manually enter details such as the date and city of the trip origin/destination, the driver conducting the trip, and the total distance and total days of the trip.
Ins.Cov Tab
This tab allows you to set up the Insurance details of the selected equipment.
Ins. Proj Tab
The 'Insurance Projected' tab allows you to enter and view the costs of your Insurance coverage over time. Manually enter the details of the Insurance agreement on the left side of the screen, and they will appear in the right side table.
Proj Tab
The 'Projected' tab allows you to view the projected costs of your Rental Agreement, based on the 'Average Charge', 'Average Distance', 'Average Distance Rate', as well as the 'Start' and 'End' dates of the agreement.
The details of your projected costs are displayed in the table within the 'Projected' tab.
Billing Tab
Shows A/P billing data on current rental agreement.
Audit Tab
The Audit module is a read only display of the modification details of the Rental Agreement.
Rental Rates Tab
The Rental Rates Tab allows the user to create and specify the details of rental codes for use in the Miscellaneous Equipment Profiles program’s Rental Agreements module.
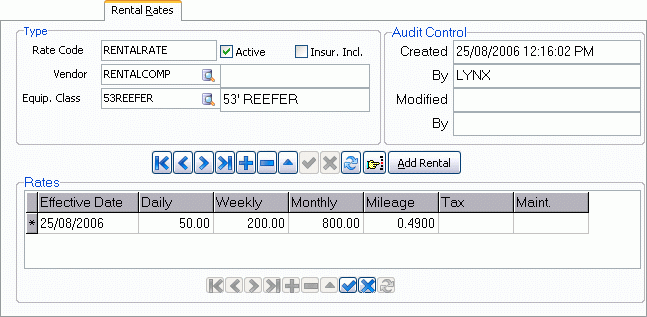
Type
Click the '+' button to begin creating a new rental rate. Enter a rental code, usually based on the equipment class being rented. To select a Vendor and Equipment Class hit your 'enter' key while in the field or click the search button button. Once all of the required fields are populated, click the check button to save your rental rate.
Active
Uncheck this field if the current Rate Type is no longer being used.
Insur. Incl.
Place a checkmark in the 'Insurance' option if a rental company is insuring the equipment. Leave this option unchecked if the equipment is self-insured (i.e. your company pays an insurance company).
Audit Control
This section is automatically populated when you create a rental rate code.
Add Rental Button
Clicking the 'Add Rental' button will return you to the 'Rental Agreements' tab with the 'Rate' sections details filled out to match the current Rental Rate Type’s data.
Rates Grid
Existing rates are populated automatically based on the Rate Code selected.
Vendors Tab
The Vendors Tab allows the user to create detailed listings for rental and insurance companies for use in the Miscellaneous Equipment Profiles program’s Rental Agreements module.
Rental Companies Tab
Click the '+' button on the Rental Companies Tab to begin entering specific data for a rental company or click the 'Find' button to choose a previously created rental company form the Customer and Vendor Profiles program. The selected Vendor’s 'Rate Type' details will appear in the right grid.
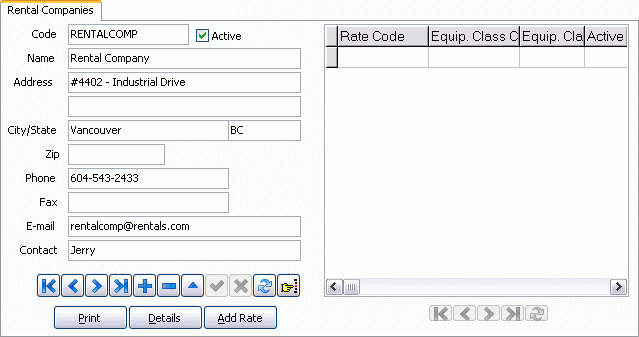
Active
This option is automatically set to 'Unused' status upon the creation of a new record. If checked the selected Rental Company’s status will be set to 'Active'. If unchecked, the selected Rental Company’s status will be set to 'Inactive'.
You may print the details for this created rental company by clicking the 'Print' button.
Details
Clicking the 'Details' button will open an instance of the Customer & Vendor Profiles program with the current Vendor’s details.
Add Rate
Once the required Vendor information is entered, you may add a rate code you have created in the Rental Rates module to the rental company by clicking this button. You will be taken to the Rental Rates Tab of the Miscellaneous Equipment Profiles program.
Insurance Companies Tab
Click the '+' button on the Insurance Companies Tab to begin entering specific data for an insurance company or click the 'Find' button to choose a previously created insurance company form the Customer and Vendor Profiles program.
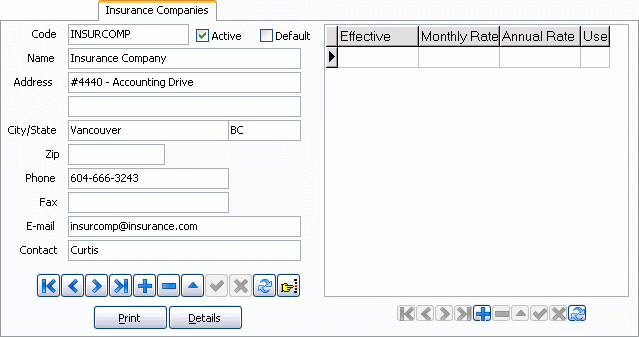
Active
This option is automatically set to 'Unused' status upon the creation of a new record. If checked the selected Insurance Company’s status will be set to 'Active'. If unchecked, the selected Insurance Company’s status will be set to 'Inactive'.
Default
This option is automatically set to 'Unused' status upon the creation of a new record. If checked the selected Insurance Company will be made the 'Default' Company. If unchecked, the selected Insurance Company will not be made the 'Default'.
Insurance Grid
Once the required fields are populated on the left side of the screen, you may add the Insurance Type details for the selected Insurance Company by clicking the '+' button in the lower right area of the screen.
You may print the details for this created Insurance Company by clicking the 'Print' button.
Details
Clicking the 'Details' button will open an instance of the Customer and Vendor Profiles program with the current Vendor’s details.
Equipment Classes Tab
The Equipment Classes Tab defines equipment classes for use in the Miscellaneous Equipment Profiles program’s Rental Agreements module.

Equip. Class
This field shows equipment class codes from the Codes Maintenance program. You may view the available codes using the left and right arrow buttons, or create a new equipment class by clicking the '+' button.
As you select values for these options on the left side of the screen, the right side 'Rate Code' grid will populate with data based on the Codes Maintenance data for the selected Equipment.
Estimated Unit Rental Costs
This section allows you to enter the average 'Flat' and 'Mileage' charges for this equipment, as well as an 'Average Mileage Used' value. Click the search button to select a Mileage Unit.
A/P Rental Charges
Click the search button to select a GL Expense Account for this rental equipment.
Details
Clicking the 'Details' button brings up the corresponding entry in the Codes Maintenance program.
Add Rate
You may also add a rate code to this equipment class by clicking the 'Add Rate' button or by scrolling through the available rate codes using the navigation menu in the lower right area of the screen.
Equipment Tab
The Equipment Tab defines equipment for use in the Equipment Rentals program’s Rental Agreements module, and contains functionality similar to the various programs within the Profiles Module of TruckMate.
Power Units Tab
You can manually enter power unit data on the Power Units Tab, or use data from the Power Unit Profiles program by clicking the 'Find' button.
Details
Opens an instance of the Power Unit Profiles program for the respective Power Unit.
Add Rental
Populates the current Power Unit data into the 'Rental Agreements' tab, where you may create a new Rental Agreement for it.
Trailers Tab
You can manually enter Trailer data on the Trailers Tab, or use data from the Trailer Profiles program by clicking the 'Find' button.
Details
Opens an instance of the Trailer Profiles program for the respective Trailer.
Add Rental
Populates the current Trailer data into the 'Rental Agreements' tab, where you may create a new Rental Agreement for it.
Misc. Equip Tab
You can manually enter Miscellaneous Equipment data on the Misc. Equip Tab, or use data from the Misc. Equipment Profiles program by clicking the 'Find' button.
Details
Opens an instance of the Misc. Equipment Profiles program for the respective Miscellaneous Equipment.
Add Rental
Populates the current Miscellaneous Equipment data into the 'Rental Agreements' tab, where you may create a new Rental Agreement for it.
Containers Tab
You can manually enter Container data on the Containers Tab, or use data from the Container Profiles program by clicking the 'Find' button.
Details
Opens an instance of the Container Profiles program for the respective Container.
Add Rental
Populates the current Container data into the 'Rental Agreements' tab, where you may create a new Rental Agreement for it.