GL Chart of Accounts

The information in these topics applies to the following Accounting and Finance applications:
-
Accounts Payable
-
Accounts Receivable
-
General Ledger
-
Interline Payables
-
Payroll
The purpose of the General Ledger Chart of Accounts program is to create General Ledger accounts. You can also view account activity and configure account budgets. Accounting Periods and currency exchange rates are also entered in the GL Chart of Accounts program.
The GL Chart of Accounts program is also used to view summary account information by period and account. This information consists of postings made by the GL Journal Entries Register program, which updates entries from the GL Journal Entries program to the GL Chart of Accounts program.
To access GL Chart of Accounts:
| From this location | Go to |
|---|---|
TruckMate Menu and TruckMate Task List |
Accounting & Finance > General Ledger > GL Chart of Accounts |
Windows Start Menu |
TruckMate 20xx > GL Chart of Accounts |
Windows Explorer |
C:\Program Files (x86) > TruckMate 20xx > Glm.exe |
How Do I?
How do I Create a GL Account?
-
Open the GL Chart of Accounts program (GLM.EXE).
-
Select the Segments tab.
-
In the 'GL Account Segments' section, there are 5 detail lines, representing a (possible) five levels of sophistication for your GL Account codes. Each of these detail lines has both a 'Length' and a 'Level' value. For each detail you wish to use, enter a 'Description' of what the value represents, and enter an integer value for the 'Length' (which tells the system the amount of digits each segment of the Account Code will have).
-
In the 'Level' field, you can choose from four values (1 to 4) which denote which Company Level’s Entities will have their 'Label' field values used to differentiate the GL Account data in a Multi-Company implementation. For more information, click here.
-
Go to the Account Info tab.
-
Select the '+' sign to add a new account. Enter the 'Account number' (based on the amount of 'Segments' you have specified), 'Description', 'Type' (use the pull-down menu), 'Currency' (use the search button to change from what’s shown), and sub-account information (if relevant).
-
Select the 'Checkmark' button to save the account information.
How do I View Summary Account Information by Period and Account?
-
Open the GL Chart of Accounts program (GLM.EXE).
-
Locate the desired GL Account.
-
Select the year you are interested in by scrolling the navigational bar at the top of the screen. The entries to the GL will display in a sub-total, grouped by fiscal period numbers (as set up on the Periods tab). Posted items will appear on top, un posted items will be in the bottom box.
-
Double click on any line to drill down to see the registers for that period. Drill down on any line and you will see the detailed information.
-
Alternatively, select the 'Print' button and choose the 'GLDETL.RPT'. From there, select the appropriate accounts and periods, and, when ready, print out the report.
How do I Create Accounting Periods for the next Year?
-
Open the GL Chart of Accounts program (GLM.EXE).
-
Go to the Periods tab.
-
Use the scroll buttons on the navigational bar to scroll to the most recent year. Then, use the '+' button on the navigational bar to enter a new year.
-
Type in the year. If a dialog box appears asking if you wish to copy period information from the previous year, and you wish to, select 'Okay'. If not, select 'No'.
-
Press the 'checkmark' button to save the account information.
How do I Prevent someone from entering Transactions for the previous year or Fiscal Period?
-
Open the GL Chart of Accounts program (GLM.EXE).
-
Go to the Periods tab.
-
Select the fiscal year you wish to close.
-
Ensure that the 'Allow Prior Period Postings' box is NOT selected.
-
In the period information grid, select the period you want to close up to, use your context menu and select 'Close Period'. You will be asked if you are sure you want to close the period, select 'Yes'.
-
The 'Closed Up To' box will display the ending date of the period you selected to close.
How do I Enter Currency Exchange Rates using the GL Chart of Accounts program?
-
Open the GL Chart of Accounts program (GLM.EXE).
-
Go to the Currency tab.
-
Use the '+' button on the navigational bar to enter a new currency.
-
In the Currency column of the new entry, use the pull-down arrow to select either US or Canadian dollars.
-
Enter the exchange rate you wish to use in the 'Exchange Rate' column.
-
Press the 'checkmark' button to save the account information.
How do I Hard Close a Fiscal Year?
If your Company requires a physical year-end close for accounting/auditing reasons, you may do so using the GL Chart of Accounts program. The following process will consolidate and determine the total groupings of your revenues and expenses for the current (or a past) fiscal year. This process will also create a GL entry for the closing of your revenue accounts (with 'debit' (losses) and 'credit' (income) records).
-
The first step occurs outside of the GLM.EXE program: you must make sure that ALL of your GL Transactions for the fiscal period you are working in are posted to the GL Journal Entries Register program. If not posted to the Register, your GL transactions will not be inputted into the Hard Close function. See the GL Journal Entries Register documentation for more information.
-
Open the GL Chart of Accounts program (GLM.EXE).
-
Select the Hard Close tab. The majority of the fields on this screen will pre-populate based on the information within the displayed 'Retained Earnings Account'.
-
If the displayed 'Retained Earnings Account' is not the one you wish to Hard Close, click the search button in the field and select the GL Account you wish to save your data to. GL Accounts are setup on the Account Info tab of GLM.EXE; periods are setup on the Periods tab. A 'Retained Earnings Account' is created when you install TruckMate, but if you would like to specify a different Account, do so. The only requirement when creating such an Account is that it be of the type: 'Retained Earnings'.
-
You can use the 'Preview' button now- or at any other time in this process- to see the breakdown of your GL transactions for this period that will be included in the Hard Close. The 'Refresh Totals' button can be used to update the period data with any last minute additions you are making to the GL Journal Entries Register program.
-
Enter a 'GL Account Mask' variable if you desire. The value you enter in this field will filter/include only certain GL Accounts, and not others, depending on what 'wildcard' character you include. For more information on the characters you can use in the 'GL Account Mask' field, see the GL Chart of Accounts documentation.
-
When you are ready to begin the Hard Close (once again, use the 'Preview' button to verify that all the GL Transaction information is correct), click the 'Close Year-End' button to begin the process. When the process is complete, a window will be displayed containing a 'Batch #'. Record this 'Batch #' for future reference- it is your 'Audit Number' for future printing and/or Batch Reversals.
-
If you have made a mistake and wish to reverse the Hard Close process, simply select the Batch Reversal tab and enter the required information. Click the previous link for more information on Batch Reversals.
| If, for some reason (perhaps your Company is being Audited) you need to add new entries into a previously Hard Closed fiscal year, TruckMate allows you to do so by simply creating GL Transactions with a date that is within the periods defined in Fiscal year that has been Closed. Processing these dated Transactions through the GL Journal Entries Register program will automatically update them into the Closed year. |
Menu and toolbar options
This topic describes menu and toolbar options and functionality that are specific to the GL Chart of Accounts window.
For information about common menu and toolbar options (i.e. File menu, Refresh, Multi-Company, etc.), see General menu and toolbar options in TruckMate basics.
Multi-Company Menu
For more information on the Multi-Company options available from the Menu Bar, see the Multi-Company documentation.
Copy GL Accounts
This option allows you to quickly generate the chart of accounts for a new company, based on the chart of accounts for an existing company (substituting the company segment). When you select the option, a screen prompts you for a "from company" and a "to company". If you set these to 2 different companies, 3 other fields, Segment Number, From Value, and To Value become disabled and are auto-populated based on your GLACCOUNT entity labels setup (in Organizational Setup option in company profiles). Again, this is useful for quickly setting up the chart of accounts for a newly added secondary company. If you set the from/to companies to be the same, then the three fields become editable; you may choose which segment you want to change when you do the copy into the same company.
There is also an "Include Inactive Accounts" checkbox. Uncheck this if you never plan to use the inactive accounts ever again. On the other hand, leave it checked if you use the active flag to temporarily disable GL accounts.
To prevent conflicts, the "default" flag (default control account for a GL type - e.g. AR, AP, Driver Pay Payable, etc) is only copied if the "to" company has no accounts yet; otherwise, it is set to False on all accounts copied into the "to" company.
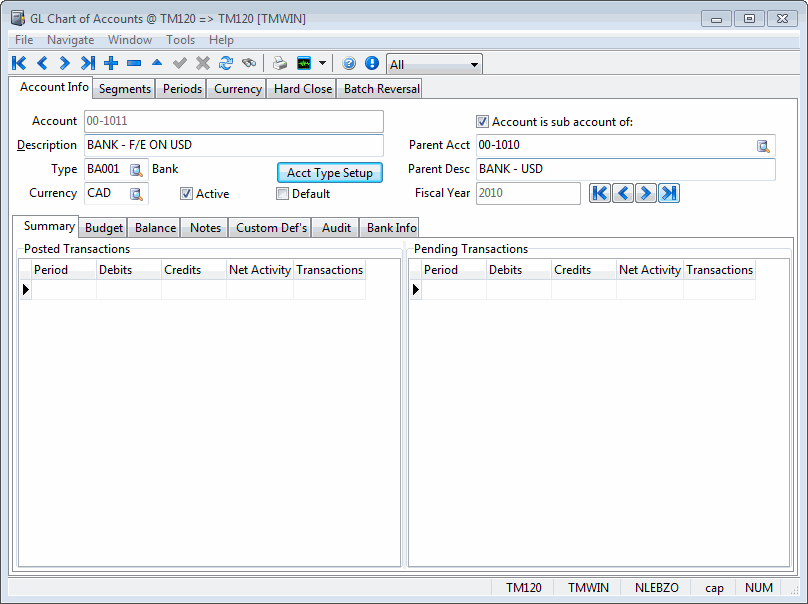
Account Info tab
Most programs that use an edit-pick to select a GL account simply require searching by account, description, and currency. However, in Chart of Accounts, when setting up GL accounts, it can be very helpful to see (and search by) some of the other header fields (for example, when creating the various inter-company due from/to accounts). The "find" edit-pick now also includes: GL Type, Active, Default, Sub-Account, and Parent Account.
Account
Enter your account number here. This must conform to the account code structure configured on the Segments tab.
Description
Enter a description for this account. In most places throughout the TruckMate system, you can select accounts according to their description as well as their account number.
Type
When creating a new GL Account, for the 'Type' field, the user can either:
-
Type the 5-character code (2 letters for financial statements section followed by 3 digits), or
-
Select the 'Type' code from a list by clicking the edit-pick button.
Either way, the 'Type' field’s description will appear above after you move off of the 'Type' field. There are 54 pre-set Account Types to choose from.
|
When creating G/L Accounts, make sure you take into account the following information concerning Account Types:
|
Currency
Select a currency description from the drop down list box. Currency codes are configured in the Codes Maintenance program.
Acct Type Setup
This button allows the user to manipulate account types by re-arranging their order, de-activate and re-activate any of the types based on business needs. Selecting this button will open the 'GL Account Types' window with controls to edit and re-order account types as desired.
Active
Tells other TruckMate applications that the selected GL Account is available for use.
Default
In various areas of TruckMate, GL entries are made against various GL control accounts (i.e. AR, AP, Bank, Driverpay Payable, etc). Similarly, GL account number fields are initialized to a default (i.e. the AP account in AP Invoice Entry). Most clients create only one such account per "category" (company / GL type / currency combination). If, however, you create multiple accounts per "category" (i.e. 2 different 'Company 1' USD AR account numbers), then TruckMate would previously select the lower numbered one.
Now, you can flag an account as "default" (for the "category") and it can be the highest of the multiples. You cannot have multiple defaults for the same "category" (if you set an account to default and there is already another account flagged as default for the "category", you will get a warning; if you go ahead, then the "other" account will have its default flag removed). Furthermore, an account cannot be both inactive (i.e. 'Active' is not flagged) and 'Default' (you will get an error if you try to update an account as such).
| If no account is flagged as default for a "category", then, as in previous TruckMate versions, the lowest numbered account is chosen. |
Account is a sub account of / Sub Account / SubA. Desc
Place a check-mark in the box provided if you wish to define this account as a sub account of another, check the box and select the parent account from the drop down list box. Sub accounts are used for foreign exchange conversions. For every account that you create that is in a currency that differs from the Base Currency (as configured in the Codes Maintenance program), you should create a corresponding sub account in the Base currency that is used for foreign exchange postings.
| The sub-account flag is only intended for creating exchange accounts (in base currency) for foreign currency balance sheet accounts. You will now get an error on trying to save an account if you checked the sub-account flag and the account or the parent is not a balance sheet account or is not of the correct currency. For ease of use, the pick-list for the parent has been shortened to only show valid ones (foreign currency balance sheet accounts). |
Use the search button to bring up the 'Select Sub-Account' dialog box where you can search by GL Account ID or Description. Select the appropriate sub-account. After your selection of a sub-account above, the 'SubA. Desc' field will populate with the sub-account’s description.
Fiscal Year
Use the record navigation arrows beside this field to jump between Fiscal Year codes. The system uses the specified code to select only those transactions posted to that year to calculate the period activity summaries in the grids below.
| Button | Function |
|---|---|
Will display the Report Selection form. The Crystal Report templates supplied with the TruckMate system are as follows:
After selecting the desired report template (using the Report Selection form), you will be prompted to enter selection criteria, such as starting and ending dates and account ranges. The report will preview to the screen. Click the printer icon at the top of the screen to send the report to the printer that is configured as the default printer for your workstation. See the Crystal Reports Reference for more information on report functions. |
|
Search |
Selecting the 'Search' button will bring up a 'Quick Search' dialog box where you can use a filter or search by Account ID, or Description. |
Summary sub-tab
The Summary tab shows general data concerning your transactions, and allows further details via a drill-down window.

Posted Transactions
This grid displays a summary by period of transactions posted against the current account. Only transactions that have been posted through the GL Journal Entries Register program are included.
Pending Transactions
This grid displays a summary by period of those transactions which have not yet been updated by the GL Journal Entries Register program. These journal entries can be viewed in the GL Journal Entries program.
Activity Drill-down
More information can be obtained about the source journal transactions represented by the period activity totals in transactions grids. Double-clicking on a period in either of the two Summary tab grids will open the Activity Drill-down form. You can drill-down on records that are from other Accounting Register applications in TruckMate, such as the AP, AR, and Pre-Paid-Accounts Modules. Users can access Document Imaging functionality from the Drill-down forms.
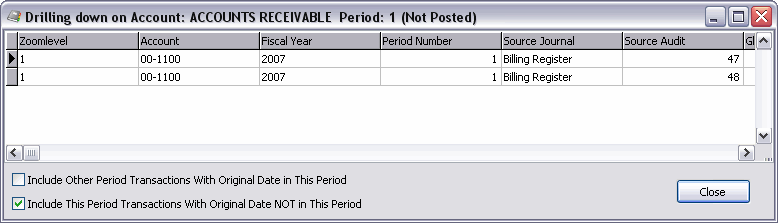
This form details the journal entries which make up the activity totals for the period for the account. If the transactions are posted transactions, the top of the form will show (Posted). If they are not, the form will display (Pending) instead. The User can double-click any of the displayed fields on this window to Drill-Down on the details again. There are 3 "Zoom-level" values that the user can Drill-Down to.
If the journal entries were entered manually, the Source Journal and Source Audit fields will be empty and the only way to view the entry in context would be to note the GL Audit number and use it to reprint the audit in the GL Journal Entries Register program.
If the journal entries where created by a sub-ledger register, the Source Journal and Source Audit fields will indicate where the journal entries were created. You can use this information to go back to sub-ledger register and reprint the source audit. Or, you can double-click on an entry to drill-down into the source transactions which were summarized into the journal entry.
In any drill-down grid where a Client ID or Vendor ID (or Driver ID etc.) is available to be displayed, the 'Name' / description will also be available to be displayed in the grid. Users may choose to display the ID or the Name/Description (or both or neither) via Grid Customization.
Imaging
If your company uses Microdea for Document Imaging purposes, you can now view stored images from within the Drill-Down window (all 3 "Zoom Levels"). Ensure that your Microdea software is properly configured, and that you have setup right-click access options (and the link to specific documents) in the Codes Maintenance program > Imaging tab for GLM.EXE.
Imaging for the GLM.EXE application is linked to the following TruckMate tables:
-
AP_BILL
-
AR_CASH
-
AR_MISC
-
AR_TRANSACTIONS
-
CHECK_MSTR
-
DRIVERDEDUCTIONS
-
DRIVERPAY
-
FA
-
FADEP
-
GLTRANS
-
ORDER_COD
-
ORDER_INTERLINER
-
ORDER_SUPPLIER
-
PPD_ACCOUNT
-
PPD_TRANS
-
RM_INADJ
-
RM_STOCK
-
RM_TRANSACTION
-
RM_WORKORDER
-
TLORDER
-
VENDOR
| Access to the Activity Drill-Down functionality can be allowed/restricted by the in the Security Setup program. In any drill-down grid where a 'Client ID' or 'Vendor ID' (or 'Driver ID' etc.) is available to be displayed, their 'Name' / 'Description' values will also be available to be displayed in the grid. Users may choose to display the ID or the Name/Description (or both, or neither) via the Grid Customization Tool. |
Budget sub-tab
The Budget tab is used to enter information about proposed budgets by fiscal year and period. For quick data entry, you can use the <tab> key to advance from field to field, rather than posting each record on the navigator bar and the using the navigator bar again to add another record.
Fiscal Year
Use the arrow buttons to select the year for which you wish to configure budgets.
Period
You must specify a period number here.
Amount
Enter the proposed budget amount for this account / fiscal year / period combination.
Context menu
Copy Budget to Remaining Periods
For quick data entry, you can enter one period and budget and then copy the budget amount to all other periods (as configured on the Periods tab). Make sure you have posted the original record before invoking this function.
Copy from Last Year’s Actuals
Will create budget entries based on the previous year’s balance at the end of each period.
Balance sub-tab
The Balance tab displays a summary of debit and credit activity for each period. In the right grid, the summary for all periods is displayed.
Include Pending
Place a checkmark in the box provided if you wish to include all pending transactions.
As at
This field defaults to the current date. To view balance information as of a specific date, click the down arrow to display a calendar selection form and select the date for which you wish to view the account balance. Activity that occurred after the As at date will not be displayed, and the summary totals will not include their debits and credits.
Notes sub-tab
The Notes tab allows you to enter any free format Notes concerning the selected GL Account.
Audit sub-tab
The Audit tab displays read-only information concerning the User who created and / or modified the currently selected GL Account.
Bank Info sub-tab
The Bank Info tab allows users to enter/modify their Bank Account and Transit Number information. These fields are used by the 'Import' function of the A/R Cash Receipts Entry program.

This tab will mainly shows read-only information from the BANK_INFO table, but allows users to enter the Bank’s name, their Account number, and Transit number, etc. The read-only values displayed are gathered from the import file processed by the 'Import' function of the A/R Cash Receipts Entry program.
Account Number / Transit Number
The user may enter the appropriate Bank information for the specific Account using these two fields.
| This tab will only appear if the Account Type currently displayed is of the 'Bank' Type. |
Segments tab
GL Account Segments
GL Account Segments must be configured before you can enter GL Accounts. The purpose of Account Code segments is for grouping and sorting your account codes. When entering account codes (on the Account Info tab), each segment will be separated by a dash. Do not modify the account code segment structure after you have entered account codes.
You can have a maximum of 5 GL Account segments that make up your GL Account Codes. Four of these can be 'Descriptive' segments (which can be used to differentiate between different Company Entities, while the fifth must be the actual Account number.
Description
For reference purposes, you can enter a description of the account code segment. You cannot enter a 'Description' value for the fifth GL segment, as that must house the actual Account number.
Length
Enter the number of numerical digits for this Account segment.
Level
By specifying a 'Level' value for a particular GL Account segment, you will then be able to separate the GL entries for your various Companies (or Company Entities) based on the value they use for that particular segment.
For example, if you specify that the first segment in the GL Account Segments section has a 'Length' of '2', and a 'Level' of '1' (Company Level), you can then give each of your Companies access to the GLACCOUNT table with various 'Label' values (such as '00', '01', '02' and so on). Then, when a user enters a debit or credit charge against a particular GL Account (say a debit to account # 00-2200), that debit will be entered against the Company with that Label value.
For more information on Multi-Company implementations of TruckMate and their GL functionality, see the Company Profiles program > Organizational Setup Window.
Company Information
The fields in the Company Information section are used to display information about your company. These values are used by pre-formatted Crystal Reports templates for determining the company name to print in the top left corner of the report. These fields are for information and reporting purposes only. Remember to enter your 'GST #', 'PST #', and 'SCAC Code' (which is the Standard Carrier Alpha Code- a common identifier within the EDI industry).
GST
Displays your Company’s 'GST #' value.
PST
Displays your Company’s 'PST #' value.
SCAC
Displayes your Comapany’s SCAC Code (which is the Standard Carrier Alpha Code- a common identifier within the EDI industry).
Company Logo
Displays your Company’s logo.
| As this section is entirely read-only, modifications to this information must be made in the Company Profiles program. |
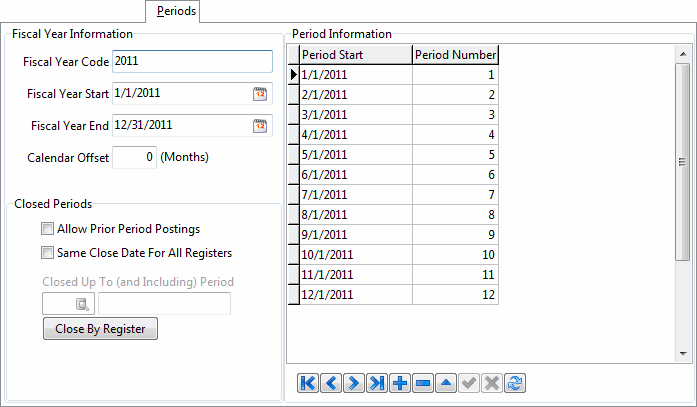
Periods tab
Use the Periods tab to define your system’s Fiscal Years and Periods. Fiscal Years and Periods must be defined before General Ledger postings can be made.
| If you have already entered fiscal year information, when you click the add button on the navigator bar to add a new fiscal year, you will be asked if you wish to copy fiscal year layout from the previous year. If you answer 'Yes', a new fiscal year will be created with the same characteristics as the previous fiscal year. Be sure to review the new fiscal year layout. |
Fiscal Year Information
The Fiscal Year Information section is used to enter your fiscal year codes, as well as start and end dates for your General Ledger.
Fiscal Year Code
Enter a code that represents your fiscal year. This can be up to 10 characters in length. The fiscal year code is used on the Account Info tab, for viewing transaction Summaries, Budgets and Account Balances.
Fiscal Year Start
Enter the date that this fiscal year begins, or click the Calendar button to select a date.
Fiscal Year End
Enter the date that this fiscal year begins, or click the Calendar button to select a date.
| Both 'Fiscal Year Start' and 'Fiscal Year End' fields cannot be updated if a period of the fiscal year is already closed. In addition, fiscal years can’t overlap. In other words, you can’t use the value of the 'Fiscal Year End' of a fiscal year or any prior date to that value, as the value of the following fiscal year’s 'Fiscal Year Start'. |
Allow Prior Period Postings
If this box is not checked, postings to closed periods will not be allowed. Periods are closed using the context menu option on the Period Information grid. When the GL Journal Entries Register program encounters a record that is destined to post to a closed period (ie, a period that does not have the Allow Prior Period Postings box checked) it will post the entry to the next open period.
| This flag can not be checked when you Close Periods (on the Period Information grid). However, you can re-activate this flag after closing a period. |
Same Close Date for All Registers
This flag controls if all the TruckMate Register applications will have the same 'Closed Up To' date or not. This flag will only be available when the 'Allow Prior Period Postings' option is un-checked.
If you check this option, you will have access to the 'Close By Register' button, where you can set the 'Closed Up To' date for each TruckMate Register independently. See below for more information.
Close By Register Button
If you uncheck both the 'Allow Prior Period Postings' checkbox and the 'Same Close Date For All Registers' checkbox, then a new button labelled 'Close By Register' becomes enabled. Clicking it brings up the Close Periods By Register window, which allows you to set the 'Closed Up To' point for each individual register. A grid displays all the registers.
Double-click a row/register to select the 'Closed Up To' period (and hence date) for the register, one at a time. You can also right-click and set the 'Closed Up To' on either all registers or on a group of registers in a single step (each register’s group is indicated in the grid). Via right-click, you can also clear the 'Closed Up To' on a single register, all registers, or a group of registers. If you go back to the main screen and check either 'Allow Prior Period Postings' or 'Same Close Date For All Registers', then all info in the Close Periods By Register screen will be lost.
Closed Up To
Indicates the date up to which the Fiscal Year is closed. Periods are closed using the right mouse menu option on the Period Information grid. The Closed Up To date, by default, is the last day of the month of the last closed period.
Calendar Offset (Months)
In a Multi-Company scenario, your companies may have different fiscal years, but the GL Chart of Accounts program will only allow one accounting period (for any given year) to be defined across all companies. The 'Calendar Offset' field is used to identify the fiscal year offset which is needed when consolidating statements.
The value entered into this field represents the first month of the fiscal year for the logged in company, as offset from the calendar month of the GL period. For example: a fiscal year that starts on January 1st would have a value of '0' in this field, while a fiscal year that starts on July 1st would have a value of '6'.
| The calendar offset specified will have an impact on Financial Statement reports run through the GL Financial Statements program. |
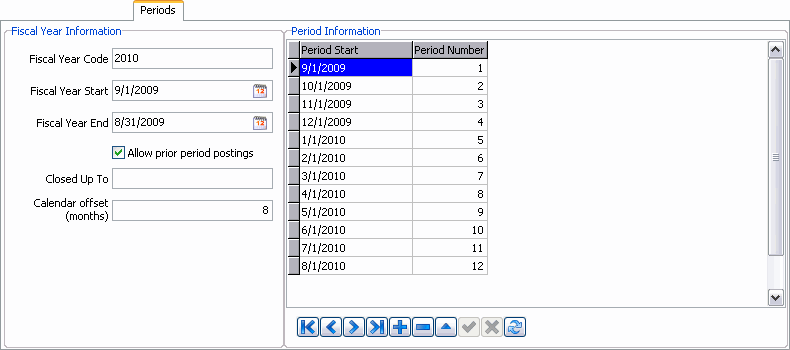
Calendar Offset Example
Correct use of the Calendar Offset field will allow your TruckMate GL to handle the following multi-company GL situation (i.e. 2 company entities with different fiscal years):
-
Entity 1 = January - December (i.e. full calendar year).
-
Entity 2 = September - August fiscal year.
The fiscal year code for 'Entity 1' would be '2009' (Jan. to Dec.). The fiscal year code for 'Entity 2' would also probably be '2009', but would have a mix of dates including both 2009 and 2010 actual years. If you tried to print a consolidated financial statement without setting up a calendar offset, you would have a mix of fiscal year codes (i.e. 2009 and 2010).
For this example, the user would setup the GL Period for 'Entity '2 as shown below. When printing the financial statements, the user will print for the 'calendar' year, and the offset will adjust each entity accordingly (i.e. even though the fiscal year code is '2010' in our example, the user will choose '2009' as the date to run the report, as the GL Period is offset '8' months from calendar January 1, 2009).
Periods tab
The Periods section allows you to configure the dates that will form your fiscal periods for the year.
Period Start
Enter the start date of the period. Press the <tab> key to default the Period Number. Press the <tab> key again to move to the Period Start field for the next period.
Period Number
Will default in consecutive order.
Context Menu
Close Period
In order for this option to be available, the Allow Prior Period Postings box cannot be checked in the Fiscal Year section. You can re-set the Allow Prior Period Postings flag after the period is closed. Closing a period will cause the last date of the month of the period that is closed to be inserted in the Closed Up To field in the Fiscal Year section.
Currency tab
The Currency tab is used to enter foreign exchange rates. For the purpose of automatic currency conversions, you should enter currency exchange rates for each currency configured in the Codes Maintenance program (with the exception of the 'Base' currency). You can record the currency every day for the highest accuracy, or you can record it at selected intervals. If you choose not to record the rate on a daily basis, the system will apply the rate that is closest to the transaction date, irregardless of if that date is in forward or backward in time.
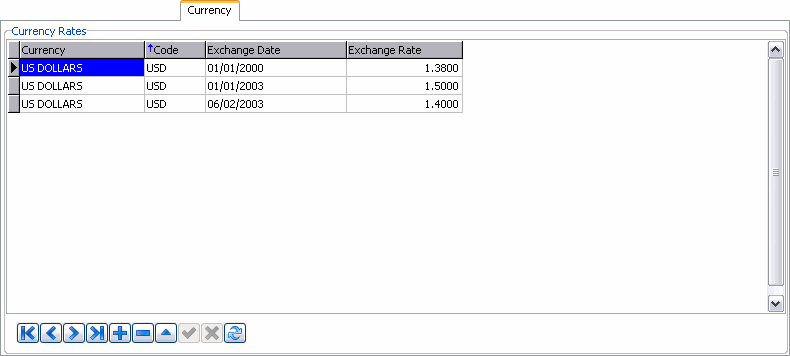
Currency
Double click to display a drop down list box. Select a Currency description (as configured in the Codes Maintenance program).
Code
The currency code will default according to the Currency description that is selected.
Exchange Date
Enter the date for which the Exchange Rate applies.
Exchange Rate
Enter the factor that, when applied to the selected currency, results in the exchanged base currency amount. For example, if is takes $1.40 of the base currency to purchase $1.00 of the exchange currency, the exchange rate is '1.4'.
| If you are working with a Multi-Company implementation of TruckMate, and have setup multi-currency behavior, you can define unique exchange rates for each of your defined Companies. See the Multi-Company documentation for more information. |
Hard Close tab
The Hard Close tab allows an alternate method of closing a fiscal year using Journal Entries. See the Need to Know How? page for more help with Hard Closes.
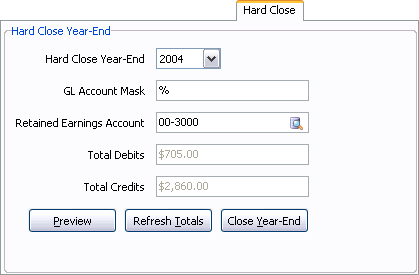
Hard Close Year-End
Pre-populated with the fiscal year of the selected GL Account. Use the drop-down menu to select which fiscal year you wish to close. Users have the ability to close any fiscal year prior to the current year.
GL Account Mask
This field is used to filter GL account numbers and codes. However, unlike other filters, an exact value match is not required; you would rarely, if ever, be posting a group of entries for a single given account number. Therefore, you are allowed to use a 'mask' (or wildcard) which is used in the SQL 'select' statement with the LIKE predicate.
In a LIKE predicate, the 'Underscore' character (_) represents any single character, the 'Percent' sign (%) represents a string of zero or more characters, and any other character represents itself. So, for example:
01-% yields only entries with account codes starting with 01- (useful if your first account segment represents company or division)
%-01 yields only entries with account codes ending in -01 (useful if your last account segment represents company or division)
__-01-% yields only entries with account codes with 01 in the 2nd segment (assuming your 1st 2 segments are each 2 digits wide and that you have 3 or more segments)
Retained Earnings Account
Manually enter the Account number, or click the search button to search the available Accounts. You must setup your Retained Earnings account using the Account Info tab header details.
Total Debits / Total Credits
Pre-populated with the account totals for the selected GL Account.
Preview Button
Selecting the 'Preview' button will display a new window containing a grid of the Account details of all Accounts that will be closed. This is a read-only window.
Refresh Totals
Click the 'Refresh Totals' button to add any recent changes into the 'Total Debits' and 'Total Credits' fields for the chosen year and account.
Close Year-End
Click the 'Close Year-End' button to close the Account for the selected fiscal year. A warning window will appear, asking for your confirmation.
Multi-Company Information
The Hard Close tab will only allow fiscal years and retained earning accounts from the currently logged in Company. When you close the year, GL entries will only be created for the current company. If you also wish to close another company’s year, you must login to that company and repeat the process.
| This functionality is consistent with the general journal register, which also only posts transactions for the current company. |
Batch Reversal tab
The Batch Reversal tab complements the Hard Close function, allowing the reversal of Batch closures.
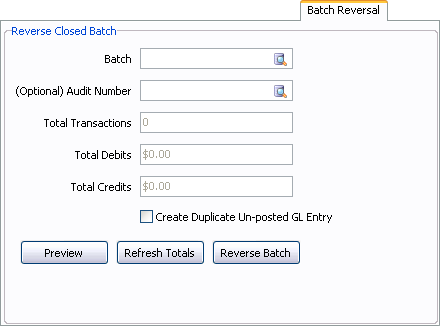
Batch
Enter a Batch number manually, or click the search button to select from a list of available closed Batches.
(Optional) Audit Number
Enter an Audit Number manually, or click the search button to select an Audit Number from those in your system. This field is optional.
Total Transactions
Pre-populated with the number of transactions within the closed GL Account.
Total Debits / Total Credits
Pre-populated with the account totals for the selected closed GL Account.
Multi-Company Information
The Batch Reversal tab will only allow 'Batch IDs' and 'Audit Numbers' from the current company. Even if a batch contains GL rows from 2 different companies (i.e. includes Intercompany transactions), when you reverse the batch, GL entries will only be created for the current company. If you also wish to reverse the other company’s entries for the batch, you must login to that company and repeat the batch reversal.
| This functionality is consistent with the general journal register, which also only posts transactions for the current company. |
GL Account Types
| Account # | Account Type | Primary Financial Statement | Secondary Financial Statement | Other Financial Statement |
|---|---|---|---|---|
BA001 |
CASH |
Balance Sheet |
Stmt of Cash Flows |
|
BA002 |
SHORT-TERM INVESTMENTS |
Balance Sheet |
Stmt of Cash Flows |
|
BA003 |
ACCOUNTS RECEIVABLE |
Balance Sheet |
Stmt of Cash Flows |
|
BA004 |
INVENTORY |
Balance Sheet |
Stmt of Cash Flows |
|
BA005 |
NOTES RECEIVABLE |
Balance Sheet |
Stmt of Cash Flows |
|
BA006 |
WORK IN PROGRESS |
Balance Sheet |
Stmt of Cash Flows |
|
BA007 |
PREPAID EXPRESS |
Balance Sheet |
Stmt of Cash Flows |
|
BA008 |
LONG-TERM INVESTMENTS |
Balance Sheet |
Stmt of Cash Flows |
|
BA009 |
PROPERTY, PLANT, AND EQUIPMENT |
Balance Sheet |
Stmt of Cash Flows |
|
BA010 |
ACCUMULATED DEPRECIATION |
Balance Sheet |
Stmt of Cash Flows |
|
BA011 |
INTANGIBLE ASSETS |
Balance Sheet |
Stmt of Cash Flows |
|
BA012 |
OTHER ASSETS |
Balance Sheet |
Stmt of Cash Flows |
|
BA013 |
COD RECEIVABLE |
Balance Sheet |
Stmt of Cash Flows |
|
BC001 |
COMMON STOCK |
Balance Sheet |
Stmt of Cash Flows |
|
BC002 |
PREFERRED STOCK |
Balance Sheet |
Stmt of Cash Flows |
|
BC003 |
ADDITIONAL PAID-IN CAPITAL: COMMON |
Balance Sheet |
Stmt of Cash Flows |
|
BC004 |
ADDITIONAL PAID-IN CAPITAL: PREFERRED |
Balance Sheet |
Stmt of Cash Flows |
|
BC005 |
RETAINED EARNINGS |
Balance Sheet |
Stmt of Cash Flows |
Stmt of Retained Earnings |
BC006 |
TREASURY STOCK |
Balance Sheet |
Stmt of Cash Flows |
|
BC007 |
COMMON DIVIDENDS |
Balance Sheet |
Stmt of Cash Flows |
Stmt of Retained Earnings |
BC008 |
PREFERRED DIVIDENDS |
Balance Sheet |
Stmt of Cash Flows |
Stmt of Retained Earnings |
BL001 |
ACCOUNTS PAYABLE |
Balance Sheet |
Stmt of Cash Flows |
|
BL002 |
NOTES PAYABLE |
Balance Sheet |
Stmt of Cash Flows |
|
BL003 |
CURRENT MATURITIES OF LONG-TERM DEBT |
Balance Sheet |
Stmt of Cash Flows |
|
BL004 |
TAXES PAYABLE |
Balance Sheet |
Stmt of Cash Flows |
|
BL005 |
INTEREST PAYABLE |
Balance Sheet |
RETAINED EARNINGS |
Balance Sheet |
BC006 |
TREASURY STOCK |
Balance Sheet |
Stmt of Cash Flows |
|
BC007 |
COMMON DIVIDENDS |
Balance Sheet |
Stmt of Cash Flows |
Stmt of Retained Earnings |
BC008 |
PREFERRED DIVIDENDS |
Balance Sheet |
Stmt of Cash Flows |
Stmt of Retained Earnings |
BL001 |
ACCOUNTS PAYABLE |
Balance Sheet |
Stmt of Cash Flows |
|
BL002 |
NOTES PAYABLE |
Balance Sheet |
Stmt of Cash Flows |
|
BL003 |
CURRENT MATURITIES OF LONG-TERM DEBT |
Balance Sheet |
Stmt of Cash Flows |
|
BL004 |
TAXES PAYABLE |
Balance Sheet |
Stmt of Cash Flows |
|
BL005 |
INTEREST PAYABLE |
Balance Sheet |
Stmt of Cash Flows |
|
BL006 |
DIVIDENDS PAYABLE |
Balance Sheet |
Stmt of Cash Flows |
|
BL007 |
LEASE PAYABLE (CURRENT) |
Balance Sheet |
Stmt of Cash Flows |
|
BL008 |
SINKING FUND PAYABLE (CURRENT) |
Balance Sheet |
Stmt of Cash Flows |
|
BL009 |
OTHER CURRENT LIABILITIES |
Balance Sheet |
Stmt of Cash Flows |
|
BL010 |
LONG-TERM DEBT |
Balance Sheet |
Stmt of Cash Flows |
|
BL011 |
COD PAYABLE |
Balance Sheet |
Stmt of Cash Flows |
|
BL012 |
DRIVER PAYABLE |
Balance Sheet |
Stmt of Cash Flows |
|
BL013 |
INTERLINE PAYABLE |
Balance Sheet |
Stmt of Cash Flows |
|
NN001 |
NON-FINANCIAL ACCOUNTS |
|||
PE001 |
SELLING EXPENSE |
Profit & Loss Stmt |
||
PE002 |
ADMINISTRATIVE EXPENSE |
Profit & Loss Stmt |
||
PE003 |
SALARIES EXPENSE |
Profit & Loss Stmt |
||
PE004 |
OTHER EMPLOYEE EXPENSES |
Profit & Loss Stmt |
||
PE005 |
INTEREST EXPENSE |
Profit & Loss Stmt |
||
PE006 |
TAX EXPENSE |
Profit & Loss Stmt |
||
PE007 |
DEPRECIATION EXPENSE |
Profit & Loss Stmt |
Stmt of Cash Flows |
|
PE008 |
INCOME TAX EXPENSE |
d wi |
||
SR001 |
REVENUES NOT PRODUCING WORKING CAPITAL |
Stmt of Cash Flows |
table Legend
| Primary Code | Subordinate Code | Integer |
|---|---|---|
B = Balance Sheet |
A = Asset |
Numbered sequence for ordering sections of Financial Statement (eg. 001, 002, etc). |
L = Liability |
||
P = Profit & Loss Statement |
R = Revenue |
Numbered sequence for ordering sections of Financial Statement (eg. 001, 002, etc). |
E = Expense |
||
G = Cost of Goods Sold / Direct Costs |
||
S = Revenue / Charges not associated with working capital |
||
N = Non-Financial Accounts |
N = Non-Financial Accounts |
Financial Statements
The above table lists three Financial Statements that the GL Accounts may appear on. These Statements are accessed via Crystal Reports and the GL Financial Statements program.